Emails
Overview
Sugar's Emails module stores copies of email messages that have been sent from or archived to Sugar. While Sugar is not primarily an email application, it does allow users to send email using their personal email address, a shared email account, or a system account and to archive copies of messages and attachments sent or received through a third-party email application.
This documentation will cover how to send and archive email messages and how to use the following modules:
In the Email Signatures, Email Templates, and Outgoing Email Accounts modules, you can view only the records that you have created with the exception of the system email account, which may be visible in the Outgoing Email Accounts list view. In the Emails module, you can search for and view emails that you have archived to Sugar or that have been archived by other users as allowed by your team membership, user access type, and assigned roles. Emails that are in a Draft status can only be seen by the created-by user and administrators. For more information on teams and roles, please refer to the Team Management and Role Management documentation in the Administration Guide.
Note: There are three types of outgoing email accounts in Sugar: system, user, and default user. This document focuses primarily on the user email account and the default user email account. For more information about the system email account and additional details on administering user email accounts, please refer to the Email documentation in the Administration Guide.
Sending and Receiving Email in Sugar
Sending Email
Emails sent from Sugar are automatically archived in Sugar and related to records that match the email addresses in the message. To send emails through Sugar, users must configure their default user email account via Email Settings, unless the administrator has enabled the "Allow users to use this account for outgoing email" option. Users may add additional outgoing email accounts (e.g., work email, home email, school email).
If the Administrator chooses to allow users to send email using the system email account by enabling the "Allow users to use this account for outgoing email" option in Admin > System Email Settings (this is not common), users will not be able to configure their default email account and must instead utilize the system email account or create a new user email account. Users will see the system email account in the Outgoing Email Accounts list view with an asterisk (*) to indicate that it is a system account.
Receiving Email
Because Sugar is not an email application, users cannot receive email directly to Sugar via their user email accounts. Instead, users must archive emails they receive using one or more of the techniques listed in the Archiving Emails section of this page.
Emails
The Emails module contains email records, which are copies of the emails that have been sent from or archived to Sugar. Users can view, sort, filter, and favorite email records according to their team and role memberships even if the emails have been sent or archived by a different user.
For basic use and navigation of the emails module, please refer to the Working With Sugar Modules section, which contains links to the User Interface documentation for behaviors that are common among most Sidecar modules. More information is available on email-specific functionality such as sending, replying, archiving, and composing emails in the sections under the Composing Emails header below.
Email Fields
The Emails module contains the following fields. For information on using and editing various field types, refer to the User Interface documentation.
| Field | Description | Notes |
| Assigned To | The Sugar user assigned to the email record. | By default, the Assigned To user is the user who creates and sends the message. For messages saved as drafts, the Assigned To user is the only users who will be able to edit and send the draft later. |
| Attachments | Any attachments included with the email. | For more information, please refer to the Adding Attachments section of this page. |
| Body | The content of the email message. |
There is no label for this field in the application. The body of your message is composed in the TinyMCE text editor window. For more information on how to use the text editor, please refer to the User Interface documentation in the Application Guide. |
| Date | The date the message was sent, received, or modified, depending on the email's status and direction. |
|
| Direction | The direction (e.g., Outbound, Inbound, Internal, Unknown) of the email based on the sender and recipient(s) in the email message. |
Not visible on record views or as a list view column, the Direction field is available only as an available filter field in the Emails list view. For more information on filtering the Emails list view using the Direction field, refer to the Email's Direction Field. |
| From | The email address that the email was or will be sent from. |
This field shows your available outgoing email accounts and determines the From name and From address that the recipient(s) will see. |
| Inbound Account | The incoming email account that received the email. | Not visible on record views, the Inbound Account field is available only for filtering the Emails list view. |
| Number of Attachments | An integer representing the number of individual files that are related to the email record as attachments. | Not visible on record views or as a list view column, the Number of Attachments field is available only as an available filter field in the Emails list view. |
|
Recipient Fields |
The fields that contain email addresses of the email recipients. |
For more information, please refer to the Working With Recipient Fields section of this page. |
| Related To | The module and record that is related to this email. | The email will be listed in a subpanel under its "Related To" record. |
| Status |
The state of the message:
|
Sugar does not differentiate between sent and received emails via the Status field, but users can find messages by direction by filtering the Emails list view using the Direction field. |
| Subject | The subject line for the email message. | |
| Tags | User-created keywords that can be used to identify records in filters, dashlets, and reports. | For more information on creating and using tags, please refer to the Tags documentation. |
| Teams | The Sugar team(s) whose users have access to the email record according to their role permissions. |
Archiving Emails
When a copy of a sent or received email message is stored in Sugar, it is considered an archived email. Users cannot edit an email's content, dates, or recipients once it has been archived. Users with appropriate role permissions can, however, edit the Assigned To, Teams, Related To, and Tags fields for archived emails.
Note: Assignment notifications, password reset emails, scheduled reports, and SugarBPM emails sent from Sugar will not be stored in Sugar as archived emails.
There are several ways that emails may be archived in Sugar, including:
- Manually creating an archived email via "Create Archived Email"
- Composing and sending an email from Sugar via the Emails module
- Sending an email campaign via the Campaigns module
- Receiving a message to a Group Inbound Email account in Sugar
- Archiving emails via the Sugar Email Archiving service (a.k.a. "SNIP")
- Archiving emails via a connector, third-party application, or API (e.g., Sugar Connect)
Note: When an email record is archived to Sugar, the service that imports the email may set the Teams field for the email record. If the team is not set at the time of archive, the email's team will default to "Global". Users with the appropriate permissions may update the Teams field after the email has been archived in Sugar.
Manually Creating Archived Emails
Users who do not have an email account configured in Sugar or who would like to log an email that was not automatically archived can manually create copies of email messages for archival purposes. To create an archived email in Sugar, navigate to the Emails module and select "Create Archived Email" from the Emails module tab menu. Alternatively, navigate to the record that you would like to relate to the archived email and select "Create Archived Email" from the record's History dashlet.
The email composer window will open where you can manually copy the contents of an email you have already sent or received outside of Sugar. When creating an archived email, the Send button is hidden. Instead, there is an Archive button, which allows the user to log the message without actually transmitting it.
In addition to completing the standard email fields, indicate the date and time that the email was sent or received in the fields labeled "Date Sent". After copying the contents of the message you want to archive, click the "Archive" button to save the record in Sugar.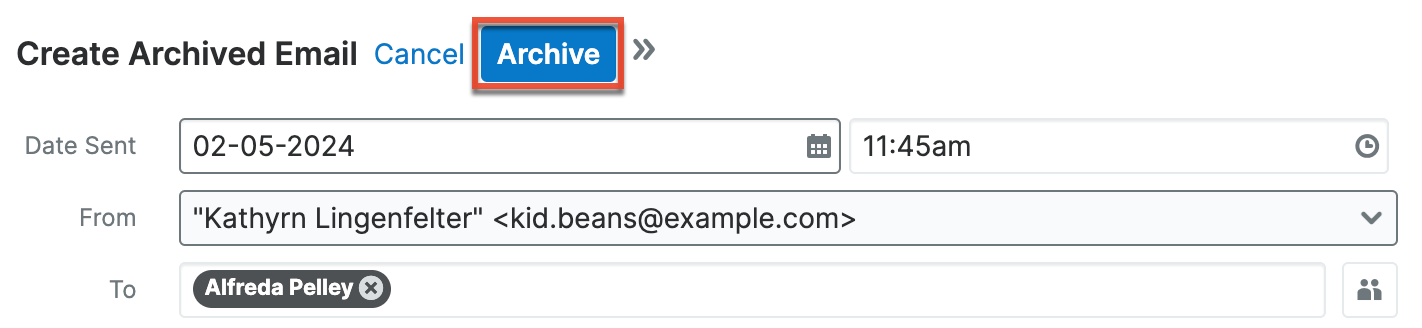
Please note that, like other archived emails in Sugar, you cannot edit the message's content, dates, or recipients once it has been archived. Users with appropriate role permissions can, however, edit the Assigned To, Teams, Related To, and Tags fields for archived emails.
Composing Emails
There are several places in Sugar where you may create an email message, but this section focuses on the composition elements of the email message such as recipients, attachments, templates, and signatures. For more information on places you can create emails in Sugar, please refer to the User Interface documentation.
Working With Recipient Fields
Sugar allows multiple recipients for an email message using the To, Cc, and Bcc fields. To send a message, at least one of the three recipient fields must contain at least one valid recipient. For example, a user may send a message with recipients in only the Bcc field if they want to hide the recipients' email addresses from each other.
To include Cc or Bcc recipients, click the "Cc" or "Bcc" button to expand the recipient field. You can click the buttons again to hide them.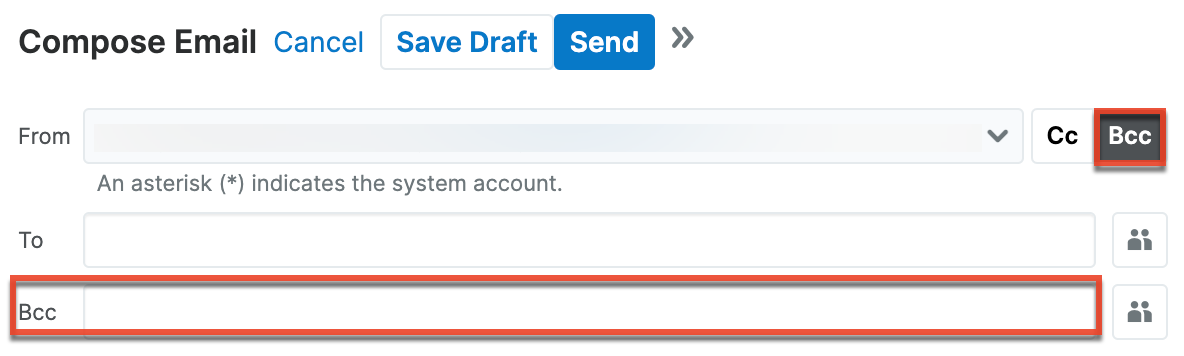
You can type email addresses directly in the recipient fields or look up recipients in the Address Book. For more information, please refer to the Freehand Address Entry and Using the Address Book sections of this page. When adding recipients, keep in mind the following tips for working with recipient fields:
- To select a recipient, click the recipient's pill in the recipient field and it will turn blue to indicate that it is in a selected state.

- To select multiple recipients within the same field, hold down the Shift or Command key then click the desired recipient pills.
- To move one or more recipients between the To, Cc, and Bcc fields, select the recipient(s) and drag your selection from one field to the other.
- To remove recipients from the message altogether, click the x inside the recipient's pill or select the recipient(s) and press the Delete key on your keyboard.
- To deselect recipient(s), click the blank space inside the field.
Using the Address Book
You can search across modules using the Address Book in the Emails module, which aggregates the users, contacts, leads, targets, and accounts in Sugar that have at least one valid email address.
To access the address book, click on the address book icon next to the recipient field you are working with.
You can search for and select multiple recipients from the Address Book and filter the Address Book's list view to restrict results to a specific module such as contacts or users.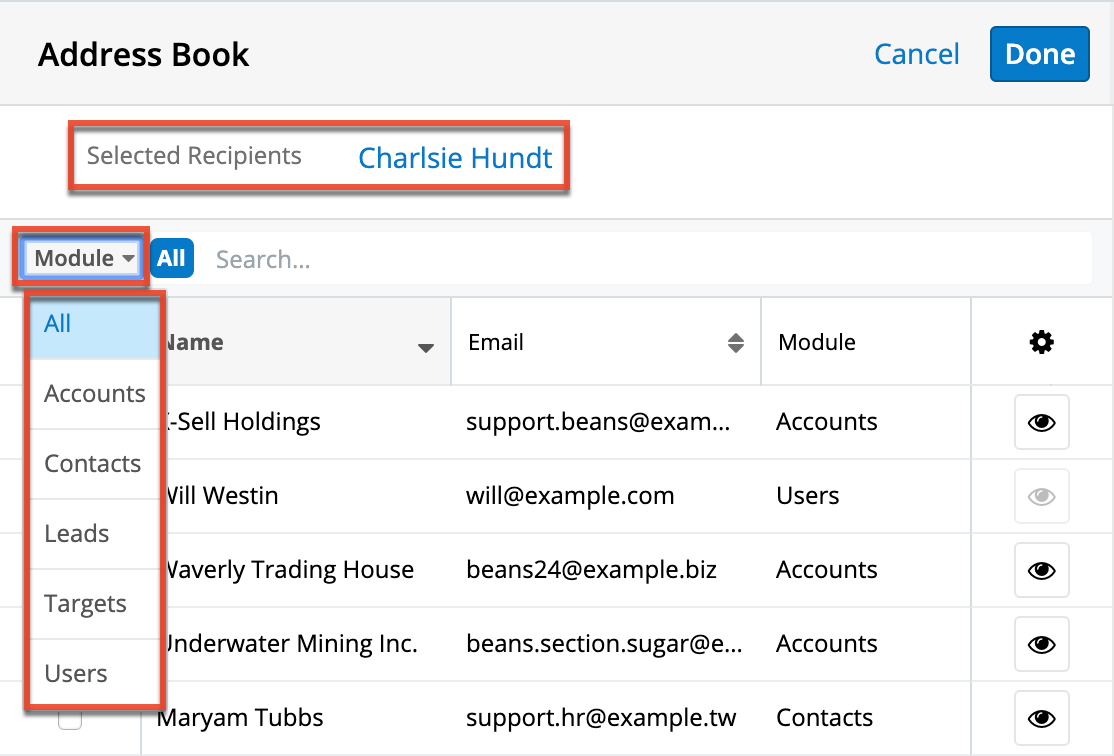
You can also tap into the Address Book by typing a first name, last name, email address, or account name directly in any of the recipient fields on the email message. Sugar will find potential matches as you type and you can select the correct recipient from the suggestions. Each matching recipient option will display a badge that indicates which module contains the record (e.g., "Le" for Leads). 
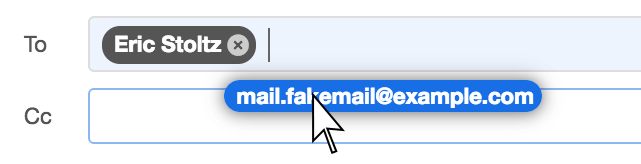
Freehand Address Entry
In addition to using the address book, you may choose to click inside any of the recipient fields and type one or more email addresses freehand. Email addresses do not need to be stored in Sugar to be used as email recipients. If an email address already exists in the database, then Sugar will find it as you type and you can select it from the suggestions. If the email address is not yet stored in the database, then simply hit the Enter key to commit the new address to the recipient field.
Note: Sugar validates email addresses on-the-fly and warns the user when an invalid email address has been entered.
Adding Attachments
Sugar allows you to send attachments along with your email. Attachments can be files from your local computer or documents from within Sugar. Any user who has permission to view the email record can also access attachments for the message. To include an email attachment, simply click on the Attachment icon in the toolbar:
Note: To embed images directly into the email message, you can copy and paste the image source/image data or drag and drop the image into the body of the email.
The Attachment menu provides two options:
- Upload From Local: Opens your system's file navigator so you can find and attach a file that is saved on your computer. Hold the Shift or Ctrl key while selecting files to select and attach multiple files at once.
- Sugar Document: Opens the Search and Select screen so you can search for a file in Sugar's Documents module.
Note: File attachments from your computer are stored in the Notes module, so you must have permission to create notes to upload attachments. If you do not have permission to create notes, the Attachment option will be hidden. Similarly, users who do not have role permission to view records in the Documents module will not see the "Sugar Document" attachment option. For more information on configuring roles in Sugar, please refer to the Role Management documentation in the Administration Guide.
After selecting the documents you want to attach to the message, they will appear under the body field of the email message. 
Each attachment will display an approximate file size in parentheses next to the file name. If the file you are attaching exceeds or causes the total size of attachments on the message to exceed the system's maximum upload size, the attachment will fail to upload. For more information on configuring the system's maximum upload size, please refer to the System documentation in the Administration Guide.
To remove an attachment before sending a message, simply click on the x next to the attachment's name.
When viewing draft and archived emails in list view, a paper clip icon next to a record's subject will indicate that the email contains one or more attachments. You can download an archived email's attachments from the email record's preview or record view by clicking on the file name.
Using a Template
Email templates can save time and reduce errors when composing common email messages. For more information on how to create an email template, please refer to the Email Templates section of this documentation.
As a best practice, send templates that contain variables to a single recipient only. If the template has any variable fields defined in it (i.e., $contact_name), Sugar will replace the variables with corresponding values from a related record. If multiple records share the same email address or multiple recipients are on the email, Sugar will pick only one of the record's values to place in the email template to send to all of the email addresses. If no related record is found, Sugar will warn you that the variable fields will be blank before you send the message. For more information on how to send a dynamic variable to many recipients, please refer to the Campaigns documentation in the Application Guide.
To use an email template, compose a new email message and click on the Template icon in the toolbar before completing any other fields on the email.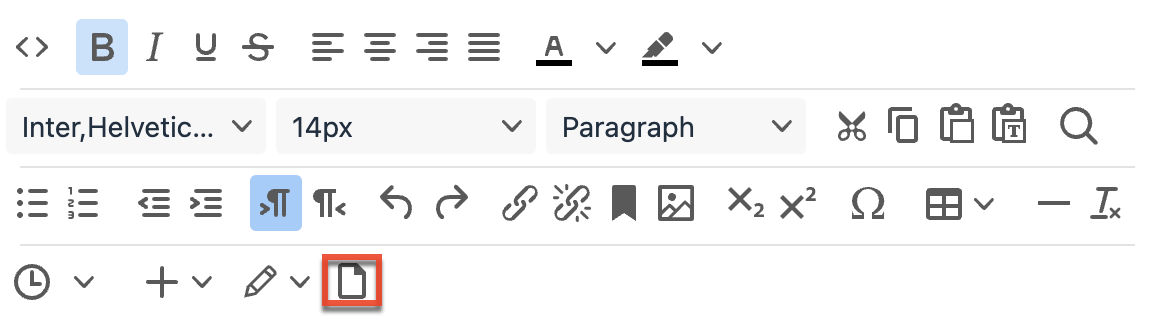
After clicking the Template icon, the Search and Select window will appear where you can find the appropriate template for your message. Select the radio button next to the template to pull all of its content and any attachments into your current message. 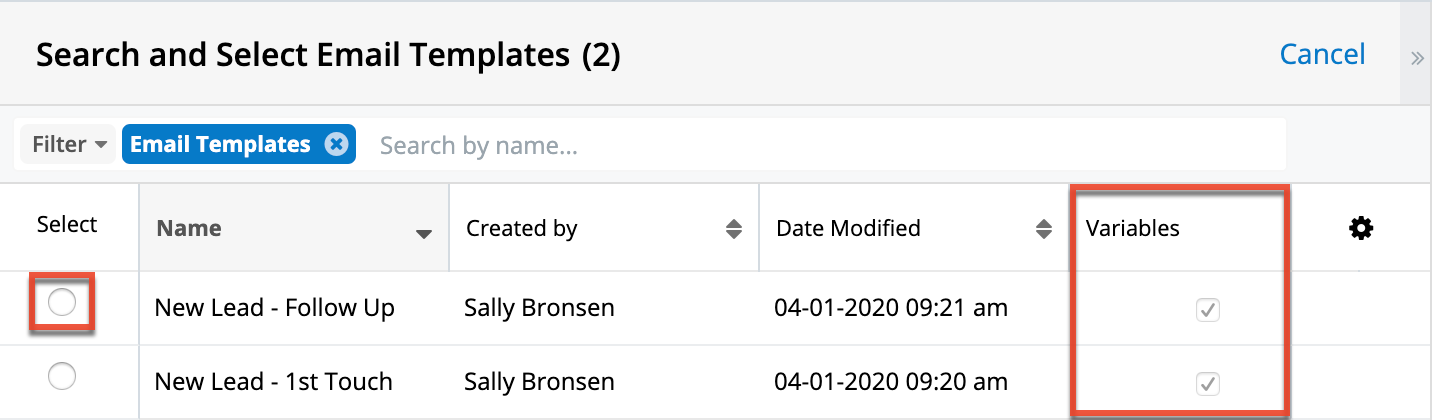
Note: If the body or subject of the email contains any data before a template is selected, the body and subject will be removed and replaced with the template data. Similarly, if the message contains an attachment, the attachment will be removed and replaced with any attachments that the template may contain.
Once an email template has been inserted in the email editor, users are free to edit the subject and email body, add or remove attachments, and insert a signature on the message.
Using an Email Signature
Email signatures are an easy way to standardize the messages you send with your contact details or other messaging. For more information on how to create an email signature, please refer to the Email Signatures section of this documentation.
Follow these steps to choose an email signature for a message:
- First, create a new email or edit a saved draft.
- If you have created a default signature, it will automatically appear in the body of the message and you can simply type your message above the signature.
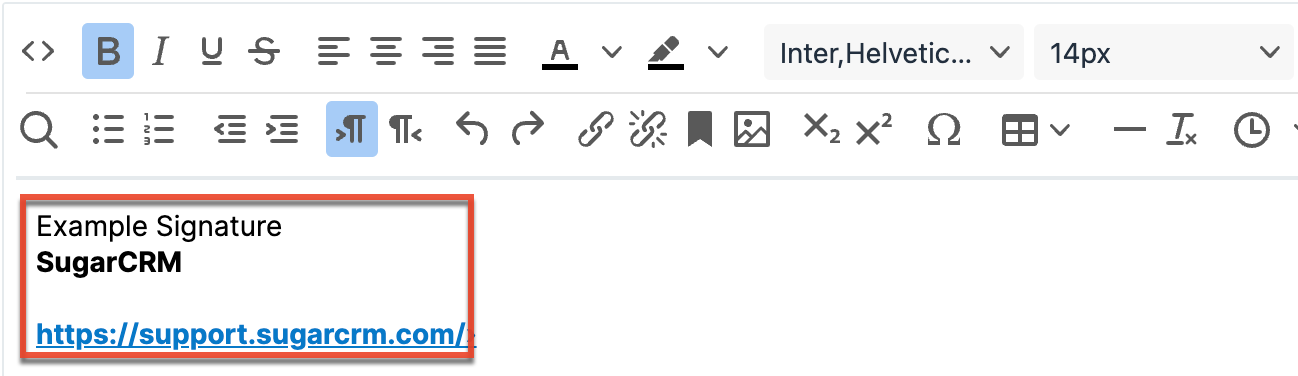
- If you have not designated a signature as default or if you would like to select a different signature, continue to step 2.
- If you have created a default signature, it will automatically appear in the body of the message and you can simply type your message above the signature.
- Place your cursor inside the body of the message where you want the signature to appear.
- Click on the Email Signature icon in the toolbar and select your preferred signature from the dropdown list.
To remove a chosen signature, simply select another signature to replace it. If you decide to use no signature at all after a signature has been added to the composer, you must delete it manually in the composition window.
Note: The Email Signature button is disabled when the cursor is not in the body of the email composer field and when there are no signatures defined for the user.
Saving and Editing Draft Emails
To save a draft of an email that you do not want to send right away, simply start composing a new email message and click "Save Draft" instead of using the Send button. Any content, recipients, templates, and signatures used in the email are saved with the draft. Only the administrator and the Assigned To user can view and edit emails in a Draft status. 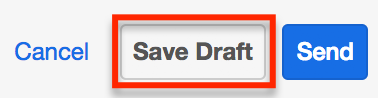
Note: Draft emails cannot be re-assigned to another user, so mass updating the Assigned To field for emails will not re-assign drafts if they are selected.
Users can only access the draft emails that they have created. A user's drafts appear alongside archived emails in the Emails list view and can be isolated in list view using the "My Drafts" filter.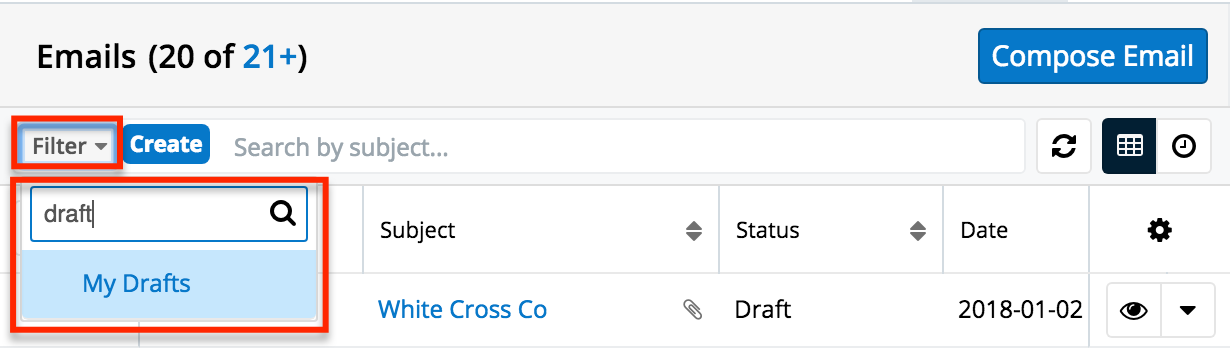
Click on the subject of a draft email to launch the Compose Email screen where the email's assigned user can continue editing the email and save the email as a draft again or send the email, which will change the email's status to "Archived".
Sending Emails
To send an email to the recipients in an email's To, Cc, and Bcc fields, simply click the Send button.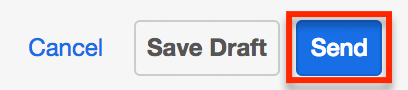
Sent emails will use the settings configured for the From account to send the email. A copy of the sent email will be saved to Sugar as "Archived" in the Emails module and can be isolated in list view using the "My Sent" filter.
Replying to Emails
Users can access the "Reply" and "Reply All" functions from the record view of emails that have an Archived status. Select "Reply" to reply to only the sender of the selected email or select "Reply All" to reply to the sender and all other recipients of the original email. 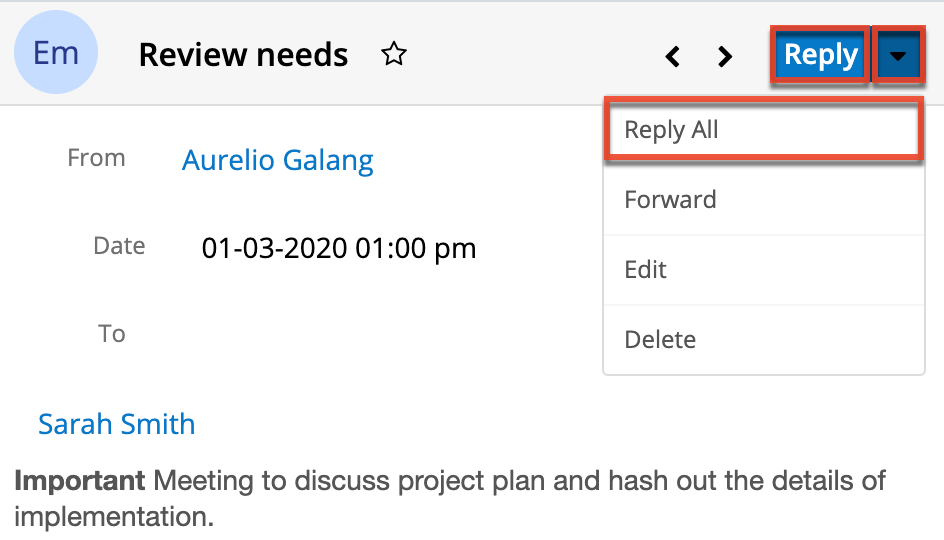
When replying to an email, Sugar creates a new email while populating the body, subject, and recipients of the email and carrying over the Related To, Assigned To, and Teams fields from the original email. The subject line of the email you are replying to carries over to the new email preceded by the letters "Re: ". The body of the email you are replying to is also carried over to the reply message with a line above the contents to separate the original email from the content you are adding to the reply.
Enter your reply above the divider line in the compose email screen. For more information on how to compose an email, please refer to the Composing Emails section.
Note: If the original email contained any attachments, they will not copy to the reply email.
Forwarding Emails
Users can access the Forward function from the record view of emails that have an Archived status. Select "Forward" to open a compose window where you can specify one or more recipients. 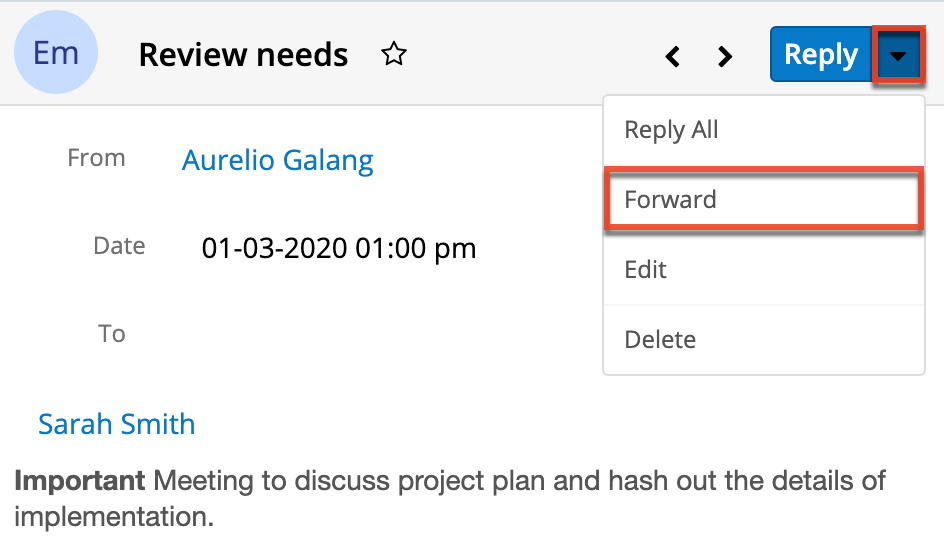
When forwarding an email, Sugar creates a new email while populating the body and subject of the email and carrying over the Related To, Assigned To, and Teams fields from the original email. The subject line of the email you are forwarding carries over to the new email preceded by the letters "FW: ". The body of the email you are forwarding is also carried over to the message with a line above the contents to separate the original email from the content you may optionally add to the message. The recipient fields must be completed by the user before the email can be forwarded. For more information on adding recipients, please refer to the Working With Recipient Fields section of this page.
Optionally, enter a message above the divider line in the compose email screen. For more information on how to compose an email, please refer to the Composing Emails section.
Note: If the original email contained any attachments, they will not copy to the forwarded email.
Relating Emails to Records
Emails in Sugar are implicitly related to records in Sugar that match an email address in the From, To, or Cc fields in the email. This implicit relationship is made for emails sent from Sugar as well as emails archived in Sugar via incoming email accounts or the Sugar Email Archiving service. Implicitly related emails will show in the Emails subpanel and History dashlet of the related record.
While composing an email, users can set an explicit relationship via the Relates To field. This allows the user to relate the email to a Sugar record regardless of whether the record contains an email address related to the email.
In addition to using the Relates To field, you can link additional module records to emails via the related record subpanels on the email's record view.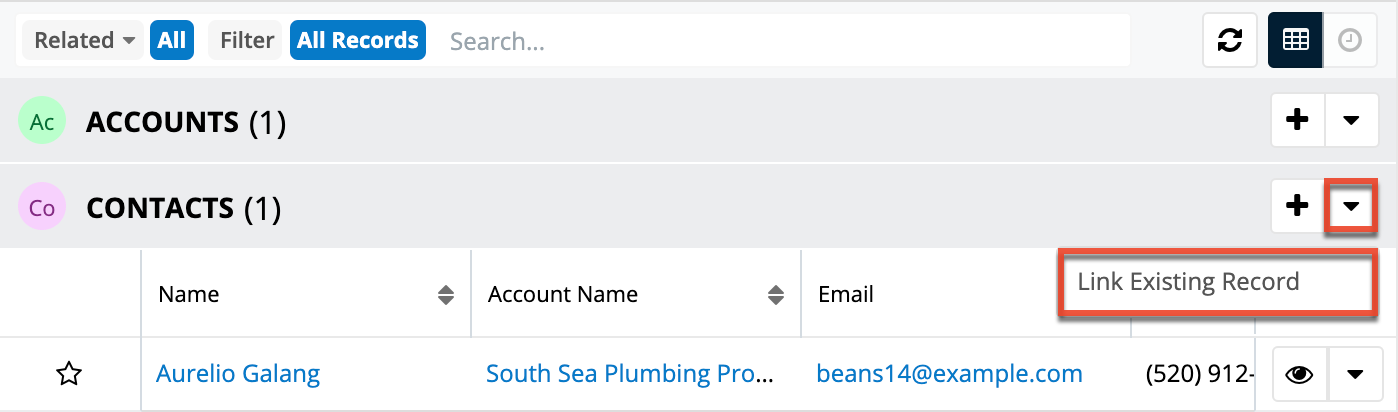
Understanding Email Address Opt-Outs
Email addresses can be marked as opted out in Sugar to indicate that the owner has not consented to receive marketing campaigns. To mark an email address as opted opt, simply click the button with a slashed circle to the right of the email address when editing the record (e.g., contact).
Administrators can configure whether new email addresses added to Sugar records default to opted-in or opted-out by using the "Opt-out new email addresses by default" option via Admin > System Email Settings. For more information regarding this option, refer to the Email documentation in the Administration guide.
When a recipient clicks the opt-out link in an email-type campaign, Sugar will automatically mark the recipient's email address as "Opted Out" in the corresponding record (e.g., contacts). For more information regarding opt-outs and campaigns, please refer to the Campaigns documentation as well as the Understanding Campaign Opt Outs article. 
Opted-out email addresses are indicated by a blue circle with a line through it. Opted-out email addresses also display a Link button in record view. Clicking this button will copy a link to your computer's clipboard which you can send to the email address owner to request that they confirm their desire to receive marketing emails from your organization. When the copied link is visited in a web browser, Sugar will automatically set the email address to opted-in.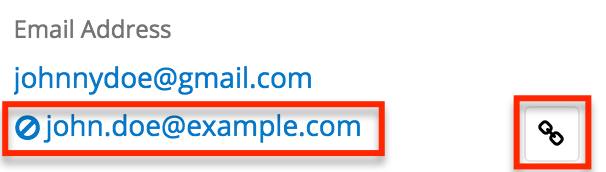
Please keep in mind that although email addresses marked as opted out cannot receive campaign emails, users can continue to send them transactional emails in Sugar. The recipient pill will display an opt-out status to indicate that it is an opted-out email address. 
Unlinking Emails
When an email is explicitly related to a record, users have the option of unlinking the email record via the Emails subpanel. Please note that the unlink option is not available for email records that are implicitly related via a matching email address or automated email importing. As a result, the unlink option is not available when viewing the Emails subpanel in the following modules: Accounts, Contacts, Leads, Targets, Cases, Opportunities, and Revenue Line Items. For more information on the different ways emails can be related to records in Sugar, please refer to the Relating Emails to Records section.
To delete the relationship between the record and the related email, simply navigate to the module record (e.g., Quotes) containing the related email and choose "Unlink" from the Actions menu on the far right of the desired record's row in the Emails subpanel. Please keep in mind that performing this action removes the relationship but does not delete the email record itself.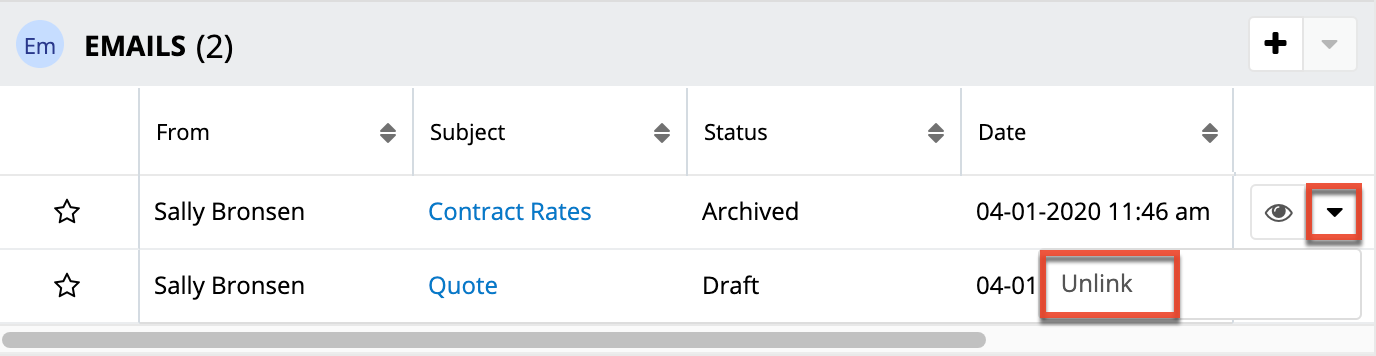
Email Templates
Email templates are used in Sugar to send simple form letters, automated email responses, or just commonly used emails to save time and prevent typos. They are also useful for ensuring a consistent style and voice for communications transmitted throughout your organization. Email templates can contain text, HTML content, images, and attachments. The content of templates may contain variables for field values like the recipient's name so that you can personalize the email for the recipient.
For information on using an existing template in an email message, please please refer to the Using a Template section of this page.
Note: Sugar's core product includes several places where email templates can be created for different purposes. For more information on alternative types of email templates in Sugar, please refer to the Understanding Email Templates for Campaigns, Workflows, and SugarBPM article.
Viewing Email Templates
To view the list of available email templates, simply click the Emails module tab and select "View Email Templates". Please note that you will only be able to see email templates as allowed by your team membership, user access type, and assigned roles. For more information on teams and roles, please refer to the Team Management and Role Management documentation in the Administration Guide. By default, the system email templates are assigned to the private team of "Administrator", so they will not be accessible to any regular users.
Note: If you are logged in as an administrator, you can view and configure several out-of-the-box system email templates such as "Forgot Password email", "Call Notifications Emails", "Meeting Notifications Emails", "Scheduled Report Emails", etc.
Creating Email Templates
To create a new email template in Sugar, click the three-dots menu on the Emails module tab and select "Create Email Template" from the module tab menu. 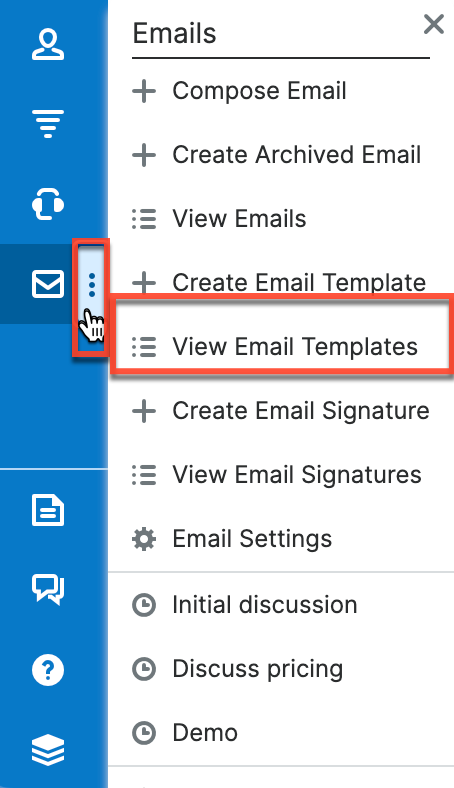
Refer to the Email Template Fields and Inserting Template Variables sections to complete the email template. For instructions on using templates in email messages, please refer to the Using a Template section of this page.
Email Template Fields
The Email Templates module contains the following fields:
| Field | Description |
| Assigned To | The Sugar user assigned to the process email template. |
| Body | The content of the message including any text, HTML content, images, or variables. Note: Use the TinyMCE functions to add formatting to the content. For more information on using TinyMCE, please refer to the User Interface documentation. To insert content variables, please refer to the Inserting Template Variables section of this page. If images or advanced CSS are required in your email template, it is highly recommended to host the images or CSS file on a publicly available hosting service and link to it in the email template. For more information, please refer to the Using CSS in Email Templates article. |
| Date Created | The date the email template record was created. |
| Date Modified | The date the email template record or its content was last modified. |
| Description | A description or other information about the email template. |
| Name | A unique and descriptive name to help users find the template. |
| Subject | The subject that recipients will see in their email inbox. |
| Tags | User-created keywords that can be used to identify records in filters, dashlets, and reports. Note: For more information on creating and using tags, please refer to the Tags documentation. |
| Teams | The Sugar team(s) that should have access to the email template. |
| Type | The type of email template. Note: The Type field defaults to "Email" when creating email templates via the Emails module. For more information on how to create an email template for campaigns, please refer to the Campaigns documentation. |
Inserting Template Variables
When constructing the subject and body of an email template, Sugar allows you to insert variables that correspond with Sugar fields on related records. The variables will be replaced with the related record's field values when the email is sent from Sugar. For example, you can insert a variable for the recipient's first name on a template that you plan to send to leads or contacts.
Use the following steps to insert a variable for the recipient's first name into an email template:
- Click to place your cursor on the location in the subject or body where the recipient's first name should appear.
- In the Insert Variable row, select the module you would like to insert a variable from.
- Set the second dropdown to the desired field from the modules selected in the first dropdown. For our example, select "First Name".
- Click "Insert" to insert the generated variable name to your subject or body at your cursor's location.
If there are no images, links, or formatting in your email, then sending it as text only may be a good option. Click the Send Text Only checkbox to remove the HTML formatting options. Alternatively, you can click "Edit Plain Text" at the bottom of the page to have the plain text option send differently than the HTML text.
Editing Email Templates
To edit a template, simply click the Emails module tab and select "View Email Templates". Click on the name of the template you wish to edit and modify the content, fields, and variables as needed. Please note that you will only be able to see and edit email templates as allowed by your team membership, user access type, and assigned roles. For more information on teams and roles, please refer to the Team Management and Role Management documentation in the Administration Guide.
Email Signatures
An email signature is a snippet of text positioned below the body of an email message that typically contains the contact information of the sender. Sugar allows users to create multiple signature variations that they can insert during email composition. Optionally, users can mark one email signature as their default signature. Sugar will automatically insert the default signature when a user composes a new email, but the user has the option to delete it or replace it with a non-default signature.
For steps to insert signatures in email messages, please refer to the Using an Email Signature section of this page.
Note: You must have role access to the Emails module to view and create email signatures. For more information on roles, please refer to the Role Management documentation in the Administration Guide.
Viewing Email Signatures
To view your saved signatures, navigate to the Emails module and select "View Email Signatures" from the Emails module tab menu. Please note that you will only be able to see email signatures that you have created.
Creating Email Signatures
To create a new email signature, click the three-dots menu on the Emails module tab and select "Create Email Signature" from the module tab menu.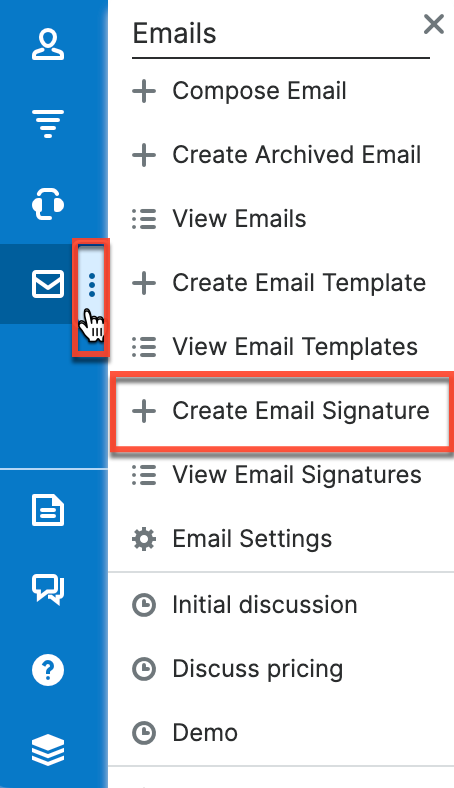
Give your new signature a descriptive name (e.g., "Sugarcon Promo Signature") and compose your signature in the Signature composition area just as you want it formatted for outgoing messages. Optionally, enable the "Default" checkbox to make this your automatic signature on all new emails. Each user can have one default signature. Marking a signature as your default will uncheck the Default field on any signature you may have previously designated.
When you are satisfied with the signature you have created, click "Save" to add the signature to the Signatures dropdown on email compose views for your user. Other users cannot access the signatures that you have created.
For more information about the fields available on the email signature record, please refer to the Email Signature Fields section. For instructions on using signatures in email messages, please refer to the Using a Signature section of this page.
Email Signature Fields
The Email Signatures module contains the following fields:
| Field | Description |
| Name | A unique and descriptive name to help users find the template. |
| Default | Designates the user's default email signature. Note: Each user can have one default signature. Marking a signature as your default will uncheck the Default field on any signature you may have previously designated. |
| Signature | The content of the email signature including any text, HTML content, and images. Note: Use the TinyMCE functions to add formatting to the signature. For more information on using TinyMCE, please refer to the User Interface documentation. If images or advanced CSS are required in your email signature, it is highly recommended to host the images or CSS file on a publicly available hosting service and link to it in the email signature. For more information, please refer to the Using CSS in Email Templates article. |
| Date Created | The date the email template record was created. |
| Date Modified | The date the email template record or its content was last modified. |
| Tags | User-created keywords that can be used to identify records in filters, dashlets, and reports. Note: For more information on creating and using tags, please refer to the Tags documentation. |
Editing Email Signatures
To edit a signature, navigate to the Emails module and select "View Email Signatures" from the Emails module tab menu. Click on the name of the signature you want to edit and adjust the content as needed. Please note that you can only view and edit the email signatures that you have created. Click "Save" to preserve your changes to the signature.
The edited signature will be available the next time you insert the signature into a new message. Any drafts that were saved with the signature before it was edited will retain the old signature. You can re-select the same signature from the draft's Signatures menu, which will replace the old version with the new one.
Sugar Email Archiving Service
Sometimes referred to as SNIP, the Sugar Email Archiving service allows users to easily archive email to Sugar records simply by sending the email to a special email address. The email archiving service monitors the email address, imports the email into your Sugar instance, and links related records without the use of a plug-in or other syncing process.
Note: Before you can use Sugar Email Archiving, an administrator must enable the service for your instance. For activation instructions, please refer to the Email documentation in the Administration Guide.
Features and Limitations
Anyone can send emails to the Sugar Email Archiving address, so the capability is not limited to users. Sugar Email Archiving will not import messages that are larger than 10 MB including attachments.
When an email record is archived via the Sugar Email Archiving service, the email's team will default to "Global". Users with the appropriate permissions may update the Teams field after the email has been archived in Sugar.
If the sender's email client is configured to use non-English From, To, and Cc fields, forwarding emails to Email Archiving may not work. Instead, send the email to Email Archiving directly using the Cc and Bcc fields or forward the email as an attachment. For a large volume of non-English emails that need to be archived using Email Archiving, set a rule in your email application to copy the emails to the Sugar Email Archiving address.
Relating Archived Emails to Sugar Records
Sugar will scan incoming emails that are sent to the Email Archiving Service for the following relatable items:
- From, To, and Cc fields: The Sugar Email Archiving service scans the From, To, and Cc fields of the message and relates the email to any records it finds with a matching email address in Sugar. The archived email will appear in the Emails subpanel and History dashlet for any matching records in Sugar. Please note that Email Archiving cannot relate records based on email addresses in the Bcc field due to the field's hidden nature.
- Message body: The Sugar Email Archiving service scans the content in the body of the message and relates the email to any records it finds with a matching email address in Sugar. For an email address to be recognized in the body of an email, it must be preceded by "To:" and surrounded by opening and closing carets, for example, "To: <john@example.com>" or "To: John Smith <john@example.com>". The archived email will appear in the Emails subpanel and History dashlet for any matching records in Sugar.
- Case Macro: If an archived email's subject line contains a specially-formatted key known as the Case Macro, the message will automatically be associated with the corresponding case in Sugar's Cases module. For more information on using the case macro, please refer to the Automatically Associating Emails With Cases article.
- Calendar invites (.ics): If the email contains a calendar event, Sugar will archive the email as well as create a Meeting record. Any users, contacts, or leads that share an email address with the meeting's attendees will be added as meeting invitees in Sugar.
The Sugar Email Archiving Service will relate emails to records in the following modules:
- Accounts, Contacts, Leads: relates emails with a matching email address
- Cases: relates emails containing a matching case number via Case Macro
- Meetings: creates meetings from emails with calendar invites; relates matching invitees
- Opportunities: relates emails from related contacts if the admin has enabled Related Contacts Emails for opportunities
Note: Any relationships between archived emails and custom modules must be made manually.
Sugar Email Archiving creates an implicit relationship between the email and matching records via the email addresses on the email. This implicit relationship behaves differently than an explicit relationship. For example, an email implicitly related (i.e., via Sugar Email Archiving by matching email address) to Beth Roberts' contact record would appear in her Emails subpanel just like one that is explicitly related (i.e., manually created relationship via subpanels). However, if Beth's email address is updated in Sugar, the emails created via Sugar Email Archiving will no longer appear in her subpanel since the email addresses no longer match. You can explicitly relate a contact to an email by navigating to the email's record view and selecting Beth Roberts in the email's Contacts subpanel.
Email Assignment
Like other records in Sugar, an email can only be assigned to one user. The Sugar Email Archiving service assigns emails to a user based on a match between the email address stored in the user's profile settings and an email address listed in the From, To, or CC fields. Sugar looks for users' email addresses in the From field first, then the To field, and then the CC field, and assigns the email record to the first user it finds with a matching email address. For example, if three Sugar users appear on an email, two in the To field and one in the CC field, the first user listed in the To field will be assigned the email record in Sugar.
Outgoing Email Accounts
Sugar users have the ability to create outgoing email accounts or edit configured email accounts by navigating to the Emails module and selecting "Email Settings" in the Emails module tab menu. The Outgoing Email Accounts list view displays all the outgoing email accounts to which the user has access in Sugar. Outgoing email accounts can include the default user email account, personal email accounts, as well as shared email accounts.
Note: The Outgoing Email Accounts list view does not support filtering, preview, or mass actions.
When the user first logs in to Sugar, the primary email address on their profile is created as a placeholder outbound account. Please note that you will need to configure this email account before using it to send emails. If the admin has enabled the "Allow users to use this account for outgoing email" option in Admin > System Email Settings, you will not be able to configure the default email account and must instead utilize the system email account which will appear in the Outgoing Email Accounts list view with an asterisk (*) to indicate that it is a system account.
When a user chooses to mark an email account as a favorite, that account will be set as the primary "From" address when composing an email in Sugar. If a user has marked multiple email accounts as favorites, they will display in the "From" dropdown in alphabetical order followed by accounts that are marked "Preferred Sending Account" in alphabetical order. All other accounts to which the user has access will appear in alphabetical order at the end of the list. Accounts marked as favorites and preferred sending accounts will be located above accounts that are only marked as favorite.
The three types of outgoing email accounts in Sugar are described below:
- User Email Accounts: User email accounts can be created by all users and can consist of the user's personal email accounts (e.g., jane@example.com) as well as any shared email accounts (e.g., support@example.com, sales@example.com). Please note that user email accounts can only be edited by the record owner. In addition, the "Allow users to configure email accounts" option must be enabled in Admin > System Email Settings for users to create new outgoing email accounts. Reach out to your Sugar administrator if you do not see the Create button in the Outgoing Email Accounts list view.
- Personal Email Accounts: Sugar users can configure one or more personal email accounts (e.g., jane@example.com, jane.smith@mycompany.com) to send email messages through Sugar. Personal email accounts will only be available for the current user since it is assigned to their private team.
- Shared Email Accounts: Shared email accounts can be created by any user and allows groups of users to send outbound email messages using the same email account (e.g., support@example.com). To share outgoing email accounts, the user must assign the email account to the specific team(s) who can use this account to send emails. Once created, the shared email account will appear in the Outgoing Email Accounts list view for all users belonging to at least one of the assigned teams. The record owner can check the Preferred Sending Account checkbox to prioritize the shared account in the "From" address dropdown when composing an email.
- Default User Email Account: A default email account is automatically created by Sugar for each user and uses the primary email address stored in the user's profile. To use this account, users need to make sure that the Username and Password fields are configured properly.
Note: The users' default email accounts may be affected by the "Allow users to use this account for outgoing email" option in Admin > System Email Settings. If the administrator has enabled the option, users will not be able to configure their default email account and must instead utilize the system email account or create a new user email account. The system email account will display in the Outgoing Email Accounts list view with an asterisk to indicate that it is a system account. - System Email Account: The system's outbound email setting is configured by the administrator via Admin > System Email Settings. By default, administrators will see the system email account in the Outgoing Email Accounts list view. Though uncommon, the administrator may choose to allow users to send email using the system email account by enabling the "Allow users to use this account for outgoing email" option in Admin > System Email Settings. Once enabled, users will not be able to configure their default email account and must instead utilize the system email account or create a new user email account. In addition, users will see the system email account in the Outgoing Email Accounts list view with an asterisk to indicate that it is a system account.
Once the necessary outgoing email accounts have been configured, users will be able to send email messages through Sugar using one of the available accounts (e.g., jane@example.com, support@example.com). Please note that to send messages through the Sugar application, you must select "Sugar Email Client" from the Email Settings section of your user profile. For more information, please refer to the Getting Started documentation.
Note: Email messages sent from Sugar will be automatically archived and linked to existing records throughout the application.
Creating Outgoing Email Accounts
Sugar users have the ability to configure personal and shared email accounts by clicking the Create button in the Outgoing Email Accounts list view. You can also click the Copy option to duplicate an existing outgoing email account record if you are creating another email account with similar settings. Once created, you can mark one or more as a favorite that will be used by default when composing an email.
Use the following steps to add a new outgoing user email account:
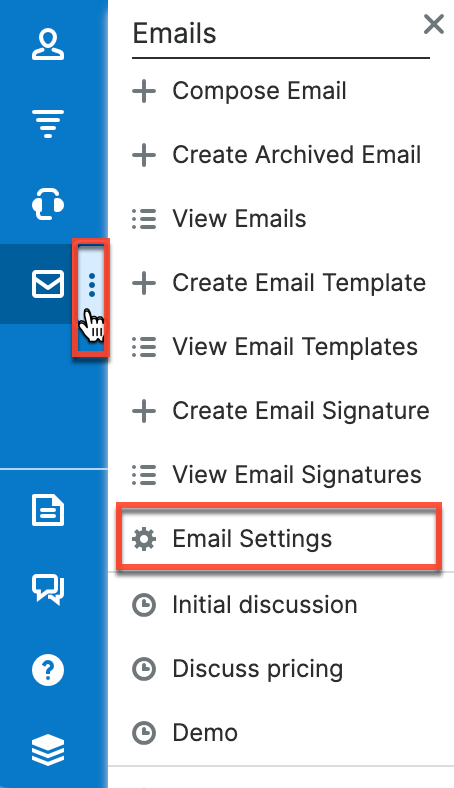
- Navigate to the Emails module and select "Email Settings" from the module tab.
- Click "Create". If you do not see the Create button, talk to your administrator about enabling the system email setting "Allow users to configure email accounts".

- Click on the appropriate Email Provider logo (e.g., Google, Exchange Online) to expose provider-specific fields pre-populated with their most common default settings. For accounts with any other email provider, select "Other".
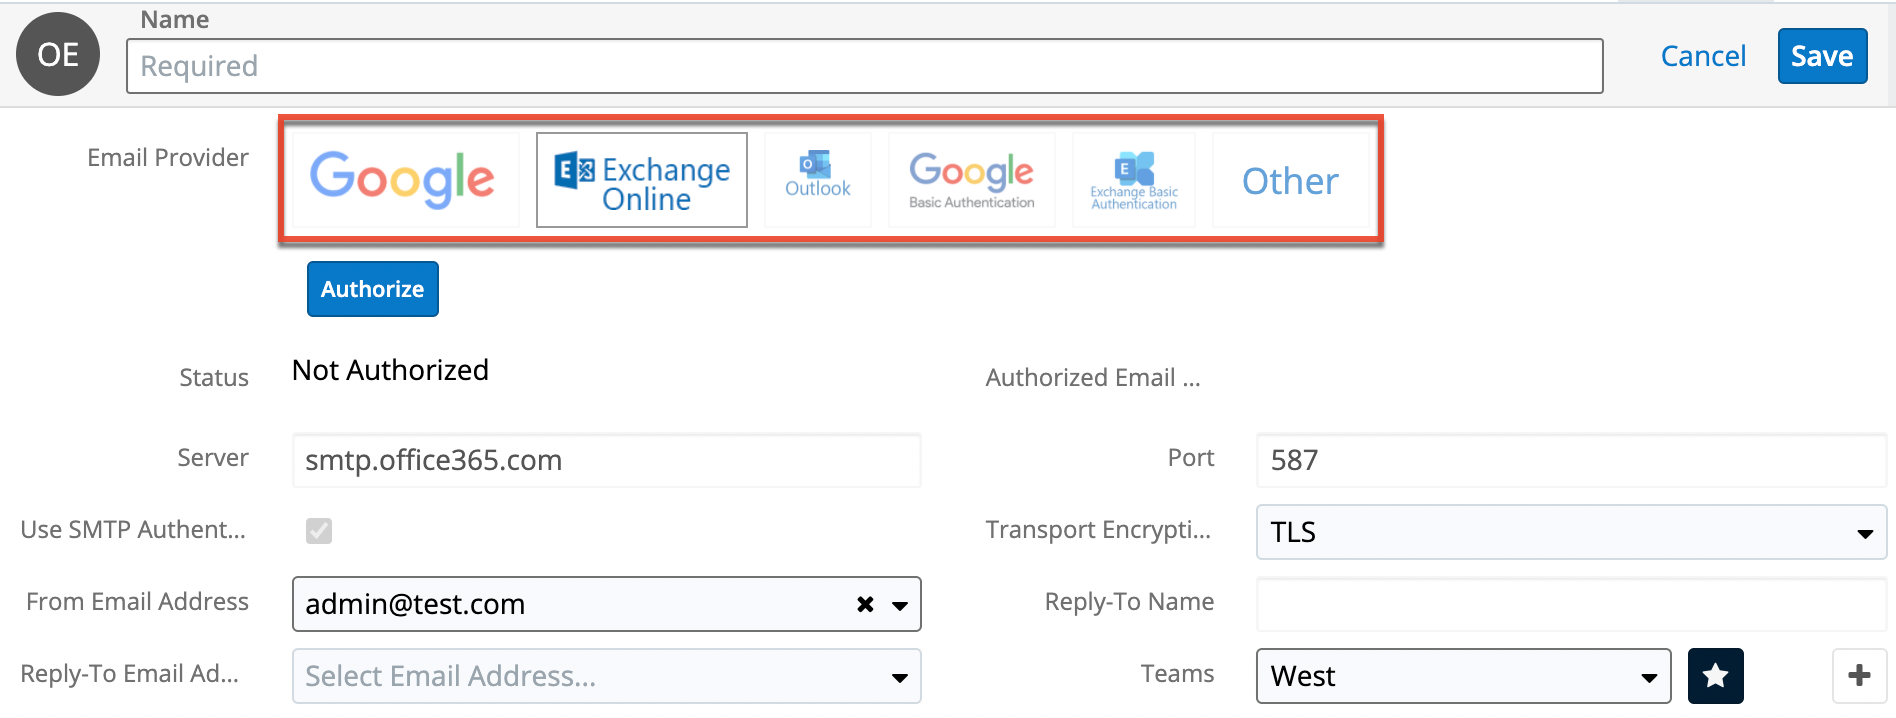
Note: For Google Basic Authentication accounts, you may be required to enable less-secure app access within your Google account. For more information, please refer to Google's help documentation. - Complete the following fields for your email account. All required fields are marked as such and must be completed prior to saving. If you are not familiar with these terms or their values, please check with your IT department or email provider.
- Name: The name of the outgoing email account that will be used to identify it in list view and will appear as the "From" name on messages sent from Sugar via this account. Defaults to the first and last name in the user's profile.
- Email Provider: Choose your mail provider to populate provider-specific values.
- Authorize: Click this button to authorize the Google/Exchange Online mail account to be the outgoing email account. The Google or Microsoft connector must be configured via Admin > Connectors before you can authorize and set up the mail account.
Note: For Google mail, a "This app isn't verified" warning may appear after selecting your Gmail account to authorize. You can click the Advanced link then click the "Go to..." link at the bottom of the window to proceed and grant permission for the connection to occur. For more information on this warning, refer to the Unverified apps article on the Google Cloud Platform Console Help page. - Status: The status will display "Authorized" once the mail account is authorized.
Note: Only available for Google and Exchange Online tabs. - Authorized Email Address: The email address of the authorized mail account.
Note: Only available for Google and Exchange Online tabs. - Server: The web address of the external email server from which emails will be viewed in Sugar.
- Port: The communication port number used for connecting to the email server.
- Use SMTP Authentication: Select this box to require server authentication for the account. For "Google" and "Exchange Online", this option is automatically enabled. Most email servers require authentication for security purposes. By default, authentication is required for Google, Exchange, and Outlook providers. If left unchecked, the SMTP server will accept anonymous connections, which is not recommended. The following fields are displayed when "Use SMTP Authentication" is enabled for Outlook, Google Less Secure Apps, Exchange, and Other providers:
- Username: Enter the username for the external account. The username is often the email address.
- Password: The Password field group contains a grayed-out field that cannot be edited and the following two required fields:
- New Password: Enter the account's existing password.
- Confirm Password: Re-type the account's existing password. This value must exactly match the "New Password" value in order to properly authenticate.
- Transport Encryption: Select the appropriate option from the dropdown to use Secure Socket Layer (SSL), Transport Layer Security (TLS), or no encryption (None) when connecting to the email server.
- From Email Address: The email address used to send messages for this account. Defaults to the primary email address stored in the user's profile.
- If specifying a different address than the email address associated with the account you are authenticating, the email server being utilized may need to be configured to allow the email account to send email as the entered From Address.
- For more information on configuring "Send As" permissions with Gmail, refer to Gmail's Help documentation.
- For Exchange Online, enter only the authorized email address, as it cannot send emails using a different email address unless the organization's Exchange admin has configured the account to allow this.
- Reply-To Name: To have replies to your email sent to a name and email address other than the From name and address, populate both the Reply-To Name and Reply-To Email Address.
- Reply-To Email Address: To have replies to your email sent to a name and email address other than the From name and address, populate both the Reply-To Name and Reply-To Email Address.
- Teams: The Sugar team(s) assigned to the outgoing email account. User email accounts are assigned to the user's private team by default. Adding teams to an email account allows the users belonging to the teams to also send from the account. The shared email account will appear in the Outgoing Email Accounts list view for all users belonging to at least one of the assigned teams.
- Preferred Sending Account: Accounts that have this checkbox checked are prioritized below the favorite accounts in the "From" address dropdown when composing an email. Preferred sending accounts are listed in alphabetical order after the accounts marked as favorites.
- Once the necessary information is entered, click "Save" to preserve the changes. Sugar will automatically validate the settings and alert you if there is an error.
Though uncommon, users may be able to use the system's outgoing email server if the administrator allows it. For more information on configuring the system outgoing email server settings and allowing users to use the system account, please refer to the Email documentation in the Administration Guide.
Editing Outgoing Email Accounts
To edit outgoing user email accounts that you created, navigate to the Emails module and select "Email Settings" from the module tab menu. Then in the Outgoing Email Accounts list view, click the pencil icon to the far right of the record's row you wish to edit. Alternatively, you can also click on the email account's name and then click the Edit button on its record view. Please note that outgoing user email accounts can only be edited by the record owner. 
Note: If the administrator has exposed the system email account to users, it will be listed in the Outgoing Email Accounts list view with an asterisk and cannot be edited by regular users.
Deleting Outgoing Email Accounts
To delete an outgoing user email account that you created, navigate to the Emails module and select "Email Settings" from the module tab menu. Then in the Outgoing Email Accounts list view, click the Record Actions menu to the far right of the record's row and select "Delete". Alternatively, you can also click on the account's name and then select "Delete" from the Actions menu on its record view. Please note that outgoing user email accounts can only be deleted by the record owner. 
Note: If the administrator has exposed the system email account to users, it will be listed in the Outgoing Email Accounts list view with an asterisk and cannot be deleted. In addition, the default user email account that was created when the user's record was created cannot be deleted.
Email's Direction Field
The Direction field in the Emails module specifies the direction (e.g., Outbound, Inbound, Internal, Unknown) of the email based on the sender (e.g., user, customer) and the recipient(s) in the email message. Please note that this field is not visible on record views or as a list view column, and is available only as an available filter field in the Emails list view. Sugar automatically sets the direction for archived emails and determines the direction using the following criteria:
| Direction | Sender | Recipient | Notes |
| Inbound | The sender is not a user/employee | ||
| Outbound | The sender is a user/employee | At least one recipient is not a user/employee | |
| Internal | The sender is a user/employee | All recipients are a user/employee | |
| Unknown | The sender is blank | Draft emails have a direction of "Unknown". |
To filter the emails by direction, simply create a filter using the Direction field then choose the value (e.g., Inbound) you wish to filter the list view by. In the example below, Sugar will return all inbound emails for Calm Sailing Inc. received in the last 30 days. 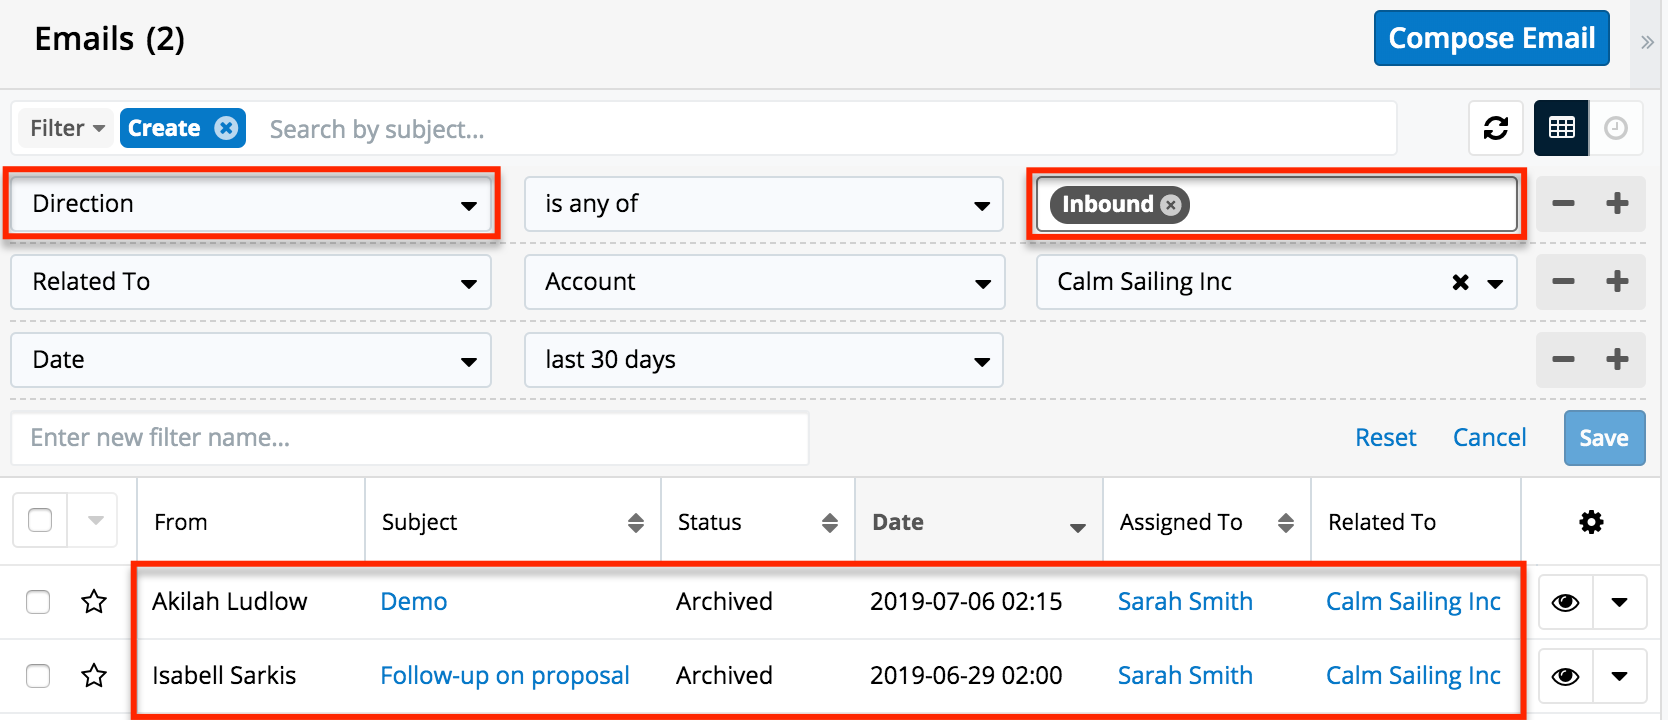
Working With Sugar Modules
The Emails module uses Sugar's Sidecar user interface. The following sections detail menus, views, and actions common to Sidecar modules and contain links to additional information within the page or links to the User Interface documentation.
Email Menus
The Emails module contains various options and functionality which are available via menus in the module tab, list view, and record view. The following sections present each menu and their options with links to more information about each option in the User Interface documentation or, for emails-specific functionality, within this page.
Emails Module Tab Menu
Click the Emails module tab in the navigation bar to access the Emails list view. You may also click the three-dots menu in the Emails module tab to display the Actions and Recently Viewed menus. The Actions menu allows you to perform important actions within the module. The Recently Viewed menu displays the list of emails you last viewed in the module. The Favorites menu displays the list of emails you most recently marked as favorites.
The Actions menu allows you to perform the following operations:
| Menu Item | Description |
| Compose Email | Opens the composition layout to compose and send a new email message or, optionally, save the message as a draft. |
| Create Archived Email | Opens the composition layout to create a historical record of an email message that was sent or received outside of the Sugar application. |
| View Emails | Opens the Emails list view to search and display email messages. |
| Create Email Template | Opens the Email Templates edit view layout to create a new email template. |
| View Email Templates | Opens the Email Templates list view to search and display email templates. |
| Create Email Signature | Opens the composition layout to create a new email signature. |
| View Email Signatures | Opens the Email Signatures list view to search and display email signatures. |
| Email Settings | Opens the Outgoing Email Accounts list view to display, edit, and create email accounts. |
For more information on module tab menus including reasons a module may not be included in the menu, see the User Interface documentation.
List View Menus
The Emails list view displays all email records and allows for searching and filtering to locate specific emails. You can view the basic details of each record within the columns of the list view or click an email's name to open the record view. To access a module's list view, simply click the module's tab in the navigation bar.
List View Mass Actions Menu
The Mass Actions menu allows you to perform mass actions on all currently selected records. You can use the checkbox on each record's row to select individual email records or click the checkbox in the list header to select all records displayed on the current set of list view results.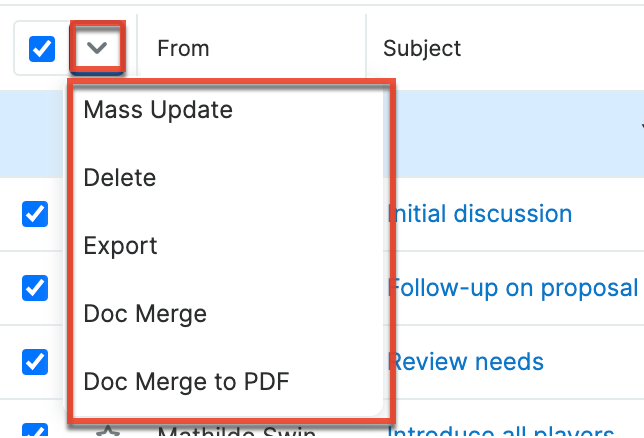
The Mass Actions menu allows you to perform the following operations:
| Menu Item | Description |
| Mass Update | Mass update one or more email records at a time. |
| Delete | Delete one or more emails at a time. |
| Export | Export one or more email records to a CSV file. |
| Doc Merge | Select or create a DOCX template to merge record data into documents that will be accessible in the Doc Merge widget. |
| Doc Merge to PDF | Select or create a DOCX, XLSX, or PPTX template to merge record data into PDF documents that will be accessible in the Doc Merge widget. |
List View Record Actions Menu
The Record Actions menu to the far right of each record's row allows you to perform actions on the individual email directly from the list view.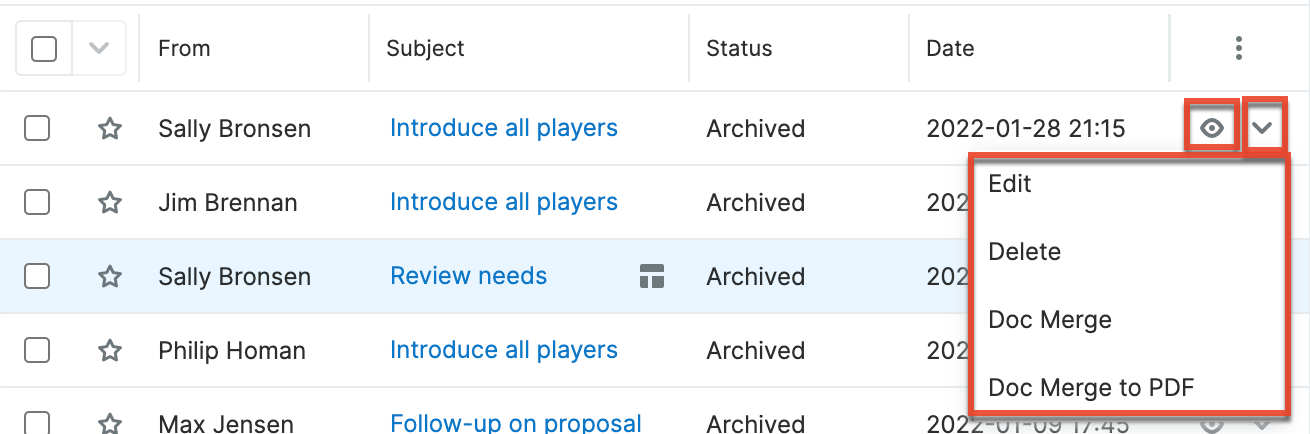
The list view's Record Actions menu allows you to perform the following operations:
| Menu Item | Description |
| Preview (Eye icon) | Preview this email in the intelligence pane. |
| Edit | Edit this email. |
| Delete | Delete this email. |
| Doc Merge | Select or create a DOCX, XLSX, or PPTX template to merge record data into documents that will be accessible in the Doc Merge widget. |
| Doc Merge to PDF | Select or create a DOCX, XLSX, or PPTX template to merge record data into PDF documents that will be accessible in the Doc Merge widget. |
Record View Actions Menu
The Emails record view displays a single email in full detail including its fields, subpanels of related records, and activity stream. To access an email's record view, simply click a hyperlinked email subject from anywhere within Sugar. The record view's Actions menu appears on the top right of the page and allows you to perform various operations on the current record. 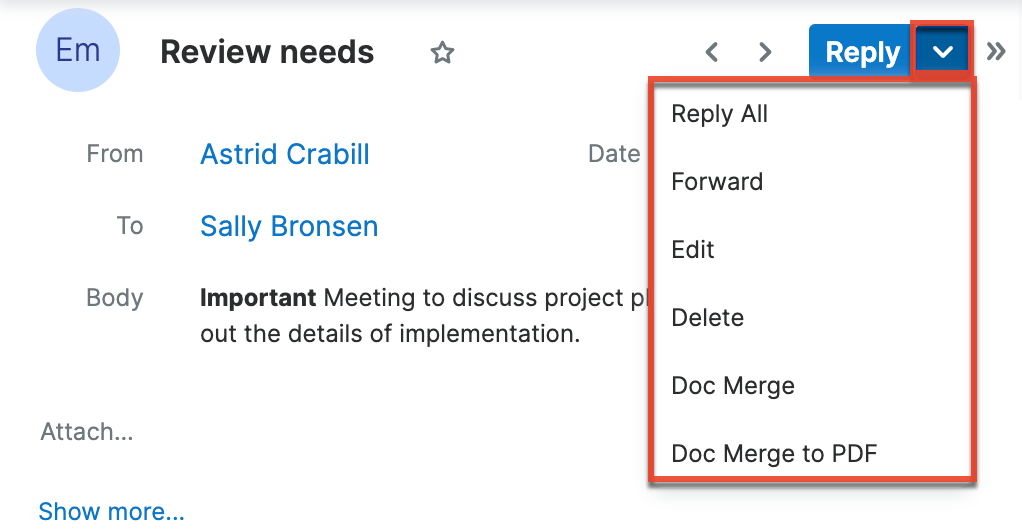
The Actions menu allows you to perform the following operations:
| Menu Item | Description |
| Reply | Respond to the sender of this email. |
| Reply All | Respond to the sender and all other recipients of this email. |
| Forward |
Forward this email to one or more recipients. Note: The Forward option is available for emails that have an Archived status. |
| Edit | Edit this email. |
| Delete | Delete this email. |
| Doc Merge | Select or create a DOCX, XLSX, or PPTX template to merge record data into documents that will be accessible in the Doc Merge widget. |
| Doc Merge to PDF | Select or create a DOCX, XLSX, or PPTX template to merge record data into PDF documents that will be accessible in the Doc Merge widget. |
Common Views and Actions
In the table below, the left column contains links to the User Interface page covering topics that are applicable to all Sidecar modules. The right column has links to sections of the current page that cover topics specific to emails.
| General Instructions for Working With Sugar Modules | Emails-Specific Instructions |
| Use the links below to navigate to the User Interface page which covers topics generic to many Sugar modules. | When Emails-specific help exists for each topic, use the links below to navigate to sections of the current page. |
| Creating Records | |
| Viewing Records | |
| Searching for Records | |
| List View | List View Mass Actions Menu List View Record Actions Menu |
| Record View | Record View Actions Menu |
| Intelligence Pane | |
| Editing Records | |
| Deleting Records | |
| Emailing Records | Sending Emails |
| Exporting Records | |
| Recalculating Calculated Values | |
| Finding Duplicate Records | |
| Merging Records | |
| Viewing Record Historical Summaries | |
| Viewing Record Audit Logs | |
| Record PDFs | |
| Favoriting Records | |
| Following Records | |
| Sharing Records |