System
Overview
Sugar® comes with the ability to configure many different system settings to personalize the way Sugar works. The System section is only available to administrative users and can be accessed via the Admin screen. The following sections are available options from the System section.
System contains the following menus:
| Menu | Description |
| System Settings | Configure system-wide settings. |
| Locale | Set default localization settings for your system. |
| Currencies | Set up currencies and conversion rates. |
| Repair | Check and repair Sugar. |
| Diagnostic Tool | Capture system configuration for diagnostics and analysis. |
| Tracker | Enable/Disable tracking. |
| PDF Manager | Manage templates for generated PDF files. |
| Mobile | Select modules to appear in the Mobile applications. |
| OAuth Keys | OAuth key management. |
| Sugar Updates | Check for the latest available Sugar version. |
| Import Wizard | Import records easily into the system. |
| Upgrade Wizard | (On-site only) Upload and install Sugar upgrades. |
| Languages | Manage which languages are available for users. |
| Search | Select modules for the Global Search and configure full-text searching. |
| Connectors | Manage connector settings. |
| Scheduler | Set up scheduled events. |
| Archive Records | Archive data from active tables in the system using the Data Archiver module. |
| Web Logic Hooks | Configure actions to call out to code hosted outside of your Sugar instance to process specified actions. |
| Content Security Policy Settings | Define the allowable content for iframe fields and Web Page dashlets. |
| License Management | Manage license properties. |
System Settings
System Settings allows administrators to configure system-wide settings to your organization's specifications. The system settings are split across a few different panes of related information. Change the values in any of the panels and click "Save" to preserve your changes. 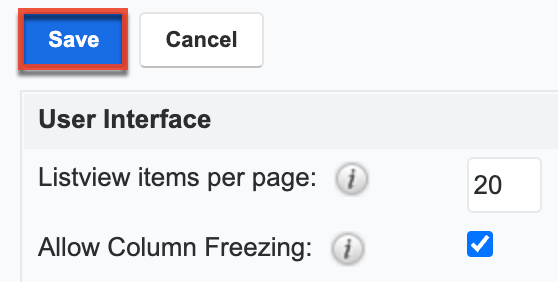
User Interface
The User Interface pane consists of a group of settings that affect the interface of Sugar. Use the following settings to configure the different aspects of the interface:
- Listview items per page: The maximum number of records to display per list view results set, as well as the search results set on the View All Results page for Global Search. By default, this is set to 20 records per results set. If additional related records exist, click "More <Module Name>..." (e.g., "More Accounts...") at the bottom of the list view.
- Note: The recommended setting is below 50 for acceptable performance levels. As additional fields are added to the list view, this number should be at the lower end of the recommended setting.
- Subpanel items per page: The maximum number of records to display on a page in subpanels. By default, this is set to 5. If additional related records exist, click "More <Module Name>..." (e.g., "More Accounts...") at the bottom of the subpanel to load the next set.
- Note: The recommended setting is no more than 25 with lower values recommended when subpanels include many fields.
- Allow Column Freezing: Enable this checkbox to allow users to freeze the first column in list views, consoles, and dashlets so that the first column remains visible when scrolling horizontally in the list of results. If disabled, the option to freeze the first column is hidden from all views.
- System Name: The name of this instance of Sugar (e.g., "My Company CRM") that displays in the browser's title bar after the current page's title.

- Show Full Names: Select this option to set the default value for new users to display the full name of users instead of login names throughout Sugar.
Note: For instances that use SugarIdentity, when the OpenID Connect authentication is configured, the User Name field will be populated with a unique alphanumeric ID (e.g., User ID). So, it is recommended that the Show Full Names option be enabled to avoid having the alphanumeric IDs display in Sugar. - Current Logo: The logo used in the left-hand corner of the header bar when viewing Sugar in light mode.
- Select Logo: Click "Choose File" to navigate to and select a new logo for your system to show when users are viewing Sugar in light mode. Logo dimensions should be 212x40 pixels, with the standard transparent background color, in PNG or JPG format.
- Current Dark Mode Logo: The logo used in the left-hand corner of the header bar when viewing Sugar in dark mode.
- Select Dark Mode Logo: Click "Choose File" to navigate to and select a new logo for your system to show when users are viewing Sugar in dark mode. Logo dimensions should be 212x40 pixels, with the standard transparent background color, in PNG or JPG format.
- Display Downloads Tab: Select this option to display the Download tab in the User settings and provide users with access to Sugar plug-ins and other available files.

- Lead Conversion Options: Select an option from the dropdown menu to determine the handling of related activity records (e.g., calls, tasks, etc.) during lead conversion. For more information, please refer to the Leads documentation in the Application Guide.
- Move: This option moves all of the lead's activities to the contact record created during conversion. For customers who are using Sugar integrated with Sugar Market, this option will also move any related records from the following Sugar Market-specific modules: Event Management, Landing Pages, and Web Activities.
- Do Nothing: This option does not alter the lead's activities during conversion. The activities remain related only to the lead. This is the default setting.
- Display actions within menus: Select to display detail view and subpanel actions within a dropdown menu. If disabled, the actions will display as separate buttons.
- Note: Only applies to legacy modules.
- Collapse all subpanels and disable sticky feature: Select this option to collapse all subpanels in the record view by default and disable automatically expanding previously-expanded subpanels in order to improve performance. Once enabled, users wishing to view subpanel data will need to expand the subpanel each time they return to a module.
- Note: Only applies to Sidecar modules.
- Prevent user customizable subpanel layout: Select this option to prevent users from dragging and dropping subpanels to a different location in the detail view layout.
- Note: Only applies to legacy modules.
Outbound Calling
If the Enable Click-to-Call setting is enabled, Sugar displays all stock and custom fields that have a type of "Phone" as a link in Sidecar modules. Click the link to dial the phone number using your default computer telephony integration software (e.g., Zoom). 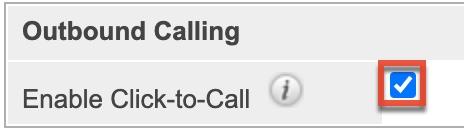
In Sugar Sell and Serve, if your instance is configured to use SugarLive and you are logged in to Amazon Connect, clicking a phone number link dials it in SugarLive instead.
Tweet to case
Tweet to case allows a user to convert a customer tweet shown in the Twitter Dashlet into a case record. Select "Enable Tweet® to case integration" to enable this feature.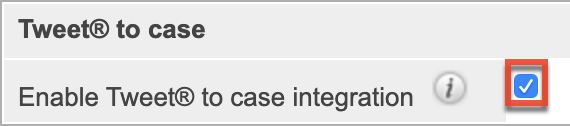
Preview Pane Settings
The preview edit feature allows users to edit records directly from the intelligence pane on list views. Please note that the "Enable edit in Preview pane" setting is enabled by default, but administrators can disable the preview edit feature based on their organization's needs by removing the checkmark from the box. For more information on using this feature, please refer to the User Interface page in the Application Guide. 
Activity Streams
Sugar's activity streams are disabled by default, but administrators can globally enable the functionality based on their organization's needs. To enable the activity stream in Sugar, simply place a check in the Enable Activity Streams box. When the feature is enabled, record posts will be generated in the system when performing actions such as creating records, updating records, linking records, unlinking records, etc. In addition, users will be able to access activity streams from anywhere within Sugar including via the home page, My Activity Stream dashlet, module's list view, etc. Please note that when the activity stream is disabled, Sugar will display a message in each of these locations indicating that the activity stream is not enabled. For the intelligence pane, the record's related activity stream posts will not appear. 
SugarBPM™
The SugarBPM™ panel contains the following configurations for the visual process designer and the SugarBPM engine:
- Auto-save process definitions: In the visual designer, process definitions are auto-saved every 30 seconds by default. This setting allows you to adjust the time interval in 30-second increments up to 5 minutes. To disable the auto-save feature, select "Never".
- Auto-validate process definitions on auto-save: Enabled by default, this option lets you decide whether Sugar should validate the open process definition's design each time the auto-save function runs. If auto-save is disabled, then enabling this feature will have no effect.
- Auto-validate process definitions on import: Enabled by default, this option lets you decide whether Sugar should automatically validate process definition designs when they are imported as .bpm files.
- Error Number of Cycles: Specify how many times a process can loop before the system stops the process definition. By default, this is set to 10. Please note that increasing the number of cycles could negatively affect performance.
Comment Log Settings
The Comment Log Settings panel contains a field that allows admins to configure the maximum number of characters shown per comment log entry. If an entry is longer than this value, it is truncated with a "Show more..." link to display the full text. Once the entry is expanded, a "Show less..." link is displayed to collapse the text so that only the configured number of characters is shown again. The default value is 500 characters.
Advanced
The Advanced panel consists of the following group of settings for advanced configuration of Sugar:
- Validate user IP address: Select this option to validate the user's IP address while accessing Sugar. If the IP address of a user changes in mid-session, Sugar will log them out and force them to log back in for security reasons. Please note that this setting is disabled by default out-of-the-box.
- Note: Some high-availability systems, VPNs, and switching Wi-Fi and wired connections may change IP addresses and thus cause your users to be logged out when they have not changed their configuration.
- Log slow queries: Select this option to log queries that take longer than the slow query time threshold. This is useful for performance debugging.
- Note: There is an inherent overhead to logging slow queries. If the threshold is set too low, it may cause performance issues.
- Maximum upload size: Specifies the maximum file size in bytes that is allowed to be uploaded to Sugar. This setting affects images, import files, and module uploads.
- Note: The file upload size is also dependent on the php.ini
upload_max_filesizeandpost_max_sizedirectives. This admin setting will not affect the maximum cumulative file size for email attachments, which is set to 10MB per message via themax_aggregate_email_attachments_bytesconfiguration attribute.
- Note: The file upload size is also dependent on the php.ini
- Portal Session Timeout: The maximum time in seconds of inactivity for a Sugar Portal session. The session will timeout and the customer will be logged out when the time limit is reached with no activity.
Note: This value is only used for legacy versions of Sugar Portal available in 6.5 and older. - vCal Updates Time Period: Determines the number of months the Free/Busy data is published to vCal. Specify the number of months in advance of the current date that Free/Busy information for calls and meetings to be published. To turn Free/Busy publishing off, enter "0". The maximum is 12 months.
- Log memory usage: Select this option to log memory usage per action performed in Sugar. The data will be stored in the ./memory_usage.log file.
- Slow query time threshold (msec): Specify a threshold in milliseconds to begin logging slow queries at. If "Log slow queries" is selected, queries that take longer than the threshold to process will be logged. If you have enabled the Tracker Queries option on the Tracker page, you can run the pre-defined Slow Queries report to view slow queries.
- Display stack trace of errors: Select this option to display where errors occur in the application's stack trace. This option is for debugging purposes and should not be left on in a production instance.
- Developer Mode: Available for on-site instances only, enabling this option will disable caching to immediately view changes made to language, vardefs, and template files. This option is for debugging purposes and should not be left on in a production instance.
- Import - Maximum Number of Rows: Specify how many rows are allowed within import files. If the number of rows in an import file exceeds this number, the user will be alerted. If no number or zero is entered, an unlimited number of rows are allowed.
- Note: Header rows count towards the total number of rows in the import file.
- Prevent private team names from inheriting the user's name fields: Select this option if private team names may be different from the user's first and last name. By default, Sugar will update a private team name to [Firstname Lastname] any time the corresponding user's profile is edited and re-saved, even if the change was not made to the user's first or last name. Enable this option to ensure that edited private team names do not revert to the system default.
Logger Settings
Sugar comes with a built-in logging system to log information or errors that occur in the application. By default, the logs are written to sugarcrm.log in the Sugar root directory. If a problem arises, you can refer to the log file for information that may help in troubleshooting the issue. The Logger Settings panel consists of a group of settings that affect the Sugar logs. Please note that SugarCloud customers can generate PHP error logs and access logs via the SugarCloud Insights page.
Note: The Logger Settings panel is hidden for instances on Sugar's cloud service. Should you require a log level to be temporarily changed on a SugarCloud production environment, you must open a support case. For more information about default configuration settings for Sugar's cloud environments, please refer to the SugarCloud Policy Guide.
Use the following settings to configure the different aspects of Sugar logging:
- Log File Name: Specify a name for the log file. Defaults to sugarcrm.
- Maximum log size: Specify the maximum size of the log file in megabytes (MB). The default is 10MB. Once a log file reaches the specified size it is renamed to have an incrementing number and a new file will be created to contain new logs.
- Log Level: Select the event level that you want to capture in the log file. The levels are listed below in order of the most log records to the least. The default level is fatal. When specifying a logging level, the system will create log files for the specified level as well as higher levels. For example, if you select "error", the system creates log files for "error", "fatal", and "security". Please note that there is an inherent overhead to logging. If the log level is set too high, it may cause performance issues. The "info" and "debug" settings are not recommended for continuous use in a production environment.
- debug: Logs events that help debug the application
- info: Logs informational messages
- warn: Logs potentially harmful events
- deprecated: Logs a function in the application that will be removed in an upcoming release
- error: Logs error events in the application
- fatal: Logs severe error events that cause the application to abort
- security: Logs events that may compromise the security of the application
- off: The logger will not log any events
- Append after filename: Select a time period from the dropdown list to append to the file name (None, Month_Year, Day_Month, Month_Day_Year). This makes it easier to identify the log that you want to view.
- Default date format: The date format for the log file. This format must be supported by strftime. Defaults to %c.
- Maximum number of logs (before rolling): The maximum number of log files to save. When the number of log files exceeds this limit, Sugar deletes the log file that was created first. Defaults to 10.
View Log
The Sugar log is stored in the root directory of Sugar and is accessible from the operating system. Administrators who do not have access to the operating system running Sugar do have the ability to view the log through Sugar. Navigate to Admin > System Settings and find the "View Log" link at the bottom of the screen: 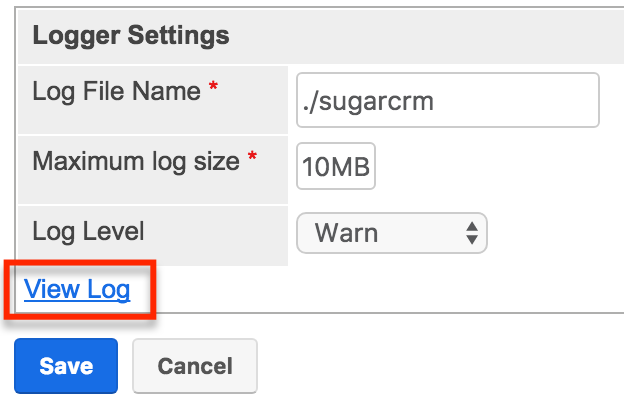
This opens the log viewer for the current log file. You have the following options for navigating the log file:
- All: Select this option to view the entire log.
- Mark Point: Select this option to mark a starting point in the current log file.
- Refresh From Mark: Select this option to view any entries made in the log after the most recent mark.
- Next: Select this option to view new entries in the current log file.

A common method for utilizing these options to debug a problem would be to click "Mark Point", perform the action causing problems, and then select "Refresh From Mark" to see any log entries caused by the action being debugged.
You also have the ability to search within the log file for keywords. To perform a search, simply enter a keyword into the search box and press Enter on your keyboard to execute the search.
Locale
Locale allows administrators to configure localization settings to your organization's specifications. Some of the settings specified here can be overridden by user-level personalizations such as date and time formats on the User Preferences page. The locale settings are split across a few different panels of related information. Change the values in any of the panels and click "Save" to preserve your changes. 
User Interface
The User Interface panel consists of a group of locale settings that affect the interface of Sugar. Use the following settings to configure the different aspects of the interface:
- Date Format: Select a format from the dropdown for displaying the date throughout the application.
- Language: Select a default language from the dropdown for use throughout the application. Users can select a different language from the login page. For more information regarding enabling or disabling languages, please refer to the Languages section.
- Name Format: Select a format from the dropdown for displaying people names throughout the application. You can specify any combination of salutation, first name, and last name.
- Time Format: Select a format from the dropdown for displaying the time throughout the application.
Users have the ability to override the default date, time, and name formats through their user profiles. For more information on how to set locale settings per user, please refer to the Locale Settings section of the Getting Started documentation in the Application Guide.
System Currency
The System Currency panel consists of a group of currency settings that affect the interface of Sugar. The system currency is displayed in addition to a record's original currency in most places across Sugar. The value is displayed in the system currency with a grey box containing the value in the record's currency next to it. However, the system currency can be overridden by the user's preferred currency if "Show Preferred Currency" is enabled in their Locale Settings and the user's preferred currency is different from the system currency. Use the following settings to configure the different currency options:
- ISO 4217 Currency Code: The ISO code for the currency.
- Note: This setting must be populated in order for the currency (e.g., EUR) to display in the Quotes detail view.
- Decimal Symbol: The default decimal symbol.
- Currency Symbol: The default symbol for the currency.
- 1000s Separator: The default delimiter to separate thousands.
Users have the ability to override the currency defaults through their user profiles. For more information on how to set currency settings per user, please refer to the Locale Settings section of the Getting Started documentation in the Application Guide.
Export Settings
The Export Settings panel consists of a group of export settings that affect different aspects of exporting in Sugar. Use the following settings to configure the different export options:
- Export Delimiter: The delimiter used to separate fields while exporting data. Defaults to a comma.
- Disable export: Select this option to disable the export option for all users, including administrators.
- Default Character Set for Import and Export: Select a default character set from the dropdown that handles the expected characters in an import and export. Defaults to ISO-8859-1.
- Admin export only: Select this option to disable the export option for standard users, administrators will be allowed to export.
Users have the ability to override the default export delimiter and character set through their user profiles. For more information on how to set export settings per user, please refer to the User Preferences section of the Getting Started documentation in the Application Guide.
Note: Locales that use character encoding other than ISO-8859-1 must specify the appropriate character set.
Database Collation
The Database Collation panel only shows if running on a MySQL database and contains an option to change the collation of the connection Sugar makes to the database. Select the desired collation from the dropdown. Defaults to utf8_general_ci.
Note: Changing this setting will not change existing tables, but only new tables going forward. If this setting does not match the collation of the current tables in the database then the database will return errors when accessing those tables.
Currencies
Currencies allow administrators to create and manage currencies and exchange rates in Sugar. The defined currencies in the system can be viewed in the Currencies list view which can be accessed by selecting "Currencies" under the System panel of the Admin page. Please note that the default system currency (e.g., USD) will always display first in the Currencies list view. The default system currency cannot be edited via the Currencies module and will need to be edited via Admin > Locale. For more information on configuring the default currency, please refer to the System Currency section.
Note: For additional information regarding the basics of performing common tasks or operations (e.g., creating records, editing records, deleting records) in the application, please refer to the User Interface documentation in the Application Guide. 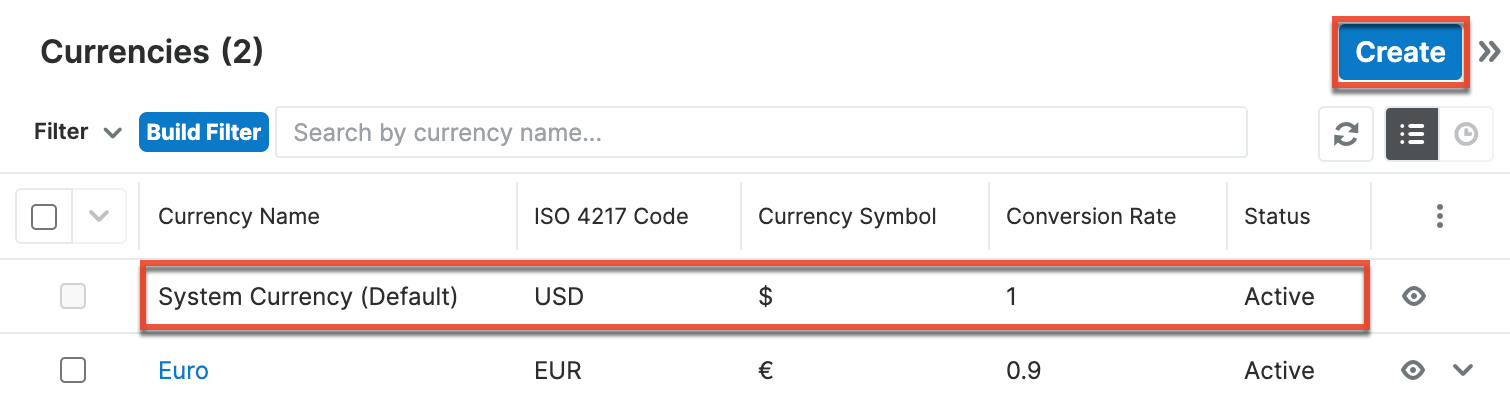
To create a new currency in the system, simply click the Create button on the upper right of the Currencies list view. Enter appropriate values for the fields in the record view layout then click "Save".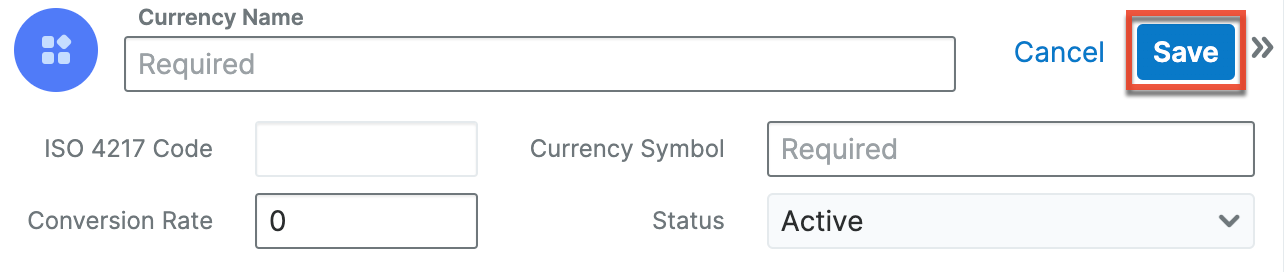
| Field | Description |
| Currency Name | The name or designation of the currency. Note: The currency name auto-populates based on the value entered in the ISO 4217 Code field. |
| ISO 4217 Code | The ISO code for the currency. Note: This setting must be populated in order for the currency (e.g., EUR) to display in the Quotes module. |
| Currency Symbol | The default symbol for the currency. Note: The currency symbol auto-populates based on the value entered in the ISO 4217 Code field. |
| Conversion Rate | The conversion rate to get to this currency from the system's default currency. |
| Status | The current status of the currency (e.g., Active, Inactive). Note: Selecting "Inactive" will remove this currency from currency fields throughout the application. |
Updating Conversion Rates
Users may use the currencies defined in Admin > Currencies when populating any currency amount field in stock or custom modules. When doing so, the exchange rate for the selected currency is stored on the record itself. The conversion rate stored on each record will update to match the current rate specified in Admin > Currencies under the following scenarios:
- The record undergoes a save event (e.g., mass update, manual save, etc.) and the record's currency has a different conversion rate defined in Admin > Currencies than is currently saved in the opportunity.
- An administrator updates the currency exchange rate under Admin > Currencies. This will trigger a scheduled job that updates all records saved with that currency to the new rate.
To keep closed-business amounts historically accurate, opportunity and quote records will not update if they are in a closed status. For more information about updating opportunity currency rates, please refer to the Opportunities documentation in the Application Guide. For more information about updating quote currency rates, please refer to the Quotes documentation in the Application Guide.
Languages
The Languages section allows administrators to configure which languages are available for users to log in with. To disable a language, simply drag the language from the Enabled Languages panel to the Disabled Languages panel and click "Save". 
Any languages in the Disabled Languages section will not be in the Languages dropdown while logging in.
Search
Global search allows users to search for information across their entire Sugar database as opposed to restricting search within a specific module. For more information on how to use global search, please refer to the Global Search section of the Search documentation in the Application Guide. The Search administration settings allow administrators to configure, enable, and index full-text search. Global searches in the desktop application and the SugarCRM mobile app will be returned by full-text search.
Configuring Full-Text Search
Sugar's global search is enabled with full-text searching abilities that use the ElasticSearch engine. Full-text search allows users to search throughout various fields and modules for an enhanced search experience. In order for results to return for a particular module, the module must be enabled on the Full-Text Search Configuration page. To enable or disable a stock or custom module for global search, simply drag and drop the module between the Enabled Modules or Disabled Modules column and click "Save". 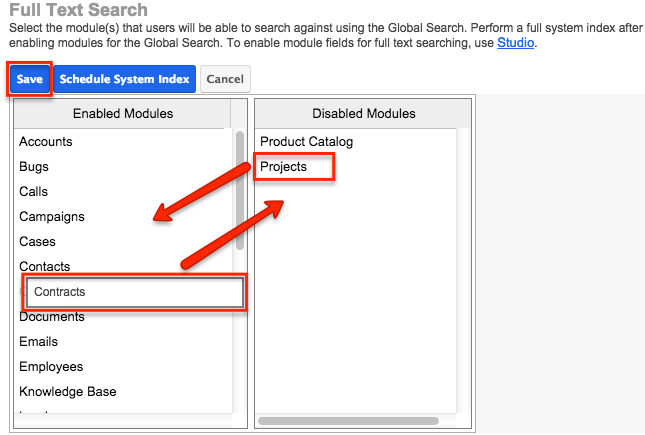
Disabled modules will not be included in the global search results nor available to select in the Modules list on the Global Search bar in the desktop application. For more information on filtering the global search by modules, please refer to the Filtering by Module section of the Search documentation in the Application Guide.
After enabling modules for Global Search, a full system index must be performed in order for the module to appear in the search results. For more information on performing a system index, please refer to the Indexing Full-Text Search section of this documentation.
Individual module fields must be enabled for full-text search in the field attributes via Studio > {Module Name} > Fields > {Field Name}. For more information, please refer to the Studio documentation.
Note: Only modules enabled for Full-Text Search can be referenced in user posts on the activity stream. For more information on referencing record's in posts, please refer to the Activity Stream documentation in the Application Guide.
Indexing Full-Text Search
Full-text search relies on an index of the records and data to be able to quickly locate results. After enabling full-text search, or enabling a module or field, you should perform a full index of your system.
Note: System performance can be affected while the index is being performed. It is recommended to run a system index during low usage or off-hours.
Use the following steps to perform a full system index:
- Click "Schedule System Index".
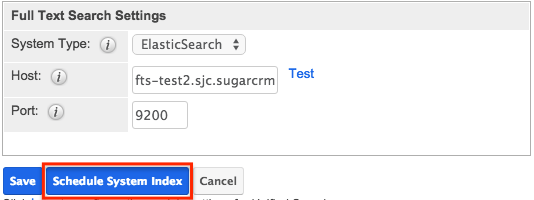
- A pop-up message will display warning of potential performance issues during the index. Click "OK" to proceed.
- The list of available full-text search modules will display. Simply select one or more module(s) to perform the index. You may also select "All" to index all full-text search enabled modules.
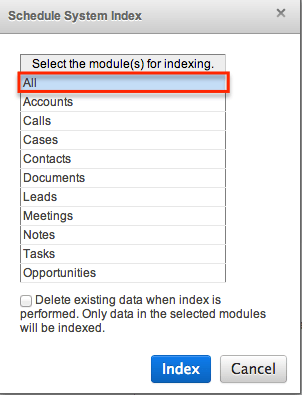
- Select the checkbox to delete the current index data before the index operation runs. If this is the first index being performed on the system, you do not need to select this option. If you have added fields to a module's index, then this checkbox should be selected or the new field may not show in the results.
- Click the Index button to schedule the index.
- The next time the scheduler runs, it will rebuild the index based on the selected options. For more information on schedulers, please refer to the Schedulers documentation.
Note: The time and resources required to perform an index are directly proportional to the number of modules selected for the indexing. It is recommended that you choose only the modules that require indexing and perform the index during low usage or off-hours.
Configuring Legacy Global Search
Legacy global search has been deprecated and is no longer applicable to any parts of Sugar. To enable modules for global search in the desktop application or the SugarCRM mobile app, use the Full-Text Search Configuration instead.
Content Security Policy Settings
Content Security Policy (CSP) directives are used by web browsers to control which content (e.g., images, scripts) can be loaded on a web page. For more information on CSP directives, refer to the Content Security Policy (CSP) guide on the MDN Web Docs - Mozilla website. Sugar prevents any external web content from loading in elements such as iframes and Web Page dashlets in your Sugar instance until the system administrator adds the web domain (e.g., https://example.com) as a trusted site on the Content Security Policy Settings page. Once added, users can then enter in the appropriate URL (e.g., https://example.com) in iframe fields and/or Web Page dashlets to load the content in Sugar. For additional information on CSP settings and how to configure the default-src in Sugar, refer to this SugarClub dev blog post.
Please note that the following CSP directives are defined in Sugar by default:
img-src: This directive has pre-defined source values ofdata:,http:,https:, andblob:in Sugar.object-src: This directive has a pre-defined source value of'self'in Sugar.
The Content Security Policy Settings page is broken into two tabs containing the basic and advanced CSP directives. 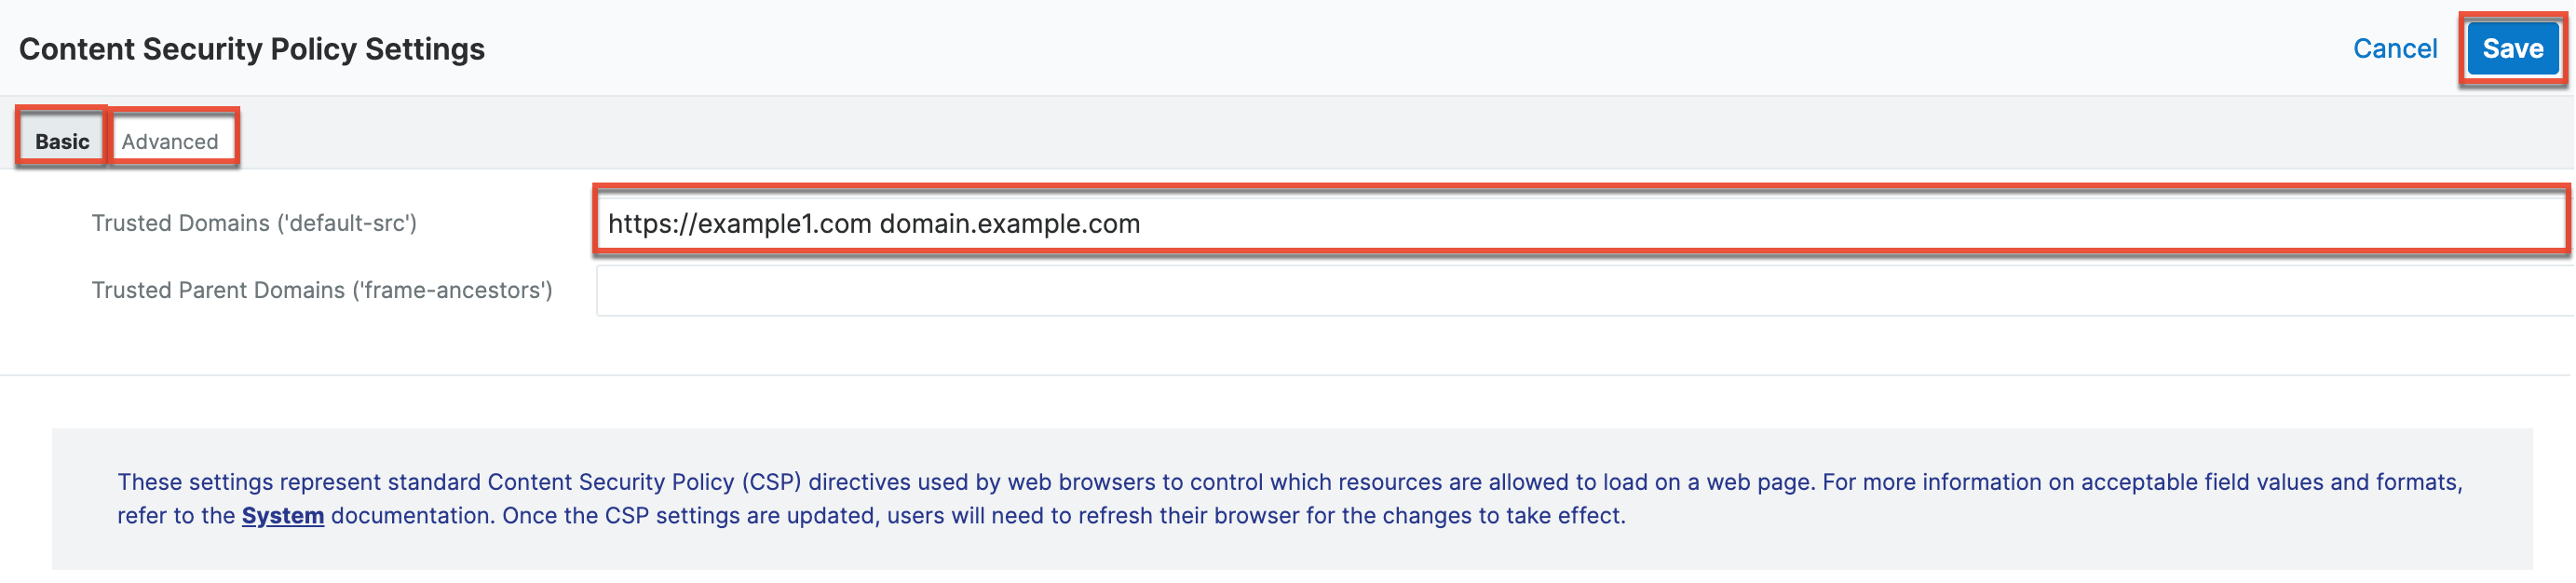
The Basic tab contains the following CSP fields:
- Trusted Domains ('default-src'): Enter the external domains or source values that will be allowed to load in iframes and/or Web Page dashlets in Sugar.
Note: The values defined fordefault-srcwill apply to the following directives if the corresponding field is empty under the Advanced tab:connect-src,font-src,frame-src,script-src, andstyle-src. - Trusted Parent Domains ('frame-ancestors'): Enter the parent website domains or source values that will be allowed to load Sugar using an <iframe>, <object>, or <embed> HTML element. For a list of the allowed source values, refer to the CSP: frame-ancestors guide on the MDN Web Docs - Mozilla website.
- If this field is empty, then Sugar will only load in your parent website domains and not in any other external website domains.
- The values defined for
frame-ancestorsdo not apply to any other CSP directives.
The Advanced tab contains the connect-src, font-src, form-action, frame-src, script-src, and style-src fields. These settings are intended for administrators with an advanced understanding of the individual CSP directives and are familiar with how to configure them for their business needs. For more information about these directives, refer to the Content-Security-Policy guide on the MDN Web Docs - Mozilla website.
Please note that there are some commonly used source values and domains that are pre-defined by default in the system for the CSP directives such as:
'self''unsafe-inline''unsafe-eval'https://*.pendo.io*.sugarcrm.com*.salesfusion.com*.salesfusion360.com*.sugarapps.com*.sugarapps.com.au*.sugarapps.eu
Note: Any new value(s) added to the CSP Settings page will be appended to this list as long as it does not already exist in the system.
CSP Guidelines
To add new domains or source values, simply enter the appropriate value(s) in the CSP fields (e.g., Trusted Domains ('default-src')), keeping in mind the following guidelines:
- Enter values in the CSP fields in Sugar using an acceptable format (e.g., https://www.example.com, http:, https:), as covered in the section below.
- Separate multiple values in the CSP field in Sugar using whitespace.
- Enter non-latin domain names in punycode format for CSP fields in Sugar. For more information on punycode, refer to the Punycode article on the Ionos website.
- If you enter a value (e.g., 'self') that is already defined as a trusted domain or source value in Sugar, the value will be disregarded as it already exists in the system.
- The values defined for
default-srcwill apply to the following CSP directives if the CSP field (e.g., frame-src) is empty in Sugar:connect-src,font-src,frame-src,script-src, andstyle-src.
Note: Thedefault-srcvalues do not apply to theform-actionandframe-ancestorsdirectives. - If you define a value in the advanced CSP directives (e.g.,
font-src,frame-src) in Sugar, then this value will supersede any value(s) entered in the Trusted Domains ('default-src') field. - If the form-action field is empty in Sugar then any supported source value will be allowed for this directive.
- The values defined for
frame-ancestorsdo not apply to any other CSP directives in Sugar.
Once the appropriate values have been entered, click "Save" to preserve your settings. Please note that users who are logged in to Sugar at the time of the CSP change will need to refresh their browser for the changes to take effect in their session.
Supported Source Values
The table below covers the source values that are supported in Sugar for CSP. When entering values such as 'unsafe-hashes', http:, and https: please make sure to enter the value as-is in the CSP directive fields. Some examples of acceptable formats for URLs are: https://www.example.com, *.example.io, *.example.gov, *.com, and https://*.example.com. Entering a URL such as https://example will result in an error as it is missing the top-level domain (e.g., .com, .io, .org).
Note: The information in this table has been adapted from the CSP Quick Reference Guide on the Content Security Policy website.
| Source Value | Description |
* |
Wildcard, allows any URL except data: blob: filesystem: schemes |
'self' |
Allows loading resources from the same origin (same scheme, host and port) |
data: |
Allows loading resources via the data scheme (e.g., Base64 encoded images) |
domain.example.com |
Allows loading resources from the specified domain name |
|
|
Allows loading resources from any subdomain under "example.com" |
https://example.com |
Allows loading resources only over HTTPS matching the given domain |
https: |
Allows loading resources only over HTTPS on any domain |
http: |
Allows loading resources only over HTTP on any domain |
'unsafe-inline' |
Allows use of inline source elements such as style attribute, onclick, or script tag bodies (depends on the context of the source it is applied to) and |
'unsafe-eval' |
Allows unsafe dynamic code evaluation such as JavaScript eval()Note: Not supported for frame-ancestors directive. |
'unsafe-hashes' |
Allows you to enable scripts in event handlers (e.g., onclick). Does not apply to javascript: or inline <script>. |
Please note that the following source values are not supported in Sugar and will result in an error if entered on the CSP Settings page:
License Management
The License Management section allows administrators to edit and revalidate their Sugar license as well as view information such as the download key, expiration date, number of users, etc. Refer to the License Management page for more details on working with license keys and license types.
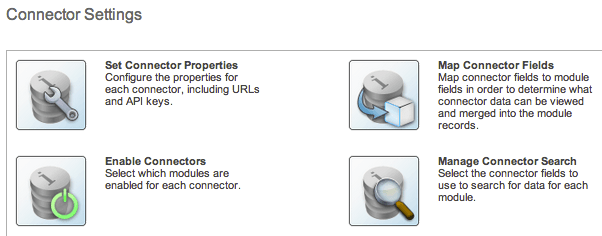
Connectors
The connector settings page allows administrators to configure and manage the various types of connectors to external data sources that integrate with Sugar. A number of different connectors (e.g., Citrix GoToMeeting) come out-of-the-box with Sugar and are enabled by default to allow users to easily view external data via their instance.
Please note that connectors can be disabled and configured accordingly via Admin > Connectors. Developers in your organization can also create connectors to other data sources, which can be uploaded via Module Loader. For more information on how to upload and install packages in Sugar, please refer to the Module Loader documentation. You can also search for other available connectors via Sugar Exchange (https://sugarexchange.sugarcrm.com).
Note: Sugar Sell Essentials customers do not have the ability to upload custom file packages to Sugar using Module Loader.
Setting Connector Properties
Many connectors use web services and require certain connector properties (e.g., API Key, API Secret) to be configured prior to use. To configure the connector properties, simply click the Set Connector Properties button on the Connector Settings page. 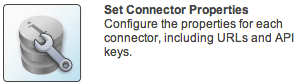
The Set Connector Properties page displays a tab for each connector that must be configured in order to use in Sugar. The tabs will include the necessary steps or a link for you to obtain the information (e.g., API Key, API Secret) needed to set up the connector. Once the necessary information has been entered, click "Save" to preserve your settings.
The following connectors and their properties are available to configure:
| Connector | Property | Description |
| API Key | The API Key provided by Twitter | |
| API Secret | The API Secret provided by Twitter | |
| Microsoft | Client ID | The Client ID provided by Microsoft |
| Client Secret | The Client Secret provided by Microsoft | |
| Connect to a Single Tenant Application | If you with to connect to a single tenant application, enable the checkbox then enter the Tenant ID obtained from Microsoft Azure. | |
| Client ID | The Client ID provided by Google | |
| Client Secret | The Client Secret provided by Google | |
| Dropbox | Client ID | The Client ID provided by Dropbox |
| Client Secret | The Client Secret provided by Dropbox | |
| GoToMeeting | Consumer Key | The Consumer Key provided by GoToMeeting |
| IBM SmartCloud | OAuth Consumer Key | The OAuth Consumer Key provided by IBM |
| OAuth Consumer Secret | The OAuth Consumer Secret provided by IBM | |
| DocuSign |
Environment | Set to demo when testing the app in DocuSign's demo environment and set to production once the app has gone through DocuSign's go-live process. |
| Integration Key | The Integration Key provided by DocuSign | |
| Client Secret | The Secret Key provided by DocuSign |
Please note that Sugar's WebEx integration is configured via the External Accounts subpanel of the user's profile. Since WebEx does not have global properties to configure, it will not appear on the Set Connector Properties page.
For more information on configuring the WebEx application, please refer to the Getting Started documentation in the Application Guide.
Enabling Connectors
In order to utilize the connectors in Sugar, administrators should ensure that they are enabled properly. Please note that certain connectors are enabled for the entire application while some allow you to enable specific modules for the connector. Simply click the Enable Connectors button on the Connector Settings page to configure the modules that should be enabled for certain connectors.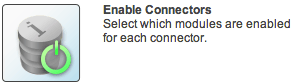
The Enable Connectors page will display a tab for each connector that is available in your Sugar instance. Connectors, where you can enable specific modules for, will display the Enabled and Disabled columns where you can drag and drop the desired module from the Disabled column to the Enabled column. Please note that you can enable the connector for any modules (e.g., Accounts, Contacts) that have a standard record view (for Sidecar modules) or detail view (for legacy modules) layout in Sugar.
Mapping Connector Fields
Some connectors query external services based on fields in Sugar. These mappings can be customized to use different fields based on your organization's needs. To configure the field mappings, simply click the Map Connector Fields button on the Connector Settings page. 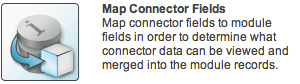
The Map Connector Fields page has a tab for each connector that has field mappings available. Each of the enabled module(s) will display the connector fields and will need to have the corresponding Sugar field selected from the dropdown list. If the connector is enabled for multiple modules, be sure to select the proper fields for each module. Once the field mapping is set up properly, click "Save" to preserve your changes.
Please note that the connector fields may not always match up with a stock field in Sugar. If you wish to capture and map certain fields from the connector to Sugar, you will need to create new fields via Admin > Studio. For more information on how to create fields in Studio, please refer to the Studio documentation.
Managing Connector Search
Connectors that have multiple fields for mapping need to specify which fields are to be used when searching for data in the module. To designate the connector fields for search, click the Manage Connector Search button on the Connector Settings page. Please note that there are no connectors that come out-of-the-box with Sugar that have search fields defined, so no connectors will be available to configure on this page. 
The Manage Connector Search page will normally display a tab for every connector that needs connector fields defined for search. The available search fields are limited to the input parameters of the connector being used. To enable a field for search, simply drag and drop the desired field from the Available column to the Default column. Once the necessary field(s) have been selected, click "Save" to preserve your changes.
OAuth Keys
OAuth is an open standard for authorization that enables users to share private resources stored on one site with another site without divulging personal credentials such as user name and password. OAuth works with a public consumer key and a private consumer key. Together, these keys identify which application connects to the service. It is the choice of the Sugar administrator to decide how many different keys to have and whom to give them to. Please refer to the User Interface documentation for more information on working with the OAuth Keys module and performing actions such as searching, editing, and deleting records.
Note: The system generated OAuth Support Portal Key cannot be modified and should not be deleted.
OAuth Keys Fields
The OAuth Keys module contains a number of stock fields that come out-of-the-box with Sugar. The following definitions are suggested meanings for the fields, but the fields can be leveraged differently to best meet your organization's needs.
| Field | Description |
| Consumer Key Name | The name or designation of the OAuth Key. |
| Consumer Key | Public key. A user name is a suitable consumer key value. |
| Consumer Secret | Private key. A password is a suitable consumer secret value. Note: The private key is not sent when making a connection. |
| OAuth Version | The version of the OAuth protocol/framework to use. (OAuth 1.0, OAuth 2.0) |
| Description | A description or other information about the OAuth key. |
Creating OAuth Keys
There are various methods for creating OAuth keys in Sugar including via the OAuth Keys module and via duplication. The full edit view layout opens when creating the OAuth keys directly from the OAuth menu and includes all of the relevant fields for your organization's OAuth keys. The quick-create form is a shortened version of the OAuth Keys edit view and typically contains fewer fields.
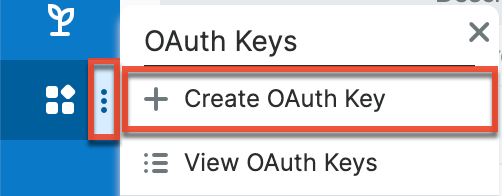
Creating via OAuth Keys Module
One of the most common methods of OAuth key creation is via the Create OAuth Key option in the OAuth Keys module tab. This opens up the edit view layout which allows you to enter all the relevant information for the OAuth key.
Use the following steps to create an OAuth key via the OAuth Keys module:
- Navigate to Admin > OAuth Keys.
- Click the three-dots menu in the OAuth Keys module tab and select "Create OAuth Key".
- Enter appropriate values for the Fields in the edit view layout. All required fields are marked with a red asterisk and must be completed prior to saving.
- Once the necessary information is entered, click "Save".

Creating via Duplication
You can also create a new OAuth key by duplicating an existing record. The duplicate option is useful if the key you are creating has similar information to an existing OAuth key.
Note: The system-generated OAuth Support Portal Key cannot be duplicated.
Use the following steps to create an OAuth key by duplicating an existing record:
- Navigate to an OAuth key record's detail view.
- Select "Duplicate" from the Actions menu.
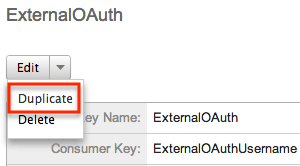
- The displayed edit view is pre-populated with the original key's values. Update the necessary fields, then click "Save".

Note: Consumer Key and OAuth Version fields cannot be edited after creation. If either of these fields needs to be changed, you must create a new OAuth key.
Tokens
Beneath an OAuth key record's fields is a subpanel containing related token records. Tokens are created when the user establishes an OAuth connection with the OAuth key pair. These are connections between the Sugar user, the OAuth keys, and the permissions to enable the external application to access data. Tokens created for each OAuth connection are listed in the Tokens subpanel of the corresponding OAuth Keys detail view page. The Tokens subpanel can be collapsed or expanded by clicking the double arrow to the left of the subpanel's name.
To delete a token from an OAuth key, choose "Delete" from the far right of the record's row.
Sugar Updates
The Sugar Updates page allows administrators to check for the latest available Sugar versions. By default, Sugar automatically checks for updates on a periodic basis to see if any version updates are available for your instance. If a new version update is available, the Sugar Updates link in the Administration page will appear red and display the latest Sugar version next to it. Administrators can uncheck the automatic updates option in the Sugar Updates page if they do not wish to have the system automatically check for updated version releases.
Use the following steps to perform a manual check for Sugar updates:
- Navigate to Admin > Sugar Updates.
- Click the Check Now button to see if a new update of Sugar is available.
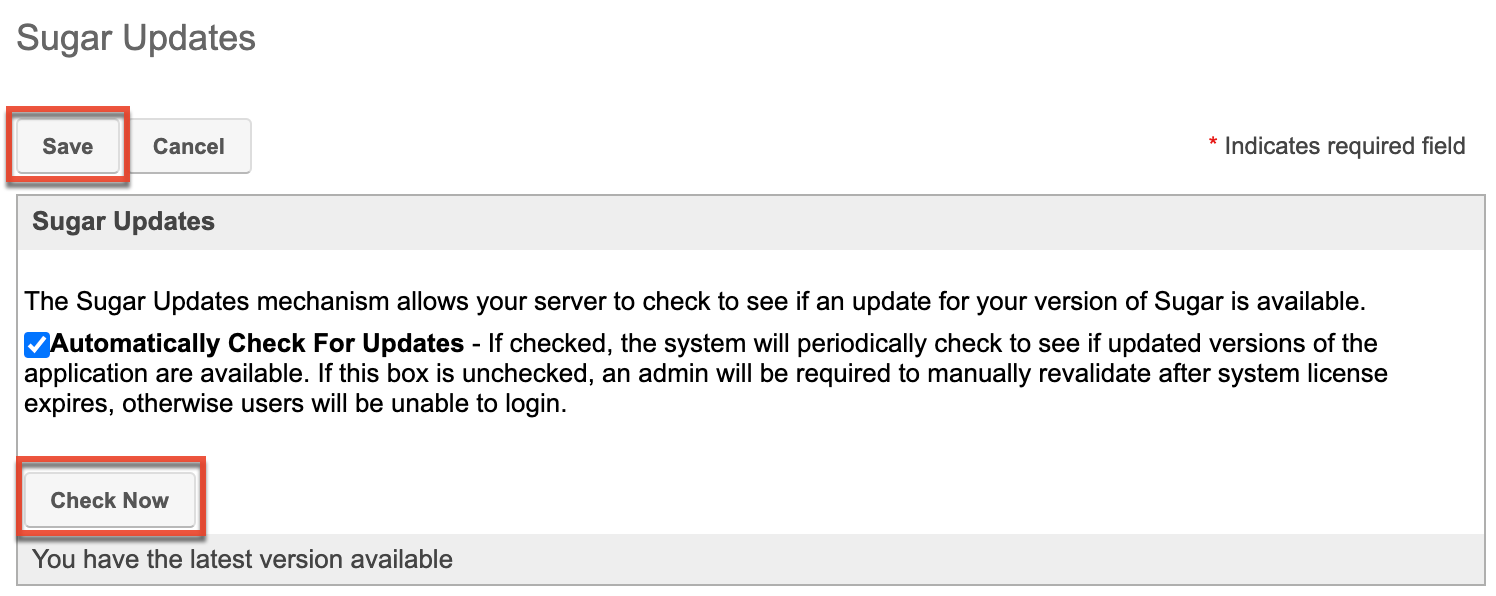
If there is an available version update, a message will appear below the Check Now button with the latest version along with a message to visit store.sugarcrm.com/download to retrieve and download the latest version. Please note that clients hosted on Sugar's cloud service are normally upgraded by the SugarCRM team on a predetermined schedule as releases are made available. On-Site clients will need to perform the upgrade themselves as Sugar is hosted on their servers. If the system detects that you have the latest version of Sugar, then the message will inform you that you have the latest version available.
Import Wizard
Import Wizard allows administrators to launch an import for any import enabled module without navigating to the module itself. After selecting "Import Wizard" from the Admin menu, you can select a module to perform an import on. 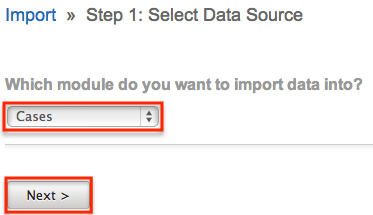
After selecting the module, click "Next" to continue the import. The steps to complete the import are identical to performing an import from the module. For more information on how to perform an import, please refer to the Import documentation in the Application Guide.
Upgrade Wizard
The Upgrade Wizard allows on-site customers to upgrade their Sugar instance to the latest software version. The Upgrade Wizard is only available for administrators of on-site installations. For steps to complete an on-site upgrade using the wizard, please refer to the Installation and Upgrade Guide for your on-site version of Sugar.
Repair
Repair allows administrators to perform common maintenance routines on their instance of Sugar. The repair menu is available to only administrative users and can be accessed through Admin > Repair.
For more information on the different repair options available, please refer to the Repair documentation in the Administration Guide.
Diagnostic Tool
Diagnostic Tool allows administrators to create a file with many diagnostic and configuration details. This tool will collect basic system information regarding Sugar and server configuration and place it all into a zip file to help debug or diagnose issues. For more information on the diagnostic tool in Sugar, refer to the Introduction to the Diagnostic Tool article. The Diagnostic Tool has options that you can turn on and off to include only specific configuration data. Select one or more of the following available options:
| Option | Description |
| SugarCRM config.php | Includes a copy of the config.php file from the root directory of Sugar. This file contains many useful system settings options in Sugar. Note: The database password contained in this file is replaced with asterisks before sending for security purposes. |
| SugarCRM Custom directory | Includes a copy of the entire custom directory in Sugar |
| Phpinfo() | Includes the output of the PHP function phpinfo() saved to an HTML file. The phpinfo() function returns information about how PHP is configured on the server running Sugar including the version of PHP, the loaded Extensions, and more. |
| MySQL - Configuration Table Dumps | Includes an HTML file for each configuration table in Sugar. The file has three sections: field definitions, indexes, and data. |
| MySQL - All Tables Schema | Includes an HTML file titled MySQLTablesSchema.html which has two sections for each table in Sugar: field definitions and indexes. |
| MySQL - General Information | Includes an HTML file titled MySQL-General-info.html. This file contains some basic information about the MySQL database Sugar is running on such as version number and character sets. |
| MD5 info | Includes a PHP file that shows any file in your instance of Sugar that has a different hash than the stock file. This can indicate which files are customized and where they are located in your file system. |
| Copy files.md5 | Includes the list of all files and their original MD5 hash in a file titled files.md5Note: Only available when the MD5 info option above is selected. |
| Copy MD5 Calculated array | Includes the list of all files and their current hash in a PHP file titled md5_array_calculated.phpNote: Only available when the MD5 info option above is selected. |
| BeanList/BeanFiles files exist | Includes an HTML file titled beanFiles.html. This file contains a list of the modules in Sugar and checks all the references for that module to make sure they are correct. |
| SugarCRM Log File | Includes a copy of the current log file for Sugar. |
| Package Install Log File | Includes the log file containing information (e.g., metadata rebuilds, SQL queries) captured during the package installation process in Sugar. Note: This log file uses the debug log level regardless of the global Sugar log level configured in Admin > System Settings or the config file. |
| Sugar schema output (VARDEFS) | Includes an HTML file titled vardefschema.html which contains detailed metadata on each table in Sugar. |
The more options selected, the bigger the resulting zip file will be. Select the desired options and click "Execute Diagnostic".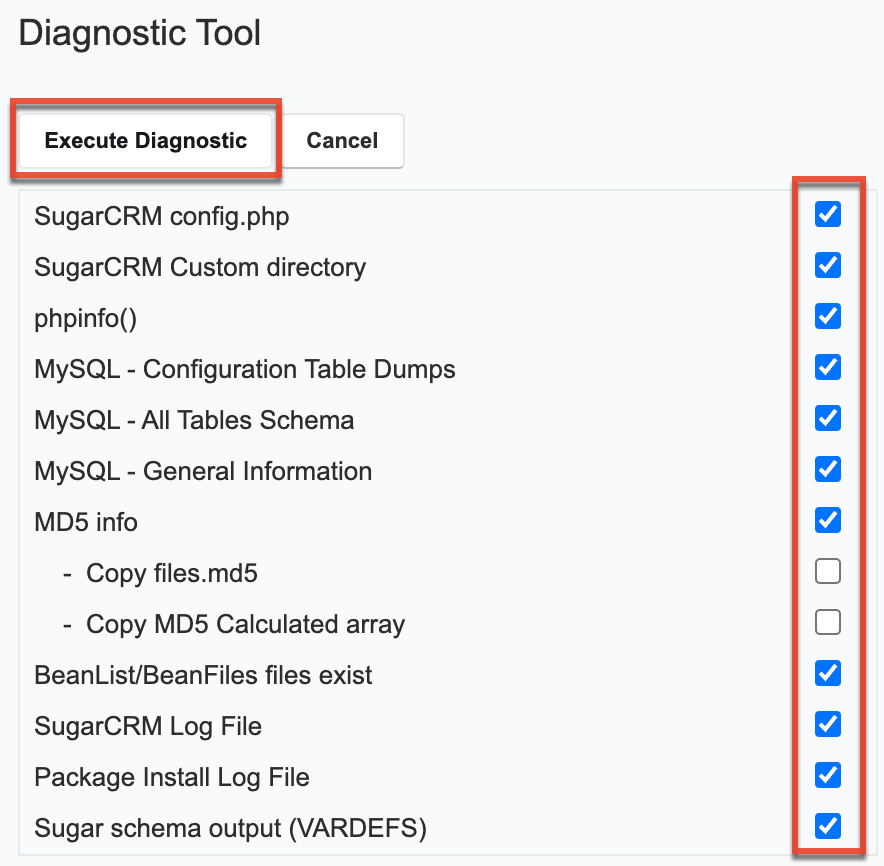
Once the diagnostic tool is finished, select "Download the diagnostic file" to download the zip file containing the results to your computer. 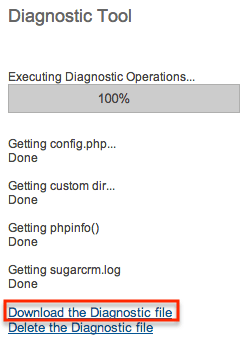
Optionally, you can then select "Delete the Diagnostic file" to remove it from the server. Large diagnostic files should be deleted from the server as they can pile up and take necessary disk space.
Tracker
Tracker allows administrators to configure the system to track certain user actions and information for Sugar modules. This information is used in tracker reports and dashlets. By default the tracker options are disabled.
Use the following options to record tracker data:
- Tracker Actions: Tracks user actions such as modules accessed and records saved.
- Tracker Sessions: Tracks active users' session data such as session length.
- Tracker Performance: Tracks system performance such as database round trips, number of files accessed, server response time, and memory usage.
Note: This option can cause performance issues and should not be enabled in a production environment. - Tracker Queries: Tracks any query that takes longer than the specified slow query time threshold and saves the data to the database. Tracker queries logs the query, how many times it has been run, the last time ran, and the average seconds the query took. "Log slow queries" also needs to be selected before this option tracks data.
Note: This option can cause performance issues and should not be enabled in a production environment. - Log slow queries: Select this option to log queries that take longer than the slow query time threshold to the sugar log. This is useful for performance debugging.
Note: This option can cause performance issues and should not be enabled in a production environment. - Number of days of Tracker data to store when Scheduler prunes the tables: Specify the number of days of data to be retained. The Prune Tracker Tables scheduler will remove any tracker records older than the specified number of days. For more information on the Prune Tracker Tables scheduler, please refer to the Prune Tracker Tables section of the Scheduler documentation in the Administration Guide.
- Slow query time threshold (msec): Specify a threshold in milliseconds to begin logging slow queries. If "Log slow queries" is selected, queries that take longer to process than the threshold duration will be recorded in the Sugar Log. If "Tracker Queries" is selected, queries will be logged to the database.
Select the desired settings and click "Save" to preserve your changes. 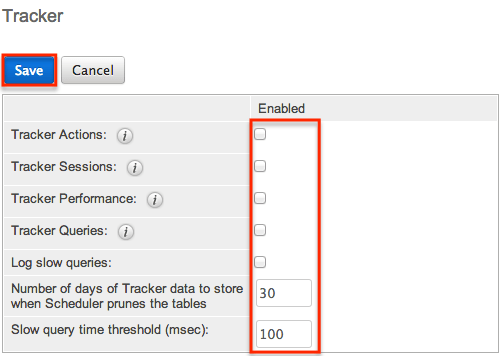
Note: Changing the Log slow queries and Slow query time threshold values will also change them in Admin > System Settings.
Scheduler
Scheduler provides administrators with a method to automate the execution of custom and system processes. The Scheduler menu is available to only administrative users and can be accessed through Admin > Scheduler.
For more information on the different schedulers available, please refer to the Schedulers documentation in the Administration Guide.
PDF Manager
PDF Manager allows administrators to create and manage templates for generated PDF files for any deployed module, custom or standard. The PDF Manager is available to only administrative users and can be accessed through Admin > PDF Manager.
For more information on the PDF Manager, please refer to the PDF Manager documentation in the Administration Guide.
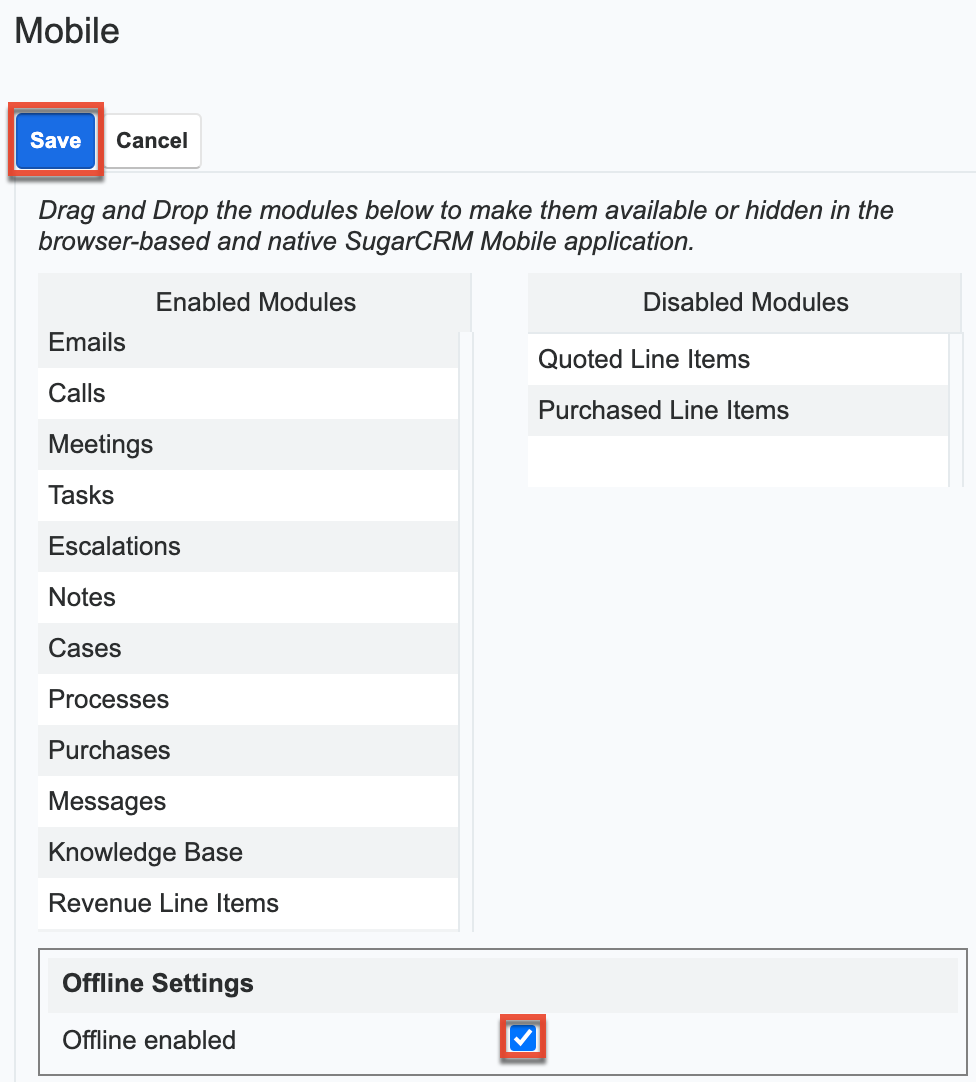
Mobile
The Mobile settings on the Administration page allow administrators to configure what modules they want enabled or disabled for the SugarCRM mobile app and the browser-based SugarCRM mobile application. In addition, you can enable the mobile offline capability for your instance for the mobile app.
The browser-based mobile application allows users to access various Sugar modules (stock and custom modules) via a web browser on a smartphone or PDA. The SugarCRM mobile app is a native mobile application that enables users to access Sugar from mobile devices. For a list of supported devices for the mobile app, please refer to the Mobile Supported Platforms page.
You can add, edit, and remove fields, including Calculated Value fields, to customize the mobile layouts via Admin > Studio. For more information on configuring fields, please refer to the Fields section of the Developer Tools documentation. For more information on configuring the mobile layouts, please refer to the Mobile Layouts section of the Developer Tools documentation.
Note: Calculated Value fields will not be updated in real-time for mobile edit view layouts.
Configuring the SugarCRM Mobile App
You can configure which modules are available for use in the SugarCRM mobile app via Admin > Mobile. Please note that the Bug Tracker, Campaigns, Products, and Targets modules are not available for the mobile app. For more information on enabling modules for the mobile app, please refer to the Enabling Modules for Mobile Access section of this documentation.
Configuring Mobile Browser Access
The modules enabled for use via Admin > Mobile will also apply to the browser-based mobile application. For more information on enabling modules for the browser-based mobile application, please refer to the Enabling Modules for Mobile Access section of this documentation. Please note that the Reports module is not available for the browser-based mobile application.
Enabling Modules for Mobile Access
Use the following steps to enable modules for mobile access:
- Navigate to Admin > Mobile.
- To enable a module for the browser-based and native SugarCRM mobile application, drag and drop the module from the Disabled Modules column to the Enabled Modules column.
- To disable a module, drag and drop the module from the Enabled Modules column to the Disabled Modules column.
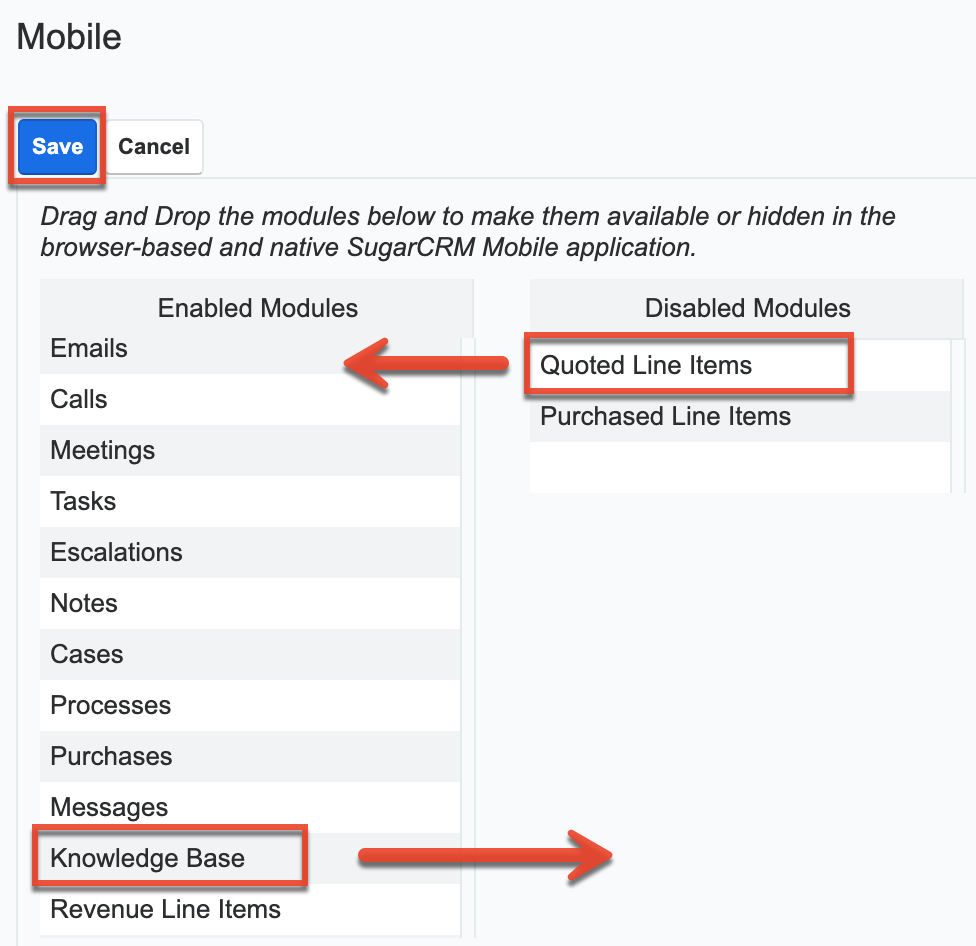
- Click "Save" to apply the changes made to the SugarCRM mobile app and the browser-based mobile application.
Enabling Offline Mobile Access
You can also allow mobile offline capabilities for your instance in the SugarCRM mobile app by marking the "Offline enabled" checkbox in Admin > Mobile. Enabling offline access allows the user's mobile device to cache records for offline viewing as well as buffer changes they make to records while offline. The changes made will be synced once they are reconnected. Please note that the offline option must be enabled in Sugar first before users can enable the offline capabilities on their devices. For more information on enabling offline access for mobile devices, please refer to the SugarCRM Mobile App User Guide.