Sugar Connector for Marketo Installation Guide
Overview
Marketo provides marketing automation and sales effectiveness solutions that help B2B marketing and sales teams at global enterprise and mid-sized companies unlock growth across the revenue cycle. Sugar can be integrated with Marketo to allow new and existing leads and contacts to be synced seamlessly between both applications. In addition, key data (e.g., name, address, and email address) from the Accounts and Opportunities modules can be synced from Sugar to Marketo. For more information on utilizing the connector to sync data, please refer to the Sugar Connector for Marketo User Guide. Before you can utilize the connector in Sugar, you must configure your Marketo account as well as upload the Marketo connector package to Sugar and enable the connector accordingly.
For more information on supported platforms, please refer to the Connectors Supported Platforms page. Please ensure that you have upgraded your Sugar instance to the minimum supported version of Sugar.
Configuring Marketo
Once you have signed up for service with Marketo, you will receive your login information and set up instructions via email. You will need to configure your Marketo account by adding custom fields before enabling the Sugar Connector for Marketo. If you already have a Marketo account, then simply log into your account and apply the configurations below.
Adding Custom Fields
The Marketo connector requires specific custom fields to be added to your Marketo account in order to sync data properly to Sugar.
To add custom fields in Marketo, please follow the steps below:
- Navigate to the Admin page in Marketo.
- Select "Field Management" on the left tree menu, then click the New Custom Field button at the top of the page.
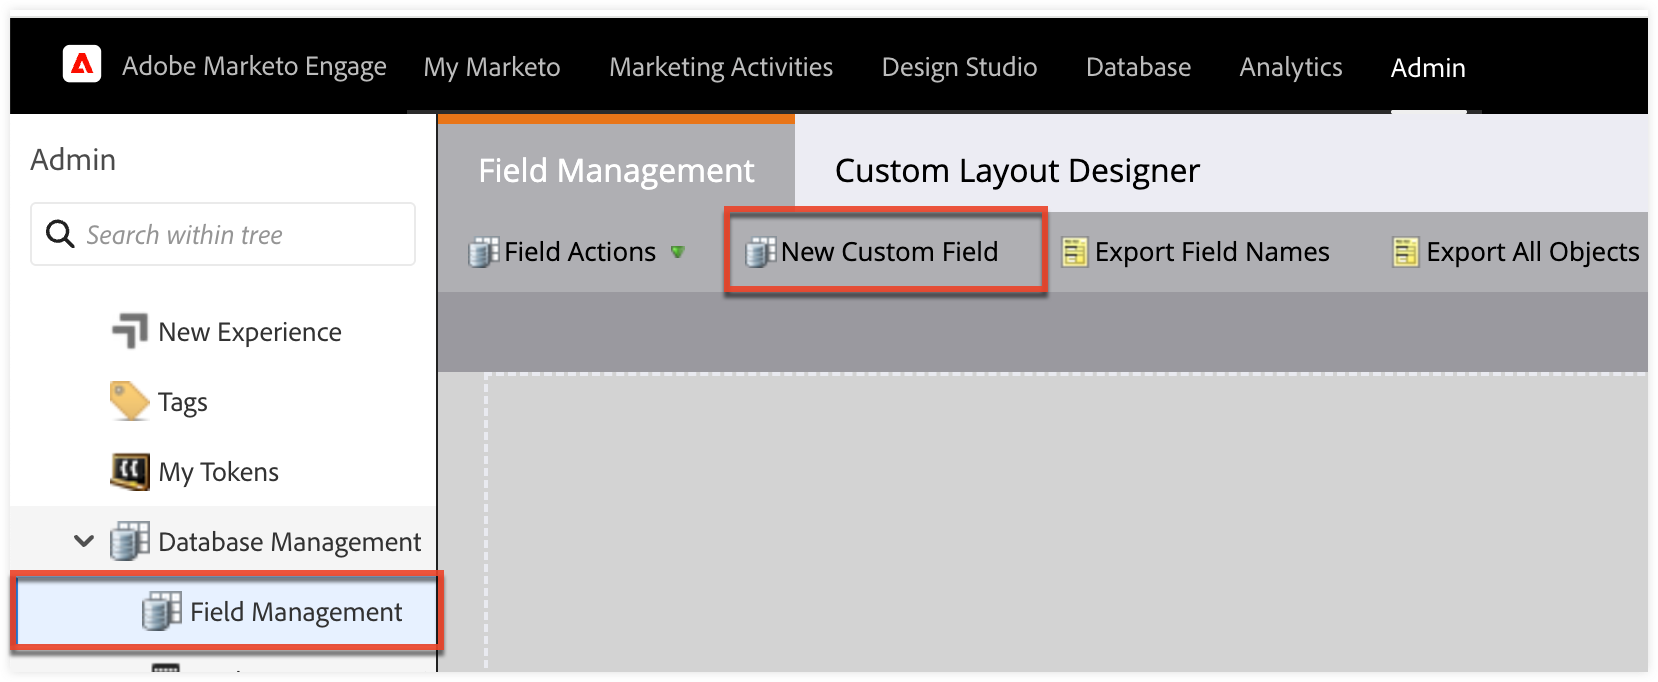
- On the New Custom Field window, select the "Object" and "Type", then enter the "Name" and "API Name" values as shown below. Click "Create" to add each field.
Type Name API Name String SugarCRM Type sugarcrm_type String SugarCRM ID sugarcrm_id String SugarCRM Owner First Name sugarcrm_owner_first_name String SugarCRM Owner Last Name sugarcrm_owner_last_name String SugarCRM Owner Title sugarcrm_owner_title String SugarCRM Owner Phone sugarcrm_owner_phone Email SugarCRM Owner Email sugarcrm_owner_email Checkbox SugarCRM Deleted sugarcrm_deleted - The newly added custom fields will appear in the field list to the right of the page.
Installing the Marketo Connector Package
In order to enable the Sugar Connector for Marketo, you must first download the Marketo connector package to your local machine which will be uploaded to Sugar. Please note that you must have administrative access in Sugar to upload and install packages via Module Loader.
Downloading the Package
The Sugar Connector for Marketo package is available for download by registered sugarcrm.com users via Sugar's Download Manager (choose your Sugar version and then choose "Plug-ins" from the adjacent dropdown). Save the installation package to a directory that is accessible by the Sugar administrator user who will complete the installation.
Installing the Package to Sugar
Once you have downloaded the package (e.g., MarketoForSugarCRMv25.x.x.zip), use the following steps to install the connector or upgrade your connector to a new version. For additional guidelines on upgrading the connector, refer to the Upgrading the Marketo Connector section in this documentation.
- Navigate to Admin > Module Loader.
- Click the Choose File" button in the Module Upload panel to open a file selection window from your browser.

- Select the package from your local machine.
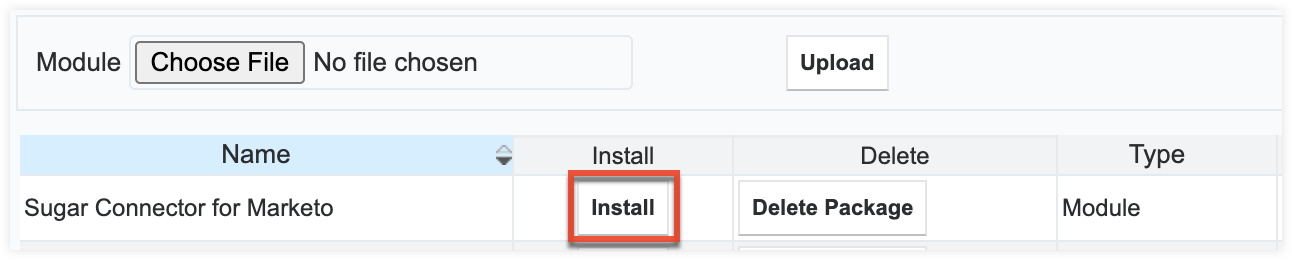
- Click the Upload button to load the package to Sugar.

- Once the upload is completed successfully, the package will appear in the Uploaded Packages panel. Click the Install button next to the package's name.
- Review the License Agreement and select "Accept" to agree to the terms. Click "Commit" to run the installation.
- A progress bar will appear on the following page and display a message once the install is successful.
Note: If there are any errors detected, it will be displayed on the page along with details of what caused the issue(s). You can also click "Display Log" to view details of what occurred during the installation process. Work with your system administrator to troubleshoot and fix the errors, and then re-attempt the installation procedure. - Click the Back to Module Loader button once the installation is complete to return to the previous page.
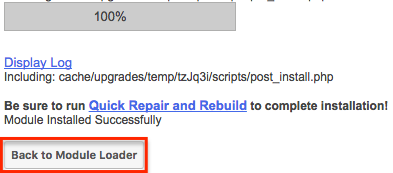
The installed package will appear on the Module Loader page. Please navigate to Admin > Repair and perform a Quick Repair and Rebuild before enabling the Marketo connector in your instance. 
Obtaining REST API Values in Marketo
To configure the Marketo connector in Sugar, first obtain the REST API Endpoint, Client ID, and Client Secret values in Marketo using the following steps below.
REST API Endpoint
Use the following steps to obtain the REST API Endpoint in Marketo:
- Log in to your Marketo account.
- Navigate to Admin > Web Services in Marketo, then record the Endpoint value in the REST API section. You will need this value to configure the connector in Sugar later.

REST API Client ID and Client Secret
Use the following steps to obtain the REST API Client ID and Client Secret values:
- Log in to your Marketo account as an administrator.
- Create an API Only User to integrate with Marketo via REST API. If you already have an API Only User in your account, then skip to step 3.
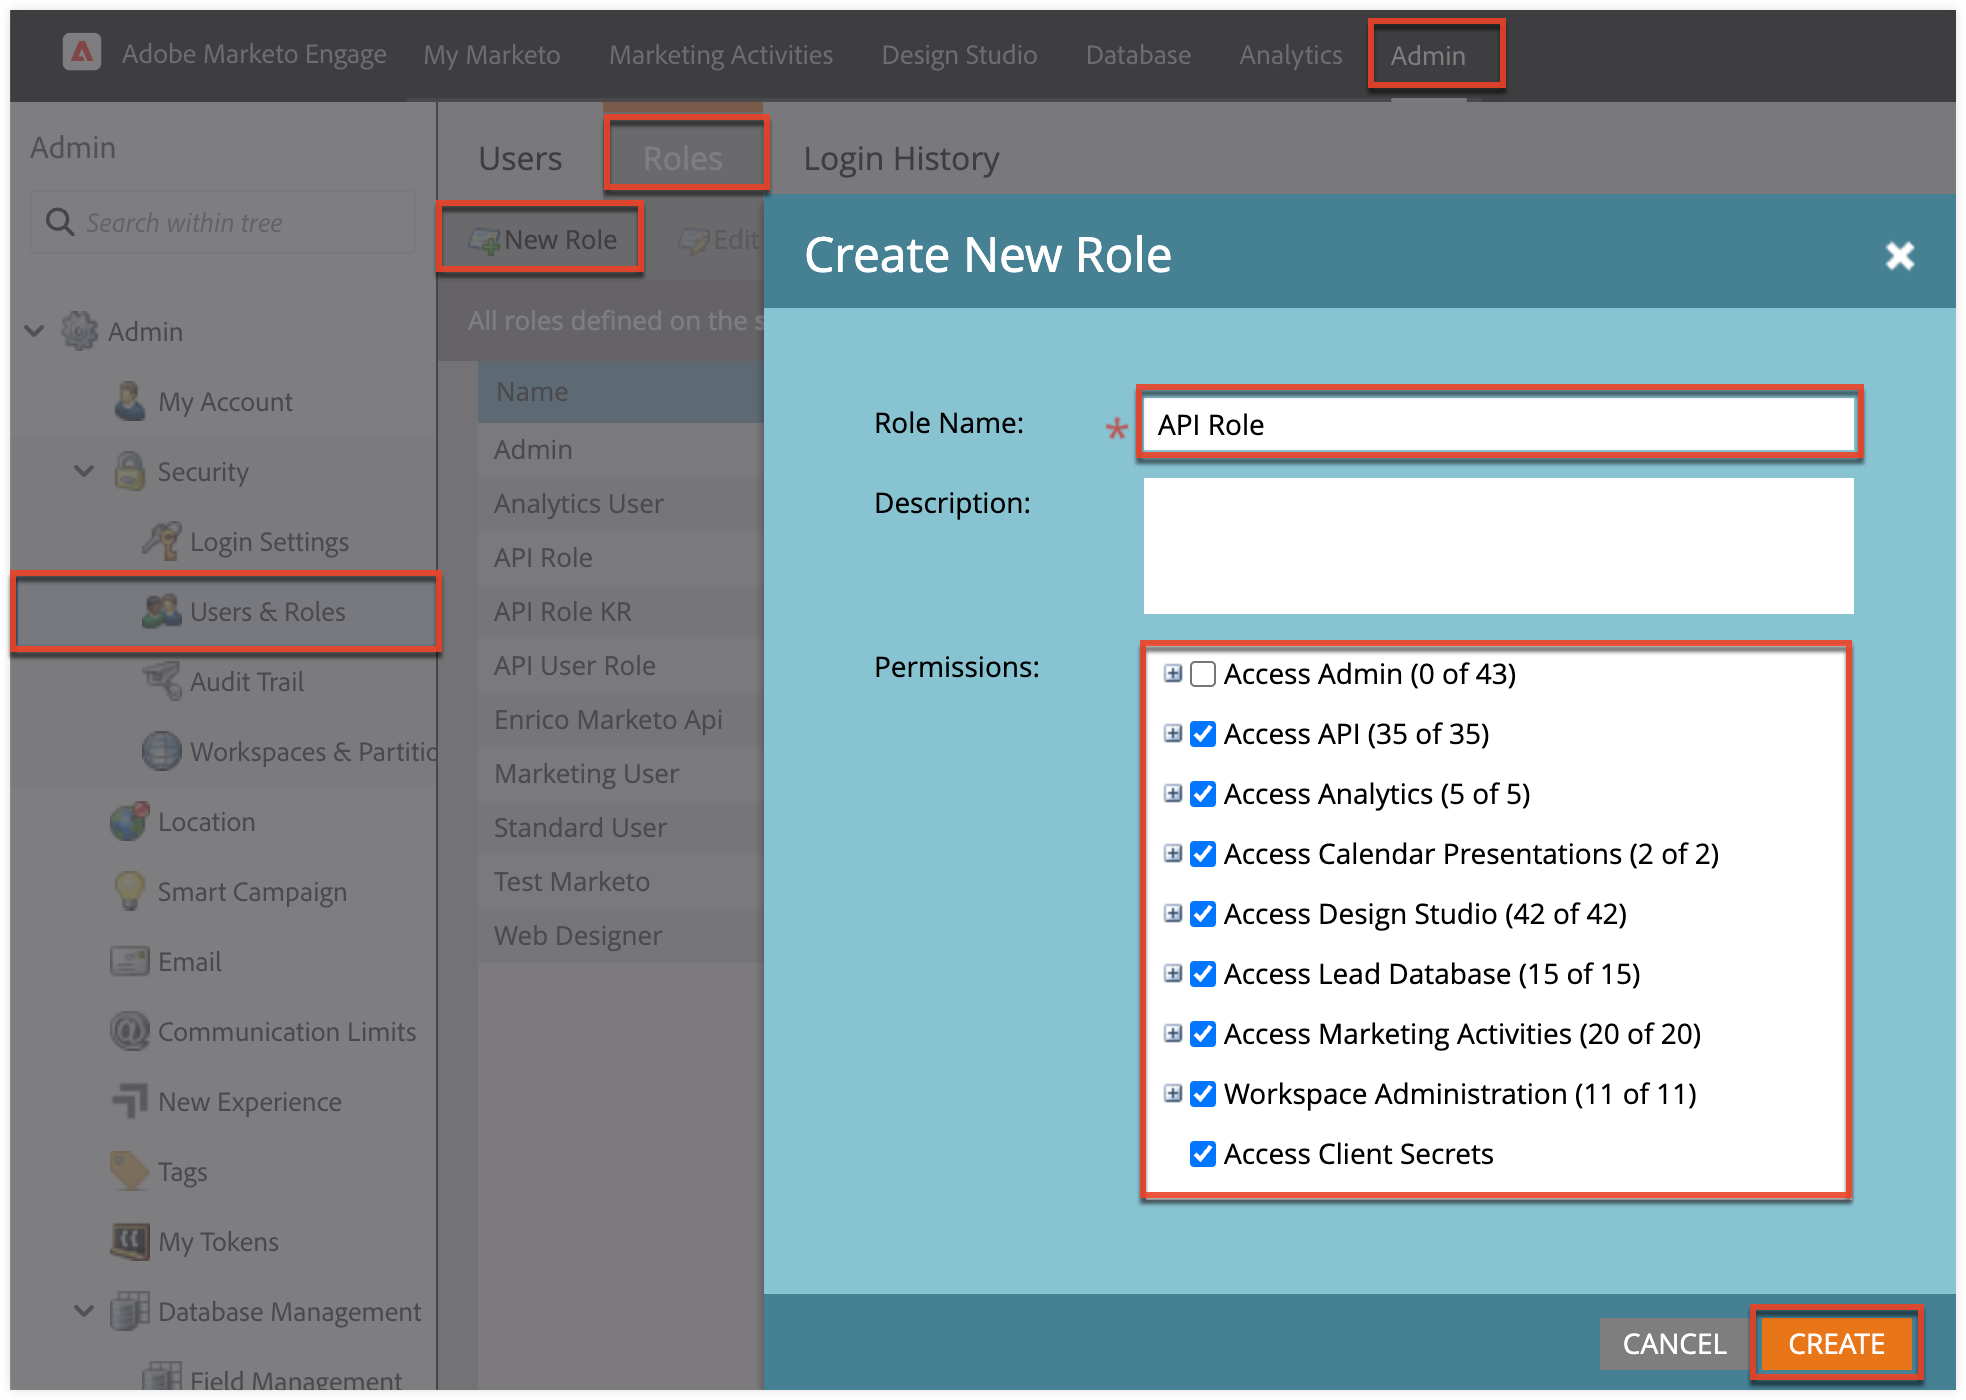
- Navigate to Admin > Users & Roles, and click the Roles tab, then click "New Role".
- On the Create New Role window, enter the "Role Name" (e.g., API Role), then select the applicable permissions you need such as "Access API". Click "Create".
- Next, click the Users tab and click "Invite New User".
- On the Invite New User window, enter the user's first name, last name, and email address in Step 1. Click "Next".
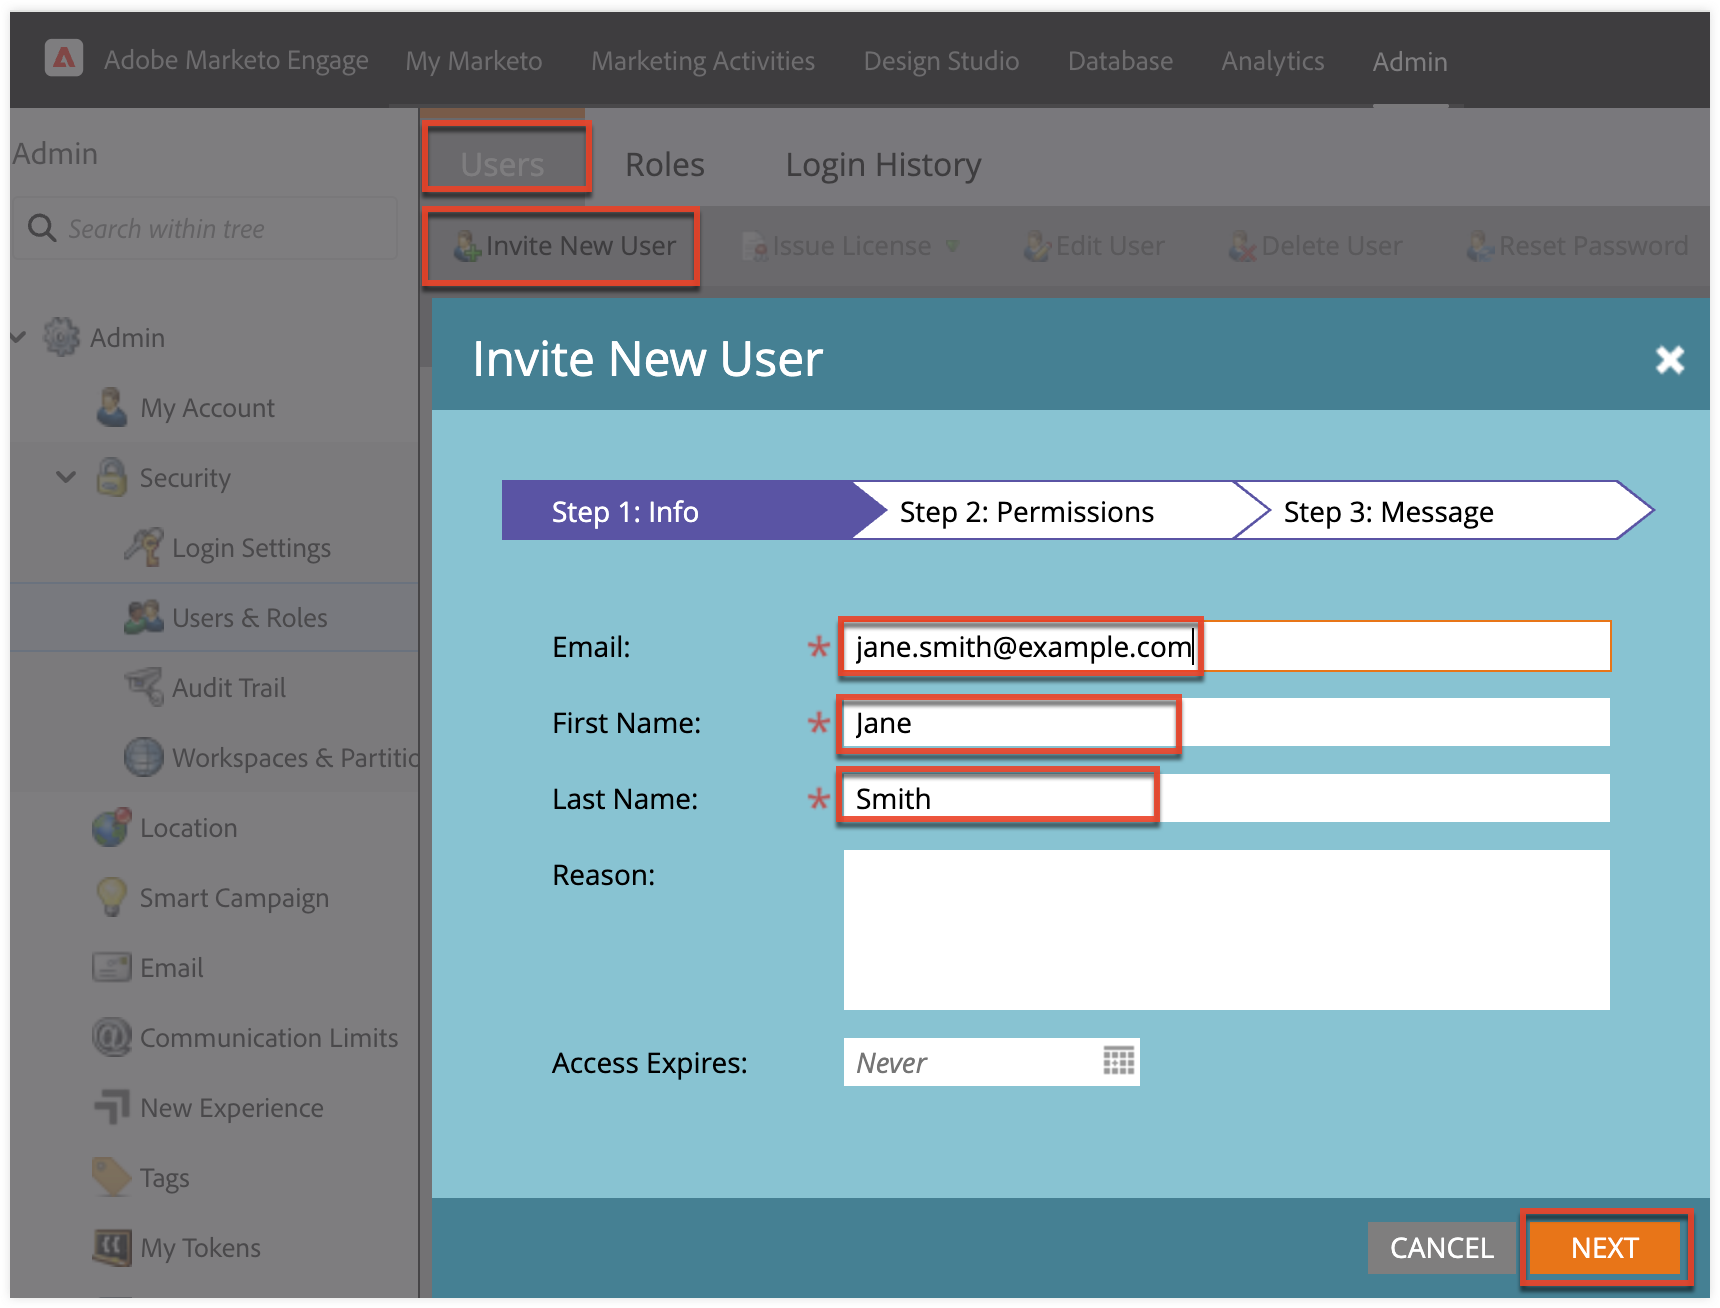
- On Step 2, select the new role (e.g., API Role) you created in the Roles tab and also select "API User Role". Be sure to enable the API Only checkbox. Click "Next".
- On Step 3, click "Send". The new user (e.g., Jane Smith) should appear in the Users list view as an "API Only User".
- Next, navigate to Admin > LaunchPoint.
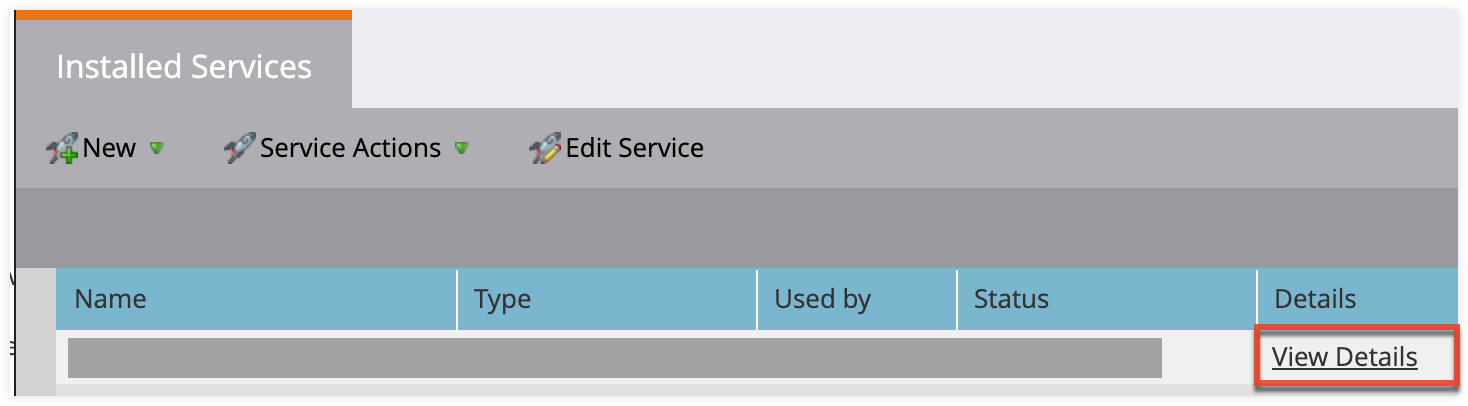
- If you already created a custom LaunchPoint service in Marketo, then locate the installed service on the list view, then click "View Details". Record the "Client Id" and "Client Secret" values as you will need them to configure the connector in Sugar. Skip step 4.
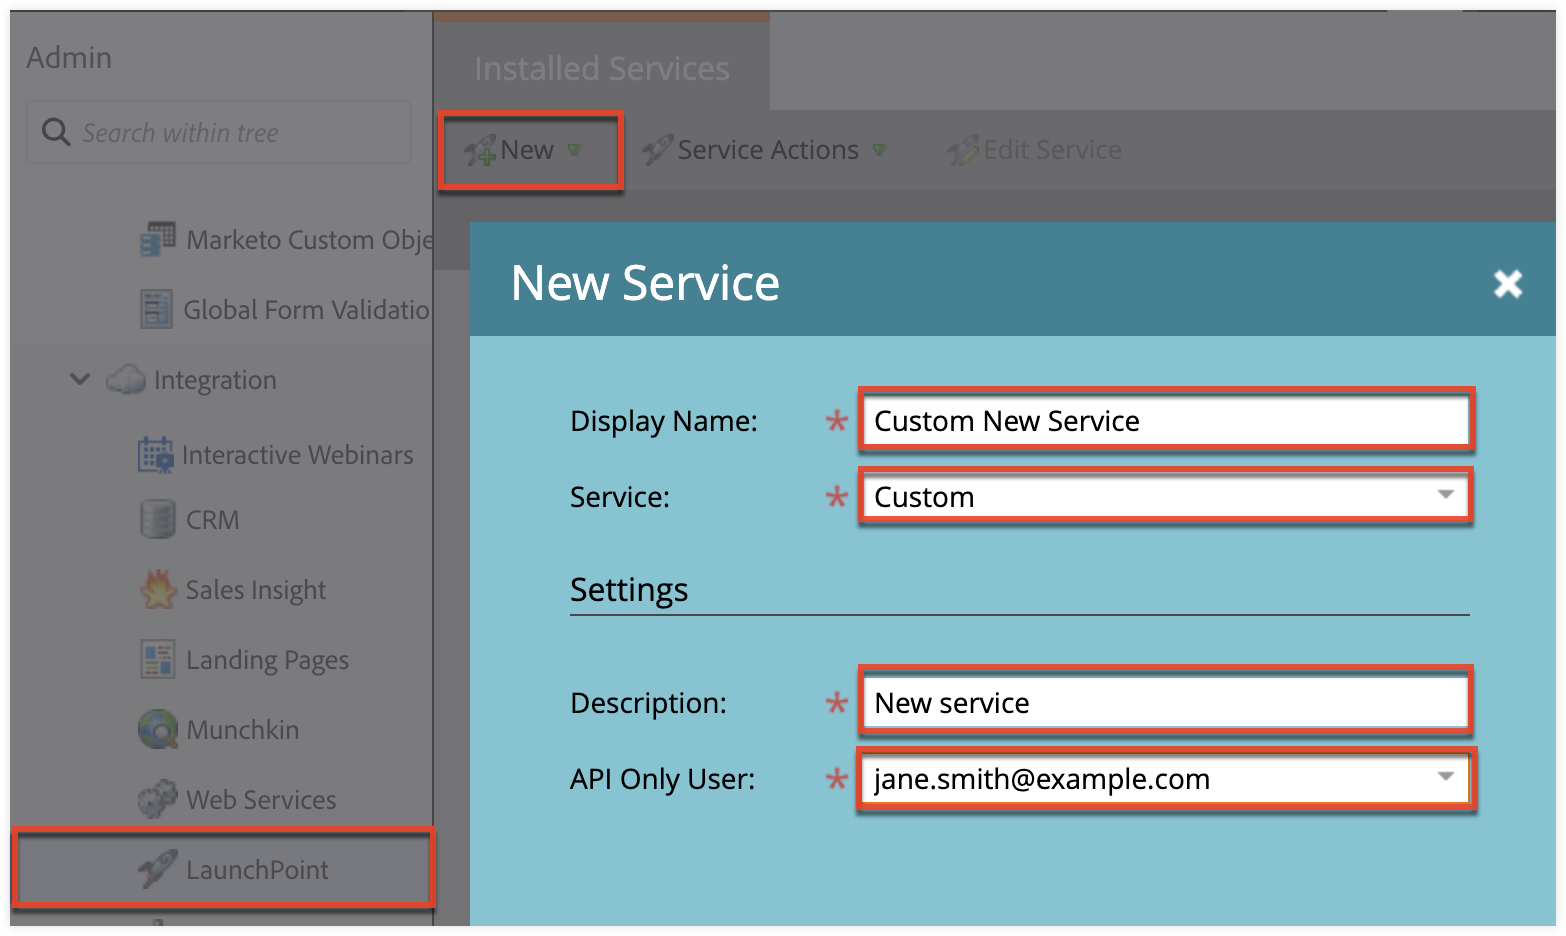
- If you need to create a new custom LaunchPoint service in Marketo, click "New", then select "New Service". On the New Service window, complete the following fields, then click "Create":
- Display Name: Enter a name for your new service.
- Service: Select "Custom".
- Description: Enter a description for your new service.
- API Only User: Select the API Only user (e.g., Jane Smith) you created in step 2 or the existing API Only User in your account.
- If you already created a custom LaunchPoint service in Marketo, then locate the installed service on the list view, then click "View Details". Record the "Client Id" and "Client Secret" values as you will need them to configure the connector in Sugar. Skip step 4.
- On the Installed Services list view, locate the new service that you created in step 3, then click the View Details link. Record the "Client Id" and "Client Secret" values from the Details window. You will need these values to configure the connector in Sugar.
Enabling the Marketo Connector
Once the package is installed successfully in Sugar, the Marketo connector can be enabled accordingly via Admin > Connectors. Please note that you must be an administrator in Sugar to enable connectors.
Note: If your Sugar instance is configured to use a proxy server, the Marketo connector will recognize and apply the settings to connect and communicate between Sugar and Marketo. For more information on configuring proxy settings in Sugar, please refer to the System documentation.
The following steps cover how to configure and enable the Marketo connector in Sugar:
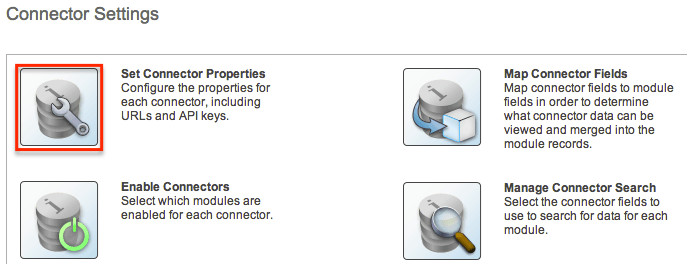
- Navigate to Admin > Connectors > Set Connector Properties.
- Select the Marketo tab and enter the following information:
Property Description Enabled Select "Yes" to enable Marketo for SugarCRM. REST API Endpoint Copy and paste the REST API Endpoint value from Marketo. Client ID Copy and paste the REST API Client ID value from Marketo. Client Secret Copy and paste the REST API Client Secret value from Marketo. Webhook Secret Key If using webhooks in Marketo, enter in a secret key value (e.g. Push to SugarCRM) of your choice.
Navigate to your Marketo account and enter this value in Webhooks Actions > Set Custom Header > Value field. For more information, refer to the Custom Headers section of the Webhooks article on the Adobe website.
For more information on creating webhooks in Marketo, refer to the Create a Webhook article on the Adobe website.
When a new SugarCRM Lead is created, who should be the default Assigned To? Select the default user assigned to the new lead created in Sugar. Only download Marketo leads with a score greater than Enter in a score (e.g., 50) identifying what threshold leads must meet in order to be pushed to Sugar. Default score is "0" which means all leads in Marketo will be downloaded. How many lead records should we download each time synchronize occurs with Marketo? Select the number of lead records you wish to download each time Sugar is synchronized with Marketo. Default is "As many records as possible". How many records should we download from Maketo per batch Select the number of records to download from Marketo per batch. Default is "100". Which Marketo Activity Logs should we download to SugarCRM? Select the Marketo Activity Log Type(s) (e.g., Interesting Moment, Fill Out Form) you wish to download to SugarCRM. 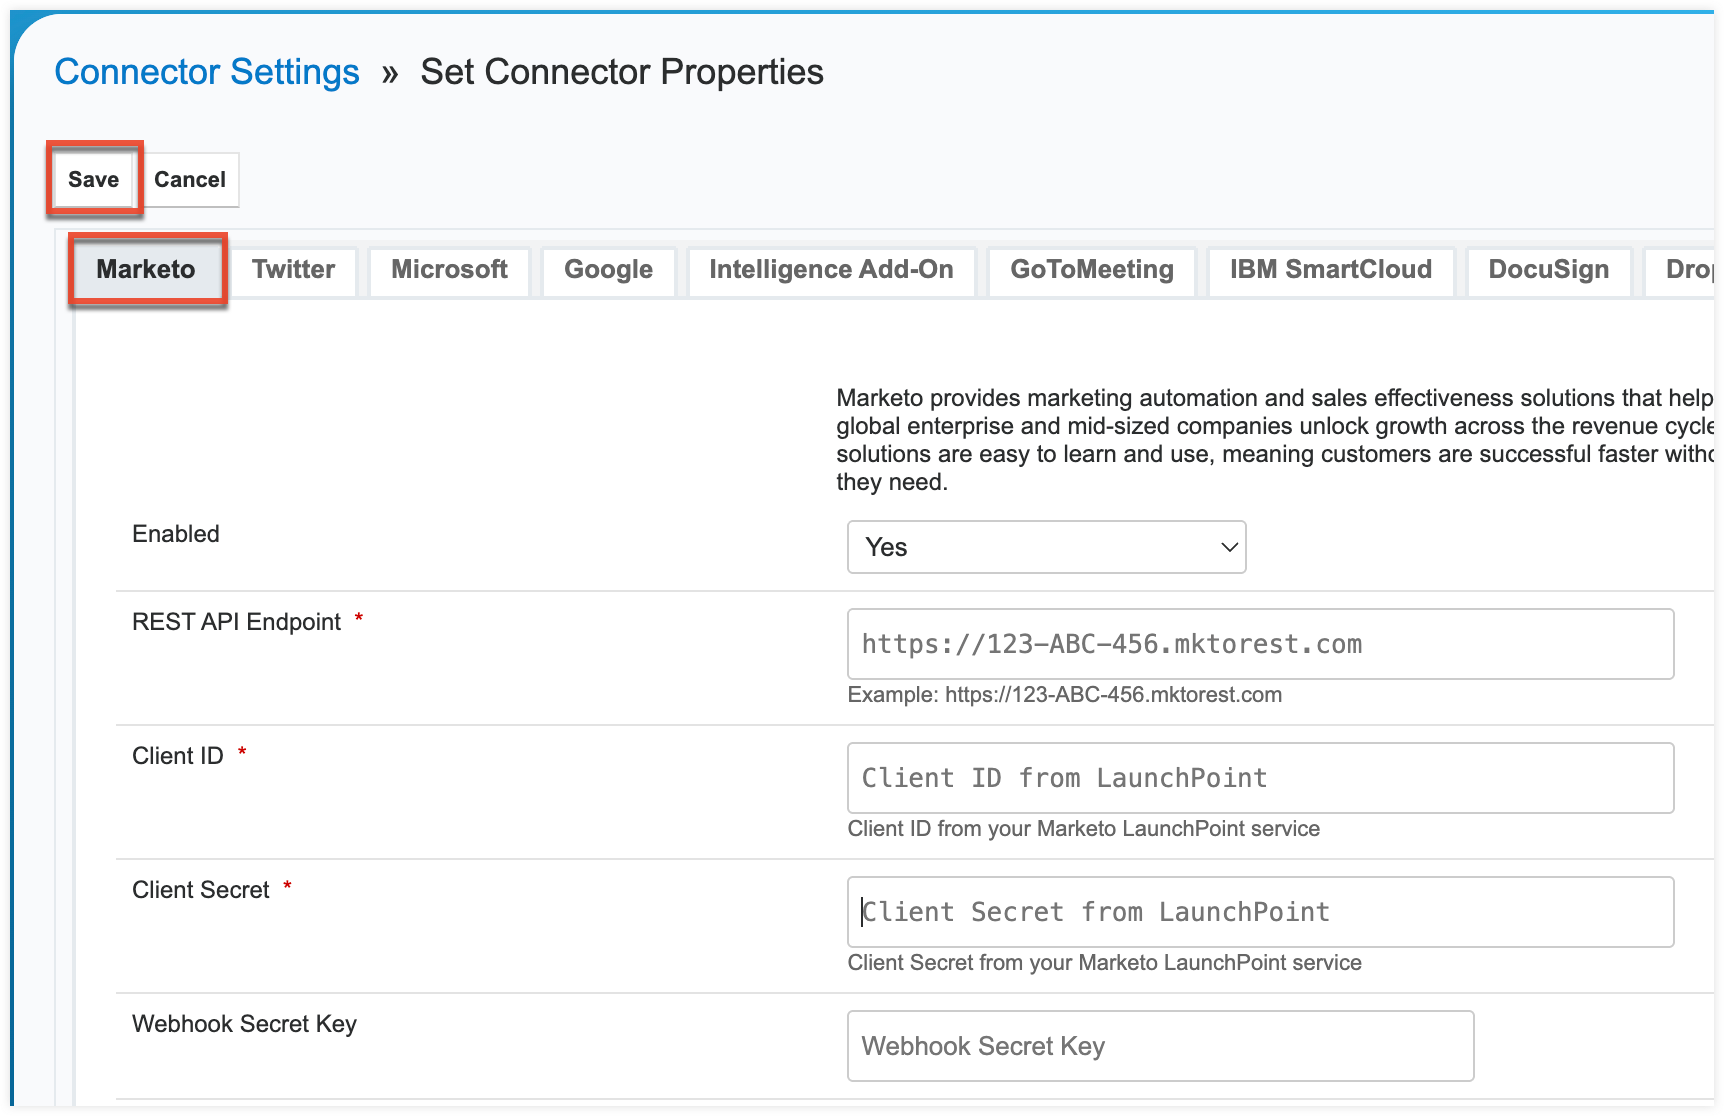
- Click "Save" to preserve the connector settings.
-
Go back to the Set Connector Properties page, then click the Test Connection button on the bottom of the Marketo tab to ensure that the connector is enabled successfully. Click "Save".
If the test fails for the connector it could be due to the following reasons:
- The Enabled option in Admin > Connectors > Set Connector Properties is not set to "Yes".
- The required custom API fields below are not available in Marketo. For more information on adding custom fields in Marketo, please refer to the Adding Custom Fields section above.
- sugarcrm_type
- sugarcrm_id
- sugarcrm_owner_first_name
- sugarcrm_owner_last_name
- sugarcrm_owner_title
- sugarcrm_owner_phone
- sugarcrm_owner_email
- sugarcrm_deleted
Marketo Connector Field Mappings
Once the Marketo connector is enabled successfully, you can navigate to the Map Connector Fields page in Admin > Connectors to view the list of fields (Connector Fields, Module Fields) that are mapped by default between Marketo and Sugar. The enabled modules (Leads, Contacts, Accounts, and Users) will appear under the Marketo tab of the Map Connector Fields page along with all the pre-mapped fields per module. The specific module fields selected on the page are the designated Sugar fields that Marketo fields will be mapped to when data is synced in Sugar and vice versa.
Note: Please ensure that the Email Address connector field is mapped to the Email field in Sugar.
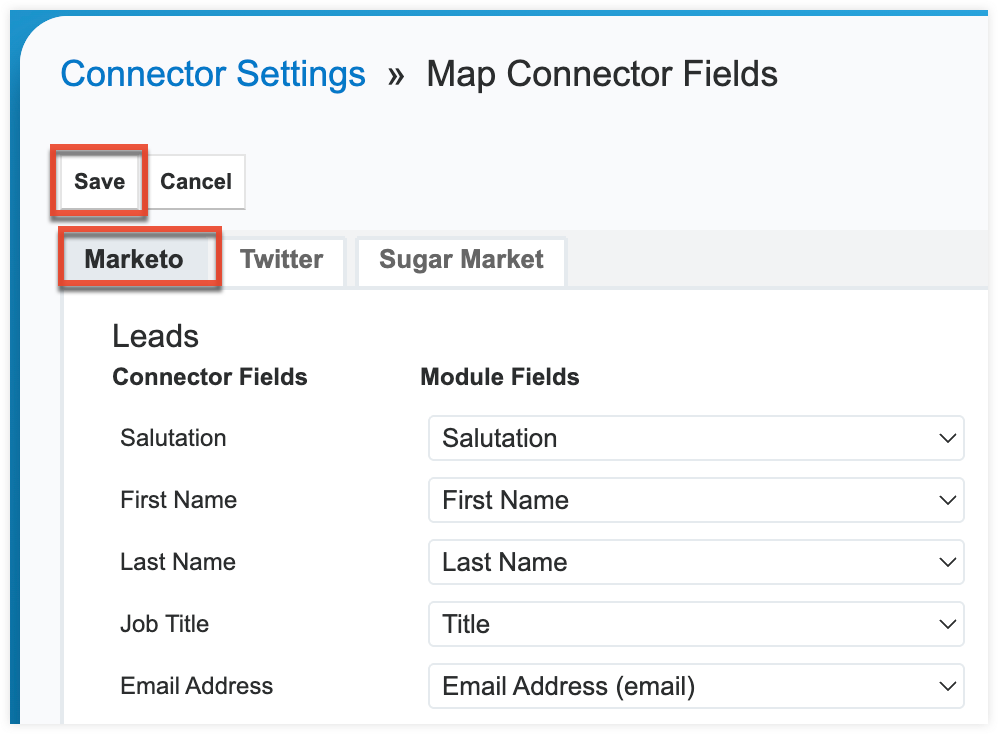
If you wish to map other available connector fields to Sugar, simply select the corresponding Sugar field from the Module Fields dropdown list, then click "Save" to preserve the change. Please note that newly added custom fields in Marketo will also appear in the connector fields mapping list once you download the custom fields to Sugar. For more information on downloading custom Marketo fields to Sugar, please refer to the Sugar Connector for Marketo User Guide.
Note: You will need to create new fields via Admin > Studio if there is no matching stock field in Sugar to map to the connector field. For more information on creating fields in Sugar, please refer to the Studio documentation.
Marketo Schedulers
When the Marketo connector is enabled in Sugar, three Marketo schedulers are automatically created in Admin > Scheduler. By default, these schedulers are set to "Inactive" and you will need to set it to "Active" once you are ready to utilize the Marketo connector and begin downloading leads. Please make sure that the Marketo connector field mappings are set accordingly before activating the schedulers. In addition, be sure to add the custom Marketo fields you wish to view in Sugar before enabling the schedulers so that the data populates accordingly in the record when the leads are downloaded. For more information on creating custom Marketo fields, please refer to the Adding Marketo Fields in Sugar section below. 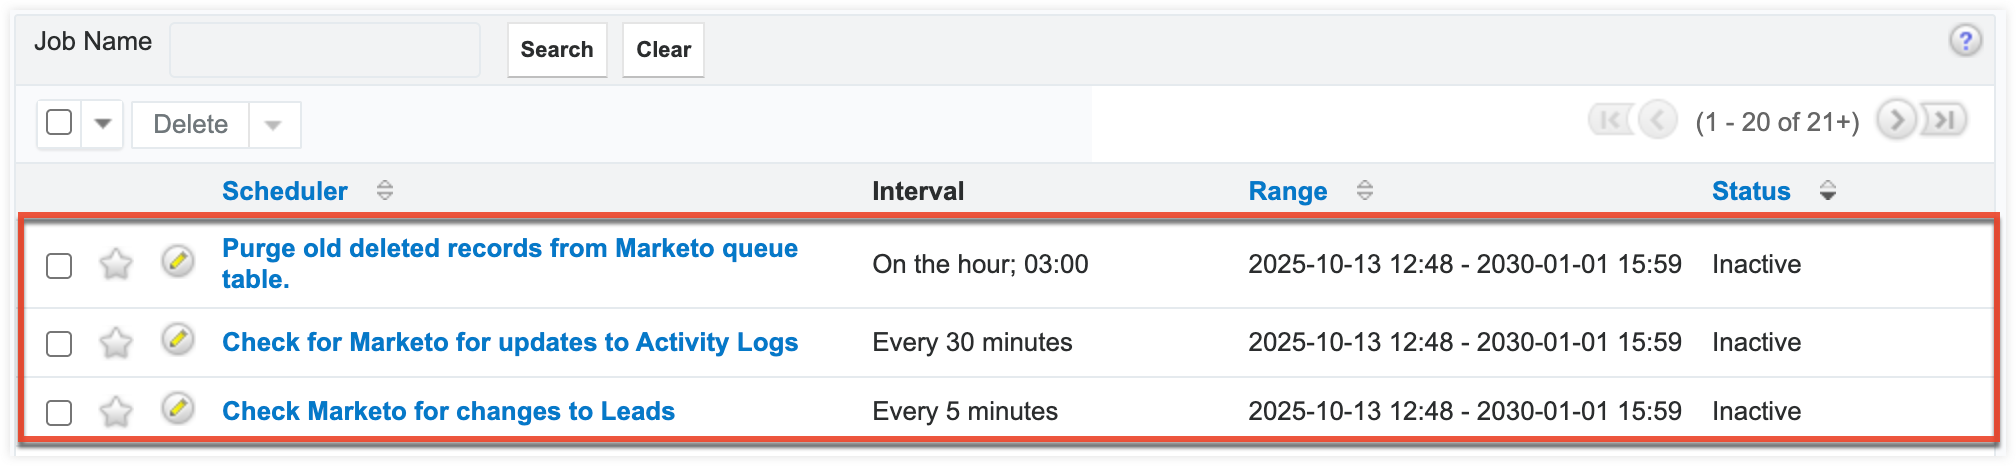
Note: It is recommended that the scheduler's interval be set to run "Every 5 minutes" for the Check Marketo for changes to Leads scheduler and "Every 30 minutes" for the Check for Marketo for updates to Activity Logs scheduler.
The available Marketo schedulers are as follows:
- Check Marketo for changes to Leads: Checks the mapped fields in Marketo for any changes (e.g., name and phone) since the last checkpoint and syncs the data to Sugar.
- Check for Marketo for updates to Activity Logs: Checks for any changes to the lead's activity log since the last checkpoint and syncs the information to Sugar. Please note that only the activity logs you selected when configuring the Marketo connector will be checked for updates for sync.
Note: The synced activity log data (e.g., Change Data Value and Interesting Moment, etc.) will appear in the Activity Logs subpanel of the Contacts or Leads record view in Sugar. Administrators can view the last checkpoint stored in Sugar for lead synchronization and activity log synchronization via Admin > Synchronization Table Information. - Purge old deleted records from Marketo queue table: Periodically removes deleted records from the
mkto_queuetable to clean up the table and help improve performance.
Note: By default, the interval is set to "5" (days) but this can be changed by updating themarketo_purge_intervalparameter in theconfig_override.phpfile.
Set the scheduler(s) to "Active" once you are ready to begin downloading leads and syncing records between Sugar and Marketo. Please note that if the Marketo connector ever gets disabled in Sugar, the Marketo schedulers will automatically be set to "Inactive" as well. Any changes made to records (e.g., leads) between the time the connector is disabled to when it is re-enabled will not get synced between Sugar and Marketo.
Please keep in mind that depending on the status of the Marketo connector and the schedulers, the data sync between Sugar and Marketo may behave differently. The table below summarizes the expected data sync behavior based on the current status of the Marketo connector and scheduler(s).
| Marketo Connector | Marketo Scheduler(s) | Data Sync |
| Enabled | Active | Data gets synced between Sugar and Marketo |
| Disabled |
Inactive |
Data does not get synced between Sugar and Marketo |
| Enabled | Inactive |
Data does not get synced in real-time between Sugar and Marketo Note: Changes made to records in both Sugar and Marketo will get queued for future sync. Once the scheduler is set to "Active" the queued changes will get synced accordingly. It is recommended that you disable the connector if you do not want any record changes queued for future sync. |
Adding Marketo Fields in Sugar
A set of default Marketo fields should be added to Sugar via Admin > Studio for the Opportunities, Contacts, and Leads module if not already present. Creating these fields and adding it to the module's Record View layout will allow the specific data from Marketo to be synced and viewable in the Sugar record. Simply navigate to Admin > Studio > {Module Name} > Fields to verify and then create the necessary custom field(s) for each module. For more information on creating fields in Sugar, please refer to the Studio documentation.
In addition, the stock Lead Score and Marketo Lead ID fields should be added to the Leads and Contacts record view layout as these fields will automatically populate with the unique ID and designated lead score associated to the downloaded lead. Also, in order to mark records for sync to Marketo, the Sync to Marketo field should be added to the Leads, Contacts, and Opportunities record view. For more information on adding fields to Record View layouts, please refer to the Studio documentation. The Sync to Marketo field must be checked in order for the record to be included for sync to Marketo. For more information on syncing Sugar records to Marketo, please refer to the Sugar Connector for Marketo User Guide.
Contacts Module
| Field Name | Display Label | Type |
| mrkto2_anonymousip | Anonymous IP | TextField |
| mrkto2_do_not_call_reason | Do Not Call Reason | TextField |
| mrkto2_inferred_company | Inferred Company | TextField |
| mrkto2_inferred_country | Inferred Country | TextField |
| mrkto2_middle_name | Middle Name | TextField |
| mrkto2_rating | Lead Rating | TextField |
| mrkto2_role | Role | TextField |
| mrkto2_site | Site | TextField |
| mrkto2_unsubscribed | Unsubscribed | Checkbox |
| mrkto2_unsubscribed_reason | Unsubscribed Reason | TextArea |
Leads Module
| Field Name | Display Label | Type | Note |
| mrkto2_annualrevenue | Annual Revenue | Currency | |
| mrkto2_anonymousip | Anonymous IP | TextField | |
| mrkto2_do_not_call_reason | Do Not Call Reason | TextField | |
| mrkto2_industry | Industry | DropDown | Select "industry_dom" from Drop Down List field when creating the field. |
| mrkto2_inferred_company | Inferred Company | TextField | |
| mrkto2_inferred_country | Inferred Country | TextField | |
| mrkto2_main_phone | Main Phone | Phone | |
| mrkto2_middle_name | Middle Name | TextField | |
| mrkto2_number_of_employees | Num Employees | Integer | |
| mrkto2_rating | Lead Rating | TextField | |
| mrkto2_role | Role | TextField | |
| mrkto2_sic_code | SIC Code | TextField | |
| mrkto2_site | Site | TextField | |
| mrkto2_unsubscribed | Unsubscribed | Checkbox | |
| mrkto2_unsubscribed_reason | Unsubscribed Reason | TextArea |
Opportunities Module
| Field Name | Display Label | Type | Note |
| mrkto2_expected_revenue | Expected Revenue | Currency | |
| mrkto2_fiscal_quarter | Fiscal Quarter | DropDown | Select "mkto_fiscal_quarter_list" from Drop Down List field when creating the field. |
| mrkto2_fiscal_year | Fiscal Year | Integer | |
| mrkto2_forecastcategoryname | Forecast Category | DropDown | Select "mkto_forecastcategoryname_list" from DropDown List field when creating the field. |
| mrkto2_is_closed | Is Closed | Checkbox | |
| mrkto2_is_won | Is Won | Checkbox |
Upgrading the Marketo Connector
If you have any custom mapped fields in Marketo, please do not uninstall any old or new Marketo Connector packages as this will remove the existing field mappings. Instead, install the latest Marketo connector package (e.g., MarketoForSugarCRMv25.1.0.zip) without uninstalling the older package to preserve the custom fields.
When upgrading your Marketo connector, it is important to adhere to the following guidelines:
- As of version 25.1.0, SugarCRM has migrated to REST API. After upgrading to Marketo connector 25.1.0, you must navigate to Marketo to obtain the REST API values, then reconfigure the Marketo connector settings in Sugar to avoid any disruptions to your marketing automation workflows, lead synchronization, etc.
- Marketo will deprecate support for the SOAP API on January 31, 2026.
- When uninstalling the Marketo connector, the database tables will be left behind by default. If you are prompted to uninstall the database tables, it is recommended to keep the database tables, as removing them will require the system to sync the Activity Logs back from Marketo.
Note: Only uninstall packages if you do not have custom mapped fields in Marketo as the uninstall will remove the existing field mappings.
The Sugar Connector for Marketo package is available for download on SugarExchange. For more information on installing the Marketo connector package to Sugar, please refer to the Installing the Marketo Connector Package section of this documentation.