Sugar Connector for LinkedIn Sales Navigator Installation Guide
Overview
The Sugar Connector for LinkedIn Sales Navigator allows you to work with your LinkedIn information directly within Sugar. Sales Navigator capability is conveniently integrated as a dashboard that can be seen on the record view dashboard on the account, opportunity, contact, and lead. After you have purchased the connector, this guide will outline the technical prerequisites and walk you through downloading, installing, activating, and configuring the connector for use.
Note: For instructions on using Sugar Connector for LinkedIn Sales Navigator after it has been installed and activated, please refer to the Sugar Connector for LinkedIn Sales Navigator User Guide.
Prerequisites
- The Sugar Connector for LinkedIn Sales Navigator is included with Sugar Sell Premier and Enterprise+. It can also be purchased as an add-on for Sugar Serve. Please contact your Sugar partner or representative to learn more.
- Sugar Connector for LinkedIn Sales Navigator must be downloaded and installed by a Sugar administrator on the Sugar instance where it will be used. Users will then be able to individually authenticate with their own LinkedIn accounts on their computers.
- Users who want to utilize the connector's benefits must be members of the LinkedIn Sales Navigator Advanced Plus license. For more information on the available LinkedIn Sales Navigator products, please refer to the LinkedIn Sales Solutions website.
- Ensure that you have upgraded your Sugar instance to at least the minimum supported version of Sugar. For more information on supported platforms, please refer to the Connectors Supported Platforms page.
Note: If you are using a browser extension that is intended to protect your privacy, you may need to disable or adjust its settings to enable the connector's functionality.
Downloading the Sugar Connector for LinkedIn Sales Navigator
The Sugar Connector for LinkedIn Sales Navigator is available for download by registered sugarcrm.com users via Download Manager. Please note that you may be able to download the connector even if you have not purchased it, but you will not be able to authenticate the connector and use it until the SugarCRM Orders Desk has associated a connector license with your SugarCRM account. Please contact your Sugar partner or representative for more information on purchasing a subscription for the connector.
Save the installation package to a directory that is accessible by the Sugar administrator user who will complete the new installation or upgrade to your existing connector.
Installing the Sugar Connector for LinkedIn Sales Navigator
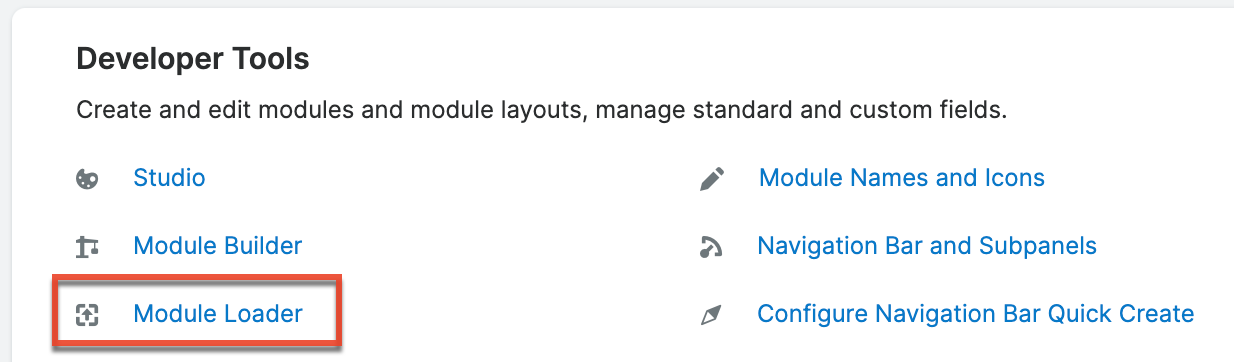
Once you have downloaded the package (e.g., Sugar_Connector_for_Sales_Navigator_1.x.x.zip), you can upload it to your Sugar instance via Module Loader. Please note that you will not be able to authenticate the connector and use it until the SugarCRM Orders Desk has associated a connector license with your SugarCRM account. Please contact your Sugar partner or representative for more information on purchasing a subscription for the connector.
After downloading the package, use the following steps to install the connector for the first time or to upgrade your connector to a new version:
- Navigate to Admin > Module Loader.
- To install the new package, click the "Choose File" button in the Module Upload panel to open a file selection window from your browser.
- Find and select the .zip package that you downloaded in the previous section.
- Click the Upload button to load the package to Sugar.

- Once the upload has completed, click the Install button next to the package's name in the Uploaded Packages panel.

- Review the License Agreement and select "Accept" to agree to the terms and then "Commit" to run the installation.
- Wait for the progress bar to reach 100% and display a success message.
Note: If installation errors occur, Sugar will display the errors with details of what potentially caused the issue(s). You can click on "Display Log" to view details of what occurred during the installation process. Work with your system administrator to troubleshoot and fix the errors, and then re-attempt the installation procedure.
The connector installation is now complete.
Configuring Access
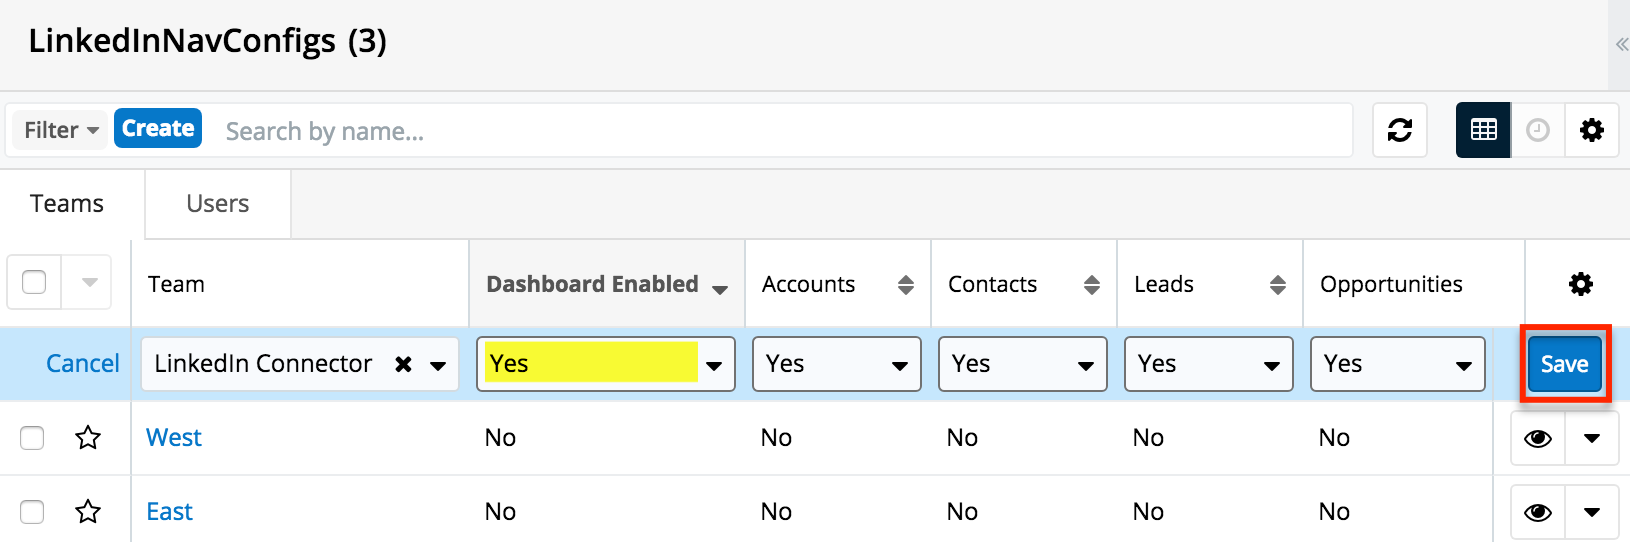
Once you have successfully activated the connector, you must select the teams or users that should have access to the Sales Navigator dashboard in Sugar. When configuring access, you will see a Teams tab and a Users tab where you can enable the respective entities for access to the Sales Navigator dashboard.
Note: Before configuring access, please review the configuration guidelines listed in the following section.
Follow these steps to grant access to teams or users in Sugar via the connector's settings:
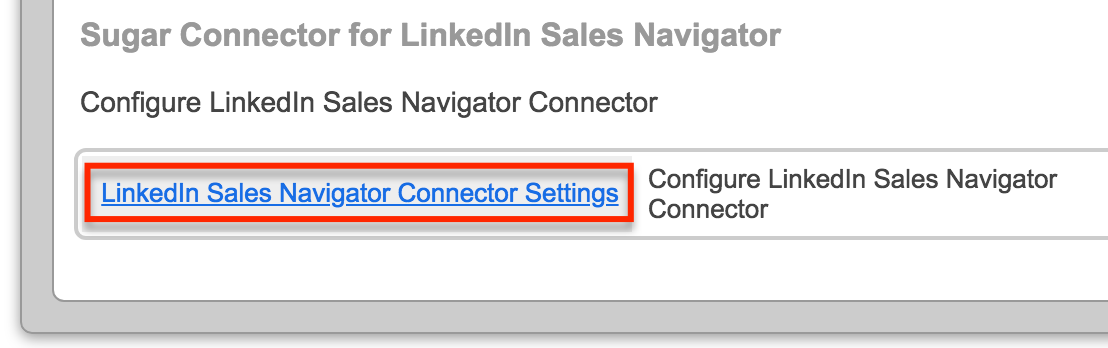
- Navigate to the Admin screen in Sugar and click on "LinkedIn Sales Navigator Settings" to open the configuration page.
- If the Settings screen is still open, click on the List View icon to switch views:

- Use the Teams and Users tabs to toggle between team access and user access.
- Teams: To grant all members of a team access to the Sales Navigator dashboard, click on the Teams tab below the filter bar and select "Edit" from the team row's actions menu.
- Users: To grant a user access to the Sales Navigator dashboard, click on the Users tab below the filter bar and select "Edit" from the user row's actions menu.
- Change the Dashboard Enabled field to "Yes". This will unlock the row's Accounts, Contacts, Leads, and Opportunities fields for editing. Set the modules you would like enabled for the team or user to "Yes" then click the row's Save button to preserve the settings.
Configuration Guidelines
Keep in mind the following important rules when configuring connector access for teams and users:
- Granting access to a team will automatically update the settings for the team's users under the Users tab.
- Access set for a user in the Users tab will take precedence over access settings for the user's team(s).
- When a user's access is "No" but one or more of the user's teams access is "Yes", the user will not have access.
- When a user's access is "Yes" but all of the user's teams access is "No", the user will have access via the user setting.
- If a user belongs to two or more dashboard-enabled teams but those teams have different access to module dashboards, then the more restrictive module setting will win out.
- For example, Jim belongs to teams East and West. Teams East and West are both configured as Dashboard Enabled=Yes. Team East has "Yes" access to the dashboard for all available modules (i.e., Accounts, Contacts, Leads, and Opportunities). Team West has "Yes" access to the dashboard for only the Accounts module; the Contacts, Leads, and Opportunities modules are set to "No". In this example, Jim will have access to the dashboard in the Accounts module and nowhere else due to the more restrictive West team's settings.
- Implicit team memberships are respected by the connector. If access to the connector is enabled for a user via implicit membership, the administrator can override that user's permissions in the Users tab to remove access. For more information on implicit team membership types, please refer to the Team Management documentation.
Note: Because conflicts or confusion may occur when granting access via both the Teams tab and the Users tab, we recommend using only one method or the other. In fact, you may find it useful to create a custom team called "LinkedIn Connector". After enabling access to the connector for the LinkedIn Connector team, you can simply add and remove users via Team Management.