App Signing for Mobile SDK
Overview
To distribute a customized mobile app that was created via SugarCRM's mobile SDK, you must provide your app with a certificate and digitally sign the app. The certificate serves as a virtual fingerprint that uniquely associates the app to you. App signing allows the client (i.e. the phone or tablet running your app) to identify who signed the app and to verify that it has not been modified since you signed it. This also helps iOS and Android ensure that any future updates to your app are authentic and come from the original author. This article explains the iOS and Android app signing process for your mobile SDK app.
For more information on the mobile SDK, please refer to the Mobile SDK Quick Start Guide.
Steps to Complete
App Signing for iOS
There are multiple steps you need to take to successfully app sign for iOS before you will be able to distribute the application via the Apple App Store, an internal enterprise store, or an MDM account. The following sections describe each of these steps in detail. For more details on any of the steps, please refer to the Apple Developer documentation on Apple's developer site.
Registering an Apple Developer Account
Apple offers two levels of developer accounts: Individual or Enterprise. An Enterprise account allows you to distribute applications internally or via an MDM vendor in addition to distributing via the public store. An Individual account only allows you to distribute via the public store. Decide which option is right for you, navigate to the Apple developer site, click "Create Apple ID", and follow the instructions to register for your Apple developer account.
Installing Apple Certificates
Your keychain must contain Apple root and intermediate certificates in order to successfully generate a signing certificate. Apple certificates are automatically installed when you install Xcode. If you do not have Xcode installed or if you do not wish to have it installed on your computer, then you must download the required certificates from the Apple PKI page on Apple's website.
Note: The next two sections describe how to create signing certificates and provisioning profiles using the Apple developer portal site. If you prefer to accomplish these tasks via Xcode IDE, please refer to the Apple developer documentation.
Generating a Signing Certificate
Once the Apple certificate is installed on your computer, you can begin generating a signing certificate. To do this:
- Log into your Apple developer account.
- Navigate to the Certificates, Identifiers, & Profiles section.
- Click "All" under the Certificates panel on the left then click the Plus icon to create a new iOS certificate.
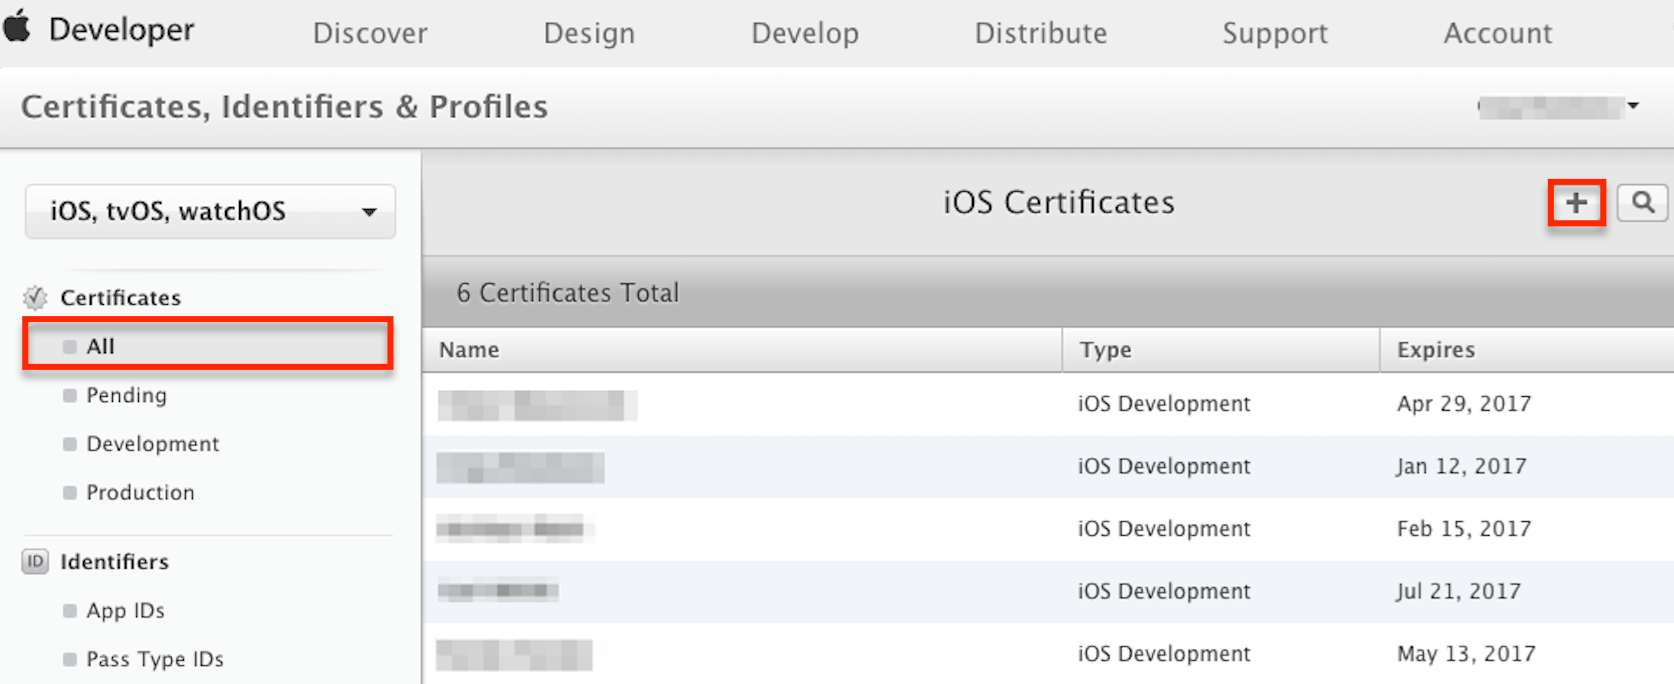
- From this page, select a certificate type:
- Development: Development certificates do not allow publishing to stores but are useful if you wish to install and test the app on your device during development. Select "iOS App Development" to create a testing certificate.

- Production: A production certificate (a.k.a. distribution certificate) is required if you want to publish your app to stores. Depending on your developer account type, there are two different options for production certificates:
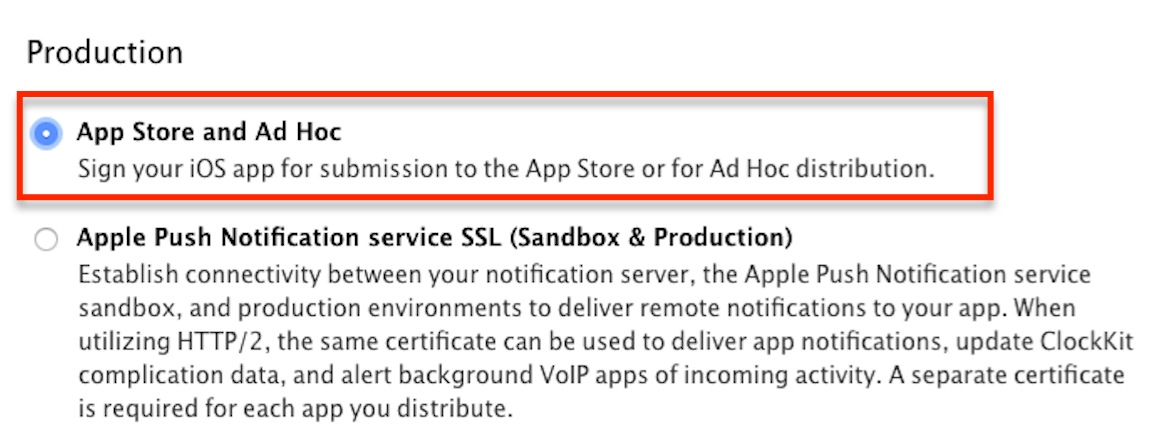
- App Store and Ad Hoc: This option is visible for users with an Individual developer account type. Select "App Store and Ad Hoc" to create a distribution certificate.
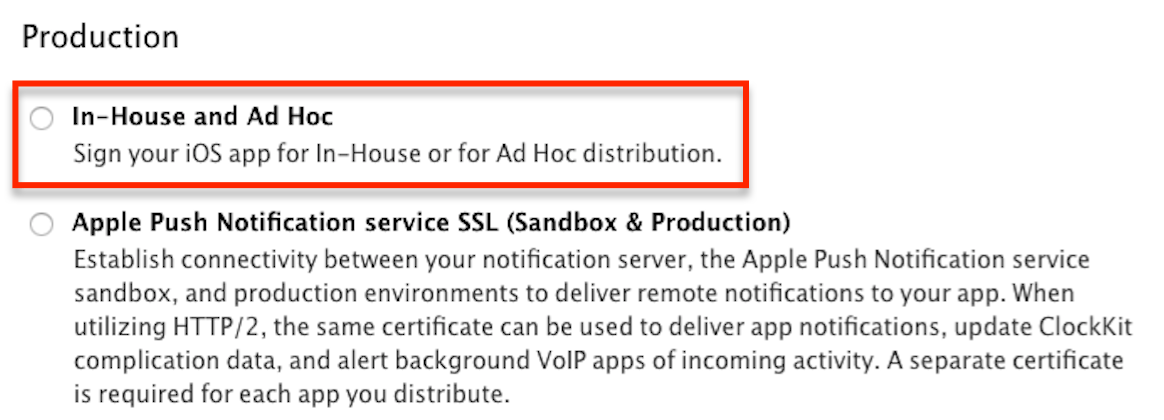
- In-House and Ad Hoc: This option is visible for users with an Enterprise developer account type. Select "In-House and Ad Hoc" to create a distribution certificate.
- App Store and Ad Hoc: This option is visible for users with an Individual developer account type. Select "App Store and Ad Hoc" to create a distribution certificate.
- Development: Development certificates do not allow publishing to stores but are useful if you wish to install and test the app on your device during development. Select "iOS App Development" to create a testing certificate.
- After selecting the certificate type that is best for your situation, click "Next" and follow Apple's instructions for creating, uploading, and approving a certificate request. You will then see it available for download in the Certificates section.
- Download the new certificate and install it onto your keychain. To do this, click "Download" to download the certificate onto your Mac computer then double-click on the file.
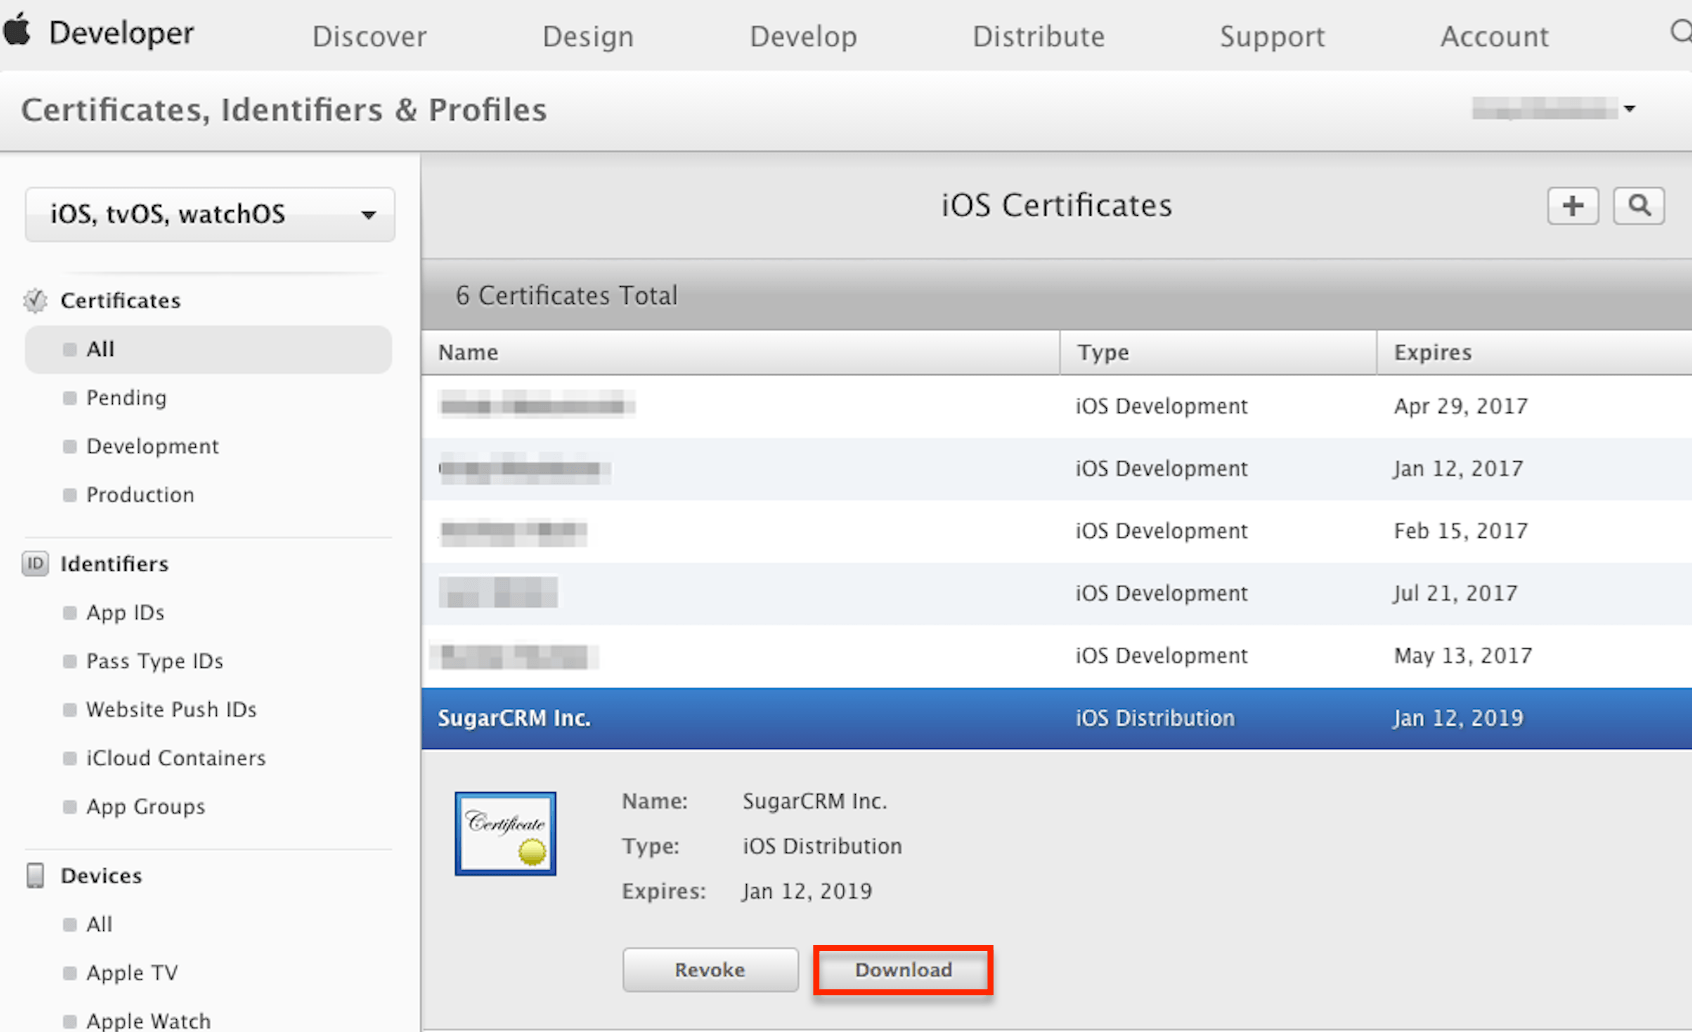
- Open your Downloads folder then right-click on the file and select "Keychain Access" from the Open With menu to install the certificate into your Keychain.

You should now see the certificate in the Keychain application: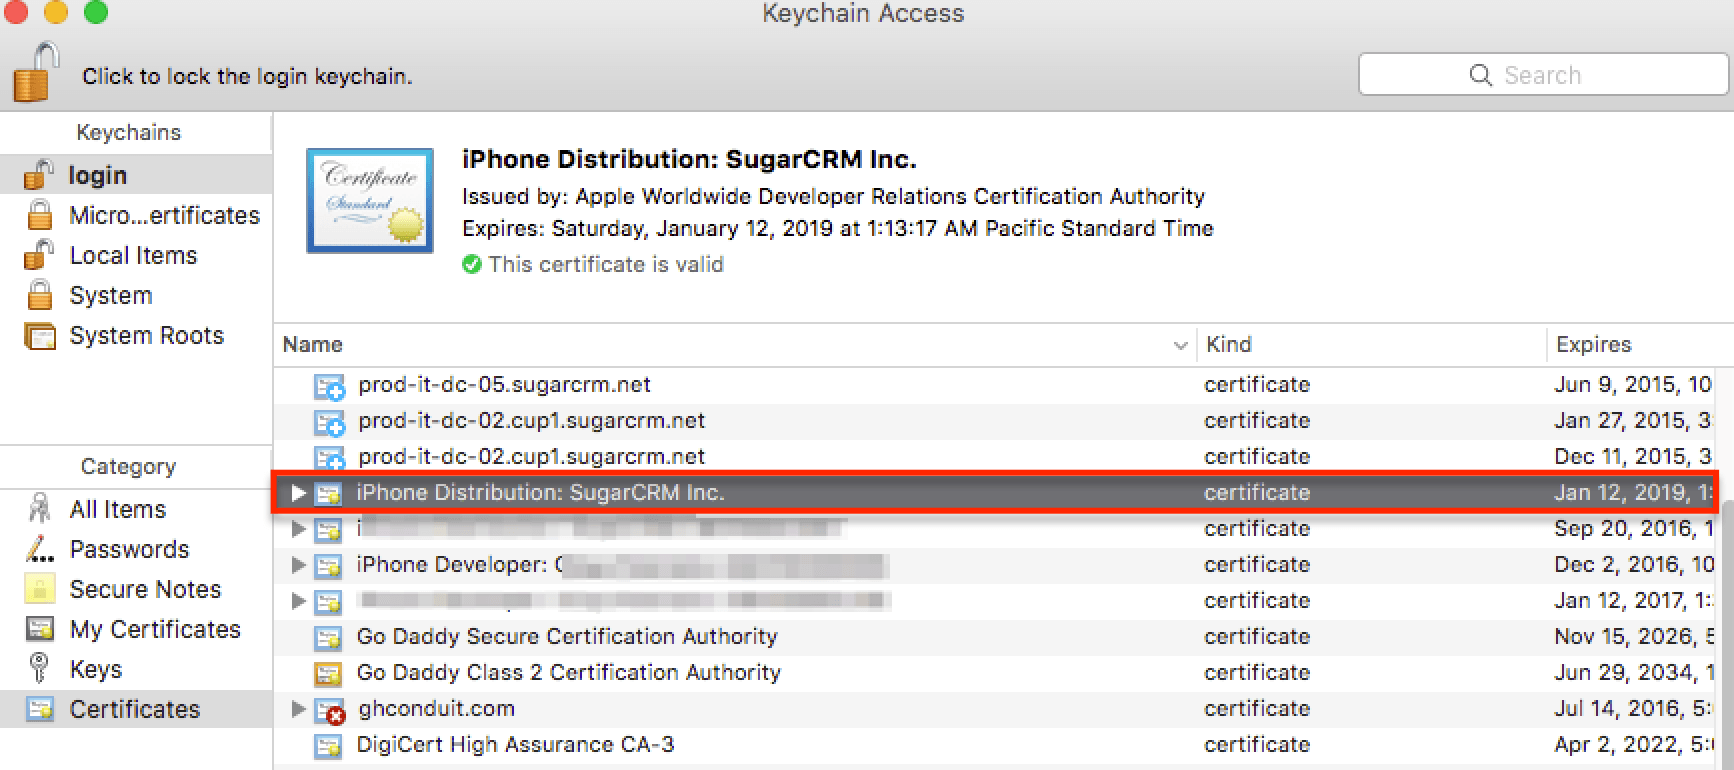
- Export the certificate in .p12 format by right-clicking the certificate's name via the Keychain list and selecting "Export…" from the menu.
- From the Export File dialog, enter a name for the certificate and then select "Personal Information Exchange (.p12)" as the file format.
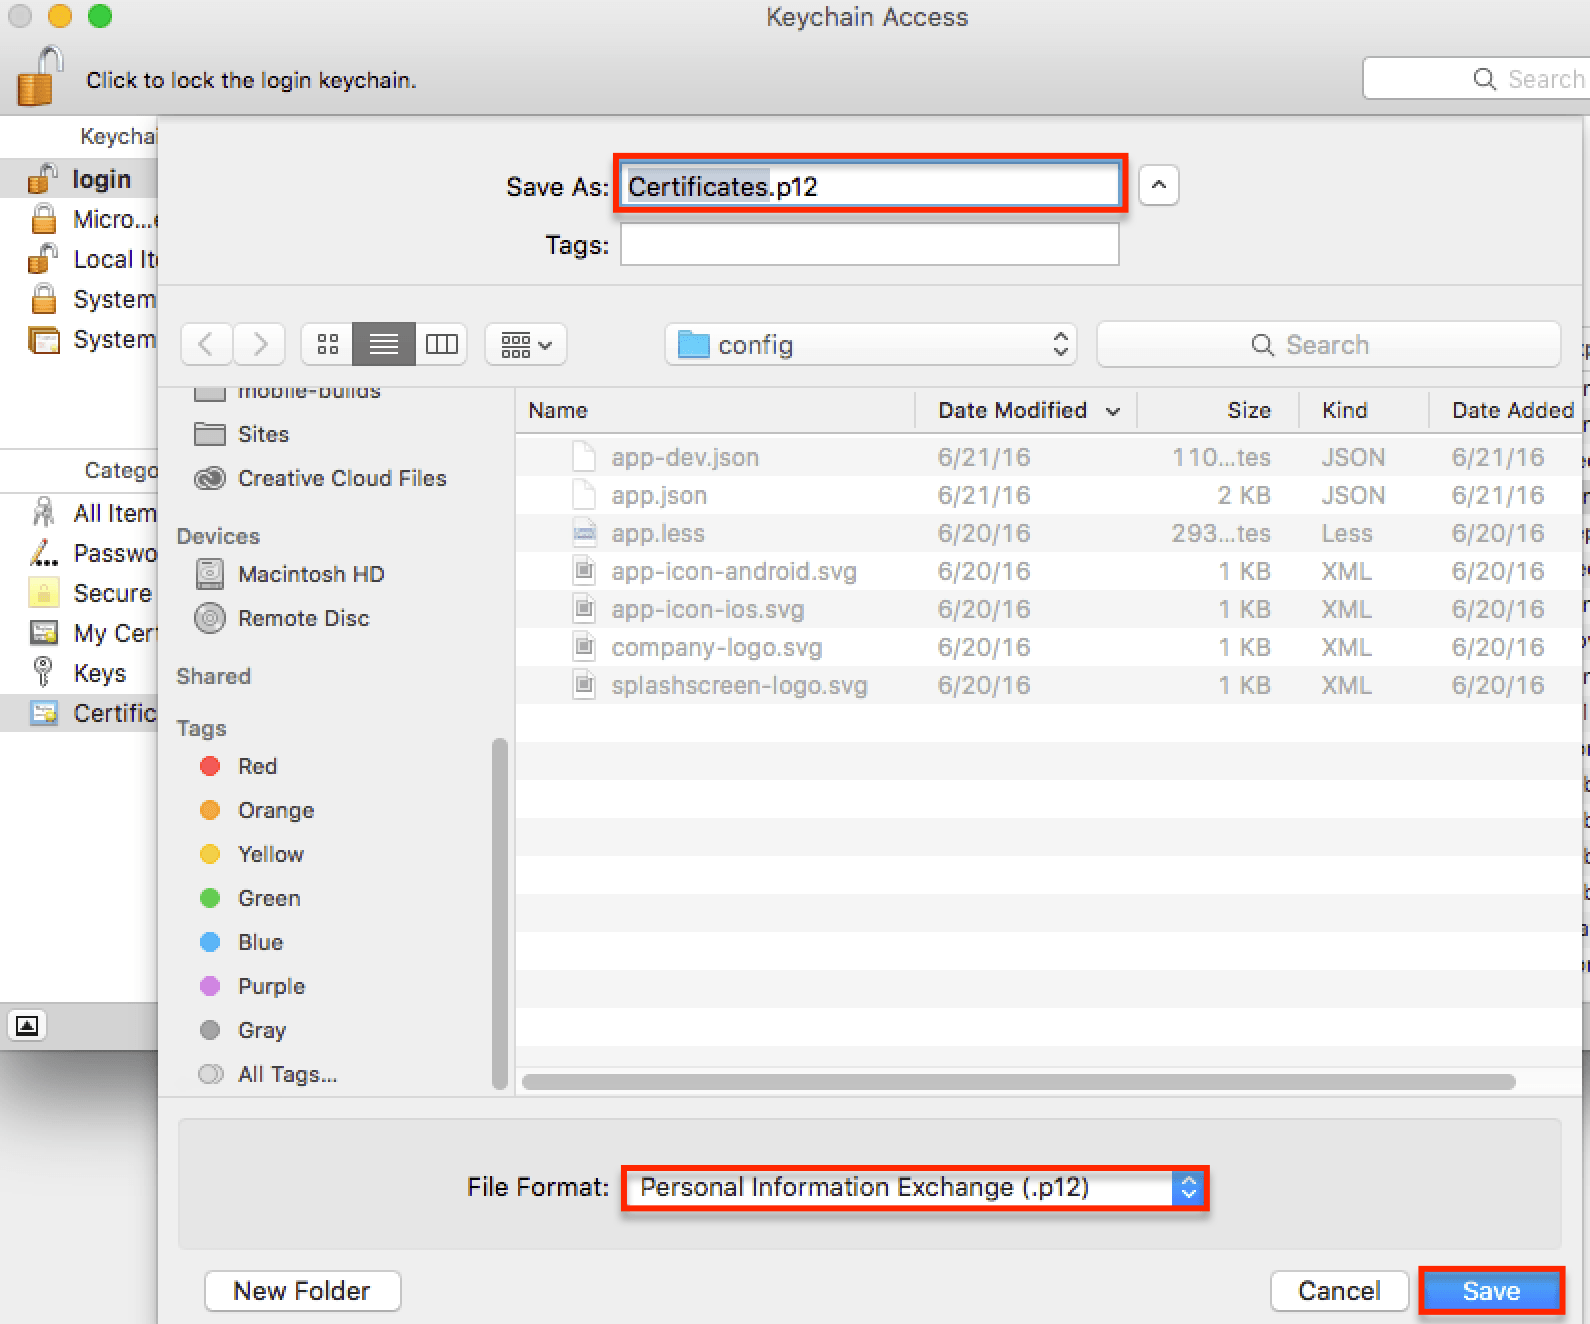
- Click "Save" to save the file to your local file system.
Creating an Application Group ID
- Log in to your Apple developer account.
- Open the Application group IDs management page.
- Click the Add icon to start the application group creation process.
- When you are prompted to enter the application group ID, use the format
group.{your_app_bundle_id}.callerid, eg. group.com.acme.crm.callerid.
See the Creating an Application ID section below for application bundle ID creation instructions.
Creating an Application ID
With the certificate successfully saved on your computer, you can begin creating an application ID. The app ID is a string that contains a team ID and a bundle ID which is used to identify one or more apps from a development team. The following steps explain how to create a unique app ID.
- Log in to your Apple developer account.
- Navigate to the App IDs section and click the Plus icon to create a new ID.
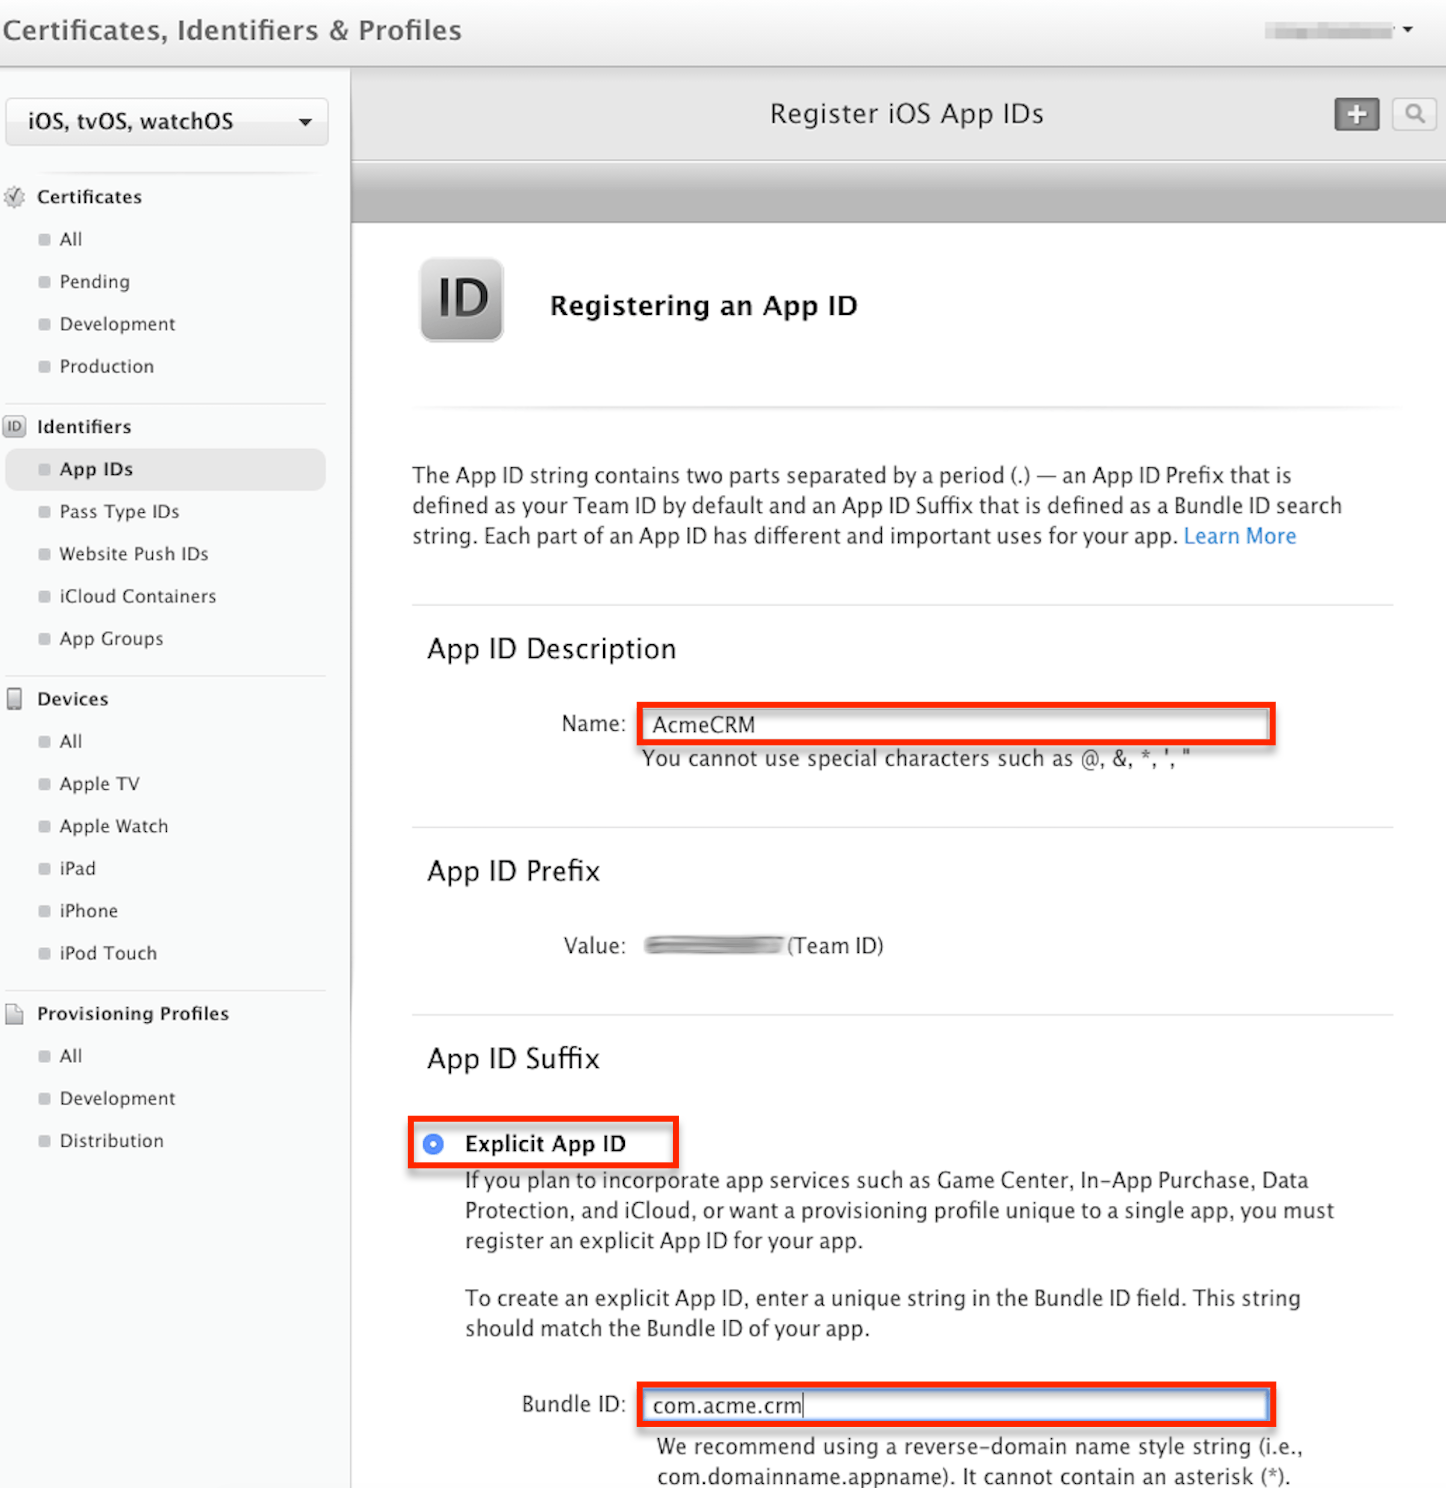
- Enter your app's name in the Name field and specify an application ID in the Bundle ID field according to Apple's guidelines. Please note that if you are planning to use in-house distribution, then you must select the radio button for "Explicit App ID". You can also enter a wildcard app ID if you have multiple apps and wish to use one provisioning profile for multiple app IDs. For more information on wildcard IDs, please refer to the iOS Developer documentation.
- Under the Capabilities tab, check the Push Notifications capability.
- Under the Capabilities tab, check the App Groups capability, click the Edit button next to it, and check the application group ID added in the Creating an Application Group ID section.
- At the bottom of the page, click "Continue" to view the confirmation page.
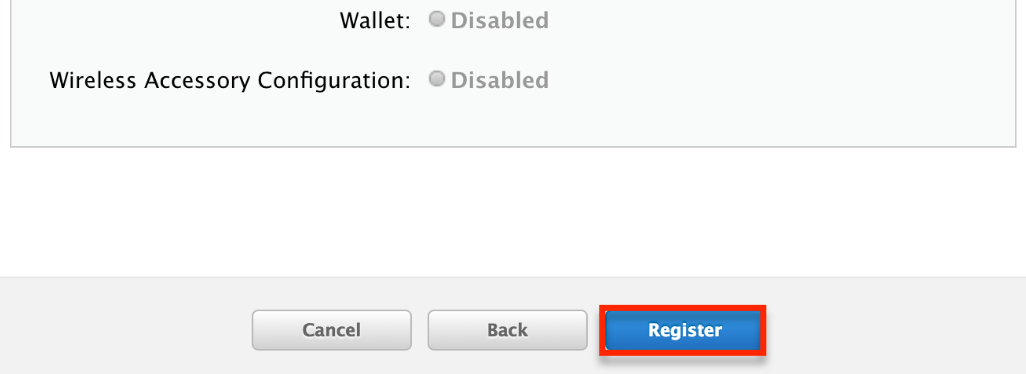
- Finally, click "Register" to finalize and confirm your app ID.
- Starting in version 58.0, the SugarCRM mobile application introduces the Caller Identification feature. In order to build the project, you need to create a separate application ID for the Call Directory extension. To accomplish this, repeat steps 1-8 but in step 3 you will need to provide a Bundle ID in the format
{your_application_bundle_id}.callerid(e.g.,com.acme.crm.callerid).
For more information on registering app IDs, please refer to the Apple iOS App Distribution Guide.
Generating a Provisioning Profile
Once you have created the app ID, it is time to create provisioning profiles. This is necessary for installing development applications on iOS devices. To generate a development or distribution provisioning profile:
- Log into your Apple developer account.
- Navigate to the Provisioning Profiles section and click the Plus icon to create a new provisioning profile.
- From this page, select a provisioning profile type:
- Development profiles do not allow you to publish to stores but are useful if you wish to install and test the app on your device. Select "iOS App Development" to create a testing profile.
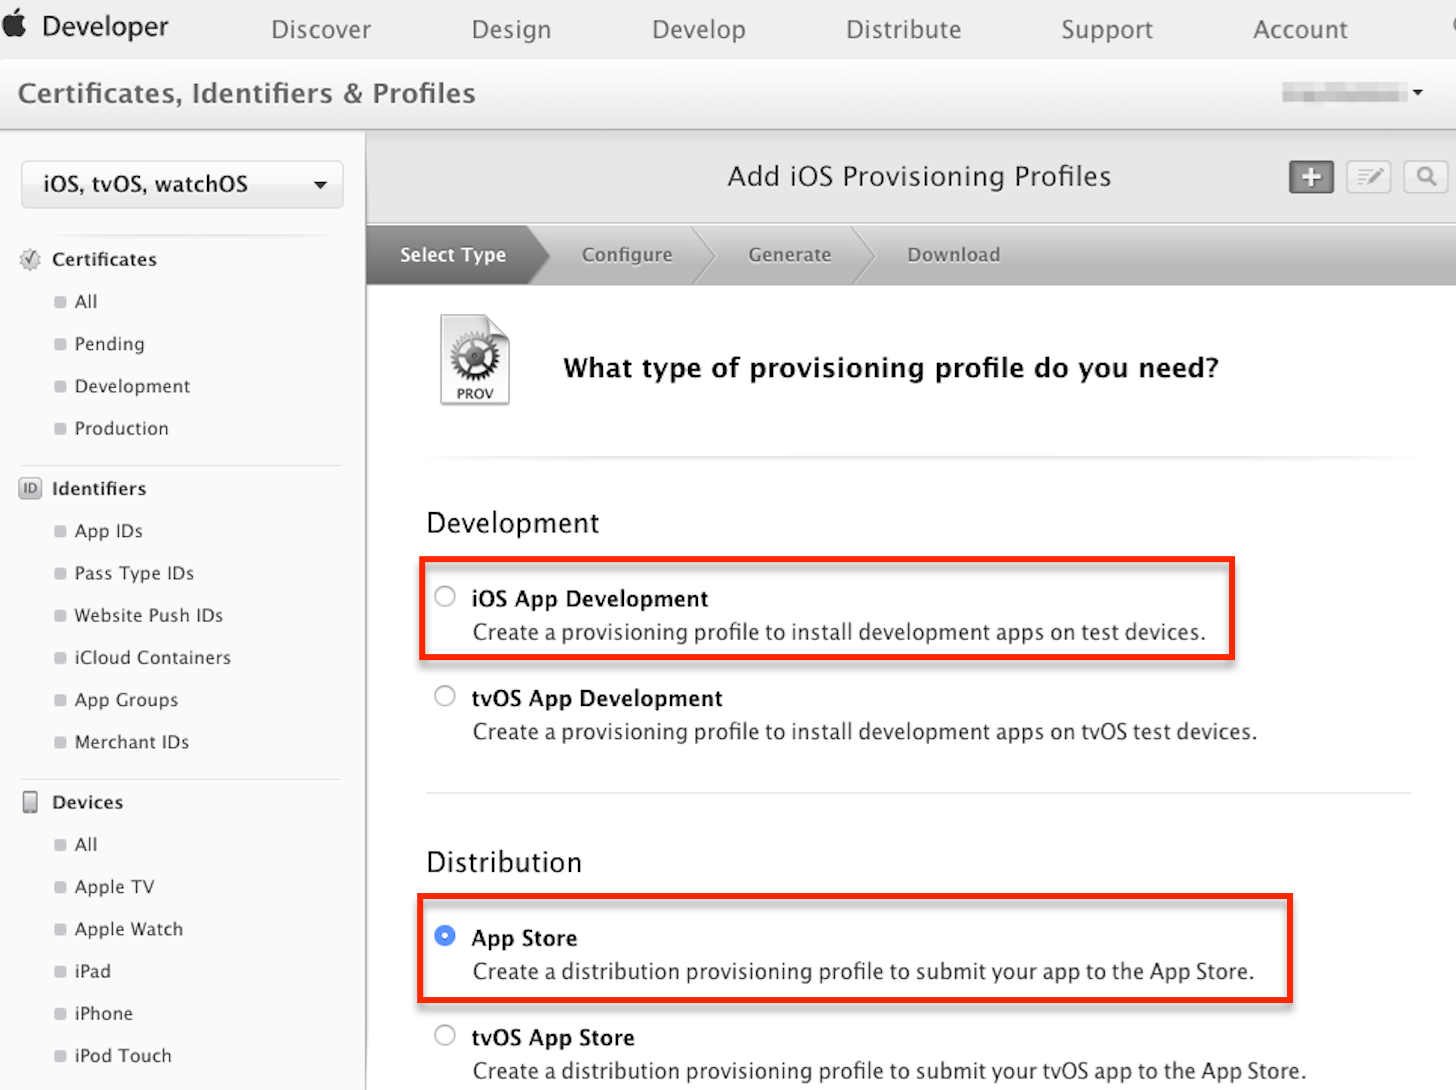
- A distribution profile is required if you want to publish your app to stores. Depending on your developer account type, there are two different options for distribution profiles:
- App Store: This option is visible for users with an Individual developer account type. Select "App Store" to create a distribution profile.

- In-House: This option is visible for users with an Enterprise developer account type. Select "In House" to create a distribution profile.

- Ad-Hoc: This option is also visible for users with an Enterprise developer account type. If you wish to only install your app on specific devices, select "Ad-Hoc". For more information on this, please refer to the About Ad Hoc Provisioning Profiles page in Apple's App Distribution Guide.
- App Store: This option is visible for users with an Individual developer account type. Select "App Store" to create a distribution profile.
- Development profiles do not allow you to publish to stores but are useful if you wish to install and test the app on your device. Select "iOS App Development" to create a testing profile.
- After selecting the appropriate profile type, click "Continue".
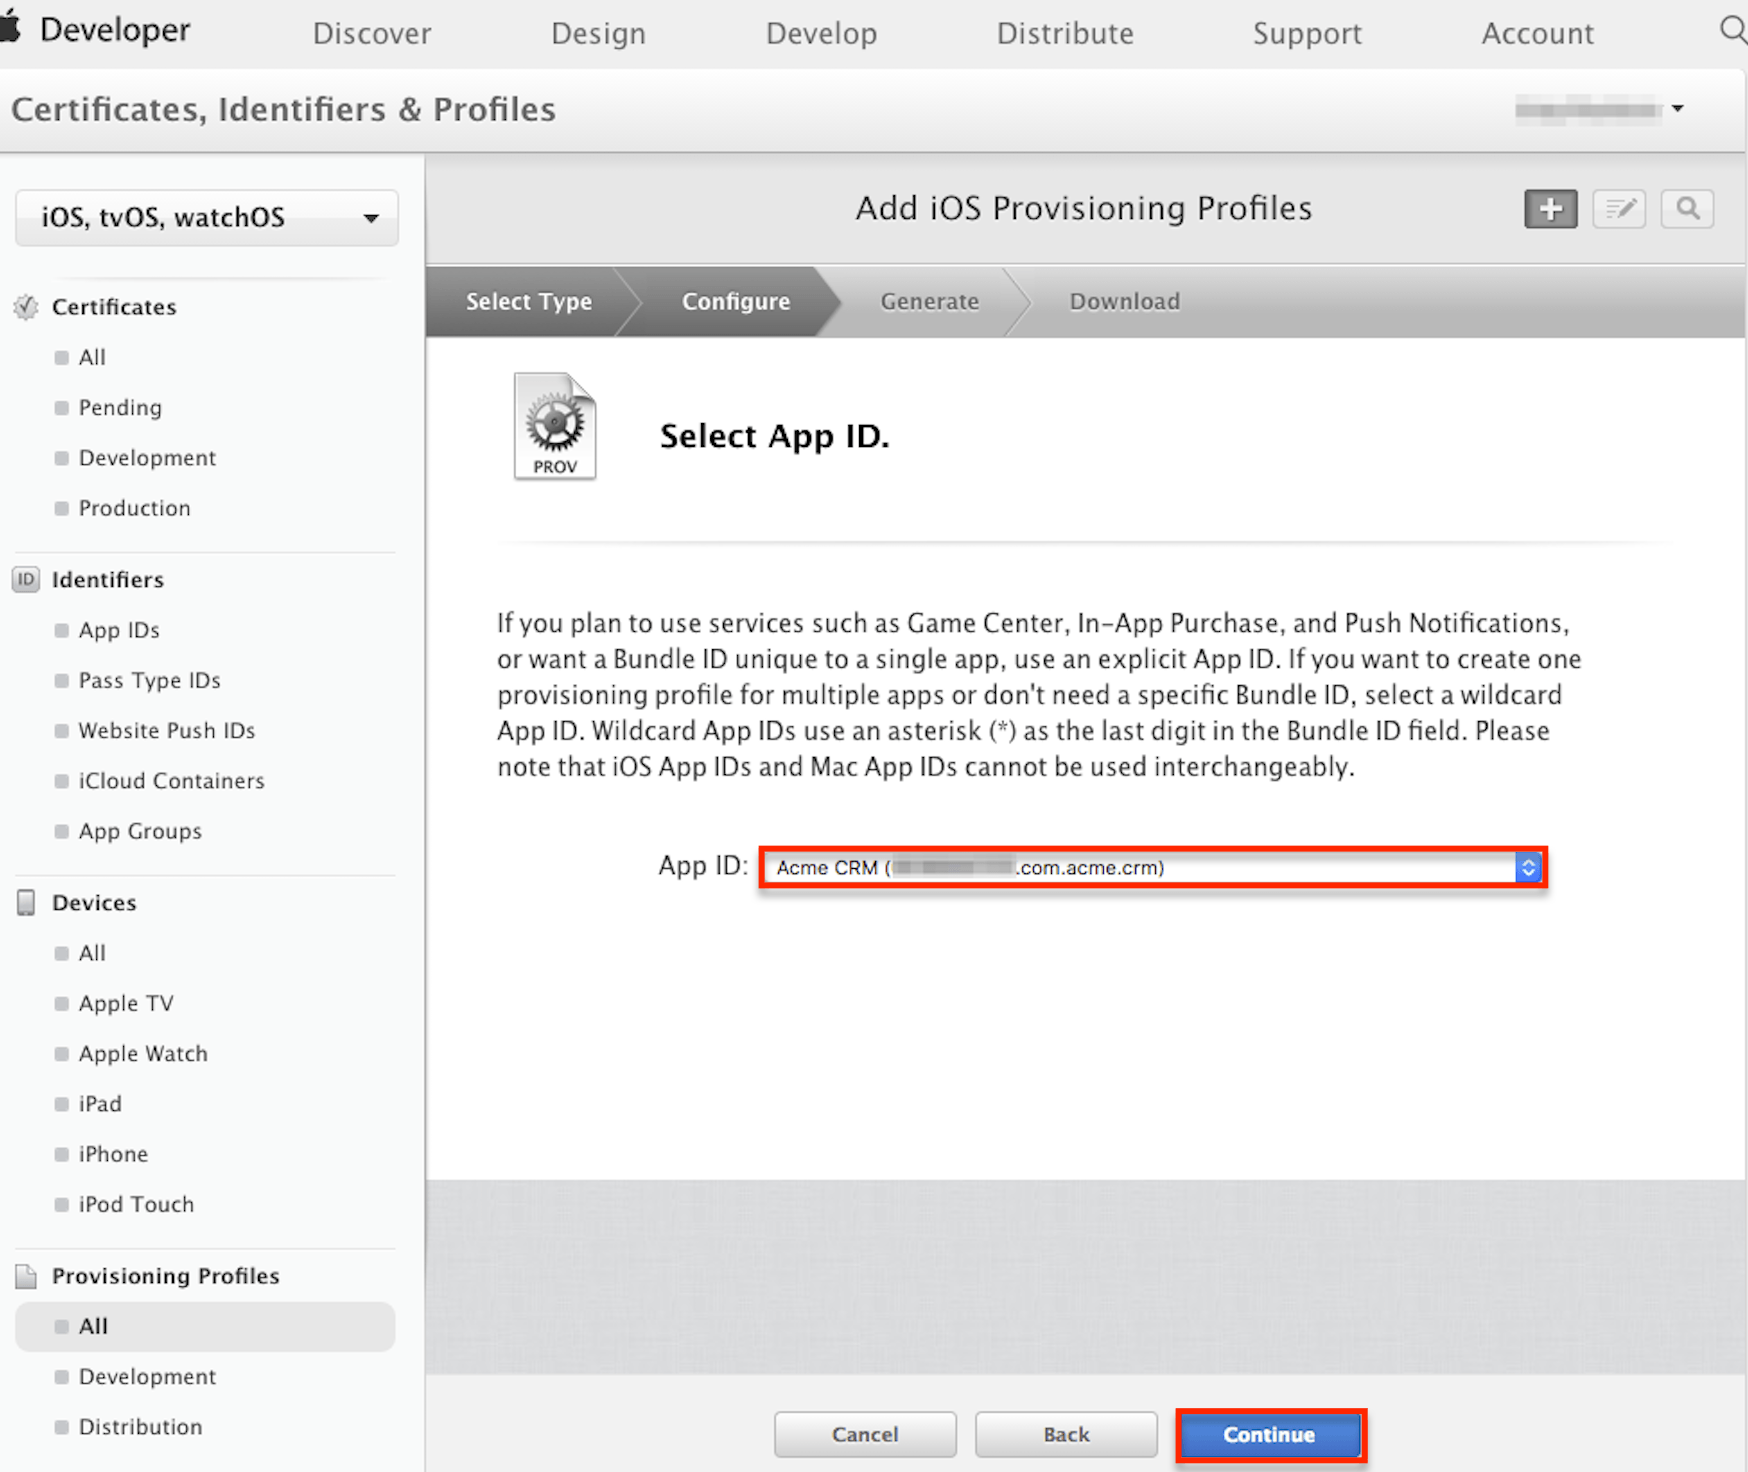
- On the Configure page, select the app ID you created in the Creating an Application ID section then click "Continue".
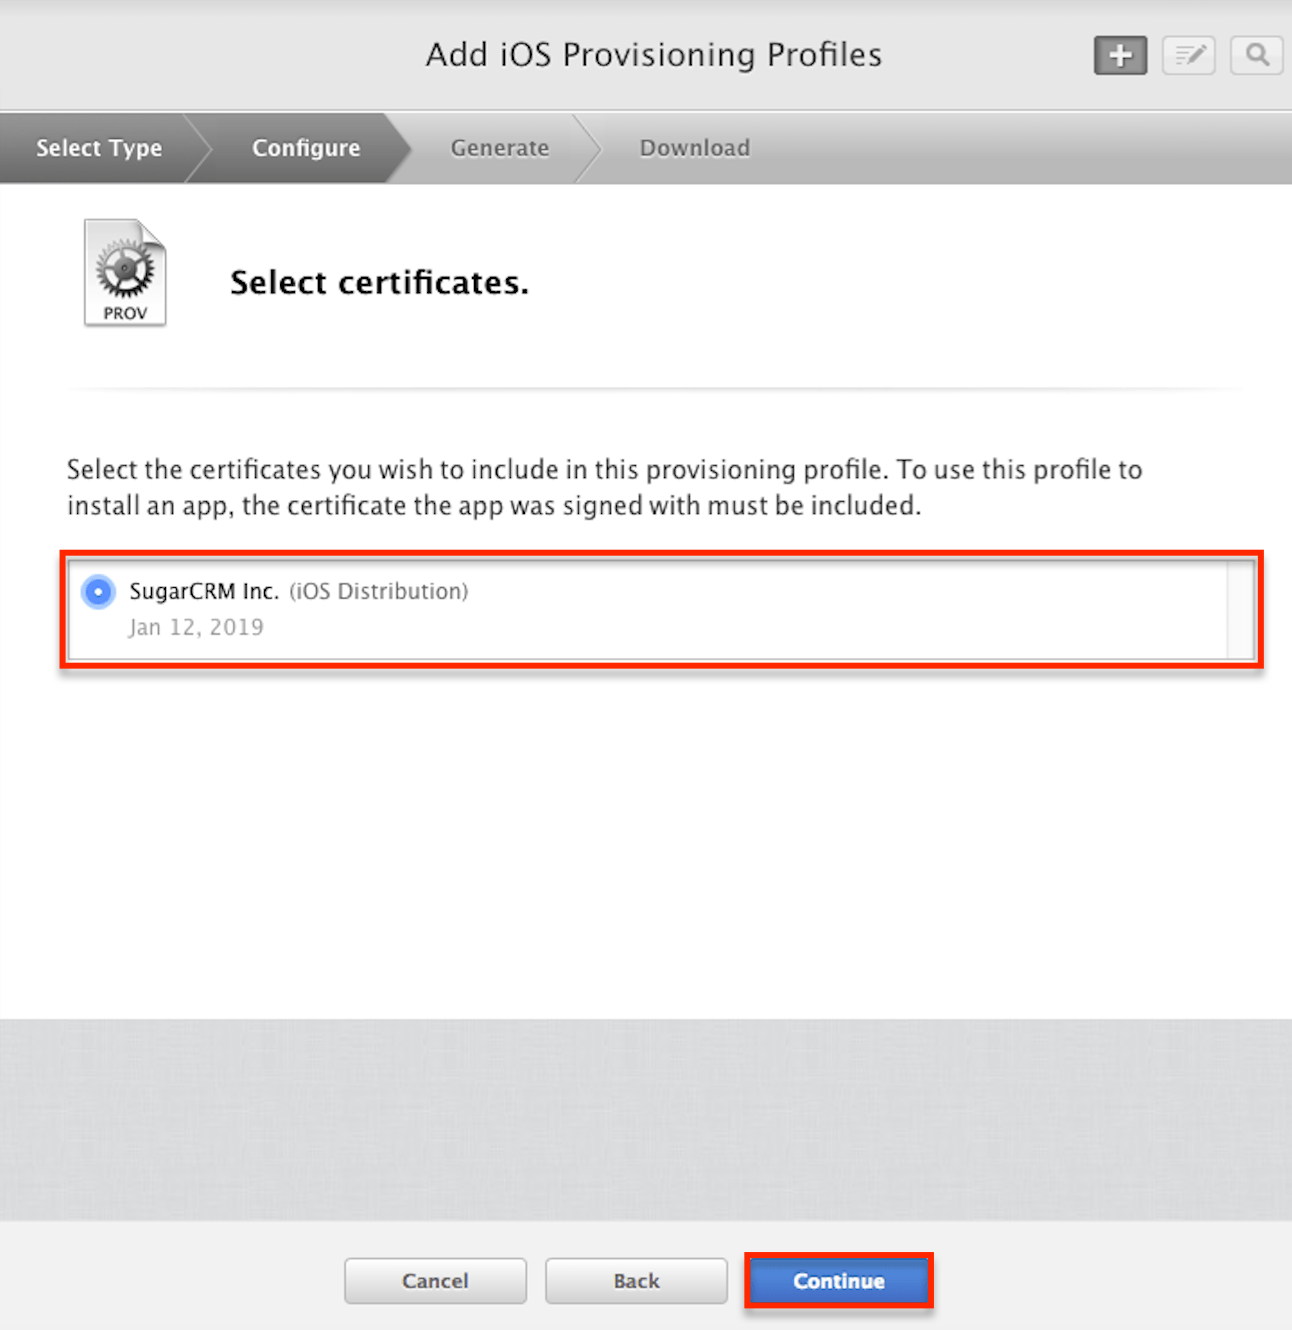
- On the next page, select the certificate you created in the Generating a Signing Certificate section then click "Continue".
- If you selected a development profile or an ad hoc distribution profile in step two, there will be an additional step where you must select the allowed iOS devices. This ensures the signed app can only be installed on the given phones or tablets. Click "Continue" to move to the next page.
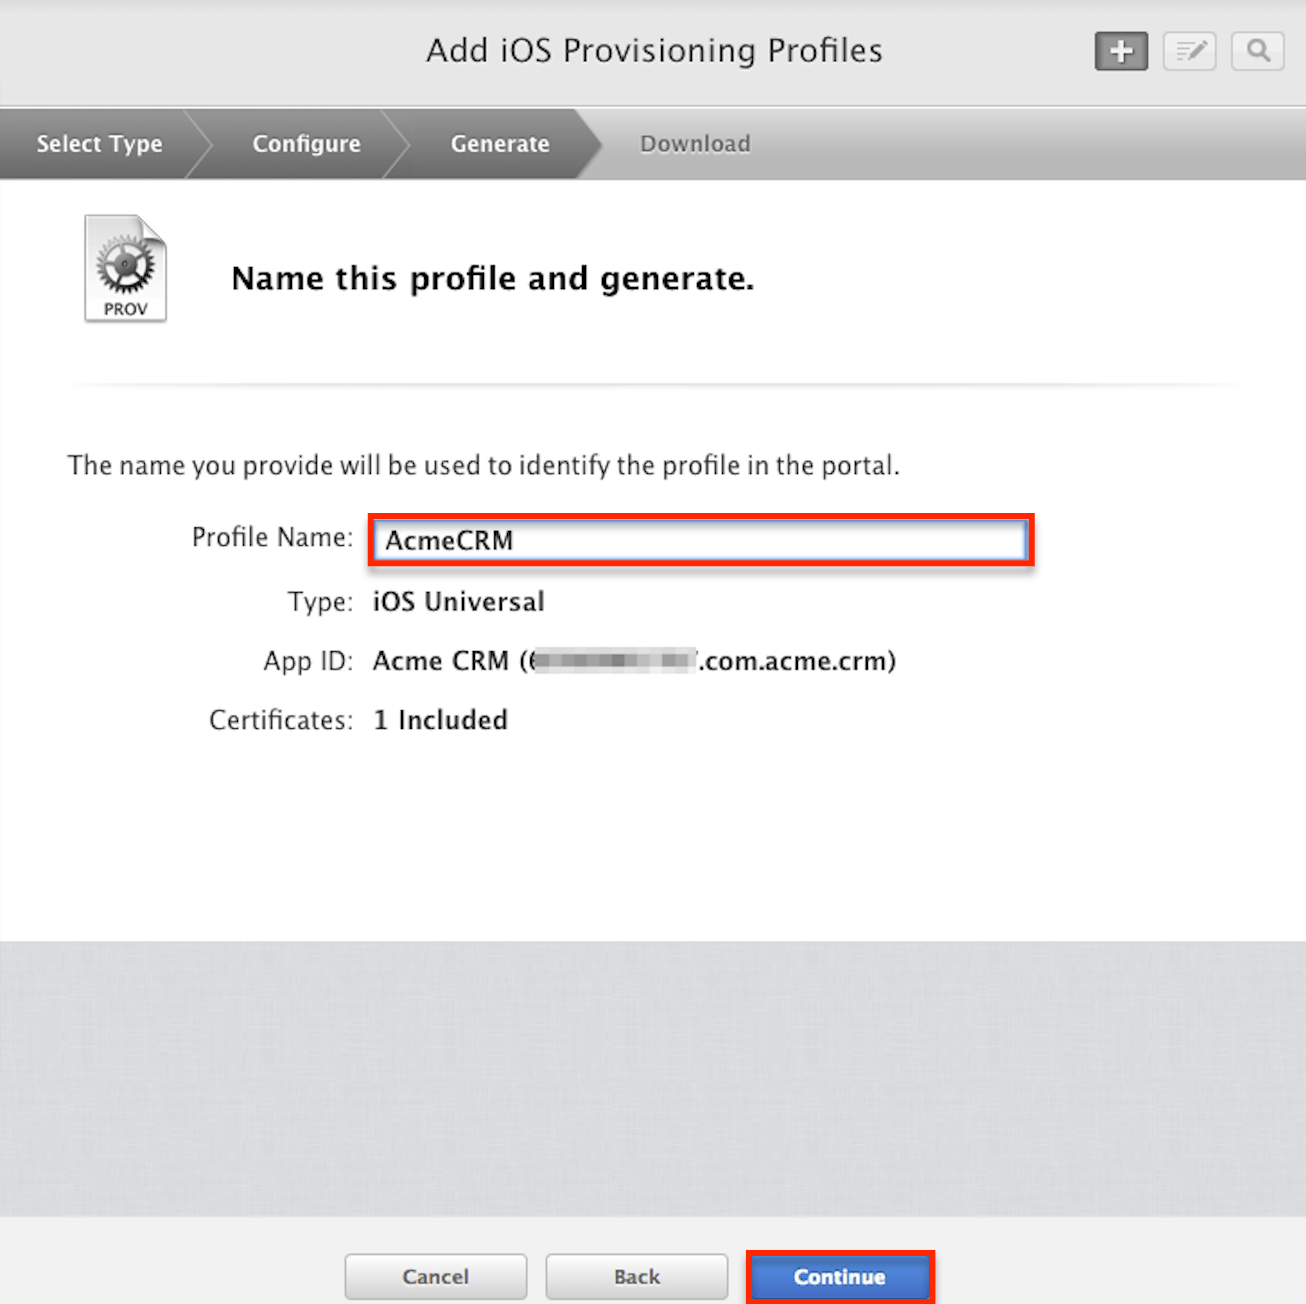
Note: You must have already registered these devices in the Devices section prior to generating the profile. - Enter the desired profile name in the Profile Name field and click "Continue".
- Finally, click "Download" to download the profile to your computer.
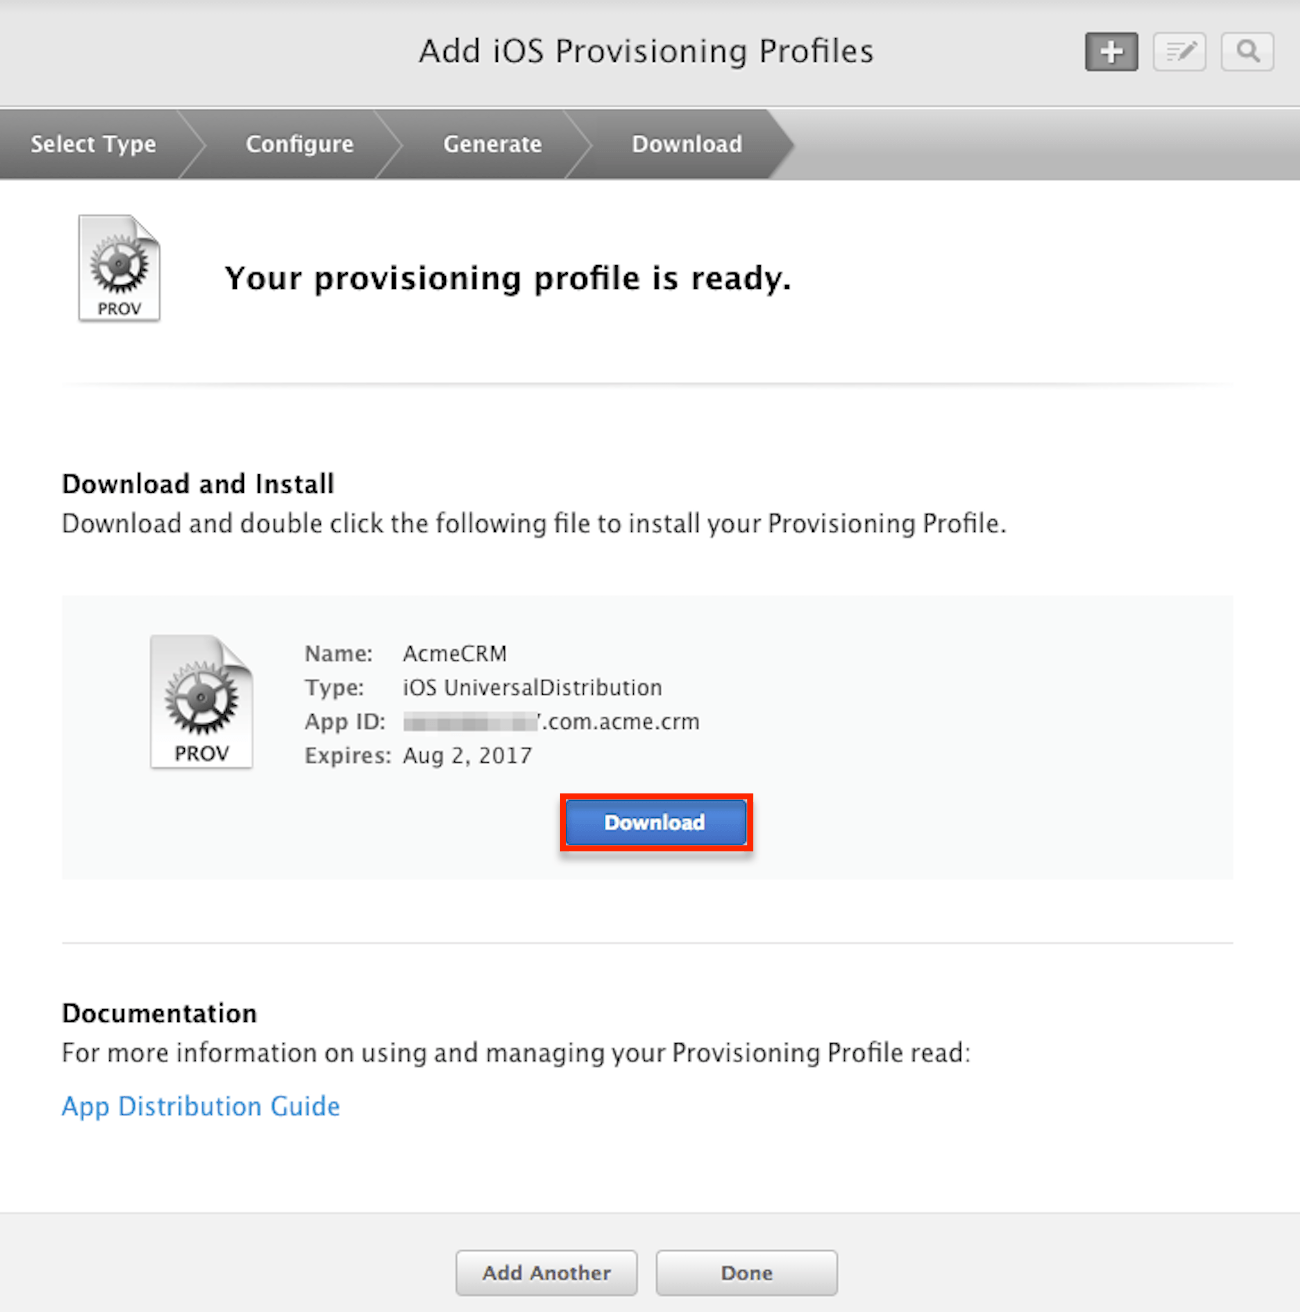
- Repeat steps 1-9 to generate a provisioning profile for the Call directory extension.
The profile file should install to ./Library/MobileDevice/ProvisioningProfiles, where it will be accessible by Xcode.
Inserting Your Team ID
Finally, locate your Team ID and insert it in the appropriate configuration file. Your ID is generated by Apple and can be found in your developer account.
- Sign in to your Apple Developer account and click "Membership" in the sidebar. Your Team ID is the 10-digit code under your team name.
- From your app's
./configfolder, open theapp.jsonconfiguration file and locate the"teamId"parameter. Insert your Team ID within double quotes then save and close the file.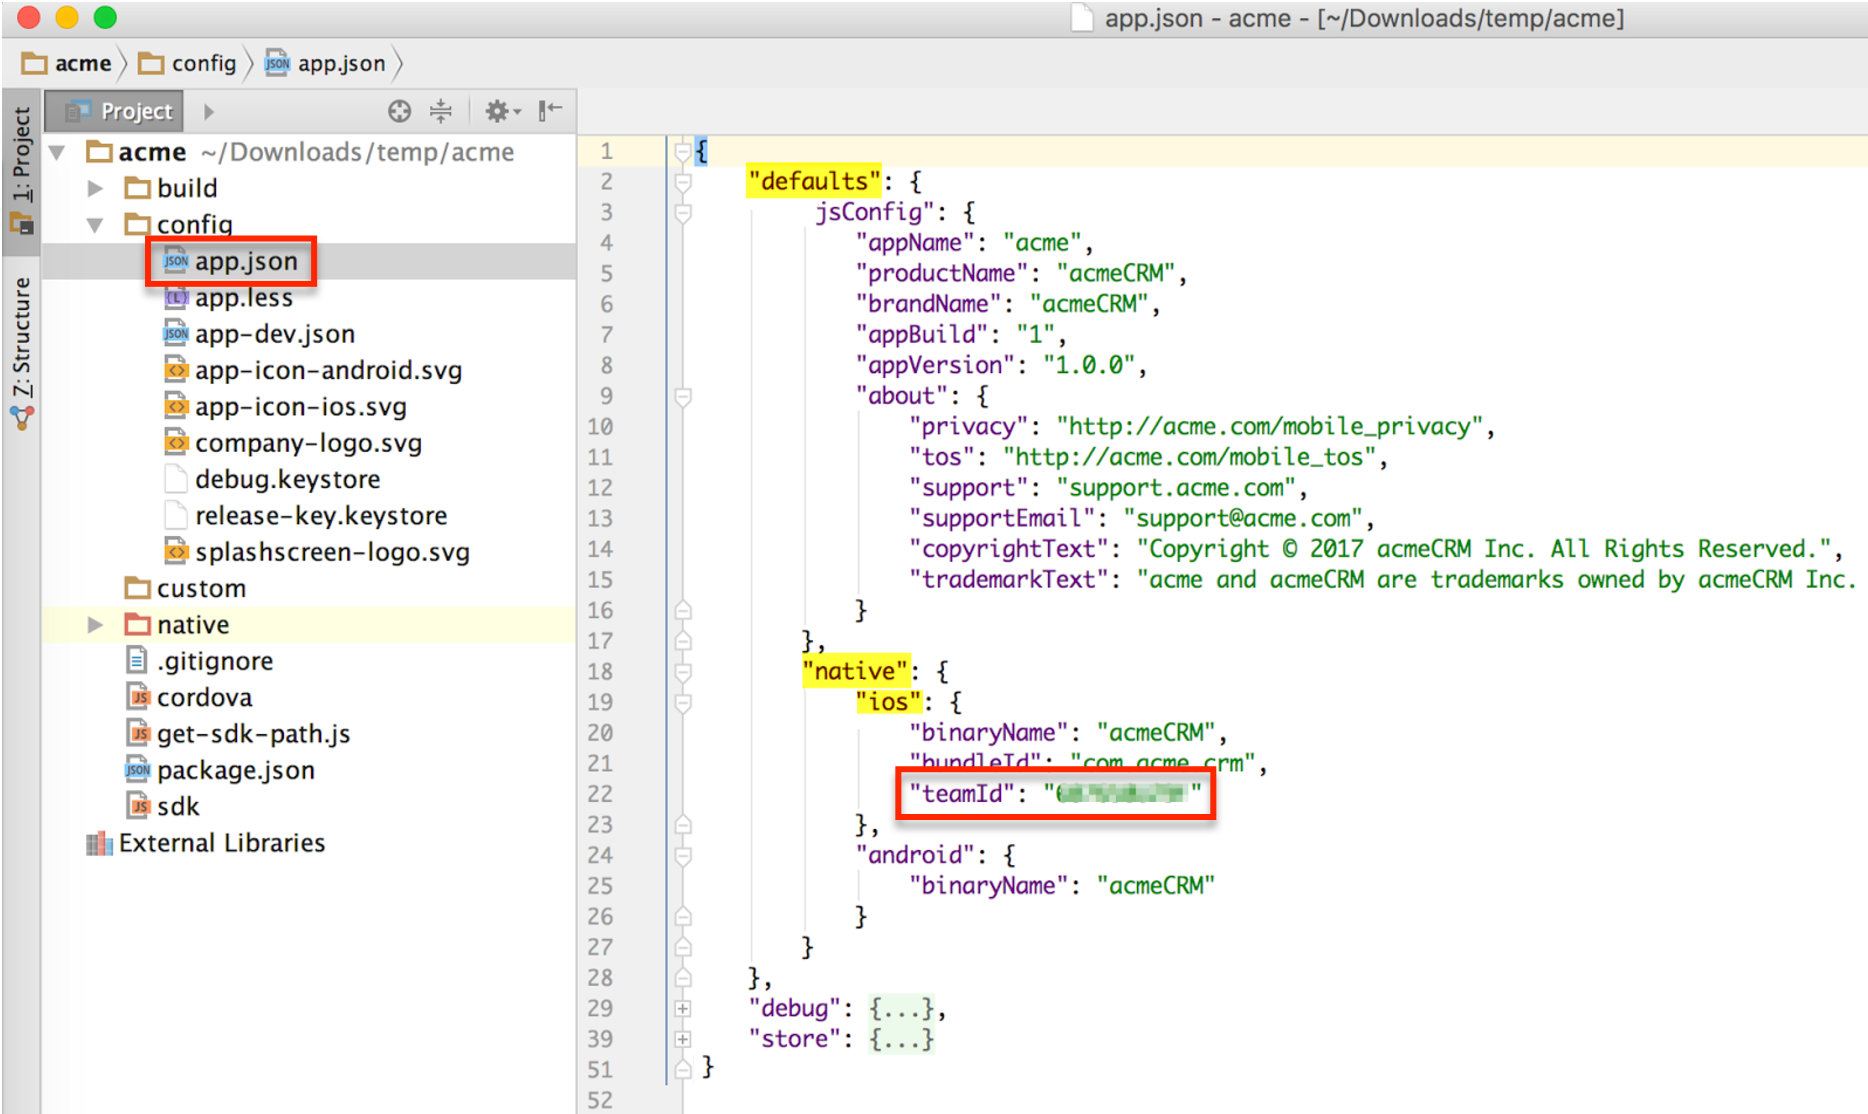
- After updating the configuration file, run the build command
./sdk init-nativeto regenerate the native iOS project.
You now have your certificate and profile files ready to sign the iOS app.
Automatic iOS Signing
After completing the steps in the previous sections, your environment is ready to compile the iOS app using Xcode or SDK command line tools. The default mobile app generated by SDK is configured to be signed automatically. Xcode will automatically select an appropriate certificate and provisioning profile based on the compile scheme and app bundle ID.
Note: If you prefer to sign the app with a specific certificate/profile pair, please refer to the Overriding iOS Default Xcode Configuration section of this page.
If you are using automatic iOS signing, you should see settings similar to the following in the build configuration when you open your native iOS app project in Xcode (.native/platforms/ios/Nomad.xcodeproj):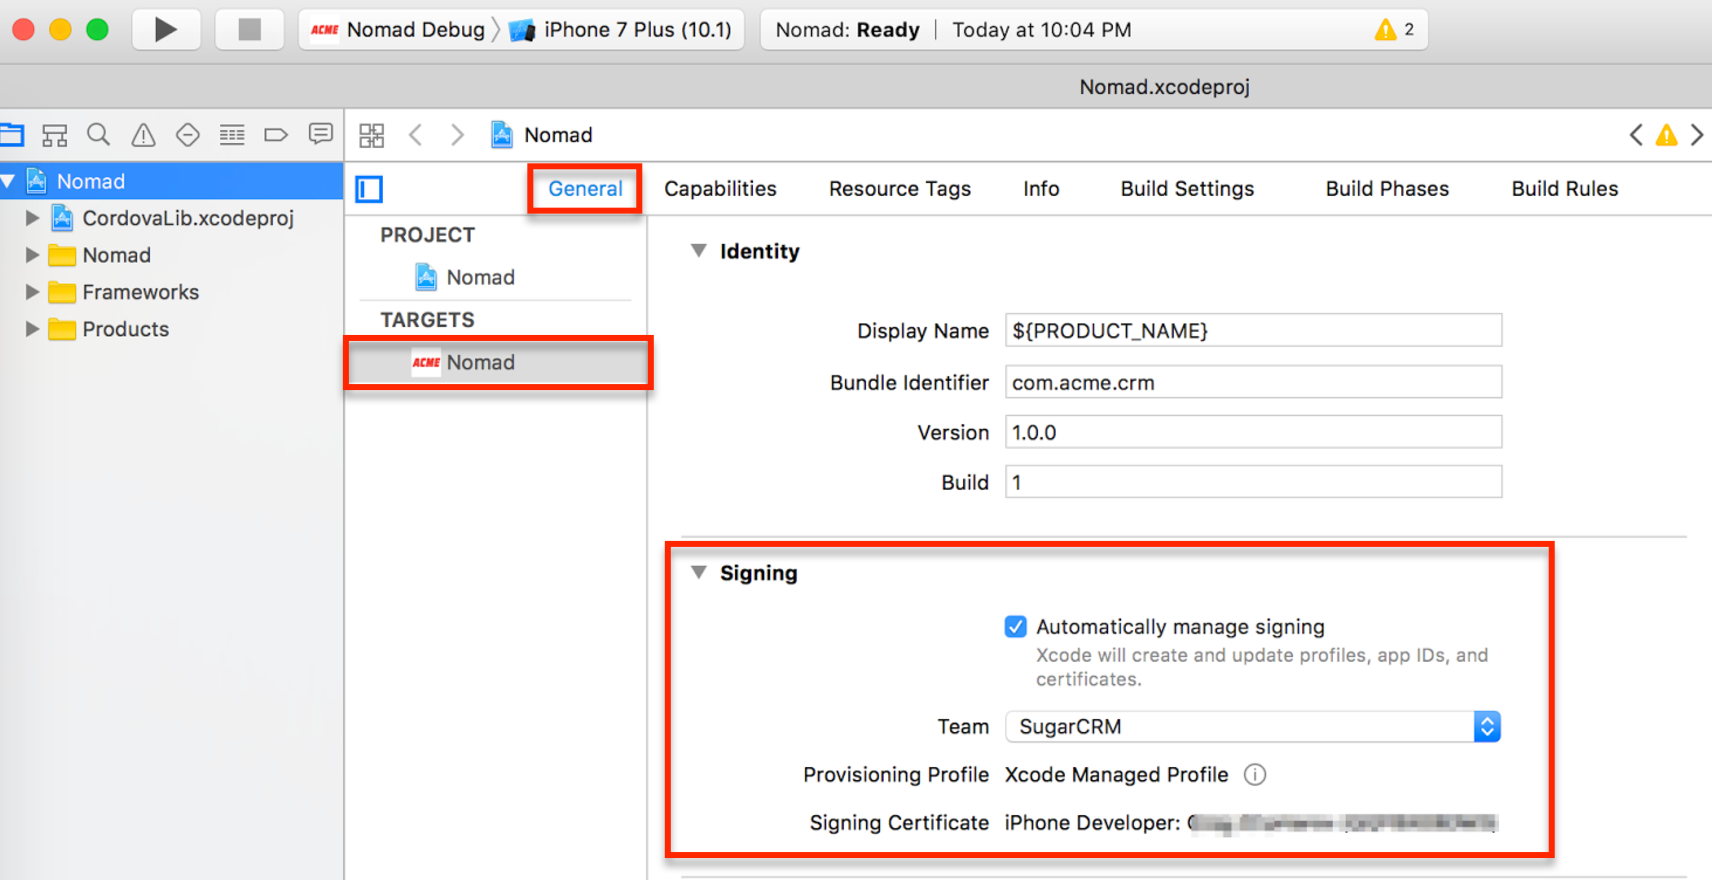
For detailed information about signing identities, please refer to the Maintaining Your Signing Identities and Certificates article in Apple's Distribution Guide.
Overriding iOS Default Xcode Configuration
Developers who develop multiple mobile applications often prefer to use their own certificate and profile. If you prefer to specify your own certificate and profile pair, you may choose to override the automatic settings via the app.json configuration file. Here, you can build a script that tells SDK to ignore the default signing identity and instead use the one that you specify. To do that, perform the following steps:
Note: Please disregard these steps if you are using automatic iOS signing.
- Export the certificate(s) in p12 format: Open the keychain, right-click the certificate name in list view, and choose "Export…" from the context menu. This should open the export file dialog. From the Export File dialog, enter a name for the certificate and then select "Personal Information Exchange (.p12)" as the file format.
- Save the file in the app
configfolder. We recommend choosing a strong password for certificates. - Copy the provisioning profile(s) you downloaded from the developer center into the app
configfolder. - Open the
app.jsonconfiguration file for editing. Find thedefaults.native.iossection to specify the default signing behavior. You can override the default behavior for any of the existing build schemes. The following settings are available:autoProvisioning: Flag indicating if the signing should be automatic (set this to false to provide custom signing options)profile: Path to the application provisioning profileprofileCallerIdExt: Path to the Call Directory extension provisioning profilecertificate: Path to the certificate file in .p12 formatidentity: Certificate identity name as displayed in the keychain- Use this setting instead of the certificate setting to avoid exporting the certificate and keeping its file on your file system. SDK build script will access the keychain automatically to retrieve the certificate by name and perform the signing.
certificatePassword: The password for the certificate stored in .p12 file- If not specified, SDK build script will request the input from the command line.
exportOptions: IPA package export options
For more information on the available configuration settings, please refer to the Mobile SDK Developer Guide.
The following image shows an example app configuration file with custom signing: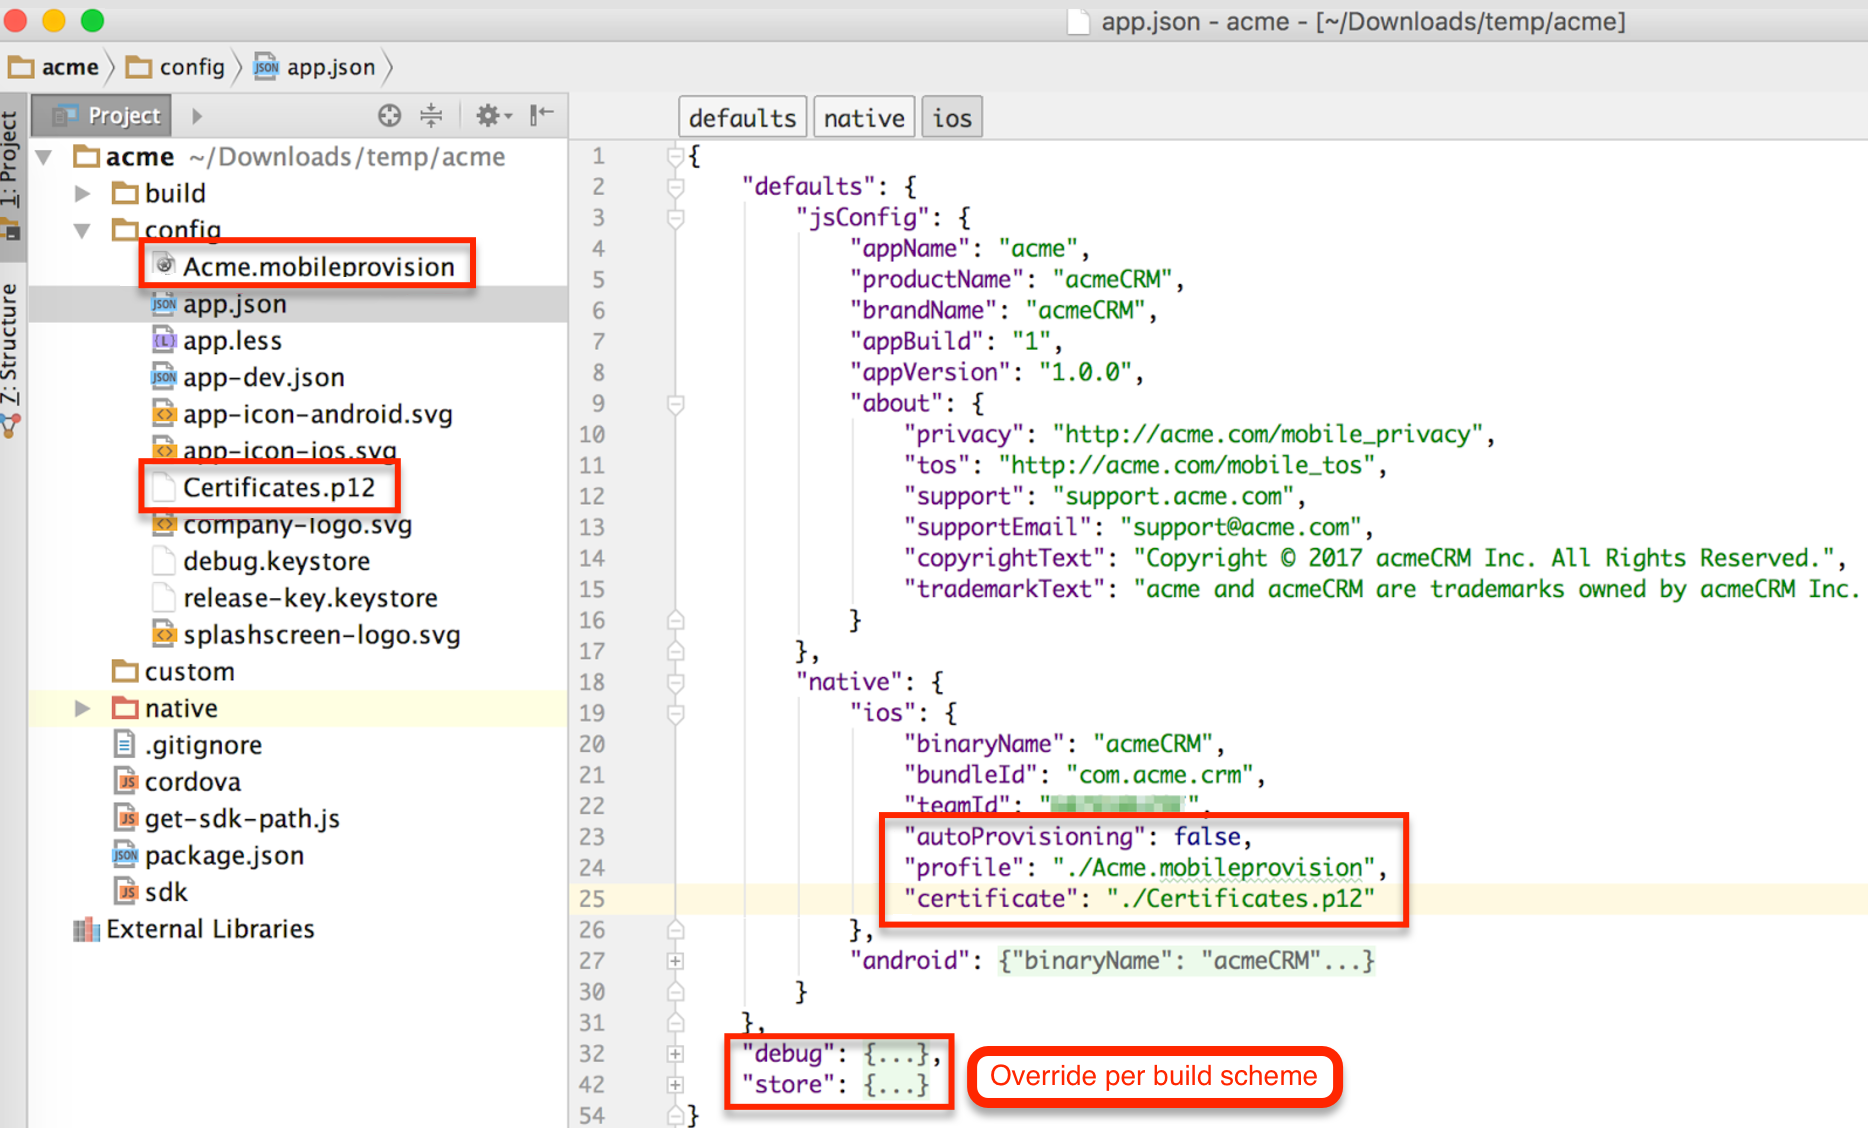
App Signing for Android
Before you can install Android native app for debugging or distribute the application to the Google Play Store, an internal enterprise store, or an MDM account, you must first generate signing certificates for Android using the keytool command-line utility.
Normally, you should create two certificates: one for debugging and the second for app store distribution.
When you generate a new custom app using SDK's generate-app utility, we will supply your app configuration with a default signing key you can use to sign the app for debugging. Do not use this key for distribution. The generate-app utility offers to create a release signing key for production. You can always generate such key later. The next section explains how to do it.
This section will provide information on how to register for an Android Developer account and how to generate an Android signing certificate.
Registering an Android Developer Account
If you wish to distribute your app via the Google Play store, you must first register an Android Developer Account. To do this, navigate to the Android Developers Portal, and follow the instructions. For more information, please refer to the Get Started with Publishing documentation on the Android developer site.
Generating a Signing Certificate
Prior to distributing an Android app to mobile devices via any method, you must generate a signing certificate using the Java keytool command interface utility. Keytool is part of Java development kit (JDK) and is available as part of JDK installation and Android SDK. For more information on acquiring the utility, please refer to Oracle's Java SE Downloads article or the Android Developer Guide.
Once the keytool utility is available on your computer, you can then easily generate your certificate which will then be stored in your keystore file. To do this, simply run the following command from the command-line:
keytool -genkey -v -keystore <keystore-name> -alias <alias> -keyalg <key-algorithm> -keysize <key-size> -validity <days-valid>
The following arguments are used by the keytool utility:
keystore-name: File name of the resulting keystorealias: Alias name of the entry to processkey-algorithm: The key algorithm name- The key algorithm must be set to "RSA".
keysize: Key bit size- The key size must be set to 2048.
days-valid: Number of days your app is valid
In the following example, the command-line keytool utility will generate the keystore as a file called my-release-key.keystore with a single key that will be valid for 10,000 days:
keytool -genkey -v -keystore my-release-key.keystore -alias key -keyalg RSA -keysize 2048 -validity 10000
Once you run this command, the keytool will prompt you to specify the keystore password and key password, along with a request for additional information (e.g. First and Last Name).
Note: Always choose a strong password for production keys.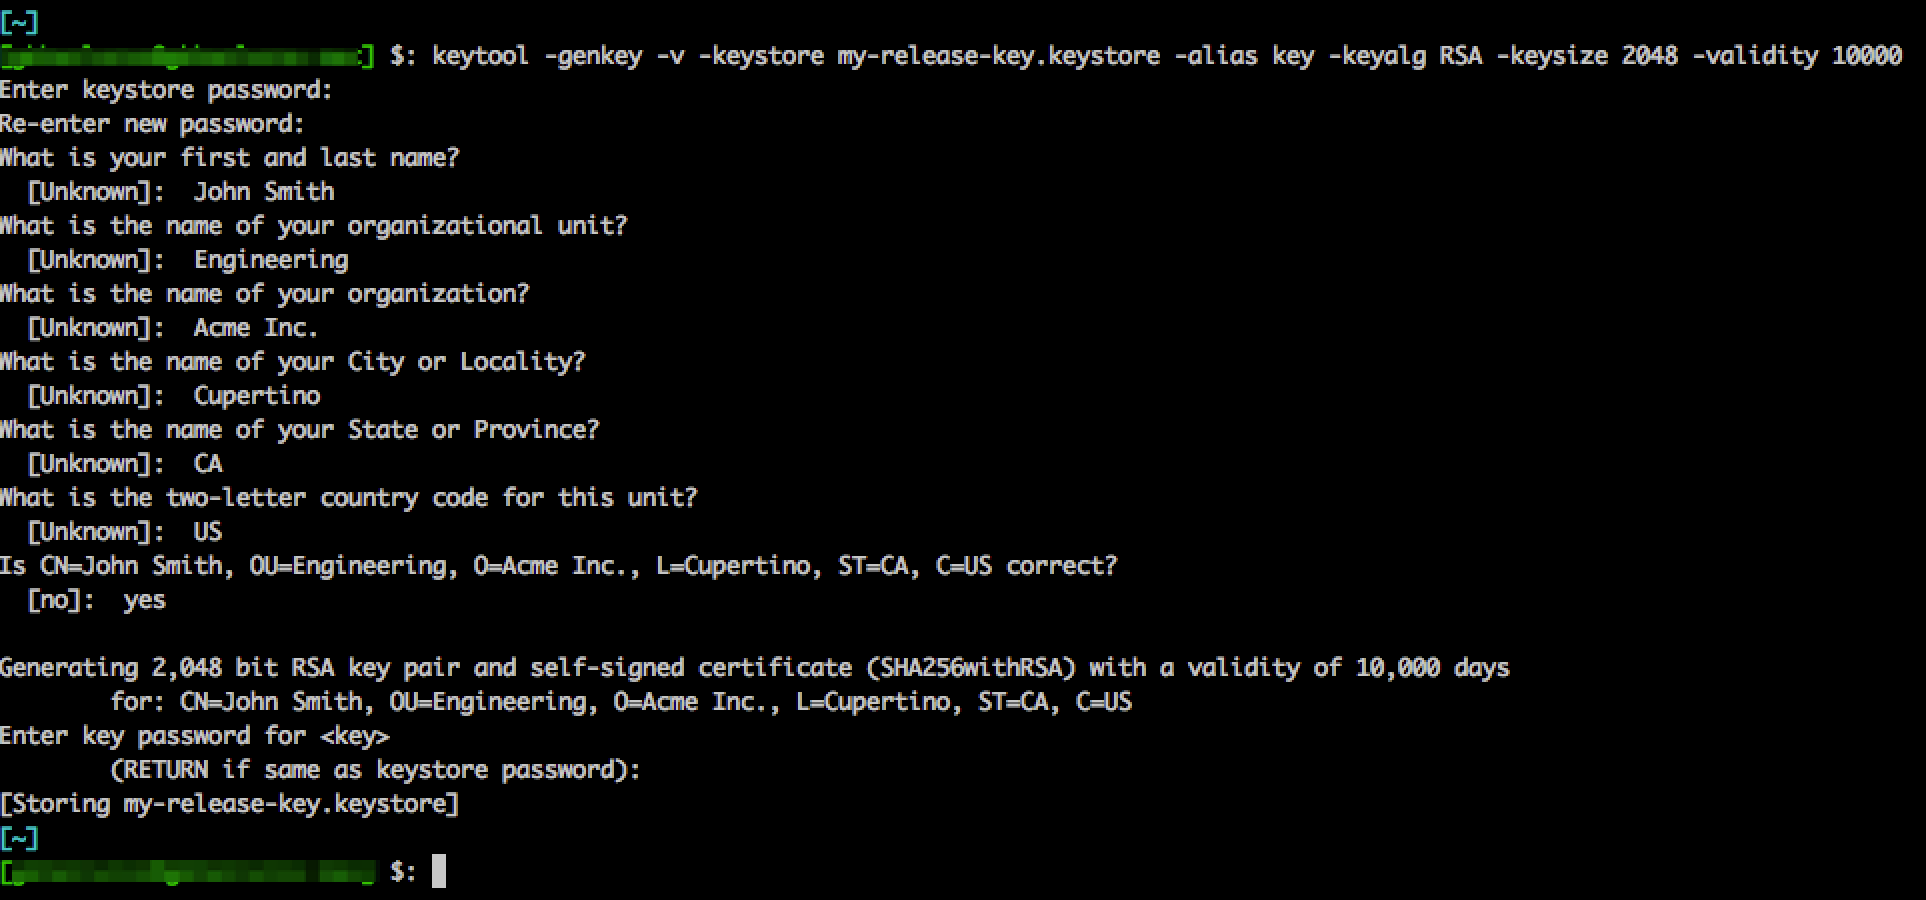
For more instructions on how to sign your app for Android, please refer to the Sign Your App page on the Android developer site.
Note: After submitting a signed app to Google Play, you must use that same signing certificate for all future updates. If you change the certificate, Google Play will not recognize the app as a new version of the same application, and users will not be able to update. If you lose the signing certificate, you will have to register a new app in Google Play.
Updating the App Configuration File
If you prefer using SDK build script instead of Android Studio for building the app binary, you must specify signing certificates in the app.json app configuration file.
Open the app.json configuration file for editing. Find the defaults.native.android.signingKey section to specify the default signing behavior. The following configuration settings are available:
keystore: Path to the keystore filestorepass: Keystore password- If not specified, the SDK build script will request input from the command line.
keypass: Key password- If not specified, storepass is used.
alias: Key name in the keystore file
For more information on the available configuration settings, please refer to the Mobile SDK Developer Guide.
The following image shows an example app configuration file with custom signing: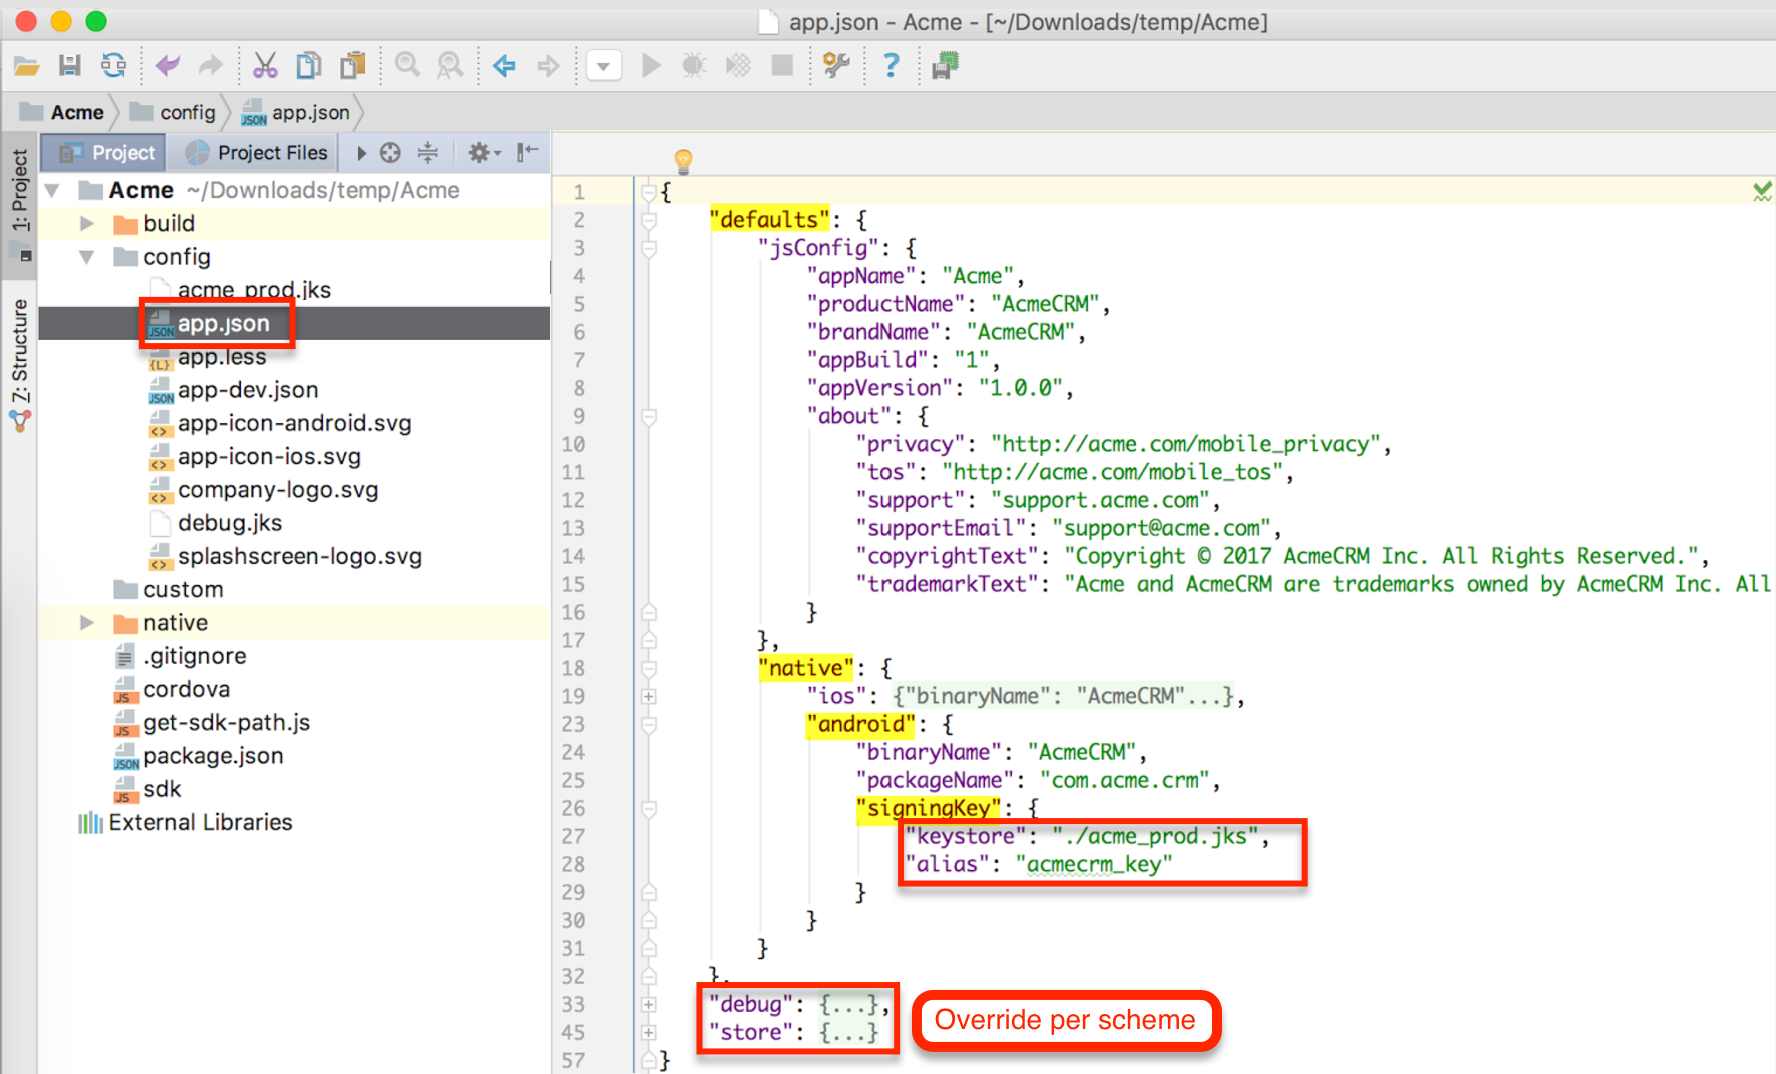
Additional Resources
More information about app-signing procedures and requirements is available directly from the iOS and Android developer sites: