Mobile SDK Quick Start Guide
Overview
Using SugarCRM®'s mobile SDK, mobile developers can customize the SugarCRM mobile app and distribute their custom app through the Apple App Store® or Google Play™ store or, for increased security and ease of distribution, through a private app store. This Quick Start Guide contains an overview of the SDK, installation instructions, and a sample project that illustrates some key concepts from the full Mobile SDK Developer Guide.
Features
A custom mobile app is developed on top of mobile SDK, often with custom UI elements and business logic developed in JavaScript, HTML, and CSS. Sugar's mobile SDK code base is stripped of Sugar-specific configuration and branding elements such as app icons, colors, analytics IDs, and signing keys. Instead, SDK contains sample branding assets and default configuration.
SDK has a public API to facilitate the rendering of the following UI components:
- Custom fields
- Custom views
- Custom dashlets
- Custom record actions
- Custom menu items
- Integration of custom Apache Cordova™ plugins
Limitations
When utilizing SDK to extend the core mobile product, you must stay within the boundaries of the public API. If you try to modify the SDK code base, make unsupported customizations, or use a private JavaScript API, you will likely lose the ability to successfully upgrade your custom app to the latest version.
Future versions of the SDK may deprecate elements of the public API. Deprecated APIs are eligible for removal one year following the announcement.
The SugarCRM mobile app and a custom app built using Sugar's mobile SDK cannot be installed on the same device.
Note: The customization of native code may be possible via integration of Cordova plugins, but directly editing the contents of your native folder via any other means is not recommended and will not be supported by SugarCRM. For more information on customizing via Cordova, please refer to the Integrating a Cordova Plugin section of this page.
Prerequisites
To access Sugar's mobile SDK, you must be in one of the following authorized user groups:
- Customers running a supported version of Sugar Enterprise, Enterprise+, Serve, Sell Advanced, or Sell Premier
- SugarCRM's OEM partners for use and distribution with their authorized OEM solution
- Partners of eligible customers
Note: SugarCRM partners who are creating a custom mobile app for a customer must log in and do so only under that customer's account. Partners are not authorized to create and store these apps under their own Sugar accounts.
To develop a customized mobile app via SDK, you should be proficient in the following languages and tools:
- Standard Web technologies including HTML5, CSS3/Less, and JavaScript
- Handlebars.js templating engine
- For iOS apps, Xcode, Objective-C, iOS SDK (optional)
- For Android apps, Java, Android SDK (optional)
You will also be required to:
- Have development accounts with Apple and Google for distribution of the custom app.
- Maintain the distribution and update the application regularly on at least a quarterly basis.
- Direct any support questions regarding potential MDM (mobile device management) distribution to the MDM vendor.
Software Requirements
Before performing the installation, please confirm that the following software requirements are met for your development machine.
Note: You must use a Mac to build code into an iOS application.
- Chrome or Safari desktop browser.
- Node Version Manager (NVM): Refer to the NVM documentation for NVM installation instructions. During installation, the SDK installation script will automatically install the correct version of node.js using NVM tool.
- Homebrew Package Manager: Install according to the installation instructions on https://brew.sh.
- After installing Homebrew, perform the following actions via command line to install additional required tools:
- Check for any Homebrew updates:
$ brew update
- Install the Yarn package manager:
$ brew install yarn
- Check for any Homebrew updates:
Optionally, you may want to be familiar with the following platform-specific technologies:
- The latest version of Xcode for iOS native apps
- Android Studio and Android SDK
Note: When using Android SDK, you must update to Android's latest SDK and accept the Android terms of service (TOS). If you have not agreed to Android's most current TOS, your scripts may fail.
Installation
SDK is distributed as a .zip package that includes the SDK source code, a README file with installation instructions, and a shell script that installs SDK and, optionally, generates an empty custom mobile app project. Please use the following steps to download and unpack the SDK file package:
Note: Before completing these steps, please confirm that you have installed the required software.
- Log in to https://mobiletools.sugarcrm.com with your sugarcrm.com username and password.
- Select "Mobile SDK" from the dropdown at the top of the page:

- On the Mobile SDK page, click on the Download button to save the latest SDK package to your local system. Please note that you can have multiple versions of SDK installed on a single development machine.
- Unpack the .zip contents into a temporary folder. For this example, we will unpack it in
~/Downloads/sdk. - Declare the
SUGAR_MOBILE_SDK_HOMEenvironment variable in your shell profile script. This variable must point to the folder where you want to keep SDK files. For this example, we will declare the following home variable, where^Drepresents typing control+D:
$ cat >> ~/.bash_profile
  export SUGAR_MOBILE_SDK_HOME=/usr/local/developer/mobile-sdk
^D - In addition, declare these environment variables, which point to your Android SDK installation and Android SDK tools:
export ANDROID_HOME=~/Library/Android/sdk export PATH=$PATH:$ANDROID_HOME/platform-tools/ export PATH=$PATH:$ANDROID_HOME/cmdline-tools/latest/bin/ export PATH=$PATH:$ANDROID_HOME/emulator/ - Finally, run the installation script. The script copies SDK files into the path specified by the environment variable
SUGAR_MOBILE_SDK_HOMEand installs the required node packages:
$ cd ~/Downloads/sdk/sugar-mobile-sdk-5.2.0.423-1.1.3-1
$ ./install
You are now ready to generate a sample app project. Please note that you can use the --generate-app switch during installation to simultaneously create a sample app but, for this guide, we will wait to create the sample project in the next section.
Sample Project
After installation, you can generate a sample app project via command line:
$ "$SUGAR_MOBILE_SDK_HOME/<sdk-version>/sdk/generate-app" [path]
If you do not specify the "path" parameter, the utility will create an app in the current folder. For this example, we will generate an app called "myFirstApp" using SDK version 5.2.0.423-1.1.3-1 and store it in a new folder called ~/Documents/Projects/mobile-sdk.:
$ "$SUGAR_MOBILE_SDK_HOME/5.2.0.423-1.1.3-1/sdk/generate-app" ~/Documents/Projects/mobile-sdk
The SDK app generator will prompt you for several optional values. We will enter myFirstApp for our app name, skip the optional instance URL, and enter y for yes when asked if we want to use sample code: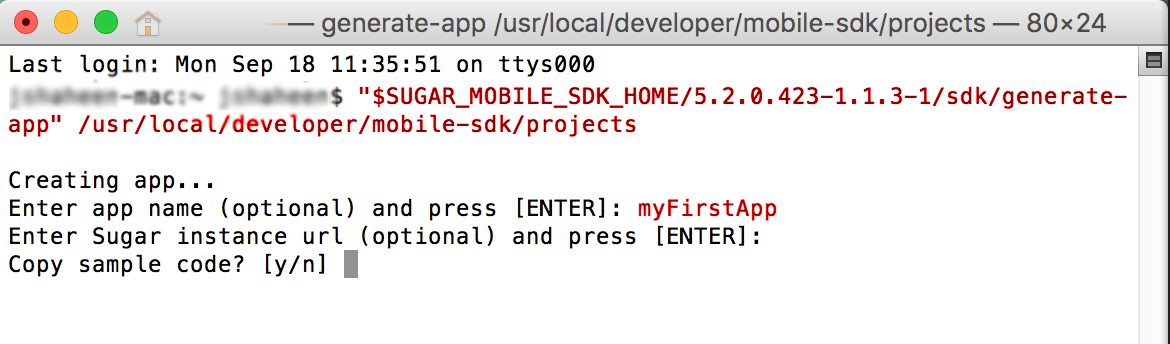
Note: The names of apps built with the SDK can only contain alphanumeric characters.
The resulting sample project will contain the default app configuration and the empty folder structure where you can store your custom code. At this point, you could simply build the application without making any changes to the default configuration or sample branding.
The structure of an SDK project contains the following notable files and directories:
config/: This folder contains app configuration viaapp.jsonand brand assets such as the app icons and company logo. It is also where your signing keys need to go after building the app binaries.custom/: The custom folder is an empty folder structure where you can place your custom code. It will contain sample code if you choose to load sample data when generating the app. The custom directory contains folders for customizing dashlets, fields, views, and more.package.json: This file contains the minimum NPM configuration to get the app build going.sdk: This is the executable that contains the SDK build runner script.native/: This is where your iOS- and Android-native apps are stored. This folder is auto-generated and is not meant to be directly edited by developers. You can create and re-create native projects by running the./sdk init-nativetask or passing the--init-nativeoption to the build command.
For more details on creating a custom app project, please refer to the Mobile SDK Developer Guide.
Upgrade
Use the following steps to upgrade a custom app from a previous SDK version to the current one:
- Modify
package.jsonin your custom app folder to specify the new version number (e.g. "17.0.531-1.4.2-2") for thesdkVersionproperty. - Recreate native projects by running
./sdk init-native. - Restart the debug server and rebuild the app.
Development Workflow
As a best practice, be sure that the development of your custom app is source controlled. We recommend creating a development version of the app configuration, or a development configuration file, especially if there are multiple developers working on the same application code base.
Development Configuration File
The SDK supports development app configuration, which is a set of app config settings that you may want to apply during the development only (i.e. for the debug scheme). During development, create an app-dev.json file in the config directory and ignore it for source control. This file will contain only the settings that are different from the main configuration stored in config/app.json. You should not check this file into the source control system because the dev settings are specific to a developer.
For more information on creating and using a development configuration file, please refer to the Mobile SDK Developer Guide.
Command Line Tools
The interaction with SDK build tools is performed with the help of SDK script located in the root application folder:
$ ./sdk build [options]
To get the full help materials for all build tasks and options, run the following command:
$ ./sdk help
Build Schemes
SDK supports a notion of build schemes. Build schemes are commonly used in scenarios where you would like to distribute an app to a small group of test users or easily port the build from a development to a production environment. The app will need to be built for different environments: development, testing, production, etc. Each environment can then have different application configurations. You can declare your own custom build schemes in the config/app.json file or use one of the two default schemes:
- debug: Used during development
- release: Used for building applications for production environment and store submission
To specify the build scheme, use -s|--scheme in command line when running ./sdk build script, for example:
$ ./sdk build [-s debug|release]
Debugging
This section covers the two debugging scenarios that you may encounter. Since the app is a hybrid and the custom logic is implemented in JavaScript/CSS/HTML, the primary debugging scenario is running the web portion of the app in a desktop browser and using its developer tools to step through the code, inspect HTML/CSS, etc. An alternative development approach is running the app on an iOS/Android simulator or a physical mobile device.
Debugging via Desktop Browser
SDK is able to run a local HTTP server for web debugging:
$ ./sdk debug [--debug-host host] [--site-url sugar-instance-url] [--disable-livereload]
The above command starts a development web server that listens on port 9000 by default. To change its host and port, use --debug-host. For example, if your Sugar instance is located at http://10.8.8.33/ent7900 and you would like to run the debug server on port 9090 instead of 9000, use the following command:
$ ./sdk debug --debug-host http://localhost:9090 --site-url http://10.8.8.33/ent7900
To confirm the changes to host and port, open a desktop browser and navigate to http://localhost:9090/app. You should see the mobile app's login view.
Note: Instead of specifying the --site-url option, you could instead configure the siteUrl setting in config/app-dev.json as described in the Development Configuration File section.
Debugging via Phone, Tablet, or Device Simulator
For this, you will need to generate an iOS-native or Android-native app from your base application. To generate a native project, use the following command:
$ ./sdk init-native
$ ./sdk build [-s|--scheme debug|release] [-p|--platform ios|android|native]
The first command line in this example bootstraps your native app project in the native folder. Usually, this is a one-time operation and automatically runs when a new app is created using the --generate-app script. You can now open the native project in Xcode and Android Studio from ./native/platforms/ios and ./native/platforms/android respectively.
The second command line in the example above compiles native projects into IPA and AAB binaries respectively. You can recreate the native project every time you build it. To do that, pass an optional --init-native switch:
$ ./sdk build --scheme [debug|release] --platform [ios|android|native] --init-native
While in the process of development and running the app from Xcode or Android Studio, it may be convenient to rebuild just the Web portion of the app (Web bundle) without compiling native binaries:
$ ./sdk bundle-web -s [debug|release] -p [ios|android|native]
The bundle-web command concatenates JavaScript files, compiles Handlebars templates and LESS stylesheets, and copies the Web bundle into the corresponding folder in the native project. Afterward, you can launch the app from Xcode or Android Studio.
Note: If you change any settings in the native section in the config/app.json configuration file, you need to update the native projects:
$ ./sdk update-native
The update-native command is much faster then init-native command because it does not recreate native projects but, instead, updates native projects with the latest configuration settings in config/app.json.
Building App Binaries for QA and Production
To distribute a customized mobile app that was created via the SDK, you must provide your app with a certificate and digitally sign the app. The steps for iOS and Android differ slightly, so you must complete the appropriate steps for each if you want to distribute your app via both channels.
In all cases, you will need to compile the appropriate app for your use case. Use the following command to compile the native application for testing or production:
$ ./sdk build -p [ios|android|native] --s [debug|release]
For complete steps on generating the signing artifacts, adding them to your project's config folder, and updating your project's app.json file, please refer to the App Signing for Mobile SDK guide.
Adding Custom Functionality
There are a number of ways of extending or customizing the standard application:
- Modify configurations in
config/app.json - Modify CSS styles in
config/app.less - Implement new functionality using Javascript and Handlebars in the
customfolder - Integrate a custom Cordova plugin to add native functions
For more information on configuration, CSS, Javascript, and Handlebars, please refer to the Mobile SDK Developer Guide. To add native functions with a Cordova plugin, please refer to the following Integrating a Cordova Plugin section.
Integrating a Cordova Plugin
SDK includes a number of Cordova plugins by default. If you need custom functionality, you can integrate a third-party plugin from Cordova or develop your own. As an example, we will integrate a third-party Google Maps plugin. Run the following commands from your project's folder:
$ cd native
$ ../cordova plugins add cordova-plugin-googlemaps
Here, "cordova" is a wrapper for the Cordova CLI tool. The command downloads the plugin and installs it into Android and iOS native projects.
Keep in mind that running the ./sdk init-native command recreates the "native" folder. So, if you have custom plugins installed, you must re-add them using the Ccordova script. For the full list of Cordova CLI commands, run:
$ ../cordova --help
Please refer to the Mobile SDK Developer Guide for more information on plugins and customizations.