Activating Sugar Sell Premier
Overview
Sugar Sell Premier includes several features that provide enhanced functionality for you and your team. Some of these features (e.g., geo mapping and data enrichment and news feed) are available as soon as a user has a Sell Premier license. Some features (e.g., mail and calendar integration) require additional activation and configuration before they are available. This article provides an overview of the process that your primary Sugar administrator should perform to activate and configure these features in addition to information about the included enhanced functionality.
This article covers the following steps that are required to activate your Sugar Sell Premier capabilities in logical order:
- Log in for the first time.
- Create users.
- Set up the Sugar Connector for LinkedIn Sales Navigator.
- Go live with Sugar.
- Activate your mail and calendar integration.
- Give users access to the mail and calendar integration.
- Give users access to Enhanced Forecasting.
- Learn about the Intelligence add-on.*
- Learn about smart guides, geo mapping, and data enrichment and news feed.
- Encourage user adoption.
Note: This article only references the Intelligence add-on that can be purchased directly from Sugar. You can find many more third-party solution add-ons in SugarCRM Marketplace.
Prepare
Before activating Sugar Sell Premier, make sure that you have access to the following items:
- SugarCRM Order Confirmation: Find your order confirmation email that contains your license keys and Sugar URL. You will need this information below.
- SugarCRM Customer or Partner Portal login: You may have had this account previously, or if you purchased Sugar online, a new account would have been automatically created. You should have received an email with a subject line similar to, "Welcome to SugarCRM Customer Portal". If you have not received this email, or you did not place your order online, you can register for the portal at https://auth.sugarcrm.com/register or by contacting your sales representative.
- List of Sugar Users and Responsibilities: You should make a list with each user's full name, username, email address, and physical address (needed for Sugar Maps geolocation services) so that you can create multiple users via import. You should understand how each user will be permitted to engage with Sugar through the lens of teams and roles.
The steps on this page may take several hours or several days depending on your level of preparedness, business process complexity, and familiarity with Sugar solutions. Please review the following sections before starting and be sure you have enough time to commit to the activation and configuration for each step.
Log in for the First Time
Welcome, administrator! The first step for assembling your Sugar Sell Premier instance is to log in to Sugar and set up your user account.
- Navigate to your new Sugar instance.
- Find your instance URL under the "SugarCloud Access" heading in your SugarCRM order confirmation email.
- Log in using the credentials provided in the order confirmation email.
- Step through the New User Wizard to configure some basic profile settings, and then click "Start Sugar" to access your Sugar account.
- Edit your admin user record in SugarIdentity.
- Click your profile icon in the upper right of Sugar and select "Admin". Then click "SugarIdentity" on the Admin page to create and manage user records and configure additional settings.
Note: For Sugar versions 13.0 and lower, click "SugarCloud Settings" on the Admin page.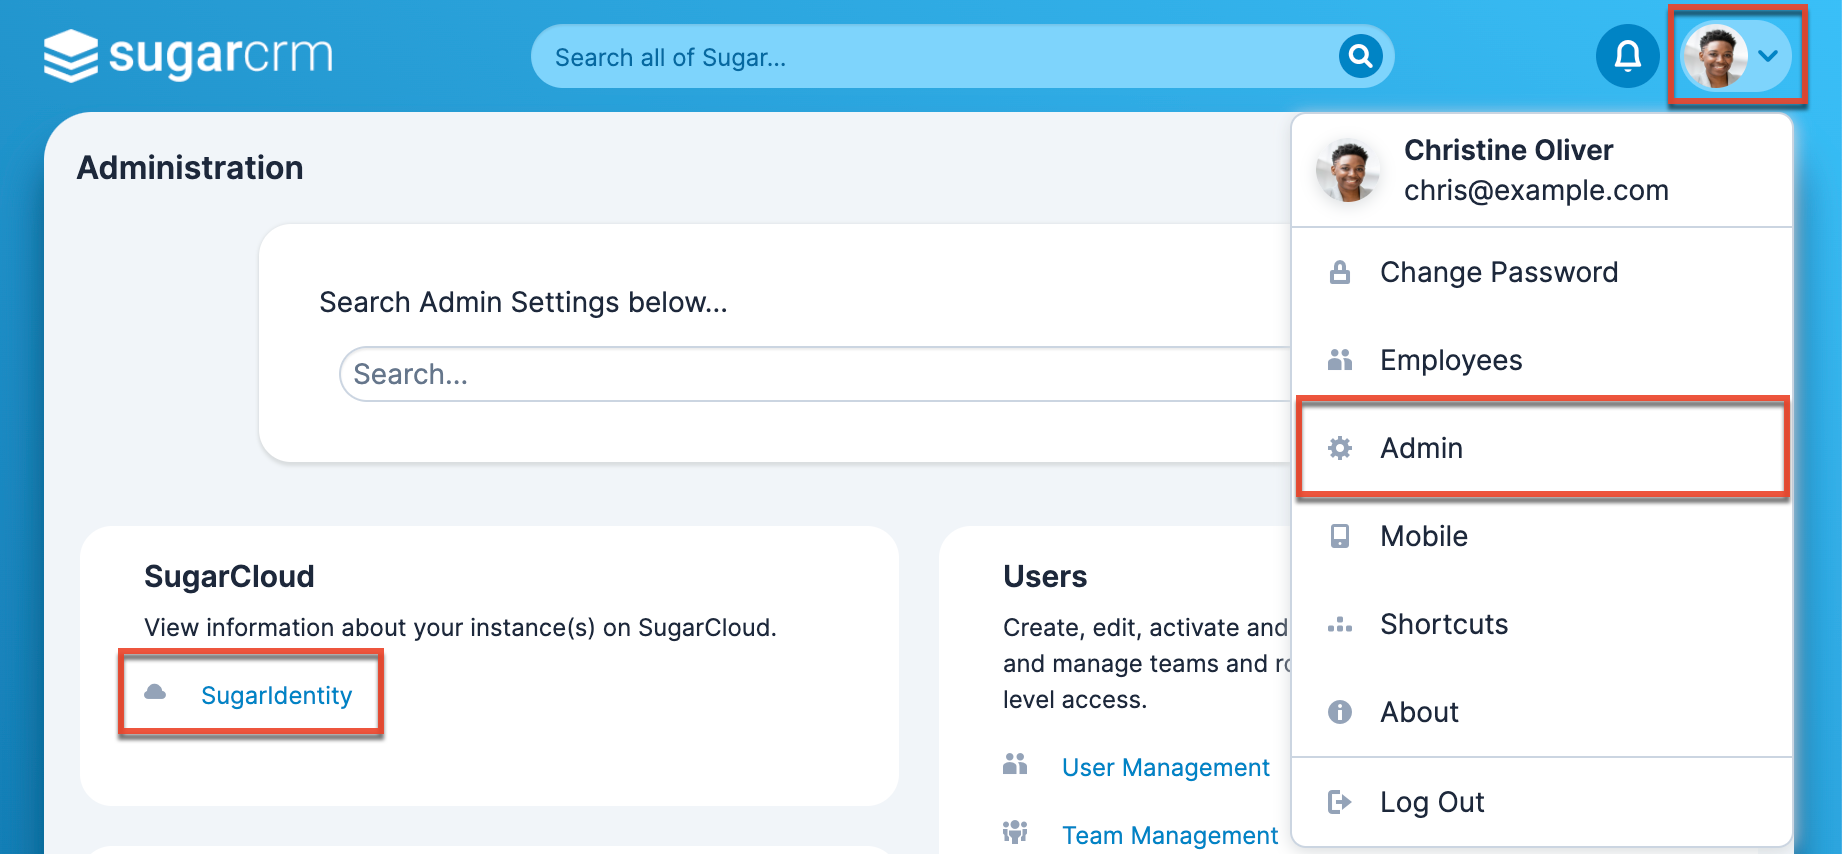
- Click on the only user record, "Administrator", and edit the details as follows:
- Set your first and last name, user name, and email address.
- Enable all available license types in the License Type dropdown to ensure you can access all of Sugar's functionality.

- Click your profile icon in the upper right of Sugar and select "Admin". Then click "SugarIdentity" on the Admin page to create and manage user records and configure additional settings.
- Define password requirements in SugarIdentity.
- At the top of the navigation bar, click the Home tab, then select "Password and Security Settings" in the Login Management section.

- Set your organization's password requirements.
Note: For more information on configuring the password requirements, refer to the SugarIdentity Guide.
- At the top of the navigation bar, click the Home tab, then select "Password and Security Settings" in the Login Management section.
- Set your password.
- Once you have established your organization's password requirements, click the User Menu in the top-right corner of SugarIdentity and select "Change Password" to change your password to a secure one.

- Once you have established your organization's password requirements, click the User Menu in the top-right corner of SugarIdentity and select "Change Password" to change your password to a secure one.
Note: Do not share your login credentials with others. If you would like to designate another person as an admin user, please create a new user with the User Type field set to "System Administrator User".
Create Users
For the remaining sections, you will need to have user records loaded into Sugar so that you can associate them with the appropriate capabilities before they log in. To determine the best way to add users for your situation, please review the Best Practices When Creating Users documentation before continuing.
- Create the user records in SugarIdentity.
- Create users individually or create multiple via import.
Note: You may refer to the list you prepared earlier before starting the Sell Premier activation process. - You must assign a license type (e.g., Sugar Sell Premier) when creating the user records.
- Create users individually or create multiple via import.
- Set up teams and roles in your Sugar instance.
Set up the Sugar Connector for LinkedIn Sales Navigator
Before you can use the Sugar Connector for LinkedIn Sales Navigator, you must install the package and configure access.
- Download the Sugar Connector for LinkedIn Sales Navigator package.
- Navigate directly to your account's Downloads page.
- If necessary, log in using your SugarCRM.com username and password.
- In the first dropdown, select "Plug-ins" and in the second dropdown, select your Sugar version number.
- Find the SC4LISN_1.x.x.zip package in the list and click on the link to initiate the download.
- Refer to the Sugar Connector for LinkedIn Sales Navigator Installation Guide to learn how to install the connector.
- Refer to the Configuring Access section in the Sugar Connector for LinkedIn Sales Navigator Installation Guide to learn how to give users and teams access to the connector.
Go Live With Sugar
Before introducing users to Sugar, you may want to make changes to Sugar's standard fields and layouts. Take some time to evaluate and configure Sugar's capabilities for your unique business processes. The following links may help guide you during this exciting process of leveraging the flexible Sugar platform.
- Configure your system settings.
- Refer to the First Settings to Configure article for some common settings that you may want to configure.
- Configure Sugar Sell-specific features.
- Refer to the Setting up Sugar Sell Features article to learn about how to configure Sell-specific features that will help your sales team succeed.
- Welcome your users.
- Send a welcome email to your users to provide them with the instance URL and information on how to log in.
Activate Mail and Calendar Integration
To start using Sell Premier in your Gmail or Outlook client, you must create and configure a Sugar Connect tenant and then configure your Sugar instance to sync with that tenant. As the primary administrator of your Sugar instance, we recommend that you also be the administrator of Sugar Connect. All Sugar Connect admins must also be admins for the Sugar instance.
- Refer to the Setting up Your Sugar Connect Tenant section in the Sugar Connect Deployment and Administration Guide to learn how to set up your organization's instance of Sugar Connect.
- When setting up your Sugar Connect tenant, you will be required to provide your SugarCRM license key. This key is found in your SugarCRM order confirmation email under the Additional Capabilities heading.
- If users will authenticate with Google Workspace accounts, you may need to add Sugar Connect to your Google Workspace account's trust list.
- Configure the email sidebar and sync settings as detailed in the Sugar Connect Deployment and Administration Guide.
- To customize the Connect sidebar record view, navigate to Sugar Connect Portal > Admin Center > Customization.
- To configure email tracking, calendar sync, and contact sync settings, navigate to Sugar Connect Portal > Admin Center > Settings.
Refer to the Sugar Connect Deployment and Administration Guide for details about other settings that you may want to configure at this time.
Note: Users do not yet have access to this capability. You will be giving users access in a later section once you have added users to Sugar and Connect.
Give Users Access to Mail and Calendar Integration
Before giving users access to Sugar Connect for mail and calendar integration, they must have already set up their Sugar user accounts with their business email address and have created a Sugar password. Use the following steps to give those users access to Sugar Connect.
- Add users to Sugar Connect.
- Manually add users to Sugar Connect or auto-add new Connect users from your domain.
- Once a user has been added, you may make any user a Connect admin via the Users action menu in Admin Center > Users.
- Map Sugar Connect users to Sugar.
- Sugar Connect users are automatically mapped to their Sugar user accounts. Admins may manually map Connect users to their Sugar user accounts via the Add User Link button in the Connect Portal > Admin Center > CRM Data Source.
- Ask users to install the Google or Microsoft extension.
- Provide users with the Sugar Connect User Installation Guide for instructions on how to install Sugar Connect.
Refer to the Sugar Connect User Guide for Google Workspace or Microsoft Office 365, or the Sugar Connect Portal User Guide for more details on how to use Sugar in your email client.
Give Users Access to Enhanced Forecasting
In order for users to view the 16 out-of-the-box Enhanced Forecasting reports, you must first grant them permission. Access is controlled via Discover roles in the Sugar Discover interface. By default, all Sugar admins have admin access to Enhanced Forecasting; all other users have no access. Note that Enhanced Forecasting reports show the same results regardless of role and team permissions that are established in Sugar. Therefore, it is important that you do not grant a user access who should not have access to all the data in the reports.
- Log in to Sugar Discover.
- Navigate to Sugar Discover by entering the URL in your web browser. Replace
{your_company_tenant_name}with the same name used for your Sugar instance. For example, if your Sugar instance is hosted athttps://mycompany.sugarondemand.com, your tenant address (if US hosted) ishttps://mycompany.discover.sugarapps.com.- For tenants hosted in the US:
https://{your_company_tenant_name}.discover.sugarapps.com - For tenants hosted in the EU (Excluding the UK):
https://{your_company_tenant_name}.discover.sugarapps.eu - For tenants hosted in the UK:
https://{your_company_tenant_name}.discover.sugarapps.uk - For tenants hosted in AU:
https://{your_company_tenant_name}.discover.sugarapps.com.au
- For tenants hosted in the US:
- Refer to the Getting Started documentation in the Sugar Discover User Guide for more information about logging in.
- Navigate to Sugar Discover by entering the URL in your web browser. Replace
- Assign roles to users.
- Click on the user profile icon in the top right corner of the Discover interface and select "Admin" to go to the user management section.
- Assign roles to users. For more information on assigning user roles, refer to the User Administration documentation in the Sugar Discover User Guide.
- Add Sugar Discover dashlet to dashboards.
- Add the Sugar Discover dashlet to dashboards in Sugar to view the out-of-the-box Enhanced Forecasting reports.
Refer to the Enhanced Forecasting Reports documentation in the Application Guide for more details on his capability and to understand prerequisites.
Learn About the Intelligence Add-On
If you have purchased the Intelligence Add-On, you have access to powerful and easy-to-use AI features that help you work smarter and faster:
- Account Intelligence: Sugar's AI powered Account Intelligence feature analyzes your data to generate actionable insights for your accounts, helping you quickly understand an account's history and make informed decisions faster.
- AI Summarization: AI summarization analyzes your data to generate concise actionable summaries of your opportunities and cases. These summaries help you understand important details quickly and make informed decisions faster.
- AI Prediction: AI prediction, formerly known as SugarPredict, analyzes your data and external firmographics to generate predictive insights for your opportunities and leads.
Note: AI feature availability is subject to specific instance requirements.
Learn About Smart Guides, Geo Mapping, and Data Enrichment and News Feed
Sugar Sell Premier includes three capabilities that provide enhanced functionality for you and your team and are available as soon as a user has a Sell Premier license. The following sections introduce these features and ways to find additional information.
Smart Guides
Smart Guides is powered by Sugar Automate and allows you to create easy-to-follow visual business processes for users to follow and complete against their Sugar records. Each Smart Guide created by Sugar Automate is an end-to-end process that is split into color-coded stages, and each stage contains one or more call, meeting, or task activities that the user can complete with optional dependencies and actions on related records.
For additional information on smart guides, please refer to the Sugar Automate documentation in the Application Guide.
Geo Mapping
Geo Mapping powered by Sugar Maps, our integration with Microsoft Bing Maps, allows you to quickly see which records are in close proximity to each other, plot records on a content-rich map, and generate driving directions between records.
For additional information on geo mapping, please refer to the Sugar Maps documentation in the Application Guide.
Data Enrichment and News Feed
Data Enrichment and News Feed powered by Sugar Hint, a relationship intelligence service, allows you to link external data such as social media accounts, work information, and company details with the contacts and leads in Sugar based on their email address. You can also quickly import the enhanced data into the Sugar database with a single click.
For additional information on data enrichment and news feed, please refer to the Sugar Hint documentation in the Application Guide.
Encourage User Adoption
Now that you have activated your Sugar Sell Premier instance, learn more about how to help your organization succeed in using this new technology by visiting the Adoption page of SugarClub. This will provide you with resources to help you organize and communicate with your users so that you can get the most out of Sugar!