Sugar Connect User Guide
Overview
This guide walks through the terminology, features, and functionality enabled by Sugar Connect for Google Workspace and Office 365 that lets you work with your Sugar data without navigating away from your email. You can use Sugar Connect to sync your Sugar and Outlook/Gmail contacts and calendars, create new Sugar records, utilize your Sugar email templates, and easily archive incoming and outgoing email messages and attachments to Sugar.
Administrators can find more information on configuring Sugar Connect before users install it in the Sugar Connect Deployment and Administration Guide. For the steps that users should take to install and activate Sugar Connect, refer to the Sugar Connect User Installation Guide.
Prerequisites
- Refer to the Plug-ins Supported Platforms page for information about supported Sugar and software versions.
- Refer to the Sugar Connect Installation Guide for important information about purchasing, deploying, and installing Sugar Connect.
- Sugar Connect for Google Workspace must be installed on a Google Chrome browser.
- Sugar Connect for Office 365 must be installed to Outlook and is compatible with the following Outlook applications:
- Outlook on the web
- Outlook for Desktop (Windows)
- Outlook for Desktop (Mac OS)
Terminology and Features
| Term | Description |
| Sugar Connect Portal | The portal is the website where your Sugar Connect features can be set up and managed. |
| Sugar Connect Sidebar | The sidebar is a panel in Gmail/Outlook where you can work with Sugar records related to your email and calendar contacts. |
| Email Archiving | Create a copy of an email message from Gmail/Outlook as an email record in Sugar's Emails module and relate it to any associated records found in Sugar. |
| Email Templates | Use the email templates from your Sugar instance without leaving Gmail/Outlook. |
| Send Later | Set a date and time in the future to send an email message. |
| Email Tracking | Enable tracking on your emails to view the number of opens, links clicked, and replies in the sidebar or Sugar Connect Portal. |
| My Sugar Tasks List | Available for Gmail only, view and interact with a list of your assigned Sugar tasks directly in the Gmail inbox above your list of inbox emails. |
| Sugar Connect Meeting Scheduler | Generate a unique, shareable link to let others see your availability, schedule a meeting with you, and automatically add the meeting to your calendar. |
| Record Sync | The sync process shares data between Google/Outlook and Sugar by first creating a corresponding record in the opposite system and then pushing changes back and forth from one or both sides. Sugar Connect enables lead and contact sync, calendar sync, and task sync between Google/Outlook and Sugar. |
| Sugar Hint | Sugar Hint is Sugar's relationship intelligence service that links external data such as social media accounts, work information, and company details with your contacts and leads in Sugar based on their email address. You can also quickly import the enhanced data into the Sugar database with a single click. Sugar Hint is included with a Sugar Sell Premier subscription or can be purchased as an add-on for use with other Sugar CRM products. |
The Sugar Connect Portal
Users will primarily engage with Sugar Connect via the Sugar Connect Sidebar, but all Sugar Connect users also have access to a portal website where they can set up and manage certain Sugar Connect features. The portal is also where Sugar Connect administrators can perform administrative functions such as creating and managing user accounts. All Sugar Connect users can access the portal by selecting "Open Sugar Connect Portal" from the Sidebar Settings Menu.
For complete information on using the Sugar Connect Portal, please refer to the Sugar Connect Portal User Guide.
The Sugar Connect Sidebar
The sidebar is the heart of Sugar Connect. It allows you to view and edit Sugar records in Gmail/Outlook without opening your Sugar instance. The following sections explain how to access and pin the sidebar, load email senders and recipient details in the sidebar, and how to work with the sidebar's home view, list view, record view, and Sugar Hint view (if available).
Accessing the Sidebar
Google Workspace
To access the Sugar Connect sidebar in Gmail, simply click on the Sugar icon on the right side of Gmail. Some Gmail themes allow you to collapse the panel to the right of the screen. If you do not see any icons there, look for an arrow in the bottom corner of Gmail to expand the side panel icons. 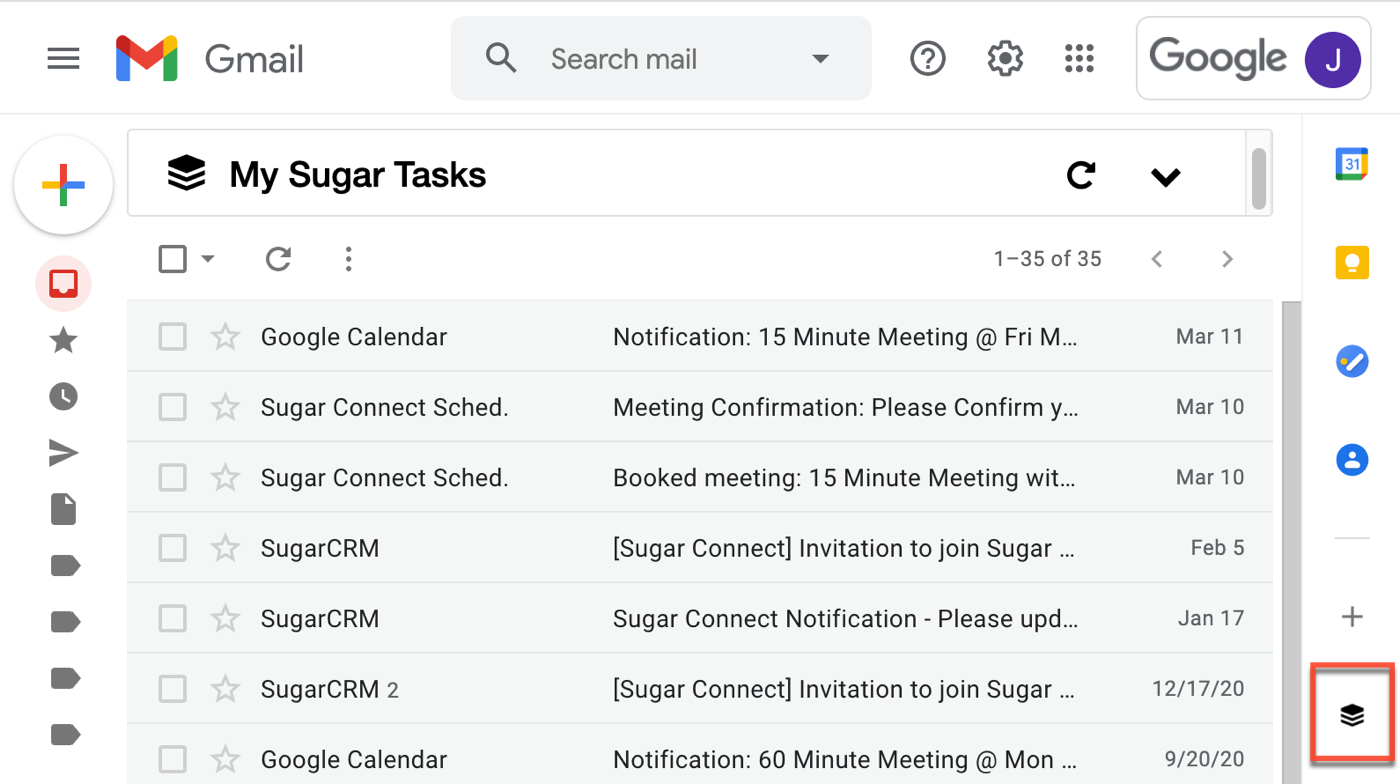
Office 365
You must open the sidebar every time you view a new record in Outlook unless you have chosen to pin the sidebar open. For more information, refer to the Pinning the Sidebar section of this page.
To access the Sugar Connect sidebar using Outlook for desktop, click on the Sugar Connect button in the ribbon and select Sugar Connect. If your window is sized smaller than the available ribbon options, it may be necessary to open the three-dots menu to find Sugar Connect.
To access the Sugar Connect sidebar using Outlook for the Web, click on any email message to open it, then click on the More Actions menu inside the message and select Sugar Connect > Open Sidebar, which will be toward the bottom of the list.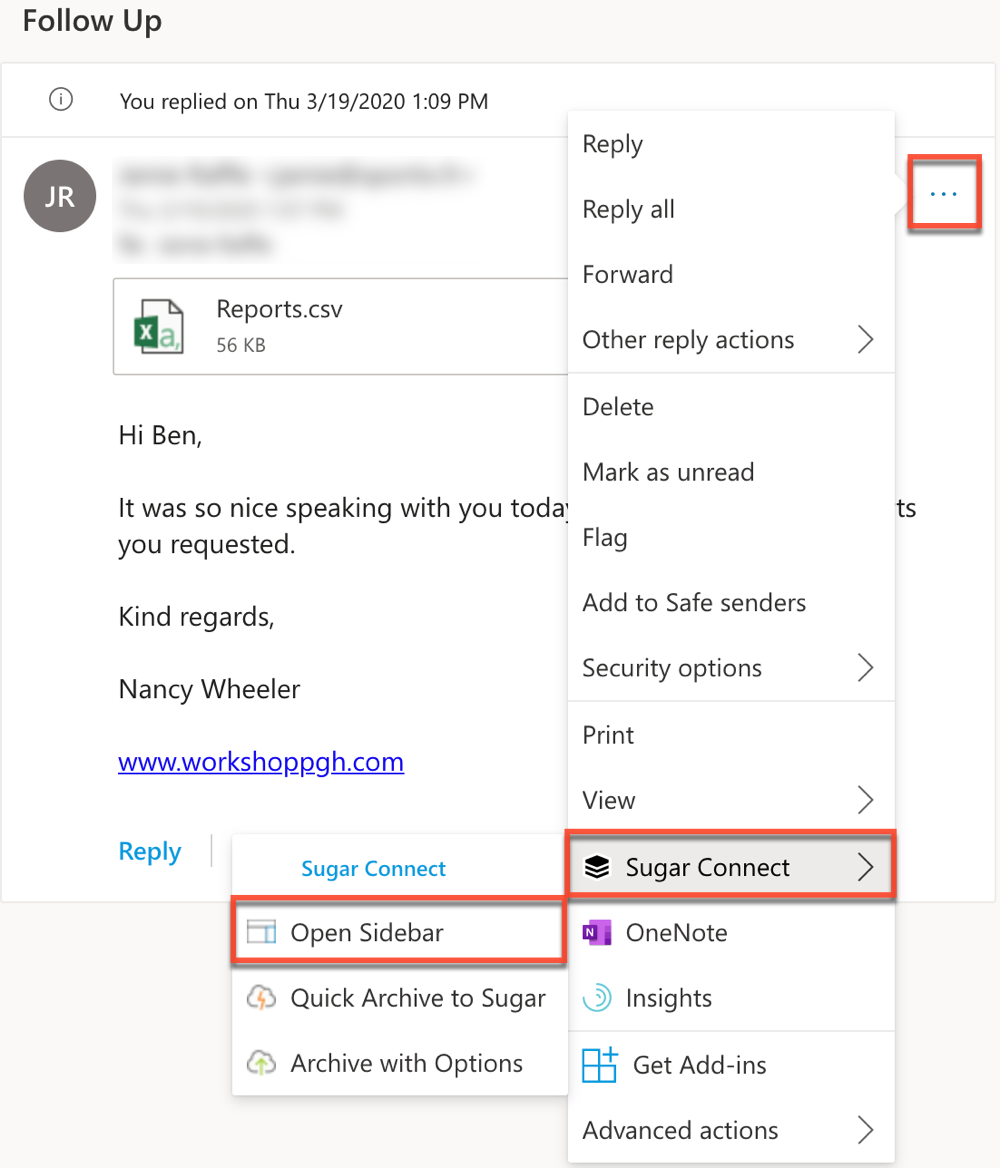
Pinning the Sidebar
Pinning the sidebar is only necessary in Sugar Connect for Office 365. By default, the Sugar Connect sidebar will automatically close when you navigate to a new message or view in Outlook. You may find it useful to pin the sidebar in a perpetually open state. Pinning the sidebar open will make the sidebar automatically load for email messages viewed in the Outlook frame only. As a limitation of Outlook, you cannot pin the sidebar open for messages and meetings opened in a pop-out view or in the compose view.
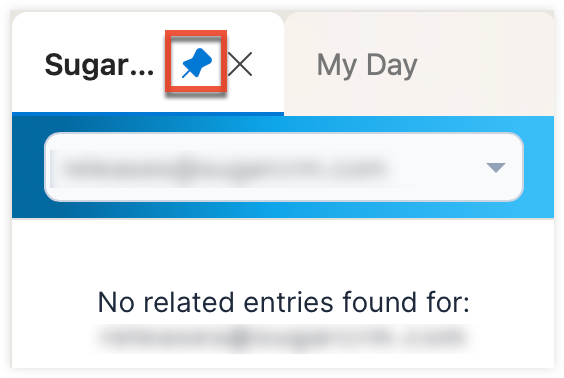
In Outlook for Desktop and Outlook on the web, simply open the sidebar when a message is selected and click on the thumbtack icon to pin it open as shown in the following images. If you do not see the thumbtack, be sure that you are viewing the message in Outlook's frame and have not opened the message in a new window. Click the thumbtack icon a second time if you wish to unpin the sidebar from your mail view.
- Outlook for Desktop:
- Outlook on the web:

Loading Senders and Recipients in the Sidebar
Sugar Connect can find the lead or contact record associated with an email address that is included as a sender or recipient on an email message. Simply view any email message, open the sidebar (if necessary), and Sugar Connect will load the Sugar details for the first email address it finds a match for in the sidebar's Record View.
If the sender or recipient is a user in Sugar, the user details are displayed in the sidebar and the option to add them as a contact or lead is not available.
Please note, Google Workspace users may need to refresh the browser after switching the inbox settings to enable/disable the reading pane with a split-screen, to ensure Sugar Connect displays the correct information.
Click on the dropdown field to retrieve additional email addresses found in the To, From, and CC fields of the current message and view their related Sugar lead or contact records in the sidebar. 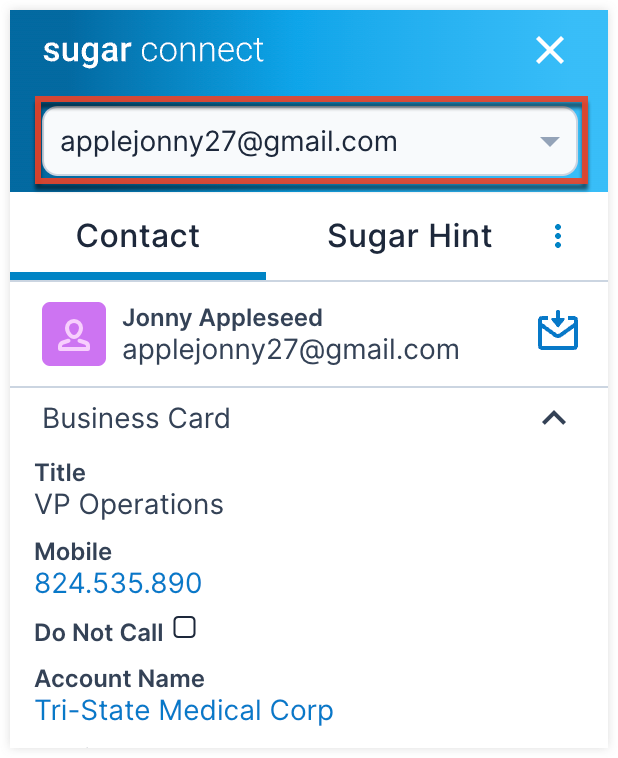
If no match is found in Sugar for an email address, then Sugar Connect will give you the option to add a contact or lead record and archive the email if the Enable Archive toggle is enabled by the Sugar Connect administrator. Please note, if you do not have access to the Contacts or Leads modules in Sugar, the buttons will be disabled.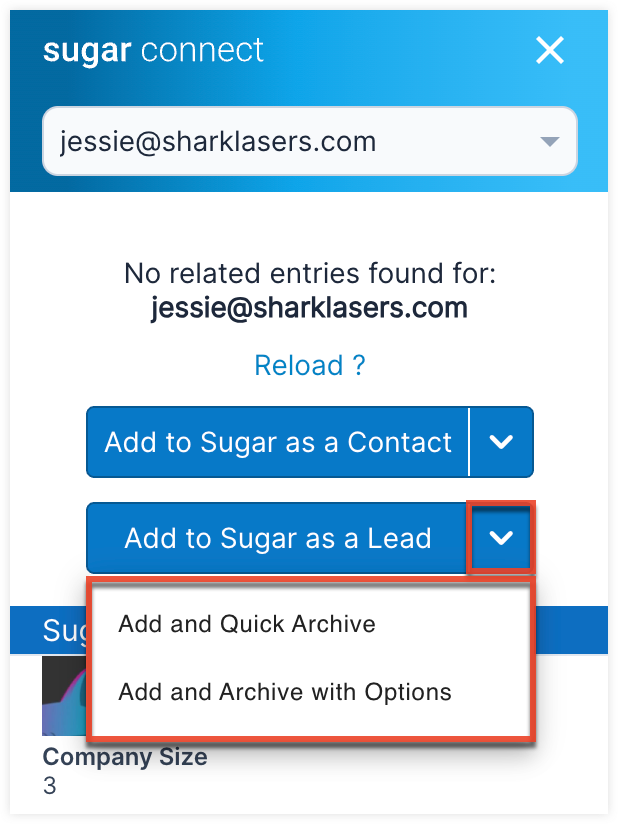
It is also possible to load Sugar details in the sidebar when creating a new message or meeting. Simply add at least one recipient or guest and Sugar Connect will automatically search for their related email addresses. If you navigate away from the record view, click on the Related Entries button to take you back.
Sidebar Home View
The default view for the sidebar is the Home view. Click the Home button at the bottom of the sidebar to access the main Sugar Connect home view.
From the Home view, you can access Sugar data and perform actions enabled by Sugar Connect:
| Home Feature | Description |
| Search Sugar | Use the search bar to quickly find specific Sugar records and view and edit them using Sugar Connect. |
| Tracked Emails | View a list of emails currently being tracked. |
| Tracking Activity | View a list of email tracking activities in chronological order. |
| Scheduled Emails | View a list of emails that were marked as Send Later using Sugar Connect. Unread alerts are shown as a red badge with a number on the Scheduled Emails button from the Home view. If an email fails to send, an alert banner will also appear at the top of the Sugar Connect sidebar to alert you. |
| Sugar Records | View lists of opportunities, tasks, cases, and other Sugar records in the Sidebar List View. |
| Related Entries | Click on the Related Entries icon to view details from Sugar about senders and recipients found in the selected Gmail/Outlook email message. |
| Scheduler | View your Sugar Connect Meeting Scheduler event types and copy their links to send to customers, colleagues, prospects, etc. |
| Archived Emails | View the status of your archived emails. |
| Settings | Manage your settings and options by clicking the gear icon located at the bottom of the sidebar. |
| Back | The left-facing arrow at the bottom of the sidebar will return you to the previous sidebar screen. |
Sidebar Search
Sugar Connect provides simple access to your Sugar records via search directly from the sidebar.
Users will only be able to see records as allowed by their team membership, user access type, and assigned roles in the Sugar application. For more information on teams and roles, please refer to the Team Management and Role Management documentation in the Sugar Administration Guide.
From the Home view, click inside the Search Sugar box, type a query, and press Enter on your keyboard to search the Sugar database for records in all of the modules to which you have access.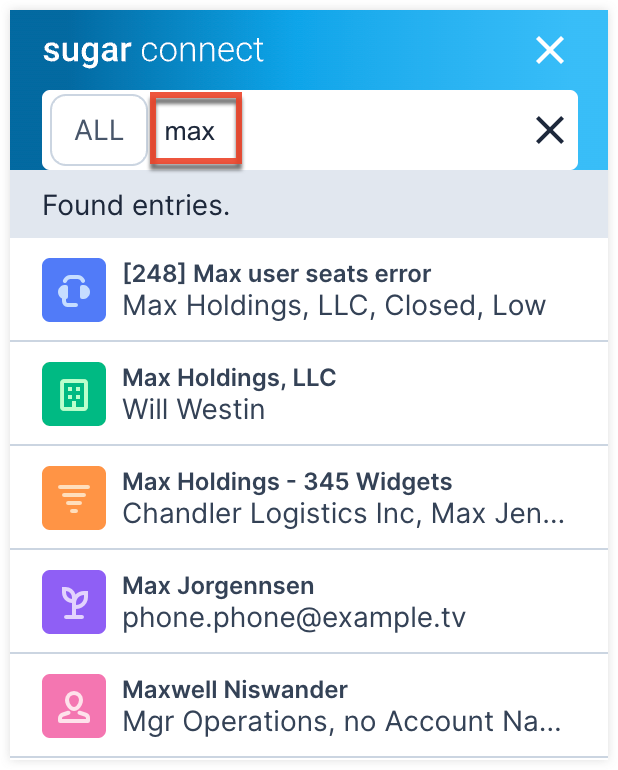
To further refine search results, you can limit the search to a particular module using the module selector next to the search box. By default, the selector will be set to "ALL", indicating that all modules are being searched. Click on the word ALL (or on the currently selected module icons) to reveal the list of available modules to be searched. You can even select multiple modules to search at once, which will result in the search box containing multiple module badges.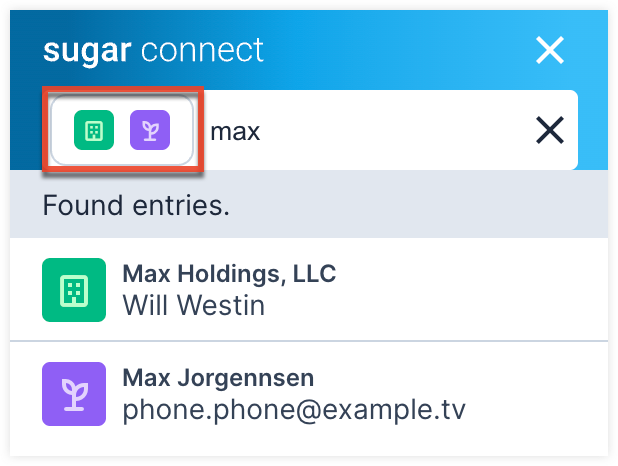
When performing searches from a module's Sidebar List View, the ability to change/add modules to the search is not available.
To view the details of a search result, simply click on the record's name to view it in Sidebar Record View, where you can see its details, related record subpanels, and perform record actions such as editing the record or navigating to the record in your Sugar instance. To return to the list of search results, click on the Back button at the bottom of the sidebar.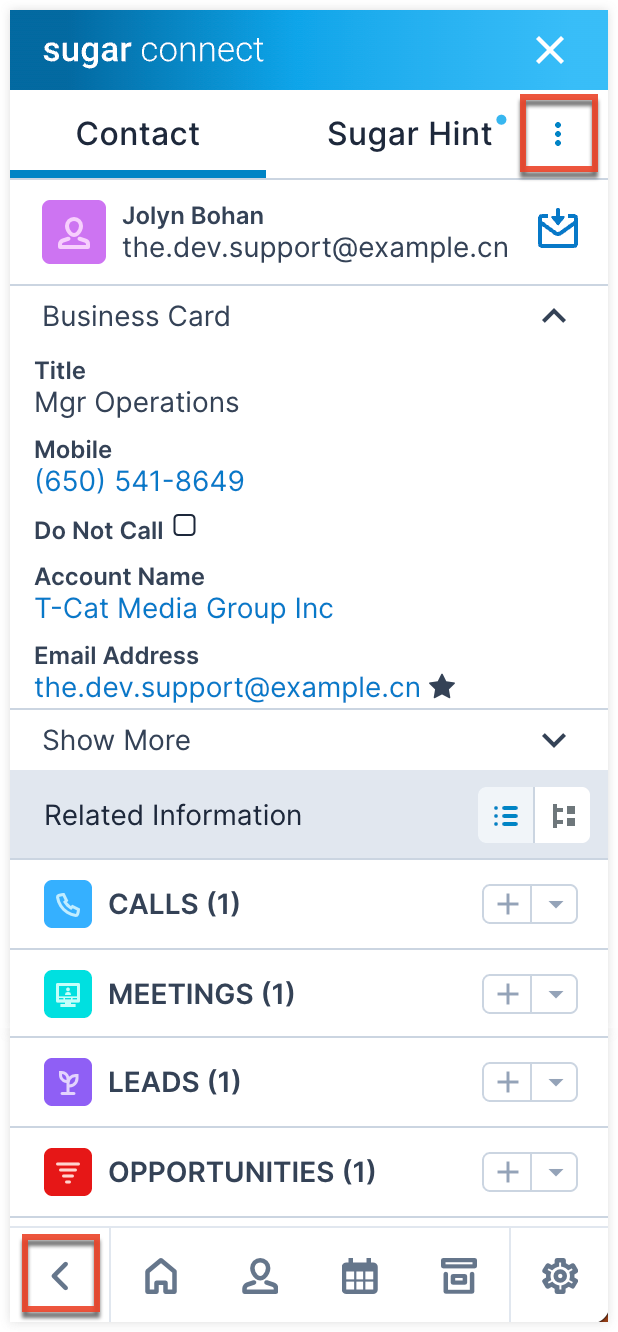
Sidebar Settings
The Settings menu is always visible via the gear icon at the bottom of the Sugar Connect sidebar: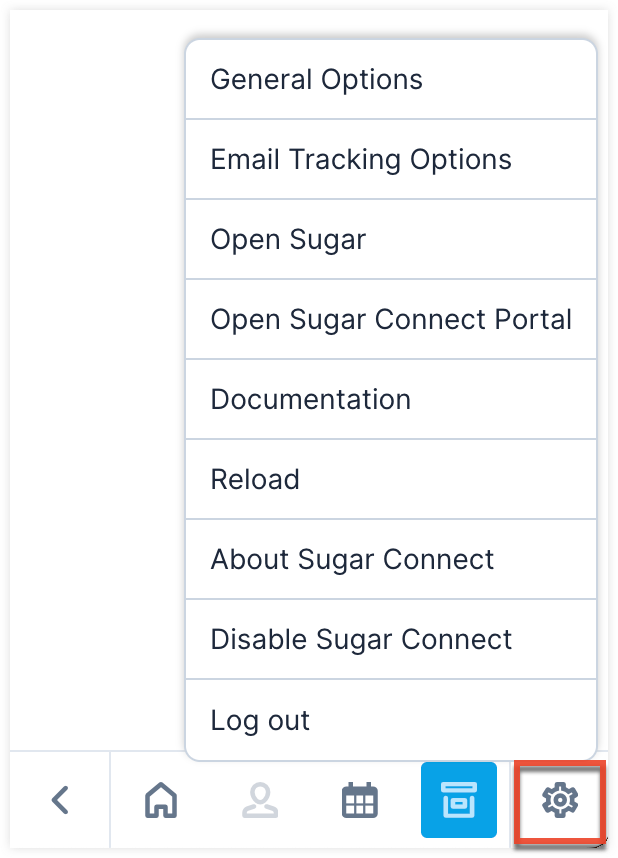
The Settings menu contains the following links:
| Settings Menu Item | Description |
| General Options | View and update your personal options to enable dark mode, save attachments by default, relate emails to Sugar contact and account records on archive, and more. |
| Email Tracking Options | View and update options to track email opens, link clicks, and replies. |
| Open Sugar | Navigate to your Sugar instance's URL in your web browser. |
| Open Sugar Connect Portal | Navigate to the Sugar Connect Portal in your web browser. |
| Documentation | Navigate to the Sugar Connect documentation in your web browser. |
| Reload | Refresh the connection between Sugar Connect and Sugar, fetching the latest changes to records and filters. |
| About Sugar Connect | View connector and user-related information including user profile, add-in version, region, Sugar version, and authentication details. |
| Disable / Enable Sugar Connect | Disable or re-enable the Sugar Connect for Chrome extension without deleting it completely or revoking your credentials. |
| Log Out | Revoke your login credentials without uninstalling or disabling Sugar Connect. After logging out, you will have the option to log back in to the sidebar as the same user or switch to a different user. |
General Options
The General Options section of the Sugar Connect Settings contains the following user-configurable settings:
- Show My Tasks List Dashboard: Available for Google Workspace, enable or disable the My Sugar Tasks dashboard that appears at the top of your Gmail inbox.
- Save attachments by default: Enable or disable saving email attachments by default. Note that attachments that are externally hosted (e.g., a link or reference to a document in Microsoft OneDrive) are not available for archiving via Sugar Connect.
- Save embedded images by default: Enable or disable saving embedded images (e.g., images in email signatures) by default.
- Auto-Archiving of Outbound Emails: Enable or disable archiving outbound emails automatically. Outbound emails are related to the contacts or leads whose email is in the To, From, CC, or BCC field. Before sending, individual emails can be prevented from archiving by disabling the "Quick Archive to Sugar" menu option. Emails from specific contacts can have different archive behavior based on the record-level auto-archive setting. This option may be disabled when your Sugar Connect admin has set the email archival method for your tenant.
- Auto-Archiving of Inbound Emails: Enable or disable archiving inbound emails automatically. Inbound emails are related to the contact or lead whose email is in the From field of the email. Emails from specific contacts can have different archive behavior based on the record-level auto-archive setting. This option may be disabled when your Sugar Connect admin has set the email archival method for your tenant.
- Relate emails to contact and account automatically on archive: Enable or disable automatically relating an archived email (incoming or outgoing) to the matching Sugar contact and account record(s), if applicable.
- Populate Sugar Hint Data on Create: Enable or disable the automatic populating of Hint data when you are creating a lead or contact from an email.
- Change language: Select a supported language from the dropdown field to apply to your Sugar Connect sidebar. As best practice and for a seamless experience between Sugar Connect and your Sugar instance, please ensure to set your language preferences in both locations. For more information, please refer to the Getting Started page in the Sugar Application Guide.
- Appearance: Choose which theme you want to use when viewing the Sugar Connect sidebar.
- Light: A light and bright white-based theme.
- Dark: A theme based in blacks and grays, often preferred for nighttime viewing.
- Use system setting: The theme (light or dark) will respect whatever rule your computer or device has set up.
Sidebar List View
From the Home view of the Sugar Connect sidebar, click on a module name to view lists of Sugar records in the sidebar. By default, you will see records assigned to you or due today but you can easily apply other filters.
For example, from Sugar Connect's home view, click on "Accounts" to view a list of Sugar accounts.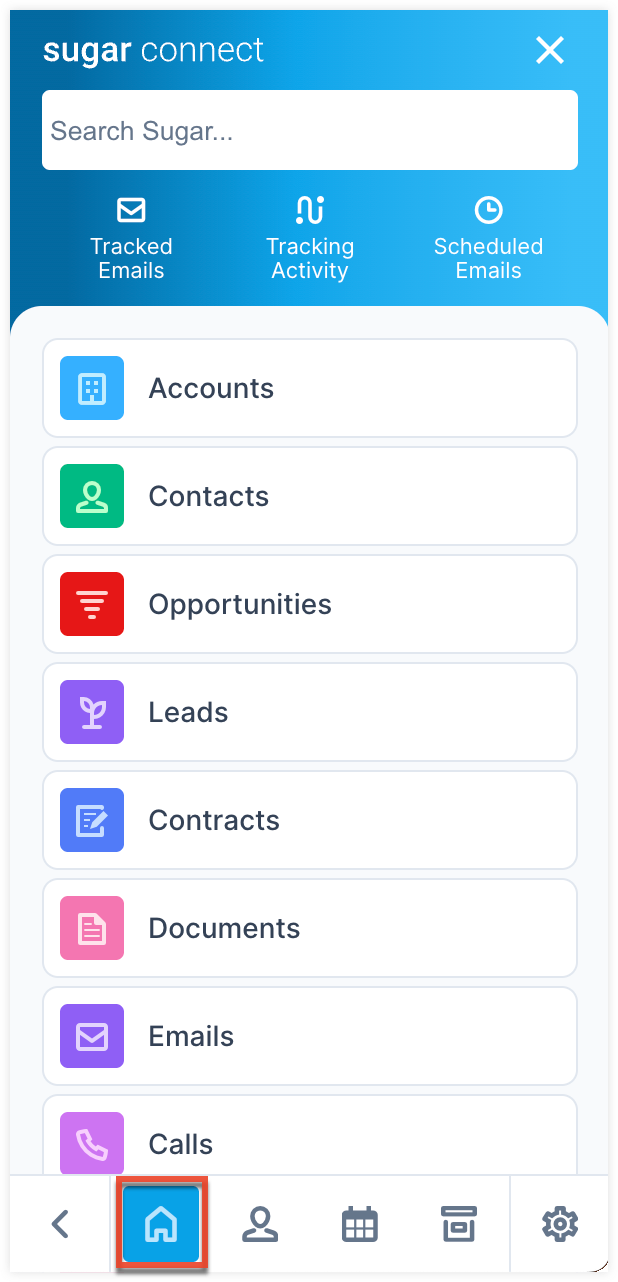
The sidebar will display a list of records for the selected module. From the list view, you can filter and perform actions on the displayed Sugar records. When you click on a record from the list view, you will be shown its record view in the sidebar.
In Gmail, when you hover over a record, you will see a pop-up that shows additional information about the record.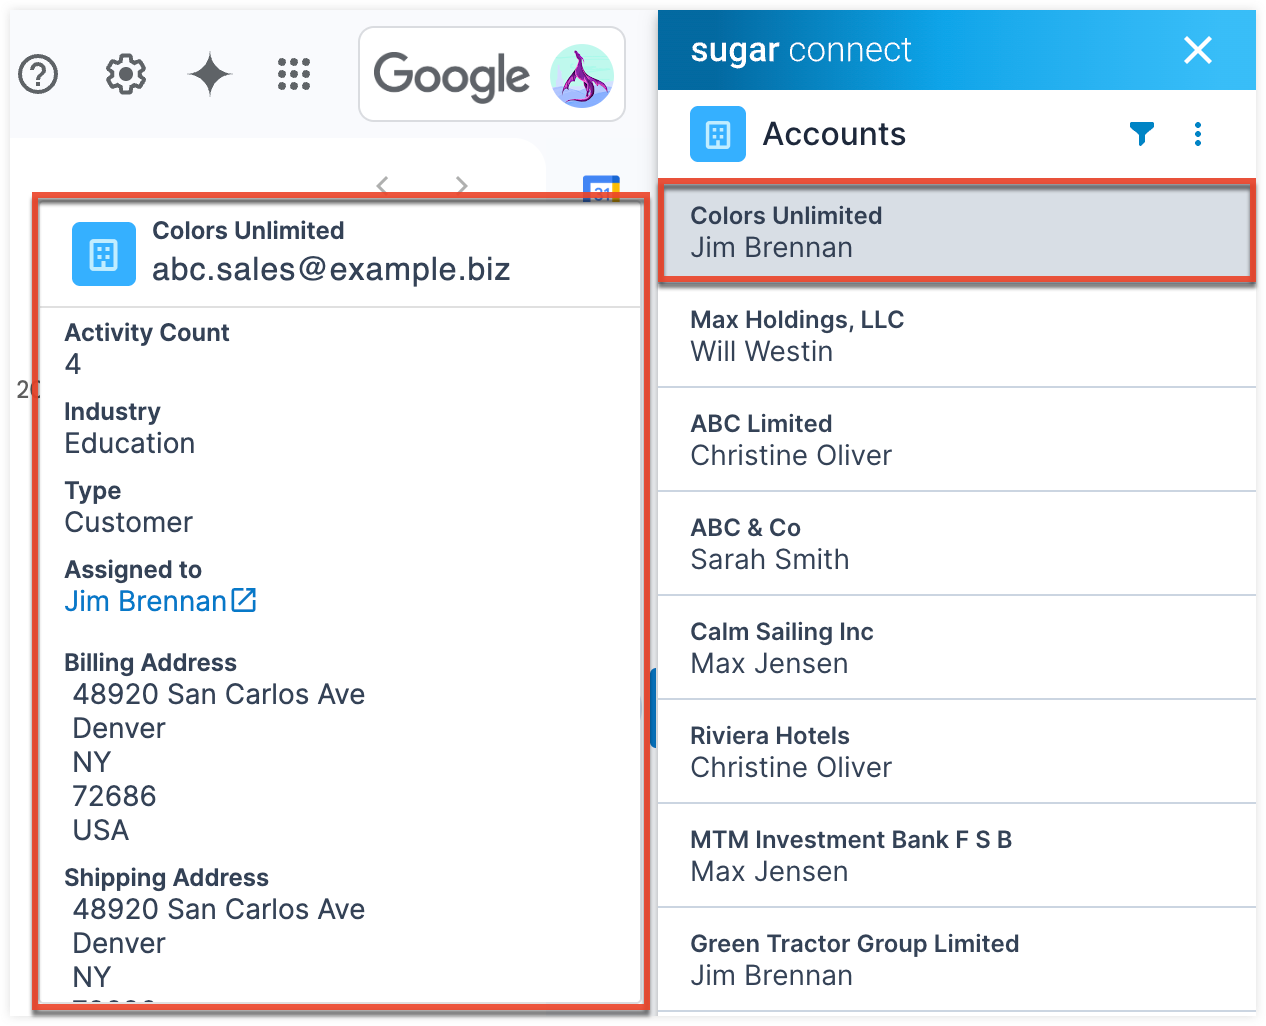
Filtering List View
To filter the list of visible records in a module list view, click on the Filter icon and apply one of the module's available filters. Any custom filters created by the logged-in user will also be available at the top of the filter list.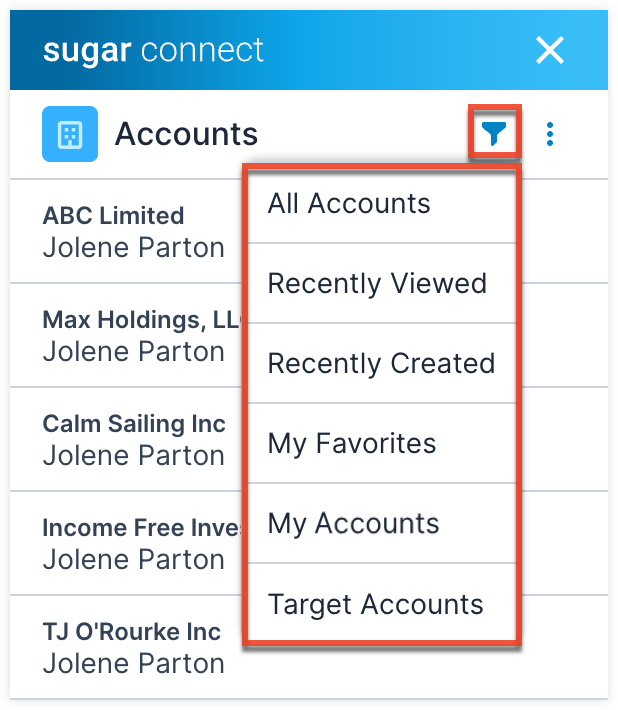
List View Actions
To perform actions on the list of records in a module list view, click on the Actions menu next to the filter icon: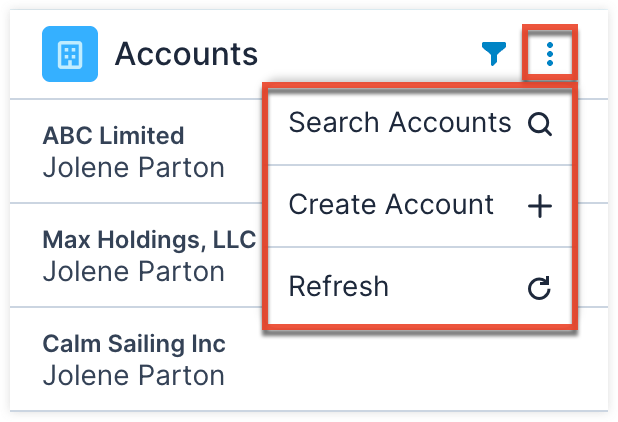
The following list view actions are available:
| Menu Item | Description |
| Search Records | Use the search bar to quickly find specific Sugar records in the selected module. |
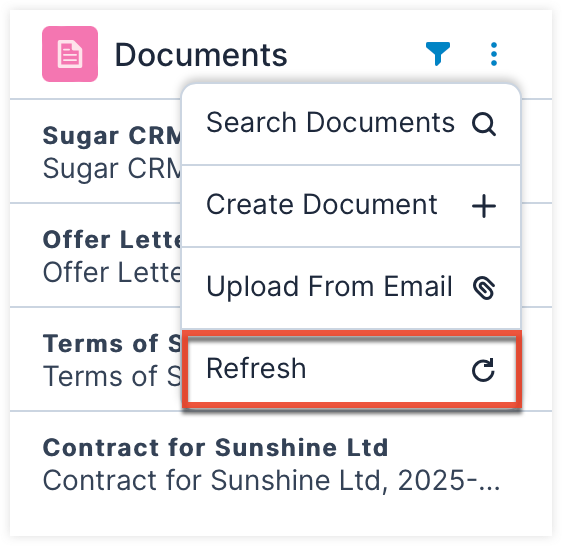
| Create Record | Create a new Sugar record in the selected module from the Sugar Connect sidebar. |
| Refresh | Fetch the latest list of records and filters from Sugar. |
In addition, when viewing task records in list view, you can click on the empty checkbox next to a task to mark it "Completed" in Sugar. For more information, refer to the Working With Tasks section.
Sidebar Record View
From the list view, click on a record's name to view its details from Sugar. The record's fields, panels, and subpanels will be presented as they are configured in your Sugar application by default. Sugar Connect Portal admin users can enable and disable fields from being displayed in the sidebar Record View. For more information, refer to the Customization section in the Sugar Connect Deployment and Administration Guide. From the record view, you can use the Actions Menu to perform actions such as editing the Sugar record and adding related records just as you would in Sugar. Please note, if your organization has AI Prediction enabled, you may see color-coded predictions in your lead or opportunity record view. For more information, please refer to the AI Prediction User Guide.
Record View Actions
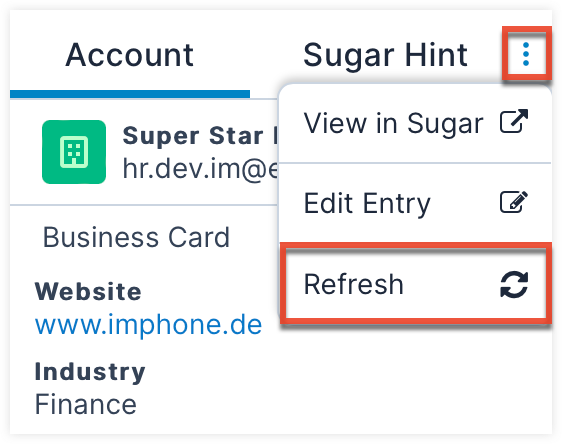
To perform actions on a record from the sidebar, click on the Actions menu: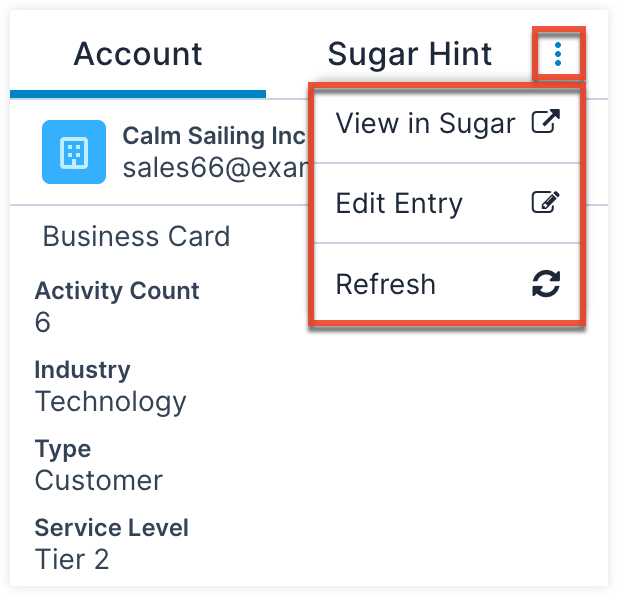
The following record actions are available:
| Menu Item | Description |
| View in Sugar | Navigate to this record in your Sugar instance via web browser. |
| Edit Entry | Edit the record via Sugar Connect and sync the changes with Sugar. |
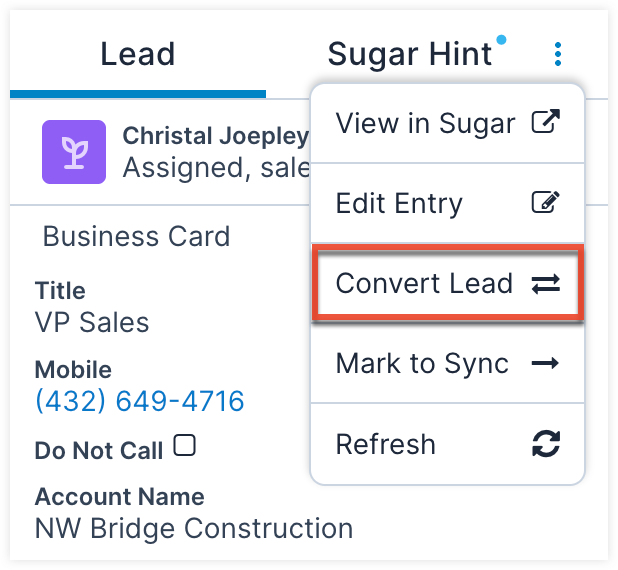
| Convert Lead | Shown for unconverted leads only, convert the lead into a contact, account, and opportunity without leaving the sidebar. |
| Refresh | Fetch the record's latest details from Sugar. |
Adding Related Records
While in record view, you can relate new or existing Sugar records to the current record you are viewing.
To create a new record in Sugar related to the current record you are viewing in the sidebar, scroll down to the related record's subpanel and click on the Create button.
Clicking the Create button in the Emails subpanel opens a compose window in Gmail/Outlook. Sugar Connect will insert the associated record's primary email address (if available) into the new message's To field. When you click the Create button on the Emails subpanel (e.g., an opportunity), your email will be archived to that record. 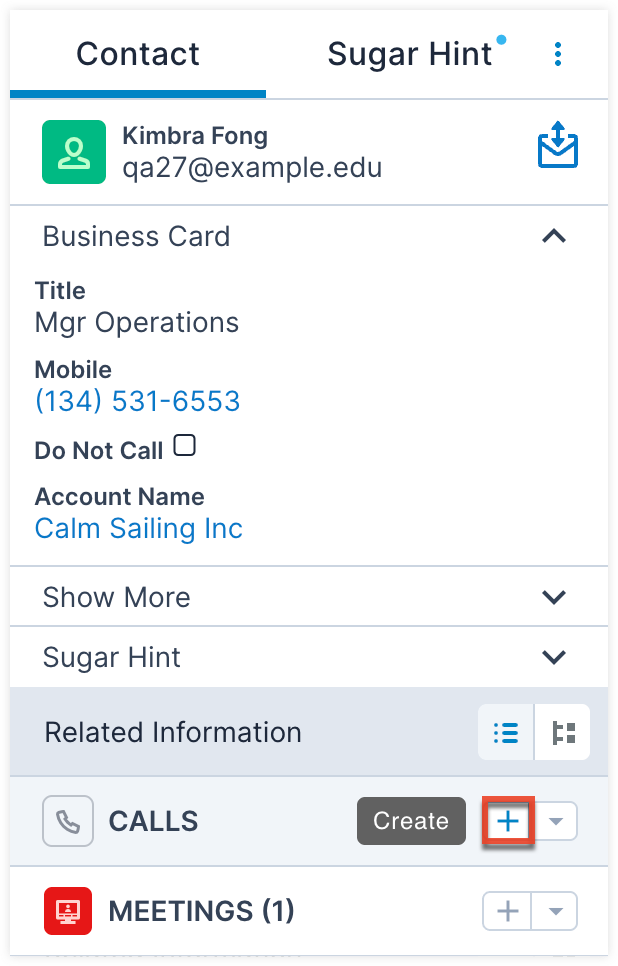
To relate an two existing Sugar records, open the primary record via the sidebar, scroll down to the related record's subpanel, and select "Link Existing Record" from the subpanel's Actions menu.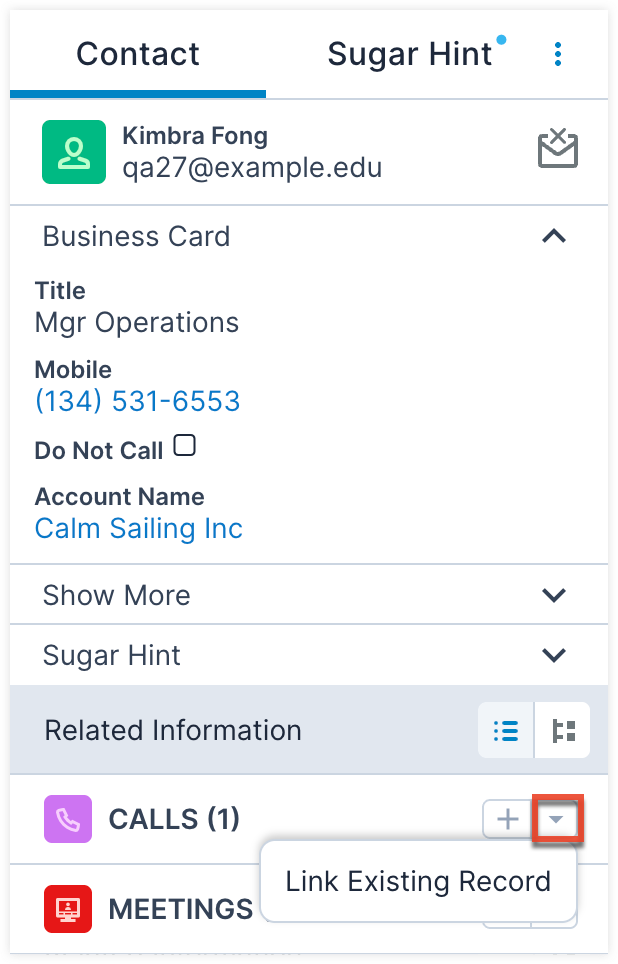
Timeline View
Timeline view is available in the sidebar record view for the Accounts, Cases, Contacts, Escalations, Leads, Opportunities, and Quotes modules. To access Timeline view, click the Timeline button at the bottom right of the record view above the subpanels. Timeline view displays the current record's related activities (e.g., emails) and select field updates (e.g., a change to the Assigned To field) in the form of record cards. Each card is sorted in chronological order based on the date they occur or are due (for tasks), with the most recent at the top. Timeline cards are collapsed by default and you can click the arrow icon to expand the card and view more information. Clicking the record name opens the record view (e.g. the meeting record view) in the sidebar. You can also filter by record type (e.g., calls) by selecting one of the options in the Related dropdown field.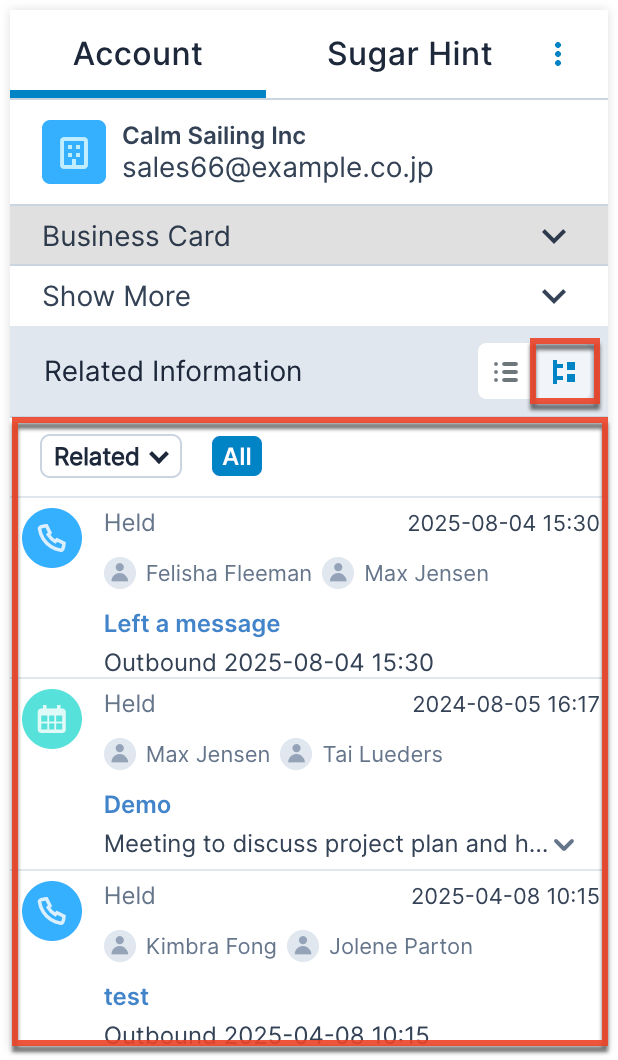
Sidebar Sugar Hint View
The sidebar Sugar Hint view is available only if you have access to Sugar Hint. You can use Hint for the Accounts, Contacts, and Leads modules to enhance your CRM data. To open the Sugar Hint view, click the Sugar Hint tab to the right of the module tab in the sidebar record view. For additional information about Sugar Hint, refer to the Sugar Hint documentation in the Application Guide. Once you have opened the Hint view, click the module tab (e.g., Account) to return to the record view.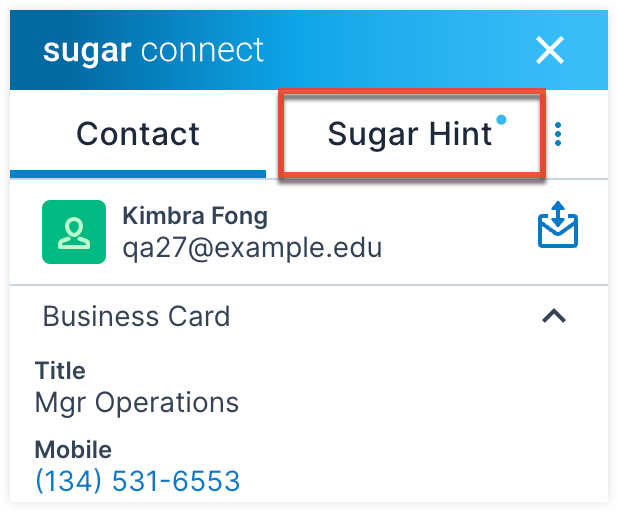
In the Hint view, a blue cloud appears next to any data that does not match the data currently in the record. Click the three-dots menu on the top right to save all Hint data to the record or refresh the results. If you want to selectively save data to the record, click the blue cloud icon next to the data so that only that data is saved.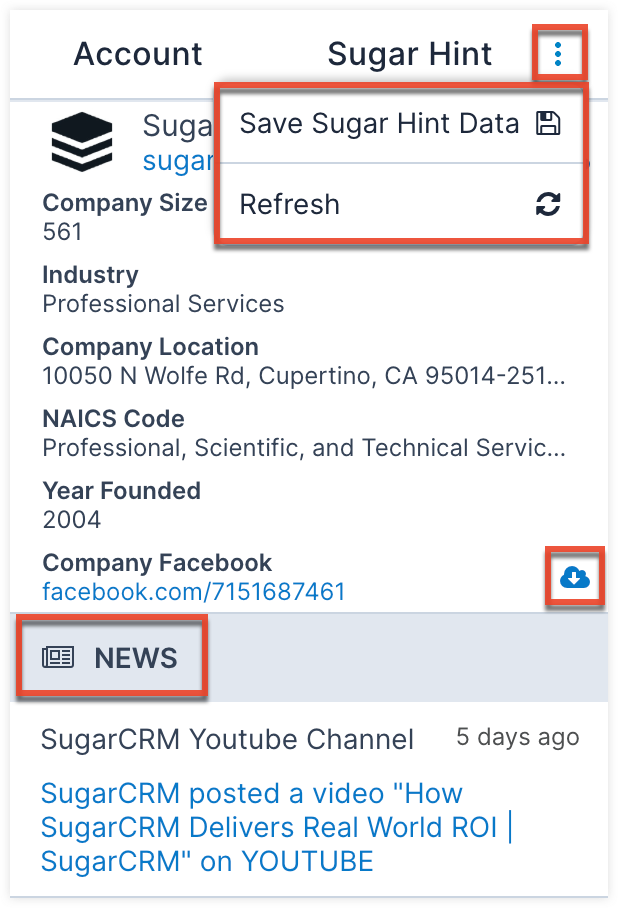
At the bottom of the Sugar Hint view is a News panel that will display recent news about the company or person. Note that the News section may take up to an hour to populate once the record is created. If your record's data is different than the data that Hint found and you choose to ignore the Hint suggestion (i.e., you do not click the blue cloud icon), your record will continue to show the data you have in Sugar. This means that your Sugar data will be displayed by default when you have Sugar Hint.
Working With Your Sugar Data in the Sidebar
From the Sugar Connect sidebar, you can work directly with your Sugar records by creating and editing records, converting leads, and even completing your Sugar tasks without leaving Gmail/Outlook. For more information on syncing Sugar data with your external calendar, refer to the Contact Sync and Calendar Sync sections.
Users will only be able to see records as allowed by their team membership, user access type, and assigned roles in the Sugar application. For more information on teams and roles, please refer to the Team Management and Role Management documentation in the Sugar Administration Guide.
Creating Leads and Contacts
There are several ways to create new Sugar leads and contacts from Gmail/Outlook via the Sugar Connect sidebar:
- Creating via Related Entries: Open an email sent by a person using an email address that is not found in Sugar. Open the Sugar Connect sidebar, click on the Related Entries icon and the sidebar will give you the option to add the sender as either a contact or lead.
- Creating via Received Mail: Hover over an email address or open an email sent by a person using an email address that is not found in Sugar and the sidebar will give you the option to add the sender as either a contact or lead.
- Creating via Message or Meeting Compose: Enter an email address that is not found in Sugar into the recipient line of a new message or reply message. Open the Sugar Connect sidebar and click on the Related Entries icon. The sidebar will give you the option to add the recipient/guest as either a contact or lead.
- Creating via Sidebar List View: You can also create new leads and contacts from the List View actions Menu when viewing leads or contacts in list view.
Once you have initiated creating a new record, fill out the information in the new lead or contact form. Click the Switch Name icon to swap the data in the First Name and Last Name fields. When creating a contact, you will have the option to copy the address information from the related account record. Once you complete the create record form, click the check icon to save the new record in Sugar, click the plus icon to save and create another record, or click the Save and Archive icon to save the record and archive the email you are viewing. You can also click the x icon to cancel. The plus and the save and archive icons are only available when adding a record from the List View Actions menu.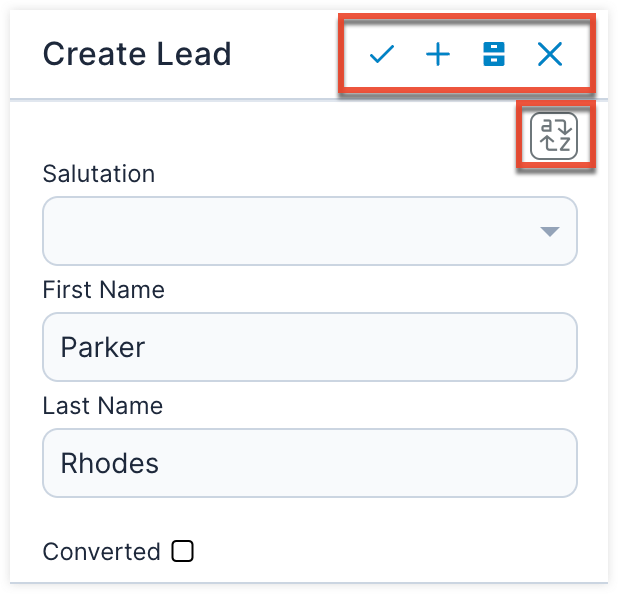
Creating Leads and Contacts with Sugar Hint
If you have Sugar Hint, you can use Hint data to create your leads and contacts. Open or compose an email that contains an email address that is not found in Sugar. You will see the data that Hint has found for the email address along with options to create a lead or contact. Click the "Reload" text to reload the Sugar and Hint data. Clicking "Add to Sugar as a Contact" or "Add to Sugar as a Lead" brings the email address and, optionally, Hint data into the create record form.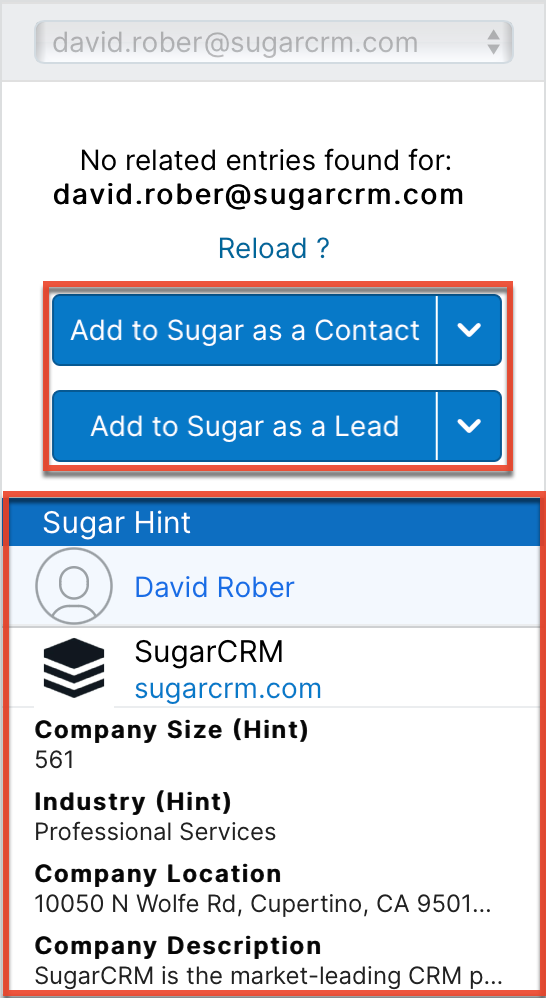
Enable or disable the Use Hint Data setting to populate or remove the information found via Sugar Hint. You can edit or delete any of the data before saving the contact or lead. Please note, you can set the default behavior of the Use Sugar Hint Data setting under the General Options by enabling or disabling "Populate Sugar Hint Data on Create".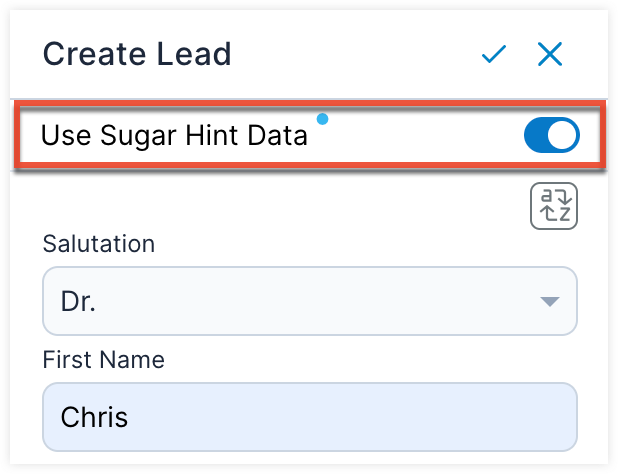
Creating Other Sugar Records
You can easily create Sugar records in the sidebar via the two create options in the List View actions menu. Select either "Create [record type]", available for all modules, or "Create from Email", available for select modules.
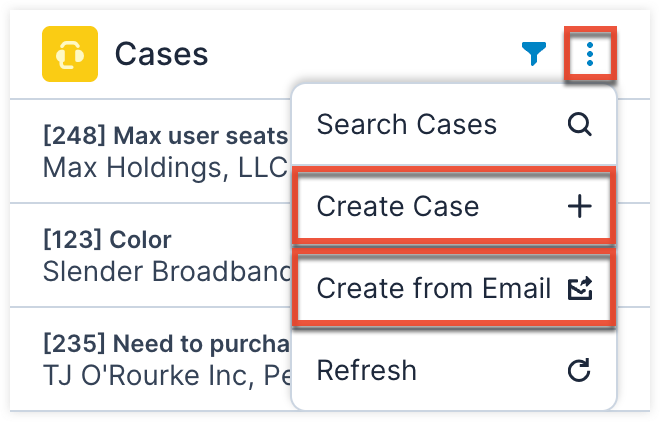
The "Create from Email" option is available in the following modules: Bugs, Cases, Opportunities, Targets, Calls, Meetings, Messages, and Tasks. When selected, it pulls available information from the selected email into the record creation form. See the table below for the information used for each record type.
| Module | Email Information | Sugar Field |
| Bugs | Email subject | Subject |
| Email body | Description | |
| Cases | Email subject | Subject |
| Email body | Description | |
| A single identifiable lead or contact, using the From, To, CC, and BCC fields who is not the current Sugar Connect User | Primary Contact | |
| Opportunities | Email subject | Opportunity Name |
| Email body | Description | |
| Targets | A single identifiable lead or contact, using the From, To, CC, and BCC fields who is not the current Sugar Connect User | First Name |
| Last Name | ||
| Email Address | ||
| Calls Meetings Messages |
Email subject | Subject |
| All identifiable leads, contacts, and users from the From, To, CC, and BCC fields | Guests | |
| Tasks | Email subject | Subject |
| A single identifiable lead or contact, using the From, To, CC, and BCC fields who is not the current Sugar Connect User | Contact Name | |
| Email body | Description |
After completing the record's details, click the check icon to save the new record in Sugar, click the plus icon to save and create another record, or click the Save and Archive icon to save the record and archive the email you are viewing. The new record will be saved in Sugar, and you can navigate to the record in Sugar via the "View in Sugar" option in the Record View actions menu.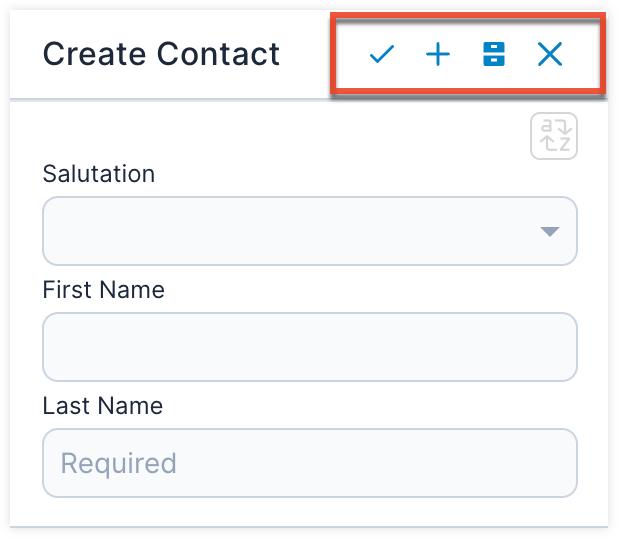
Editing Sugar Records
You can easily edit Sugar records in the sidebar via the "Edit Entry" option in the Record View actions menu. 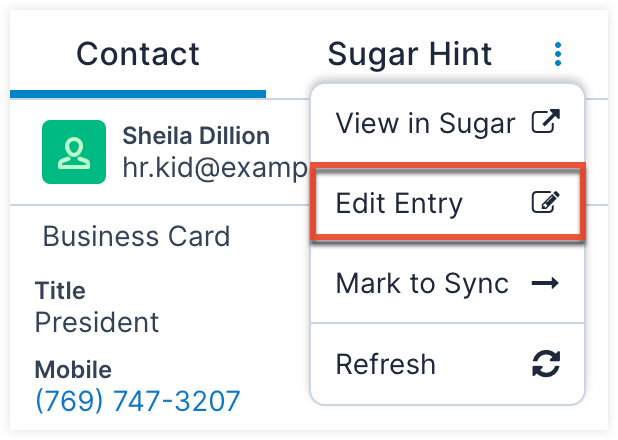
After editing the record click the check icon to save your changes or click the x to cancel. Please note, for contact and lead records, click the Switch Name icon to swap the data in the First Name and Last Name fields while creating a new record or editing an existing record. The changes you save will be synced to and reflected in Sugar. Attempting to navigate away from the record before saving or canceling will prompt a warning letting you know you have unsaved changes and giving you the option to continue editing or discard changes.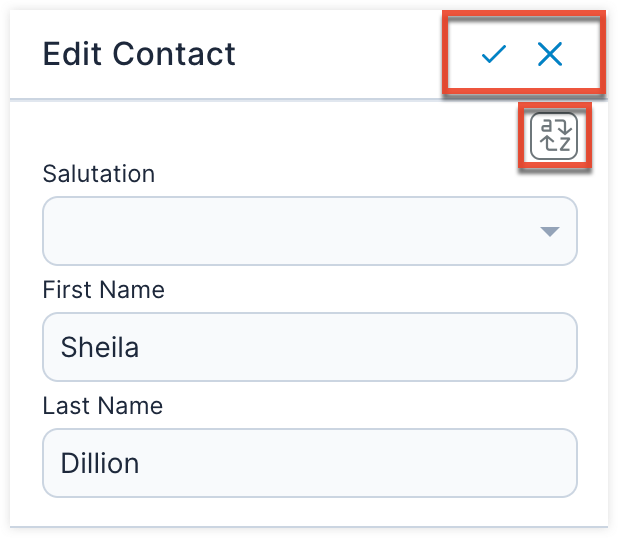
Converting Leads
Sugar Connect lets you convert leads into contacts, accounts, and opportunities from the sidebar in Gmail/Outlook.
- When viewing a lead in the sidebar, open the Record View Actions menu and select "Convert Lead". Please note, if the lead's status is already "Converted", the Convert Lead option will be grayed out.
- Next, you will be prompted to associate a contact, account, and optionally, an opportunity.
- If the record(s) you want to associate with the lead is already in Sugar, then you can start typing in the given field or click "Search and Select" to find a match from Sugar.
- To create a new record in Sugar to associate with the lead, click on the Create (+) icon next to the field.
- Once you have finished finding and creating the records you want to associate with the lead, select "Save and Convert" from the Actions menu.
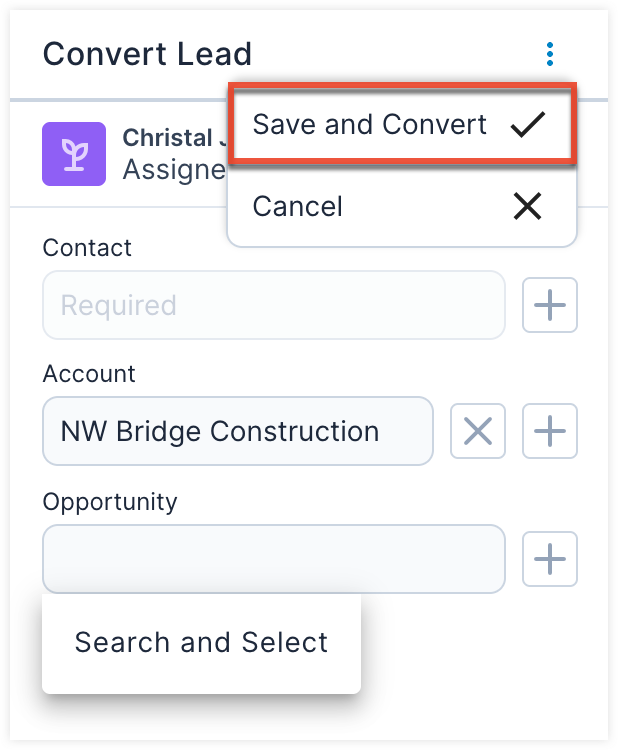
The sidebar will display a success message and you can find and navigate to the converted contact and related records below the lead's details in the sidebar.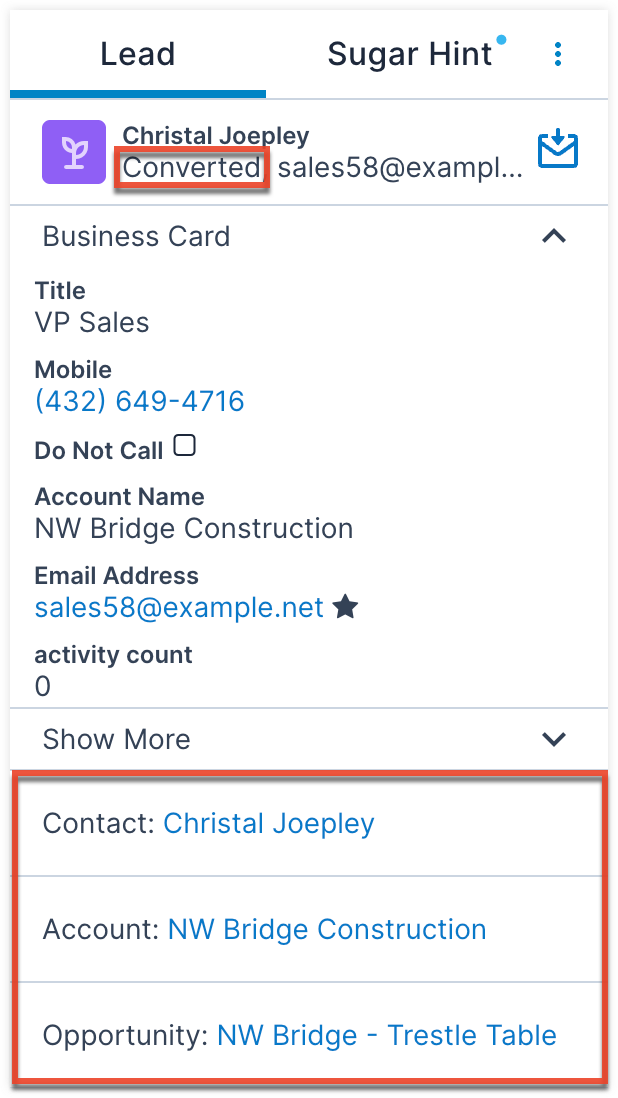
Working With Tasks
When viewing task records from Sugar in the Sugar Connect sidebar's list view, an additional option is available to quickly mark your tasks as complete. Click inside the task's adjacent checkbox to update its status to "Completed" and sync the change with Sugar. For information on working with tasks with Sugar Connect for Google Workspace, refer to the My Sugar Tasks List section.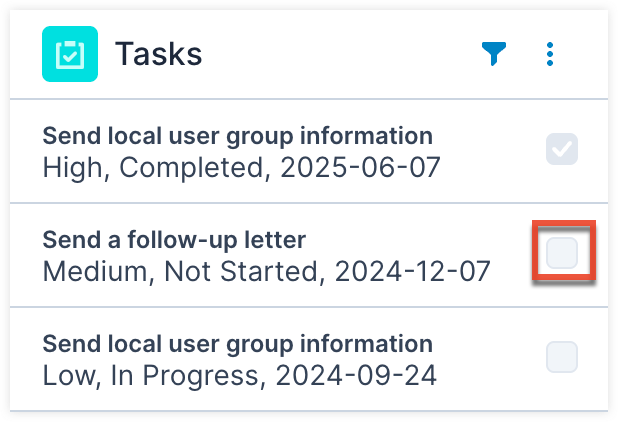
Shared Inboxes
Sugar Connect can be utilized for users working in shared inboxes for both Google Workspace and Office 365.
Google Groups
For Google Workspace users working in shared inboxes, Sugar Connect can be used with Google Groups. Sugar Connect is not supported with Google's Collaborative Inbox or delegated accounts. If you are a member of a Google Group with emails distributed to each member, you may use Sugar Connect while viewing these emails and logged into your email address associated with your Sugar instance and Sugar Connect tenant. For example, your organization may have a Google Group with an email alias of "sales@yourcompany.com" of which you are a member. You, and all other group members, will receive emails sent to that email alias and may choose to view or create Sugar records and archive emails as you would normally. The created records and archived emails will be assigned to you in Sugar. Please note, because Sugar Connect checks for existing emails when archiving, if a person using the shared mailbox has auto-archive enabled or manually archives an email, you may receive a notification that the email already exists in Sugar.
For information and steps to implement Google Groups in your organization, refer to Google Groups Help.
Shared Mailbox
For Office 365 users, Sugar Connect can be used if you are a member of an Office 365 Shared Mailbox. You may use Sugar Connect while viewing these emails and logged into your email address associated with your Sugar instance and Sugar Connect tenant. For example, your organization may have a shared mailbox with an email alias of "sales@yourcompany.com" of which you are a member. You, and all other group members, will receive emails sent to that email alias and may choose to view or create Sugar records and archive emails as you would normally. The created records and archived emails will be assigned to you in Sugar. Please note, because Sugar Connect checks for existing emails when archiving, if a person using the shared mailbox has auto-archive enabled or manually archives an email, you may receive a notification that the email already exists in Sugar.
For information and steps to implement Shared Mailboxes in your organization, refer to Microsoft 365 Documentation.
Emails
When working with email messages in Gmail/Outlook, Sugar Connect lets you easily archive emails and attachments, use your Sugar email templates, set a delay on emails that you want to write now but send later, and track if and when your emails were opened, links were clicked, and replies sent.
Email Archiving
When an email is sent to or received from an email address that is associated with a Sugar contact or lead, Sugar Connect can archive the message to the contact or lead and its parent account. Emails will be archived to any Sugar contacts, lead, or account that matches the email addresses in the message's To, From, CC, and BCC fields. Emails can also be archived to other record types in Sugar. Once archived, Sugar Connect will prevent the email from being duplicated in Sugar by preventing you from archiving it to the same record. However, you may use the Archive with Options feature to archive the email to additional records. To archive an email to a custom module, there must be an existing relationship to the Activities. For more information, refer to the Creating Relationships documentation in the Sugar Administration Guide.
Keep the following in mind when archiving emails to Sugar:
- It may take as long as 30 minutes to see the archived email in your Sugar instance.
- When the "Auto-Archiving of Outbound Emails" setting is enabled under General Options, outgoing emails are set to archive automatically, and you can select "Quick Archive to Sugar" to toggle off individual emails from archiving.
- When the option to "Save attachments by default" is enabled, the email attachments are archived automatically or selected to be archived in the Archive with Options screen.
- The Teams field on the archived email is set to the user's default team.
- When composing an email, add the subject, body, and message recipient(s) first before opting to archive an email to Sugar.
- Digitally signed emails will only archive correctly if they were sent from an Office 365 account where the "Send digitally signed messages as clear text" setting is enabled.
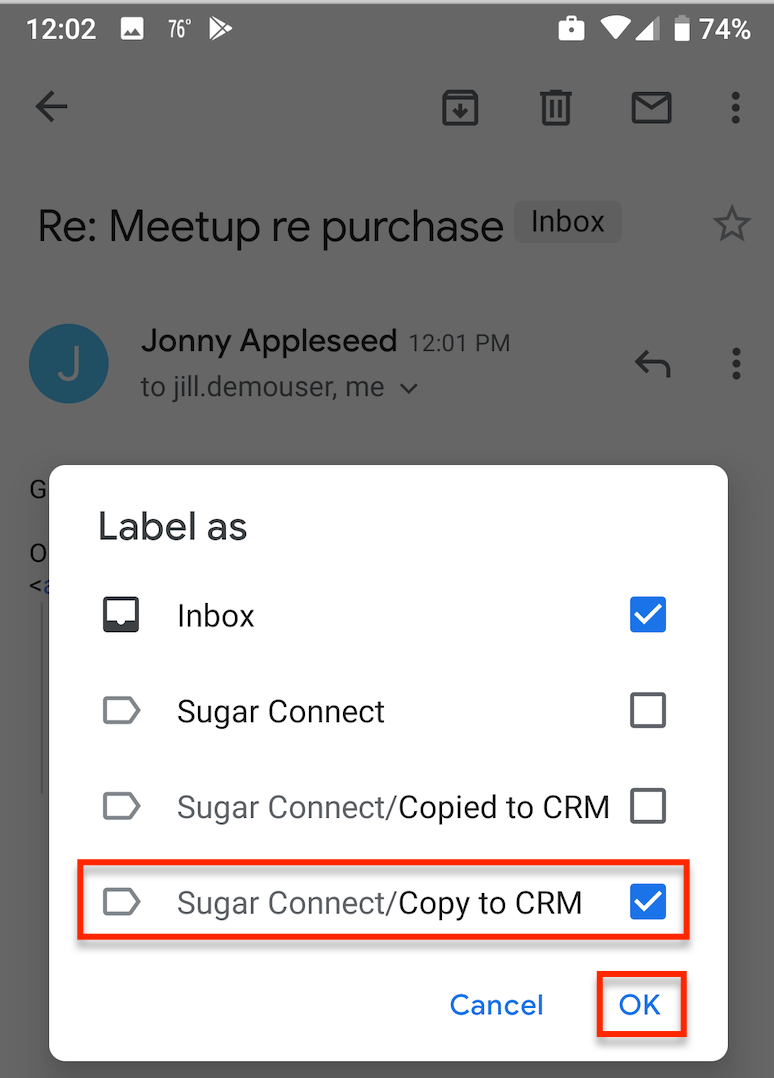
- In Gmail, archived emails are flagged with the "Copied to CRM" label as it is using the "Copy to CRM" Mailbox Label.
- In Outlook, archived emails are flagged with the "Sugar Connect/Copied to CRM" category as it is using the "Copy to CRM" Folder.
There are several ways you can archive emails in Gmail/Outlook. Please click on the archiving options to read more information about each method:
- Quick Archive to Sugar: Archive and relate the email to the Sugar record with a matching email address.
- Archive With Options: Select which attachments to archive and select the Sugar record(s) that you want to relate to the archived email.
- Multi-select from Inbox: Select two or more emails from your inbox to archive at the same time.
- "Copy to CRM" Mailbox Label: In Gmail, apply the "Copy to CRM" Gmail label to quick-archive one or more email messages on the next Sugar sync.
- "Copy to CRM" Folder: In Outlook, drag one or more email messages into the Copy to CRM folder to quick-archive email messages on the next Sugar sync.
- Auto-Archiving: Set the auto-archive behavior for a specific lead or contact.
- Save and Archive: When creating a new record (e.g., opportunity) in the sidebar, you can archive the email currently being viewed to the record you are creating.
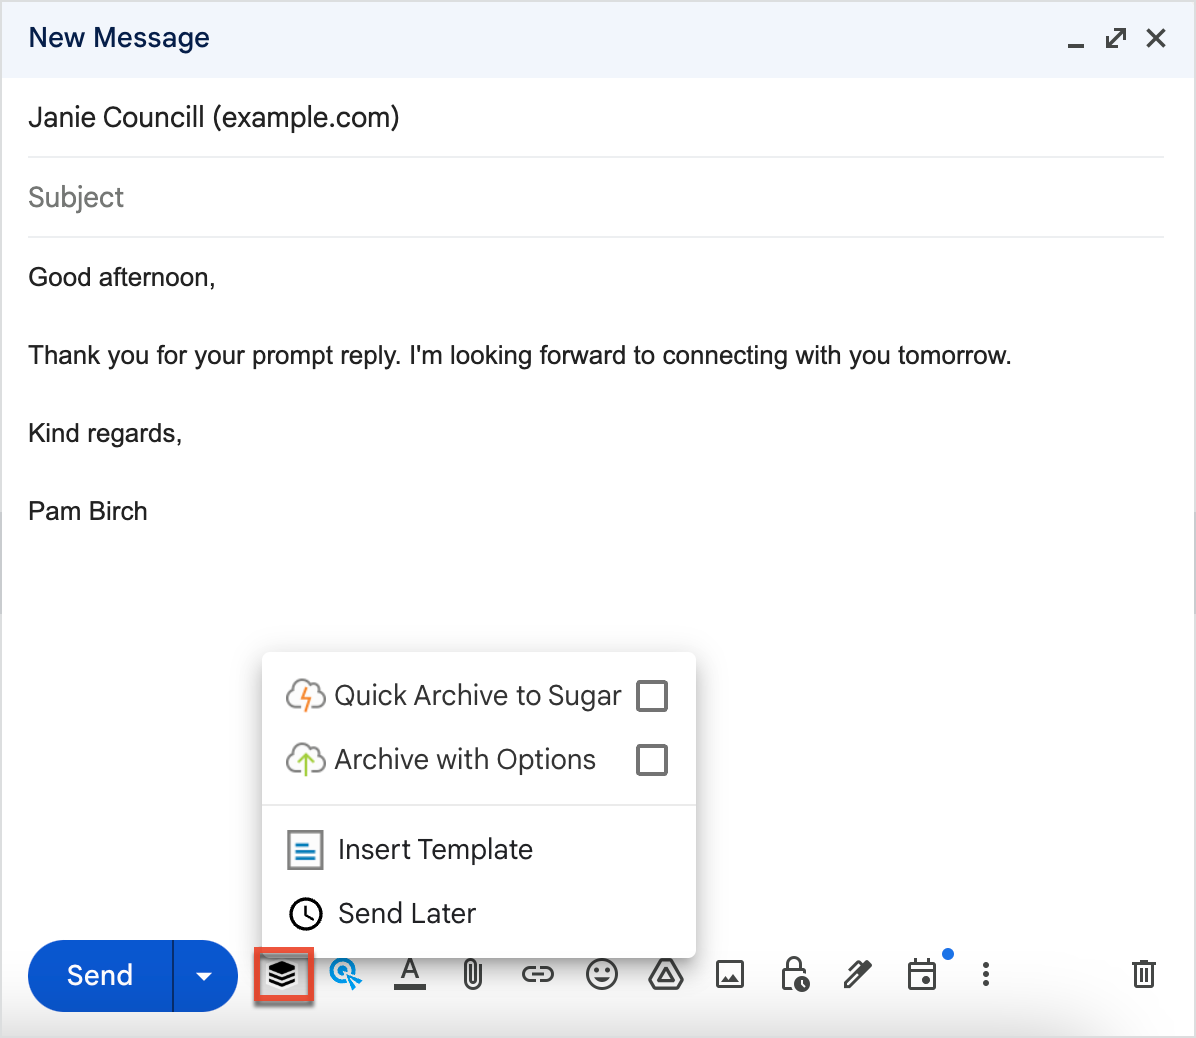
Quick Archive to Sugar and Archive with Options
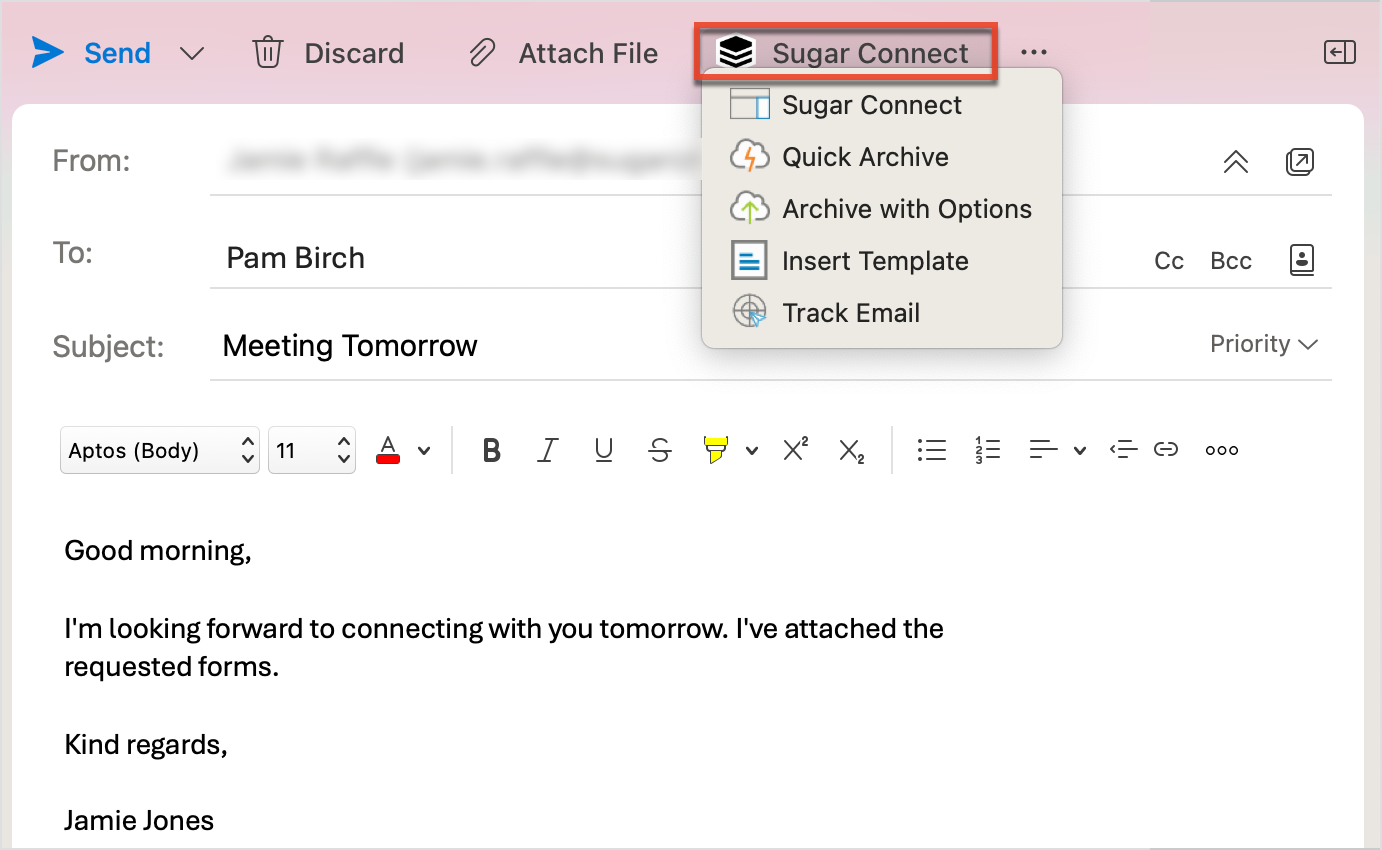
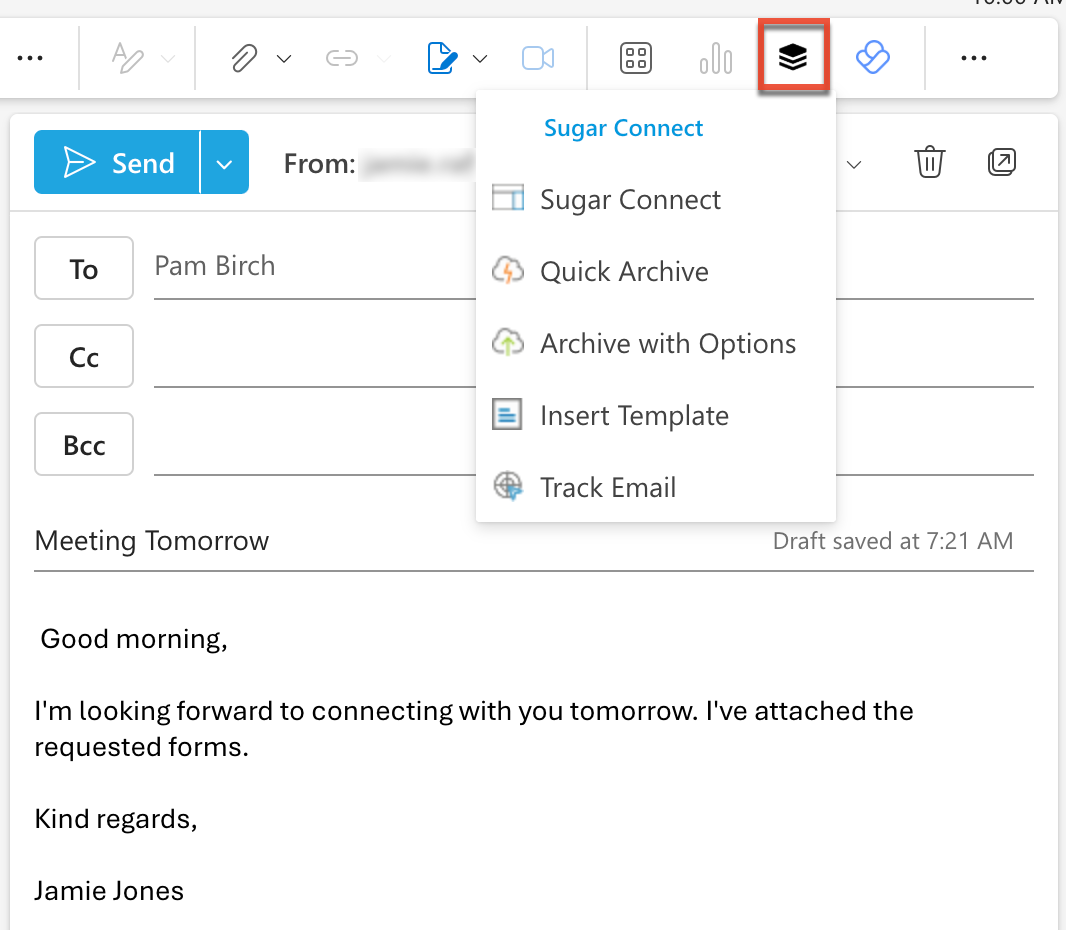
The following table represents where in Gmail and Outlook you can find the "Quick Archive to Sugar" and "Archive with Options" features.
| Email Client | Existing Email | New Email |
| Gmail | 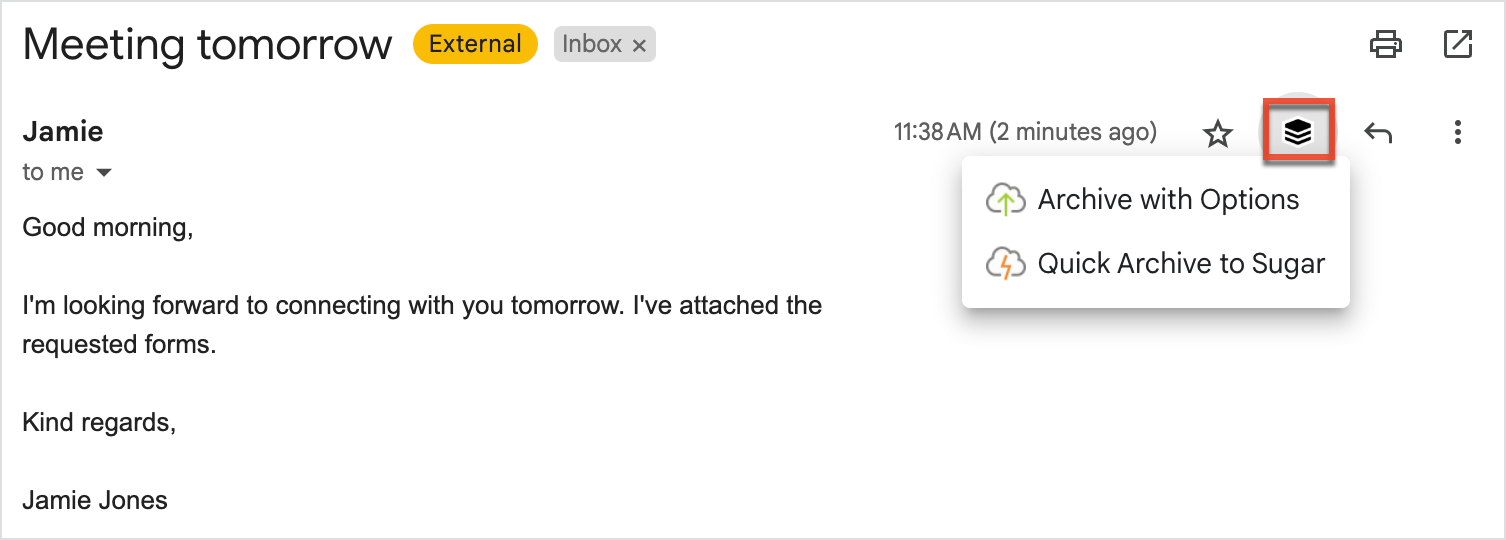 |
 |
| Outlook Desktop | 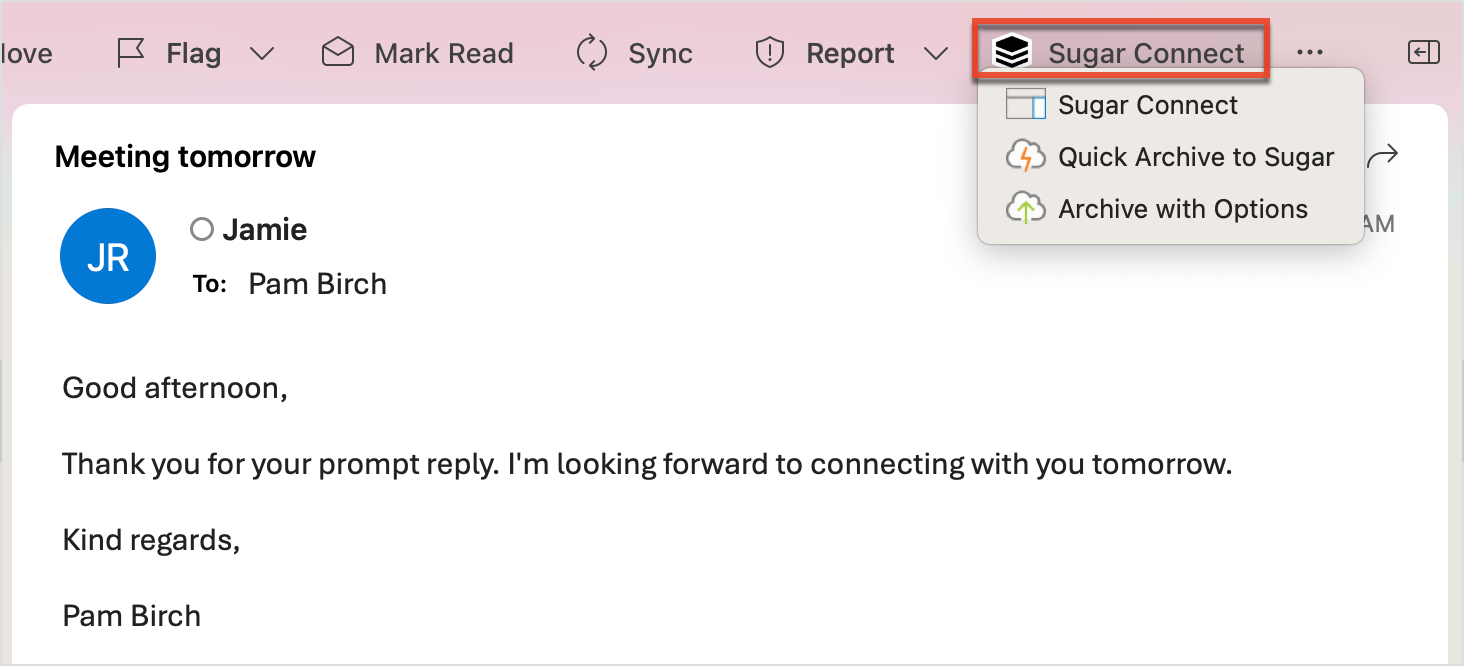 |
 |
| Outlook Web | 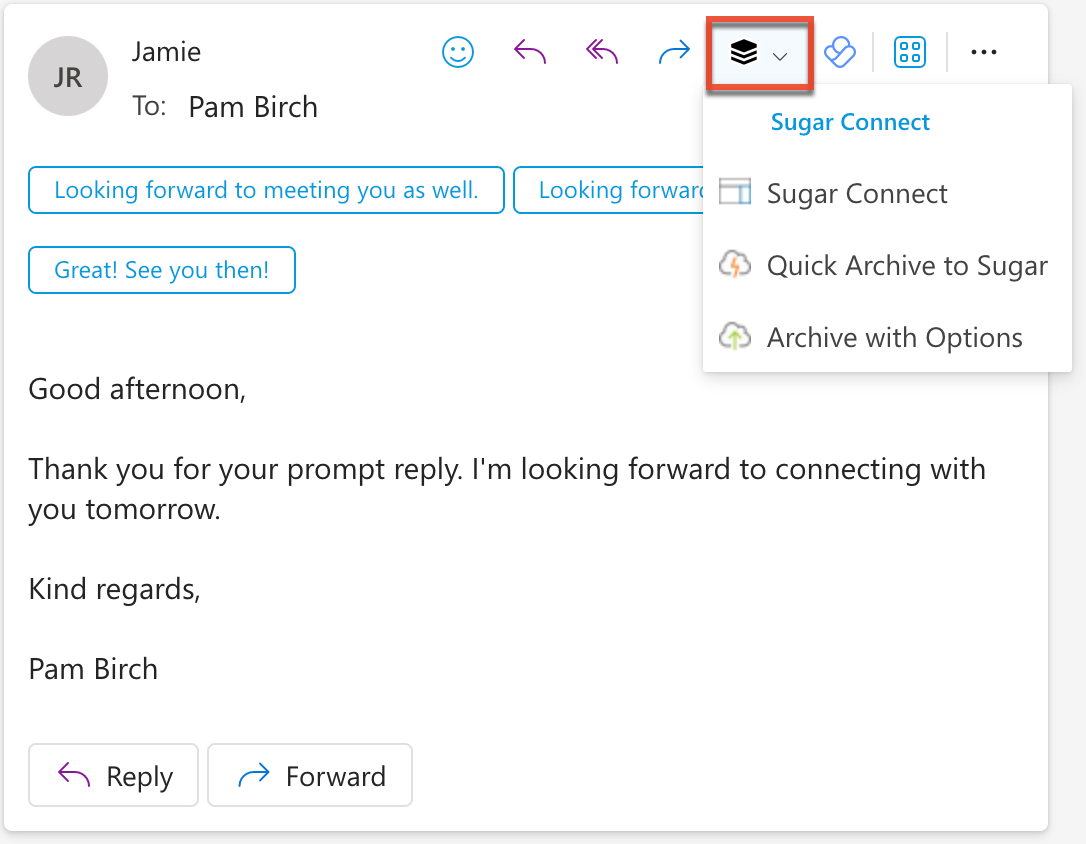 |
 |
Quick Archive to Sugar
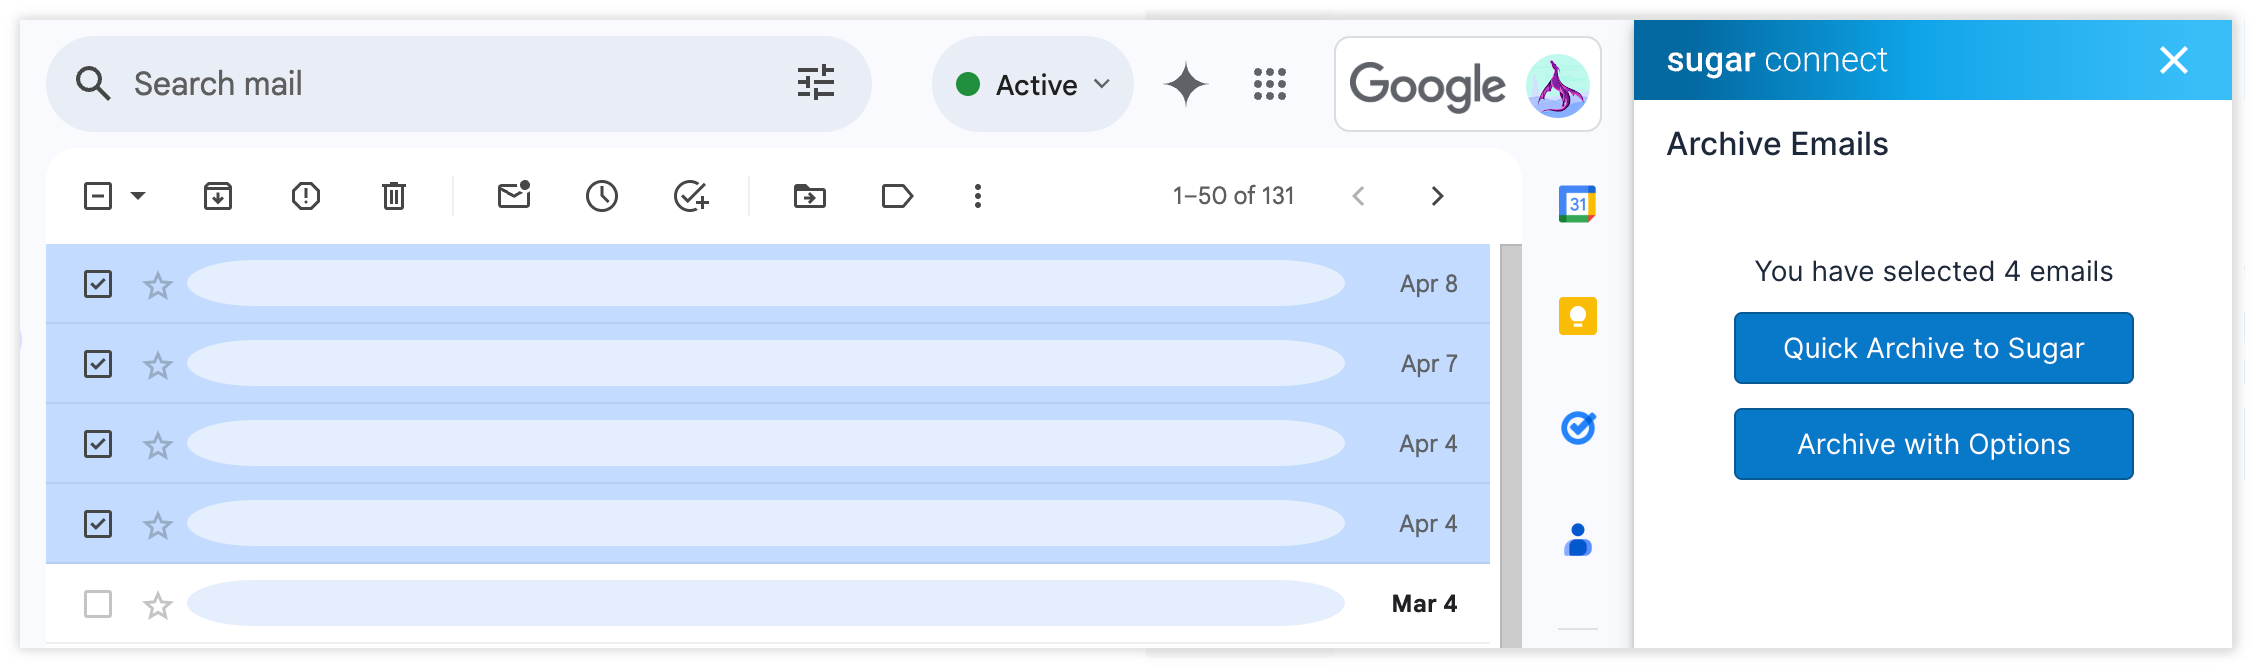
Choose Quick Archive to Sugar to save an email to Sugar and relate it to the Sugar records (i.e., accounts, contacts, leads) that match the email addresses in the To, From, CC, and BCC fields. If no matching email addresses exist in Sugar, the email will not be archived. Use quick-archive for existing email messages (e.g., sent messages, messages in your inbox) and new messages. The images in the table above display where you can find the Quick Archive to Sugar button in Gmail/Outlook.
Archive With Options
The "Archive With Options" functionality opens the full archive window and lets you manually select the Sugar records (e.g., contacts, cases, opportunities) to relate to the email and to select which attachments you want to archive to Sugar. You can use Archive With Options for existing email messages (e.g., sent messages, messages in your inbox) and messages you are sending from Gmail/Outlook. After archiving using any method, you may use the Archive With Options to relate the email to additional records. For example, you already related the email to a contact record, and want to relate it to your newly created opportunity. Your email will be archived with the selected options when your email is sent, whether you click the Send button to send immediately or use the "Send Later" feature to send the email at a future time or date. The images in the table above display where you can find the Archive with Options button in Gmail/Outlook.
To cancel the Archive with Options: In Gmail, select "Archive with Options" again from the Sugar Connect menu. In Outlook, select "Quick Archive" from the Sugar Connect menu.
Archive with Options for Existing Emails
Use the following steps to leverage the "Archive With Options" functionality when you are viewing an existing message in Gmail/Outlook. On archive, the email message's content will be copied to a record in Sugar's Emails module, any attachments will be archived to the Notes module, and the new email and note records will be related to the records you selected in the dialog. If an email has been previously archived, it will be noted at the top of the popup. However, you may choose additional records to relate to the email.
- Click on or open the email that you want to archive to Sugar.
- Select "Archive With Options" from the Sugar Connect menu.
- In the popup window, place a checkmark next to the records that you want to relate the email message to in Sugar.
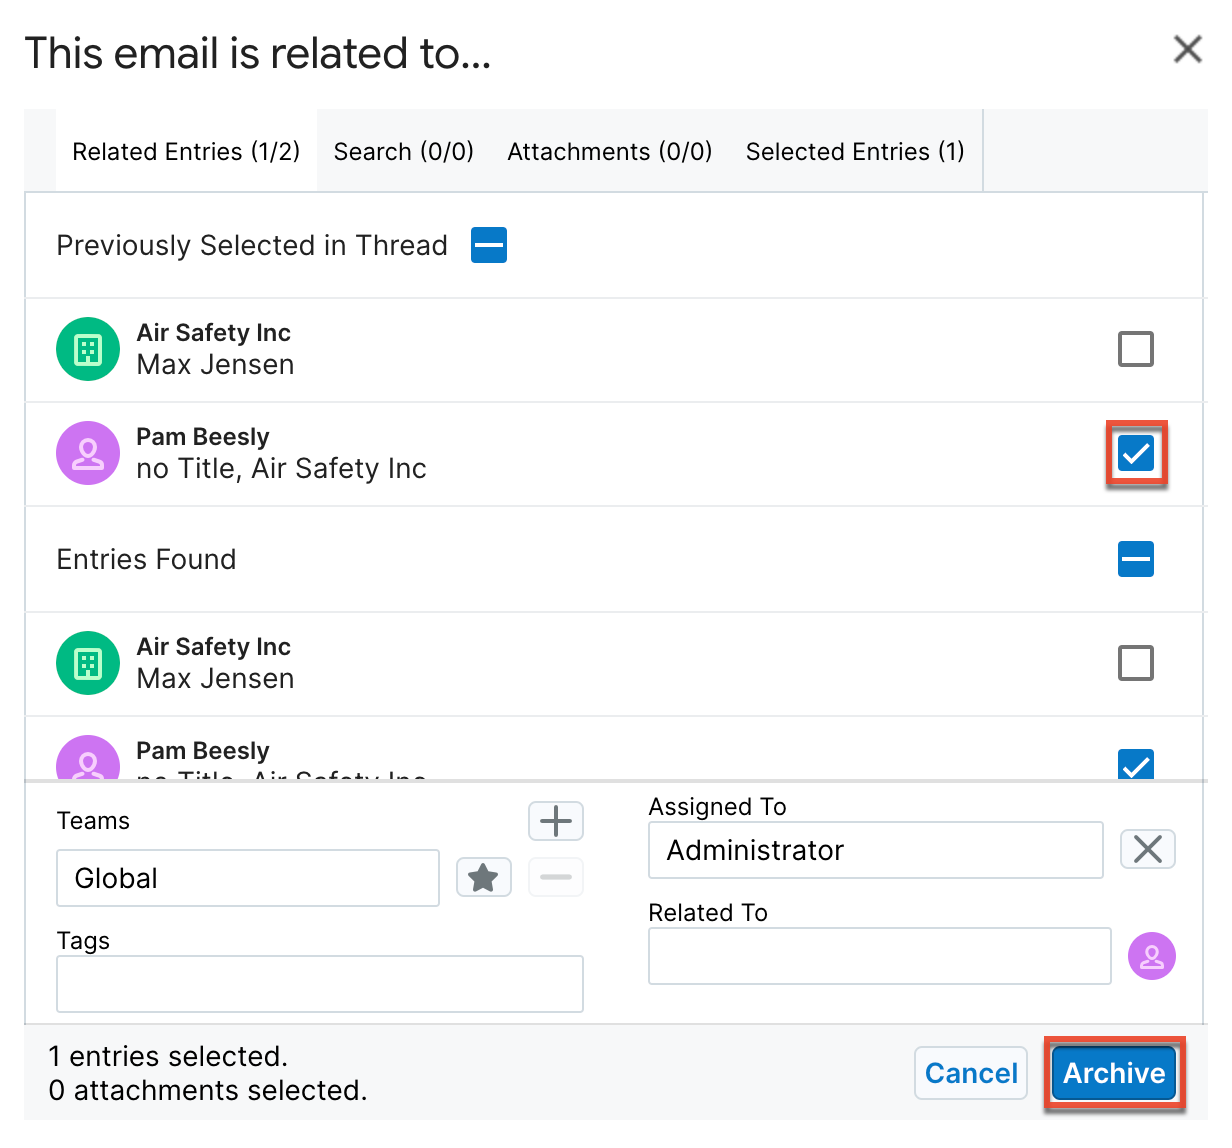
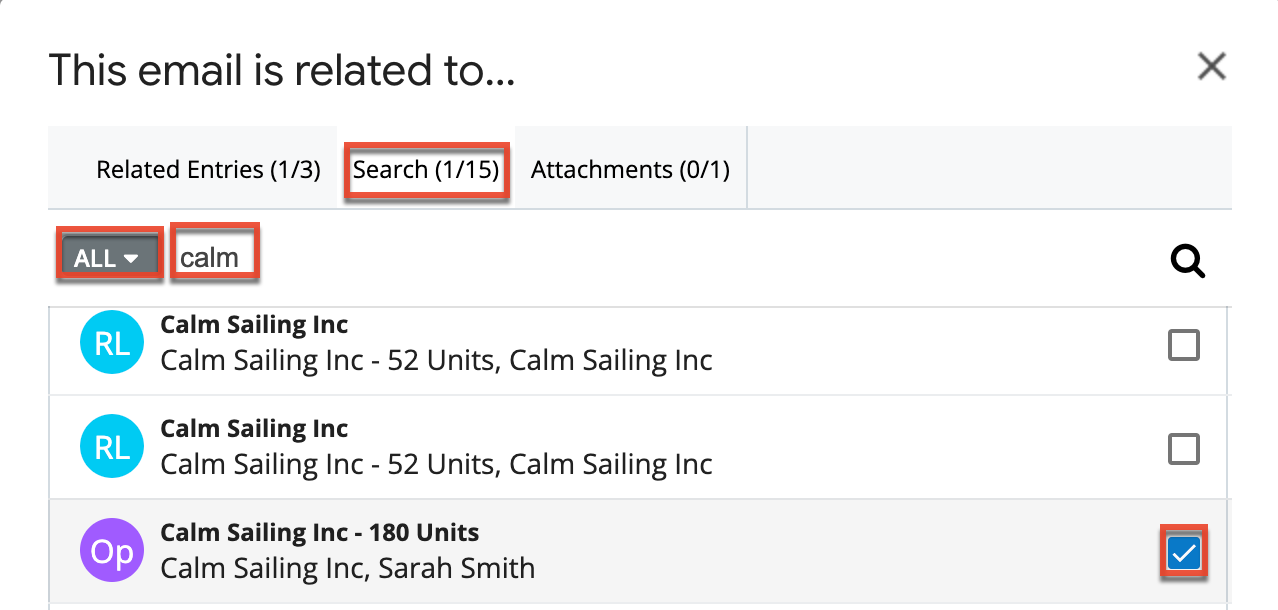
- Use the Search tab to find additional records to relate to the email.
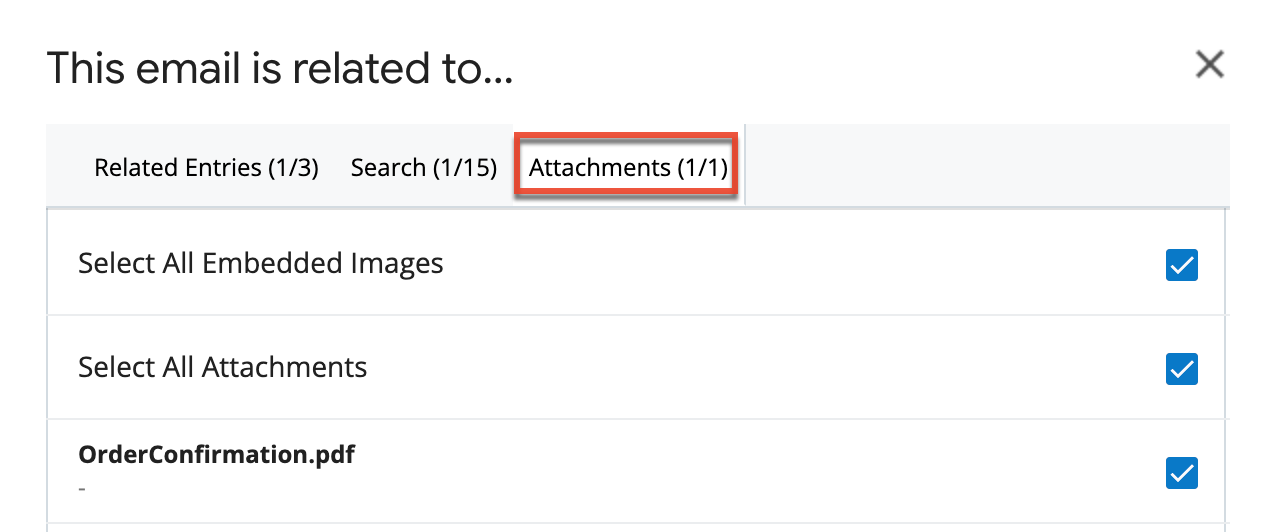
- Use the Attachments tab to select which attachments to archive. When the option to "Save attachments by default" is enabled, the attachments will be automatically selected. Images embedded using a URL that points to an external source will not be archived.
- Relate the email to a record in the Related To field. To change the record type (e.g., account, contact) click the module icon to the right to open the list of available modules.
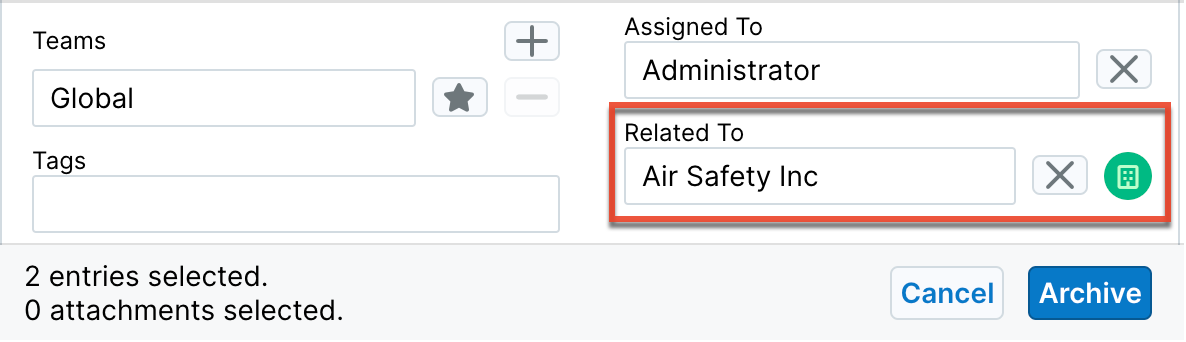
- Select the team and assigned user to save on the Sugar email record. The Teams field is set to the user's default team, but you can change the Teams field on a per-email basis.
- Once everything is complete, click "Archive".
Archive with Options for New Emails
Use the following steps to leverage the "Send With Options" functionality when you are composing a new message in Gmail/Outlook.
- Compose a new message, or reply to or forward an existing message.
- Once you have entered the recipients, subject, and body for the email, click "Archive With Options".
- Follow steps 3-7 in the section above.
- Once everything is complete:
- Gmail users must click "Select Entries" to close the archive window.
- Outlook users can click "Archive" to close the archive window.
- Finish composing your message and click "Send" to send and archive your email.
- You can also choose to use the Send Later feature with Archive With Options to send the email at a later time with the options you selected.
Upon sending, the message will be delivered to the recipients and archived to Sugar. The email message's content will be copied to a record in Sugar's Emails module, any attachments will be archived to the Notes module, and the new email and note records will be related to the records you selected in the dialog.
Multi-select from Inbox
With the Sugar Connect sidebar open, select multiple emails to archive at the same time. In Outlook, you are limited to selecting 2-100 emails at a time. In both Gmail/Outlook, when you select two or more, the Sugar Connect sidebar shows you the options to Quick Archive to Sugar or Archive with Options. When selecting Archive with Options, please note the following:
- All selected emails will archive to the records chosen in the Archive with Options popup window.
- You can choose to archive either all attachments included in the selected emails, or none of them.
Copy to CRM
When you installed Sugar Connect in Gmail or Outlook, a custom label or Smart Folder, respectively, was automatically added to your mailbox. This feature makes it easy to select and archive many emails at once to your Sugar instance, set up email rules for handling automatic archive, and to archive emails from your mobile device. When archiving email messages to Sugar using "Copy to CRM", by default, no email attachments will be included. Navigate to Settings > General Options > enable "Save attachments by default" if you want attachments automatically included. A matching email address must exist in an account, contact, or lead record for the archive to succeed. Otherwise, the email will not be archived to Sugar.
The label in Gmail is called "Copy to CRM" and is nested under the "Sugar Connect" label. For more information on using Gmail labels, please refer to Google's help article, Create Labels to Organize Gmail.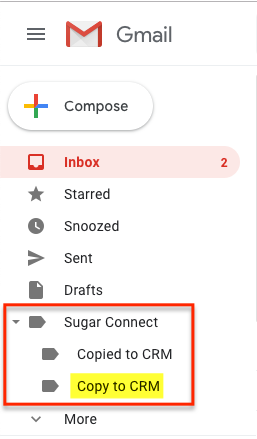
The folder in Outlook is called "Copy to CRM" and is nested under the "Sugar Connect" folder.
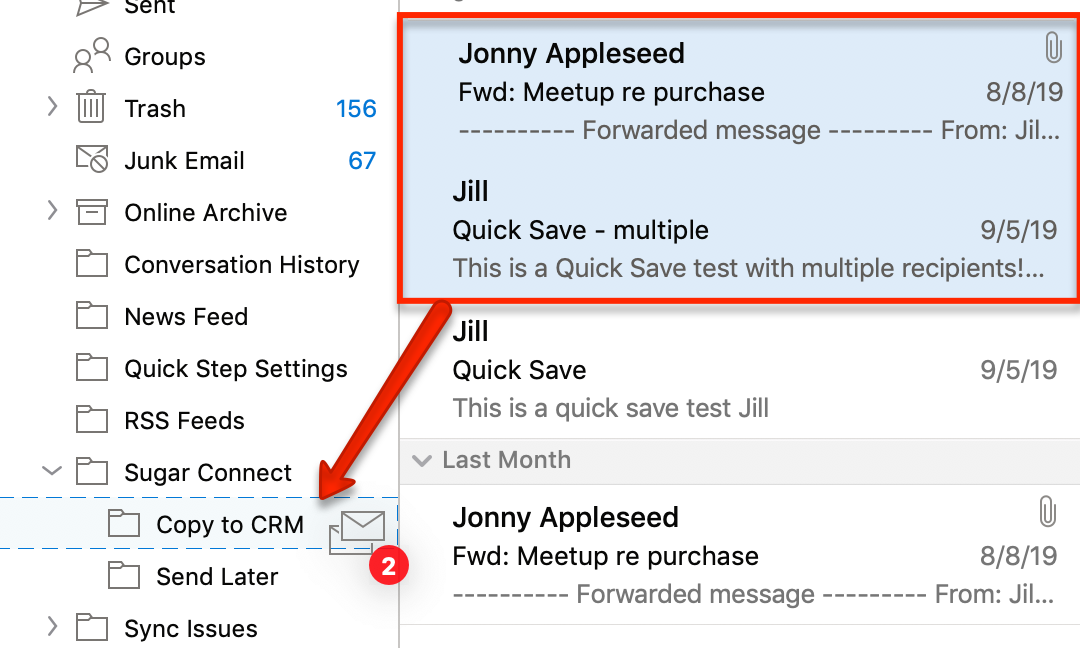
Mass Archive via "Copy to CRM"
To archive many emails at once, simply select the messages and drag them to Sugar Connect > Copy to CRM. The first time the email sync is processed, only emails received in the last 90 days will be archived. Subsequent sync sessions will include all emails regardless of the date received. Emails will archive to Sugar on the next server sync (typically 15- or 30-minute intervals) and if matching email addresses are found in Sugar (i.e., accounts, contacts, leads) for the To, From, CC, or BCC fields, Sugar Connect will relate the email to the matching records in Sugar. Successfully archived emails will be moved back into the inbox and will be flagged with a category "Sugar Connect/Copied to CRM". If a matching email address is not found, the email will not be archived to Sugar and will remain in the Copy to CRM folder.
Auto-Archive via "Copy to CRM"
After a filter is created in Gmail/Outlook, all incoming messages (or the messages that match your filter criteria) will be automatically put into the "Copy to CRM" folder and archived to Sugar if a matching email address is found. If a matching email address is not found, the email will not be archived to Sugar.
For Gmail users, follow these steps to automatically archive email messages received:
- In the search bar at the top of Gmail, click on the Down arrow.
- For the "From" criteria, enter an asterisk * character to auto-archive all messages from all senders. Alternatively, you can specify certain senders, domains, or keywords to refine the types of messages you want to auto-archive. For more information on creating filters in Gmail, refer to the Google Help article Create Rules to Filter Your Emails.
- Do not click Search. Instead, click on the "Create Filter" option next to the Search button.
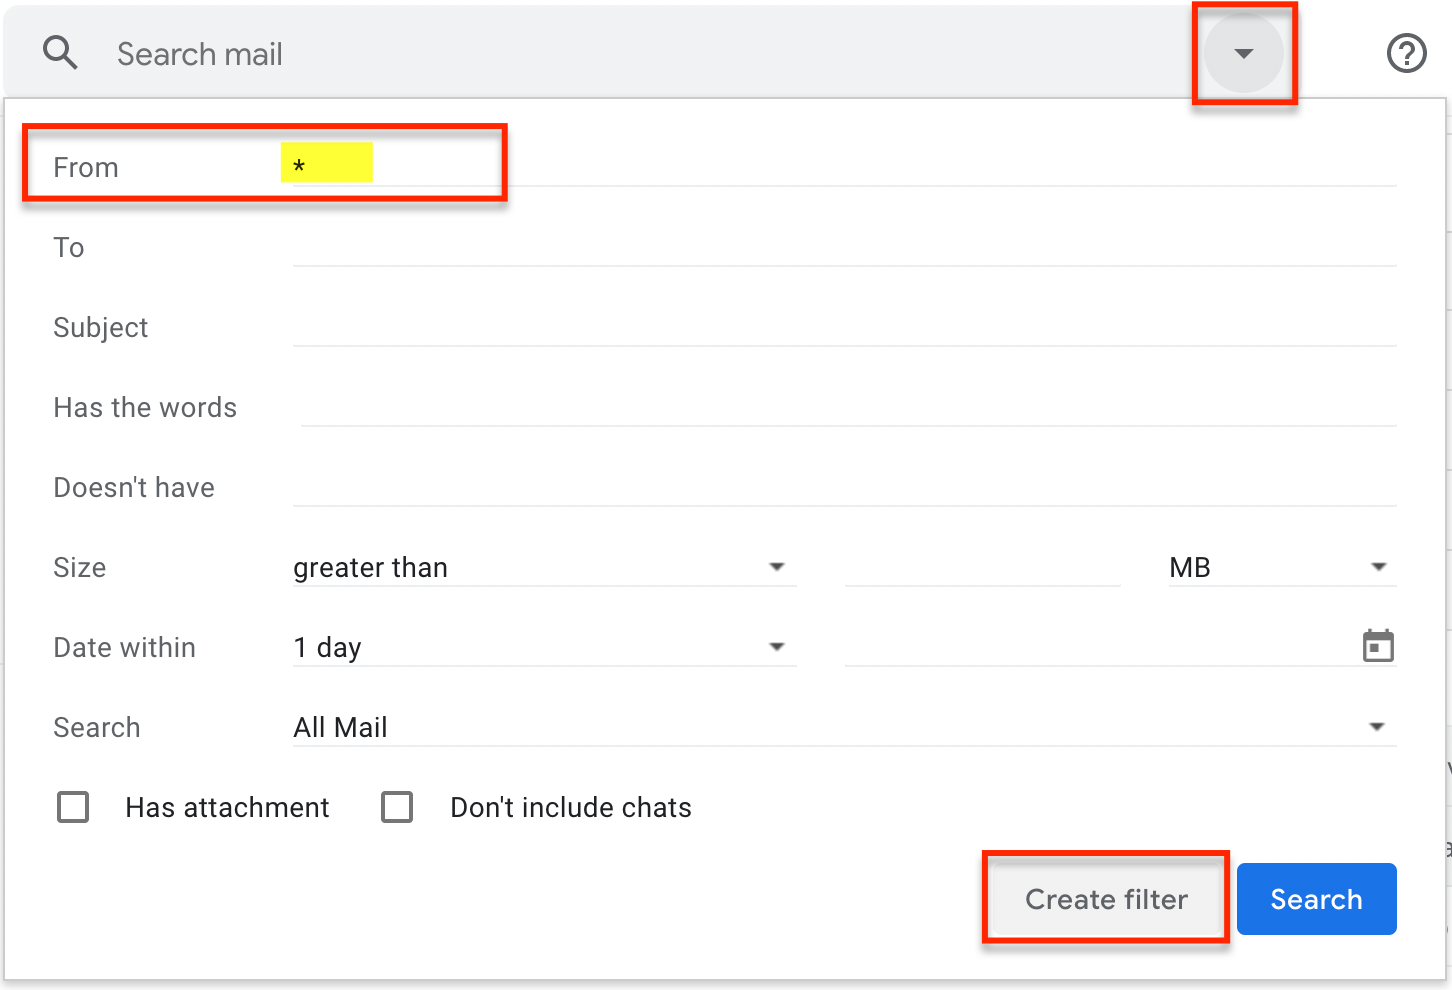
- From the filter actions, select "Apply the label" and select the "Sugar Connect > Copy to CRM" label.
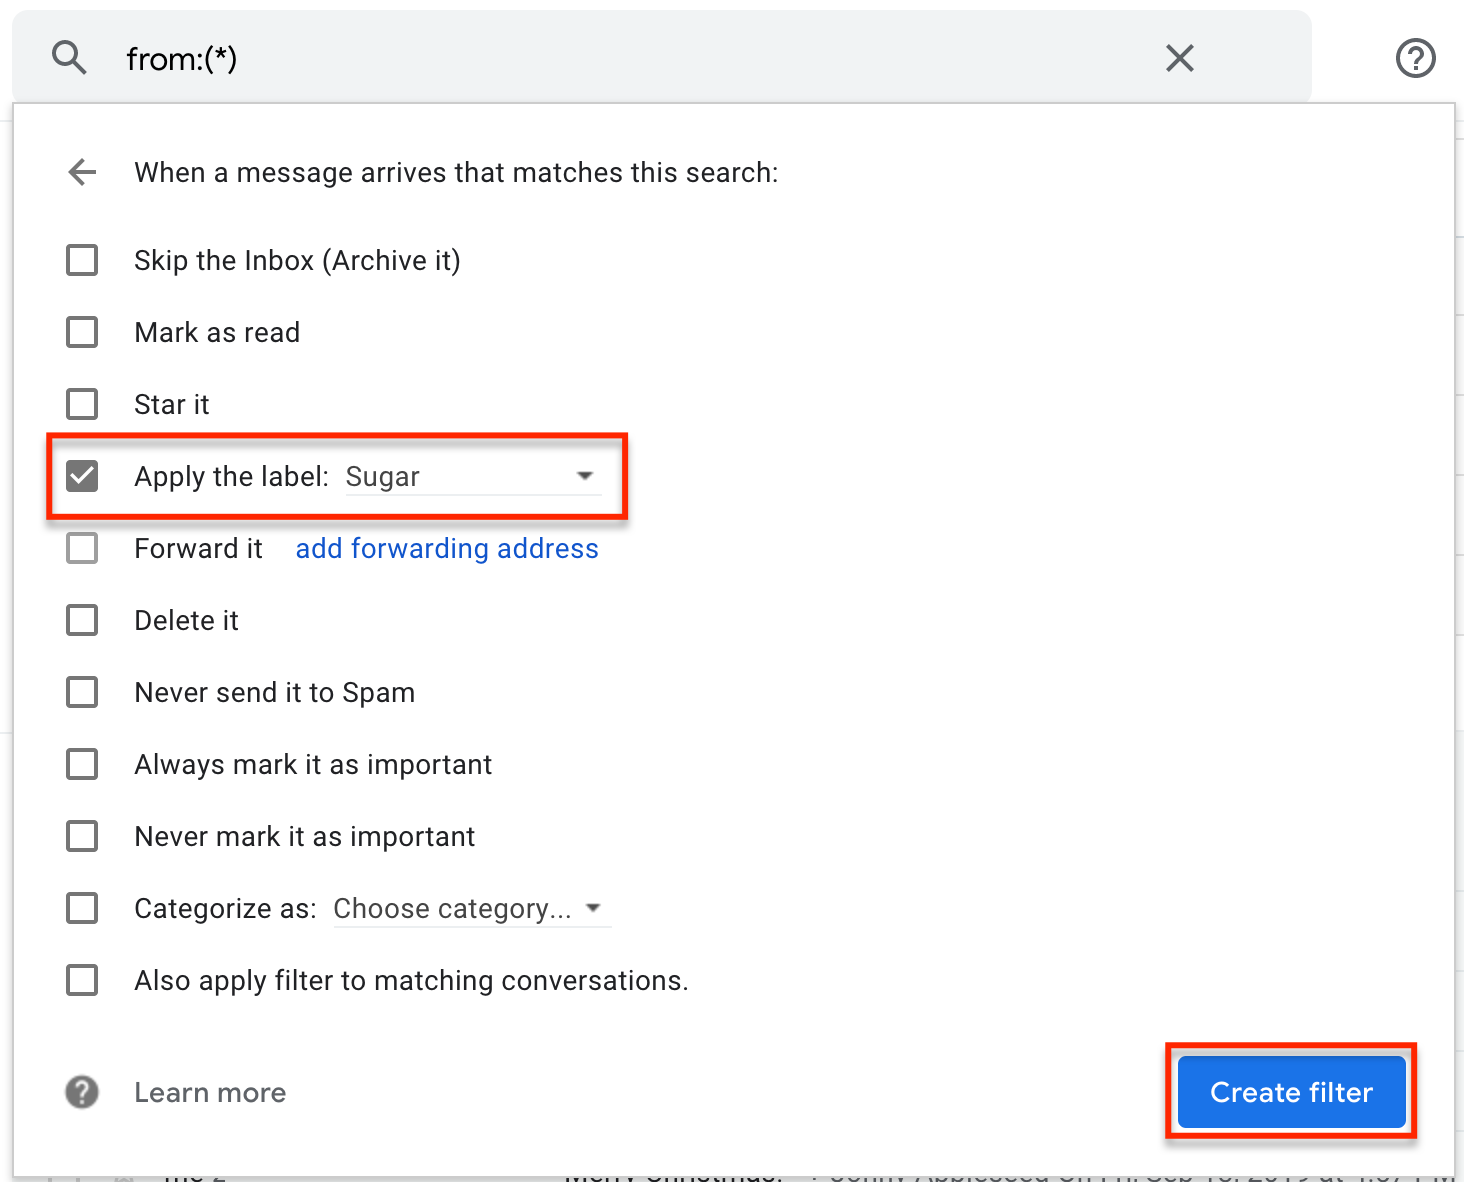
- Click "Create Filter".
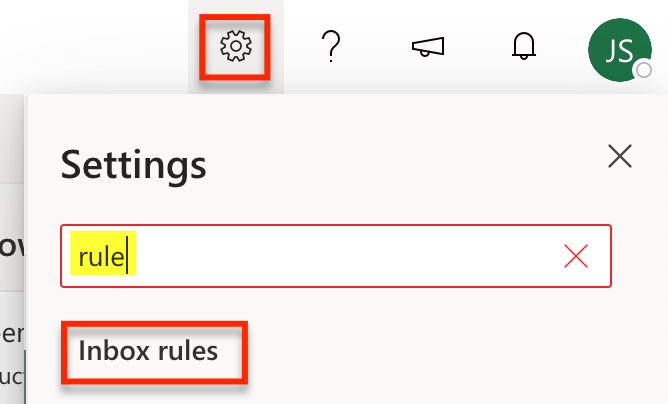
For Outlook users, follow these steps to automatically archive email messages received:
- Start by creating a new inbox rule in Outlook.
- In Outlook for Desktop, navigate to Organize > Rules > Create Rule in the Outlook ribbon.
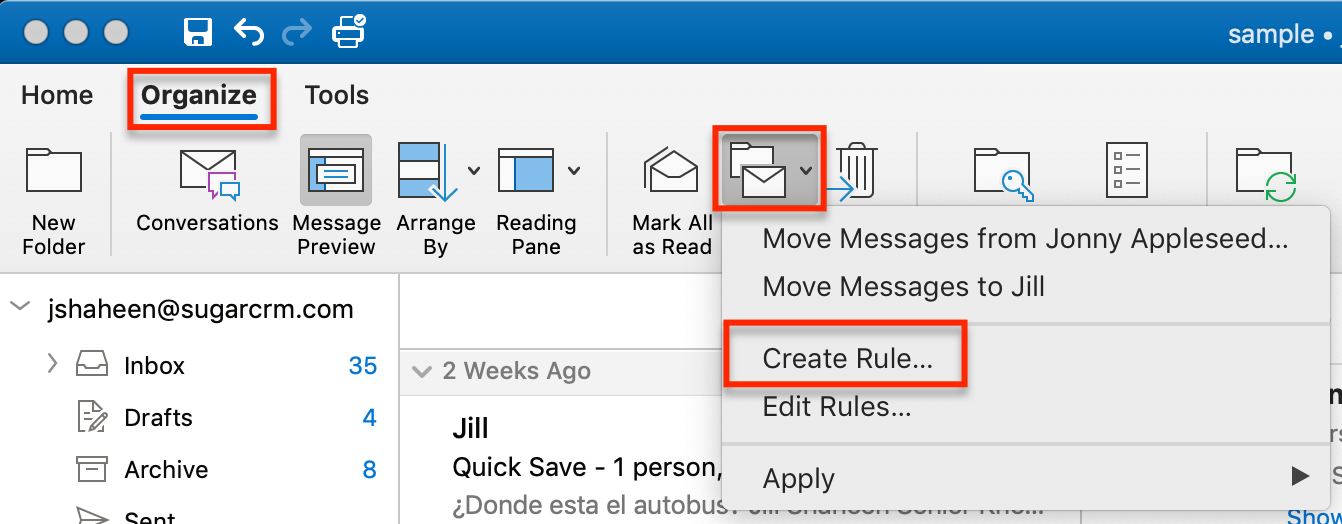
- In Outlook for Web, search the Settings menu for "rule" and select "Inbox rules".
Then click on "Add New Rule".
- In Outlook for Desktop, navigate to Organize > Rules > Create Rule in the Outlook ribbon.
- Create a rule, following Outlook's guidelines, to move all messages sent to you to the Sugar Connect > Copy to CRM folder. Alternatively, you can specify certain senders, domains, or keywords to refine the types of messages you want to auto-archive.
- Click "OK" to finish.
Mobile Archive via "Copy to CRM"
While you cannot use Sugar Connect's sidebar on your mobile device, you can still use the power of Sugar Connect to archive emails using the "Copy to CRM" label from the Gmail/Outlook app. The message will be labeled "Copy to CRM" and will archive to Sugar during the next server sync if a matching email address is found. If a matching email address is not found, the email will not be archived to Sugar.
Follow these steps to apply the "Copy to CRM" label to a message in Gmail using your mobile device:
- Tap on the message that you want to archive.
- Open the message's options menu and tap on "Change Labels".
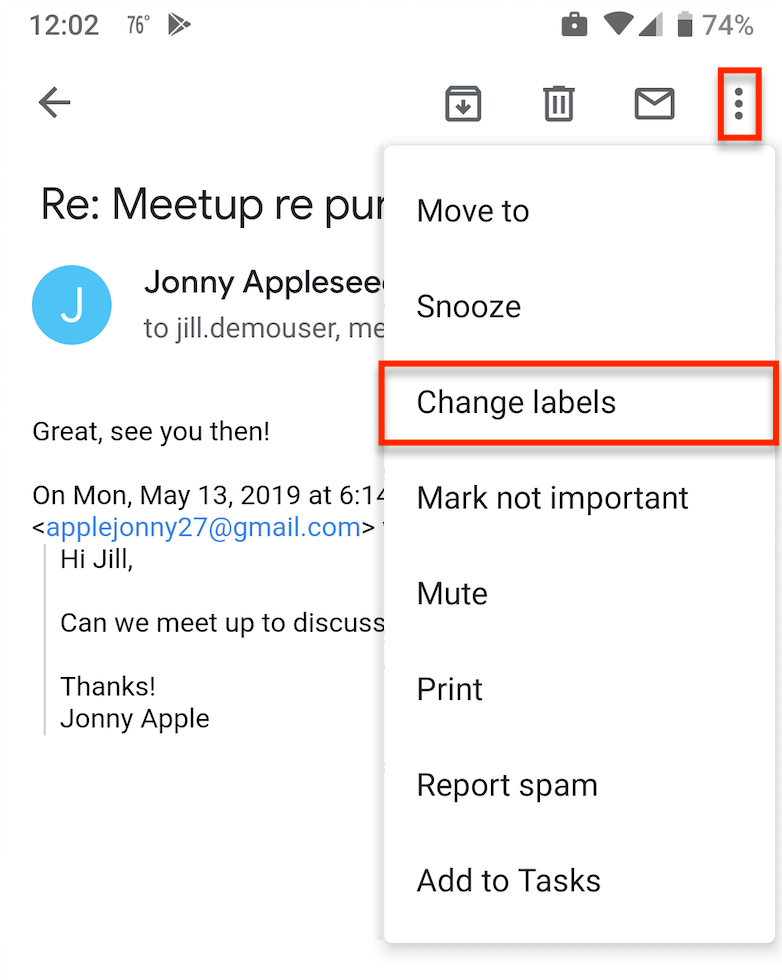
- Select the "Sugar Connect/Copy to CRM" label and then tap "OK".
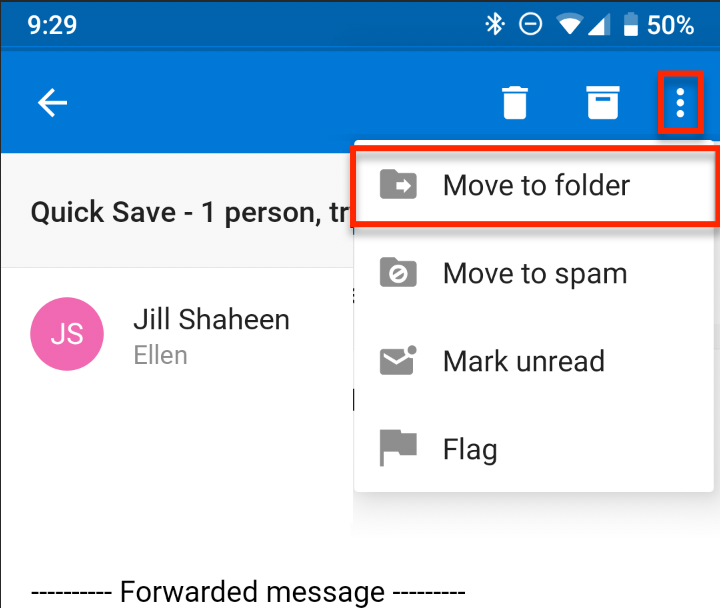
Follow these steps to move a message to the "Copy to CRM" folder in Outlook using your mobile device:
- Tap on the message that you want to archive.
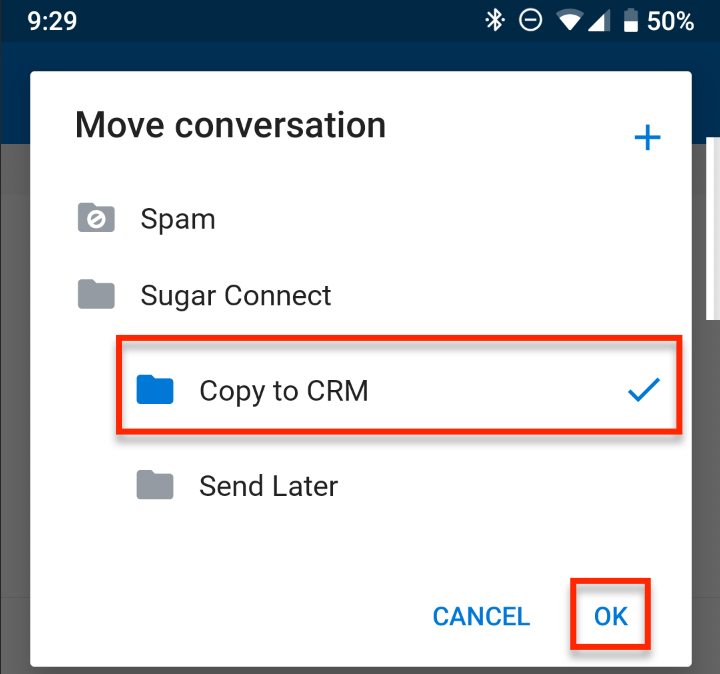
- Open the message's options menu and tap on "Move to Folder".
- Select the "Sugar Connect > Copy to CRM" label and then tap "OK".
Auto-Archiving
When viewing a contact or lead record in the Sugar Connect sidebar, you can decide whether to enable or disable inbound and/or outbound email auto-archiving for that specific record.
To control the auto-archive behavior for a specific lead or contact, open the lead or contact record in the Sugar Connect sidebar. Click the envelope icon that appears to the right of the name to change the auto-archive behavior for that lead or contact.
| Icon | Description |
| Do not auto-archive any emails for this lead or contact. | |
| Auto-archive only outbound emails to this lead or contact. The lead or contact's email may appear in the To, From, CC, or BCC field to be related to the archived email. | |
| Auto-archive only inbound emails from this lead or contact. The lead or contact's email address must be in the From field to be related to the archived email. | |
| Auto-archive outbound and inbound emails for this lead or contact. |
Some or all of these options may be disabled if your Sugar Connect admin has set the email archival method for your tenant.
Save and Archive
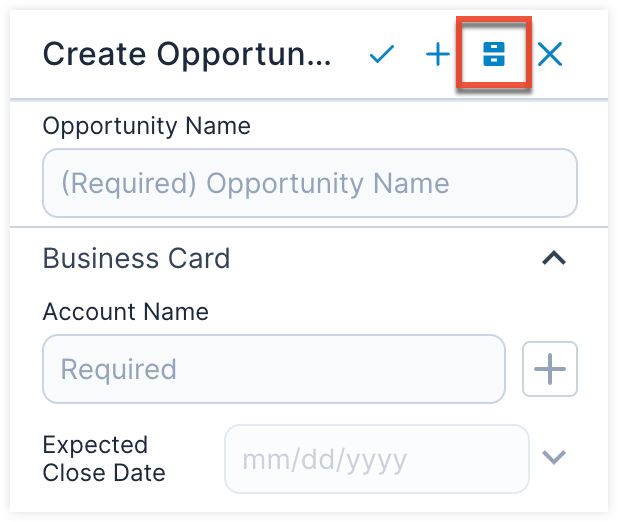
When creating a new record (e.g., opportunity) in the Sugar Connect sidebar, you can archive the email currently being viewed to the record you are creating via the Save and Archive icon. The Save and Archive icon is available for all modules that have a relationship with the Emails module. Please note that the option is available while the record is being created and will not be shown after the record is saved
Follow these steps to archive an email to Sugar using the Save and Archive button in a new opportunity record as an example:
- Locate the email you want to archive to Sugar and ensure you have it open so that Sugar Connect can process it.
- If no related entries are found for the email, you can optionally add to Sugar as a contact or lead before proceeding to the next step.
- Navigate to the Home screen > Opportunities > select "Create Opportunity" from the list view actions menu.
- Fill out the applicable fields for the new opportunity record.
- Click the Save and Archive icon.
Archiving Attachments to Sugar
When archiving attachments, you have the option to archive the email along with its attachments or as a stand-alone document.
Archiving Emails With Attachments to Sugar
When archiving email messages to Sugar, Sugar Connect will detect any attachments and embedded images included with the message. When archived together, an email and its attachment(s) are archived as an email and related note(s) records, respectively, in Sugar. During quick archive and when using the Sugar Connect mailbox label, if the option to "Save attachments by default" is enabled, the attachments are automatically archived to Sugar with the message.
When using Archive With Options, you can select which attachments to save under the Attachments tab in the archive window. You can also choose to select all or none of the images embedded into the email. Please note, images embedded using a URL that points to an external source will not be archived. Links to Google Drive or Microsoft OneDrive files are not able to be archived and will not be listed in the Attachments tab in the archive window.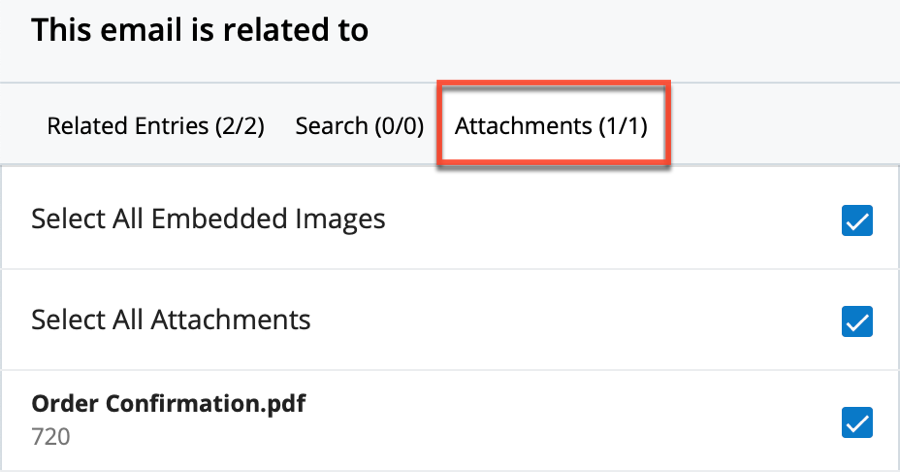
Archiving Attachments as Documents
Sugar Connect allows you to archive an attachment to records in your Sugar instance without archiving the whole email message. This archives the attachment as a document record in Sugar.
To archive an attachment in Gmail, hover over the attachment and select the Sugar Connect - Archive button. 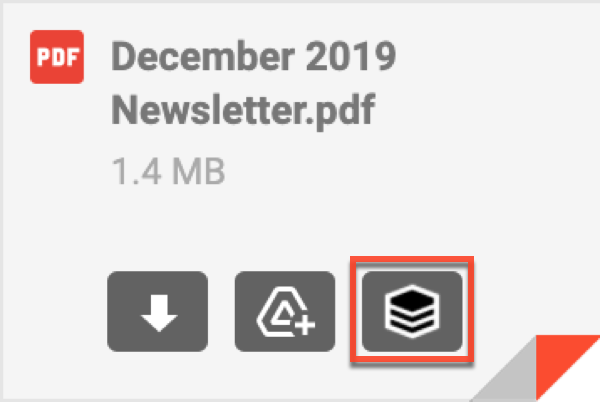
You will have the option to save the attachment to a related sugar record based on the email address of the sender or to search existing records to save the attachment. You can optionally assign a category and subcategory to the attachments. The values of the Category and Subcategory dropdown fields are inherited from the Documents module in your Sugar instance. Links to Google Drive files appear as attachments when included in an email. However, they are not able to be archived and will not have the Sugar Connect Archive button available for selection.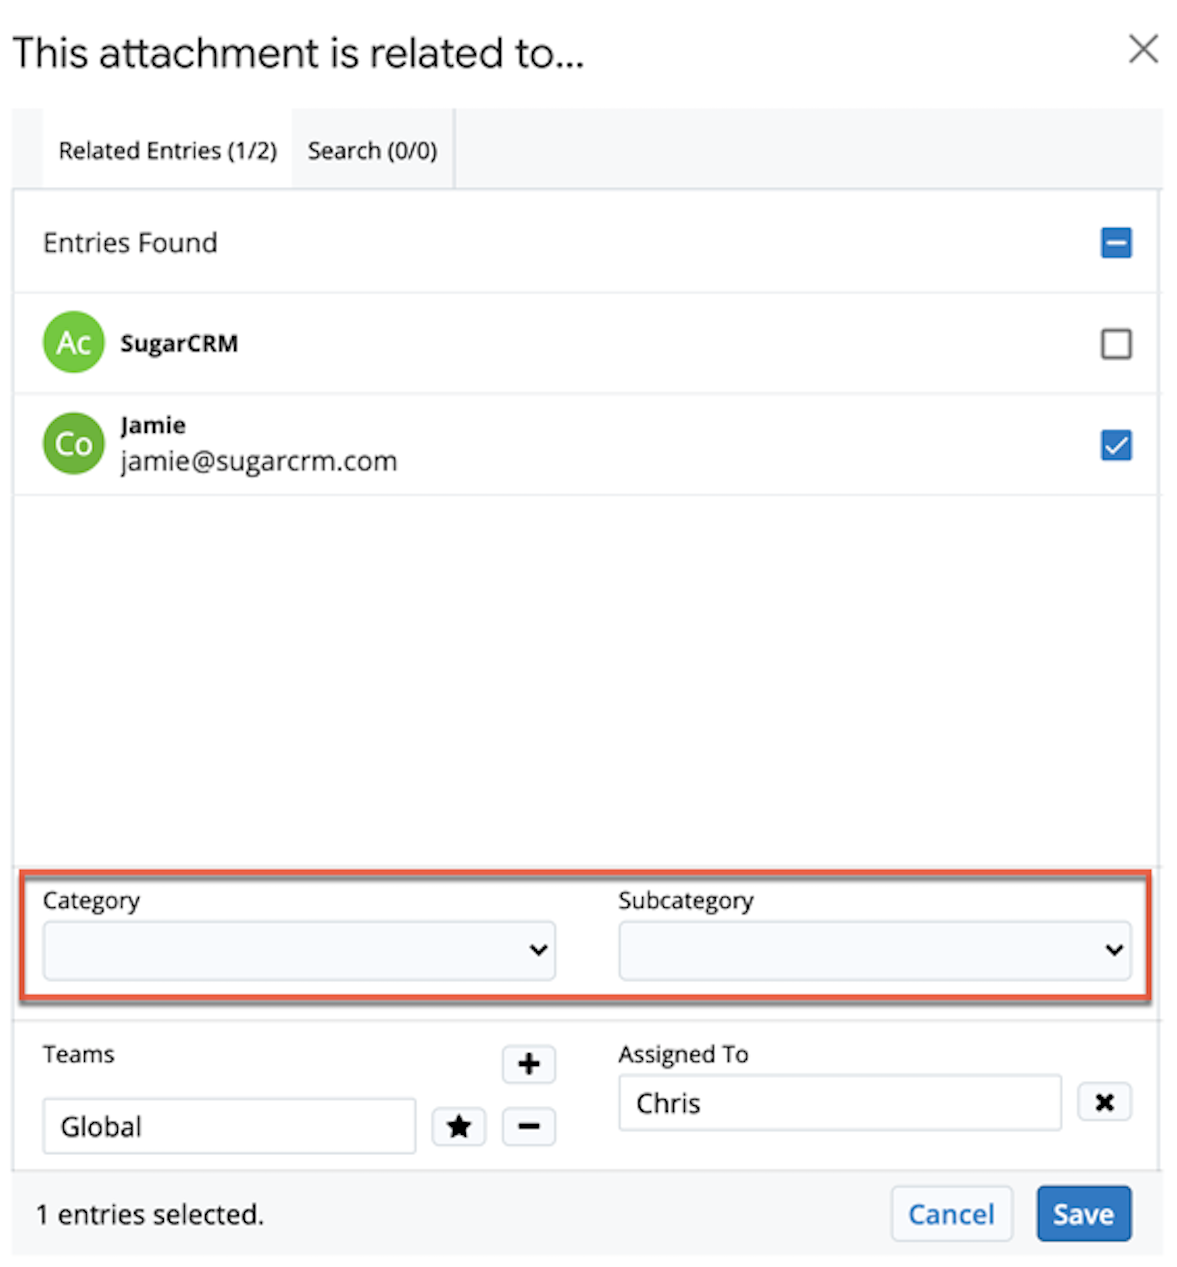
In Outlook, Sugar Connect allows you to save an attachment to your Sugar instance without archiving the whole email message either from the Documents Module or from the Documents Subpanel. Note that attachments that are externally hosted (e.g., a link or reference to a document in Microsoft OneDrive) are not available for archiving via Sugar Connect.
Documents Module
You may use the Documents module in the Connect Sidebar to archive email attachments in Outlook.
- Select an email with an attachment and open the Sugar Connect Sidebar.
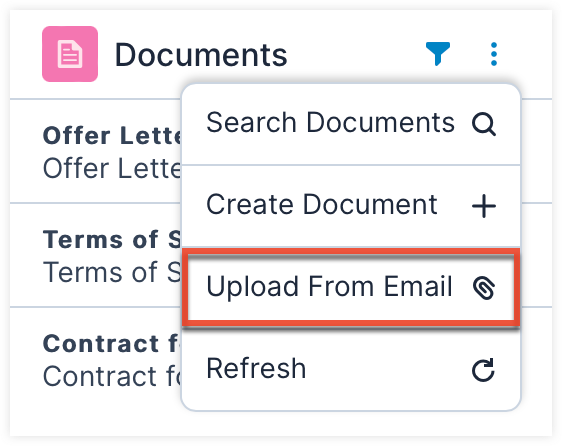
- Click the Home icon and click the Documents module.
- Click the Actions menu and select "Upload from Email".
- Select the appropriate file. Please note, only one file may be uploaded at a time.
- An alert will appear notifying you that the document was created. You may need to refresh for the file to appear on the list.
Documents Subpanel
You may use the Documents subpanel in any module that has a relationship to documents (e.g., Contacts) to archive email attachments in Outlook.
- Select an email with an attachment and open the Sugar Connect Sidebar.
- Navigate to the appropriate Sugar record (e.g., Contact) and locate the Documents subpanel.
- Click the Actions menu and select "Upload from Email".
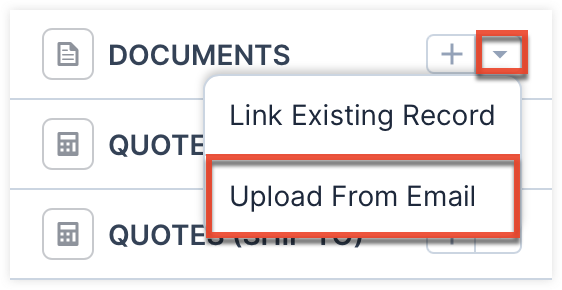
- Select the appropriate file. Please note, only one file may be uploaded at a time.
- An alert will appear notifying you that the document was created. You may need to refresh the record view for the file to appear in the subpanel.
Troubleshooting Email Archiving
There are some reasons why email archiving could fail:
- If the message failed to archive and the confirmation message "Email Saved to Sugar" did not appear, then the email was not archived because of slow internet connection or connection with your Sugar server. If you experience this issue, try archiving the email at a later time.
- Sometimes the email archives to a different Sugar record (e.g., account, contact, opportunity, or case) than the one you expected. Double-check in Sugar that the correct relationship was made by searching for the email in the Emails module list view.
- Errors with the network connection are the most common cause of a failed archive. Check with your company's network administrator to find out if there are network issues.
Archived Emails
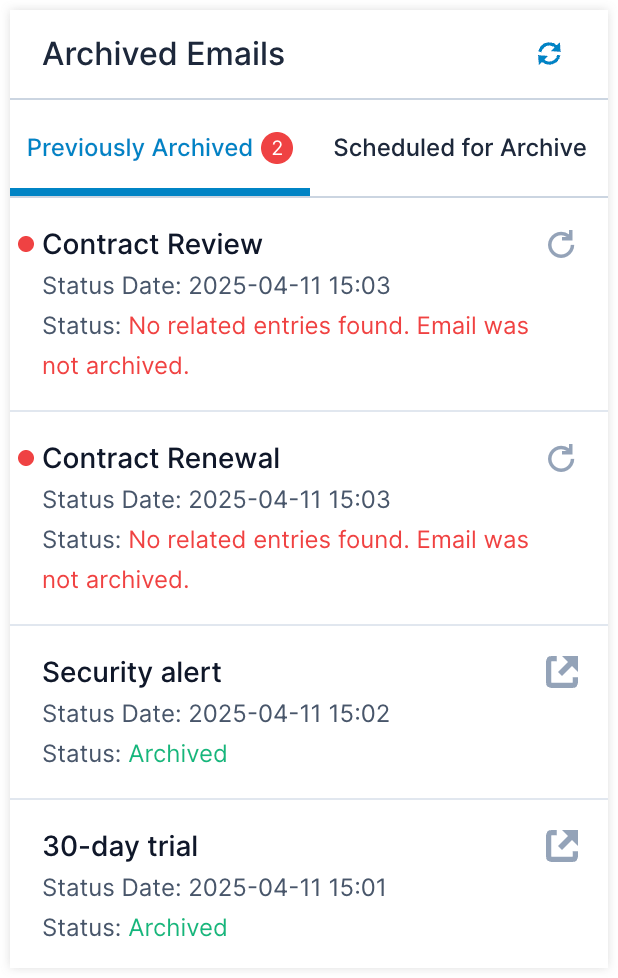
Once you have archived your emails using the methods described above, you can check their archive status in the Sugar Connect sidebar by clicking the Archived Emails icon located along the bottom of your sidebar.![]()
The archived emails section contains two lists:
- Previously Archived: View a list of emails along with their archive status.
- Scheduled for Archive: View a list of emails scheduled for archive on the next sync from Sugar Connect to your Sugar instance.
As you archive emails either automatically or manually, the previously archived list updates automatically. You can expect the following behavior, based on the archive status, of the messages shown in the previously archived list:
- Archived: The email has successfully archived to Sugar, for the first time.
- Unread messages shown in the list display a blue dot next to them that disappears after you have viewed the message.
- The View in Sugar button is available.
- After viewing, the message for an archived email remains visible in the list for roughly ten minutes, after which it is cleared out.
- Email has been previously archived and already exists in Sugar: The email was successfully archived to Sugar during a prior archive action.
- A red number is added to the Archived Emails icon at the bottom of your sidebar and stays until you navigate to the list.
- Unread messages shown in the list display a red dot next to them that disappears after you have viewed the message.
- The View in Sugar button is available.
- After viewing, the message for a previously archived email remains visible in the list for roughly twenty-four hours, after which it is cleared out.
- No related entries found. Email was not archived: No matching record was found in Sugar and the email was not archived.
- A red number is added to the Archived Emails icon at the bottom of your sidebar and stays until you navigate to the list.
- Unread messages shown in the list display a red dot next to them that disappears after you have viewed the message.
- The Retry button is available.
- After viewing, the message for an unarchived email remains visible in the list for roughly twenty-four hours, after which it is cleared out.
- Failed: An error occurred during the archive process and the email was not archived.
- A red number is added to the Archived Emails icon at the bottom of your sidebar and stays until you navigate to the list.
- Unread messages shown in the list display a red dot next to them that disappears after you have viewed the message.
- The Retry button is available.
- After viewing, the message for a failed email remains visible in the list for roughly twenty-four hours, after which it is cleared out.
Email Templates
Sugar Connect communicates with your Sugar instance to retrieve email templates that you have created in your instance. When you use the templates in Sugar Connect, any variables are also detected and filled in automatically. Please note, if your email template in Sugar contains an attachment, the attachment will not be included in the Sugar Connect email template.
Users will only be able to see templates as allowed by their team membership, user access type, and assigned roles in the Sugar application. For more information on teams and roles, please refer to the Team Management and Role Management documentation in the Sugar Administration Guide.
Email Templates List and Actions Menu
The Email Templates list and the Actions menu are available after clicking "Insert Template" in the Sugar Connect menu of an email message.
Gmail:
Outlook:
Email Templates List
The email templates are organized by the tags applied to each record, as shown below. For best practices in creating tags for the Email Templates module, please refer to the Optimizing Tag Usage help article. For additional information on email templates and tags, please refer to the Emails and Tags documentation in the Sugar Application Guide. The search bar at the top of the template list allows you to locate a specific template by name.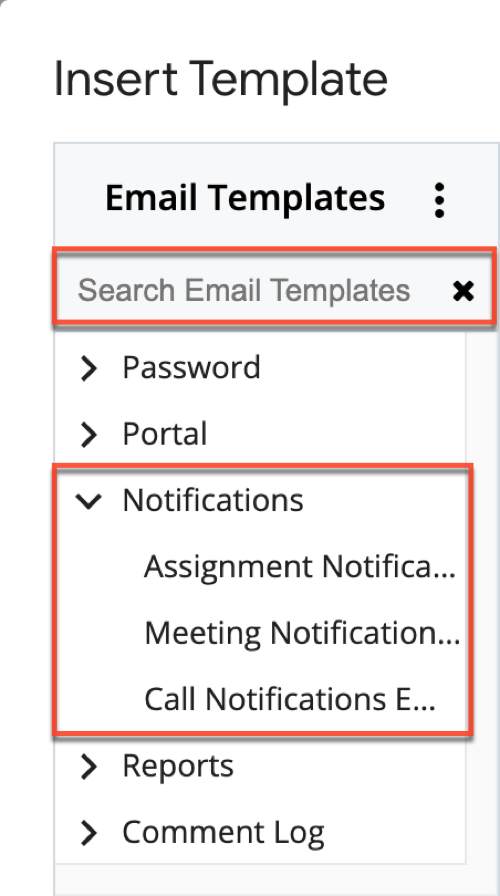
Email Templates Action Menu
The following options are available in the Actions menu located at the top of the template list: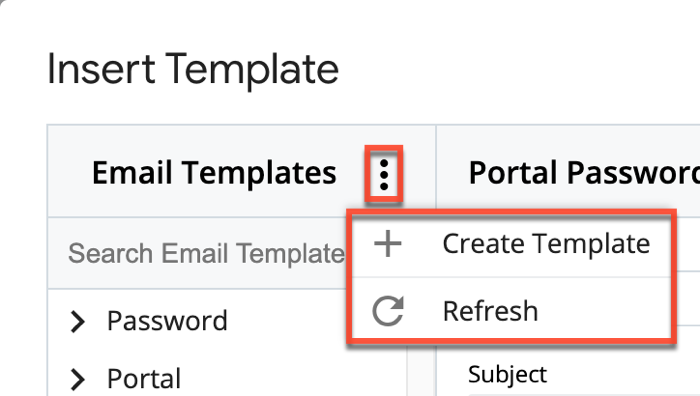
| Menu Item | Description |
| Create Email Template | Navigate to your Sugar instance's Email Templates module to create a new template. |
| Refresh | Reload the list of Email Templates from your Sugar instance to retrieve the latest changes. |
Using Email Templates
To access your Sugar templates in Gmail/Outlook via Sugar Connect, use the following steps:
- Compose a new message, or reply to or forward an existing message.
- Enter the recipient for the email, click the Sugar Connect menu, then select "Insert Template".
- In the popup window, click on a template or use the search to find the template that you want to use.
- A preview of the template will load and the name of the lead or contact that matches the recipient's email address in Sugar will appear above the preview.
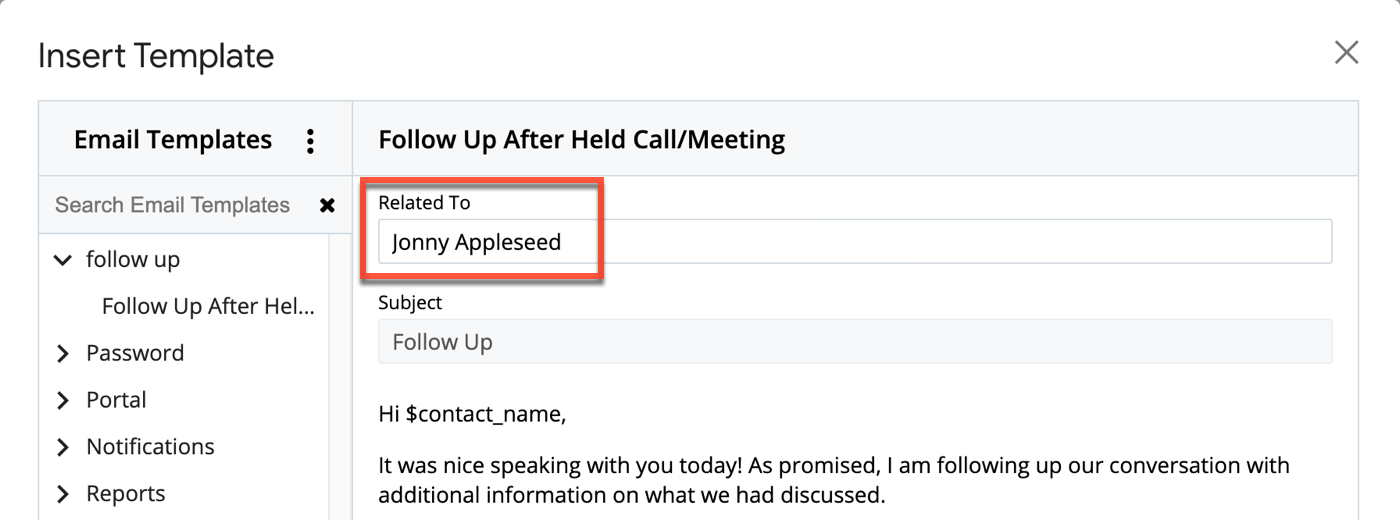
- Optionally, you may erase the Related To value and start typing a different name or email address to search for leads and contacts from your Sugar database.
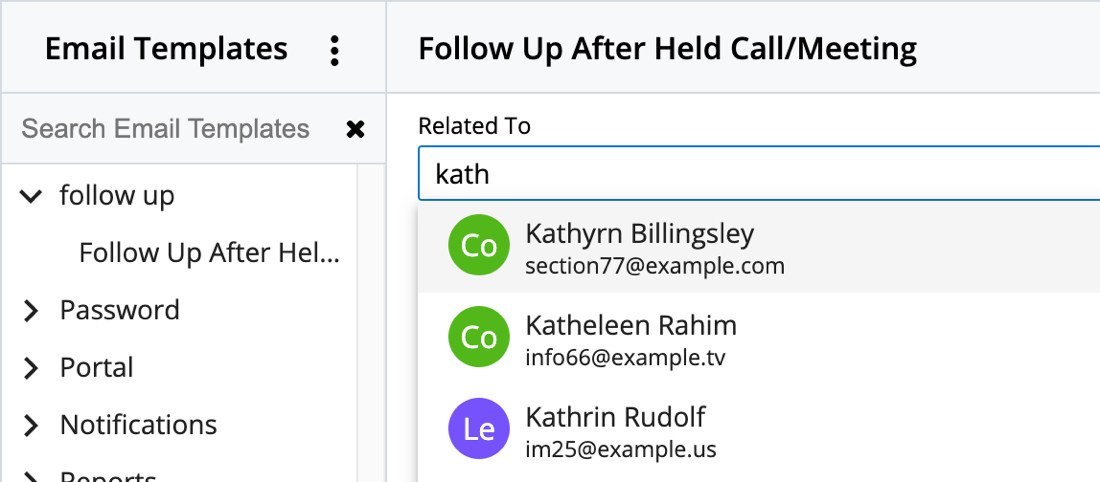
- Click on "Use Template" to transfer the content of the template to your email message. The field variables will automatically be populated with the data from your selected Sugar lead or contact.
Searching Email Templates
If you have a lot of email templates, the template search can help you refine the list and find what you need. In the Insert Template window, click in the "Search Email Templates" search area. As you begin to type, the list will show relevant results that contain the string you enter. Clicking the "x" will clear the search and reset the template list. The email templates are organized by the tags applied to each record.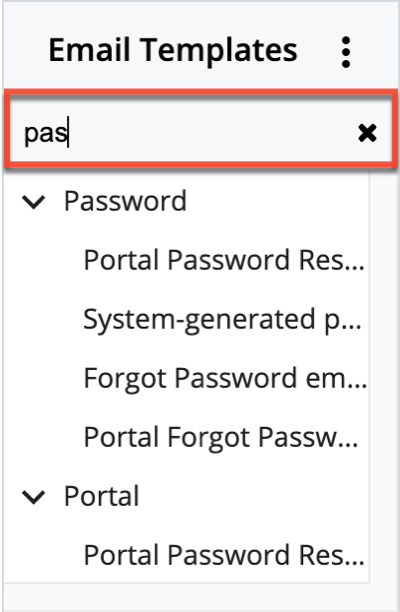
Creating and Editing Email Templates
The templates you use with Sugar Connect are the templates that you and your fellow Sugar users have created in your Sugar instance. You can navigate to the Email Templates module in Sugar directly from Sugar Connect via the "Create Email Template" option in the Email Templates Actions menu or the Edit Template button at the bottom of the Insert Template screen.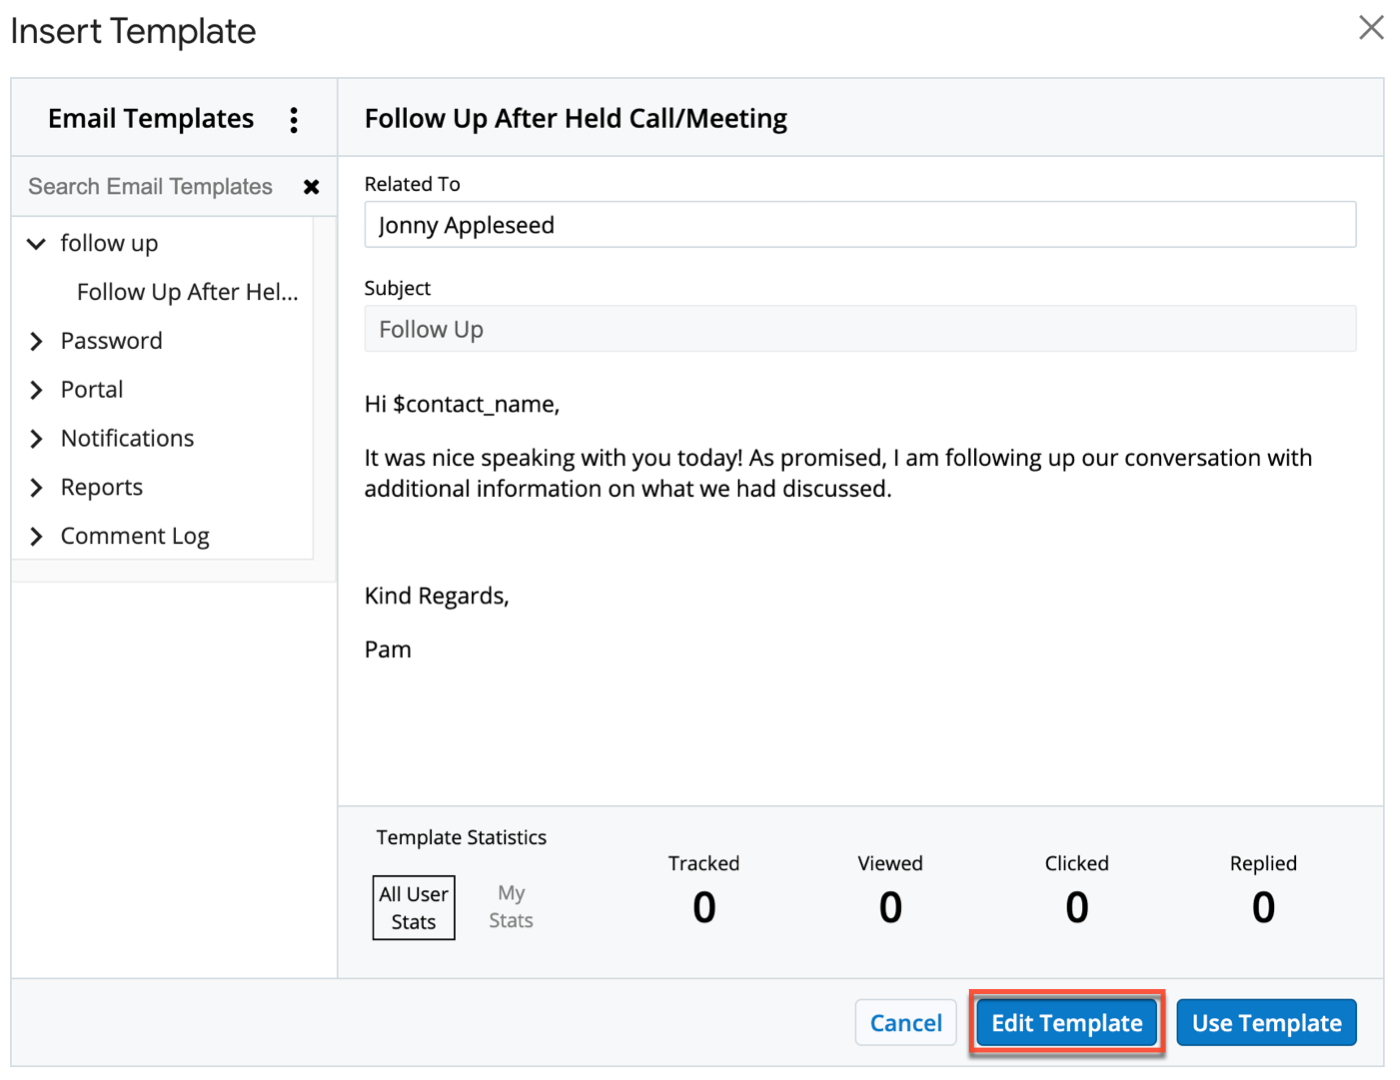
Because it may take some time for changes in Sugar to sync to Sugar Connect, we recommend using the Refresh option in the Email Templates Actions menu after creating or editing a template in Sugar. This will retrieve the most up-to-date data and any new templates that have been created.
For more information on creating and editing email templates in Sugar, please refer to the Emails documentation in the Sugar Application Guide.
Template Statistics
When Email Tracking is enabled and email templates are used in combination, Sugar Connect compiles template statistics for each template. The statistics display the number of times: a template has been used in a tracked email, a template has been viewed by the recipient, a link within the email was clicked, and a recipient replied to the tracked email. You can toggle between viewing "All User Stats" or "My Stats" to gain insight into the effectiveness of each email template either across your organization or specific to your tracking history. 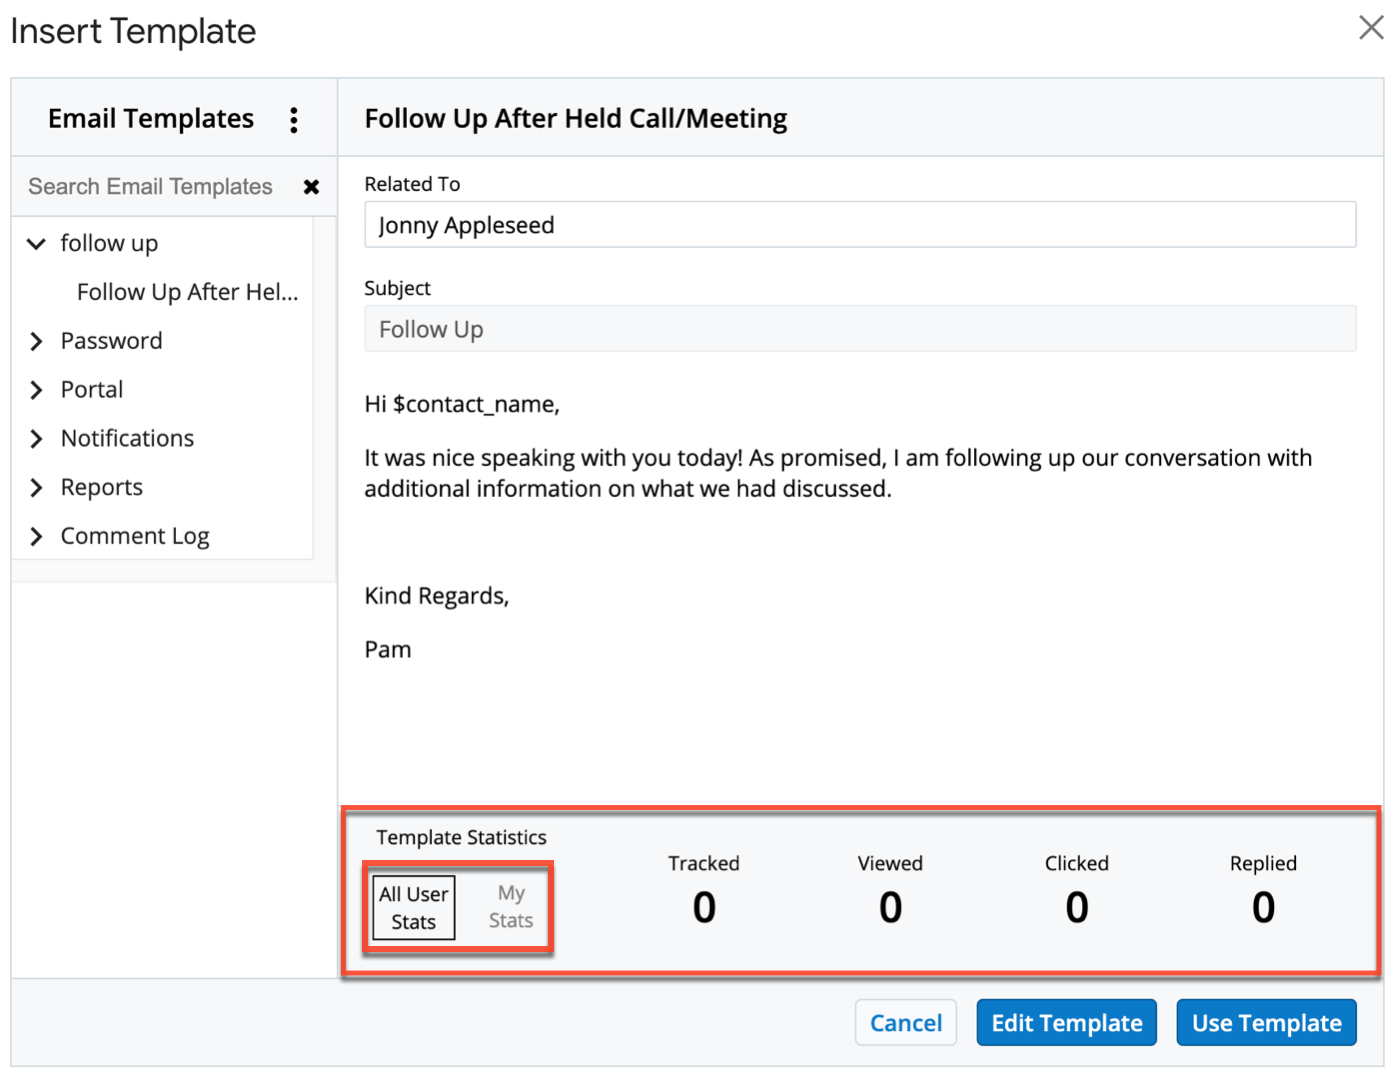
Send Later
The "Send Later" feature lets you set a date and time in the future to send an email message from Gmail/Outlook. Simply compose an email message from scratch or by using a template and then select "Send Later" as the last step once you have finished composing your email.
In Gmail, the Send Later feature is located in the Sugar Connect menu: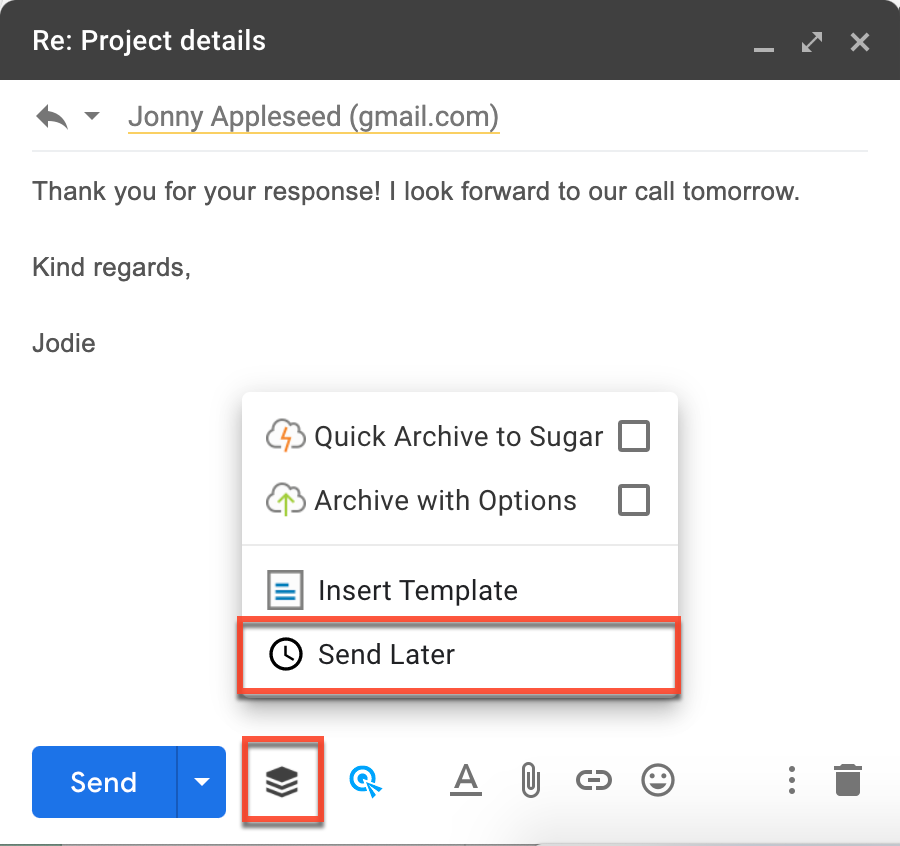
In Outlook, the Send Later feature is located in the Archive with Options window: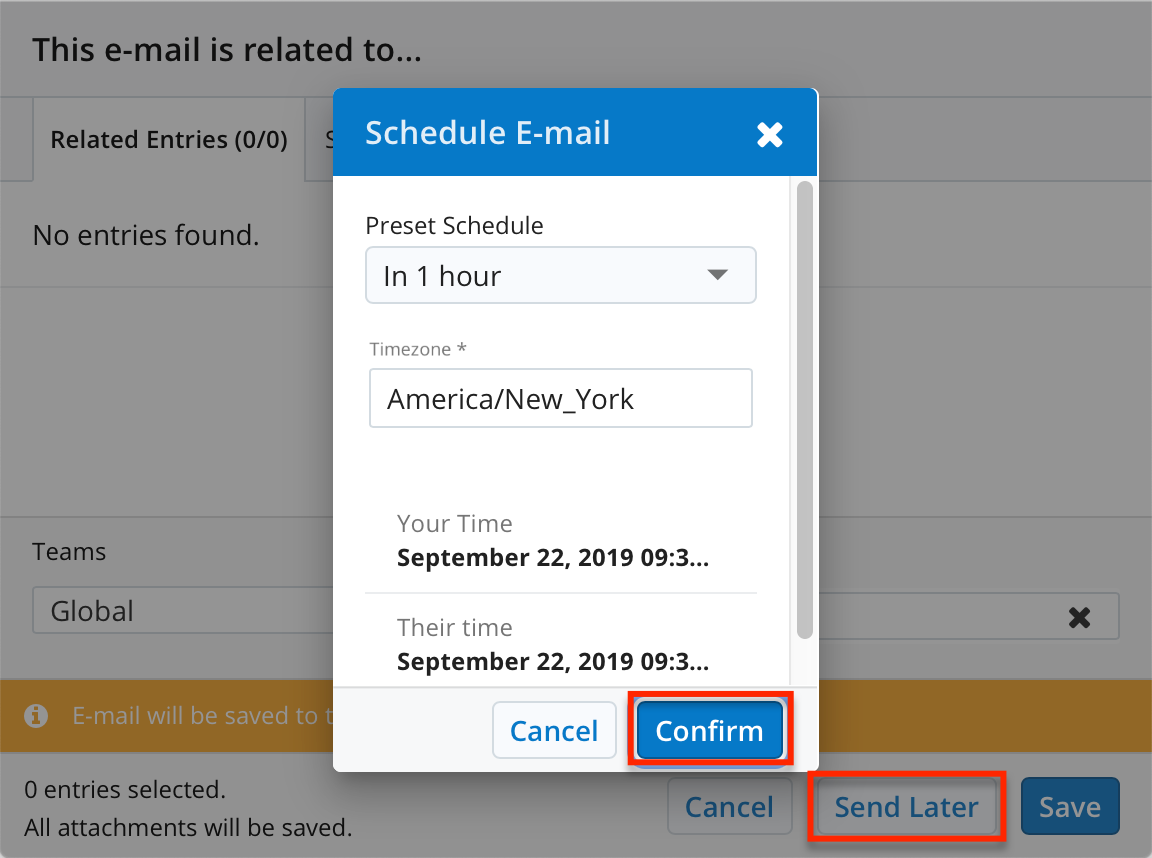
Select a time to send the message, using the "Your time" and "Their time" prompts as guidance. To update the "Their time" value, select a new value for the Timezone field. Lastly, click "Confirm". The email message will close and be queued to send later. They are stored in your Drafts folder, as well as the Sugar Connect > Send later folder in Outlook, and can be reviewed by clicking on the "Scheduled Emails" badge on the Sidebar Home view. Please note, the Send Later folder in Outlook will continue to work even when moved under the Deleted Items folder.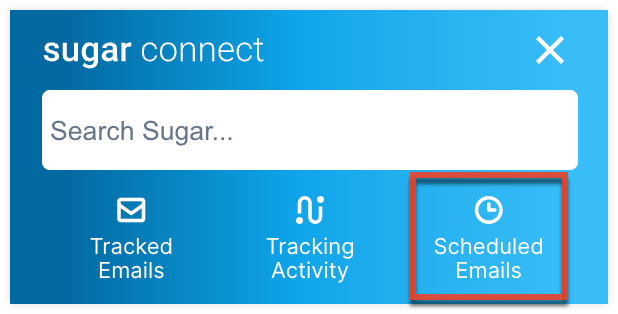
Email Tracking
Sugar Connect offers you the ability to track emails sent from Gmail/Outlook to prospects, customers, and anyone with whom you want to track interactions. Email Tracking will show if a recipient has opened your email, clicked any links you provided, and replied. If you have set up any email templates, the same metrics can be tracked and viewed in a summary per template.
Some email clients may route tracked emails into a spam folder, thus impacting the delivery/receipt of your emails.
Sugar Connect administrators are able to set the Email Tracking default settings. For more information, please refer to the Email Tracking section in the Sugar Connect Deployment and Administration Guide.
Enabling and Disabling Email Tracking
The Email Tracking features can be enabled/disabled in the places listed below. The Sugar Connect Portal settings and the sidebar Email Tracking options will mirror each other. Changing a setting in one location will automatically update the other location.
- Toggle Tracking: Turn tracking on or off while composing an email.
- Email Tracking Options: Set your preferences for enabling/disabling default behaviors in the sidebar.
- Sugar Connect Portal: Set your preferences for enabling/disabling default behaviors in the Email Tracking Settings tab.
Email Tracking Rules
For Sugar Connect to track emails and display tracking statistics correctly, the following guidelines should be kept in mind:
- Google/Office 365 Permissions: To track email replies, you must give Sugar Connect permission to access your Google/Office 365 data as explained in the Sugar Connect User Installation Guide.
- Links: Sugar Connect supports link tracking for the following link types: HTTP and HTTPS. All other link types (e.g., Mailto, RDP, UDP) are not supported and will not be tracked.
- Recipients With the Same IP Address as Sender: Users may not get any reported event from tracked emails sent to a recipient who is also using Sugar Connect or from users who are using the same IP Address.
- Email Aliases: Reply events will not work when tracked emails are used with an alias address.
- Disabled Images: Sugar Connect uses a tracking image/pixel embedded within your tracked email. If a recipient has disabled the option to automatically display images within their email client, the tracking image will not be loaded and Sugar Connect will not be able to notify the user that the message has been opened.
- Conflicts With Other Email Tracking Providers: Because Sugar Connect uses images embedded in emails to track them, it is important to note that other email-tracking companies will have their own code or images that they may embed on a hyperlink. Sugar Connect cannot track hyperlinks that already have other images/codes embedded on the hyperlink. To avoid conflicts, do not copy/paste hyperlinks from previous emails or from another email. Chances are, those links are already edited or might have its own tracking links from other companies. Instead, use the "Insert Link" option when adding links in your email.
- Tracking Multiple Email Addresses: Tracking an email with multiple email addresses (To, CC, BCC) will show up as one section on the Sugar Connect side panel. It may appear that the emails weren't tracked because an email sent with multiple email addresses will only be under one "tracking file". The side panel tracks all email addresses; however, it is not possible to see which email address it is tracking. Sugar Connect can only record the location where the email was opened but not who opened the email.
- Time to Track: Depending on the action performed and the age of the tracked email, it may take a little time to register in Sugar Connect. The older the tracked email is, the longer it takes to track. Slow or interrupted network connections may cause additional delays on tracked events. The following guidelines are typical for tracked events:
- Clicks and views will take 1-3 minutes to prevent the side panel from being flooded with new events.
- Reply events will take up to 15 minutes to appear than the actual time the reply was received.
- After 24 hours of being sent, the statistics and notifications may take up to 3 hours.
- Opening Your Own Tracked Email: If you, the sender, views the tracked email (e.g., opening it from your Sent folder) it will show as being opened in your tracking statistics.
In 2013, Google implemented a change to how linked images are handled in Gmail webmail. These changes affect the way email tracking works. Please refer to this external blog post for more information.
Toggling Tracking Within Emails
While composing an email in Gmail, click the Sugar Connect - Toggle Tracking button. The email will be tracked when the target is blue. When it is grey, the email will not be tracked. 
While composing an email in Outlook, click the Track Email button. A Bcc marker will be added to the message and you will see a notification saying "This email has been marked for tracking". Click the Track Email button again to cancel.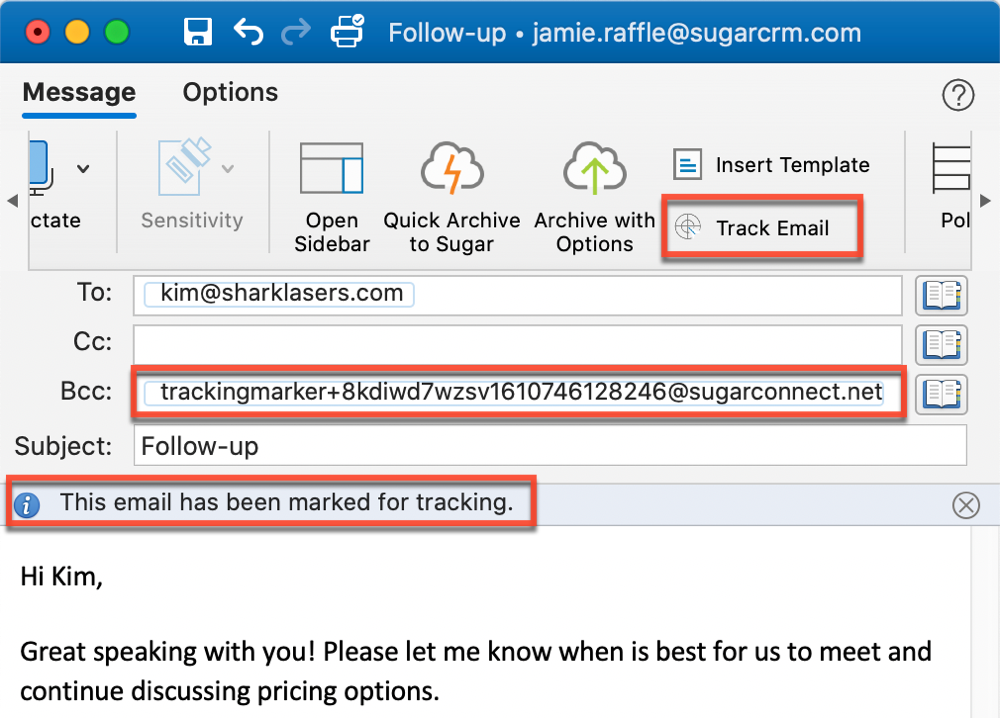
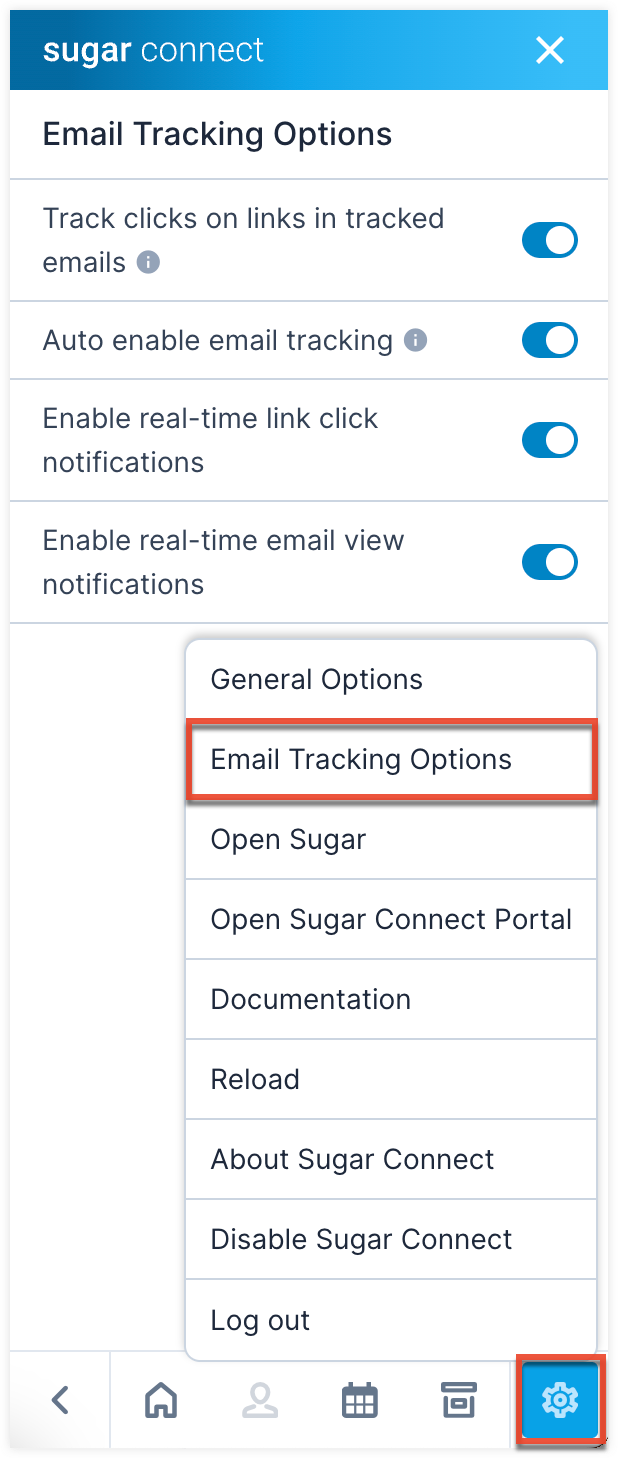
Email Tracking Options
From the sidebar, click the Settings gear icon, and select "Email Tracking Options". You can toggle the following settings, which are enabled by default, off or on based on your preferences:
- Track clicks on links in tracked emails: When a link is included in either a template or by using the "Insert link" button in your email, you can find out if the recipient clicked it.
- Show real-time click notifications: A popup will be shown in the sidebar and the Tracking Activity badge will display a number.
- Enable real-time email view notifications: A popup will be shown in the sidebar and the Tracking Activity badge will display a number.
- Auto enable email tracking: Available in Gmail only, all emails sent will be tracked by default unless you click the Toggle Tracking button while in the compose message screen.
Email Tracking in Sidebar
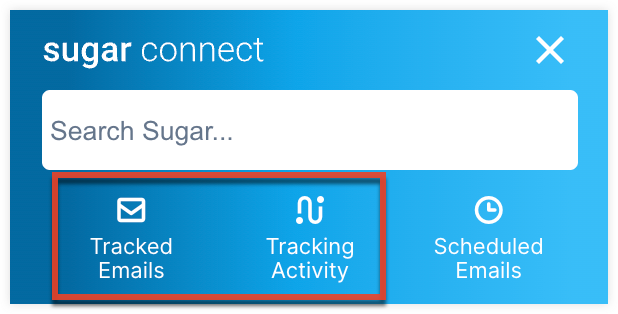
There are two areas within the sidebar to view the emails you are tracking:
- Tracked Emails: This badge opens a list of individual emails in the order they were sent. Each email displays the total number of opens, link clicks, and replies. Clicking the arrow will open the details of the statistics including time stamps and locations when applicable.
- Tracking Activity: This badge opens a list of all opens, link clicks, and replies in chronological order. A red circle with a number will appear to alert you when you have new tracked activity.
Once the tracked email's age reaches 24 hours, there may be a delay in updates of tracking statistics of up to 3 hours.
Email Tracking in Sugar Connect Portal
Within the Sugar Connect Portal, you have the ability to view a much more detailed reporting of all tracked emails. For more information please visit the Sugar Connect Portal User Guide.
Calendar Sync
Sugar Connect will sync meetings between Sugar and your Google/Outlook calendar. Sugar Connect Calendar Sync does not support shared calendars. For steps to sync your calendars, please refer to the Sugar Connect Portal User Guide, which covers how to use the Sugar Connect Portal to sync Sugar calendar events with your external calendar. The following sections cover how to work with synced events in your Google/Outlook calendar once you have set up the calendar sync. The sync interval between Google Calendar and Sugar occurs once every 15 to 20 minutes.
Viewing Sugar Calls and Meetings
The way you will view your Sugar events in Google/Outlook depends on the option you selected when you enabled calendar sync. If you selected the default behavior, "Use primary calendar", then you can simply switch to your primary calendar view and find the events that have synced from Sugar among the rest of your meetings and appointments.
In Gmail, if you disabled the option to use your primary calendar, then Sugar Connect will add a Sugar label in Google Calendar which must be selected as a visible calendar to see your synced Sugar events: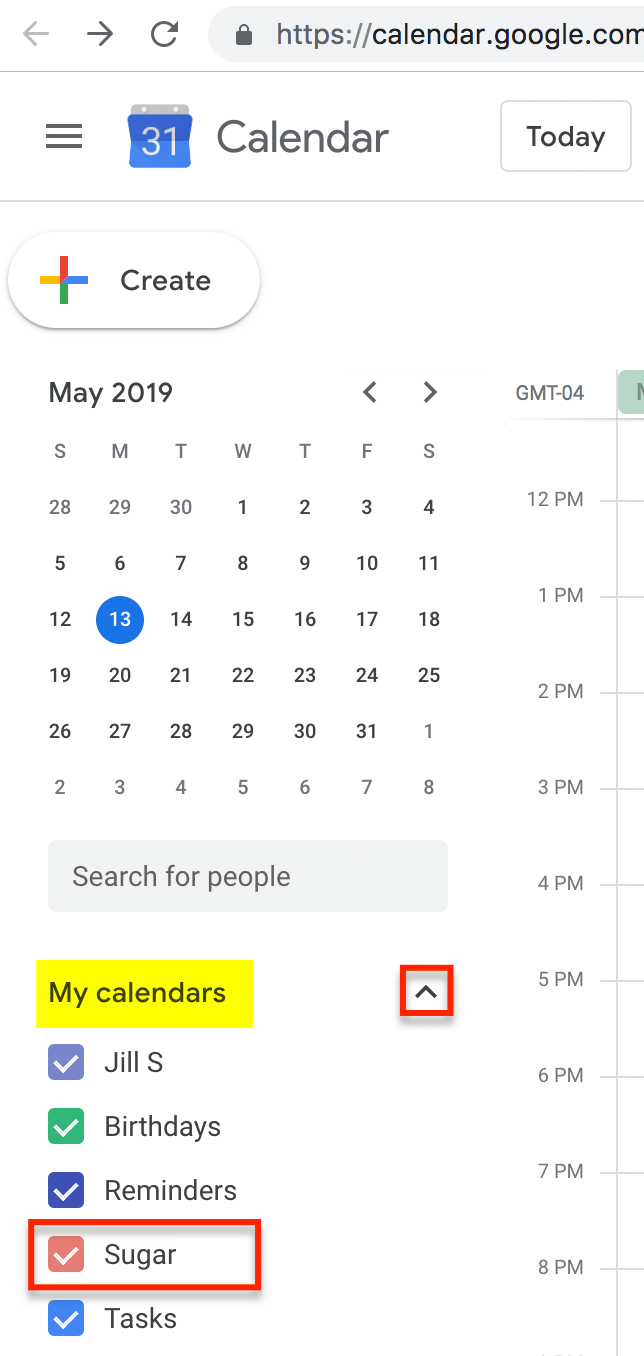
In Outlook, If you disabled the option to use your primary calendar, then you will view your Sugar events in Outlook by switching to the calendar view and enabling the calendar labeled Sugar. Please note, Sugar meeting records will sync to Outlook as standard meeting records. Sugar call and task records will sync to Outlook as appointments if you choose to enable sync for these record types.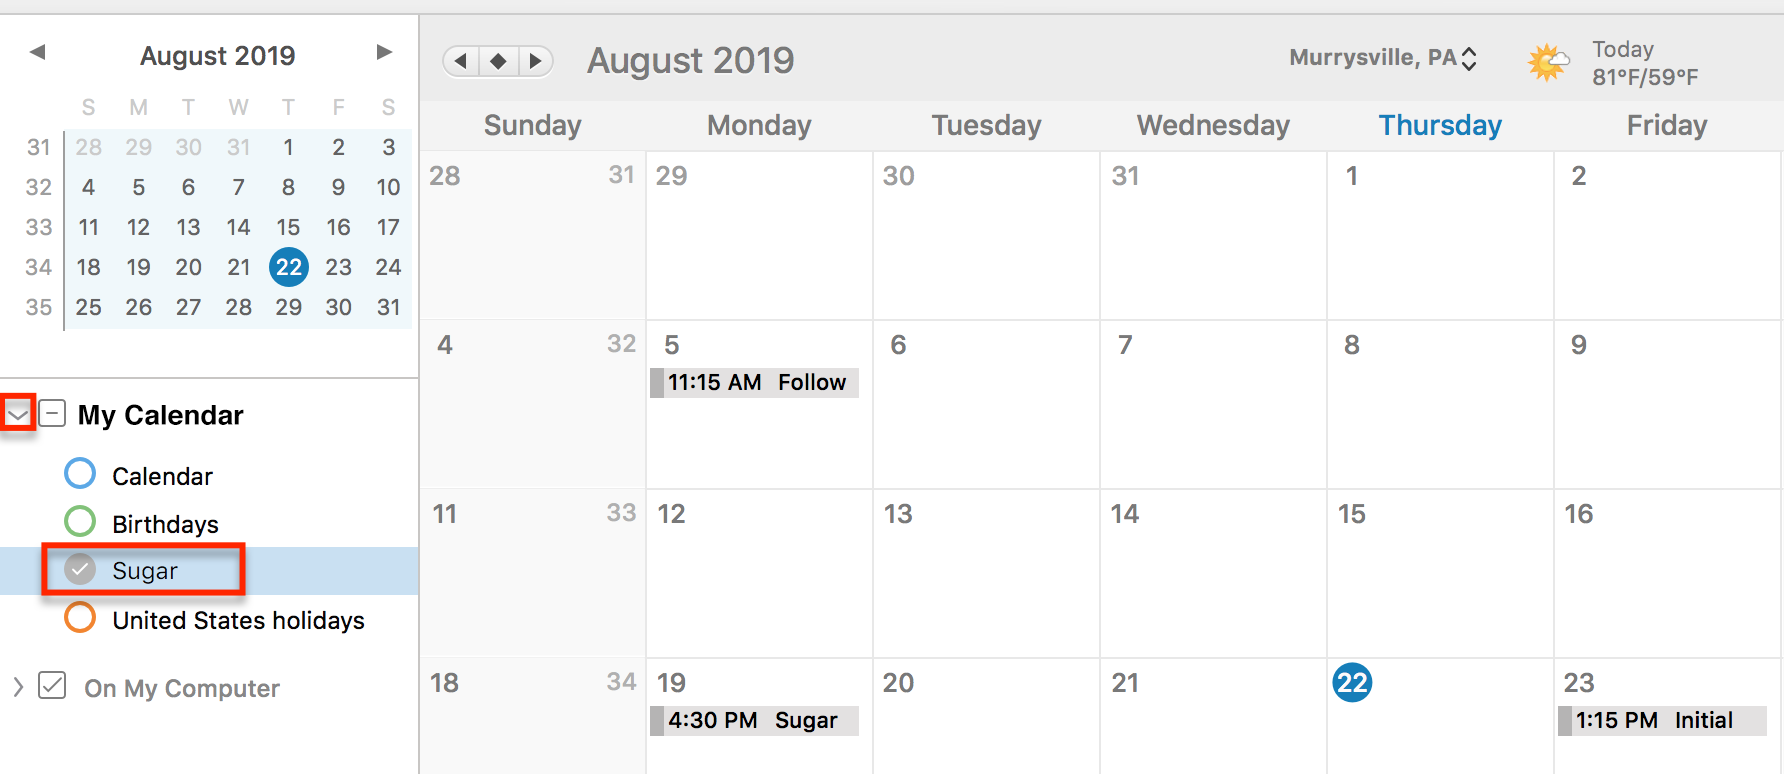
Creating Sugar Meetings From the External Calendar
To create a new event in Google/Outlook that syncs to Sugar's Meetings, Calls, or Tasks modules, you must first set up calendar sync. The default setup options "Automatic Synchronization" and "Use primary calendar" let you simply create meetings in your primary calendar view and they will sync to Sugar automatically on the next sync (every 15 - 20 minutes).
Exceptions
If you disabled the Automatic Synchronization setting during sync setup, then you must enable "Sync Event" in the Sugar Connect meeting sidebar when creating the event in Gmail/Outlook: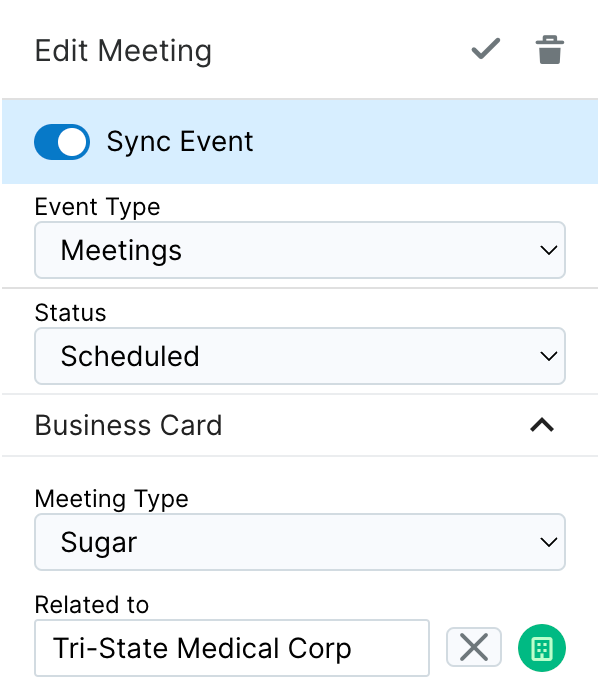
If you disabled the Use primary calendar setting during sync setup, then you must select the Sugar calendar when creating the event in:
Google: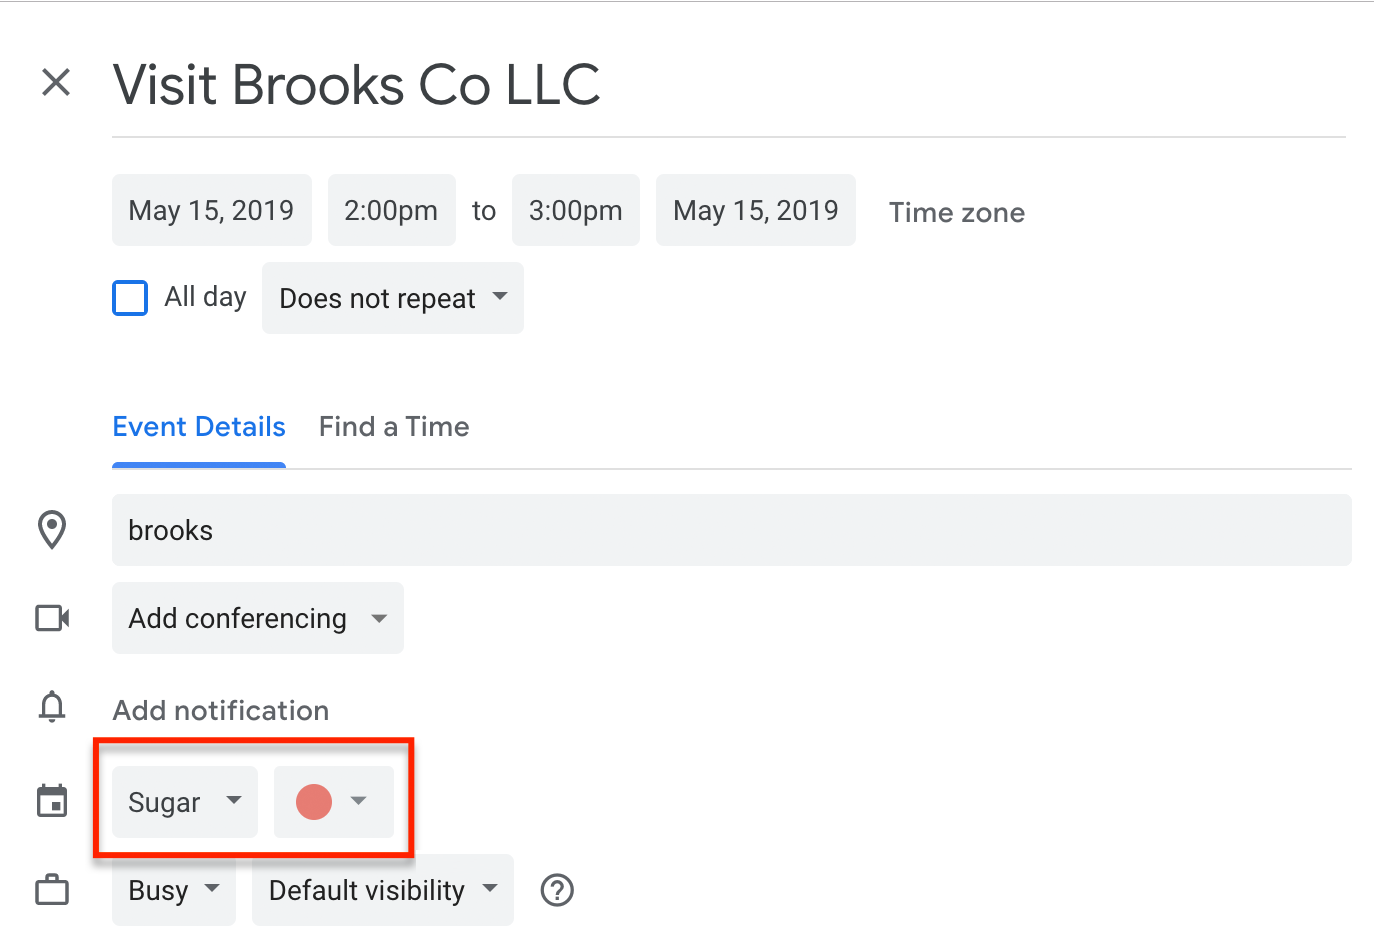
Outlook: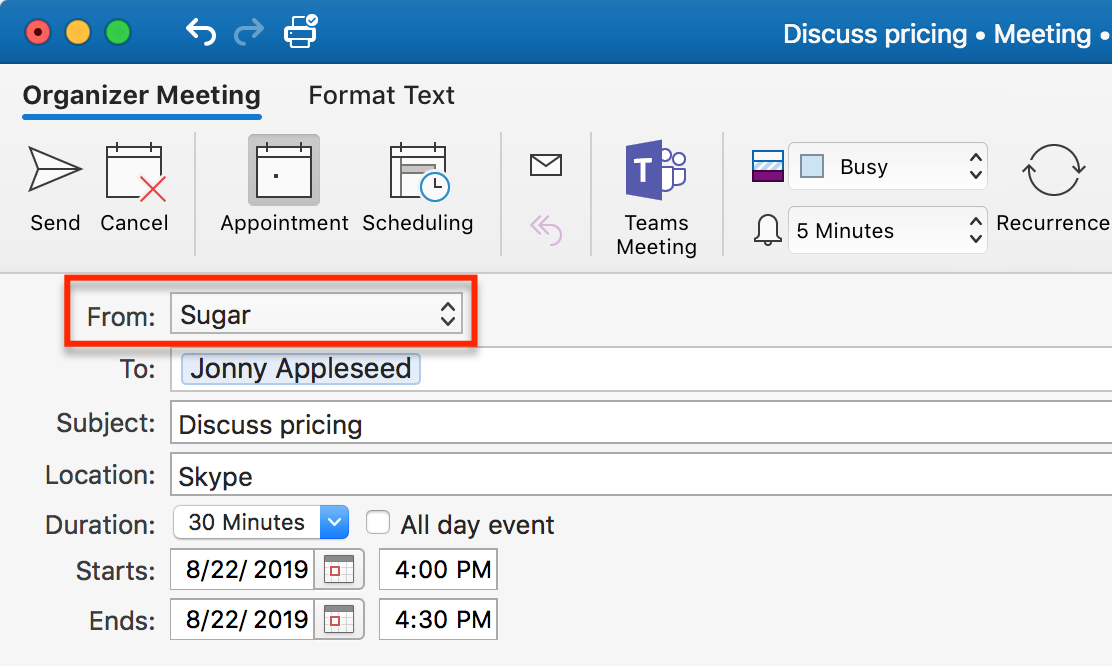
Upon sending the meeting request, you will be warned that the meeting is not in your primary calendar. This is expected and you should click on Send Invitation to proceed.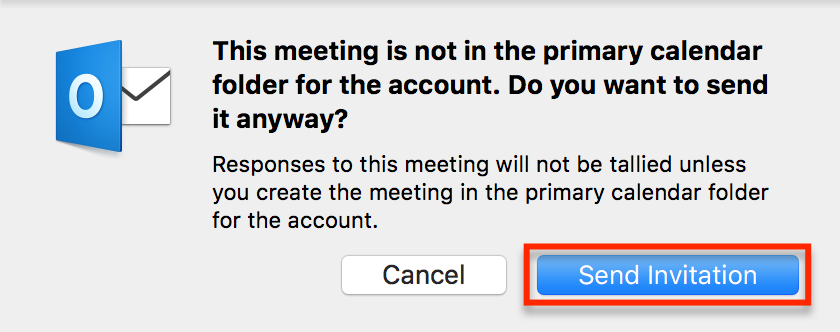
Adding Existing Calendar Meetings to Sugar
By default, meetings that were set up before Sugar Connect was installed and meetings that are accepted in Gmail/Outlook will automatically sync with Sugar during the standard sync event. However, for users who opted to sync calendar events manually or those who do not use the primary calendar must take additional steps to ensure their calendar events sync to Sugar.
Manual Sync Enabled
Users who disabled the default "Automatic Synchronization" behavior during calendar sync setup, must enable the Sync Event toggle in the Sugar Connect meeting sidebar so the event will sync to Sugar:
Sugar Calendar Enabled
Users who disabled the default "Use primary calendar" behavior during calendar sync setup, must copy any existing or accepted events from their primary calendar to the calendar labeled "Sugar". This will result in duplicate meetings on your calendar, and the event that is saved to the Sugar calendar will sync to Sugar during the next sync event. Note that you may choose to hide the Sugar calendar from view if you prefer not to see duplicate events, but this may prevent you from seeing events that were created in and synced from Sugar. As an example, the following steps cover how to copy an event to the "Sugar" Google/Outlook calendar.
Gmail
- In Google, double-click on the event that you want to copy to Sugar.
- Select Duplicate from the event's More Actions menu.
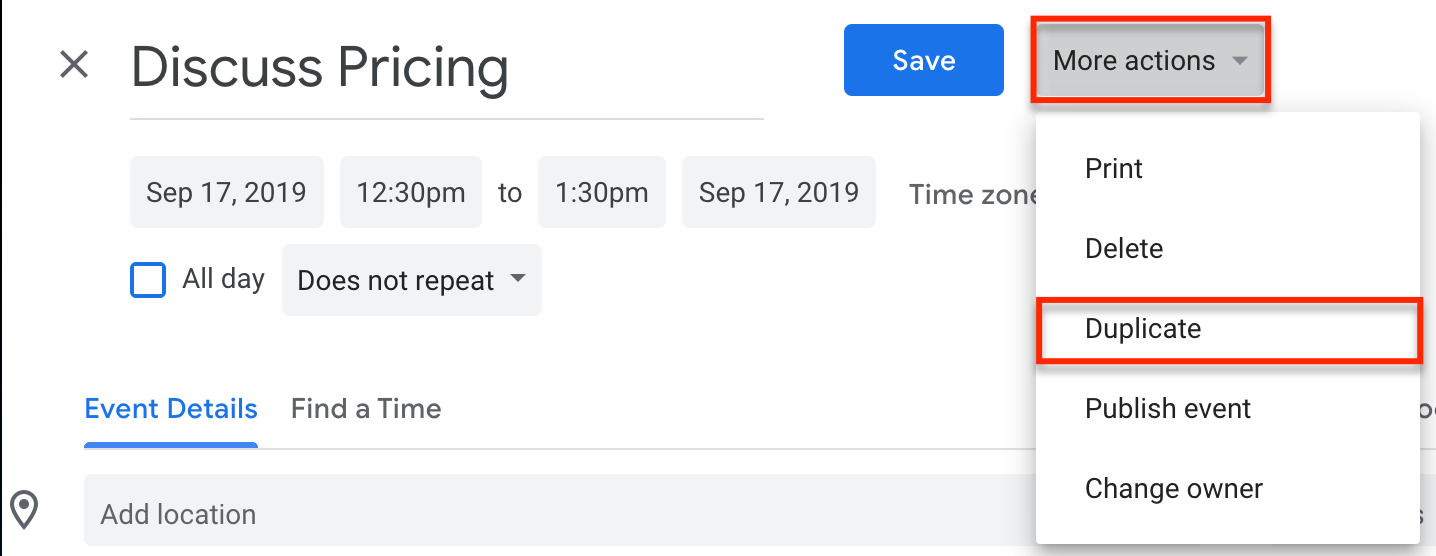
- The new copy of the event will open. Use the calendar selector to select the Sugar calendar.
- Save the calendar event.
Outlook
Please note, Outlook for Mac OS Desktop does not support copying events to other calendars. Therefore, users who are syncing the Outlook "Sugar" calendar (opposed to syncing their primary Outlook calendar) and are using Outlook for Mac cannot sync calendar events that are accepted to or created in their primary calendar to Sugar. As a workaround, log into your Office 365 calendar on the web (https://outlook.office365.com/calendar/view/month) and duplicate the event there using the following steps.
- In Outlook on the Web, open the event that you want to copy to Sugar by double-clicking on it.
- Select Duplicate event from the event's overflow menu.

- The new copy of the event will open. Use the calendar selector in the event's title bar to select the Sugar calendar. The window color will change to the color you have selected for your Sugar calendar.
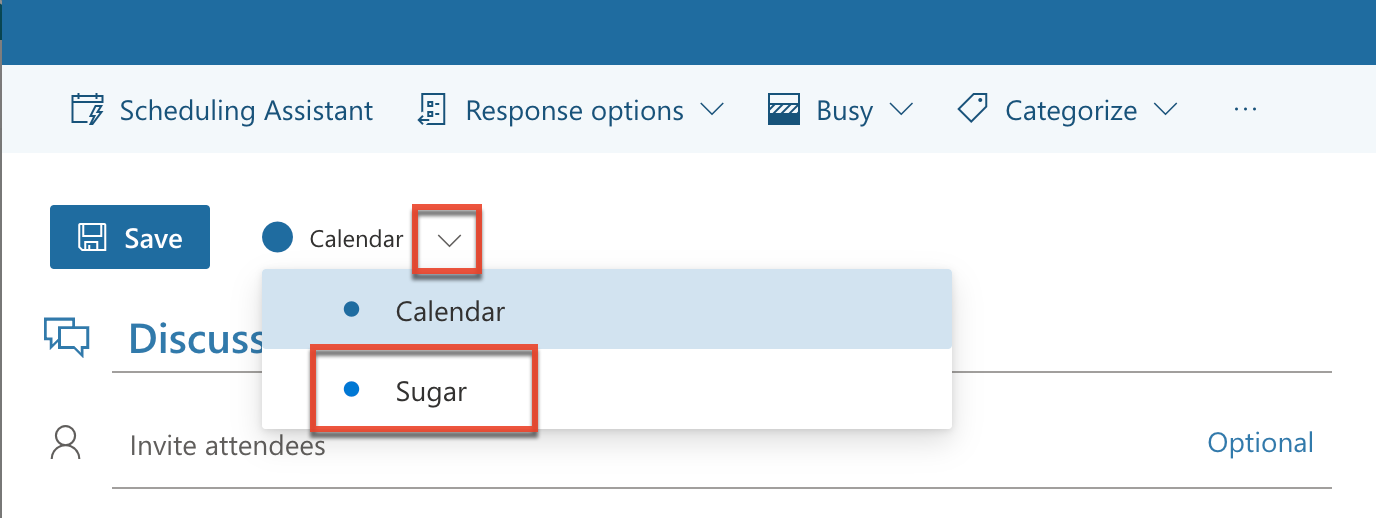
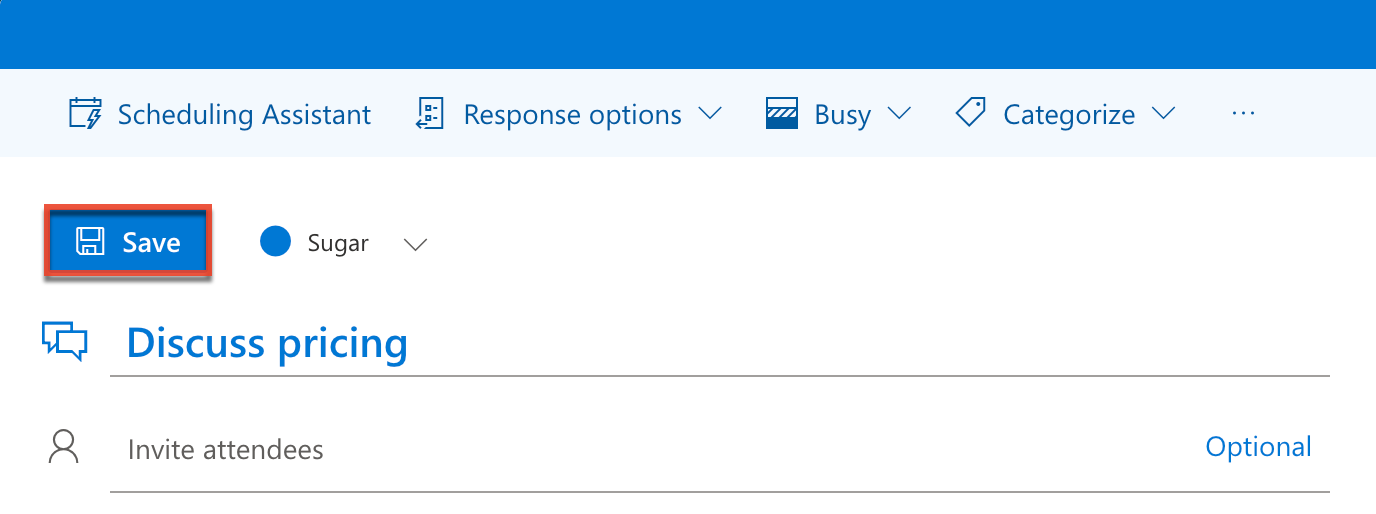
- Save the calendar event without sending invitations.
Adding Existing Sugar Meetings to the External Calendar
By default, Sugar meetings will automatically sync with to your external calendar during the standard sync event. However, for users who opted to sync calendar events manually must take additional steps to ensure their Sugar events sync to their external calendar.
Manual Sync Enabled
Users who disabled the default "Automatic Synchronization" behavior during calendar sync setup, must mark individual calendar events to sync to Sugar. To do so, open a Sugar call, meeting, or task in the Sugar Connect sidebar, click the three-dots menu, and select "Enable Sync".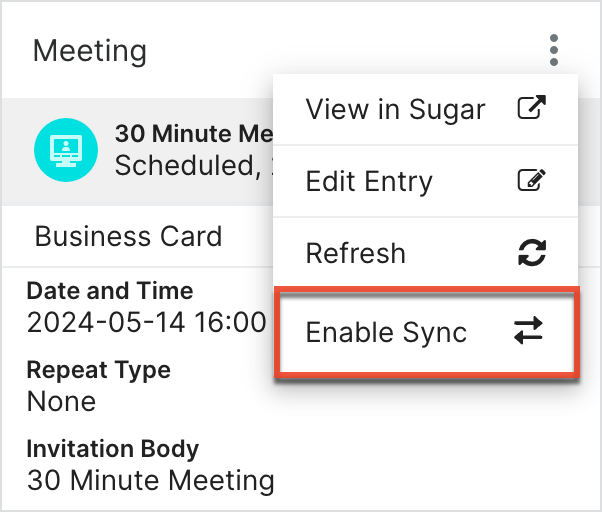
Setting the Relate To and Other Sugar Fields
When creating a calendar event in Google/Outlook, after setting up calendar sync, you can choose whether your event syncs as a Sugar meeting, call, or task, choose to relate the event to an existing Sugar record (e.g., opportunity), and add information to additional Sugar fields (e.g., Internal Notes). While the calendar event window is open, click the Sugar Connect button, shown in the screenshots below, to open the Sugar Connect sidebar. Please note, unlike the sidebar in your inbox, this sidebar only pertains to the calendar event that you are currently creating.
Google Meeting Sidebar:
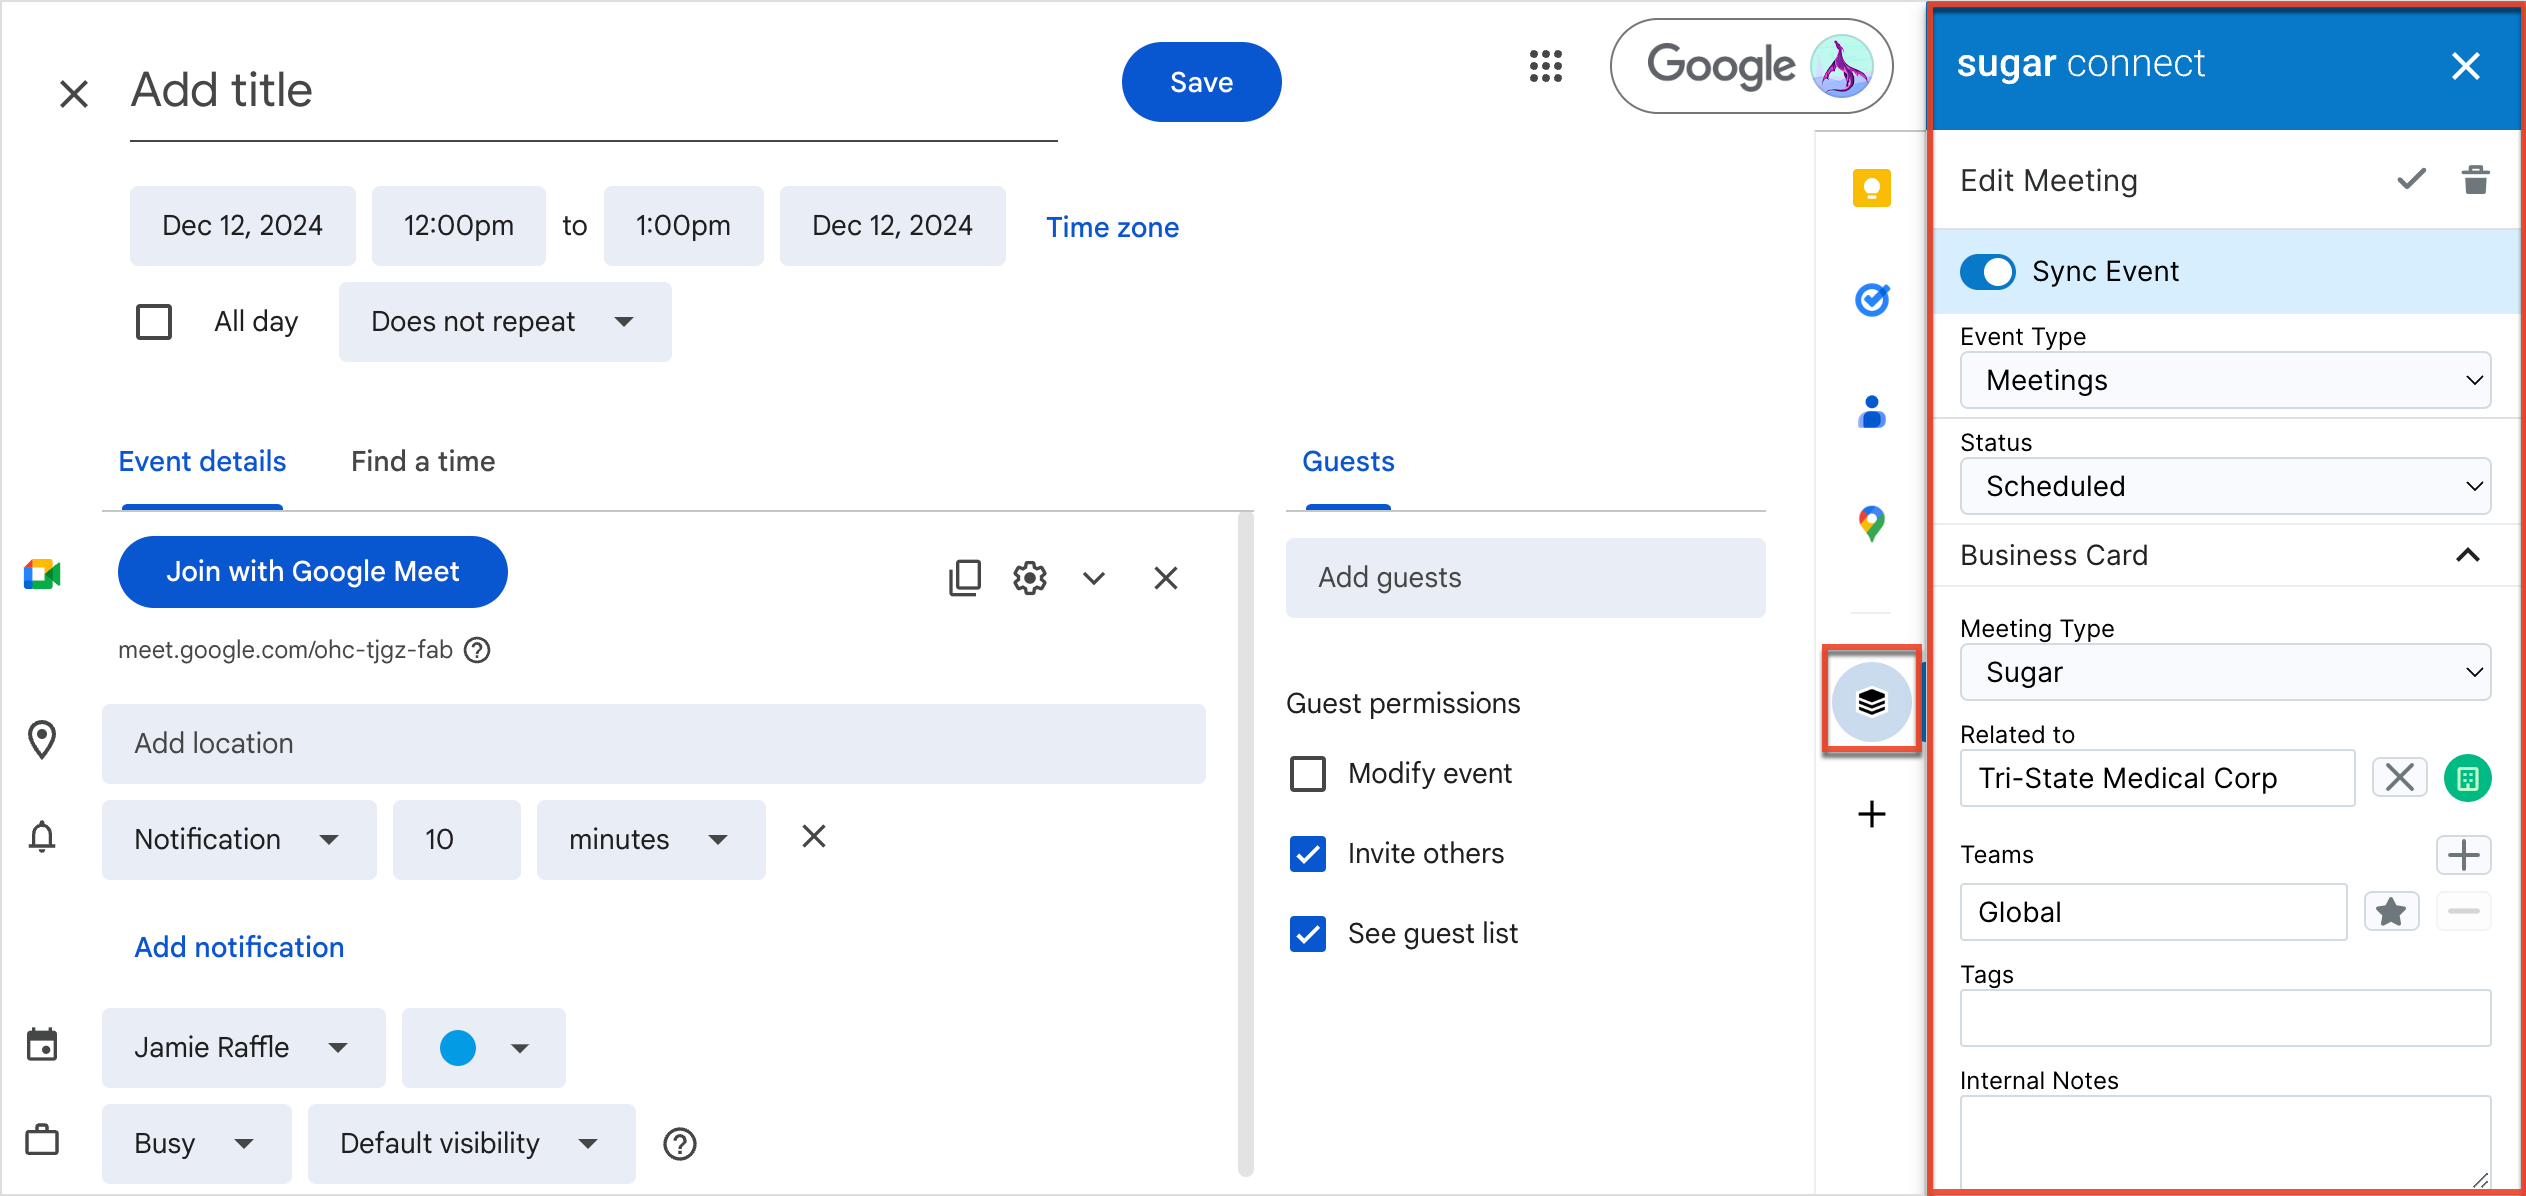
Outlook Meeting Sidebar:
With the sidebar open, click the module icon to the right of the Related to field to select which record type (e.g., Cases) you wish to relate the meeting to. With the module selected, click inside the Related to field and either begin to type the name of your record or click "Search and Select" to open the module search with available filters. You can also fill out the other available fields in the sidebar. Click the Save Changes button (i.e., checkmark icon) when finished with your updates in the sidebar.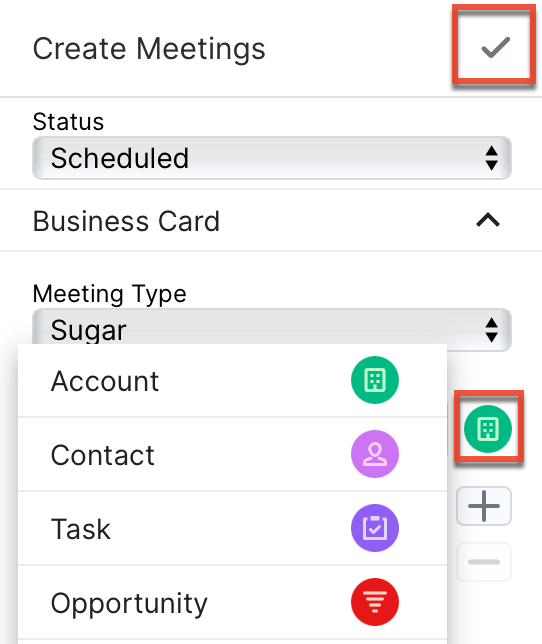
After completing the event details in the Google/Outlook event portion (e.g., adding guests, setting location), click the Send/Save button in the calendar event screen. All information entered in the sidebar and calendar event is available to view in Sugar after the meeting sync is complete. You can also choose to update existing meetings with information in the sidebar. Simply open the existing calendar event, open the sidebar as described above, add information to the Sugar fields, and click the Save Changes button in the sidebar. The corresponding meeting in Sugar will be updated after the next sync.
Sync Status
After your meetings, calls, and tasks have synced between Sugar and your external calendar, you can see their sync status to ensure their success. When viewing the sidebar, navigate to the Meetings, Calls, or Tasks list view. The sync status appears next to the record status as shown in the screenshot below. The sync status also appears in record view. Hovering over the sync status icon displays a tooltip that tells you the date and time the event was synced.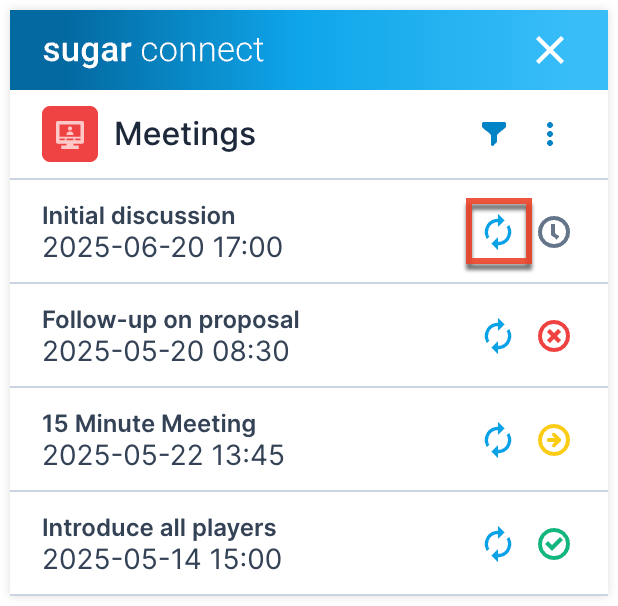
When viewing your external calendar, if your admin has enabled the functionality, your synced meetings will appear with a default designated color. In Google, you may update individual events to the color of your choosing. In Outlook, the default color (#9ad39a) is set automatically and cannot be changed.
Deleting Synced Events
Events that you delete from your synced Google/Outlook Calendar will automatically be deleted from Sugar during the next calendar sync. Please wait for the next sync event (approximately 15 - 20 minutes) for the event to be deleted.
Contact Sync
You can sync your Sugar leads and contacts with Google/Outlook Contacts via Sugar Connect. Leads and contacts assigned to you in Sugar will sync by default. For steps to sync your contacts, including how to configure two-way contact sync, please refer to the Sugar Connect Portal User Guide. This guide covers the Sync Rules for Leads and Contacts and how to use the Sugar Connect Portal to sync leads and contacts.
To sync additional leads or contacts not currently assigned to you, navigate to the record in the sidebar > click the actions menu > Select "Mark to Sync".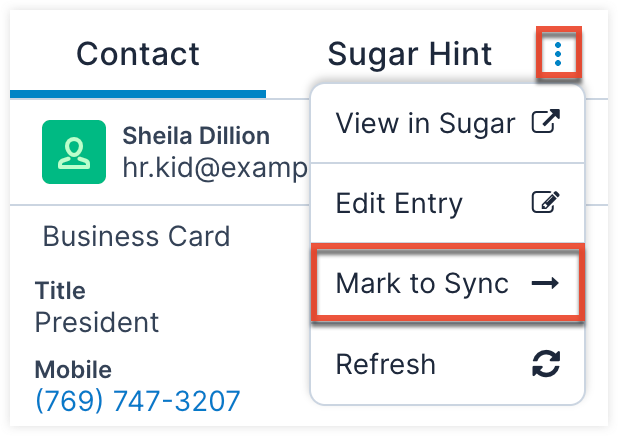
In Google, you can find the leads and contacts by navigating to Google Contacts via the apps menu at the top of Gmail: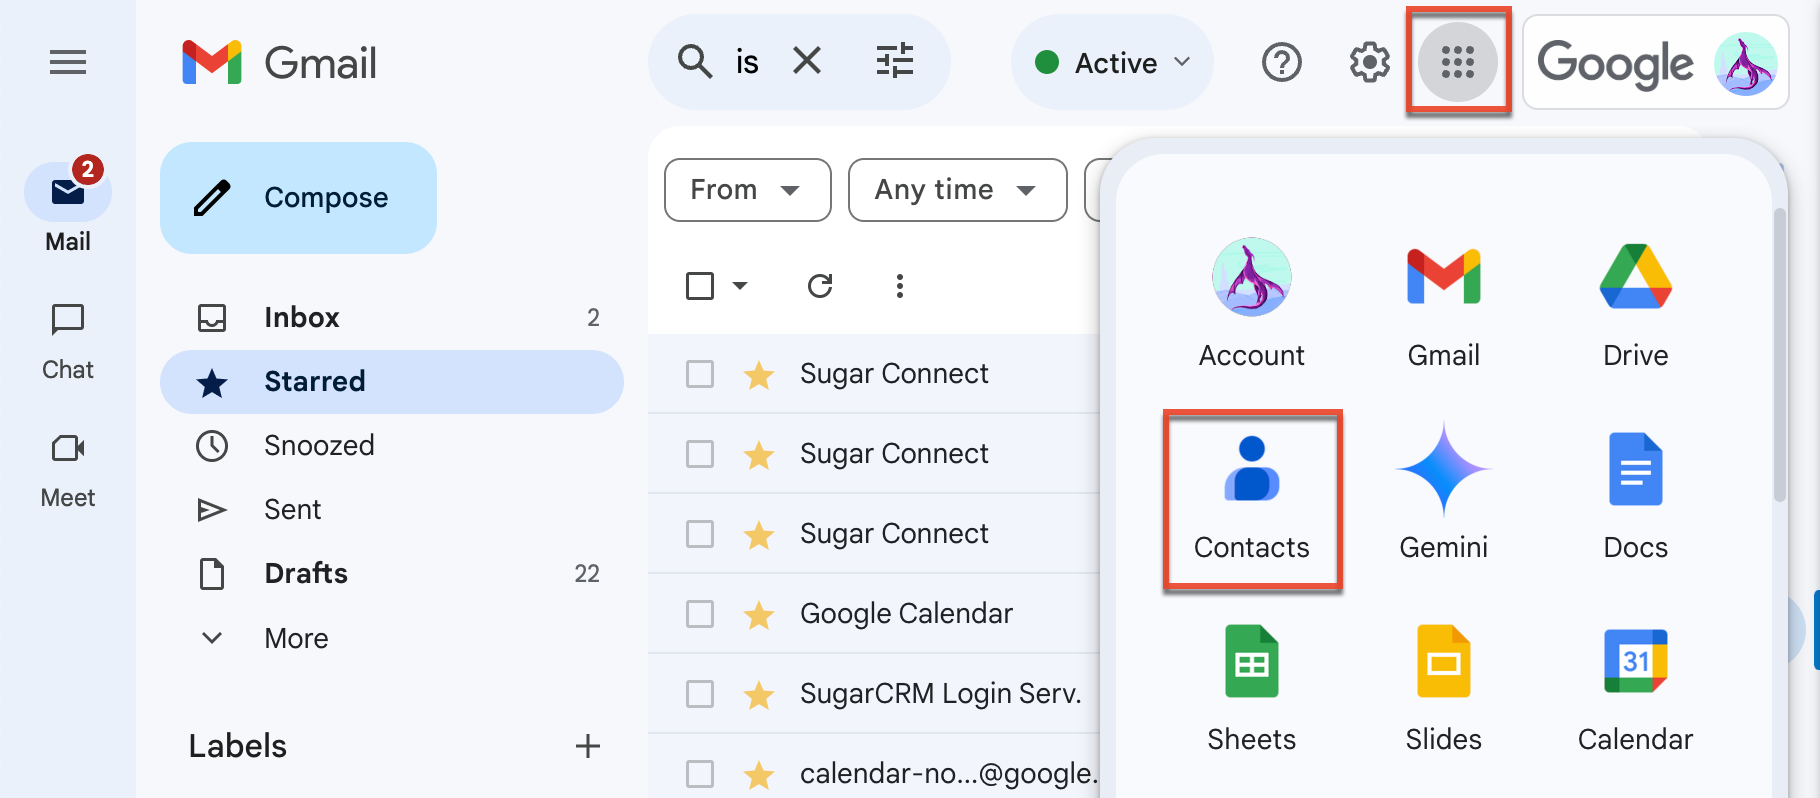
In Google Contacts, the Sugar leads and contacts that are assigned to you will appear under the label "Sugar". Simply click on the "Sugar" label to view your synced contacts: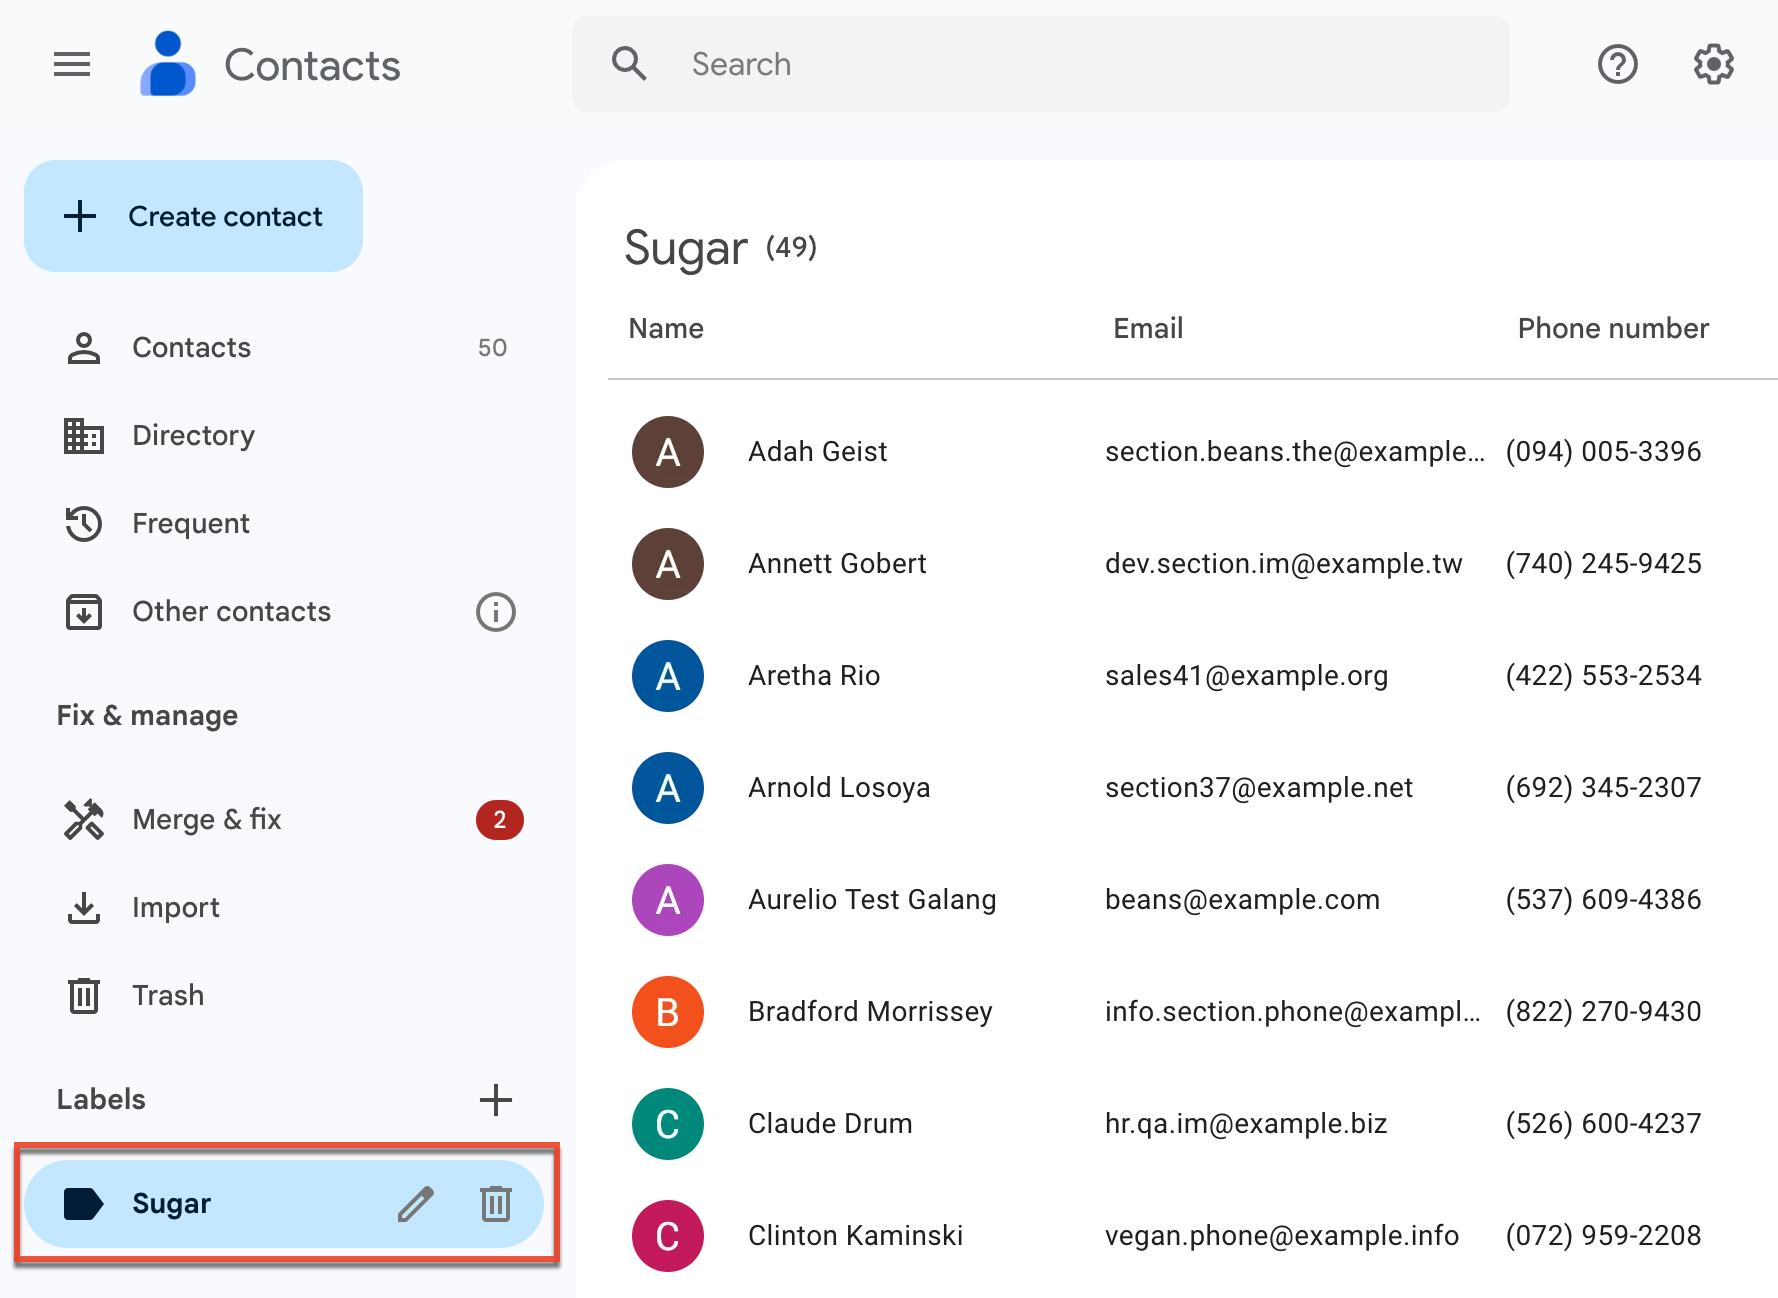
In Outlook, click on the People icon to access your Outlook address book. Leads and contacts that are synced from Sugar will be listed under your Contacts: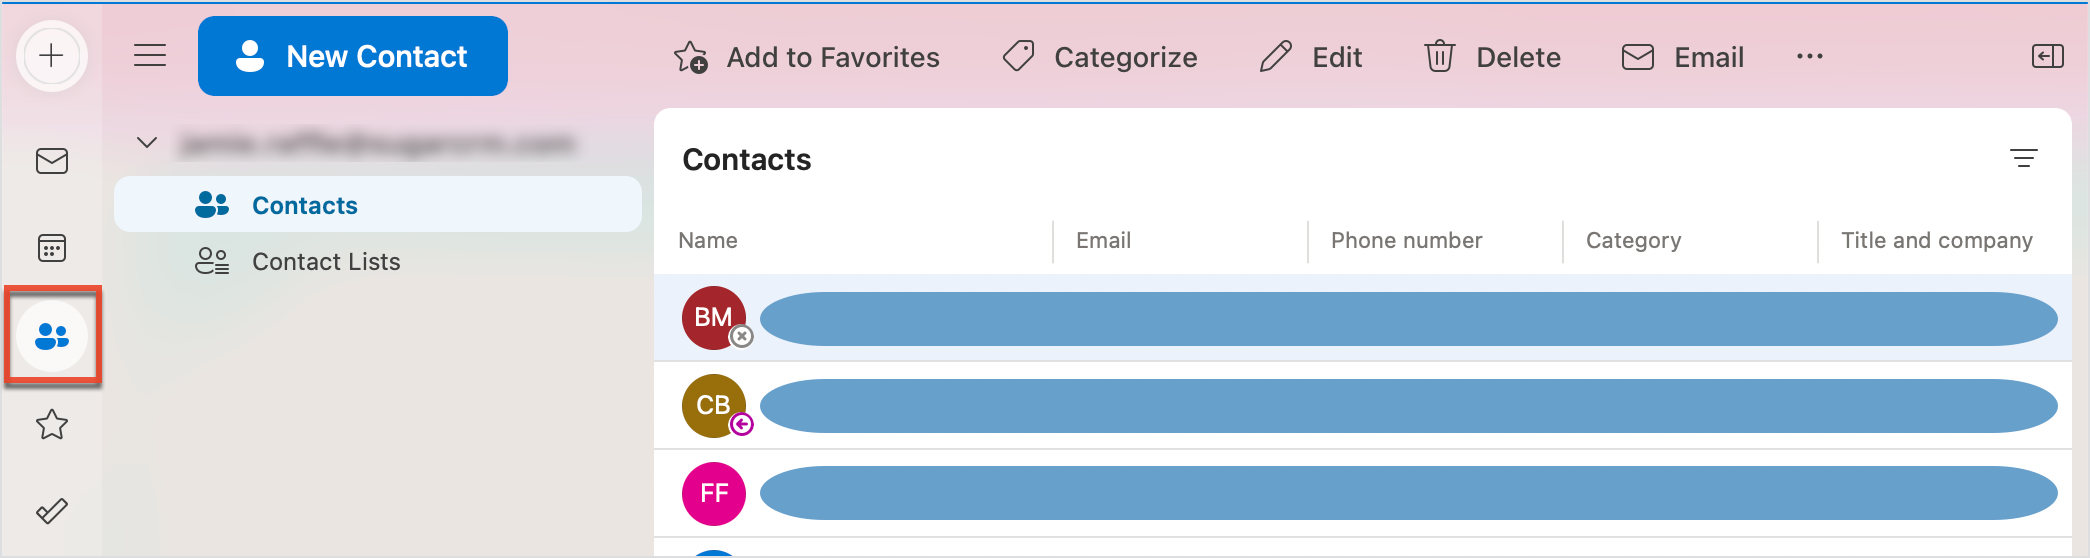
My Sugar Tasks Dashboard
In Gmail, the My Sugar Tasks dashboard appears prominently above your inbox and provides quick access to your Sugar tasks. You can edit, mark complete, and send an email to the task's related entry (Lead, Contact, or Account) directly from Gmail. Only tasks that are assigned to you are shown. The My Sugar Tasks dashboard is enabled by default. It can be disabled from Settings > General Options or minimized using the arrow in the header bar. Please note that you can also view and work with your Sugar tasks in the Sugar Connect sidebar. For more information, refer to the Working With Tasks section.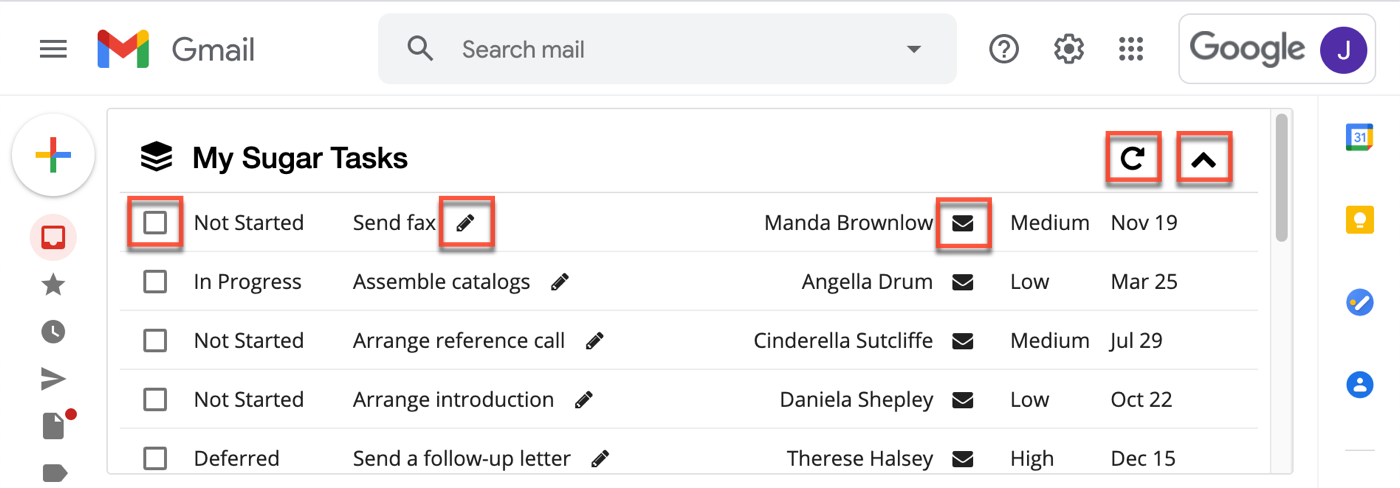
- Refresh: Click the Refresh icon to retrieve the most recent updates from Sugar.
- Expand/Collapse: Click the Arrow icon to expand or collapse the Tasks list.
- Email: Click the Email icon to compose a new email to the related entry.
- Edit: Click the Pencil icon to edit the task.
- Complete: Click the checkbox and then "Confirm" to mark the task as complete.
To prevent display issues in Gmail, the My Sugar Tasks dashboard cannot be used when using Gmail's Preview Pane lab feature.
Sugar Connect Meeting Scheduler
The Sugar Connect Meeting Scheduler lets users easily schedule meetings with prospects, partners, customers, and coworkers and sync them to Sugar by just sharing a link. Navigate to your custom meeting types by clicking the Scheduler link in the bottom of your sidebar. Locate the meeting type you want to share and click the Copy Calendar Link button. The link, now copied to your clipboard, can be easily shared via email, Slack, etc. Clicking the Add Event Type button takes you to your Sugar Connect portal where you can create additional options. Clicking Refresh brings any newly added event types into your sidebar. For more information on creating event types, please refer to the Sugar Connect Portal User Guide.
Switching Sugar User Accounts
If you wish to switch to a different Sugar user account or instance in Sugar Connect, open the Sidebar Settings menu and select "Log Out of Sugar". You will then be prompted to re-authenticate with the new user information.
Clearing the Outlook Cache
In Outlook, if you are experiencing unusual errors or behavior, it may help to clear the cookies from your Outlook cache. Outlook will rebuild the deleted cache files from scratch when you restart Outlook.
If you are running the desktop Outlook application on a Mac computer, follow these steps to clear the cache:
- Exit Outlook.
- Launch a Finder window.
- Click on the Go menu in your computer's task bar.
- With the Go menu open, press and hold the Option key on your keyboard to reveal the Library folder.
- Click on "Library".
- Navigate to Containers > Microsoft Outlook > Data > Library > Cookies.
- Right-click on the "Cookies.binarycookies" file and select "Move to Trash".
- Close the Finder window and restart Outlook.
If you are running the desktop Outlook application on a Windows computer, follow these steps to clear the cache:
- Exit Outlook.
- Press the Windows key+R.
- In the Run dialog box, enter
%localappdata%\Microsoft\Outlookand then press Enter. - Double-click on the RoamCache folder to view the cache files.
- Press and hold the Shift key while selecting all of the files and then press the Delete key.
- Close the window and restart Outlook.
If you are using Outlook on the Web, you can also clear your browser cache using the steps found in the Clearing Browser Cache troubleshooting article.