Creating a Landing Page With the Designer
Overview
Sugar Market allows you to create Landing Pages with the Landing Page Wizard or by going directly to the page setup and using the designer. This page explains how to use the Designer.
Accessing Legacy Tools
To access legacy features:
- Click the open button at the top of the navigation bar to view all available modules.
- Click the Legacy Features module.

- Select the tool you need to access from the Legacy Features section.
Step-by-Step Guide
- Fill in the fields for the basic page information
- Click "Create" to go to the Landing Page Properties
- Choose Page 1 and start editing the content
Page Properties
You have the ability to view, edit and personalize all the properties for each specific page of the landing page. These properties include Page Title, Submit Button, Description, Trigger Emails and Mapping to CRM Records upon completion of the landing page.
Page Title: The page title is very important. This is the actual text that the user will see in the browser's heading. So, be careful in naming it and remember that browsers have a hard time supporting very long names. The page title will also show up in the web tracker and might also play a part in your lead scoring. For these reasons, make sure that the page title is relevant and unique from other landing page pages.
Customizing Your Submit Button
Each page that is not marked as a "Final Page" will have a Submit button. The submit button is the way the user saves the form data and proceeds to the next page. The text that you enter here is the text that the user will see in the button area (i.e. submit, register, next page, etc.).
You can also use an image for a submit button. You will need to use the Asset Library feature of the application to upload an image. The Asset Library feature can be found on the main Navigation. To reference an image instead of text, click the radio button and then browse the Asset Library for the uploaded image.
Field Merge
Using Field Merge will allow you to alter the template of the page using the form field values, such as URL parameters and previous form questions. It will also allow you to merge contact data in the template. By not using Field Merge, it will increase the performance of the landing page if you are seeing a bit of a lag on rendering time of the landing page.
Field merge will also affect the rendering of Merge Tags in a landing page. For example, Social Media merge tags will not render in a landing page template if Field Merge is unchecked. These include:
- ++Twitter++
- ++FaceBook++
- ++SocialBundle++
Cookie User
You have the ability to tag a user by selecting the Cookie User field. This feature will allow the landing page to retain visitor information and pre-populate landing page pages when viewed by the visitor.
Attaching a Trigger Email
If you want the user to be placed into a trigger campaign or auto-responder, then you can select Yes to place in trigger campaign selection. After selecting Yes, the Select in Trigger Campaign will become enabled. The page placement is important to ensure that your trigger is delivered when you want it to be. For a landing page without any advanced logic, the option to add to a trigger should be set to Yes on the last page of questions. You can only place someone in a Trigger Email and not a regular Drip Email.
Map to CRM Records
You have the ability to send all collected data from a landing page into your CRM. We recommend that this always be set to Yes on every page in your landing page. This allows for a user's information to be captured and automatically created/updated in the CRM.
Final Page
You will choose this option when the page will be the very last page that the user will touch.
For example, if you are building a one-page landing page that redirects to a URL, then your first page would be the final page. If you are creating a two page landing page where the redirect goes to page 2, then page 2 would be your final page.
Auto-Populate to CRM
By selecting Yes the application will automatically push the CRM data into the database. This includes external CRMs like SalesForce.com and Microsoft CRM. If you choose no, then the data will be held in a holding area until you manually push the data.
Note: This feature will only work if the Map to CRM Records and Final Form are set to Yes.
Captcha
You have the ability to set up a Captcha display on every landing page you create.
- Display Captcha: By using this feature, you can prevent spoofing programs from entering information into your landing page. Users will be required to enter the code provided for verification.
- Captcha Text: We give you the flexibility to change the wording that will instruct the person to type in the code that is displayed.
- Refresh Captcha Link: If checked, this will display a link for the end-user to click on and generate a new image. This is useful if the end-user is having issues reading the code.
Landing Page Questions
Once our page properties have been set, you can begin building your questions. Creating your landing page for a particular user experience is always important. A key factor to consider here is how much time and effort you will require of the end-users who want to register. Most people prefer the "quick and simple" approach, where you gather just a few — but very important — pieces of information. These are usually basic, open-ended questions about their business (i.e. email, company, etc.), contact details (i.e. name, phone, etc.), and a question or two about current business processes relevant to your company offerings (i.e. what CRM do they use, etc.). As the relationship continues to be nurtured, you can ask more in-depth questions.
- To create a new question for your landing page, click New Field.
- Once clicked a New Landing page Field Properties pop-up window will appear.
- Enter the necessary information and click Save.
Question Properties
Merge Field: This is a tag unique to each question. If you want to reference a person's choice on an earlier question, you would use this tag in the template to pull that value. For example, if I want to say "Because you are a Salesforce user, you need to answer some additional questions." I would have it in the template as "Because you are a ++Form:xxx:xxxx++ user , you need to answer some additional questions."
Field Name: This is an internal name used to identify the field. You will see this name in various list boxes in the application.
Question: This is the question/text that the user will see when the form is rendered.
Field Type: This is a drop-down list box of how the field will be rendered.
Event Field: This is used if a field map will be routed back to an Event Location.
Map to Field: This is the section that allows you to map each record back to a field in the CRM. This includes all custom fields in the contact table. So, you would map first name to first name, last name to last name, and maybe IT budget to a custom field called budget__c.
*Please note, if you are using an integrated CRM and you wish to push lead and contact data back into your CRM, please read the Integration Guide relevant to your CRM. This is very important as it details the relationship of mapping certain variables such as Company name and street addresses.
Overwrite Value: If checked, the system will overwrite any existing value with the new value captured in the Landing page. If this option is unchecked, then if the field you are mapping to already contains a value, then we will not overwrite that value with the new value captured on the Landing page. It will only update with the new value if no value currently exists in the field.
Default Value. If you want any of the fields above to default to a particular value, then enter the value here.
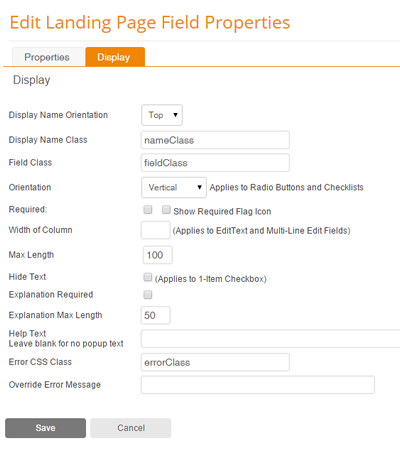
Display Properties
Display Name Orientation. Do you want the text of the question to appear on the left of the input field or on top?
Display name Class: If you are using style sheets in your template, then specify the class name here for the question text.
Field Class: If you are using style sheets in your template, then specify the class name here for the question input.
Orientation: This applies to Checkboxes and Radio Button lists. Do you want the questions to be shown in a vertical fashion or horizontal?
Required: Do you want the user to be required to input this data? If so, then check required.
Show Required Flag Icon: This will show a red flag indicating that the field is required. If you would like to use another image other than this flag, then rename or remove the flag image from the Landing page media manager and upload an image of your choosing. Please note that the image must be named flag_red.gif for the system to recognize this as the new required icon.
Width of Column: This allows you to control the width of the answer column when using Edit Text or Multi-Line Edit. By default, an edit text is 200 and a multi-line edit is 500. Go above or below these numbers to make the column longer or shorter.
Max Length: You can limit the number of characters that the user can input on an EditText or multi-line edit. Please note that if you change the max length to allow more characters you will need to make sure that the field it is mapping to will allow that number of characters.
Explanation Required. This will generate an extra edit text for the field. The user will be required to input more data for this explanation.
Explanation Max Length: You can restrict the number of characters that the user can enter for the explanation field.
Help Text: If you enter text into this field, then a help icon will appear next to the question. When the user hovers the mouse over this icon, then the help text will appear in the hover tag. If this is left blank, then the help icon will not be generated.
Error CSS Class: You are able to override the styling of the text that will appear if a required field is not satisfied or any other error message that is system generated. You will need to use an inline style sheet to create the new styling and then reference the name of the style sheet here.
Override Error Message: This will allow you to change the error text that appears if a required field is not satisfied.
List Properties
When you select any of these options as the field type: Checkbox List, Drop Down List or Radio Button List, then you will see an extra tab called Lists.
Add: To create new items in the list, enter the values into the items box. If you enter more than one item, then separate the items by a semi-colon – ";". After entering the items, click the "Add" link and they will be moved from the box to the Items above.
Remove All: To remove all items, select Remove All.
Import Picklist: To import the picklist values of a field (either from a system field or a field from an integrated CRM), select the Import Picklist. This will pull all the values available from the field that you are mapping to.
Import States: To import a list of States, select the Import States link.
Import Countries: To import a list of countries, select the Import Countries link.
Import 1-10: To import the numerals 1-10, select the Import 1-10 link.
Import Yes/No: To import yes and no, select the Import yes/no link.
Sync Events: To sync event options and import them into the list menu. This can only be done when the landing page is associated with an event.
Items: These are the optional values that the user will be able to choose form on the landing page.
Return Value: When mapping back to your CRM, the values must exactly match the fields in the CRM. (ex: if it is True/False in the CRM, the value for your question MUST be True/False). However, this may not always make sense to the user when placed as a value for a question. So, what the return value does is it allows you to still have the values that are user friendly, but then it allows for you to return the selected value as the required value to your CRM so that the field gets mapped correctly.
Order: When using the list properties, you have the ability to reorder the values once you have added them. Simply number them in the order you wish to have them and select "Save Item Changes."
Import CSV: To import a .csv file with the list options.
Using CSS to Edit Field Style
You can change the look and feel of your Questions by using CSS. There are a couple of different approaches, depending on what you need to accomplish.
Example 1 - Global approach
You can set styles based on the form field types and labels. These would apply to all the fields that share an attribute. This reduces the need to set Class names on each individual question. You can find what types of fields appear on your form after it has been published. Use Chrome's "Inspect Element" to narrow down what field names, ids, or types are appropriate for your form
- Make sure to set up styles in your head tag
<style>
</style> - Add a CSS definition to elements found in the form
<style>
input[type="text"] { /* some styling here /*}
span[id*="NameLabel"] { /* some styling here /*}
</style>
Example 2 - Individual Fields
On the Properties tab for each Question you will find an area where you can assign a CSS class name. Put the name of the class in the part of the question you wish to modify, then define that CSS class within the HTML of the page itself. This approach is useful if you need to style just a few fields on your form or if you need to rearrange all the fields into multiple columns (requires advanced CSS knowledge).
- Add a CSS class to the Question. For example: "nameClass"
- Add CSS definitions to the HTML of your page
<style>
.nameClass { /* some styling for the Label here /*}
.fieldClass { /* some styling for the Field here /*}
.errorClass { /* some styling for the Error Message here /*}
</style>
Creating and Editing a Field
There are several types of fields to use when creating questions: CheckBox List, Checkbox, Drop Down List, Edit Text, Hidden, Multi-Line Edit, Password, Radio Button, URL Parameter, Email, Date, Time, Label, Slider and Rating.
|
Type |
Values |
How it renders |
|
Check Box List |
Multi-values |
|
|
Checkbox |
Single value |
This will render a single checkbox for the user. You can choose to have text beside it or hide the value. The return values for this field type will always be "True" if checked and "False" if unchecked. This also cannot be a required field. The question can appear to the left or on top of the checkbox. The help icon will also not be shown on this field.
|
|
Drop Down List |
Multi-values |
|
|
Edit Text |
User Input |
|
|
Hidden |
Does Not Render to user. |
Not shown. Uses the default value to capture data for the form. This is useful to track the source of the form and map to the database. |
|
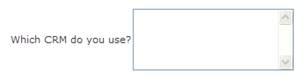
Multi-Line Edit |
User Input |
|
|
Password |
User Input |
Data entered is hidden from user. |
|
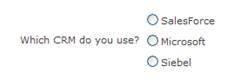
Radio Button |
Multi-values |
|
|
URL Parameter |
Does Not Render to user. |
This field allows you to look for the incoming URL and pick out parameters to store in the form or CRM. This is very useful for tracking source of leads. |
|
|
User Input |
When you use this as a field type, it renders an edit text box, but looks for a valid email address format and also cross references the Landing page Excluded Domain (if applicable). See the Suppression List manual for more information. |
|
Date |
User Input/Helper |
Using this option will render a calendar that the user can choose a date from.
|
|
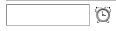
Time |
User Input/Helper |
Using this option will render a clock where the user can choose a time from.
|
|
Label |
Text Only |
This allows you to have a descriptive label above, below, or in between the questions in your landing page.
|
|
Slider |
Sliding Rule |
This will render a sliding rule for the user to choose a value between 0-100. You are also able to customize the values to anything of your choosing. |
|
Rating |
Star Rating |
This will allow the end-user to choose a number of stars or half stars as their answer to the question. These are commonly used for surveys. |


Importing Fields
Once you click on the Import link, an Import Question pop up window will appear. Here you have three options: Copy Existing Page, Copy Question, and Import Question Template.
Copy Existing Page: If there is a landing page that exists that you'd like to copy, select the existing landing page from the dropdown menu and click the Copy Existing Page link.
Copy Question: If there is a landing page that exists with a question you'd like to copy, select the existing question from the dropdown menu and click the Copy Question link.
Import Question Template: If there is a landing page template that exists that you'd like to copy, select the existing landing page template from the dropdown menu and click the Import Question Template link.
Editing Field Layout
Once you click on the Layout link, a Landing page Fields in Order pop up window will appear. Here you will be able to change the order of the fields and how they show up in the landing page.
Select the field you want and use the arrows to change the order in which these fields appear on the landing page. Once you've completed the order, click Save.
Content
The template of a landing page is the look and feel that will surround the questions, the basic framework of an HTML Page. The template includes images/logos, text, background colors, hyperlinks, the header and footer of the page that the user will see. Using our advanced HTML editor, it is similar to putting together a word document. The template is created using a WYSIWYG editor. It can be as basic or as dynamic as you are capable of creating. Essentially, the template contains everything but the actual questions for the form.
Using Iframes to Display Landing pages on Your Website
Our Landing Pages can be embedded into your website using iframes to provide a more seamless user experience.
For a more descriptive step-by-step guide, please see our article on How to embed Sugar Market forms on your website with an iframe.
Uploading Third-Party HTML
Create your HTML in another HTML editor such as Dreamweaver and then import it directly into your Landing Page
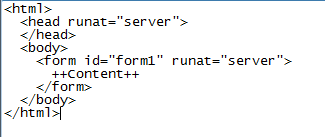
If you use this method, there are three key pieces of information that must be present on an imported HTML page to make a Landing Page function correctly within the system.
- <head runat="server"> - This attribute must be present in your HTML head tag
- <form id="form1" runat="server"> - This attribute and id must appear on the form tag that encapsulates the ++Content++ merge field.
- ++Content++ - This merge tag will be where the form field labels and inputs will appear. Be sure your imported HTML page has enough room for those questions.
Save the imported HTMLand you're ready to go!
Next Page Logic
You have the ability to define where the end-user will go upon submission of the page. How your landing page flows will be the determining factor of where the person gets routed. This can be a very simple or extremely complex process. The routing can also be based on conditions based on how a person answers question(s).
You can create a new Next Page Logic command by clicking New or you can edit an existing command by clicking on Tasks and selecting Edit.
Click Add New Condition and an Add Condition pop up window will appear. This will be the condition a user follows once the landing page is completed.
Condition Name: A name that you use to identify the logic. This can be anything of your choosing.
Conditions: If you are using logic (redirecting to a page or URL based on how they answer a question within the page) in your landing page, you would need to specify the conditions here.
If you are not using any logic, and regardless of how they answer the questions, you want them to be redirected to the same page or URL, then you would leave this area blank.
Next Page: This section specifies the page or URL that you want to redirect to. If you select the "go to URL" option in the command above, you will see the option change from a drop down list to and edit text allowing you to type in the URL.
Actions: If you want them to be enrolled in a Trigger Campaign upon completion, you would check the box and the Trigger Campaign would be enabled for you to select the trigger campaign to enroll them into.
Assign New Lead to User: You can choose who will be the owner of new leads coming in from the landing page. You can also base the owner on specific conditions. For example, if you are using the question "Industry" you are able to say that anyone who answers "Healthcare" will be assigned to "Sue." And you can then have anyone who answers "Financial" to be assigned to "Tom." Please note that any owners assigned in the next page logic will override the landing page lead routing rules and the primary contact. If you do not choose an owner on the next page logic, then the primary contact will be the default owner.