First Settings to Configure
Overview
Sugar's flexibility empowers users to configure the platform for their specific needs. This article explains some of the most basic settings an administrator should configure to get their users up and running with Sugar.
Prerequisites
You must be an administrator or have developer-level role access to make the necessary changes in the Admin page.
Core Settings
Sugar offers administrators a comprehensive range of configuration options to set up their instances according to their organization's needs and processes. On the initial login, the Admin Wizard helps you set up your profile settings like name and locale, but you can skip the wizard if you would like to configure these options later. The following sections cover some key things that administrators should configure when first setting up Sugar.
Locale
To set the system's default language and default date, time, and name formats, navigate to Admin > Locale. Review and adjust the localization options when first configuring your Sugar instance. Individual users can change these settings later to suit their personal preferences via their user profiles.
System Settings
Administrators can configure aspects of the Sugar interface that affect user experience via Admin > System Settings. You can customize several aspects of Sugar's appearance while also limiting potential stress on the server and browser. This is especially important for the main layouts where users work with data regularly. This section explains these system user interface options in detail.
Review and adjust the following layout options when first configuring your instance:
- Listview items per page: Specify the number of records to display by default on list views. Try to keep the number of list items per page between 20 and 50 for the best page-load performance.
- Subpanel items per page: Set the number of records to display by default within a subpanel's list view under a Sugar record. Try to keep the number of list items per subpanel to 10 or less for the best page-load performance.
- System Name: Enter a custom name for this Sugar instance. This name will appear as the browser tab header when Sugar is open.
- Select Logo: Replace the SugarCRM logo at the top of Sugar and the login page with your custom logo. For the best results, upload a .png or .jpg image file that is 212 pixels wide and 40 pixels high.
- Display Downloads Tab: Check this box if you want users to have access to the Sugar Plug-ins for Microsoft Office and other available files. When enabled, users can see the Downloads tab in their user profiles.
- Collapse all subpanels and disable sticky feature: For Sidecar modules (e.g., Accounts, Contacts, Meetings), select this option if you want Sugar to ignore a user's preference for open and closed subpanels, thereby closing all subpanels by default. This option improves page load performance by forcing users to expand the subpanels manually as needed.
Please note that some of the settings on this page are specific to legacy modules. For more information on these and other system settings in Sugar, please refer to the System documentation.
User License Assignment
For instances that do not use SugarIdentity, administrators assign license types for users via Admin > User Management. All users have a field called "License Type" on their user record. This field determines which functionality the user may access. The options that appear in this field are determined by the product(s) that an organization has purchased from SugarCRM. When an organization has purchased more than one product, such as Sugar Sell Premier and Sugar Serve, both will appear as options in the License Type field. Each user must have at least one license type selected, and selecting multiple products enables the user to access the combined functionality of all selected options. Select multiple options by clicking while holding the control or command key. Refer to the License Management documentation for more information.
Note: For SugarIdentity-enabled instances, the License Type field is managed in SugarIdentity.
Password Settings
For instances that do not use SugarIdentity, administrators manage password settings for users via Admin > Password Management. The following sections explain the various password management options available to you.
For detailed information on password options in Sugar, please refer to the Password Management documentation.
Note: For instances that use SugarIdentity, password rules and password reset emails are managed in SugarIdentity.
Password Requirements
Configure the Password Requirements section to set complexity rules for user-created passwords via controls over the length and strength of valid passwords. 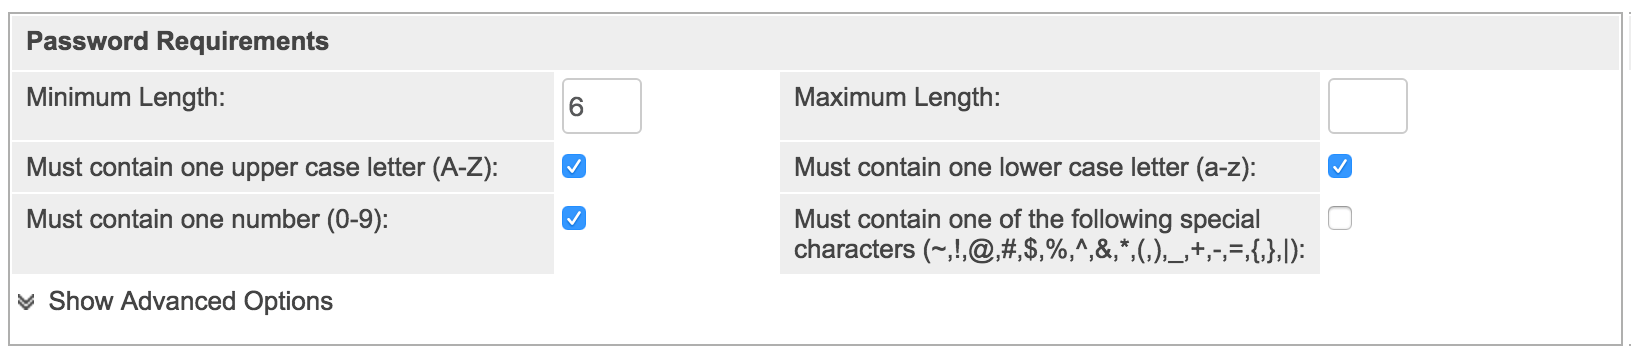
System-Generated Passwords
For older unsupported versions of Sugar, the System-Generated Passwords section and Reset Password option let administrators email temporary passwords to users. You can also set the expiration timeframe for temporary passwords from this section (i.e., 7 days).
Once system-generated passwords is enabled, simply select the "Reset Password" option in the user's profile to send system-generated passwords via email to, for example, new users or users who need their password reset.
Note: The system-generated passwords feature and the Reset Password option are only available for older unsupported versions of Sugar.
Manually Created Passwords
If you do not enable the system-generated passwords feature, or your Sugar instance is on version 13.0.x, then you must manually create passwords for users under the Passwords tab of their user records.
For Sugar instances on version 14.0.x and higher without SugarIdentity enabled, administrators will not be able to manually create a password. Instead, the administrator must provide the user with their username and primary email address configured in their user profile and direct the user to the Forgot Password link on the login page which the user can click to begin the process of creating their new password. The forgot password feature must be enabled for the users to access the Forgot Password link on the login page.
User Reset Password
Under the User Reset Password section, ensure to enable "Enable the Forgot Password feature" field. This setting ensures users have the option to request a new password from the login screen.
When a user clicks the link, they will receive an email allowing them to reset their password. If you choose to use the forgot password feature, remember to set an expiration interval for the reset link and to ensure all users have valid email addresses in their user profiles. For more information, please refer to the Enabling Users to Reset Forgotten Passwords article.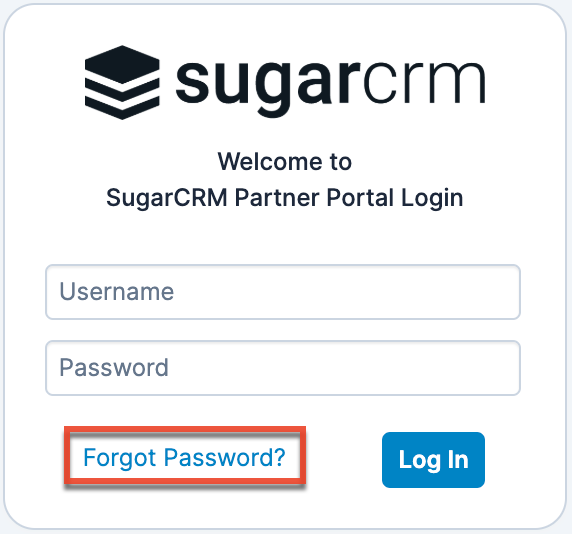
Email Settings
Many Sugar functions depend on properly configured email settings, so it is important to set up the system email early to ensure delivery of forgotten password requests, scheduled reports, assignment notifications, workflow notifications, campaign emails, and various other system-generated emails. This section covers the basic email configurations an administrator should define in Admin > Email Settings.
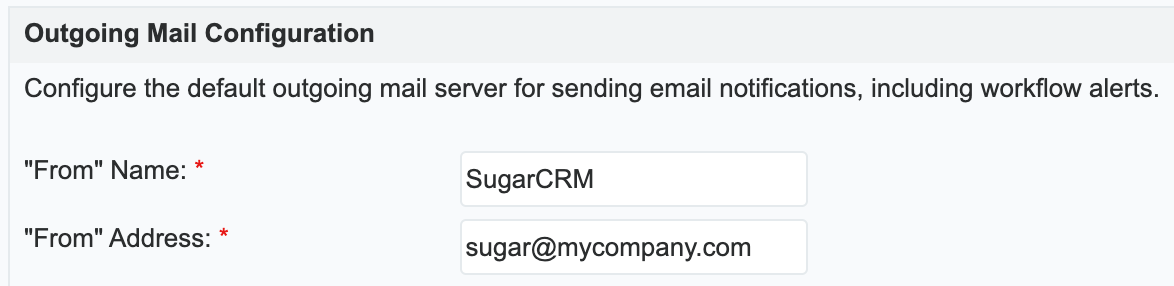
Configure Sugar's outgoing mail by completing all of the fields in the Outgoing Mail Configuration section.
- "From" Name: Enter the name that you want to appear in the "From" line of system emails sent to users from Sugar. The "From" name is commonly the same as the System Name that was configured via System Settings.
- "From" Address: Enter the email address that Sugar will use to send system emails to users. For example, sugar@mycompany.com.
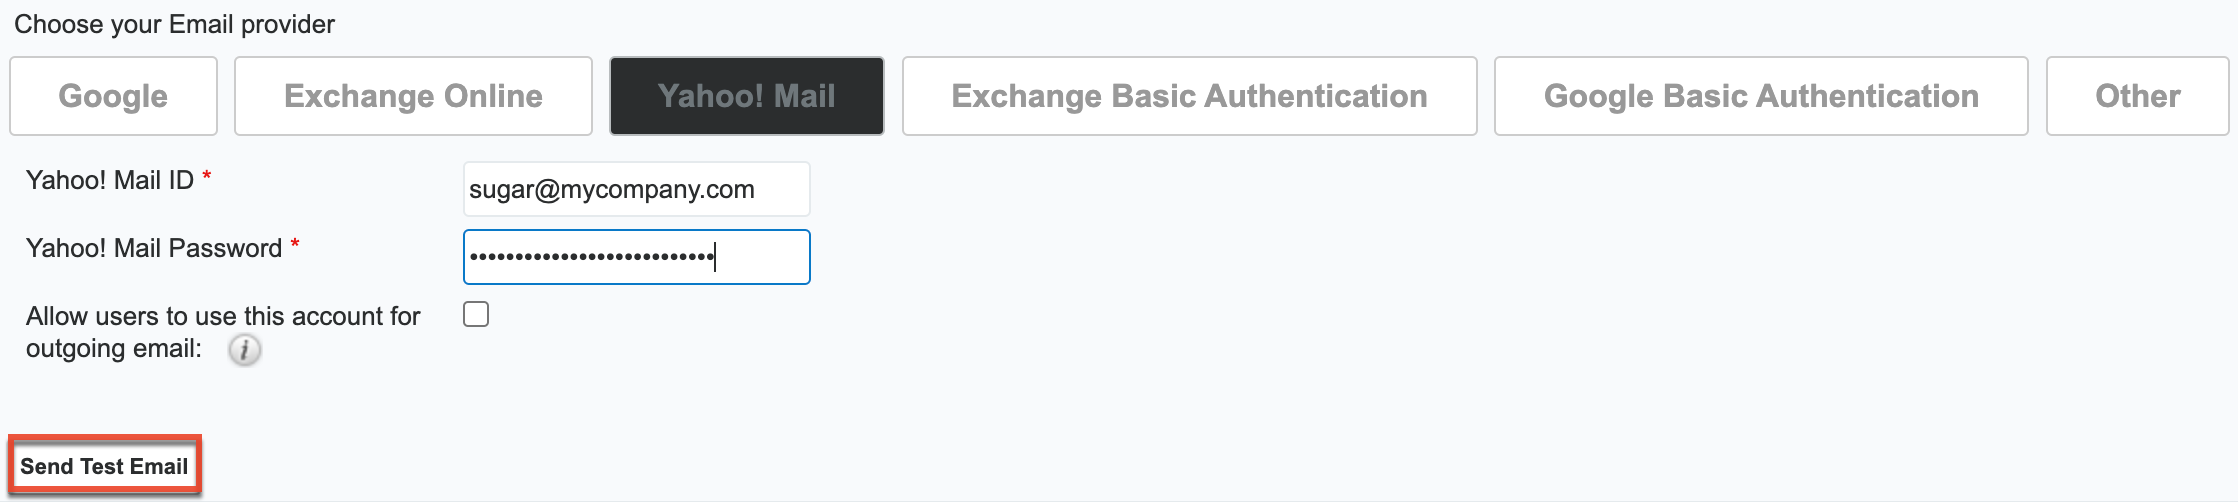
- Choose your Email provider: If your email provider is Google (i.e., Gmail), Exchange Online (i.e., Microsoft), or Yahoo! Mail, simply click the corresponding button to automatically populate certain fields with the correct server settings. For any other email provider, click the Other button and manually enter the credentials and server settings given to you by your provider. Refer to the Email Administration documentation in the Administration Guide for more information on completing the corresponding fields for each provider.

- After completing the form fields, click "Send Test Email" to confirm that you have configured the outbound mail server successfully.
For more detailed information on setting up the system email settings, please refer to the Emails documentation.
Mobile
One of the first things that users will want to do is start using the SugarCRM mobile app. As an administrator, you can enable or disable modules for mobile access via Admin > Mobile.
Simply drag and drop module names from the enabled panel to the disabled panel and vice versa to configure the available modules for the mobile app. You can also turn offline access on or off from this page by checking the "Offline enabled" box.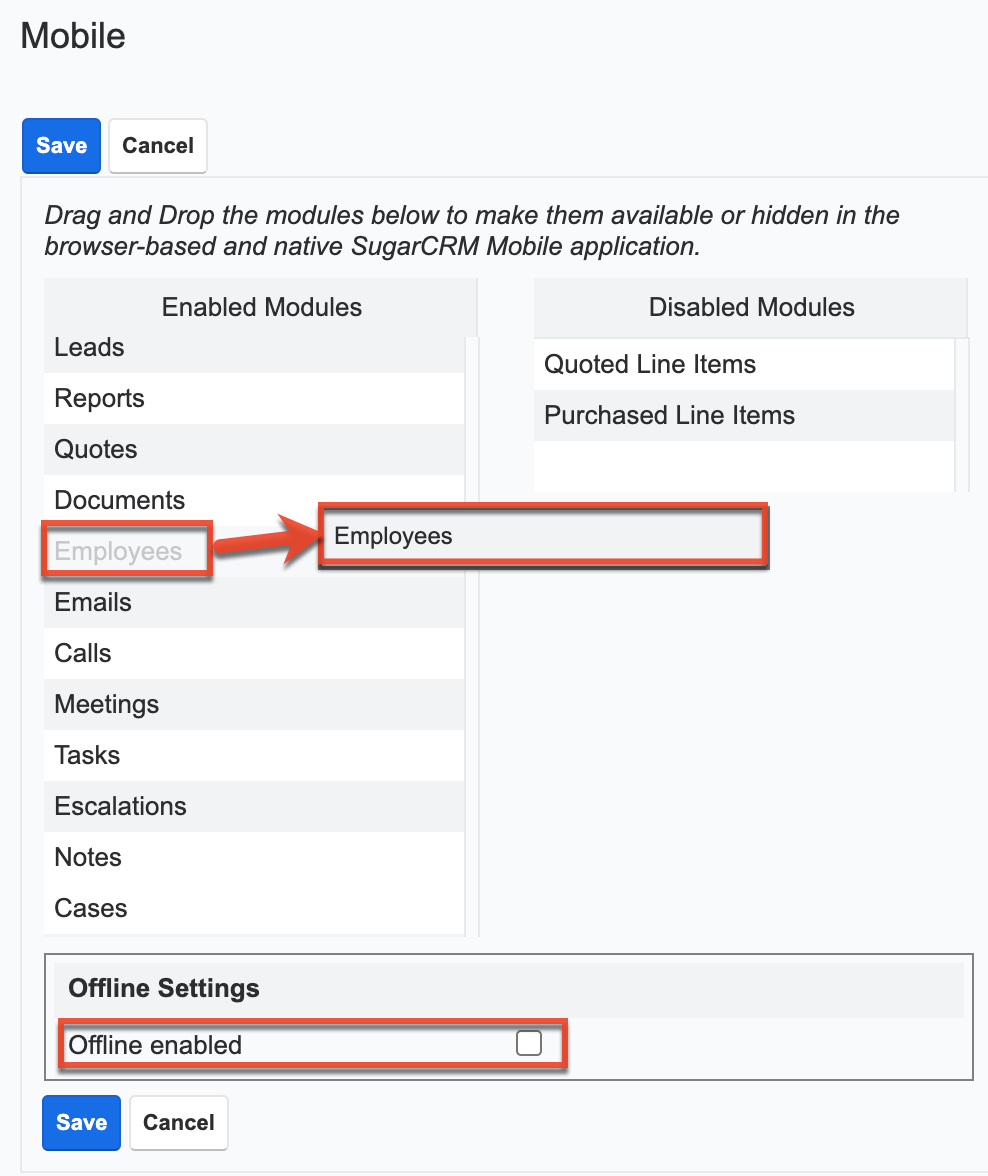
To view enabled modules within the app, click the three-bar icon in the top left corner to open the Main Menu: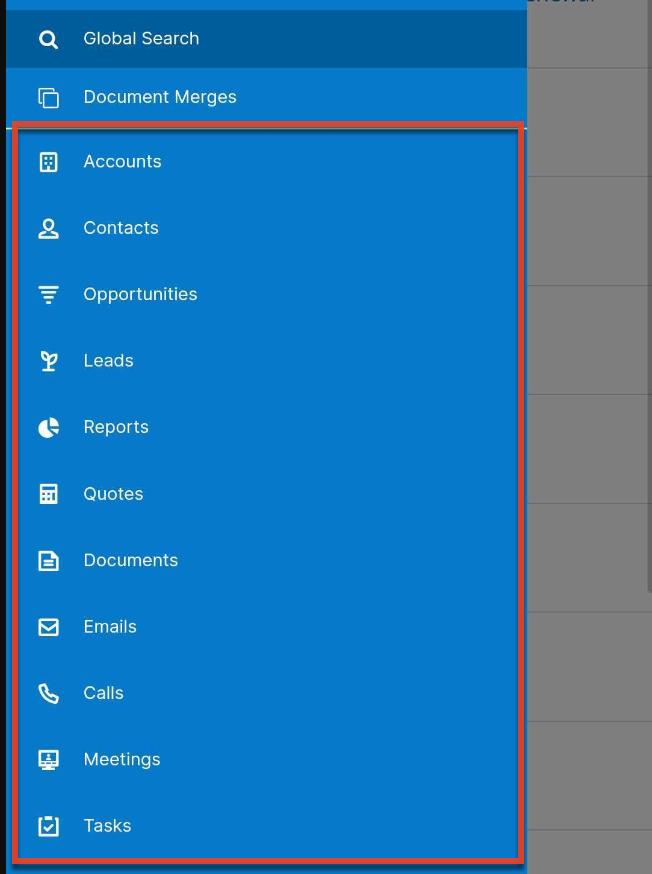
For more information about setting up and using the mobile app, please refer to the System documentation, the Accessing Sugar From a Mobile Device article, or the SugarCRM Mobile App User Guide.
Opportunities Configuration
Before working with business opportunities in Sugar, customers should decide which level of granularity they would prefer for tracking opportunities and building forecasts. Your company can choose to use opportunities alone or opportunities in combination with revenue line items. Sugar admins should configure the opportunity model that makes the most sense for their organization via Admin > Opportunities.
Note: Revenue Line Items are only available in Sell and Enterprise versions of Sugar.
It is important to make this decision before sharing the application with your sales team because changing your instance's opportunity model once users have started working in Sugar may result in the loss of forecast data and break related workflows, dashlets, reports, and other key analytic tools. To confirm or change your opportunities configuration, navigate to Admin > Opportunities, select your preferred option, and then click "Save". 
To learn more about which opportunity configuration is best for your organization and the risks involved with changing the configuration in an existing Sugar instance, please refer to the Opportunities Configuration documentation.
Currencies
If your company negotiates business in more than one currency, you can create and manage various currencies and conversion rates via Admin > Currencies. To add a new currency to the system, click the Create button on the upper right of the Currencies list view. Enter appropriate values for the fields in the record view layout then click "Save". To update a currency's exchange rate, you can click on the currency's name (e.g., Euro) to edit the necessary fields via the record view layout or click the Record Actions menu to the far right of the record's row in the list view to edit individual fields. For more information on configuring the system currencies, please refer to the System documentation.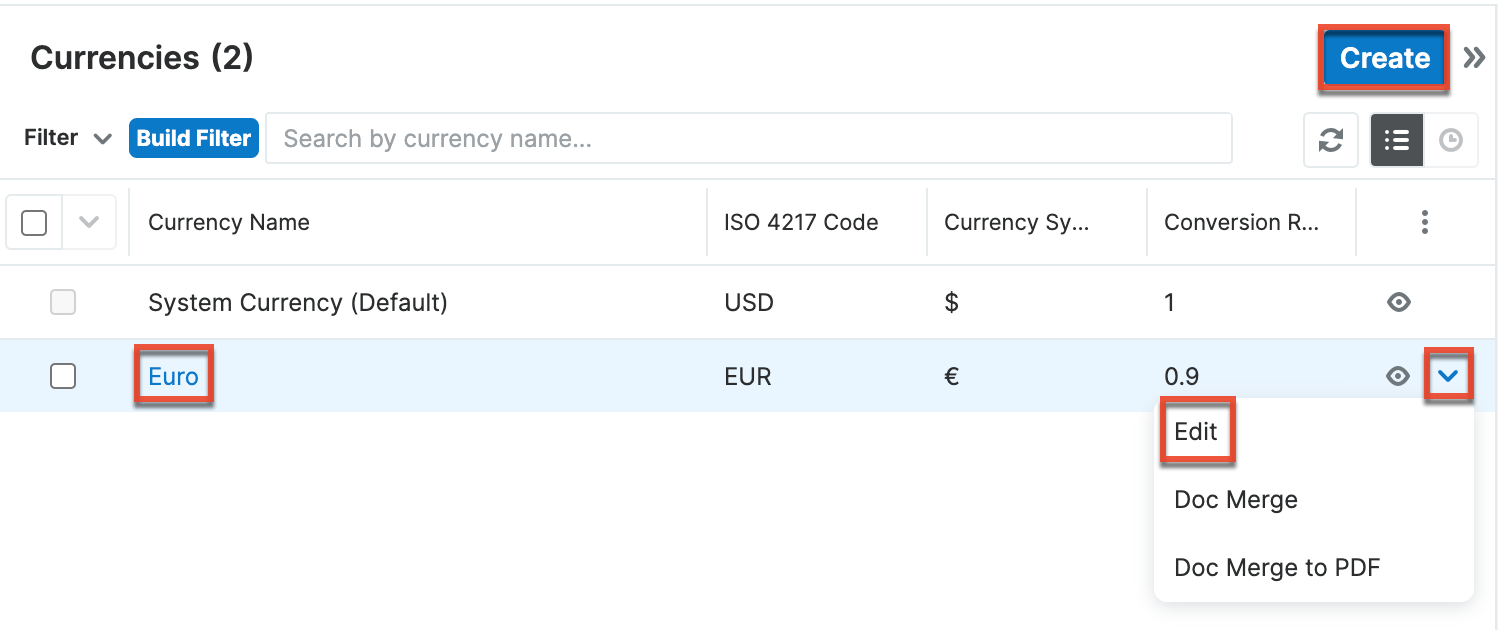
Scheduler
Sugar's scheduler executes critical processes in Sugar, such as automated workflows, campaign distribution, and periodic cleanup tasks. For instances hosted on Sugar's cloud service, schedulers are automatically enabled. On-site administrators will need to set up a cron job if you are running on a Unix-based system, or a Scheduled Job if you are running on Windows. For more information on cron jobs, please refer to the Introduction to Cron Jobs article.
For more information on schedulers, please refer to the Schedulers documentation.
Dashboards
Administrators can help their users get started by providing them with Home, list view, and record view dashboards. Sugar comes with dashboard templates for Home dashboards, as well as out-of-the-box default dashboards on list and record views that are available to users immediately. If these dashboards serve your purposes, no further action is needed since they are already shared with all your users. If, however, you would like to configure new dashboards for your users, these pre-built dashboards can still provide a starting point for your personalized dashboards. Please refer to the Dashboard Templates and the Dashboards and Dashlets documentation for more information on getting started creating and editing dashboards.
Once you have defined the dashboards your users should have, you can push the dashboards to your team by enabling the Default Dashboard checkbox on the dashboard's record view. Refer to the Dashboards and Dashlets documentation for more information.
Summary
After configuring these recommended settings, you will be ready to start using a basic installation of Sugar. It is recommended to review the Administration Guide in its entirety, then consider becoming Administrator Certified with SugarU. Some other configurations include setting up users, teams, and roles. Then, use Studio and Module Builder to adjust Sugar's modules, fields, and relationships to suit your business model before sharing login information. To help your end users, you can also set up and deploy default Home and Sidecar dashboards.