DocuSign Integration
Overview
Sugar's DocuSign® Integration allows users to create DocuSign envelopes to send documents such as quotes and contracts for electronic signatures directly from Sugar records. Envelope status and the completed documents are maintained with their originating Sugar records, providing an uninterrupted workflow within Sugar. This documentation describes how to use the DocuSign integration in your Sugar instance.
For information on how to use DocuSign, please refer to the documentation on the DocuSign website.
Features
Sugar's DocuSign integration includes the following features:
- Send envelopes from the DocuSign dashlet, the Documents subpanel on a specific record, or the Cloud Drive dashlet.
- View envelope status in the DocuSign dashlet.
- Download completed documents from the DocuSign dashlet or the DocuSign Envelopes module.
- Create envelopes from the DocuSign dashlet.
- Resend envelopes from the DocuSign Envelopes module.
- Apply DocuSign templates to Sugar documents.
Prerequisites
- The DocuSign connector must be configured by a System Administrator before you can access the integration.
- Sugar and DocuSign can be configured to optimize the user experience. Refer to the DocuSign documentation in the Administration Guide for more information.
- Your Sugar profile must be configured with an account associated with a paid DocuSign plan before you can send envelopes from Sugar.
Note: Free DocuSign accounts are allowed to send a small number of envelopes for testing purposes. Refer to the DocuSign website for information on the differences between account types.
While this documentation is written for Sugar users with a profile connected to a DocuSign account, limited functionality in the DocuSign dashlet can be accessed by other users. Please refer to the Using the DocuSign Integration without a DocuSign Account section for more information.
DocuSign Integration Workflow
The DocuSign Integration provides a link from your Sugar instance to your DocuSign account to create and manage envelopes in DocuSign. The basic steps of the DocuSign integration workflow include:
- Create an envelope: DocuSign envelopes contain one or more documents that are transmitted to and from contacts. Documents within an envelope have fields (e.g., signature fields) for the recipient to complete. You create an envelope with documents (.doc, .docx, .pdf, .xls, .xlsx, .ppt, .pptx, .png, .jpg, .jpeg) from Sugar and the sent documents are linked to parent records.
- Select template: When using "Send to DocuSign with a template" from the Documents subpanel or "Send with template" from the DocuSign dashlet, choose a DocuSign template to apply to the Sugar document before sending. Templates must be defined in DocuSign before they can be used in Sugar.
- Select recipients: Identify the recipients of the envelope within your DocuSign account, which opens when you initiate a Send to DocuSign. Note that an admin must have this option enabled; please see the DocuSign page in the Administration Guide for more information. If this option is not enabled, you will be directed to the next step automatically.
- Name the envelope: Provide a name for the DocuSign envelope.
- Complete the send from DocuSign's website: After you name the envelope, you are redirected to DocuSign to finish the sending process.
- Monitor envelope status: Access the status of envelopes in the DocuSign dashlet and the DocuSign envelope record.
- Download completed envelopes: View and download the completed envelopes from the DocuSign dashlet, the DocuSign Envelopes module, or the Documents module.
Note: The envelopes created within Sugar are accessible within your DocuSign account; however, envelopes you create directly in your DocuSign account are not accessible within Sugar unless you manually import envelopes.
Accessing the DocuSign Integration
The DocuSign integration is available in the following locations:
- DocuSign dashlet
- Documents subpanel Actions menu
- Cloud Drive dashlet Actions menu
- SugarBPM
- Doc Merge widget
DocuSign Dashlet
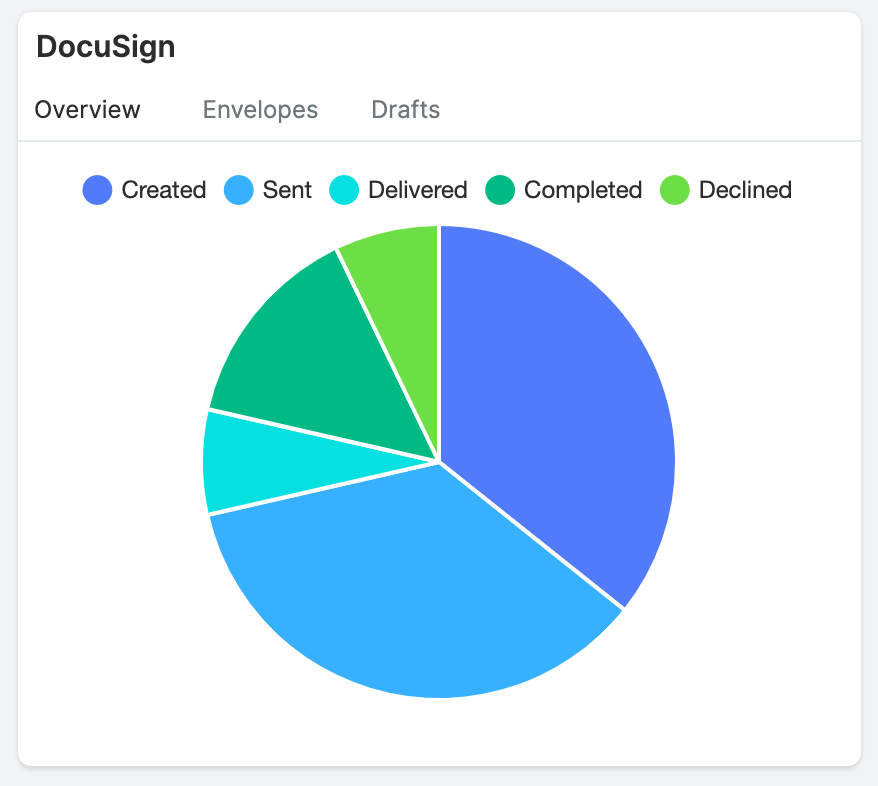
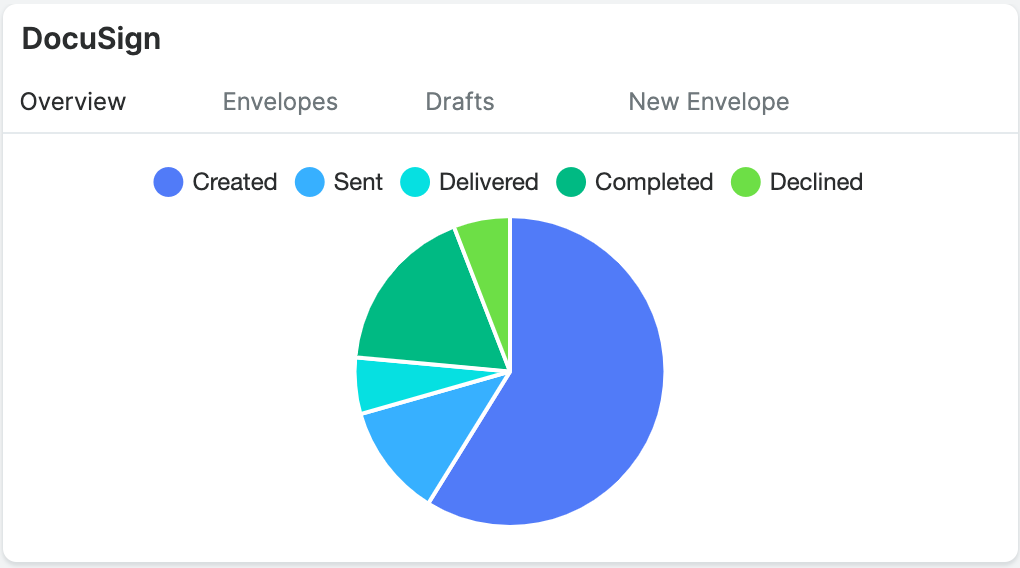
The DocuSign dashlet can be added to the home dashboard, list view intelligence pane, and record view intelligence pane. When the dashlet is displayed in list view, the records are filtered for the current module type when it is displayed on the home dashboard, where envelopes for all modules are included. When displayed in record view, the New Envelope tab is included to allow the quick creation of new envelopes.
| Home Dashboard and List View DocuSign Dashlet | Record View DocuSign Dashlet |
 |
 |
The dashlet is organized into the following tabs:
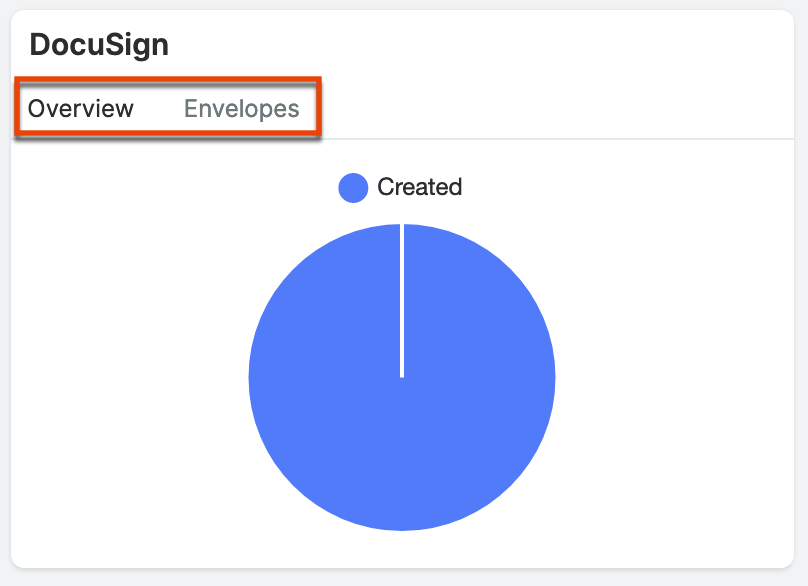
- Overview: Provides a chart representing the status of all envelopes. Hover over each segment to view the number and percentage for each status. Click a segment to display details in the dashlet's Envelopes tab.
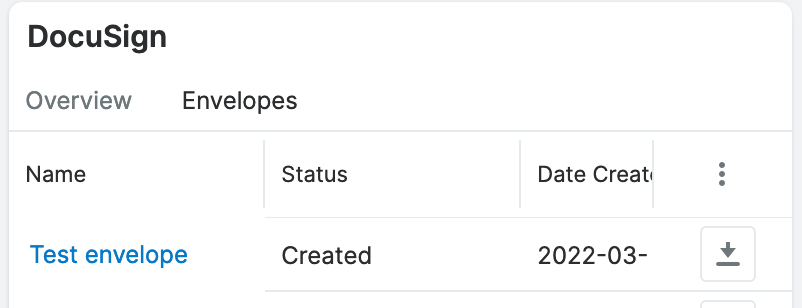
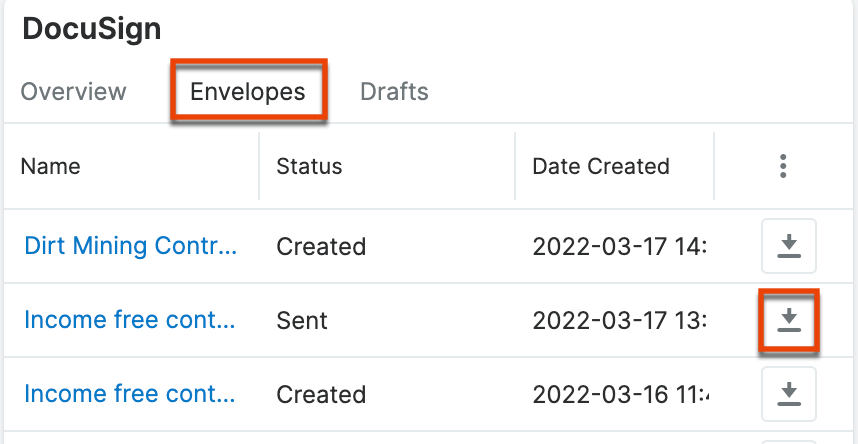
- Envelopes: Lists all envelopes added to DocuSign, including the envelope status, date created, created by user name, and a download link*. The envelope name links to the Document Envelope record.
* Only the user that created the envelope may download it via the Envelopes tab on the DocuSign dashlet. Other users may download the envelope from the DocuSign Envelopes module, depending on their team and role permissions.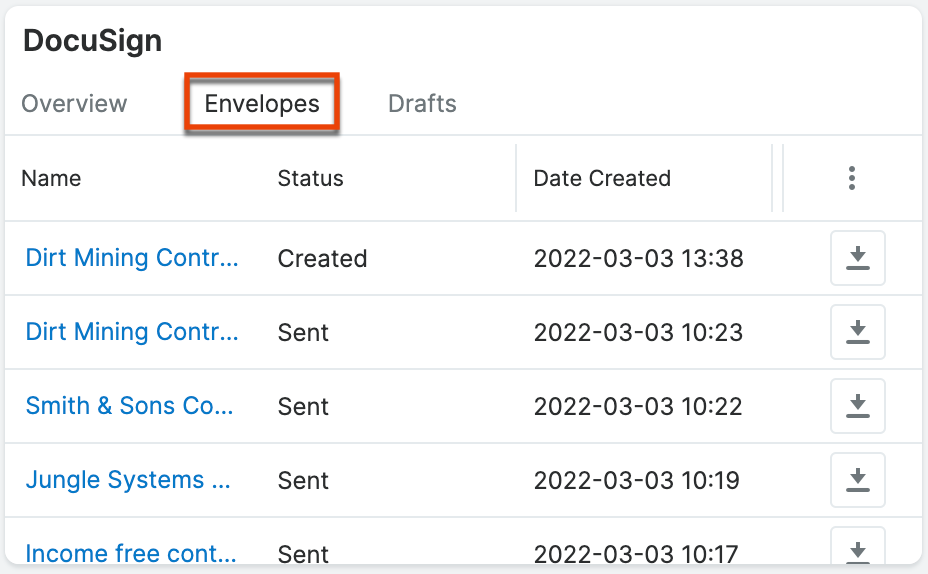
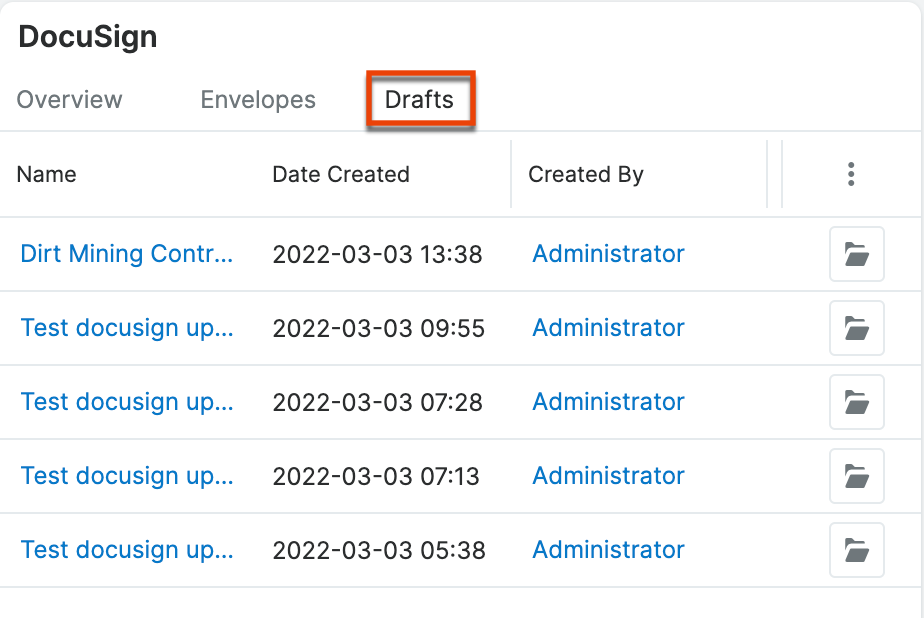
- Drafts: All envelopes in draft status. Click the Open Draft button (folder icon) next to each envelope to open the document in DocuSign. The envelope name links to the Document Envelope record.
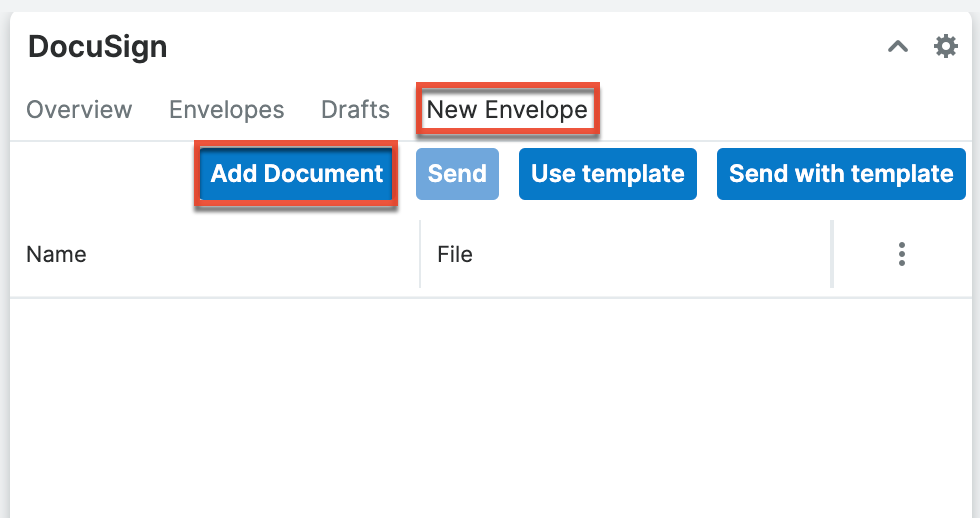
- New Envelope: This tab is only displayed when the dashlet is in the record view intelligence pane. You can send to DocuSign in three ways from this tab:
- Click the "Use template" button to select a DocuSign template that has the content you wish to send (e.g., a standard contract that gets sent to every new customer).
- Click the "Add Document" button to open a Search and Select drawer where you can select one or more Sugar documents to add to the new envelope. Then you can:
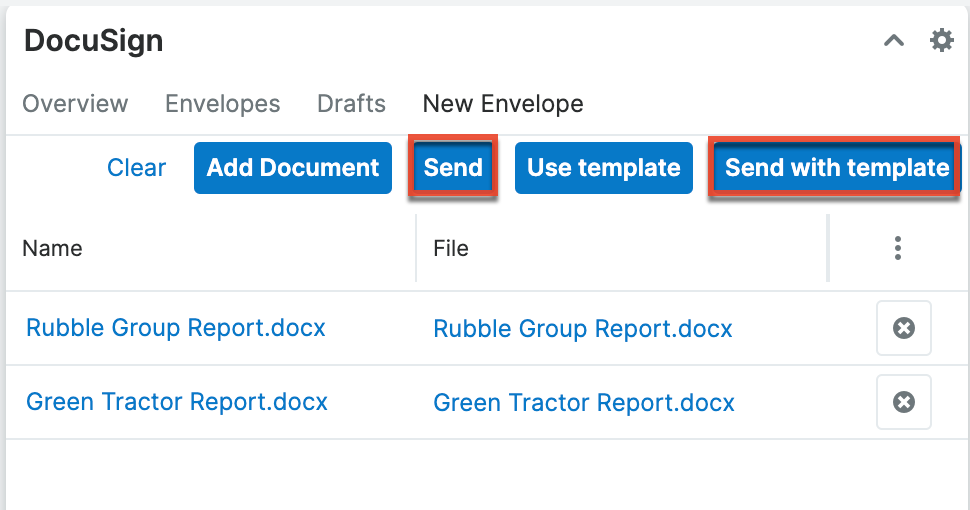
- Click "Send" to initiate the envelope-sending process.
- Click "Send with template" to select a DocuSign template to apply to the document (e.g., a template that adds signature fields after every use of the word "Signature" in the document) and initiate the envelope-sending process.

Documents Subpanel Actions Menu
From the Documents subpanel, you can either select "Send to DocuSign" or "Send to DocuSign with a template" from the Actions menu. When you select "Send to DocuSign", you immediately initiate the envelope-sending process without selecting a template. When you select "Send to DocuSign with a template", you have the opportunity to select a DocuSign template to apply to the selected Sugar document. For example, the DocuSign template may include formatting to include Signature and Date fields after every use of the word "Signature" in a document. When you send a document to DocuSign with that template, the document will already be formatted with those fields when it arrives in DocuSign.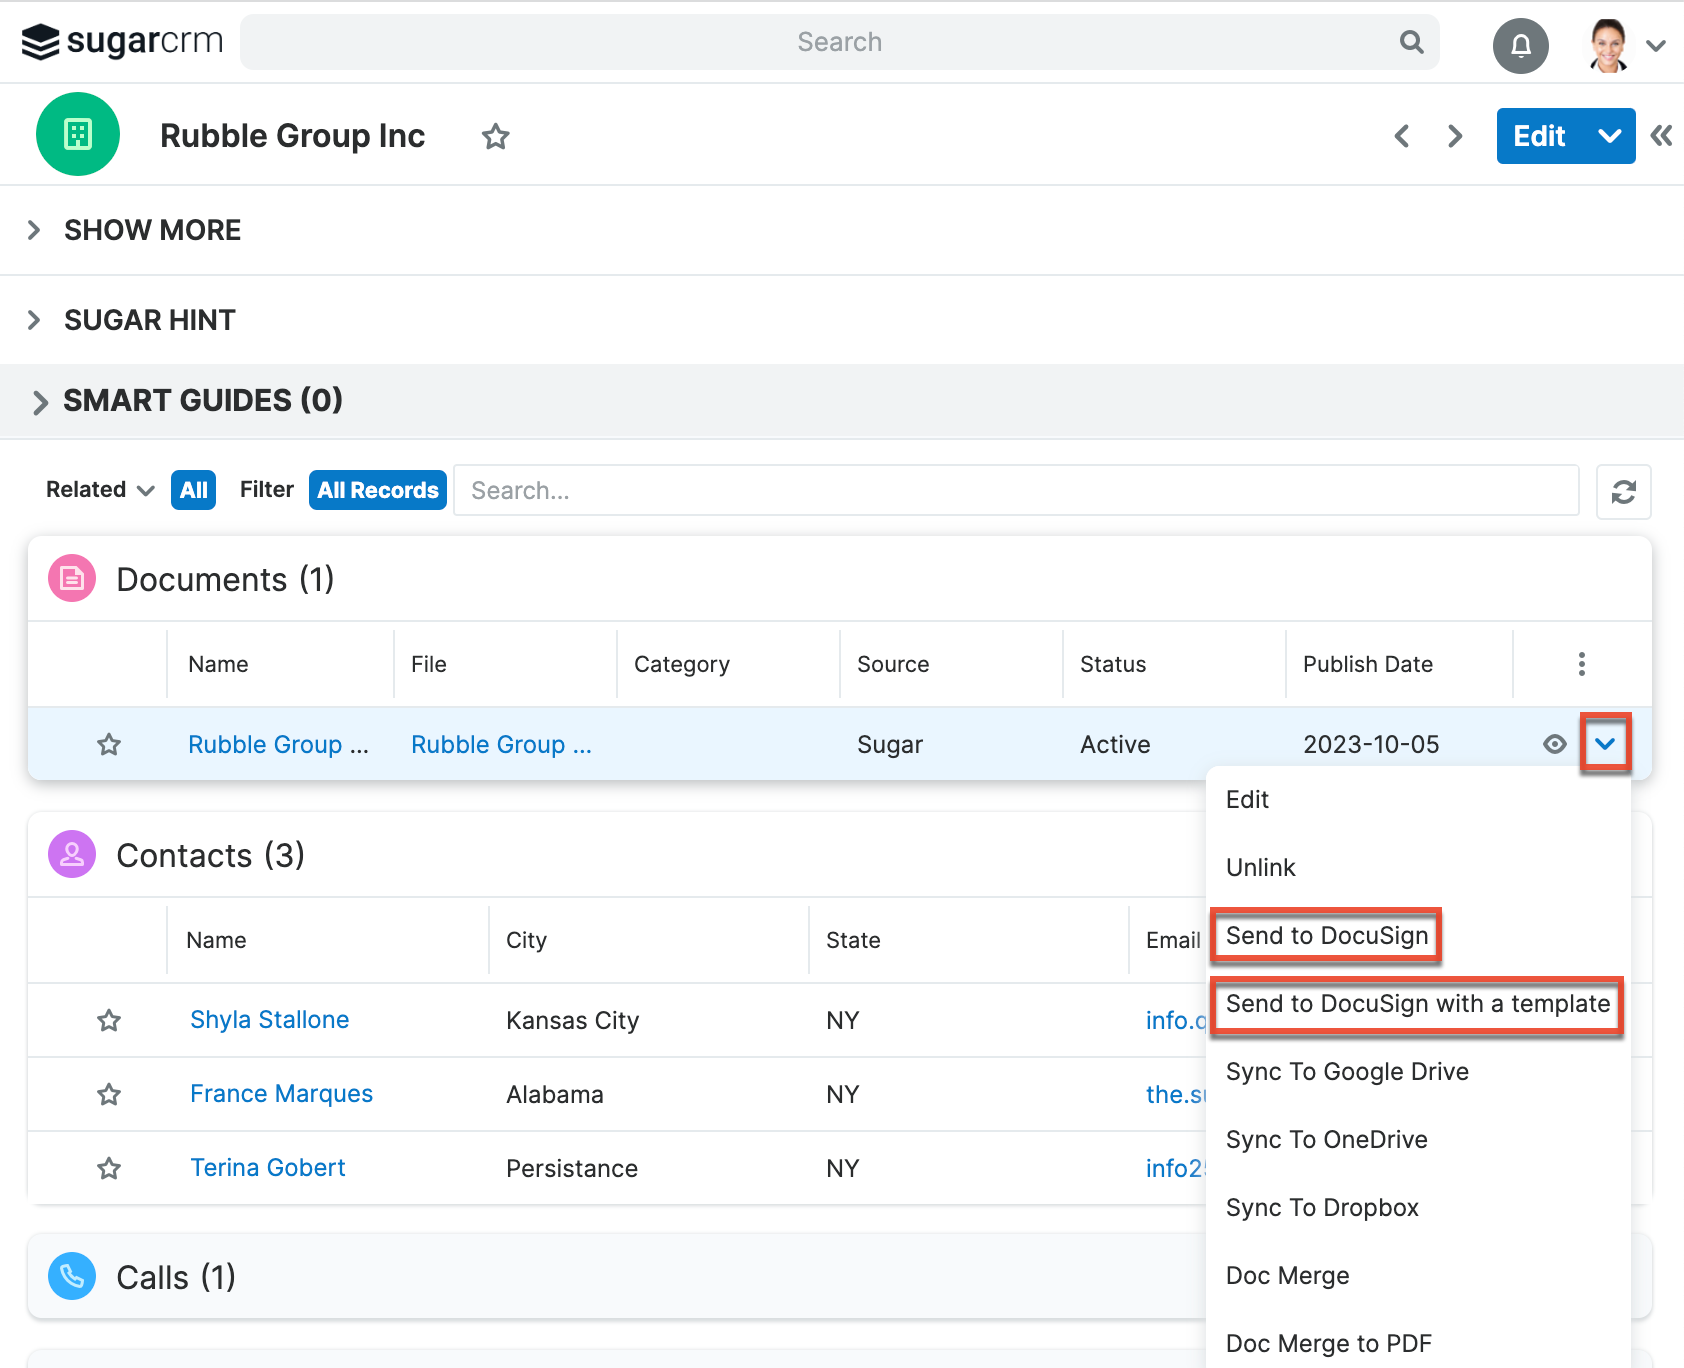
Cloud Drive Dashlet Actions Menus
Sending a document to DocuSign can be initiated from the Cloud Drive dashlet either as a dashlet action in the three-dots menu or as a row action in the row Actions menu. Using the dashlet-level action requires you to select a Sugar document to send while using the row action sends that row's document. On a record view dashboard, you can also choose to Doc Merge and then send the resulting merged document to DocuSign via the dashlet action "Doc Merge to DocuSign".
SugarBPM
You can use process definitions in SugarBPM to create an activity that is similar to an approve/reject activity. The Send to DocuSign form activity allows users who are routed records from processes to send any record to DocuSign via the Processes dashlet.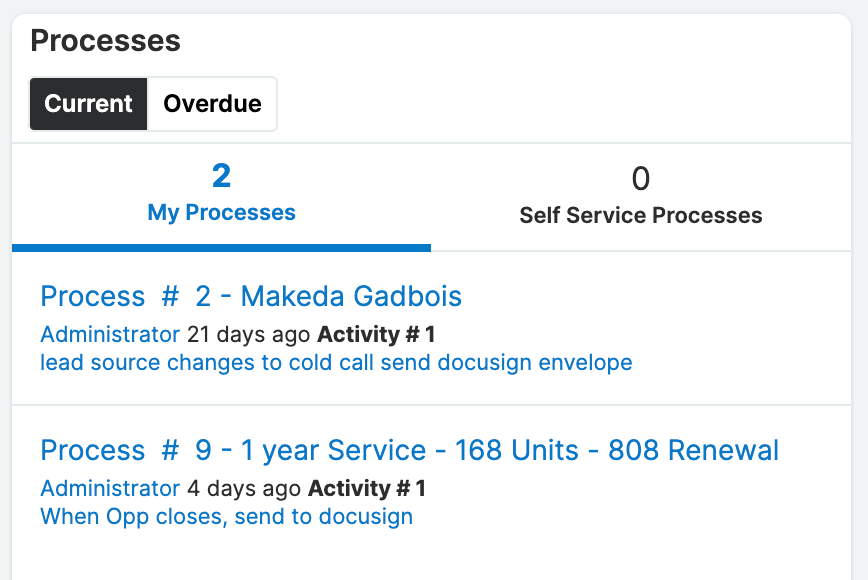
Once in DocuSign, you can add recipients, documents, and anything else regarding the signing workflow within DocuSign.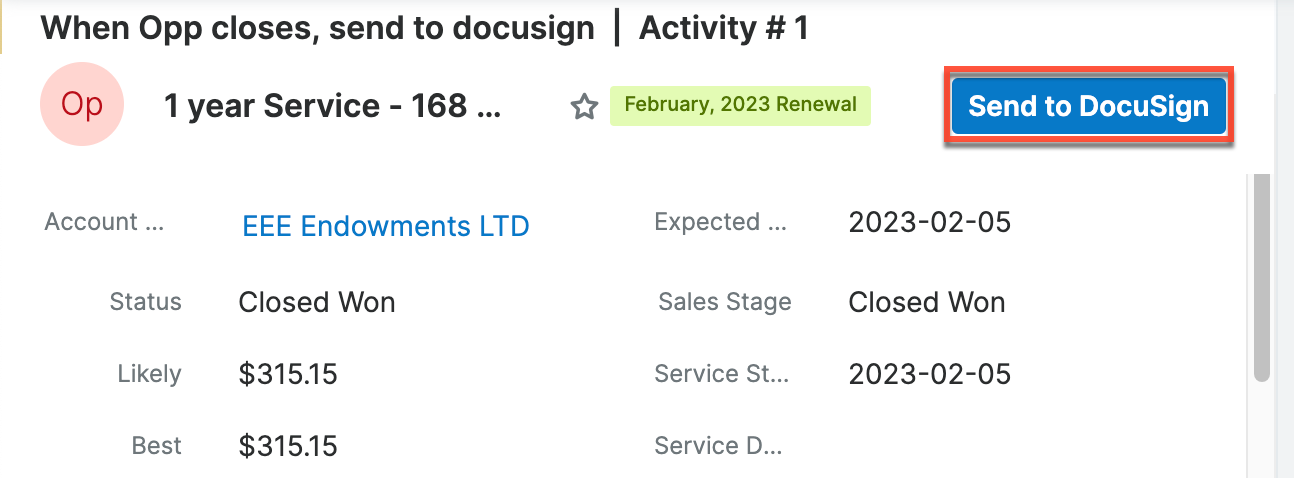
Doc Merge Widget
The Doc Merge widget is found on the lower portion of the navigation bar and is represented by an icon of a piece of paper with a folded corner. Clicking this icon will reveal the widget, which contains available actions next to any successfully merged document. The Send to DocuSign button is indicated by a pencil, and when clicked, sends a merged document to DocuSign. From there, you can add recipients and send the document as an envelope. The DocuSign connector must be configured in order for this button to appear in the widget. For more information on Doc Merge, please see the Doc Merge page.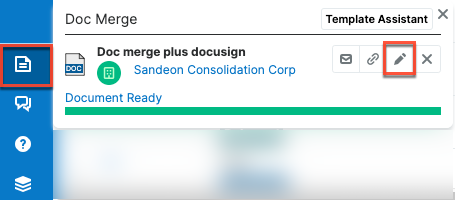
Using the DocuSign Integration without a DocuSign Account
Users without a DocuSign account or those who do not have their Sugar profile connected to their DocuSign account can access the DocuSign dashlet with limited functionality. These users can access the following:
- The Overview and Envelopes tabs in the DocuSign dashlet.
- DocuSign envelope records from the dashlet's Envelope tab. While the download link is available to these users, they can only download completed documents if they created the DocuSign Envelope record.
Note: The "Send to DocuSign" option is displayed in the Documents subpanel Actions menu for these users, but an error message displays if they attempt to use this action.
Creating an Envelope
DocuSign uses envelopes to send documents to contacts. When using the DocuSign Integration in Sugar, envelopes are automatically created when you initiate a "Send to DocuSign" and are managed in the DocuSign Envelopes module. You can initiate the envelope-sending process on any Sugar document from various areas throughout Sugar, as outlined in the Accessing the DocuSign Integration section. The final step of sending the envelope happens within the DocuSign web application.
Creating Envelopes With One Document
Envelopes containing a single document can be sent from any of the locations where you access the DocuSign integration: DocuSign dashlet, Documents subpanel, Cloud Drive dashlet, SugarBPM, and the Doc Merge widget.
Creating Envelopes With Multiple Documents
You can send envelopes with multiple documents associated with the same record in the record view DocuSign dashlet.
To send an envelope with multiple documents:
- On the DocuSign dashlet's New Envelope tab, click the Add Document button. A Search and Select drawer opens with the available documents.
- Select the checkboxes next to the desired documents, and then click the Select button. The documents are added to the list in the DocuSign dashlet.
- Click the Send button to immediately initiate the envelope-sending process. Click the "Send with template" button to first select a DocuSign template to apply to the documents before initiating the envelope-sending process.
After the request is sent from DocuSign, a DocuSign envelope record is created in Sugar and the envelope is added to the list on the DocuSign dashlet's Envelopes tab with "Sent" status. You determine the envelope name after you click "Send" and before you are redirected to DocuSign.
Note: The envelope recipients will see the name associated with your DocuSign account as the sender, not your user account name in Sugar.
Using a Template
To use a DocuSign template in Sugar, you must use either the DocuSign dashlet or the Documents subpanel.
There are two styles of templates that you may want to use:
- Template document: A template that is static and independent of any Sugar document (e.g., a standard contract that is sent to new customers with specific places for them to sign).
- Template applied to a document: A template that depends on a Sugar document (e.g., a template that formats Signature and Date fields to come after every use of the text "Signature and Date:").
To use a template that is independent of a Sugar document, click the "Use template" button in the DocuSign dashlet. You must then select which document to send.
To use a template that is dependent on a Sugar document, you can do so via the DocuSign dashlet or the Documents subpanel. When using the dashlet, first click "Add Document" to add the desired Sugar document to the dashlet, then click the "Send with template" button to select a template and initiate the envelope-sending process. When using the Documents subpanel, find the document you wish to send in the subpanel and then use the row Actions menu to select "Send to DocuSign with a template". You will then need to select a template to apply to the document.
Note that templates must first be defined in the DocuSign web application before they can be used in Sugar. Please refer to the DocuSign documentation for more information.
Selecting Recipients
You may select recipients in Sugar during envelope creation. An admin must have this option enabled; please see the DocuSign page in the Administration Guide for more information.
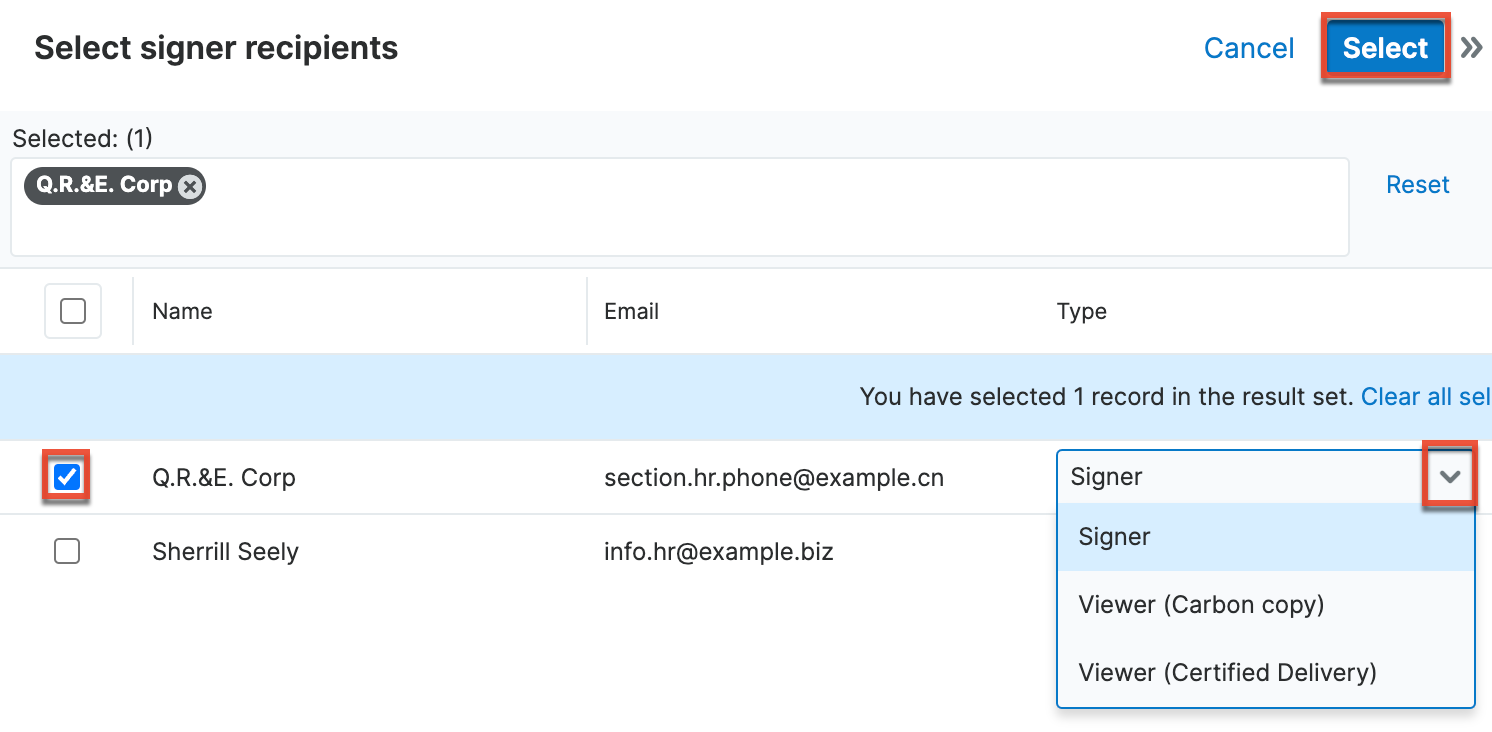
When you initiate the envelope-sending process using a method that does not use a template, a "Select signer recipients" drawer opens for you to select your desired recipients. The options in the drawer are accounts and contacts related to the current record. Enable the checkboxes next to the email addresses you wish to include and then choose the type of recipient (e.g., Signer). Then click "Select" to proceed to the next step. Note that you do not need to select any recipients if you prefer to set your recipients in DocuSign.
Selecting Recipients When Using a Template
When you are sending a document to DocuSign using a template, the "Select signer recipients" drawer also opens with potential recipients. You can click the Module button near the top left of the list to change the module to another related module to see different recipient options. Once you find your desired recipients, enable the checkbox next to their names and assign a role based on the template. The role is generated from the template used; therefore, if you wish to change the names of any roles, change them in the DocuSign web app.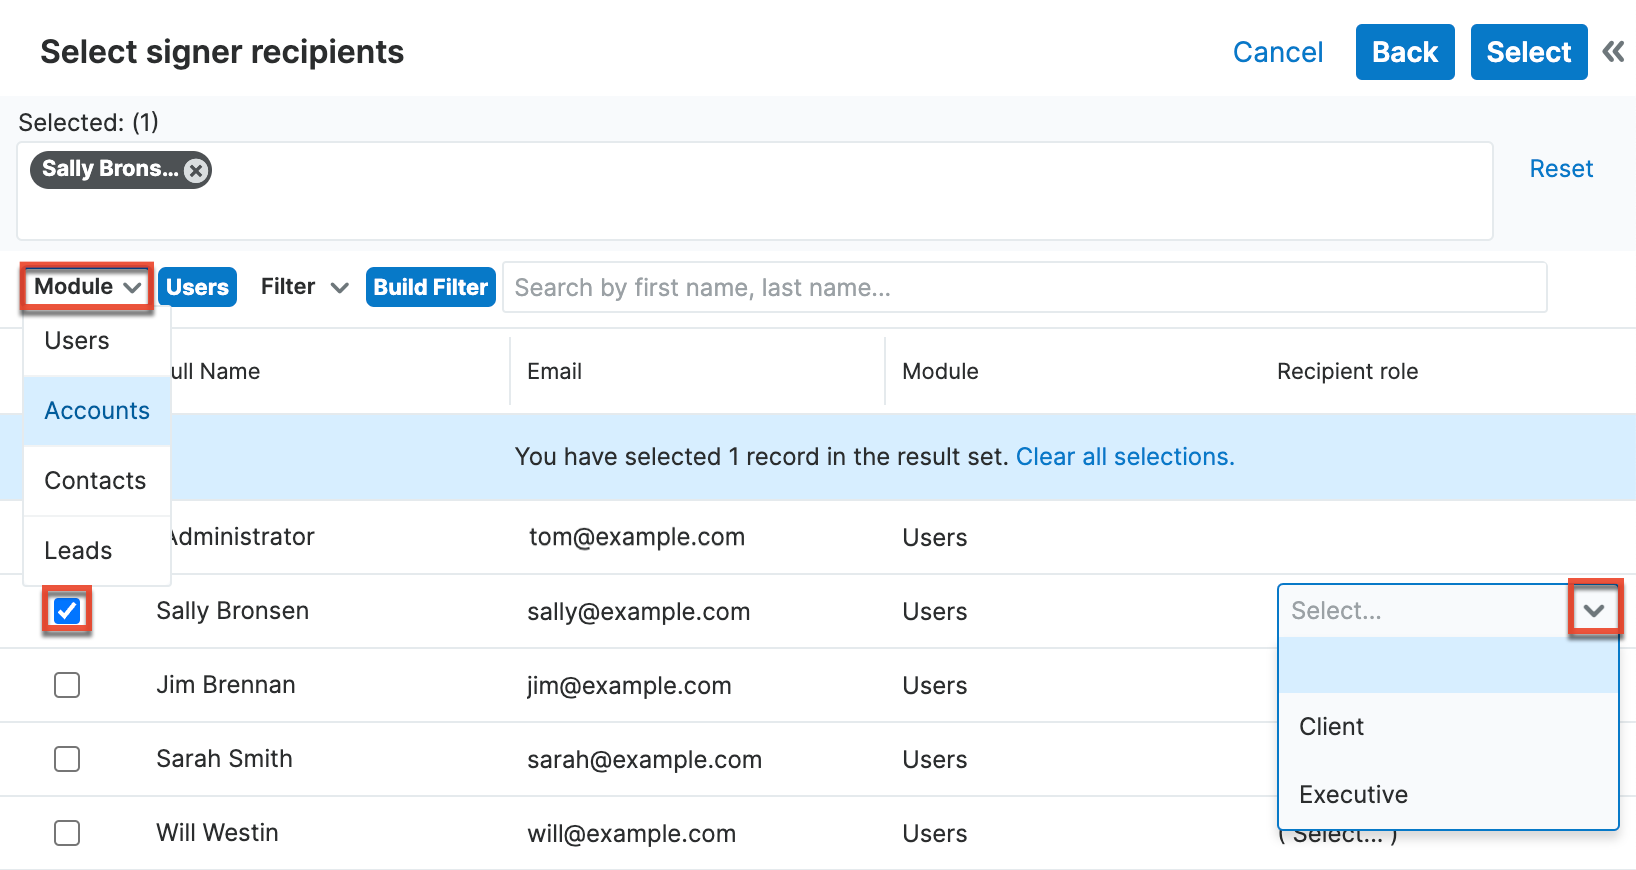
Viewing Envelope Status
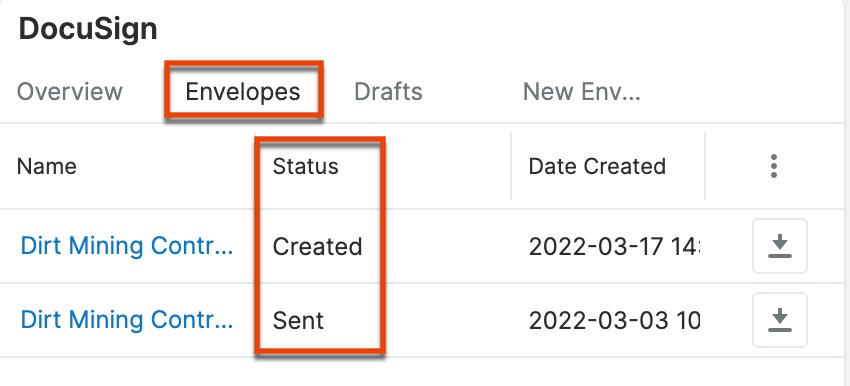
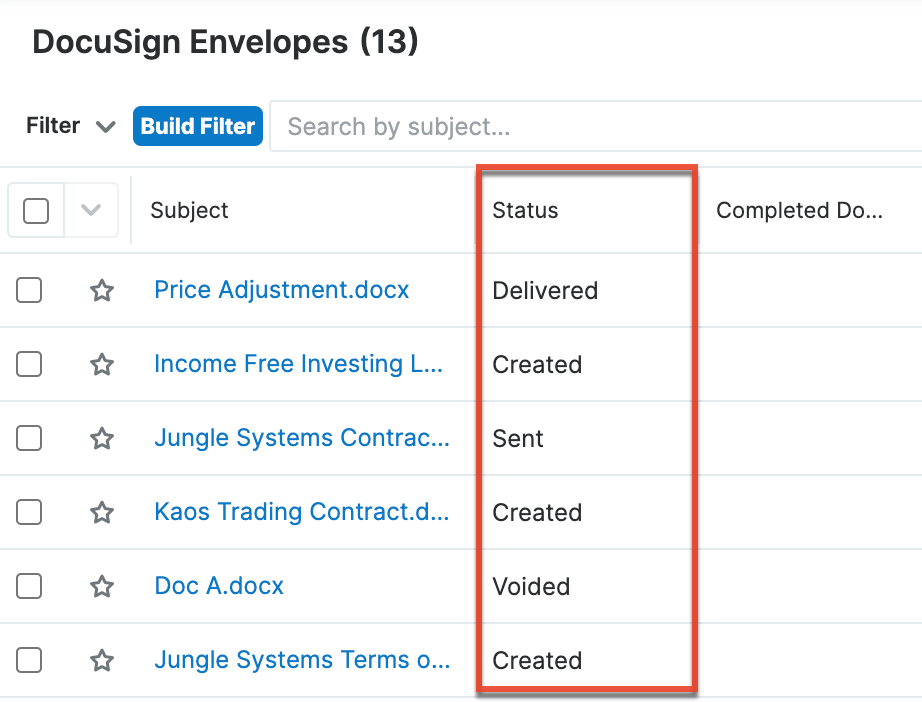
View the status of sent envelopes in the DocuSign dashlet or the DocuSign Envelopes module. Please refer to the DocuSign documentation for a description of status types.
| DocuSign dashlet | DocuSign Envelopes module |
 |
 |
Whenever the status is updated, the assigned user will receive a notification in the Notifications module. Please refer to the User Interface documentation for more information on notifications.
Downloading Completed Documents
Completed documents are saved with "- Completed" appended to the original file name. You can view and download completed documents in the following locations within your Sugar instance:
- DocuSign dashlet (only available if you created the envelope)
- Documents module

- DocuSign Envelopes module

To download completed documents from a DocuSign envelope record, select "Fetch completed document" from the record's Actions menu. The document will populate the record's Completed Document field.
Note: Completed documents are also available in your DocuSign account.
Managing Envelopes
You can perform the following actions within the DocuSign envelope record to manage the envelopes created in Sugar:
Resending Envelopes
Envelopes that are in "Sent" and "Delivered" envelope status can be resent to the original recipients. To resend envelopes, click the Resend option in the DocuSign envelope record. 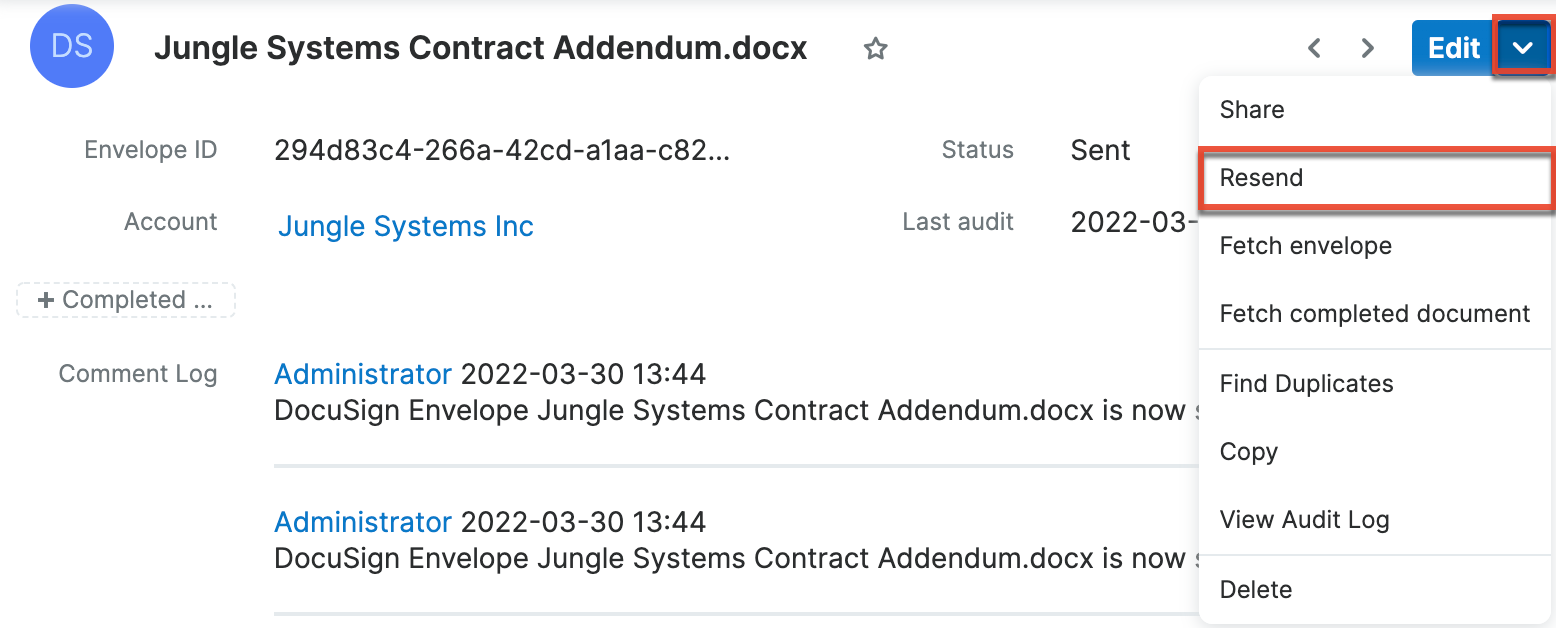
Updating Envelope Status
To update the envelope status, select "Fetch envelope" from the DocuSign Envelope record. The Status field is updated and a new entry is added to the Comment Log.
Note that in most cases, when an envelope's status is updated, Sugar will automatically be updated with the latest status. However, in certain scenarios (e.g., a DocuSign admin has disabled automatic updates for a specific status), you may need to fetch the envelope manually to see any updates.
Merging Duplicate Envelopes
To find and merge duplicate envelopes:
- From the Document Envelope record's action menu, select "Find Duplicates". A Search and Select drawer opens with any duplicate envelopes found.

- Select the checkboxes next to the records to merge, and then click the Merge Duplicates button.

For more information on finding duplicates and merging Sugar records, please refer to the User Interface documentation.
Importing DocuSign Envelopes
The envelopes you create in Sugar are maintained in Sugar and are also available in your DocuSign account. The envelopes you create in your DocuSign account are not accessible in your Sugar instance unless you import them via a CSV file.
To import DocuSign envelopes:
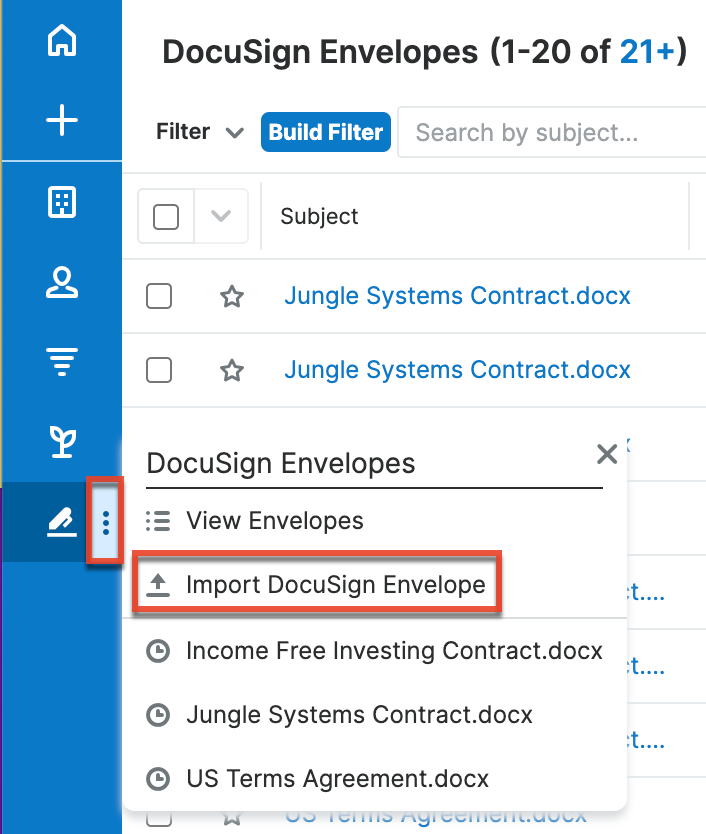
- From the DocuSign Envelopes module Actions menu, select "Import DocuSign Envelope".
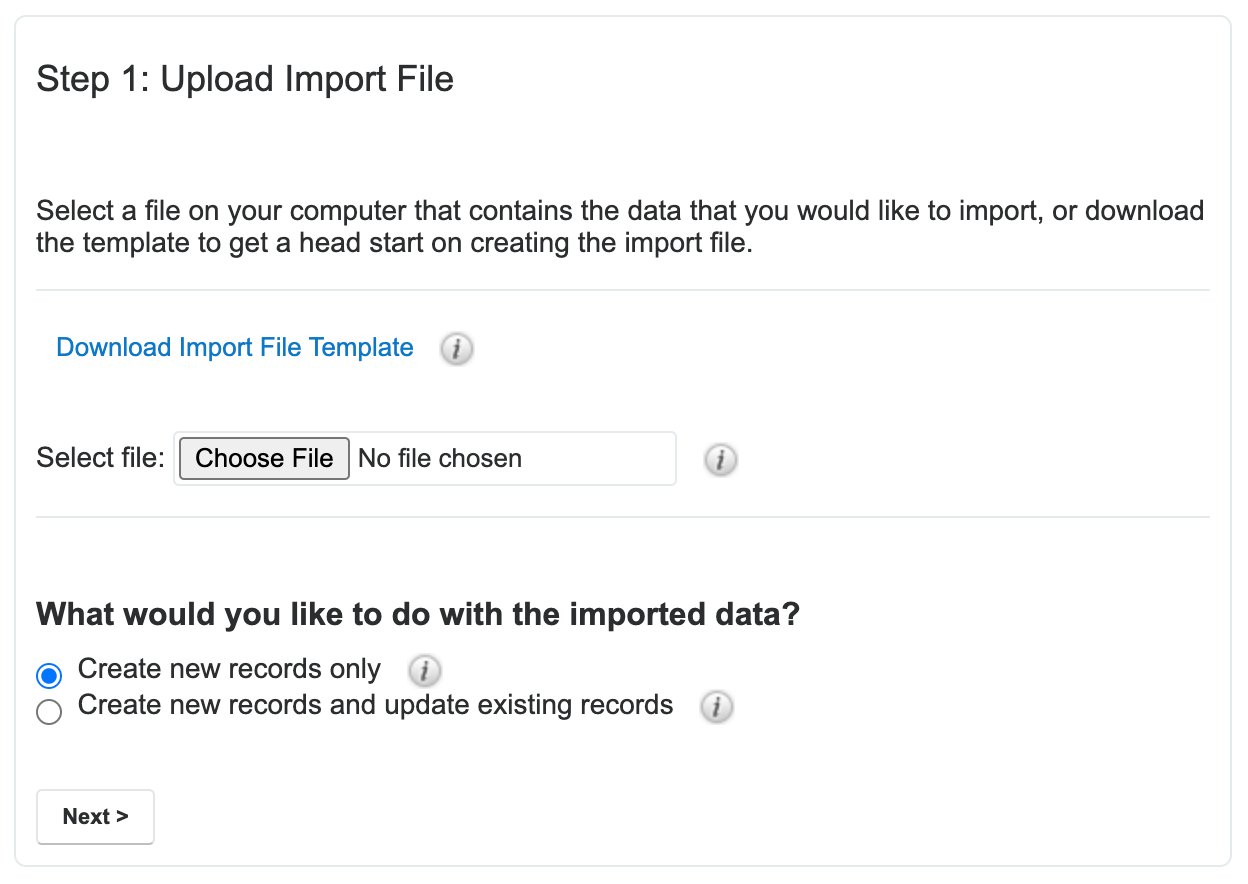
- Click the "Download Import File Template" link to download a file that contains the correct format for uploading envelopes.
- Follow the instructions in the template and save. The Envelope ID column is required and must be populated with the IDs from DocuSign.
- Click the Choose File button and navigate to the file you just created.
- Choose to create only new records with the uploaded envelopes or to also update existing records, and then click the Next button.
- On Step 2 of the wizard confirm that the header rows appear as expected, and then click the Next button.
- On Step 3, the wizard attempts to match fields to the header rows in your file. Make any desired changes, and then click the Next button at the bottom of the page.
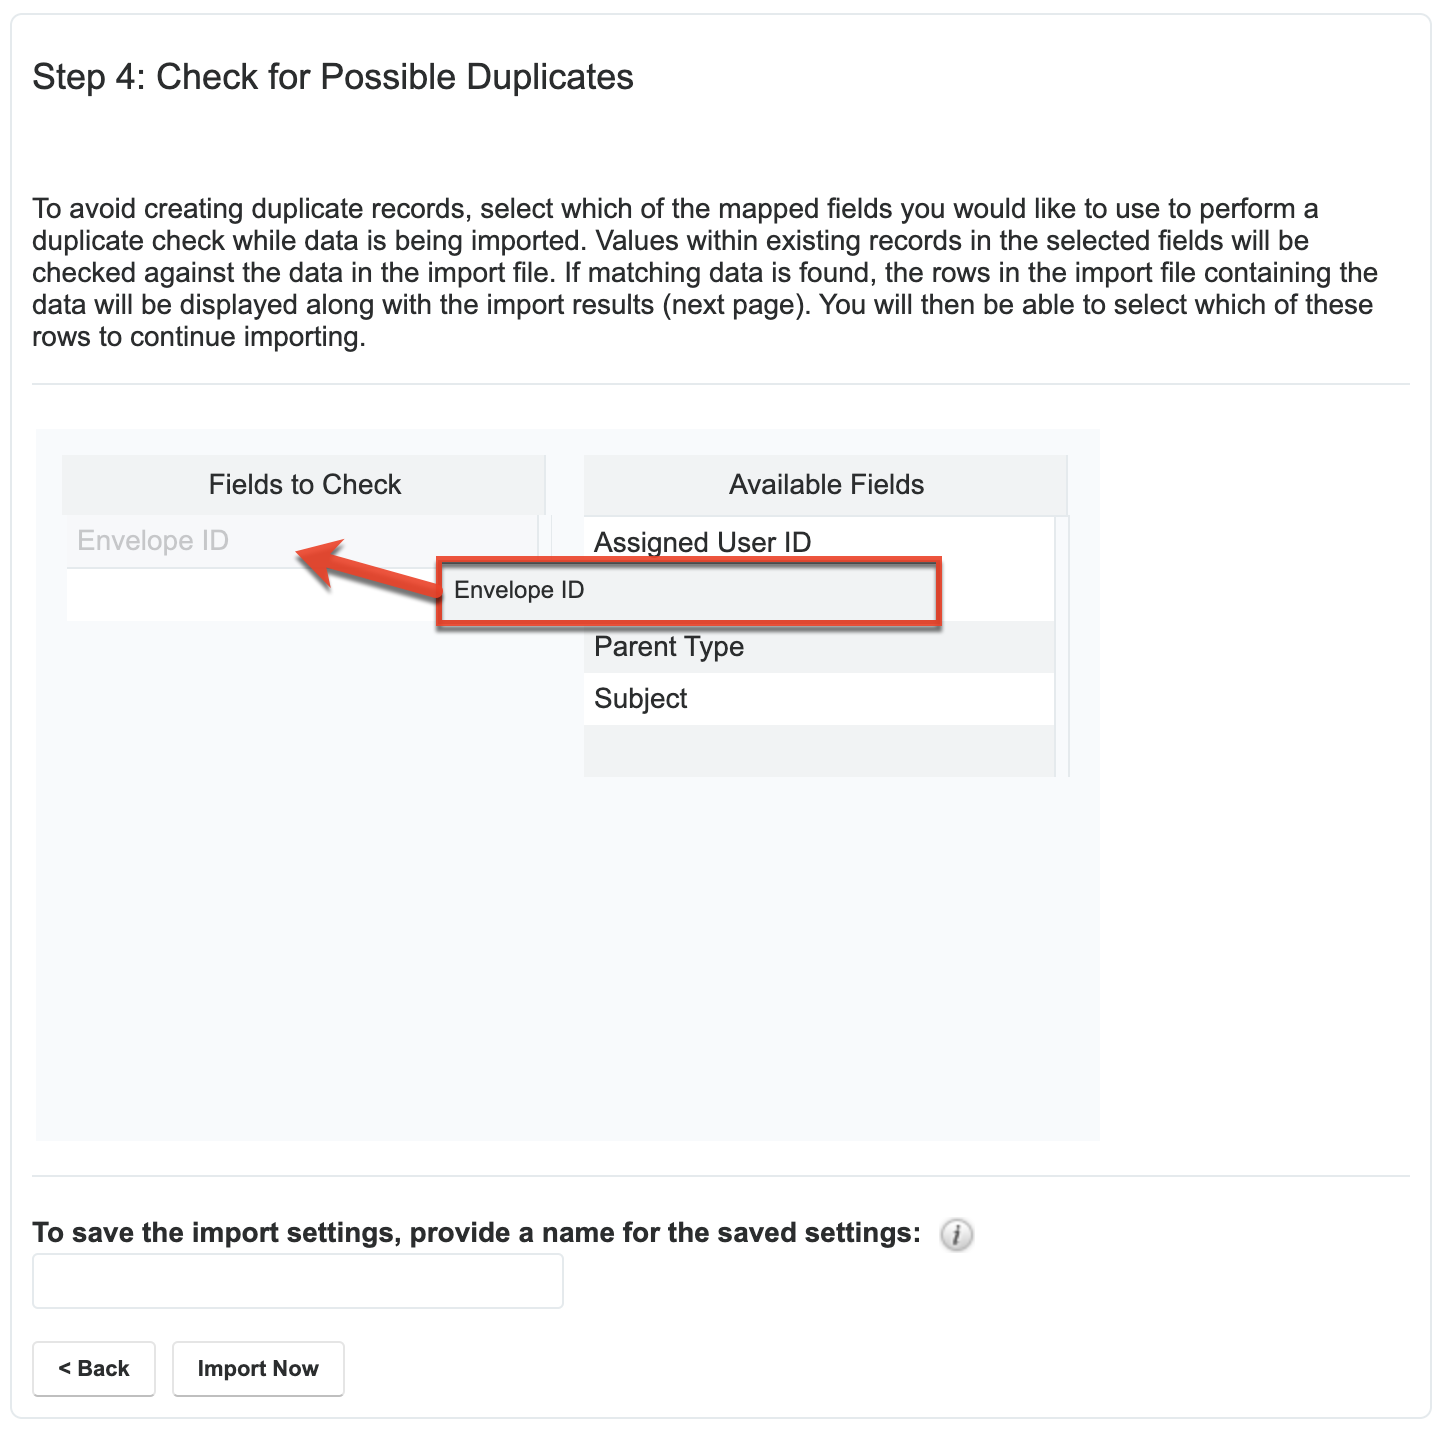
- On Step 4, select the fields to use for duplicate checking by dragging fields from the Available Fields list to the Fields to Check list.
- Click the Import Now button to begin the import.
DocuSign Envelopes Module
The DocuSign Envelopes module was added to Sugar to support the DocuSign feature. The DocuSign Envelopes module is where you can upload DocuSign envelopes in bulk and manage existing DocuSign envelopes. This section provides information specific to the DocuSign Envelopes module. For information on views and actions that are common across all Sugar modules, such as editing and deleting DocuSign envelopes, please refer to the Working with Sugar Modules section of this page.
Note: The DocuSign Envelopes module is hidden by default. If you do not see the DocuSign Envelopes module, please check the Layout Options in the Advanced tab of your user profile or ask your Administrator to unhide the module via Admin > Navigation Bar and Subpanels.
DocuSign Envelope Fields
The DocuSign Envelopes module contains a number of stock fields that come out of the box with Sugar. For information on using and editing various field types, refer to the User Interface documentation. The definitions below are suggested meanings for the fields, but the fields can be leveraged differently to best meet your organization's needs. Administrators or users with developer-level role access have the ability to alter, add, or remove fields via Admin > Studio. For more information on configuring fields, please refer to the Studio documentation in the Administration Guide.
| Field | Description |
| Subject | The envelope name. When sending to DocuSign with a template, the envelope name defaults to the name of the template and you can change it before redirecting to DocuSign. For all other envelopes, the envelope name is left blank for you to name it appropriately before redirecting to DocuSign. |
| Envelope ID | A unique identifier that is automatically generated when the envelope is created. |
| Status | Where the envelope is in the workflow. Values are determined from DocuSign's statuses. Please refer to the DocuSign documentation for a description of status types. When the status changes, the assigned user will receive a notification. |
| Parent | The parent record with which the envelope is associated. This field label updates with the module name when a new DocuSign Envelope record is saved. |
| Last Audit | Date and time of the most recent envelope status retrieved from DocuSign. |
| Teams | The Sugar team(s) that have access to the record. |
| Assigned to | The Sugar user to whom the envelope is assigned. The value in this field defaults to the user who created the envelope. |
| Date Created | The date and time when the envelope was created in Sugar. |
| Date Modified | The date and time when the envelope was last updated in Sugar. |
Working With Sugar Modules
While the DocuSign Envelopes module has some features that only apply to DocuSign envelopes, it also uses the Sidecar user interface that most Sugar modules are based on. The following sections detail menus, views, and actions common to Sidecar modules and contain links to additional information within the page or links to the User Interface documentation.
DocuSign Envelopes Menus
The DocuSign Envelopes module contains various options and functionality that are available via menus in the module tab, list view, and record view. The following sections present each menu and its options with links to more information about each option in the User Interface documentation or, for DocuSign Envelopes-specific functionality, within this page.
Module Tab Menus
Click the DocuSign Envelopes module tab in the navigation bar to access the DocuSign Envelopes list view. You may also click the three-dots menu in the DocuSign Envelopes module tab to display the Actions, Recently Viewed, and Favorites menus. The Actions menu allows you to perform important operations within the module. The Recently Viewed menu displays the list of accounts you most recently viewed. The Favorites menu displays the list of accounts you most recently marked as favorites.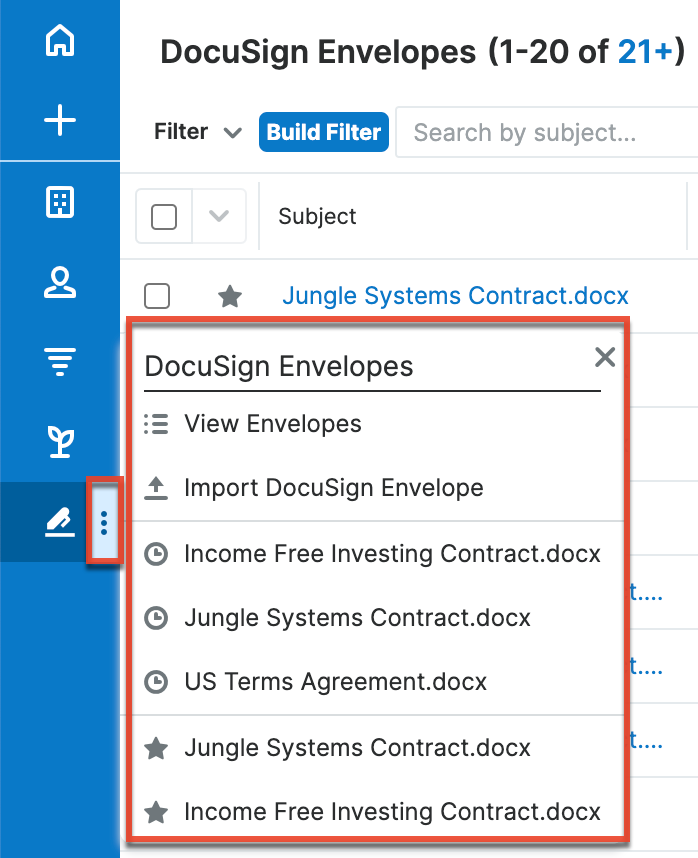
Note: By default, the DocuSign Envelopes module is hidden in Sugar and the system administrator must enable the module via Admin > Navigation Bar and Subpanels. For more information on displaying modules in Sugar, please refer to the Developer Tools documentation in the Administration Guide.
The module tab's Actions menu allows you to perform the following operations:
| Menu Item | Description |
| View Envelopes | Displays the DocuSign Envelopes list view. |
| Import DocuSign Envelope | Opens an import wizard that enables the bulk upload of DocuSign envelopes. |
For more information on module tab menus including reasons a module may not be included in the menu, see the User Interface documentation.
List View Menus
The DocuSign Envelopes list view displays all envelope records and allows for searching and filtering to locate specific envelopes. You can view the basic details of each record within the field columns of the list view or click an envelope's name to open the record view. To access a module's list view, simply click the module's tab in the navigation bar.
List View Mass Actions Menu
The Mass Actions menu to the right of the checkbox option in the list header allows you to perform mass actions on all currently selected records. You can use the checkbox on each record's row to select individual records or click the checkbox in the list header to select all records displayed on the current set of list view results.
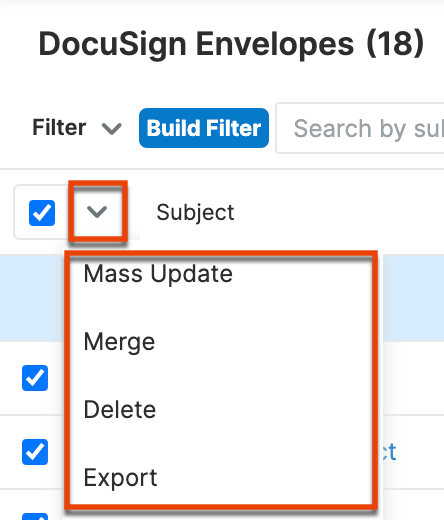
The Mass Actions menu allows you to perform the following operations:
| Menu Item | Description |
| Mass Update | Mass update one or more envelopes at a time. |
| Merge | Merge two or more duplicate envelopes. |
| Delete | Delete one or more envelopes at a time. |
| Export | Export one or more envelopes to a CSV file. |
List View Record Actions Menu
The Record Actions menu to the far right of each record's row allows you to perform actions on the individual record directly from the list view.
The list view's Record Actions menu allows you to perform the following operations:
| Menu Item | Description |
| Preview (Eye icon) | Preview this DocuSign envelope in the intelligence pane. |
| Edit | Edit this DocuSign envelope. |
| Delete | Delete this DocuSign envelope. |
Record View Actions Menu
The DocuSign Envelopes record view displays a single envelope in full detail. To access a DocuSign envelope's record view, click a hyperlinked document name from anywhere within Sugar. The record view's Actions menu appears on the top right of the page and allows you to perform various operations on the current record.
The Actions menu allows you to perform the following operations:
| Menu Item | Description |
| Share | Opens a Sugar email record to compose an email with an embedded link to the DocuSign envelope. |
| Resend | Sends the DocuSign envelope to the recipients identified when the envelope was originally sent. This option is only available for envelopes in "Sent" or "Delivered" status. |
| Fetch envelope | Retrieves the latest envelope status from DocuSign. Note that in most cases, when an envelope's status is updated, Sugar will automatically be updated with the latest status. However, in certain scenarios (e.g., a DocuSign admin has disabled automatic updates for a specific status), you may need to fetch the envelope manually to see any updates. |
| Fetch completed document | Retrieves the completed document and attaches it to the DocuSign envelope record. This action is only available for envelopes in "Completed" status. |
| Find Duplicates | Searches existing DocuSign envelope records for potential duplicates and provides an option to merge any duplicate records found. |
| Copy | Creates a copy of the DocuSign envelope record. |
| View Audit Log | View a sequence of changes made to this record. Activity history is also available in the record's Comment Log field. |
| Delete | Deletes the DocuSign envelope record. |
Common Views and Actions
In the table below, the left column contains links to the User Interface page covering topics that are applicable to all Sidecar modules. The right column has links to sections of the current page that cover topics specific to DocuSign envelopes.
| General Instructions for Working With Sugar Modules | DocuSign Envelopes-Specific Instructions |
| Use the links below to navigate to the User Interface page which covers topics generic to many Sugar modules. | When DocuSign Envelopes-specific help exists for each topic, use the links below to navigate to sections of the current page. |
| Creating Records | |
| Viewing Records | |
| Searching for Records | |
| List View | List View Mass Actions Menu List View Record Actions Menu |
| Record View | Record View Actions Menu |
| Intelligence Pane | |
| Editing Records | |
| Deleting Records | |
| Exporting Records | |
| Recalculating Calculated Values | |
| Finding Duplicate Records | |
| Merging Records | |
| Favoriting Records | |
| Following Records | |
| Sharing Records | |
| Viewing Record Audit Logs |