User Management
Overview
The Users module in SugarIdentity allows system administrators to perform various actions such as creating, editing, and deactivating users in their Sugar instances (e.g., Sugar Sell, Sugar Market). To access the Users list view, simply click the Users module tab in the navigation bar. You can also click the three-dots menu in the Users module tab to access the Actions menu, which allows you to perform important actions such as creating new users and importing a list of users using a .csv file. Please note that you can navigate directly to the Create User page in SugarIdentity by clicking the Create New User option from your SugarCRM instance. For Sugar Market customers using SugarIdentity, you can click the Create button on the users page in your Sugar Market instance. This guide covers the basics of creating and managing your organization's user records in SugarIdentity.
SugarIdentity User Fields
The user records in SugarIdentity contain the contact information for the user and other employment-related settings and key details. The User fields are as follows:
| Field | Description |
| Address City | The user's employment city. |
| Address Country | The user's employment country. |
| Address Postal Code | The user's employment address's postal code. |
| Address State | The user's employment state or region. |
| Address Street | The user's employment street address. |
| Create Date | The date the user record was created. |
| Created By | The Sugar user (e.g., Sugar Sell, Sugar Market) or SSO provider that created the user record. |
| Department | The user's employment department. |
| The user's primary email address. Note: If you use LDAP, the email address should match the mail attribute defined in the LDAP server. |
|
| Enable User Management Role | A checkbox that allows administrators to grant regular, non-admin users access to SugarIdentity to allow them to modify certain user data (e.g., email address) and perform certain actions without giving them full system administrator access. Note: This option is only available to enable if the SugarIdentity user management role option is configured on the Tenant Settings page. |
| First Name | The user's first name. |
| Last Name | The user's last name. |
| License Type |
The user's assigned license, which determines what Sugar products and functionality the user can access. |
| Modified By | The Sugar user or SSO provider that last modified the user record. |
| Modified Date | The date the user record was last modified. |
| Send Email to User |
A checkbox that controls whether the new active user will receive a welcome email to create a password for Sugar login.
|
| Status | The active or inactive state of the user record. |
| Sugar Resource Name | The unique alphanumeric ID associated with the user's record which can be used to troubleshoot any log in issues. |
| SugarCRM URL | The SugarCRM URL associated with the instance you are managing in SugarIdentity. |
| Title | The user's employment title. |
| CRM User Type |
This is the user's SugarCRM user type (i.e., Regular CRM User, CRM System Administrator).
|
| Username (Local Authentication) 1 |
The unique name (e.g., jsmith) that the user will enter to log in to Sugar and that the other users will see when they view fields on records such as "Assigned To" and "Created By". |
| Username (LDAP Authentication) 1 | The username (e.g., john@example.com) associated with the user authenticating the LDAP directory. |
| Username (OIDC Authentication) 1 | The unique alphanumeric ID (e.g., User ID) associated with the user defined in the identity provider (e.g., Okta, Auth0). |
| Username (SAML Authentication) 1 | The Name ID claim (e.g., john@example.com) for the user that is defined in the identity provider (e.g., Okta). |
| Work Phone | The user's phone number. |
1 Depending on whether the user is set up to access Sugar using Local, LDAP, OIDC, or SAML authentication will determine the value that appears in the Login column of the Users list view. For example, if the user is set up for local authentication, the Login column will display "Regular Login". If the user is set up for both local authentication and SAML authentication, then the Login column will display "Regular Login" and "SAML" for the user.
License Limit Options
There may be occasions when there are no seats available for a particular license type (e.g., Sell Premier) or across all license types in your organization when creating or editing users in SugarIdentity. Consider the following available options to purchase or free up seats so that you can assign users to the appropriate license type(s):
- Deactivate any user accounts that are no longer needed.
- If possible, reduce the number of users assigned to the particular license type(s). Simply navigate to the user's record and de-select the specific license (e.g., Sell Premier) in the License Type field to remove the license assignment.
- Purchase additional seats for your organization by contacting your Sugar partner or contacting SugarCRM. Once the license seats have been purchased, you will need to revalidate the license via Admin > License Management in your SugarCRM instance. For more information, refer to the System documentation.
Creating Users
There are different methods for creating users in SugarIdentity, including via the Users module tab's Create User option as well as importing a list of users using a .csv file. You can configure the user's basic and employment-related information in SugarIdentity. Administrators will not be able to set the user's password in SugarIdentity, but can send a password reset email to the user to set their password and access their account.
Please note that you can preview a new user's account to ensure that it is set up correctly by using the Impersonate in SugarCRM option. For more information, refer to the Impersonating Users section below.
Notice: If you wish to configure additional user settings as well as assign teams and roles to the new user, you will need to navigate back to your SugarCRM instance to make the appropriate changes. If SugarIdentity is enabled for Sugar Market, you must assign a role (e.g., Sales Navigation) to the user in Market and configure additional user settings (if necessary).
When using LDAP, SAML, or OIDC, you have the option to allow new users that are added to your directory service or identity provider (e.g., Okta) to be automatically created as new users in Sugar when they log in to Sugar for the first time. For LDAP, SAML, and OIDC, please note that the user must already exist in the LDAP server or identity provider before they can be manually provisioned in SugarIdentity.
For best practices around user creation for SugarIdentity, please refer to the section below.
Best Practices When Creating Users
Before creating users in Sugar, please review the following best practices first depending on your scenario.
Creating Users Without SSO
When creating users in SugarIdentity, if the "Send email to user" or "Send email to imported users" option is enabled, the new user will receive a welcome email that allows them to create their Sugar password and access their account. If you wish to assign teams and roles to the user, it is recommended that this option not be enabled since the user could potentially log in to Sugar before their access has been appropriately restricted.
As a best practice, create the new users with the Send email option disabled, then assign teams and roles to the user from your SugarCRM instance. If SugarIdentity is enabled for Sugar Market, then users must also be assigned to a role (e.g., Sales Navigation) in Sugar Market to be able to access their Market account. Once the user's account has been configured properly, you can send the welcome email to the user again by clicking the "Send Welcome Email" option from the Users list view actions menu.
Creating Users With SSO
When using LDAP, SAML, or OIDC, if the "Auto Create Users" option is enabled, then adding a new user to your directory service or identity provider (e.g., Okta) will automatically create a new user record in Sugar when the LDAP, SAML, or OIDC user logs in to Sugar for the first time. If you wish to assign teams and roles to the user, it is recommended that this option not be enabled since the user can log in to Sugar before their access has been appropriately restricted.
As a best practice, create the new users in SugarIdentity with the "Send email to user" option disabled, then assign teams and roles to the user from your SugarCRM instance.If SugarIdentity is enabled for Sugar Market, then users must also be assigned to a role (e.g., Sales Navigation) in Market to be able to access their Sugar Market account. When creating the user in SugarIdentity, you must complete the Username field for the LDAP, SAML, or OIDC authentication as follows:
- LDAP Username: Enter the user's email address (e.g., john@example.com) defined in your LDAP server.
- SAML Username: Enter the user's email address (e.g., john@example.com) defined in your identity provider.
- OIDC Username: Enter the unique ID (e.g., User ID) associated with the user's account in the identity provider (e.g., Okta, Google).
Once the user's account has been configured properly, the user can then access Sugar. For information on attribute mapping, refer to the LDAP, SAML, and OIDC sections in the External Authentication guide.
Creating Users With SCIM
If you have SCIM enabled and configured, then when a new user is created in the identity provider (e.g., Okta) and assigned to the SCIM application, for example, the user will be automatically created in Sugar in real-time.
As a best practice, if you wish to assign teams and roles to the user, please do so as soon as you assign the user to the SCIM application since the user could potentially log in to Sugar before their access has been appropriately restricted.
Assigning Licenses to Users
Each active user in Sugar must be assigned a license type (e.g., Sell Advanced) to access their Sugar account. For Sugar Market users, the user must be assigned to the Sugar Market license type to access their Market account. The table below summarizes where you can assign licenses to users depending on where the License Type field is located.
Note: If your on-site SugarCRM instance is SugarIdentity-enabled and you wish to manage your users' licenses in SugarIdentity instead of Sugar, you can activate license management via the Enable License Management option on the home page.
| Location of License Type Field | Where to Assign Licenses | License Type Field |
| SugarIdentity 1 |
If the License Type field appears in the following views, you can assign licenses to users in SugarIdentity: |
|
| SugarCRM instance 1 |
If the License Type field does not appear in SugarIdentity, then you must navigate to your SugarCRM instance to manage the users' licenses in Admin > User Management. |
 |
1 License assignment works differently when creating users via import and single sign-on (SSO).
To learn more about license assignment for the different use cases, click on a section link below:
- License Assignment via User Record
- License Assignment via Import
- License Assignment via Mass Update
- License Assignment for Users Created via SSO
License Assignment via User Record
When creating or editing users via the Users module, licenses are assigned to users in SugarIdentity unless the License Type field is located in your SugarCRM instance. For more information on assigning user licenses, refer to the section below that best applies to your scenario.
If You Do Not See a License Type Field on the Create and Edit User Screens
To manage the user's license, you will need to navigate back to your SugarCRM instance and update the License Type field in Admin > User Management. For more information on editing a user record in Sugar, refer to the User Management documentation.
If You See a License Type Field on the Create and Edit User Screens
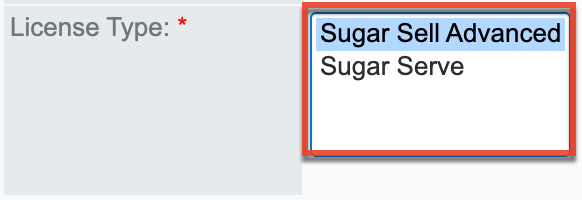
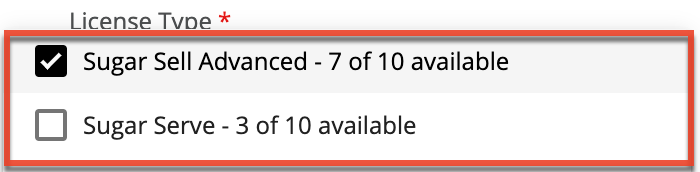
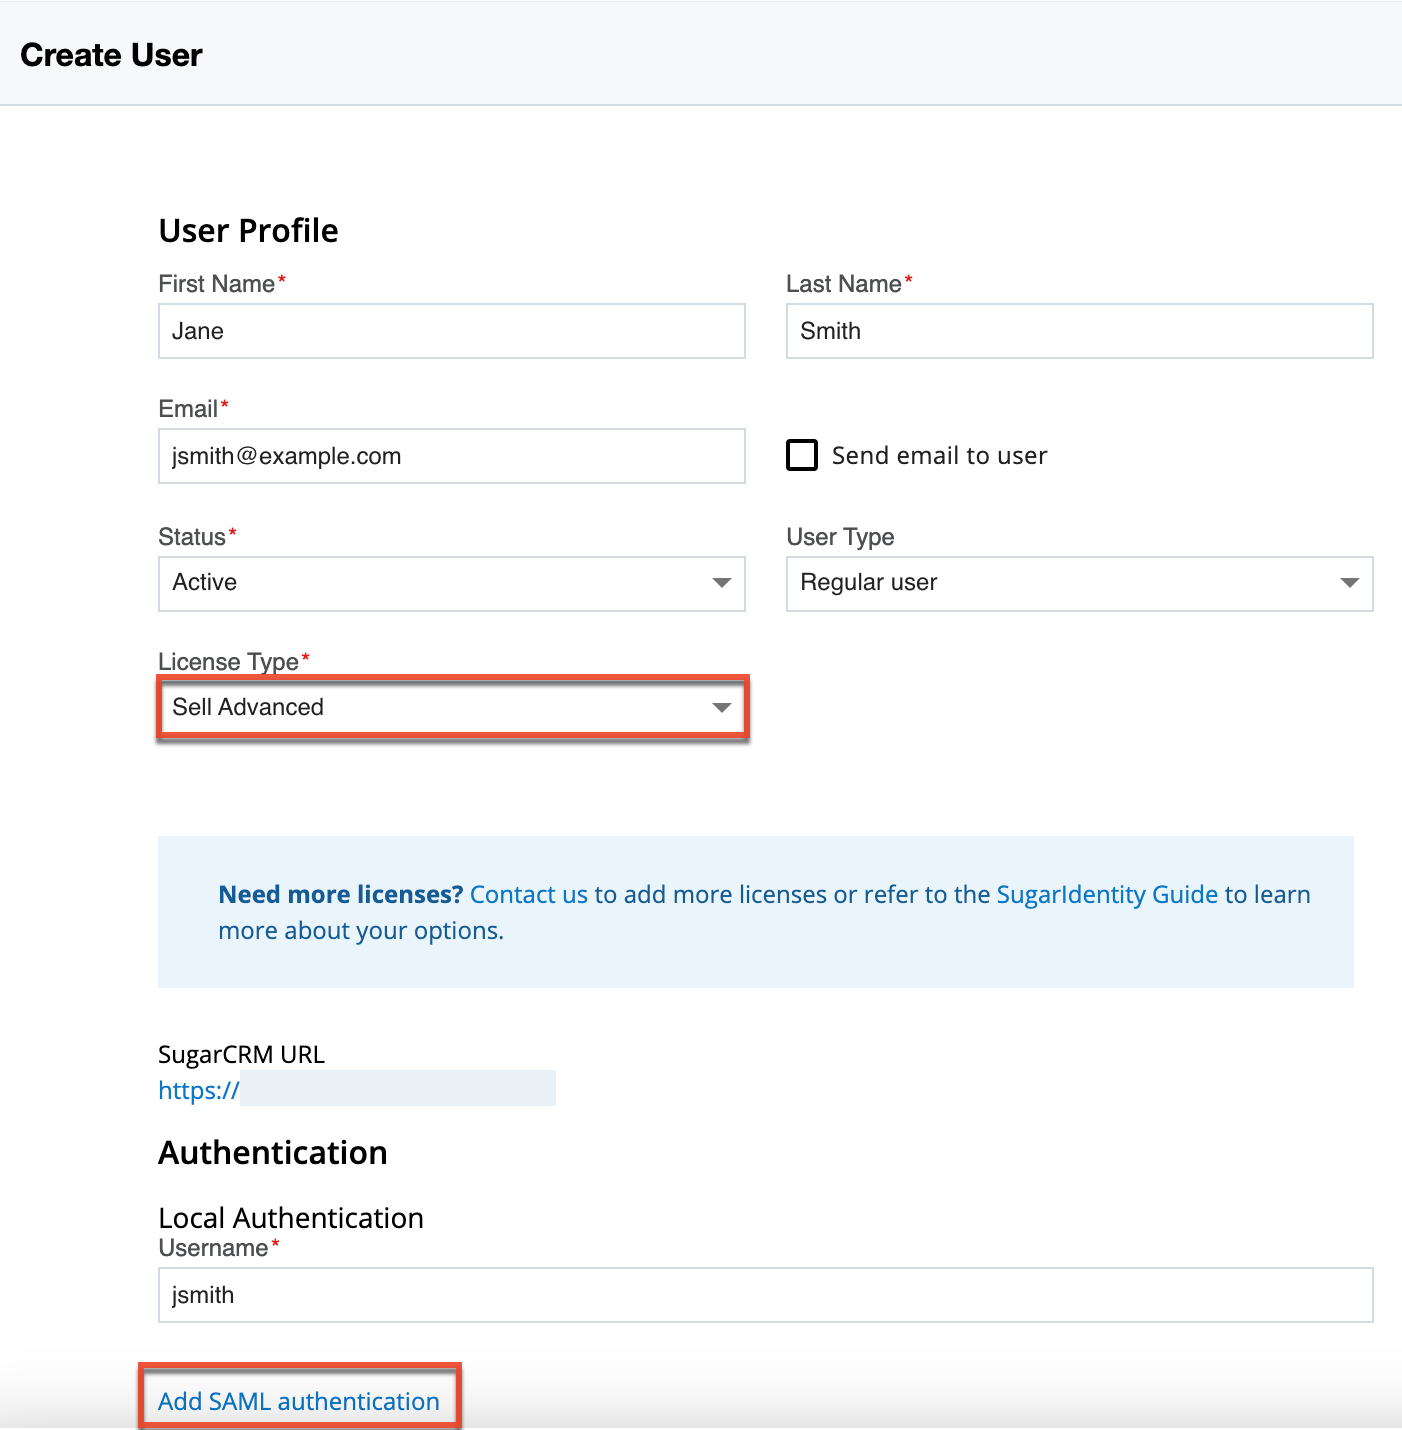
You can select the license(s) (e.g., Sugar Serve, Sell Advanced) you wish to assign in the License Type field when creating or editing the user record in SugarIdentity. Please be aware of the following guidelines when creating/editing users:
- Each Sugar license listed in the License Type dropdown field will display the number of available seats and total number of purchased seats (e.g., 20 of 50 available) in parentheses. This does not pertain to the Sugar Market license type.
- If you are activating a user already assigned to a license, ensure that the selected license(s) has an available seat to avoid potential errors.
- If the Sugar license (e.g., Sell Advanced) you wish to assign to the user no longer has available seats, please select another license (e.g., Sugar Serve) or refer to the License Limit Options section of this page to learn more about your other options.
- If your organization has purchased Sugar Automate (i.e., Smart Guides) for Sell Advanced, then the license (i.e., Automate) will appear in the License Type field. The Automate license must be assigned in conjunction with a CRM solution license (e.g., Sell Advanced).
Note: The Smart Guides capability is already included with the Sugar Sell Premier license and does not need to be assigned to users with this license type. - If your organization has purchased the Intelligence add-on, then the Sugar Intelligence license will appear in the License Type field. The Sugar Intelligence license must be assigned with a CRM solution license (e.g., Sell Advanced).
License Assignment via Import
License assignment for newly imported users will vary depending on whether the License Type field lives in SugarIdentity or in your SugarCRM instance. In both scenarios, the license types cannot be defined in the import file template, but you can manage the users' licenses directly in SugarIdentity or in your SugarCRM instance after the import. For more information on license assignment when importing new users, refer to the section below that best applies to your scenario.
If the License Type Field is Managed in Your SugarCRM Instance
If you wish to manage a user's assigned licenses after import, you can navigate back to your SugarCRM instance and update the License Type field in the user's record or via mass update in Admin > User Management.
If the License Type Field is Managed in SugarIdentity
During the import process, the system will automatically assign a Sugar license type to each user if your organization only has a single Sugar license (e.g., Sugar Serve). However, if your organization has purchased multiple CRM solution licenses (e.g., Sell Advanced, Sugar Serve), all users will be created with an Inactive status and not assigned to a license type. This allows administrators to assign the appropriate license type(s) to users before activating their account to ensure that they access proper functionality in Sugar.
Note: The "Send email to imported users" option, which sends a welcome email to users, is not available in the import wizard if your organization has multiple CRM solution licenses since all users are created inactive. If this option is enabled in a single-license scenario, then the welcome email will only be sent to users imported with an Active status.
The table below summarizes the expected behavior when importing users in a single vs multi-license scenario and the next steps to take for any users created as inactive.
| # of License Types | License Limit Not Reached | License Limit Reached | Next Steps |
| Single license | Users created as "Active" with Sugar license assigned. | Users created as "Inactive" with Sugar license assigned. | For any users created as inactive, purchase additional seats or refer to the options covered in the License Limit Options section of this page, then activate their account once seats are available. |
| Multiple licenses | Users created as "Inactive" with no license assigned. | Users created as "Inactive" with no license assigned. | Assign a license type(s) to the new users via their user record or mass update, and set their status to "Active". |
License Assignment via Mass Update
You can update the users' license type when performing a mass update action in SugarIdentity unless the License Type field is located in your SugarCRM instance. For more information on updating the License Type field via mass update, refer to the section below that best applies to your scenario.
If You Do Not See a License Type Field in the Mass Update Panel
To mass update the users' licenses, you will need to navigate back to your SugarCRM instance and update the License Type field in Admin > User Management. For more information on mass updating user records in Sugar, refer to the User Management documentation.
If You See a License Type field in the Mass Update Panel
You can select the desired license(s) (e.g., Sugar Serve, Sell Advanced) in the License Type field on the mass update panel to update the selected list of users in the Users list view. For more information on mass updating user records, refer to the Mass Editing via List View section of this page. Please be aware of the following when mass updating users' licenses:
- When mass updating the License Type field, the Append license type(s) option is enabled by default to prevent loss of data by adding the new license values to any existing data in the field.
- If your organization has purchased Sugar Automate (i.e., Smart Guides) for Sell Advanced, then you can choose to append the license type to users already assigned to the Sell Advanced license. Please note that the Smart Guides capability is already included with the Sugar Sell Premier license and does not need to be assigned to users with this license type.
- Before triggering the mass update action, make sure there are enough seats available to assign to your desired list of users, as exceeding the license limit for any of the selected licenses will cause the mass update operation to fail.
- You can perform a mass update operation to activate and assign licenses to users that were created as inactive during the user creation or import process. If you do not have enough license seats available, refer to the License Limit Options section of this page to learn more about your options.
License Assignment for Users Created via SSO
If your organization uses LDAP, SAML, or OIDC and falls into one of the two categories below, the license assignment behavior in Sugar may vary for users created in the identity provider (e.g., Okta) and assigned to the SugarCRM app (not applicable when using Auth0) or SCIM application.
- Your organization uses LDAP, SAML, or OIDC and the "Auto Create Users" option is enabled.
- Your organization has configured SCIM for the Identity Provider (e.g., OneLogin).
For more information on how license is assigned to new users in Sugar, refer to the section below that best applies to your scenario.
If the License Type Field is Managed in Your SugarCRM Instance
When users are automatically created using LDAP, SAML, or OIDC with the Auto Create Users option enabled or when using SCIM, you will need to navigate to Admin > User Management in your SugarCRM instance to manage the users' assigned license. You can update the user's License Type field, as necessary, in the user's record or via mass update to ensure that the user accesses proper functionality in Sugar.
If the License Type Field is Managed in SugarIdentity
The flowchart below summarizes the expected behavior around license assignment when users are created using LDAP, SAML, or OIDC with the Auto Create Users option enabled or when using SCIM. In both use cases, there may be occasions where the user is created as "Inactive" with no license assigned.
Note: If your organization has multiple licenses (e.g., Sell Advanced, Sugar Serve), the system will not auto-assign a license to the user so that administrators can assign the appropriate licenses to ensure that the user accesses proper functionality in Sugar. 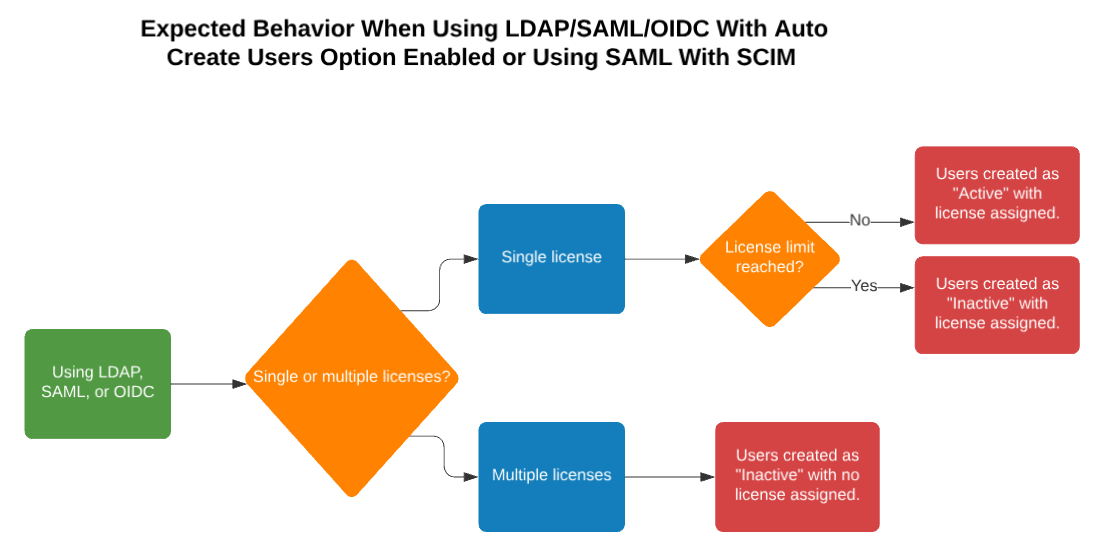
For any users created as "Inactive", refer to one of the action items below for information on how to activate the user's account:
- If your organization has a single license type: You will need to purchase additional seats or look at other options covered in the License Limit Options section of this page. Change the user's status to "Active" once the license seats are available.
- If your organization has multiple license types: You must assign a license type(s) to the new user via their user record or the mass update option, and set their status to "Active". For Sugar Market users that are automatically created via SSO, the admin must also assign the user to a role in Sugar Market for them to access their Market account.
- If there are no seats available for a particular license type, you will need to purchase additional seats for the license or look at other options covered in the License Limit Options section of this page.
Basic User Creation
A common method of user creation is via the Create User option, which can be accessed via the Users module tab or the home page in SugarIdentity. You can also create users via Quick Create. Clicking the Create New User option in your SugarCRM instance will also navigate you directly to the Create User page in SugarIdentity, where you can enter the necessary information to create the new user.
If SugarIdentity is enabled for Sugar Market, you can click the Create button on the Users list view in Market to open the Create User page in SugarIdentity.
The following steps cover creating a new user via the Create User option:
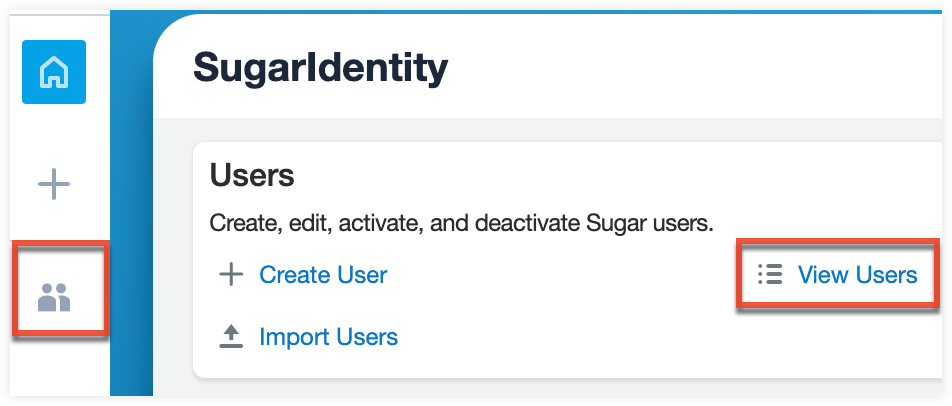
- Log in to SugarCRM and navigate to Admin > SugarIdentity.
- For Sugar versions 13.0 and lower, navigate to Admin > SugarCloud Settings.
- Click "Create User" from the home page in SugarIdentity.
Note: You can also create users via Quick Create or click the three-dots menu in the Users module tab and select "Create User".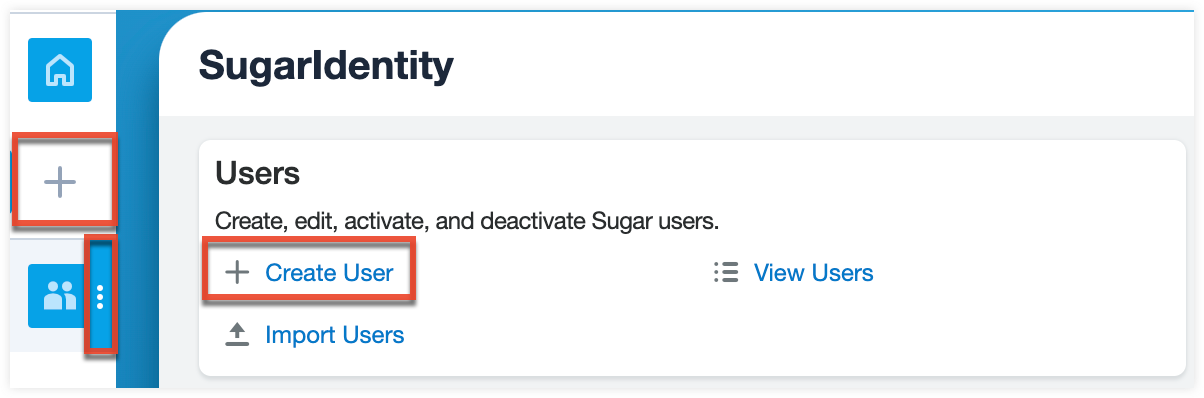
- Enter appropriate values for the fields in the record view layout. All required fields are marked with a red asterisk and must be completed prior to saving.
- License Type: If the License Type field appears on the Create User screen, be sure to assign a license(s) (e.g., Sugar Serve, Sugar Market (if applicable)) to the user. For more information on assigning licenses, refer to the License Assignment via User Record section of this page.
- If the License Type field does not appear on the Create User screen, you will need to navigate back to your SugarCRM instance to manage the users' license(s) in Admin > User Management.
- If your on-site SugarCRM instance is SugarIdentity-enabled and you wish to manage your users' licenses in SugarIdentity, you can activate license management via the Enable License Management option on the home page.
- Send email to user: If the "Send email to user" option is enabled, a welcome email will be sent to the user's primary email address asking them to create a Sugar password that conforms with your configured password requirements. Do not enable this option if you wish to assign teams and roles to the user first before they can access their Sugar account. For more information, refer to the Best Practices When Creating Users section of this page.
- Enable User Management Role: System administrators can grant regular CRM users access to SugarIdentity by assigning them to the User Management role. Users assigned to this role will be able to modify certain user data (e.g., email address) and perform certain actions in SugarIdentity without being granted full system administrator access. Once enabled, the user will be automatically added to the SugarIdentity User Management role in SugarCRM, and the SugarIdentity link will appear on SugarCRM's Administration page. The user must log out and back in to see the changes in their SugarCRM account.
- You must first enable the SugarIdentity User Management Role setting on the Tenant Settings page to be able to configure this option for non-admin users.
- Sugar Market users must be assigned a CRM license (e.g., Sell Advanced) to assign the user to the User Management Role option.
- License Type: If the License Type field appears on the Create User screen, be sure to assign a license(s) (e.g., Sugar Serve, Sugar Market (if applicable)) to the user. For more information on assigning licenses, refer to the License Assignment via User Record section of this page.

-
- Add LDAP/SAML/OIDC authentication: If you use LDAP, SAML, or OIDC, you will need to click the "Add LDAP authentication", "Add SAML authentication", or "Add OIDC authentication" link. Do not enable the "Send email to user" checkbox if you are only creating a new user for LDAP, SAML, or OIDC authentication without local authentication.
- For LDAP and SAML: Enter the username (e.g., john@example.com) defined in your LDAP server or identity provider. The Email field should contain the mail attribute defined in the LDAP server or identity provider.
- For OIDC: Enter the unique alphanumeric ID (e.g., User ID) associated with the user's account in the identity provider (e.g., Okta, Google).
- Add LDAP/SAML/OIDC authentication: If you use LDAP, SAML, or OIDC, you will need to click the "Add LDAP authentication", "Add SAML authentication", or "Add OIDC authentication" link. Do not enable the "Send email to user" checkbox if you are only creating a new user for LDAP, SAML, or OIDC authentication without local authentication.
- Click "Save".
Creating via Quick Create
The Quick Create button in the navigation bar allows you to easily create new user records from anywhere in SugarIdentity. When you click the Quick Create button, the Create User form will open for you to enter appropriate values in the user fields. All required fields will be marked with a red asterisk and must be completed prior to saving. Once the necessary information is entered, click "Save".
Note: Users assigned to the User Management role will only be able to create regular users in Sugar as the CRM User Type field cannot be modified.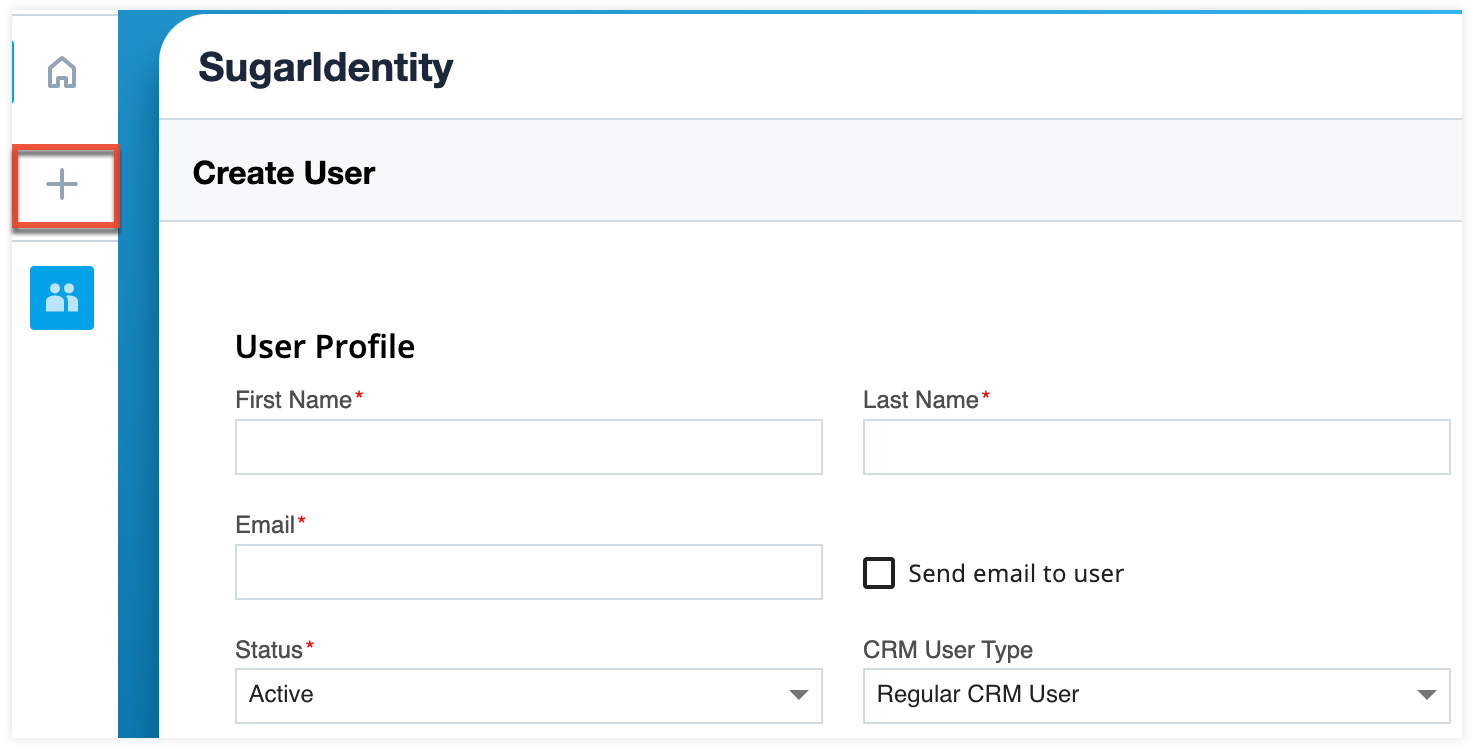
Creating via Import
The import function allows you to import and create multiple user records in SugarIdentity by using a .csv file instead of creating them one-by-one. You can also update existing user records via the Import Users option in your SugarCRM instance.
The following steps cover importing a list of new users via the Import Users option:
- Log in to SugarCRM and navigate to Admin > SugarIdentity.
Note: For Sugar versions 13.0 and lower, navigate to Admin > SugarCloud Settings. - Click "Import Users" from the home page in SugarIdentity.
Note: The "Import Users" option is also available in the Users module tab's three-dots menu.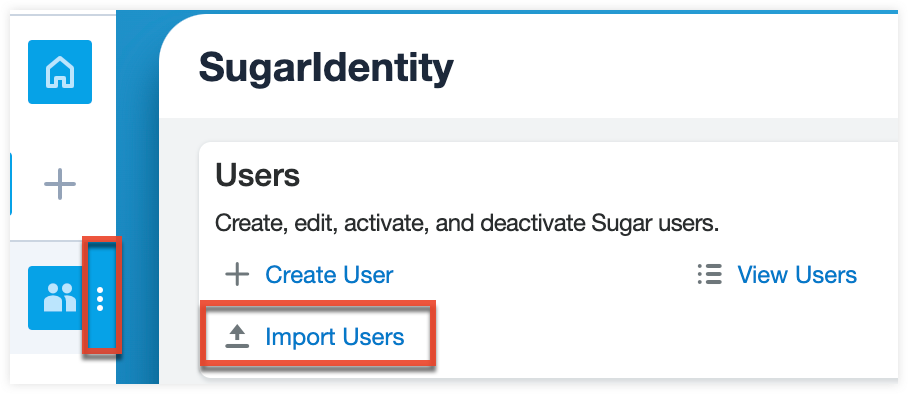
- Click the "download" link on Step 1 to download the import file template. Then enter your data into the appropriate columns adhering to the following guidelines:
- The First Name, Last Name, Email, Status, and Username fields are required for import.
- You cannot define the users' license type in the import file. For more information on license assignment for users created via import, refer to the License Assignment via User Import section of this page.
- If you use LDAP, SAML, or OIDC, be sure to include the user's LDAP, SAML, or OIDC username in the import file.
- If you are migrating data from another CRM system and wish to map the users to specific user IDs, please enter the appropriate value in the ID column.
- If you already have a .csv file containing the data to import, make sure to manipulate the file to meet the format of the import template to ensure that the import goes through properly.
- Once your import file is ready to upload, click the Select File button, select the import file, then click "Next".
Note: If the "Send email to imported users" option appears on the screen, enabling this option will send a Welcome email to the user's primary email address asking them to create a Sugar password that conforms with your configured password requirements. Do not enable this option if you wish to assign teams and roles to the users first before they can access their Sugar account. For more information, refer to the Best Practices When Creating Users section of this page. - In Step 2, confirm the import file properties, then click "Import".
If there are any errors detected during the import, the Import results page will display the records that failed to import. For any users that are created as inactive due to license limitations, there are steps you can take to activate their account.
Note: To update additional fields (e.g., Reports to, Default Teams) that are only available to manage in your SugarCRM instance, you can import updates to the newly imported user records by navigating to your SugarCRM instance. For more information on importing updates to existing user records, refer to the User Management documentation in the Administration Guide.
Auto-Creating Users for LDAP, SAML, or OIDC
If you use LDAP, SAML, or OIDC, you can have users that are added to your directory service or identity provider automatically created as new users in Sugar by enabling the "Auto Create Users" option in SugarIdentity. Do not enable this option if you wish to assign teams and roles to the user first before they can access their Sugar account. For Sugar Market customers using SugarIdentity, you must assign new users to a role (e.g., Sales Navigation) in Sugar Market before they can access their Market account.
For more information, refer to the Best Practices When Creating Users section of this page.
Note: The new user will count against the number of licensed user accounts for your instance. SugarCloud customers can monitor the number of active users counting against their license via the SugarCloud Insights page.
- To enable auto-create for an instance that is configured with LDAP, navigate to the home page and click "LDAP Settings". Enable the "Auto Create Users" option, which is located in the lower portion of the form, and then click "Save".
- To enable auto-create for an instance that is configured with SAML, navigate to the home page and click "SAML Settings". Enable the "Auto Create Users" option, which is located about halfway down the form, and then click "Save".
- To enable auto-create for an instance that is configured with OIDC, navigate to the home page and click "OIDC Settings". Enable the "Auto Create Users" option, which is located about halfway down the form, and then click "Save".
If you have configured SCIM for the identity provider (e.g., OneLogin), then please disregard this option since SCIM allows new users to be automatically created in Sugar regardless of this setting.
Once the "Auto Create Users" option is enabled, a new user record will be automatically created when the LDAP, SAML, or OIDC user logs in to Sugar for the first time. For more information on license assignment for new users, refer to the License Assignment for Users Created via SSO section of this page.
Please note that the mapped LDAP attributes will sync to SugarIdentity by default including the user's LDAP username. To have SAML attributes map to the SugarIdentity user fields, you will need to set up the attribute mapping in the identity provider (e.g., Okta). For more information on setting up the attribute mapping, refer to the Configuring SAML Attribute Mapping for SugarIdentity article.
Creating Users With SCIM
If you have enabled/configured SCIM, then when users are created in the identity provider (e.g., Okta) and assigned to the SCIM application, for example, they will be automatically created in Sugar in real-time. As a best practice, if you wish to assign teams and roles to the user, please do so as soon as you assign the user to the SCIM application since the user could potentially log in to Sugar before their access has been appropriately restricted.
If your organization has purchased multiple CRM solution licenses (e.g., Sell Advanced, Sugar Serve), please check the user's record as soon as it has been created to ensure they are assigned to the appropriate license to access their account. For more information on license assignment when using SCIM, refer to the License Assignment for Users Created via SSO section of this page.
Viewing Users
The Users list view displays all user records in Sugar as well as some key user fields such as Name, Username, Email, etc. To access the list view, simply click the Users module tab or click "View Users" from the home page. To view the user's basic contact information and other employment-related information, click the user's name (e.g., Max Jensen) in the list view. If you wish to view other stock and/or custom user fields that do not appear in SugarIdentity, you will need to navigate back to your Sugar instance.
The Login column in the Users list view will display "Regular Login", "LDAP", "OIDC", or "SAML" depending on the type of authentication (e.g., Local Authentication, SAML Authentication) configured in the user's record. For example, if the user is set up for local authentication, the Login column will display "Regular Login", and the user will access their account using Sugar credentials. If the user is set up for both local authentication and SAML authentication, then the Login column will display "Regular Login" and "SAML" for the user.
If the License Type field is managed in SugarIdentity, then the License Type column will appear in the list view and display the users' assigned license types (e.g., Sugar Serve).
Please note that you can also sort the Users list view by a field column in either ascending or descending order by clicking the appropriate column header (e.g., Department) in the list view.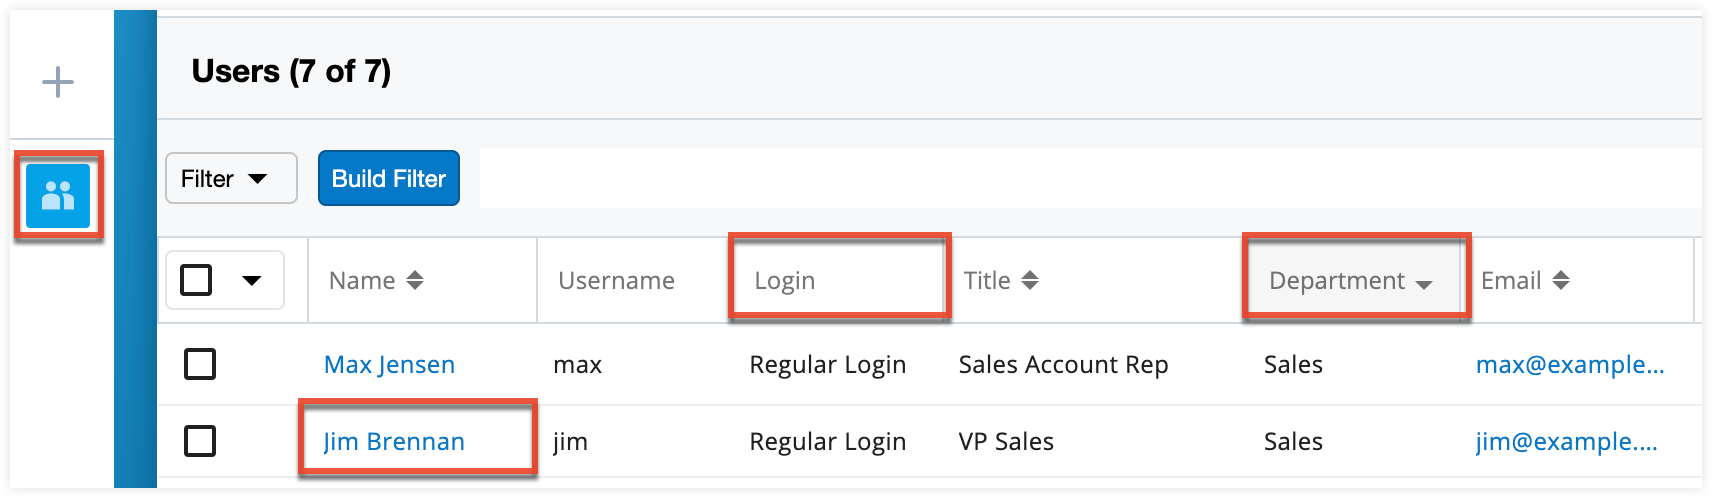
Impersonating Users
Administrators have the ability to log in as regular or other system administrator users in their organization using the Impersonate in SugarCRM option in SugarIdentity. When impersonating a user in Sugar, the administrator will be able to access and view the same modules and settings as the user's actual account without having to obtain their login credentials.
Users assigned to the User Management role cannot impersonate other users in Sugar.
Some common use cases for impersonating a user in Sugar are:
- Reproducing or troubleshooting a user-reported issue directly from the user's account.
- Previewing a new user's account to ensure that it is set up correctly before the user first logs in to Sugar.
- Previewing a user's account after assigning new teams and roles to ensure that the proper permissions and restrictions are in place.
- Creating and/or configuring dashboards for users directly in their account.
- Performing any necessary tests or validating user interface changes in the user's account.
To impersonate a user, navigate to the Users list view in SugarIdentity, and click the actions menu to the far right of the desired user's row, then select "Impersonate in SugarCRM". This will initiate the impersonation session, and the selected user's account will automatically open in a new browser tab. A purple banner will display above the navigation bar on every screen during the impersonation session, with text similar to the following: "Administrator, you are currently impersonating Chris Olliver". The user will be able to utilize their Sugar account concurrently while you are impersonating as them.
Note: Please keep in mind the guidelines in the section below when impersonating users in Sugar.
If you have Sugar open in another browser tab when you initiate the impersonation session, and the impersonated user does not have access to the page (e.g., Administration page) in that tab, you will see an Access Denied warning message appear on the screen. Simply refresh the page and the impersonation session will load in the tab.
The impersonation session will remain active until Sugar's access token expires. Once you have performed the necessary actions in the user's account, be sure to click the Finish Impersonating option to end the session and avoid any unexpected behaviors in Sugar. The Finish Impersonating option can be found in the following locations during the impersonation session:
- In the purple impersonation banner:

- In the user menu:
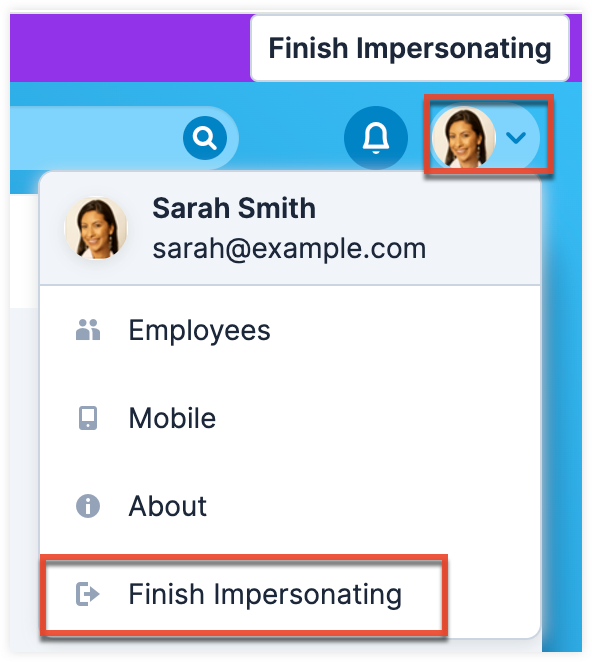
Once you click the Finish Impersonating option, you will be logged out of the impersonation session. Please note that if you have other Sugar tabs open in the browser, you can refresh the page and your Sugar admin account will reload in those tabs. You can also navigate back to your Sugar account by entering your instance URL in a new browser tab.
Impersonation Rules
When impersonating a user in Sugar, please keep in mind the following guidelines:
- User impersonation is supported for Sugar versions 13.0.0 and higher.
- You can only impersonate users in SugarCRM that are assigned a CRM license (e.g., Sugar Serve).
- The impersonation feature is not available in Sugar Market.
- You can only impersonate one user at-a-time.
- You can impersonate users with an active or inactive status.
- Users assigned to the User Management role cannot impersonate other users in their organization.
- You can continue accessing SugarIdentity during the impersonation session.
- If you happen to click the Impersonate option for another user while already impersonating a user, this will end the current impersonation session and start a new session for the selected user.
- Any changes made to audited fields in the user's account will be captured in the audit log as being made by the administrator on the user's behalf.
Note: If the administrator makes any changes to a record's personal information fields (e.g., email address, phone), the Personal Info screen will capture the change as being made by the administrator on the user's behalf. - Each impersonation session that an admin user initiates will get logged in the system with the following info: Start date/time, admin user's SRN (user ID), and impersonated user's SRN. Please note that this information is only accessible by Sugar Support.
Resending Welcome Email
After a user account has been created and configured properly (e.g., assigned to teams and roles), the administrator can resend the welcome email to the user to let them know it is ready to access. To send the welcome email to a user, navigate to the Users list view in SugarIdentity, and click the actions menu to the far right of the desired user's row, then select "Send Welcome Email".
The welcome email will be sent to the user's primary email address and provide key account details such as:
- Username: The user's username to log in to their SugarCRM/Sugar Market account.
- SugarCRM URL: This URL info appears if the user is assigned a CRM license (e.g., Sell Premier).
- Sugar Market URL: This URL info appears if the user is assigned a Sugar Market license.
- License types: The user's assigned license(s) (e.g., Sell Premier, Sugar Market).
There will also be a link in the email for the user to set their password and access their account. Please note that the link will expire 6 hours after the user receives the email.

Searching Users
You can perform a search in the Users list view to pull up relevant records that you wish to view. Simply enter a keyword (e.g., john) in the Search box and as you begin typing, the search will immediately start returning results for records matching the search term. As you make changes to the text entered in the search box, the search results will update dynamically to display additional and/or new matching records. All records matching the search term will display in the list view below the Search bar. The following fields are included in the Users list view search:
- Name (Full Name)
- First Name
- Last Name
- Username
- Title
- Department
- Phone
Please note that you can also use the Filter option to the left of the search box to narrow your search further using pre-defined filters (e.g., Active Users) or creating a custom filter to pull up records matching your search term. 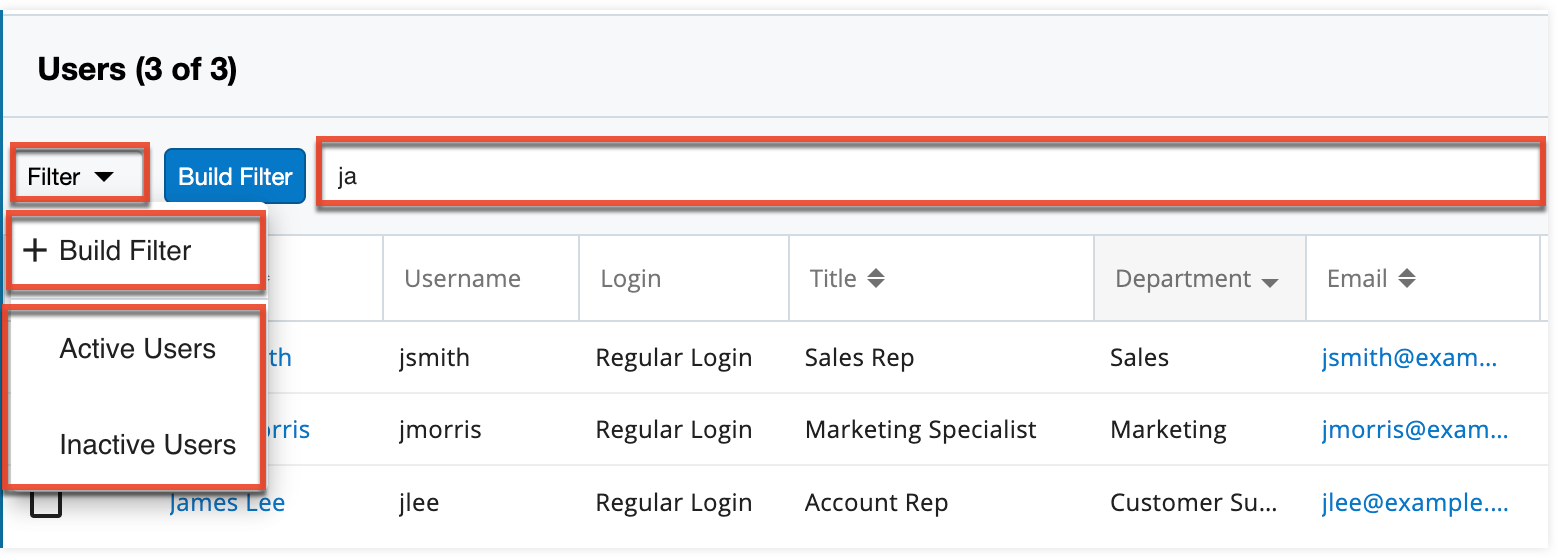
The search in SugarIdentity uses the "starts-with" search. So, for example, performing a search for "john" will pull up "John Smith" and "Sue Johnson" as the user's first and/or last name begins with "john". You can also perform a partial search by entering a part of the keyword in the search box. So, entering "jac" will pull up "Jacob Rivers", "Robert Jackson", and "Jackson Westin" in the search results. If you update the search term to be "ja", then the search results will also include "Janet Rose" and "Tim Jansen", as well as Jim Albertson with username "jalbertson".
Creating a Filter
You can also create new filters via the Build Filter option in the Users search bar to narrow your search further using custom filter options in the Users list view. Filters may contain one or more fields and operators (e.g., is any of, is, starts with) along with their desired values. All of a filter's criteria must evaluate as true for a record to appear in the Users list view search results. When you run a search using a filter (e.g., saved, ad-hoc), the search will be preserved when you navigate away from the Users module. When you later return to the Users list view, the results of your last filter will automatically display.
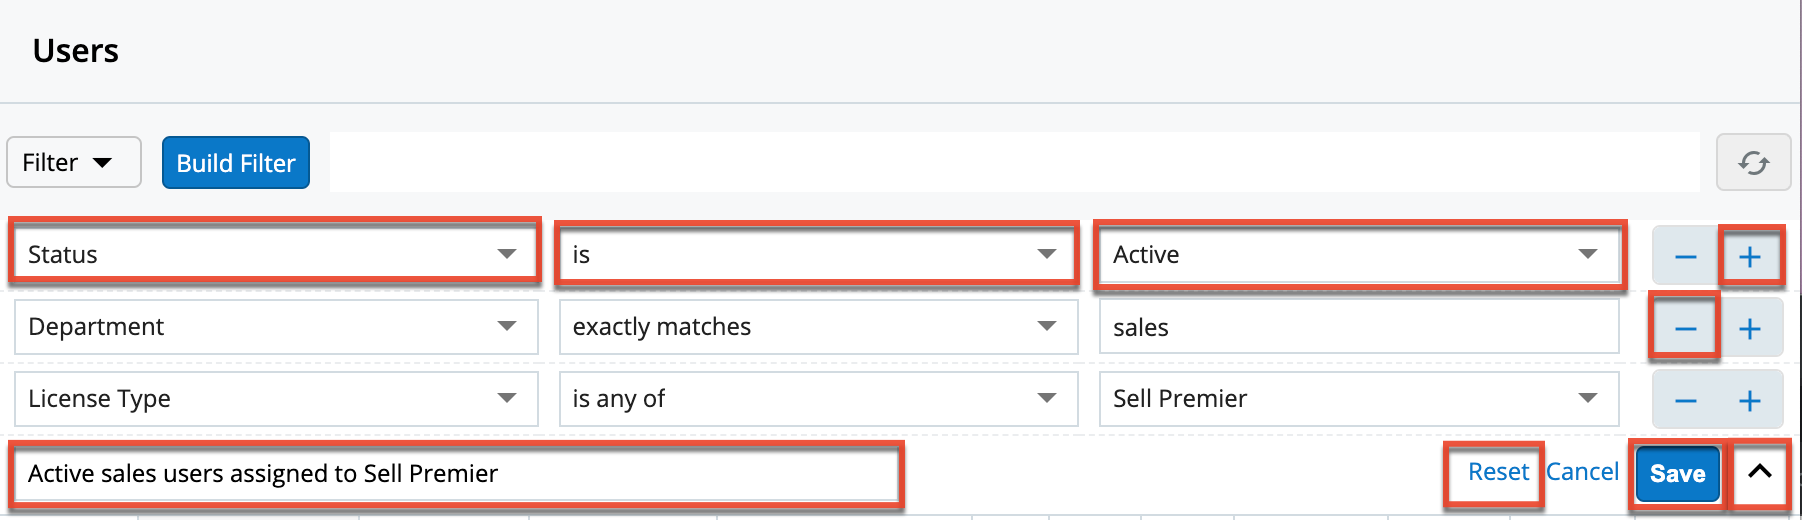
The following steps cover building a filter for active users in the Sales department assigned to the Sell Premier license as an example:
- Click "Build Filter" to the right of the Filter option.
Note: You can also click the Filter option on the Users search bar, then select "Build Filter" in the menu.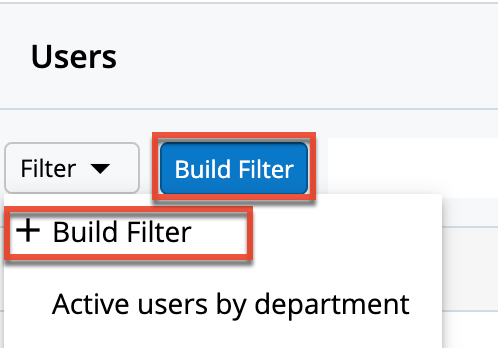
- Select "Status" as the filter field and then select "Active" as the filter value. Click the Add button (+) to the right of the filter to add additional fields.
Note: The "is" operator is automatically selected as it is the only available option for the Status filter field. - Select "Department" as the secondary filter field and select the "exactly matches" operator, then enter "sales" as the filter value. Click the Add button (+).
- Select "License Type" as the filter field and select the "is any of" operator, then select the desired license type (e.g., Sell Premier).
- Lastly, enter a descriptive title (e.g., Active sales users assigned to Sell Premier) for your filter in the "Enter new filter name..." field.
- Click "Save" to add this filter to the Users module's Filter option.
If you wish to view the filter details, simply click the filter's name (e.g., Active sales users assigned to Sell Premier) on the Users search bar and the filter details panel will open. If you wish to hide the filter details panel to allow more list results to be visible, click the up arrow to the right of the Save button.
Please note that filters may also be created and saved as templates with empty filter values to be completed at the time the filter is run. This is useful for any searches that need to be performed often against the same fields (e.g., Department) but with varying values each time you utilize the filter. When re-using the filter, simply enter the appropriate filter value(s) (e.g., Marketing), and the Users list view will display the matching results. Once you are done with the filter, you can either remove the specific filter value or click "Reset" to the far right of the filter's name to clear all filter values.
Custom filters can also be edited as necessary by selecting the specific filter from the Filter list and updating the appropriate fields, conditions, and values via the filter details panel. If you wish to remove any filter fields (e.g., Department), simply click the Minus button in the specific filter field's row. Once the necessary updates have been made, click "Save" to preserve your changes.
If you wish to delete any custom filters, simply select the desired filter from the Filter list, click the filter's name on the search bar, then click "Delete" on the filter details panel.
Users List View
The Users list view which can be accessed by clicking the Users module tab, displays all user records in Sugar. You can view basic details such as the user's name, email address, and status from within the field columns of the list view. To view additional contact or other employment-related information, click the user's name (e.g., John Smith) in the list view. If you wish to view other stock and/or custom user fields that do not appear in SugarIdentity, you will need to navigate back to your Sugar instance.
Total Record Count
The Users list view displays the total count of records in parentheses on the upper left of the page. The first number in the parentheses represents the total count of records displayed on the current list view results set, and the number to the right is the total count of all records on the list view results set. So, for example, if the current list view results set shows 25 user records, and there is a total of 27 user records in the list view results set, the total record count on top will display "(25 of 27)".
Column Sorting
You can sort the Users list view by a field column in either ascending or descending order by clicking the appropriate column header (e.g., Email) in the list view. Please note that you can only sort the list view by one column at a time. To adjust the size of the columns in the list view, place your cursor on the column divider, and when the left-and-right arrow appears, click and drag the column to your desired size. The set column width will be preserved when you navigate away from the page or log out from SugarIdentity. Clearing or resetting the relevant browser cookies will revert the column widths back to the default size.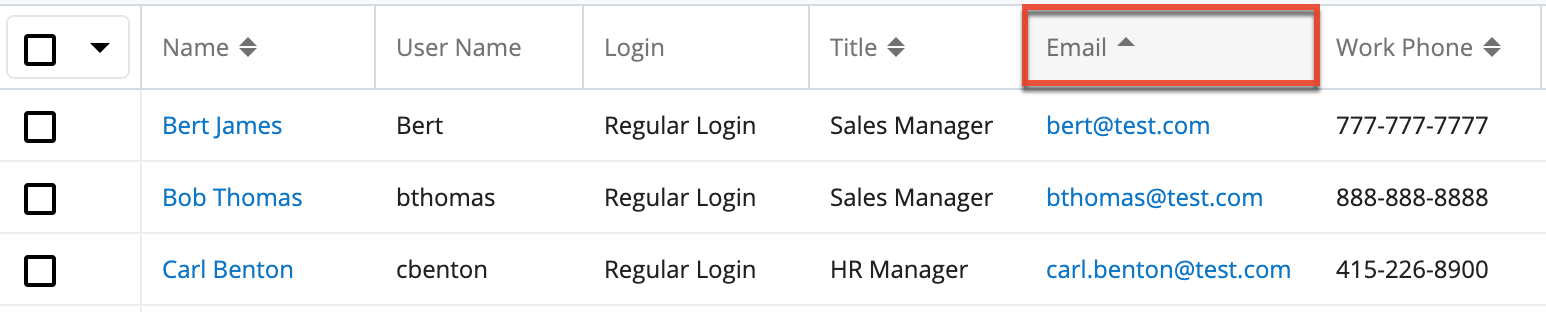
Column Selection
You can personalize the Users list view by specifying which fields you want to be displayed in the list view. Simply click the three-dots menu to the far right of the list view column headers to see the list of available fields. Then enable/disable the checkbox for the desired field (e.g., Title, Department) you wish to display or hide as a field column in your Users list view. 
Editing Users
SugarIdentity user records may be edited at any time to modify or add information in SugarIdentity. If you wish to edit other stock and/or custom user fields that do not appear in SugarIdentity, you will need to navigate back to your SugarCRM instance to make the appropriate changes.
Editing Users With SCIM
If you have enabled/configured SCIM, you can modify the user's mapped attributes (e.g., phone, title) directly in the identity provider (e.g., Okta) and the changes will sync to SugarIdentity in real-time. For more information on attribute mapping, refer to the External Authentication guide. Please note that modifying the user fields in SugarIdentity will not sync back to the identity provider.
Editing Users With SSO
For customers using LDAP, SAML, or OIDC, you can modify the mapped attributes directly in the LDAP server or identity provider to maintain consistent data since the changes will sync to SugarIdentity when the user next logs in to Sugar. Please note that modifying the user fields in SugarIdentity will not sync back to the LDAP server or identity provider.
The attribute mapping behavior is as follows for LDAP, SAML, and OIDC:
- LDAP: LDAP attributes map to the SugarIdentity user fields by default.
- SAML: Only the Name ID claim (email address) is mapped by default to the SAML Username field in SugarIdentity, but you can set up the attribute mapping in the identity provider to have other SAML attributes mapped to SugarIdentity user fields.
- OIDC: The attribute mapping varies between the identity providers.
Editing Users Without SSO
Use the following steps to edit an existing user record in SugarIdentity:
Note: Users assigned to the User Management role can only edit data for regular (non-admin) users who are not assigned to the user management role. Also, the "CRM User Type" and "Enable User Management Role" fields are read only for user managers.
- Log in to SugarCRM and navigate to Admin > SugarIdentity.
Note: For Sugar versions 13.0 and lower, navigate to Admin > SugarCloud Settings. - Click the Users module tab in the navigation bar or "View Users" on the home page to access the Users list view.
- In the Users list view, click the user's name you wish to edit.
- In the user's record view, enter appropriate values for the user fields.
Note: If you are changing a user's status to "Active" and their license is assigned in SugarIdentity, make sure that the selected license(s) has an available seat to avoid potential errors. - Click "Save".
The changes to the user's record will be synced to Sugar, and the updates can be viewed in Admin > User Management. To edit a user's record without logging in to Sugar first, simply log in to SugarIdentity, select the user record from the Users list view, edit it, then save.
Mass Editing via List View
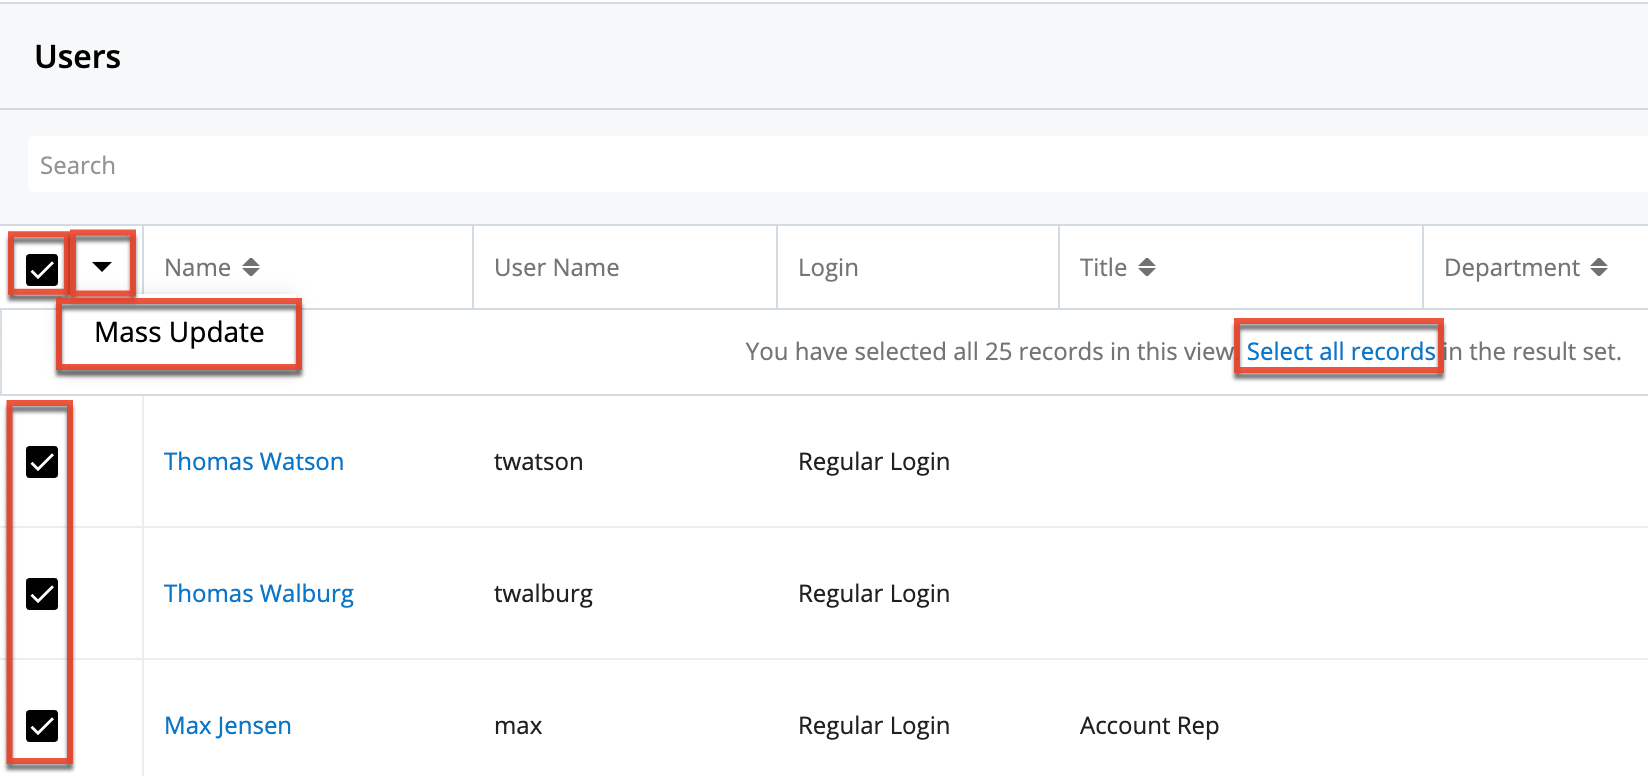
Mass updating allows you to apply the same changes to multiple user records at once from the Users list view. Once you have located the desired records on the list view, you can either choose individual user records or select all records displayed on the current set of list view results by clicking the checkbox to the left of the Actions menu.
Note: Users assigned to the User Management role can only mass update data for regular (non-admin) users who are not assigned to the user management role.
Use the following steps to mass update user records from the list view:
- Log in to SugarCRM and navigate to Admin > SugarIdentity.
Note: For Sugar versions 13.0 and lower, navigate to Admin > SugarCloud Settings. - Click the Users module tab in the navigation bar or "View Users" on the home page to access the Users list view. Then use the list view search to identify users you wish to modify.
- Select the desired users, then choose "Mass Update" from the Actions menu.
- To select all records displayed on the current set of list view results, click the checkbox to the left of the Actions menu. A dialog will appear below the list view's column headers indicating that you have selected all records on the list view's current result set. To select all records in the results set, click "Select all records" in the dialog. You can clear the selections for all records on the result set by either clicking the "Clear selections" link in the subsequent dialog or clicking the checkbox option again to remove the checkmarks.
- To select all records displayed on the current set of list view results, click the checkbox to the left of the Actions menu. A dialog will appear below the list view's column headers indicating that you have selected all records on the list view's current result set. To select all records in the results set, click "Select all records" in the dialog. You can clear the selections for all records on the result set by either clicking the "Clear selections" link in the subsequent dialog or clicking the checkbox option again to remove the checkmarks.
- The Mass Update panel will appear below the search bar. Set values for the fields (e.g., CRM User Type, Status) you wish to alter. If you do not wish to mass update the records, simply click the Cancel button.
- If the License Type field is managed in SugarIdentity, you can assign licenses to users via mass update. For more information on assigning licenses to users via mass update, refer to the License Assignment via Mass Update section of this page.

- If the License Type field is managed in SugarIdentity, you can assign licenses to users via mass update. For more information on assigning licenses to users via mass update, refer to the License Assignment via Mass Update section of this page.
- To mass update several fields at once, click the plus button to the right of the row to add additional fields. Click the minus button that appears to remove the fields.
- Click "Update" to save the changes to all of the selected user records.
Deactivating Users
When a user is no longer a member of your organization, it is best practice to deactivate them instead of deleting them. This ensures that the user will no longer be able to log in to Sugar, but that their historical data remains intact in SugarCRM still. In addition to the Sugar application, the user will no longer be able to access Sugar Market (if user is assigned to the Sugar Market license), Sugar Connect, and the SugarCRM mobile app once they are deactivated. Please note that deactivating user records will not update any related records and will only prevent the user from being assigned to records and such.
Users that have been deactivated do not count against the number of licensed user accounts for your instance. When changing the user's status to "Inactive", please also consider updating the Employee Status field for the user in your SugarCRM instance to update their employment status in the Employees module.
The steps to deactivate a user in Sugar will vary depending on how SugarIdentity has been configured. Please refer to the section below that best applies to your scenario:
Deactivating Users With SCIM
If you have enabled/configured SCIM, you can deactivate the user from the identity provider (e.g., Okta), and the change will automatically sync to SugarIdentity and update the user's status to "Inactive". Once the user's status has been changed in the identity provider, please confirm that the status change is reflected correctly in Sugar. If you wish to reassign the user's records, simply log in to SugarCRM, then navigate to Admin > User Management, and select "Reassign Records" in the Users module tab's actions menu. For more information on reassigning an inactive user's records, refer to the User Management documentation in the Administration Guide.
Deactivating Users With SSO
If you use LDAP, SAML, or OIDC, you will need to deactivate the user from the LDAP server or identity provider (e.g., Okta) first before following the steps in the section below. Please note that changing the user's status in SugarIdentity will not sync back to the Identity Provider.
Deactivating Users Without SSO
Use the following steps to deactivate a user in Sugar:
- Log in to SugarCRM and navigate to Admin > SugarIdentity.
Note: For Sugar versions 13.0 and lower, navigate to Admin > SugarCloud Settings. - Click the Users module tab in the navigation bar or "View Users" on the home page to access the Users list view.
- In the Users list view, click the user's name you wish to deactivate.
- In the user's record view, change the Status field to "Inactive", then click "Save".
The user is now deactivated and can no longer log in to the SugarCRM applications and services. Please note that you can also mass update the user's status via the Mass Update option in the Users list view. If you wish to reassign the user's records, simply log in to SugarCRM, then navigate to Admin > User Management, and select "Reassign Records" in the Users module tab's actions menu. For more information, refer to the User Management documentation in the Administration Guide.
Sugar Market customers using SugarIdentity can also reassign a user's records in Sugar Market. For more information, refer to the User and Role Management documentation in the Sugar Market User guide.
Deleting Users
If a user record is invalid or should no longer appear in your organization's Sugar instance, it may be deleted from SugarIdentity. Please note that deleting user records will not delete any related records and will only prevent the user from logging into Sugar and being assigned to records. For Sugar Market users, deleting their user record in SugarIdentity will deactivate their user record and set their username to blank on the Market side.
Note: Users assigned to the User Management role cannot delete any user records in Sugar.
Please keep in mind that if a user is no longer a member of your organization, it is best to deactivate them by changing the Status field to "Inactive" instead of deleting them. This way, the user's historical data remains intact in SugarCRM still, but the user will no longer be able to log in to Sugar. In addition to the Sugar application, the user will also no longer be able to access Sugar Market (if user is assigned to the Sugar Market license), Sugar Connect and SugarCRM mobile app once they are deleted.
It is recommended that you reassign the user's records first in Sugar before deleting the user record in SugarIdentity. For more information on reassigning users' records in SugarCRM, refer to the User Management documentation in the Administration Guide.
Sugar Market customers using SugarIdentity can also reassign a user's records in Sugar Market. For more information, refer to the User and Role Management documentation in the Sugar Market User guide.
Note: Deleting the user record via SugarIdentity will delete the corresponding user and employee records from your SugarCRM instance.
The steps to delete a user from Sugar will vary depending on how SugarIdentity has been configured. Please refer to the section below that best applies to your scenario:
Deleting Users With SCIM
If you have enabled/configured SCIM, you can delete the user from the identity provider (e.g., Okta), and the user record will be automatically deleted from Sugar in real-time. Once the user has been deleted from the identity provider, please confirm that the user's record has been deleted accordingly in Sugar.
Deleting Users With SSO
If you use LDAP, SAML, or OIDC, you will need to delete the user from the LDAP server or identity provider (e.g., Okta) first before following the steps in the section below.
Deleting Users Without SSO
Use the following steps to delete an existing user from Sugar:
- Log in to Sugar and navigate to Admin > SugarIdentity.
Note: For Sugar versions 13.0 and lower, navigate to Admin > SugarCloud Settings. - Click the Users module tab in the navigation bar or "View Users" on the home page to access the Users list view.
- In the Users list view, locate the user you wish to delete, and click the Record Actions menu to the far right of the record's row then select "Delete". A pop-up message will display asking for confirmation. Click "Confirm" to proceed.

The user is now deleted from Sugar and can no longer log in to the SugarCRM applications and services.
Resetting User Passwords
There may be occasions when users forget their Sugar password and will need to reset it to access their account. Administrators have the option to reset users' passwords as necessary using the following steps below.
Note: Users assigned to the User Management role can only send password reset emails for regular users and user managers, but not system administrators.
- Log in to Sugar and navigate to Admin > SugarIdentity.
Note: For Sugar versions 13.0 and lower, navigate to Admin > SugarCloud Settings. - Click the Users module tab in the navigation bar or "View Users" on the home page to access the Users list view.
- In the Users list view, locate the user you wish to send the password reset email to, then click the lock icon to the far right of the record's row. A pop-up message will display asking for confirmation. Click "Confirm" to proceed.

An email with the reset password link will be sent to the user's email address. Please note that the password reset email will use the primary language of the admin user triggering the request. Users can also click the "Forgot Password?" link on the Sugar login screen to reset their passwords.
For Sugar Market instances enabled for SugarIdentity, the Sugar Market user can reset their password using the steps in the Getting Started With Sugar Market guide.