AI
Overview
With the Intelligence add-on in SugarCRM, you have access to powerful and easy-to-use AI features that help you work smarter and faster.
- Account Intelligence: Generates actionable insights from your data to help you quickly understand an account’s history and make informed decisions.
- Summarization: Produces concise, actionable summaries of your Opportunities and Cases.
- Prediction: Uses your data and external firmographics to deliver predictive insights for opportunities and leads.
This guide covers activating and setting up AI features in Sugar. For information on using AI features in Sugar, please refer to the AI User Guide.
To access Intelligence add-on AI features, users must be assigned a Sugar Intelligence license. For more information please refer to the License Management page.
To learn more about how we build safe and impactful AI tools, see our SugarCRM's Approach to AI help article.
Privacy and Security
All data shared with external AI models is protected by SugarCRM's trust and security layers.
- Your data is anonymized before it is shared.
- Your data is never used for training.
- For auditing purposes, your anonymized data is stored for one month and then permanently deleted.
To learn more about how we build safe and impactful AI tools, see our SugarCRM's Approach to AI help article.
Requirements
Before activating AI features in SugarCRM your instance must meet the following requirements.
- You have purchased the Intelligence add-on.
- The add-on is available to customers using Sugar 14.0 or higher with an Enterprise+, Enterprise, Sell Premier, Sell Advanced, or Serve license.
- To purchase the Intelligence add-on, contact your customer success manager.
- You have SugarIdentity enabled.
- If you are hosted on SugarCloud, your instance is hosted in one of the following regions:
- ap-southeast-2: Asia Pacific (Sydney)
- eu-west-2: Europe (London)
- eu-central-1: Europe (Frankfurt)
- us-west-2: US West (Oregon)
Prediction Data Requirements
In addition to the above perquisites, you must meet the following data requirements before you can activate the Prediction feature.
- Default Lead Module
- Auditing is enabled for the Lead Score, Lead Source, and Status fields
- 1000 or more lead records created in the last two years
- 300 or more lead records created in the last six months
- Converted lead records is no less than 5% and no more than 95%
- Default Opportunities Module
- Auditing is enabled for the Sales Stage field
Note: If you are using the Revenue Line Items module, auditing must be enabled for the Status field. - 500 or more opportunity records created in the last two years
- 200 or more opportunity records created in the last six months
- Closed-won opportunity records is no less than 5% and no more than 95%
- Auditing is enabled for the Sales Stage field
Please note that even if all data requirements are met, a usable AI model is not guaranteed.
Activating AI Features
Account Intelligence and Summarization
Once you have met the requirements, the Account Intelligence and Summarization features will be activated automatically if your instance is hosted on SugarCloud. If your instance is on-site, your customer success manager will work with you to activate the needed connections.
Prediction
Once you have meet the general and data requirements, contact your Customer Success Manager. We will then assess your data against our AI model and firmographic data. Once the data assessment is completed, your Customer Success manager will contact you with the results. If the model produces projected outcomes that are more than 70% accurate, we will activate Prediction in your instance. If accuracy is below 70%, we will review your instance and may be able to improve the model’s accuracy through further configuration aligned with your unique data. Once AI prediction is enabled changes to the Prediction field will update the Date Modified and Modified By Name fields for lead and opportunity records. These updates may trigger dependent workflows.
Setting Up AI Features
Account Intelligence and Summarization
Once activation is completed, the AI Summary dashlet is added automatically to the default Account, Opportunity, and Case record view intelligence pane and focus drawer dashboards. In the default focus drawer dashboard, the dashlet is added to the bottom of the dashboard, so you may need to scroll down to see it. If you are using a custom dashboard you will need to manually add the dashlet.
Setting Up the AI Sentiment Field
The AI Sentiment field must be manually added by an administrator to the Case module record, list, and search layouts. Please refer to our Layouts guide page for more information of editing layouts.

Prediction
Once AI Prediction is activated in your instance, your Sugar Administrator can set up predictions to to be displayed to users in the Leads and Opportunities record view and list view.
Note: AI prediction will stop creating new predictions if the modal accuracy drops below 70%. This is to ensure that predictions are always as accurate as possible. Once the model accuracy returns to 70% or higher, AI prediction will create new predictions again.
Displaying the Prediction Dashlets to Users on the Default Record and Focus Dashboards
Follow the steps below to add the Prediction dashlet to your default Record and Focus dashboards:
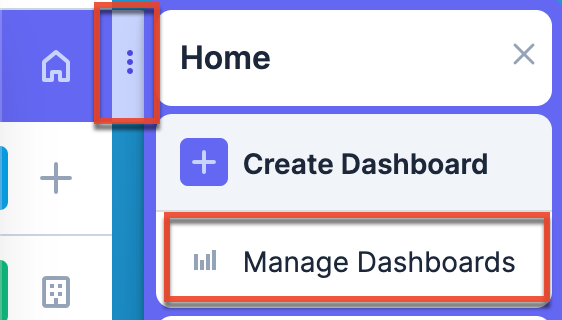
- Hover over the Home module tab > click the three-dots menu > select "Manage Dashboards".
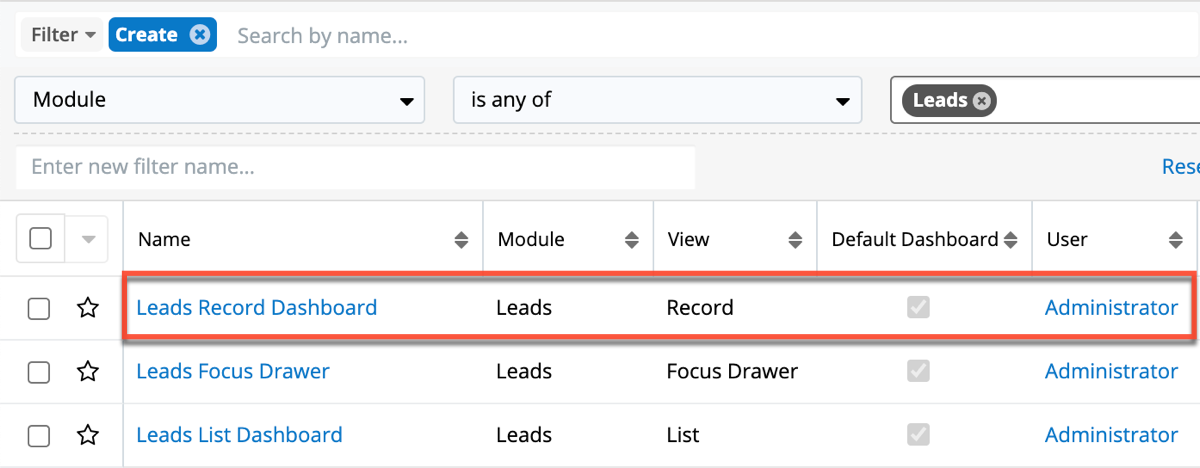
- Create a filter for the Leads or Opportunities module.
- Confirm the dashboard name of the respective module's default Record and Focus Drawer views.
- Navigate to the Leads or Opportunities module list view.
- Open a record to access the Record dashboard or click the Focus Drawer icon of a record to open the Focus dashboard.
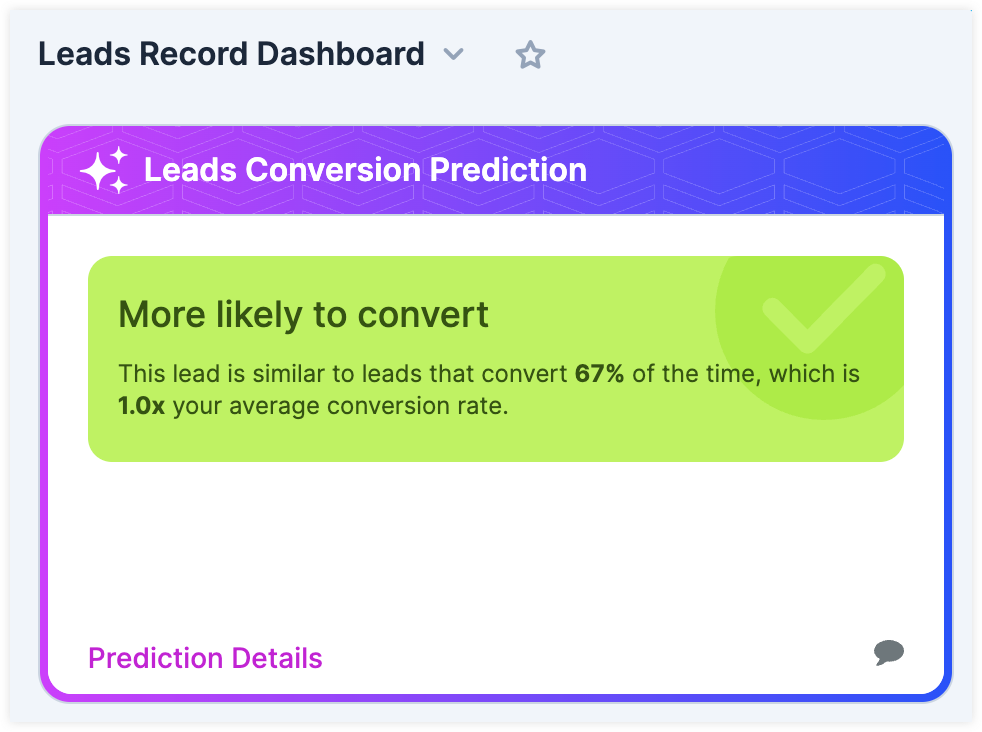
- Ensure the record view dashboard displayed is the default dashboard from step 3. If it is different, click the arrow next to the name and select the appropriate dashboard from the list.
- Scroll down to locate the Leads Conversion Prediction dashlet.
- If you do not see the dashlet, click the Floating Actions button > select "Add Dashlet" > select "Leads Conversion Prediction" from the list of available dashlets > click "Save". For the Opportunities module, select "Opportunity Close Prediction".
- Click and drag the dashlet to your desired location in the dashboard layout.
Displaying Updates to the Predict Field in the Timeline Dashlet
Sugar versions 14.0 and higher will display Prediction field updates in the Timeline dashlet by default. If you are not seeing Prediction field updates in the Timeline dashlet of your lead and opportunity records follow these steps:
- Go to Admin > Studio > Leads or Opportunities > Fields.
- For Leads, click the Prediction (ai_conv_score_classification) field, or for Opportunities click the Prediction (ai_opp_conv_score_enum) field.
- Ensure that the field has the Audit checkbox checked.
- Once auditing is enabled for the field, Prediction field updates will be displayed in the Timeline dashlet.
Displaying AI Prediction to Users in List View
Follow these steps to display predictions in the Leads and Opportunity list views by default.
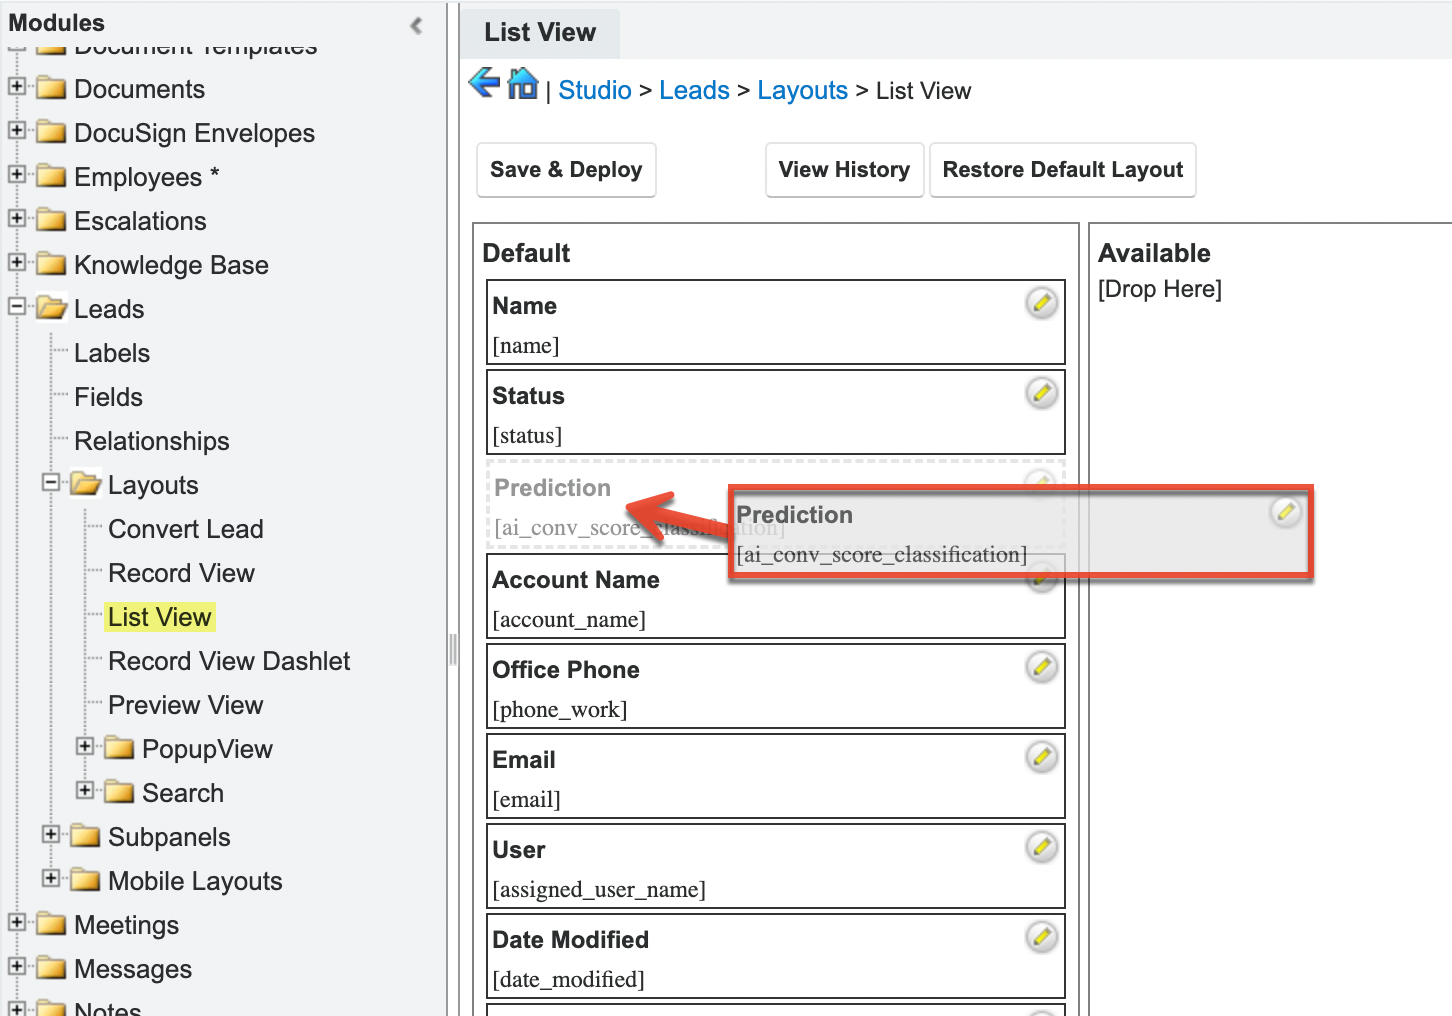
- Go to Admin > Studio > Leads or Opportunities > Layouts > List view.
- Locate the Prediction field.
- Click and drag the field to the Default section. The field's placement within the section determines the order of the columns that appear in the list view.
- Click "Save & Deploy".
- Once the Prediction column is added in Studio, users can add the column to their list view and change the order of the column if needed.
Note: For more information on administrative action in Studio, visit the Studio documentation in the Administration Guide.
Allowing Users to Filter a List View with the Prediction Field
Follow the steps to add the Prediction field as a list view filter option.
- Go to Admin > Studio > Leads or Opportunities > Layouts > Search.
- Locate the Prediction field.
- Click and drag the field to the Default section. The field's placement within the section determines the order of the fields that appear in the list view filters.
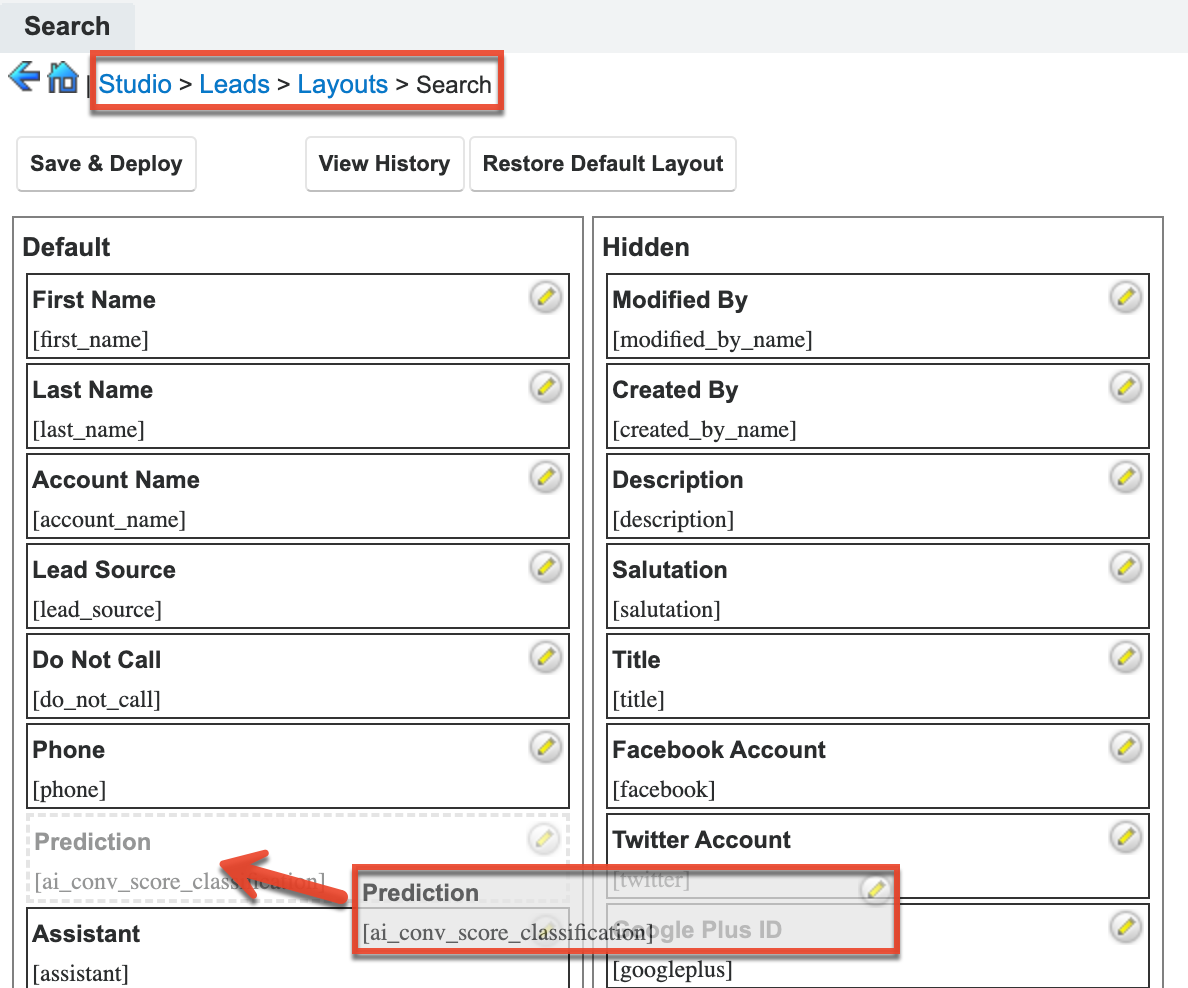
- Click "Save & Deploy".
Access to AI Summary Dashlet
Users must have access to the Account, Opportunity, or Case module to view and add the AI Summary dashlet. Generated information is not restricted by the user's permissions and may include information from fields the user cannot access.
You can prevent a user from viewing all content generated by AI summary dashlet using Sugar roles. Access to this content is controlled by the SummarizationGai module role permission. When the Access column for this module role permission is set to "Disabled" in an applied user role, AI Summary contents will be hidden in the dashlet.

For more information on role management, see the Role Management guide.
Token Usage for AI Summary Dashlet
Once the dashlet is added to a user's dashboard, the initial generation is triggered when they open a record view. Information will automatically regenerate when the record view is opened and there is new data available. Each time information is generated tokens are consumed, the amount used is dependent on the amount of data analyzed.
Using the info icon in the dashlet, administrators and dashboard owners can review the current percentage of tokens used from the monthly instance allowance. Once your instance reaches its monthly token limit, the dashlet will no longer generate new information. The last generated information will still be visible.
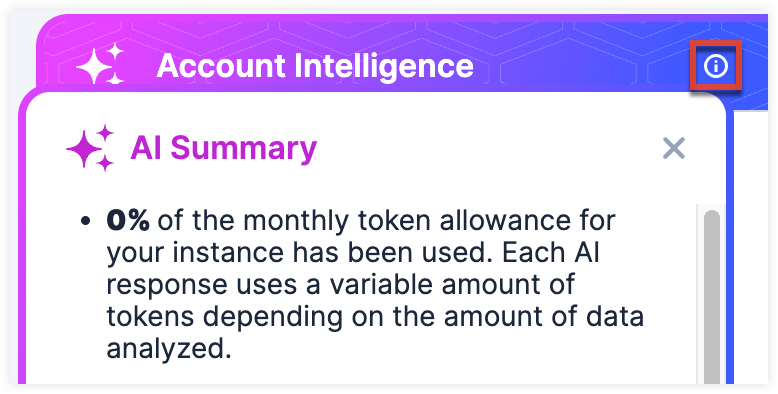
The token allowance is refreshed on the first day of every month. To purchase additional tokens, either after reaching your allowance or in advance, contact your Customer Success Manager.