Getting Started
Overview
Sugar offers users a wide range of configuration options when getting started with the application. Your first time logging into Sugar the New User Wizard will step through configuring some basic settings (i.e., Your Information, Your Locale). You may skip these steps and configure these settings in your user preferences at a later time. Please note that system administrators can also set up each user's basic settings when creating the user in Sugar. This documentation will cover the various options (e.g., New User Wizard, User Preferences) available when first getting started with Sugar and accessing your account.
Note: For instances that use SugarIdentity, certain configuration options (e.g., editing certain user fields) will not be available. These differences are covered in the following sections.
Accessing Sugar
Prerequisites
The following will need to be installed and configured on your local machine prior to accessing Sugar:
- A supported web browser application (e.g., Chrome, Firefox) is required on your computer. For more information on the various supported web browsers, please refer to the Supported Platforms page.
- The web browser must have JavaScript and cookie support enabled in order to access Sugar.
- Network access to a server running your Sugar instance is required.
Logging In
Refer to the appropriate section below for steps on logging in to your Sugar instance.
Standard Login
Use the following steps to log in to your Sugar instance:
Note: The following steps pertain to instances that do not use SugarIdentity, as well as instances that use SugarIdentity.
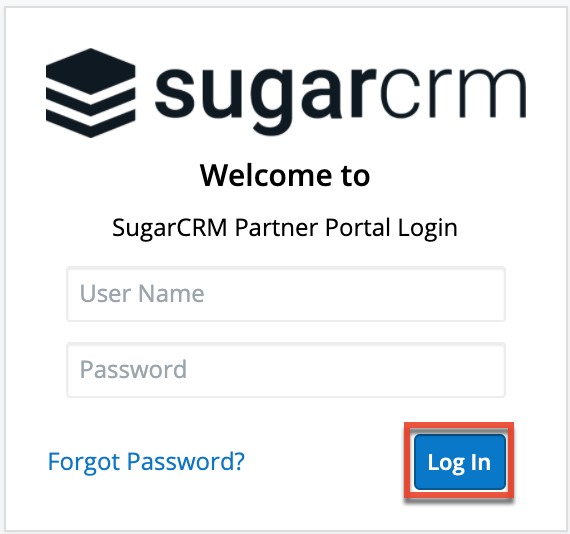
- Enter your Sugar instance URL (e.g., https://example.sugarondemand.com) in your web browser to access Sugar's login screen.
- Enter your Sugar login credentials (User Name and Password) on the login screen then click "Log In".
- If you do not know your instance URL or login credentials, please reach out to your system administrator for assistance.
- If your Sugar instance is configured for single sign-on (SSO) (e.g., SAML), then the login screen will display a separate Log In button where you will enter your identity provider (e.g., Okta) login credentials to be authenticated and automatically logged in to your Sugar account.
- The New User Wizard will launch upon your first successful login to Sugar allowing you to configure some of your basic personal settings.
Note: For instances that use SugarIdentity, the User Profile step of the User Wizard is read-only and the displayed fields (e.g., First Name, Last Name) will not be editable in your user profile as they can only be edited by administrators in SugarIdentity.
Note: If your instance has more active users than is allowed by your Sugar license, regular users will not be able to log in and a warning will be displayed on the screen once the user attempts to log in. Admin users will be able to log in but will be redirected to the Users module. For more information, see the Understanding User Types, License Types, and Sugar Licenses article.
Logging in With SugarIdentity Using Multi-Factor Authentication
For instances that use SugarIdentity, administrators can enable multi-factor authentication, which provides an added layer of security when logging in to Sugar to prevent unauthorized users from gaining access to your account. If multi-factor authentication is enabled for your Sugar instance, you will need to use a mobile authenticator app (e.g., Authy, Google Authenticator, Microsoft Authenticator) and enter the 6-digit code generated from the app to verify your identity when logging in to Sugar. Please note that multi-factor authentication only applies to users who log in using Sugar credentials or use LDAP authentication.
Once multi-factor authentication is enabled for your Sugar instance, the following Sugar products will also use multi-factor authentication when logging in using SugarIdentity:
Use the following steps to log in to Sugar using multi-factor authentication:
- Enter your Sugar instance URL (e.g., https://example.sugarondemand.com) in your web browser to access Sugar's login screen.
- Enter your login credentials (User Name and Password) on the Sugar login screen, then click "Log In".
- If this is your first time logging in after multi-factor authentication has been enabled or reset, a QR code will appear on the screen. Scan the QR code using your authenticator app (e.g., Google Authenticator) to pair the app with Sugar. Click "Continue". If you cannot scan the QR code using your mobile device, skip to step 4.
Note: If you have already paired an authenticator app with Sugar, then skip to step 5.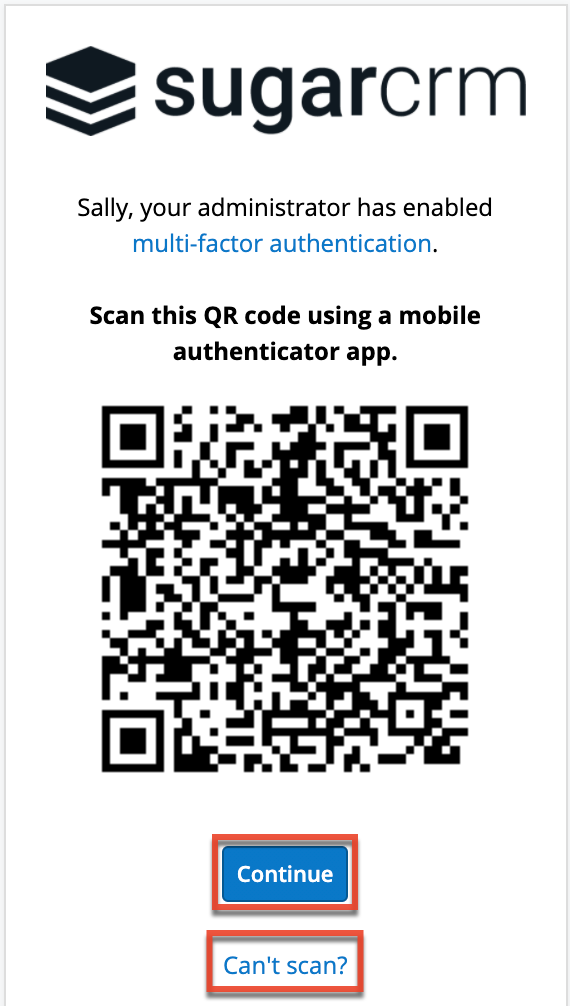
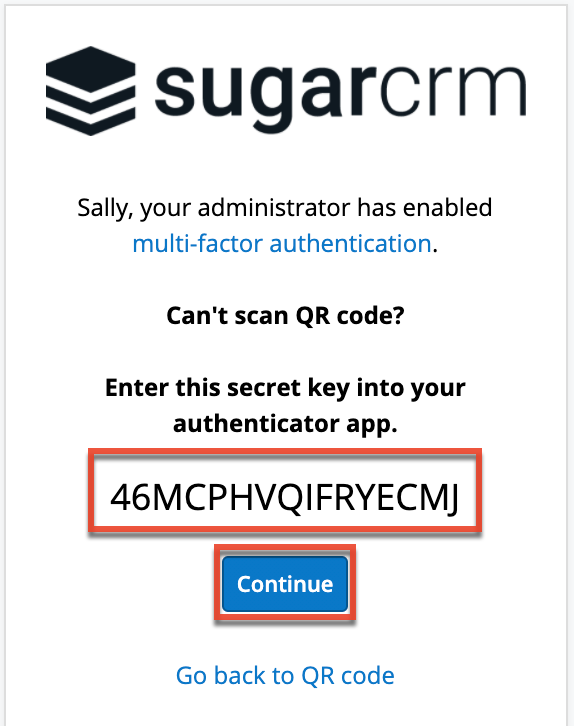
- If you cannot scan the QR code on step 3 using your mobile device, click the "Can't scan?" link and enter the secret key that appears on the screen into your authenticator app. Click "Continue".
- On the next step, enter the 6-digit code generated from your authenticator app, then click "Log In" to access your Sugar account.
Note: Once your authenticator app is paired with Sugar, for future logins, you will just be required to enter a new 6-digit code on this screen after entering your login credentials on step 2.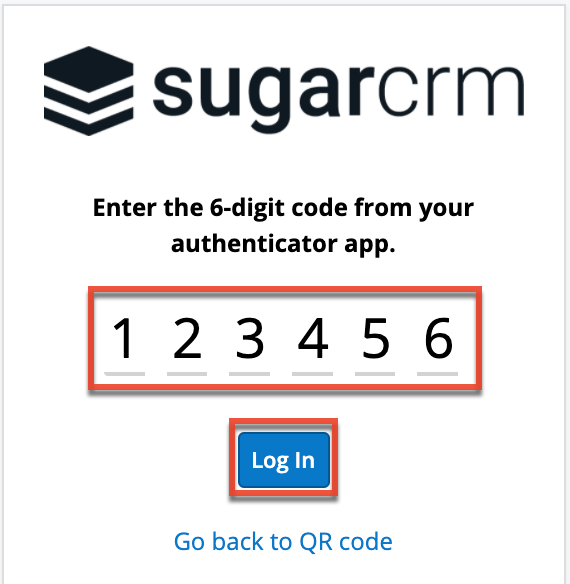
- The New User Wizard will launch upon your first successful login to Sugar allowing you to configure some of your basic personal settings.
Note: For instances that use SugarIdentity, the User Profile step of the User Wizard is read-only and the displayed fields (e.g., First Name, Last Name) will not be editable in your user profile as they can only be edited by administrators in SugarIdentity.
If you ever need to reset your multi-factor authentication, for example, to set up the authenticator app on a new mobile device, select the Reset Multi-Factor Auth option under your user menu on the upper right of Sugar. For more information, refer to the Resetting Multi-Factor Authentication section of this page.
Resetting Your Password
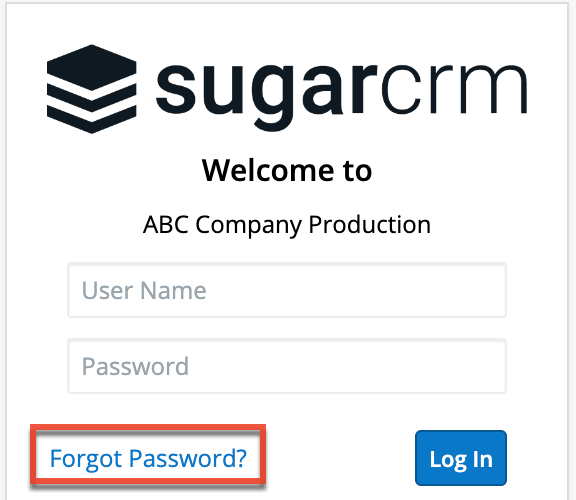
There may be occasions when users forget their Sugar password and will need to reset it. If the system administrator has enabled the Forgot Password feature via Admin > Password Management, users will have the option to request a password reset directly from Sugar's login screen. If you do not see the "Forgot Password?" link on your login screen, please reach out to your system administrator for further assistance.
System administrators can either enable the Forgot Password feature or manually change the user's password via Admin > User Management. For more information on how to set up and manage passwords in Sugar, refer to the Password Management documentation. Please note that the outbound mail server for the system must be configured via Admin > System Email Settings and users will also need to have their personal email settings configured in their user preferences in order for the password reset email to be sent. For more information on setting up the system email settings, refer to the Email documentation in the Administration Guide.
Note: For Sugar instances that use SugarIdentity, administrators will not be able to configure the Forgot Password option or change the user's password.
Resetting Your Password Without SugarIdentity
Use the following steps to reset your password for a Sugar instance that does not use SugarIdentity:
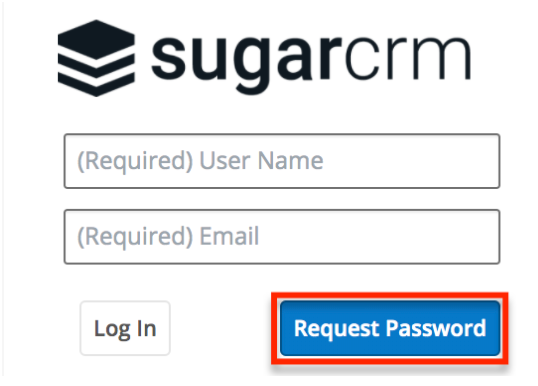
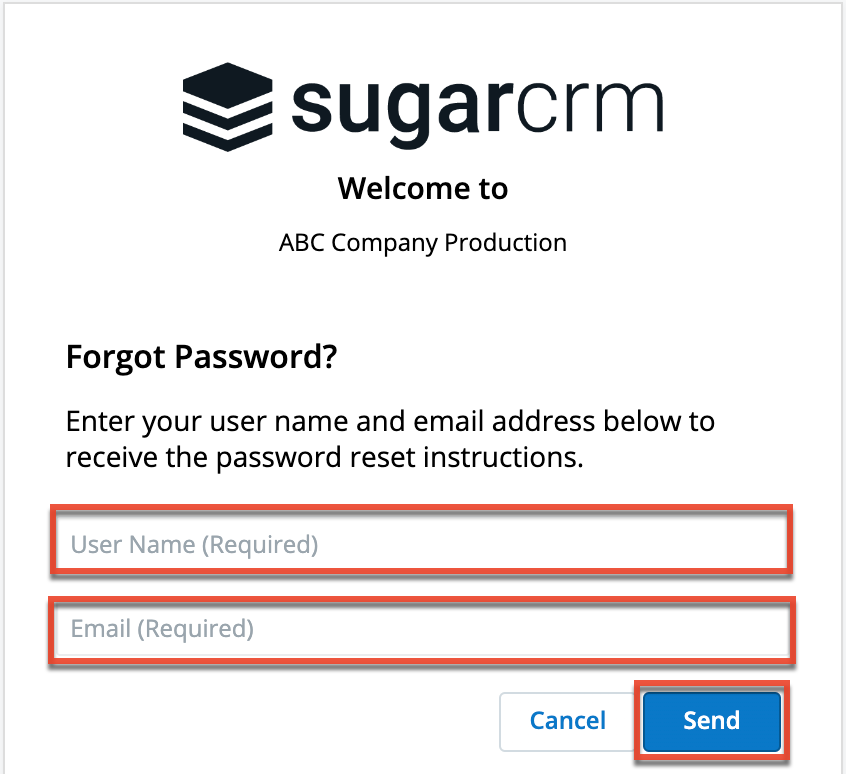
- Click the "Forgot Password?" link on the bottom left of Sugar's login dialog box.
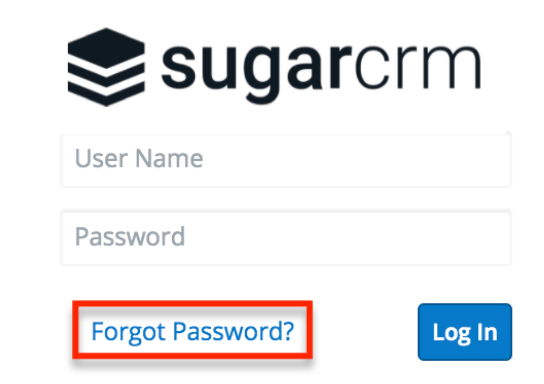
- Enter your Sugar user name and primary email address on file, then click "Request Password". If submitted successfully, a message will appear that your request has been submitted.
- A password reset email will be sent to your primary email address containing a link you can click to reset your password.
- Enter your new password and confirmed password making sure to meet the password requirements listed on the screen. Then click the Log In button to log in to your account.
Note: System administrators can configure the password requirements via Admin > Password Management.
Resetting Your Password With SugarIdentity
Use the following steps to reset your password in a SugarIdentity-enabled instance:
- Click the "Forgot Password?" link on the bottom of Sugar's login dialog box.
- Enter your Sugar user name and primary email address on file, then click "Send". A message will appear confirming that the password reset email has been sent to your primary email address.
- Click the password reset link in the email to be directed to the password reset page.
- Enter your new password and confirmed password making sure to meet the password requirements listed on the screen. Click "Change password" then click the Log In button on the following dialog box if you wish to log in to your account.
Note: System administrators can configure the password requirements in SugarIdentity.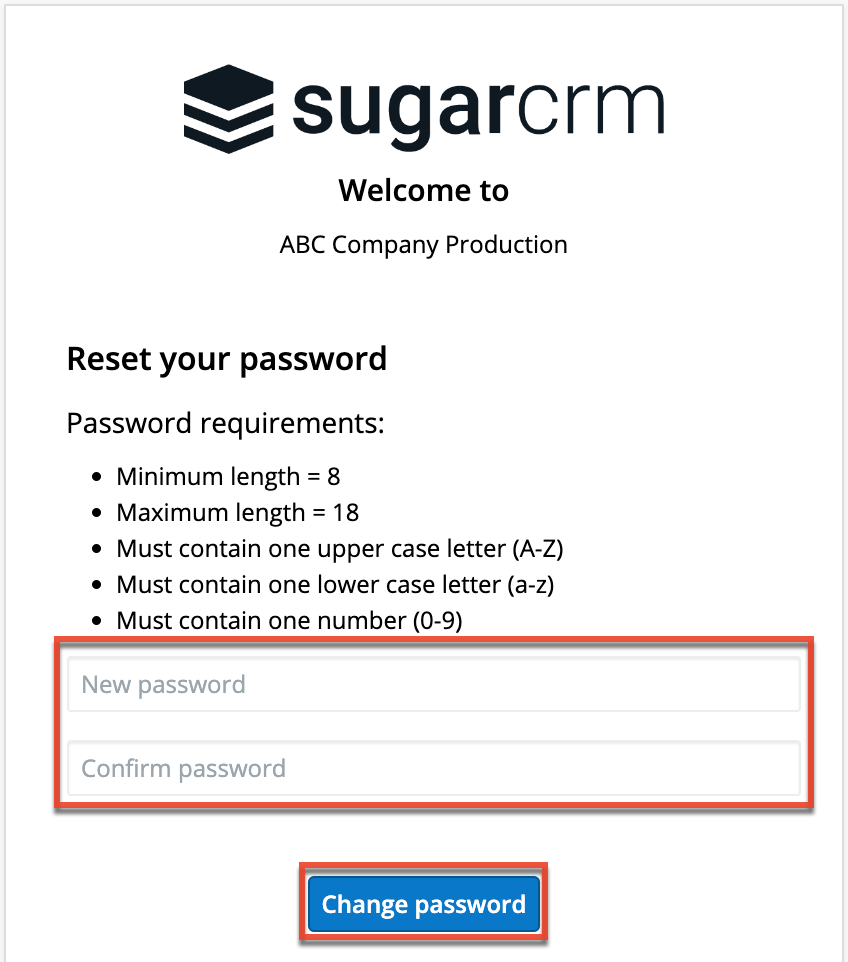
Note: System administrators also have the ability to send password reset emails to users via SugarIdentity.
Setting Your Language
Users have the option to choose the primary language they want to be displayed in Sugar by clicking the Language link at the bottom of the Login screen. The Language dropdown list will appear allowing you to select the appropriate language you want to be displayed in your Sugar account. The out-of-the-box default language is English (US), but administrators can change the default language globally via Admin > Locale. For more information on configuring the default language in Sugar, please refer to the User Interface section of the System documentation. Once the default language is changed by the administrator, it will display as the default selection on the login screen for all users.
Administrators can also control what languages are available to select in the Language dropdown list via Admin > Languages. If you do not see one of the listed languages below displayed in the Language dropdown list, please reach out to your system administrator for assistance. For more information on managing languages in Sugar, please refer to the Languages section of the System documentation.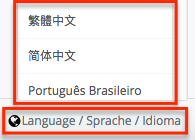
The following languages are available for use in Sugar:
| Albanian | Hungarian |
| Arabic | Italian |
| Brazilian Portuguese | Japanese |
| Bulgarian | Korean |
| Catalan | Latvian |
| Chinese (Simplified) | Lithuanian |
| Chinese (Traditional) | Norwegian |
| Croatian | Polish |
| Czech | Portuguese |
| Danish | Romanian |
| Dutch | Russian |
| English (UK) | Serbian |
| English (US) | Slovak |
| Estonian | Spanish |
| Finnish | Spanish (Latin) |
| French | Swedish |
| German | Thai |
| Greek | Turkish |
| Hebrew | Ukrainian |
Logging Out
When you are done working in Sugar and wish to log out of the system, simply click the user avatar on the upper right of Sugar and select "Log Out". This will log you out completely from Sugar and you must log in again in order to access your account.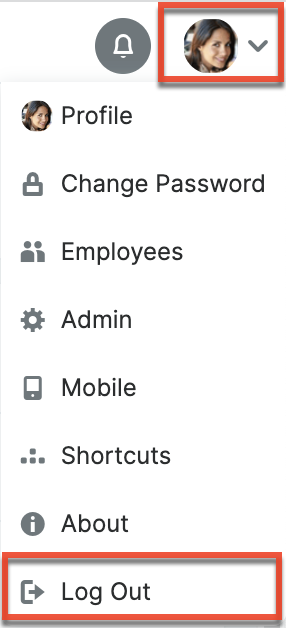
Automatic Log Outs
While working in Sugar, a user may be automatically logged out of the system. There are several valid and expected reasons that this may occur, primarily for security purposes. For more information and steps to troubleshoot this behavior, please refer to the Troubleshooting Sugar Logging Out Unexpectedly Knowledge Base article.
Please note that users can have multiple tabs of Sugar pages open within the same web browser (e.g., Chrome) without getting logged out of the system. For example, this is useful when working with multiple Sugar pages or records without navigating away from previous pages.
New User Wizard
When users first log in to Sugar, they will step through the New User Wizard to configure some basic settings (i.e., User Profile and User Locale Settings). If the system administrator already configured your basic settings when adding you as a user to Sugar, the fields in the wizard will be populated with the provided information. You can update your information as you go through the New User Wizard to make any necessary changes. Please note that you can skip the steps in the wizard if you wish to configure the settings via your user preferences at a later time.
Note: For instances that use SugarIdentity, the User Profile step of the User Wizard is read-only and the displayed fields (e.g., First Name, Last Name) will not be editable in your user profile as they can only be edited by administrators in SugarIdentity.
Accepting Cookies
In order to log in to Sugar, you must accept the use of cookies in the application. You will only be asked to accept the first time you log in, and any time there are changes to the privacy policy. To accept, enable the checkbox option then click "Continue" to advance to your user profile information.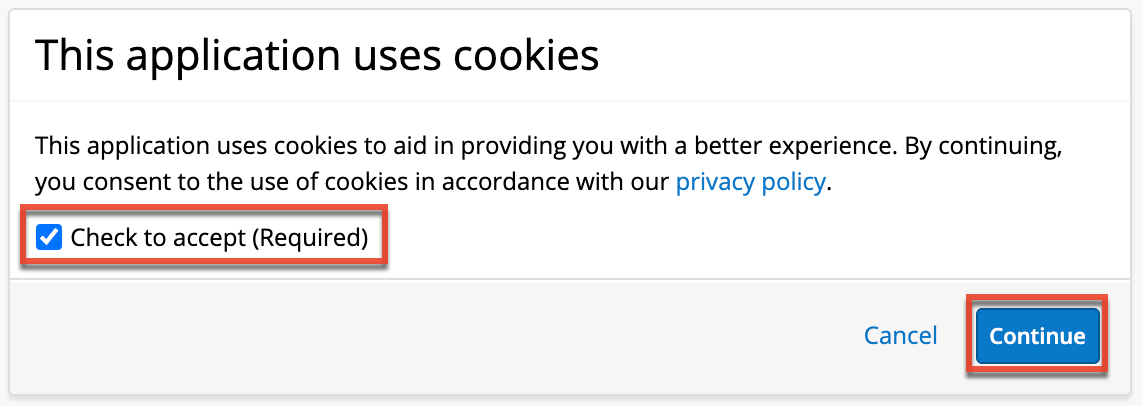
Configuring Your Information
The User Profile step of the New User Wizard allows you to enter basic information (e.g., name, email address, phone) about yourself to be stored in your user profile. Please note that the information provided in this step can be updated in your user preferences at a later time if desired. For more information on configuring your personal information, please refer to the User Preferences section.
Note: For instances that use SugarIdentity, the User Profile step is read-only and the displayed fields (e.g., First Name, Last Name) will not be editable in your user profile as they can only be edited by administrators in SugarIdentity.
The following options are available to configure your user profile:
- First Name: Enter your first name.
- Last Name: Enter your last name.
- Email: Enter your primary email address.
- Phone: Enter your office number.
Please note that all required fields will indicate "Required" in the field and must be completed prior to moving to the next step of the wizard. Once your personal information is entered, click "Next". 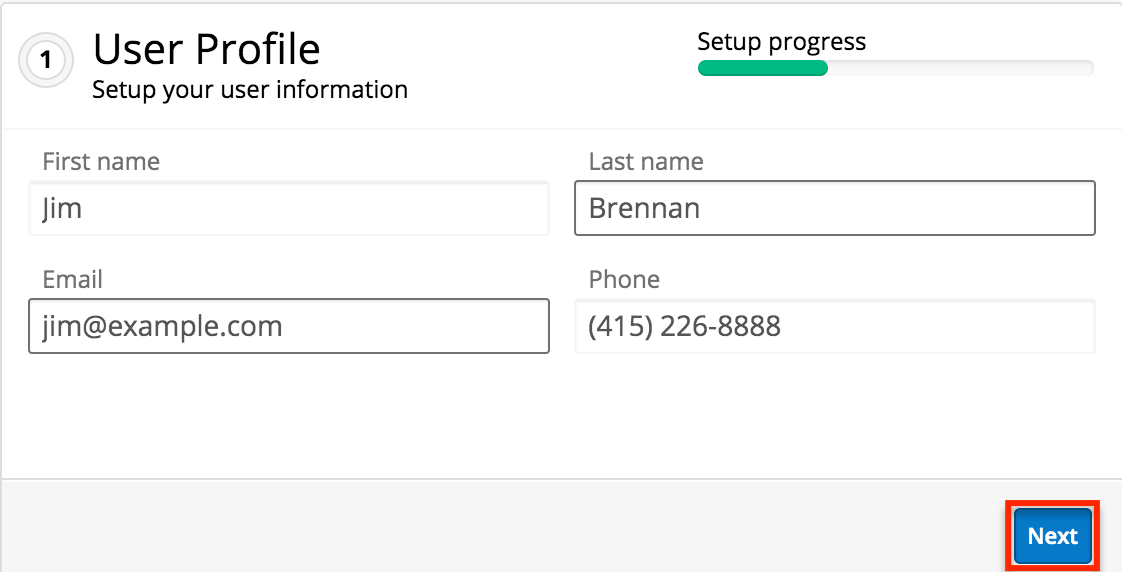
Configuring Your Locale
The User Locale Settings step allows you to configure the date, time, and name format you want to be displayed in Sugar based on your current geographical location. Please note that the information provided on this page can be updated in your user preferences at a later time if desired.
The following options are available to configure your locale settings:
- Time Format: Select the format you want the timestamps displayed in Sugar.
- Date Format: Select the format you want the date stamps displayed in Sugar.
- Name Format: Select the format you want the concatenated name fields displayed in Sugar's list view and record view.
Once your locale information is entered, click "Next".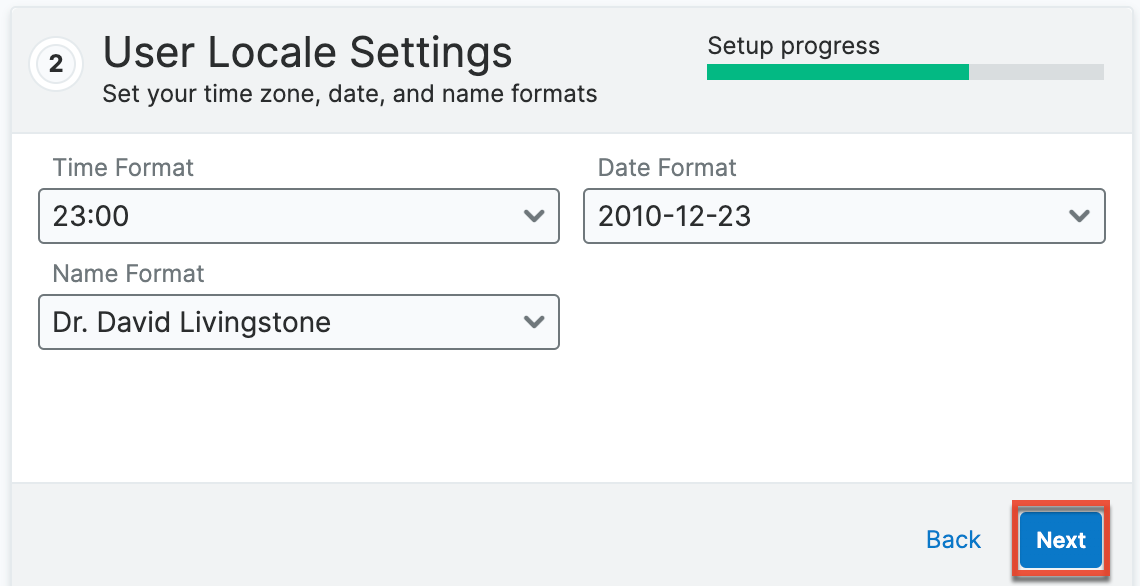
The following page will confirm that your setup is complete and that you are ready to use Sugar. You can access the various support resources (e.g., Documentation) available by clicking one of the boxes in the dialog box. Please note that you can click "Start Sugar" to go directly into your Sugar account.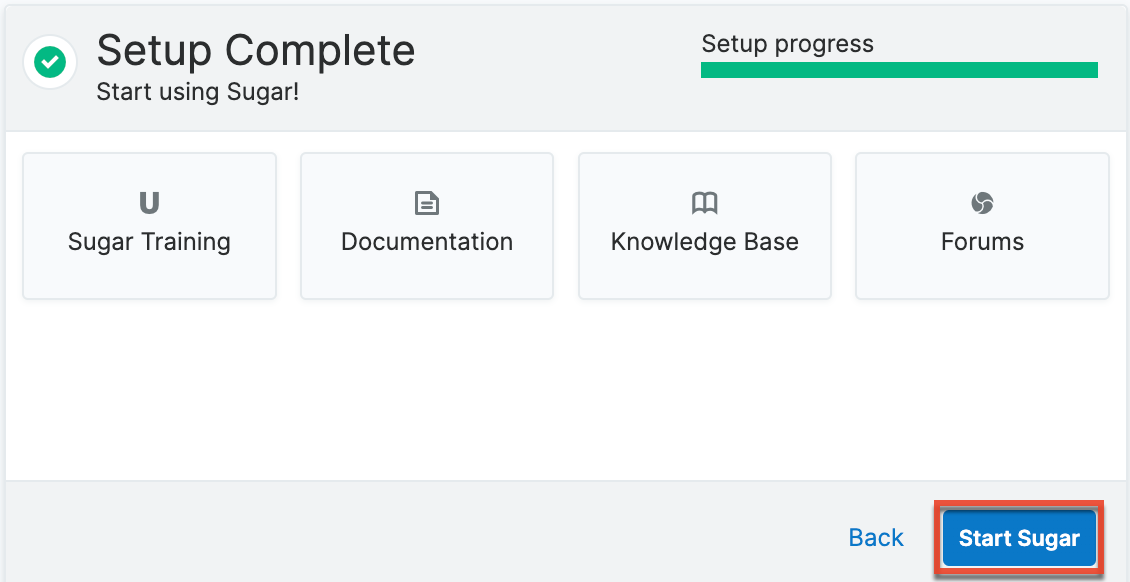
User Preferences
There is a wide range of configuration options available to users when setting up their profiles in Sugar. The User Preferences section gives users the ability to view and update their basic information, personal email settings, etc. To access user preferences, click your user avatar on the upper right of Sugar and select "Profile".
Note: For instances that use SugarIdentity, certain fields (e.g., First Name, Last Name, Work Phone, Title) in the user's profile are read-only and can only be edited by administrators in SugarIdentity. 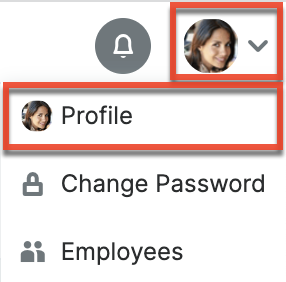
User Profile Tab
The User Profile tab displays basic information such as your name, license type, email address, etc. If the New User Wizard was completed, the information you entered will appear under the User Profile tab. For Sugar instances that use SugarIdentity, the User Profile step of the User Wizard is read-only and the displayed fields can only be edited by administrators in SugarIdentity. The system administrator can also enter the user's basic information when creating the user via Admin > User Management. For more information on creating new users, please refer to the User Management documentation. Your personal information on this tab is grouped by default into the User Profile, Employee Information, and Email Settings sections. To enter or update your information, simply enter the appropriate values for the fields then click "Save" to preserve the changes.
For instances that use SugarIdentity, the following fields under the User Profile tab are read-only and can only be edited by administrators in SugarIdentity:
- First Name
- Last Name
- Work Phone
- Address Street
- Address City
- Address State
- Address Postal Code
- Address Country
- Primary Email Address
User Profile
The User Profile section displays your Sugar name, user name, status, user type, avatar, and license type. Of these fields, regular users can only modify First Name, Last Name, and Avatar; the rest are set by Sugar administrators as described in the User Management documentation. Each user must have one or more Sugar products selected in their License Type fields. This field controls what functionality you may access. When working in Sugar or learning about the features available to you, view your profile to confirm your license type(s). A list of functionality available for each license type is listed in the License Types Matrix documentation.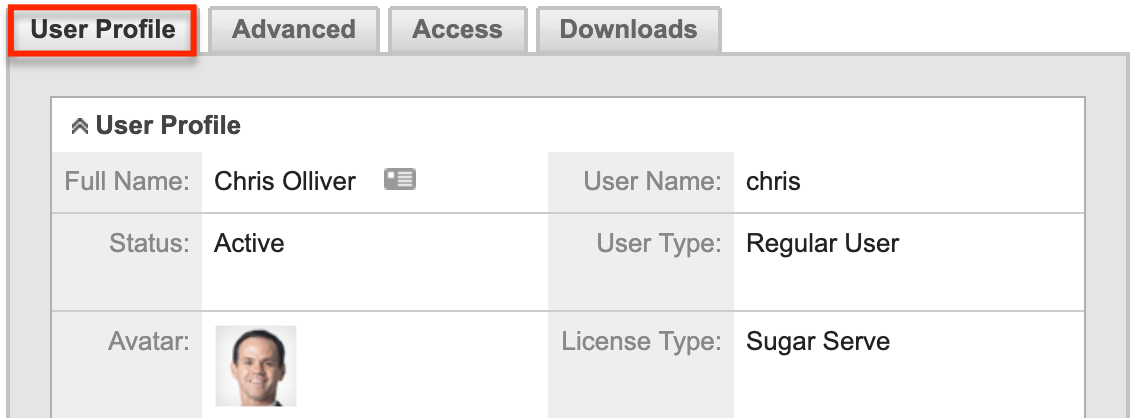
Employee Information
The Employee Information section displays your employee status, title, phone number, address, etc. If you completed the Your Information step of the New User Wizard, the information you entered will appear in this section. You can update your address, phone number (e.g., Work Phone, Mobile), description, IM Type (e.g., MSN, Yahoo!), and IM Name in this section accordingly. Please note that only system administrators can change your employee status, title, department, and supervisor information. For instances that use SugarIdentity, administrators will need to access SugarIdentity in order to update the Title and Department fields. For more information on administrator updates to the Employee Information section, please refer to the User Management documentation.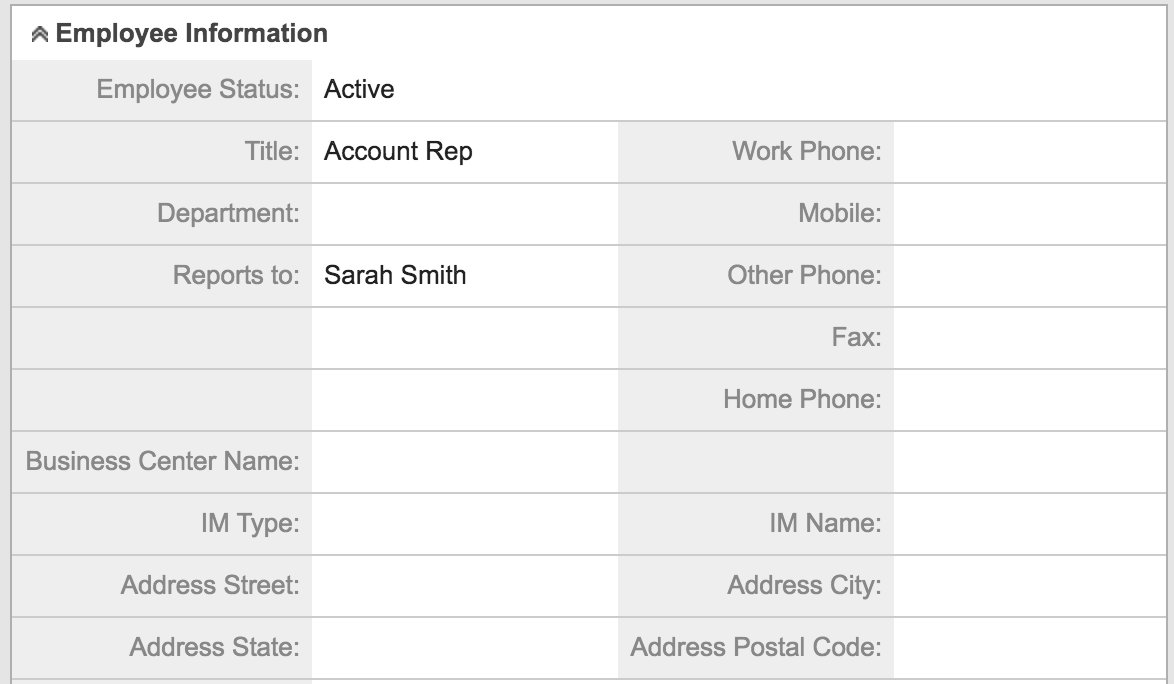
Email Settings
The Email Settings section contains your primary email address and preferred method for sending mail from Sugar.
Note: For instances that use SugarIdentity, the user's primary email address can only be edited by administrators in SugarIdentity.
If the administrator has set up the system email, you may see an Authorize button or a field for email server information when editing your profile.
The Email Settings section contains two fields:
- Email Address: Enter your primary email address.
- Sugar refers to the primary email address in the user's profile to send messages such as password-reset emails, record-assignment notifications, and workflow alerts to users.
- Users can add multiple email addresses in email settings, but only one can be marked "Primary".
- If the administrator has enabled the system email account for users, the primary email address will be displayed when the user sends outbound emails via the system email account.
- Outgoing email accounts (e.g., support@example.com) that are used to send outbound email messages will get added to the Email Address field as Sugar links the user to that email address since they used it to send an email message through Sugar.
- Email Client: Select how you would like to send email from Sugar.
- Sugar Email Client (most common): To send messages through the Sugar application and automatically archive them in Sugar, you must select "Sugar Email Client" from the Email Settings section of your user profile. This is the default setting.
- Note: To send email from Sugar, you must configure your outbound email server via Emails > Email Settings or, if using the system email account to send email, the system's outbound email server must be configured by an administrator via Admin > System Email Settings.
- External Email Client: Users can choose this option if they would like to send email from an application outside of Sugar (e.g., Microsoft Outlook, Gmail). If you choose the External Email Client option, emails sent to contacts, leads, etc. will not be saved in Sugar as archived emails unless you use the Sugar Email Archiving service (a.k.a. "SNIP") or Sugar Connect.
- Sugar Email Client (most common): To send messages through the Sugar application and automatically archive them in Sugar, you must select "Sugar Email Client" from the Email Settings section of your user profile. This is the default setting.
Note: The administrator may have configured the user's email settings when adding the user to the system, but the user can always edit the options in their profile.
Password Tab
For Sugar instances that do not use SugarIdentity, users have the option to change their password in Sugar by navigating to the Password tab in their user preferences. Administrators also have the ability to change a user's password via Admin > User Management. For more information on how administrators can manually set a user's password, refer to the User Management documentation. Please note that passwords can be changed as often as you wish in Sugar. Updating passwords in Sugar on a regular basis is recommended for the security of your account.
Note: For Sugar instances that use Sugaridentity, users can reset their password by selecting the Change Password option under the user menu on the upper right of Sugar.
To reset your password, enter your current password, new password, and confirmed password making sure to meet the password requirements listed on the right. Each password requirement will be checked off in the list as the new password meets the required conditions. Please note that the new password you enter must meet all the restrictions in order for the password to save. System administrators can configure the password requirements via Admin > Password Management. They can choose the minimum and maximum lengths required for the password, as well as indicate if any special characters are needed. Additional requirements such as upper case, lower case letters, and numbers can also be part of the set restriction. The password requirement set by the system administrator determines what users will need to include when creating new passwords. Although not recommended, administrators can choose to not set password requirements if they wish, which will allow users to change their passwords without any restrictions. For more information on configuring password requirements, please refer to the Password Requirements section of the Password Management documentation. Once you have entered the new password, click "Save" to preserve the change. 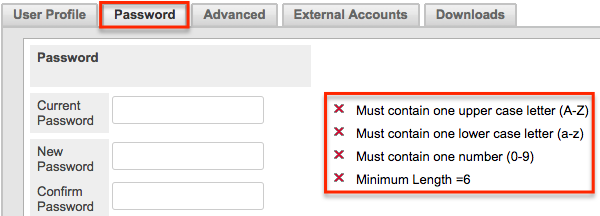
Advanced Tab
The Advanced tab shows information specific to the user's preferences in Sugar. This information includes user settings, locale settings, PDF settings, calendar options, and layout options. Users can set up, view, or change the information under this tab based on their geographical location and personal preference.
User Settings
The User Settings section allows you to configure various settings for your account such as default team(s), reminders, notify on assignment, etc. The system administrator can configure these settings for you when adding you as a user in Sugar, but you can change these settings accordingly based on your personal needs and preference.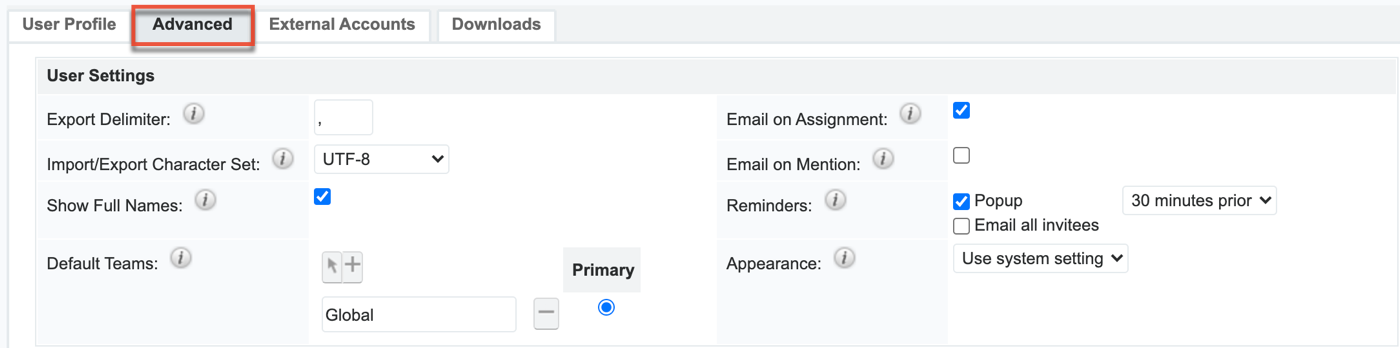
The options available to configure in the User Settings section are as follows:
- Export Delimiter: Specify the character used to delimit exported data from Sugar. By default, the comma is used to separate exported data in Sugar.
- Import/Export Character Set: Select the default character set used for data import, data export, and vCard generation. By default, UTF-8 (US or Western Europe region) is selected as the import/export character set.
- Please be sure to select the proper character set based on your locale setting in Sugar. This will make sure that the character set between Sugar and your local machine matches when you export data, import data, or generate PDFs.
- Show Full Names: Select this option if you would like your full name (e.g., John Smith) instead of your assigned user name (e.g., jsmith) displayed in Sugar. If enabled, your full name will appear in the My Activity Stream dashlet, Assigned to fields, and on the upper right of your Sugar account.
- Default Teams: Select the default team(s) that will be automatically assigned to new records you create in Sugar. Whenever you create a record, the team is set as your default team, similar to how the "Assigned To" field is set to you. You can have any number of default teams. When selecting a default team set, you must select one team as the primary team and, if the Administrator has enabled team-based permissions, you may optionally indicate whether the teams on each set should be automatically set to "selected" (Additional Permissions Enabled).
- Email on Assignment: Enable this option to receive an email notification when a record is assigned to you by another user. Both the outbound mail server and personal email settings must be configured in order to receive the notification. For more information on configuring the outbound mail server, please refer to the Email documentation.
- Email on Mention: Select this option to receive an email notification every time your name is mentioned in a comment log.
- Reminders: Enable the popup or email reminder checkbox to set default reminders for calls and meetings. Once marked, you can select the default reminder time (e.g., 10 minutes prior) to send reminders to invitees.
- Appearance: Choose which theme you want to use when viewing Sugar.
- Light: A light and bright white-based theme
- Dark: A theme based in blacks and grays, often preferred for nighttime viewing
- Use system setting: The theme (light or dark) will respect whatever rule your computer or device has set up
Note: You can configure the SugarCRM mobile app to send push notifications to your device for record assignments and comment log mentions, but note that the "Email on Assignment" and "Email on Mention" settings are independent of the mobile settings. Each must be configured separately.
Layout Options
The Layout Options section allows users to select which modules they want Sugar to display or hide in the navigation bar, how many modules should be pinned to the navigation bar when it is collapsed, and where the field name placement should be on record views. For additional information on the navigation bar and record views, please refer to the User Interface documentation.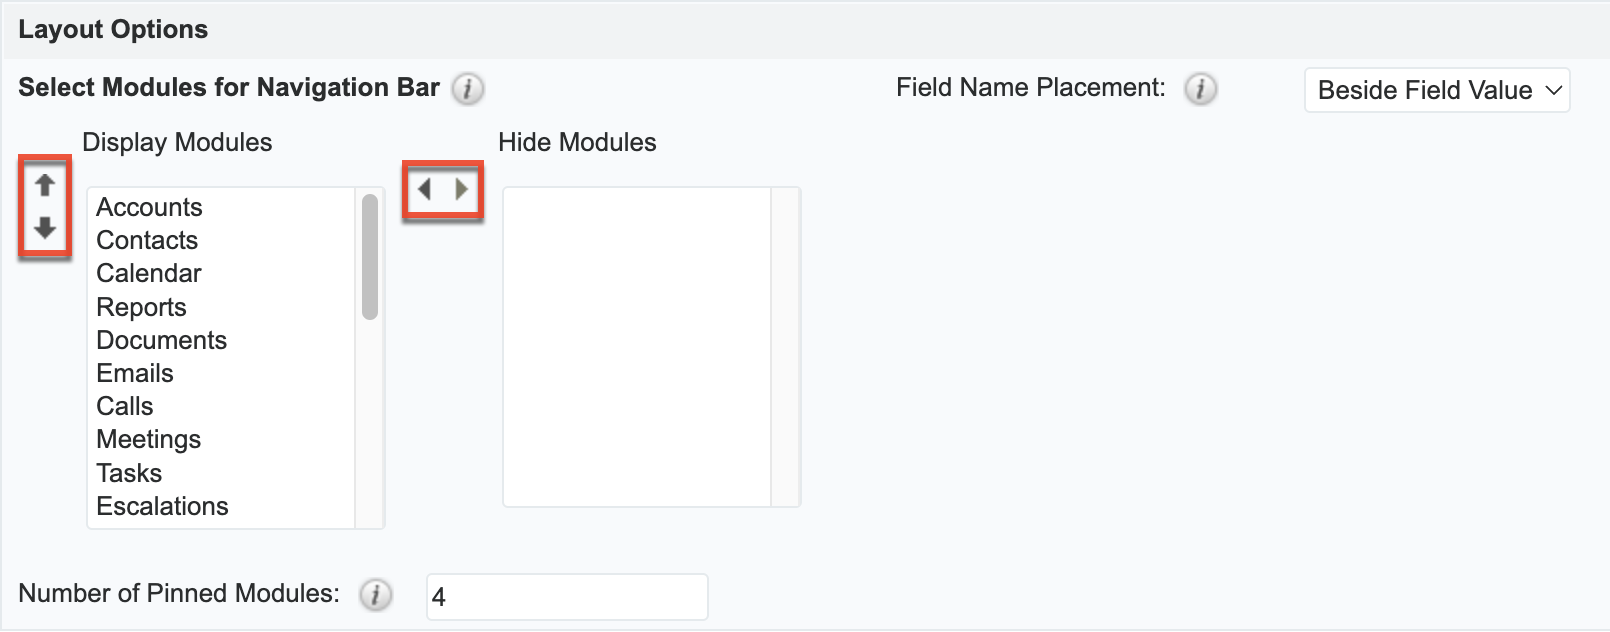
The options available to configure in the Layout Options section are as follows:
- Select Modules for Navigation Bar: Select which modules will be displayed or hidden in the navigation bar by using the left and right arrows to move modules between the Display and Hide Modules columns. You can also designate the order of the modules displayed in the navigation bar by selecting the module in the Display Modules column and clicking the up and down arrows.
- Number of Pinned Modules: Enter the number of displayed modules that will be pinned to the navigation bar when it is collapsed (i.e., if 5 is entered, the first five modules in your list are pinned). It is recommended to use a number that represents your most frequently used modules. Values over 100 will not be respected.
- Field Name Placement: Choose whether field names are displayed above or beside field values in record view; by default, field names are displayed beside the field value. This option does not apply to the Record View dashlet.
Note: Administrators can limit the ability to configure your navigation bar. For more information, refer to the Developer Tools page in the Administration Guide.
Locale Settings
The Locale Settings section is where you can specify how you would like the data in Sugar displayed based on your geographical location. Please note that system administrators can set the system locale settings via Admin > Locale, which will be the default setting for all users in Sugar. But each user has the option to change the default locale settings for their Sugar account in their user preferences.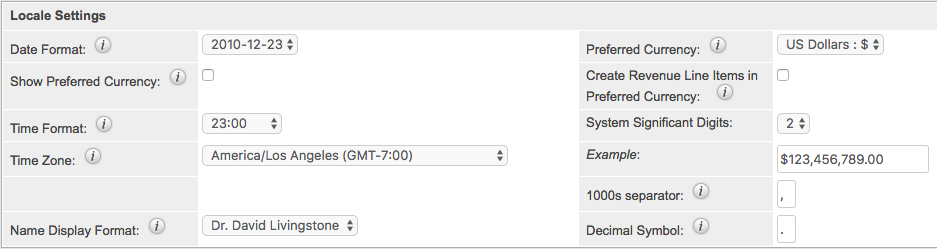
The options available to configure in the Locale Settings section are as follows:
- Date Format: Select the format you want the date stamps to be displayed in Sugar.
- Show Preferred Currency: Mark the checkbox to convert the base currency to user-preferred currency in list views and record views.
- Time Format: Select the format you want the timestamps to be displayed in Sugar.
- Time Zone: The Time Zone field will be automatically set to match your browser's time zone by default. This field is read-only.
- Name Display Format: Select the format you want the concatenated name fields displayed in Sugar's list view and record view.
- Preferred Currency: Select the default currency you wish to use when creating new records.
- Create Revenue Line Items in Preferred Currency: Mark the checkbox to use your preferred currency when creating revenue line items based on a product catalog item,
rather than the default behavior of using the product catalog item's currency. - System Significant Digits: Select how many digits will appear after the decimal symbol for currencies.
- 1000s Separator: Enter the default character used to separate numeric values in the thousands.
- Decimal Symbol: Enter the default character used as the decimal symbol.
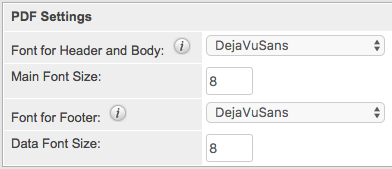
PDF Settings
The PDF Settings section allows users to set and change the default font settings for PDF documents generated in Sugar.
The options available to configure in the PDF Settings section are as follows:
- Font for Header and Body: Select the font for the header and body of PDF documents when generated in Sugar.
Note: Select the cid0ct font if you wish to export reports with Chinese characters. - Main Font Size: Enter the default font size for the PDF header when generated in Sugar.
- Font for Footer: Select the font for the footer of the PDF document when generated in Sugar.
Note: Select the cid0ct font if you wish to export reports with Chinese characters. - Data Font Size: Enter the default font size for the PDF body when generated in Sugar.
Calendar Options
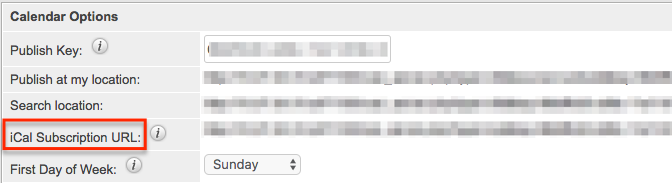
Sugar calendars can be shared and viewed with various iCal compatible calendar applications such as Apple Calendar, Google Calendar, Yahoo! Calendar, Mozilla Thunderbird, etc. The calendars are viewable as read-only in the external calendar applications and any edits to existing calendar events (e.g., meetings, calls) can only be done in Sugar. The Calendar Options section allows users to generate a unique publish key to sync their Sugar calendar to external calendar application(s). The publish key is a security feature as it prevents other users from viewing your calendar unless they have this information. The user must have your publish key information to view your Sugar calendar via the external calendar application.
- Publish Key: The publish key is used to uniquely identify a user's calendar and sync Sugar's calendar to external calendar applications (e.g., Google Calendar, Apple Calendar). A system-generated alphanumeric value (e.g., 948fc65a-9c89-a11f-b40c-5) is displayed by default, but users can change this key (e.g., mysecretkey) to whatever they wish. The Publish at my location site, Search location, and iCal Subscription URL all reflect the publish key within the URL.
- Publish at my location: Use this URL to sync free/busy information for meetings from Microsoft Outlook to Sugar. This is helpful when scheduling meetings in Sugar as you can view the user's free/busy information to avoid scheduling conflicts.
- Search location: Use this URL to sync free/busy information for meetings from Microsoft Outlook to Sugar. This is helpful when scheduling meetings in Sugar as you can view the user's free/busy information to avoid scheduling conflicts.
- iCal Subscription URL: Use this URL to integrate the external calendar application with your Sugar calendar.
- First Day of Week: Select the first day of the week that will display in Week, Work Week, and Month views when viewing your Sugar calendar. This setting also applies to calendar pickers which display when users are setting a value for a date field (e.g., Expected Close Date) in a record. You may need to refresh your browser to see changes take effect.
Use the following steps to integrate the external calendar application with your Sugar calendar:
- Navigate to the Advanced tab in your user profile and scroll down to the Calendar Options section.
- Copy the iCal Subscription URL then paste the value into your iCal compatible calendar application.
- For Apple Calendar:
- Click "File" then select "New Calendar Subscription".
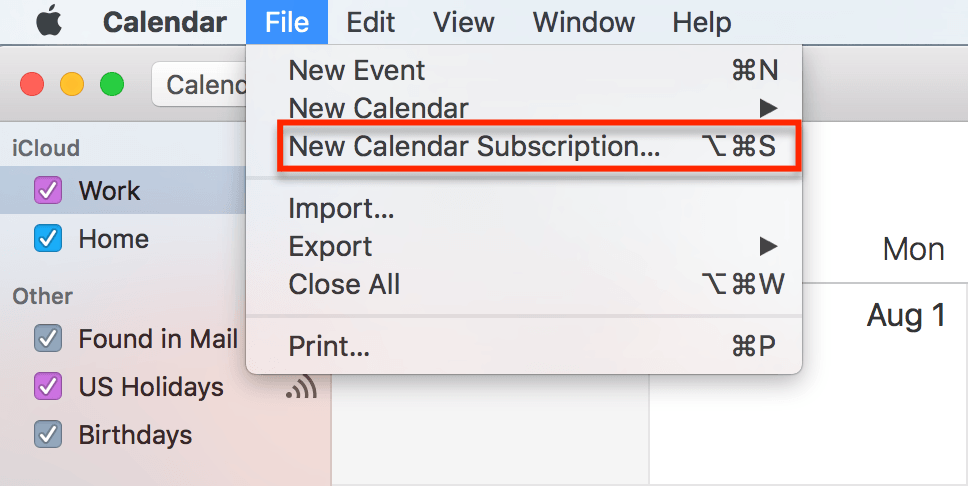
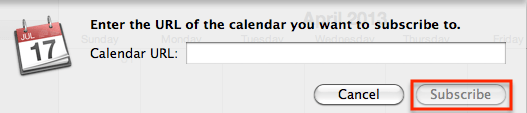
- Enter the iCal Subscription URL and click "Subscribe".
- Click "File" then select "New Calendar Subscription".
- For Google Calendar (https://www.google.com/calendar):
- Click "Other Calendars" then select "Add by URL".
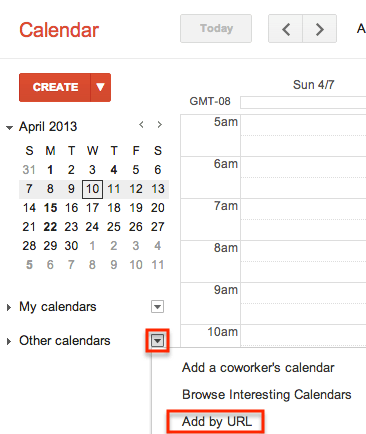
- Enter the iCal Subscription URL and click "Add Calendar".
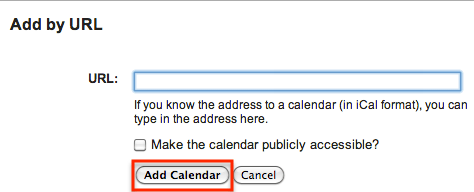
- Click "Other Calendars" then select "Add by URL".
- For Apple Calendar:
Use the following steps to sync the free/busy information from the Sugar calendar to Microsoft Outlook:
- Navigate to the Advanced tab in your user preferences and scroll to the Calendar Options section.
- Copy the Search location URL.
- In Outlook, go to File > Options > Calendar > Free/Busy Options.
- In the Internet Free/Busy section, paste the Search location URL into the corresponding box.
Please note that the settings must be configured on each user's computer. Once configured, the invitee shows as busy for any time currently scheduled in Sugar if the user's email address in Sugar matches the invitee email address in Outlook.
For help troubleshooting or displaying your Sugar calendar in an external application, refer to the Troubleshooting Viewing Sugar Calendar in Google Calendar and Troubleshooting Feed Refresh in External Calendars articles.
External Accounts Tab
The External Accounts tab allows users to connect to external applications (e.g., Google, GoToMeeting, WebEx) from Sugar. Please note that you must have an existing account with the external application prior to connecting in Sugar.
Connecting to your Google account enables you to upload and access documents stored in Google Drive from the Documents module. In addition, you can upload and view Sugar documents via Google Drive. For more information on how to upload and view external source documents, please refer to the Documents documentation. The Google connector also enables you to access your Google Drive via the Cloud Drive dashlet on dashboards throughout Sugar. Please refer to the Cloud Drive documentation for more information.
Connecting to your Microsoft account, you will be able to access your Microsoft OneDrive via the Cloud Drive dashlet on dashboards throughout Sugar. Please refer to the Cloud Drive documentation for more information.
Connecting to your Dropbox account, you can access your Dropbox via the Cloud Drive dashlet on dashboards throughout Sugar. Please refer to the Cloud Drive documentation for more information.
Connecting to your GoToMeeting and WebEx accounts allows you to be able to schedule meetings in Sugar that are hosted by one of these applications. Please note that you must indicate the specific meeting type (e.g., Sugar, GoToMeeting, WebEx) when creating the meeting in Sugar. For more information on scheduling meetings, please refer to the Creating Records section of the User Interface documentation.
When you connect to your DocuSign account, you can send documents to DocuSign for electronic signature from the DocuSign dashlet or the Documents subpanel in Sugar.
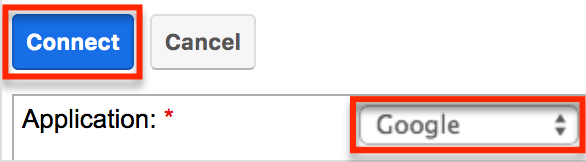
The following steps cover connecting to the Google application as an example:
- Click the External Accounts tab in your user preferences then click "Create".

- Select "Google" in the Application field then click the Connect button.
- Note: If the Google option is not available to select in the Application field, the Google connector may not have been configured properly via Admin > Connectors. Please reach out to your Sugar administrator to have the Google connector configured. For more information on configuring connectors, please refer to the System documentation in the Administration Guide.
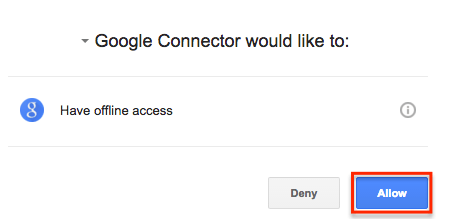
- After clicking "Connect", a pop-up window will appear. Click "Allow" to grant permission for the connection to occur.
- Google's login screen may appear inside the pop-up if you are not already logged in to your Google account in the active browser window. Simply enter your credentials then click "Allow" in the next window.
- Note: Your browser's pop-up blocker must be disabled to ensure that the Google account connects successfully to Sugar.
The Google application is now connected to your Sugar account and will appear under the External Accounts tab. Please note that for Google, Microsoft, GoToMeeting, and WebEx, you can only be connected to one account per application in Sugar.
Access Tab
Users can view their access information (e.g., Access table, Roles, My Teams) via the Access tab in the detail view of their profile. System administrators can assign users to various teams and roles depending on what each user is allowed access to in Sugar. You will be able to view the team(s) and role(s) assigned to you via the Roles and My Teams section in the Access tab.
Access Table
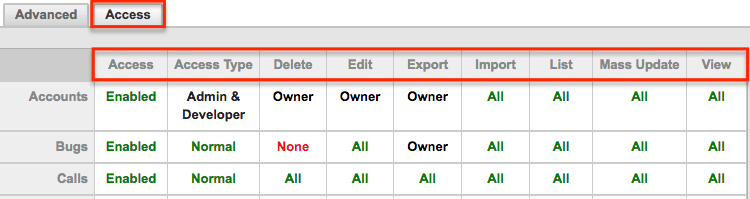
The Access table summarizes the set of permissions assigned to the user and allows them to view the type of access they have along with the actions (e.g., View, Edit, Delete) they can perform in Sugar. Only system administrators have the ability to create roles and assign them to users. Users who are assigned to the role will only be able to perform actions defined by it. Please note that users with more than one role assigned will have the more restrictive role setting prevail on the access table. For example, if one role allows the user to delete records in the Contacts module, but the other role does not allow record deletion, the user will not be able to delete records in the Contacts module. The table will list the modules in rows on the far left with column headers representing the type of action (e.g., Delete, Edit, Export) users can perform in each module. For more information on the Access table column headers, please refer to the Setting Module-Level Permissions section in the Role Management documentation.
The following setting options are available for the Access column on the table:
- Enabled: The user is allowed access to this module.
- Not Set: Does not restrict or grant access to this module, defaults to having "Enabled" access when selected.
- Disabled: The user will not be able to access this module, view any of its records, or see any trace of its existence in Sugar.
The following setting options are available for the Access Type column on the table:
- Normal: The user will be able to perform standard functions in this module barring restrictions from other roles or team settings. The user will not have any type of access to the Admin menu for this module.
- Not Set: Does not restrict or grant additional access to this module, defaults to having "Normal" access when selected.
- Admin: The user will supersede any team restrictions for this module and be able to view all records.
- Note: User does not get access to developer tools such as Studio and Workflow Management.
- Developer: The user will be given access to the module-specific sections of Studio, Workflow Management, Dropdown Editor and any other necessary menus in Admin that are specific to the module.
For more information on developer tools, please refer to the Developer Tools documentation. - Admin & Developer: The user will be given the rights defined with the Admin and Developer role settings.
The following setting options are available for the actions (e.g., Edit, Delete, Export) on the table:
- All: The user will be able to perform this action on any and all records that can be accessed.
- Owner: The user will only be able to perform this action where the Assigned To field is set to be this user.
- Not Set: Does not restrict or grant access to this function and actions default to having "All" access when selected.
- Note: The user is not able to perform this action while using this module.
Roles
Sugar Roles define permissions for users such as what kinds of records they can access and what level of access they are allowed. Roles work in conjunction with teams to form a robust security model for non-admin users in Sugar. Roles control three different layers of access for users within Sugar: module, field, and action-level access. Please note that only users who are assigned to the specific role will be able to perform actions (e.g., view, edit, delete) defined by it. For more information on the various actions and setting options for roles, please refer to the Access Table section. Users who are not assigned to a role can access and perform actions in any module as long as they are assigned to the record or a member of the team assigned to manage it. System administrators have the ability to create various roles and assign additional roles to users via Admin > Role Management. For more information on creating and assigning roles, please refer to the Role Management documentation.
The Roles section displays the list of roles (if any) assigned to the user. Please note that if you are assigned to more than one role, the more restrictive role setting prevails. For example, if you have two roles where one role allows exporting of records in the Leads module and the other does not, then you will not be able to export lead records due to the more restrictive role setting.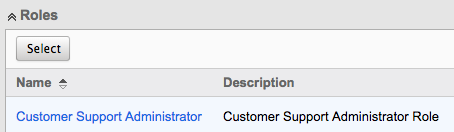
My Teams
Teams consist of one or more users who are assigned to manage records in Sugar. The defined permissions determine what records a user is and is not able to access. Teams are used in conjunction with roles to form a robust security model for non-admin users in Sugar. The My Teams section displays the list of teams a user is associated with, which determines what records the user has access to in Sugar. Please note that every record is assigned to at least one team, but can be assigned to multiple teams as well if different users need access to it. The default team(s) set in the User Settings section under the Advanced tab will automatically be assigned to new records created by the user. Users assigned to the record, as well as system administrators can access the record regardless of team membership. When a user is created in Sugar, they are automatically associated with the Global team (universal team) and a Private team (users own personal team) is created by default. System administrators can assign users to additional teams via Admin > User Management or Admin > Team Management as necessary. For more information on teams as well as creating and assigning teams, please refer to the Team Management documentation.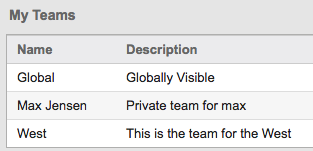
Downloads Tab
The Downloads tab contains the files to download the Sugar Plug-in for Excel. The Excel plug-in enables you to create, delete, update, or view data that is in your Sugar application. The plug-in is available with all Sugar products and must be installed on each Windows computer running the Microsoft Office application where the plug-in is desired.
To download the plug-in, click the appropriate file that corresponds with your version and bitrate of Microsoft Office Excel. Please be sure to check for the correct version and bitrate of your Microsoft Office application in order to download the correct file for installation. For more information on downloading and installing the Sugar plug-ins, refer to the appropriate Plug-ins documentation.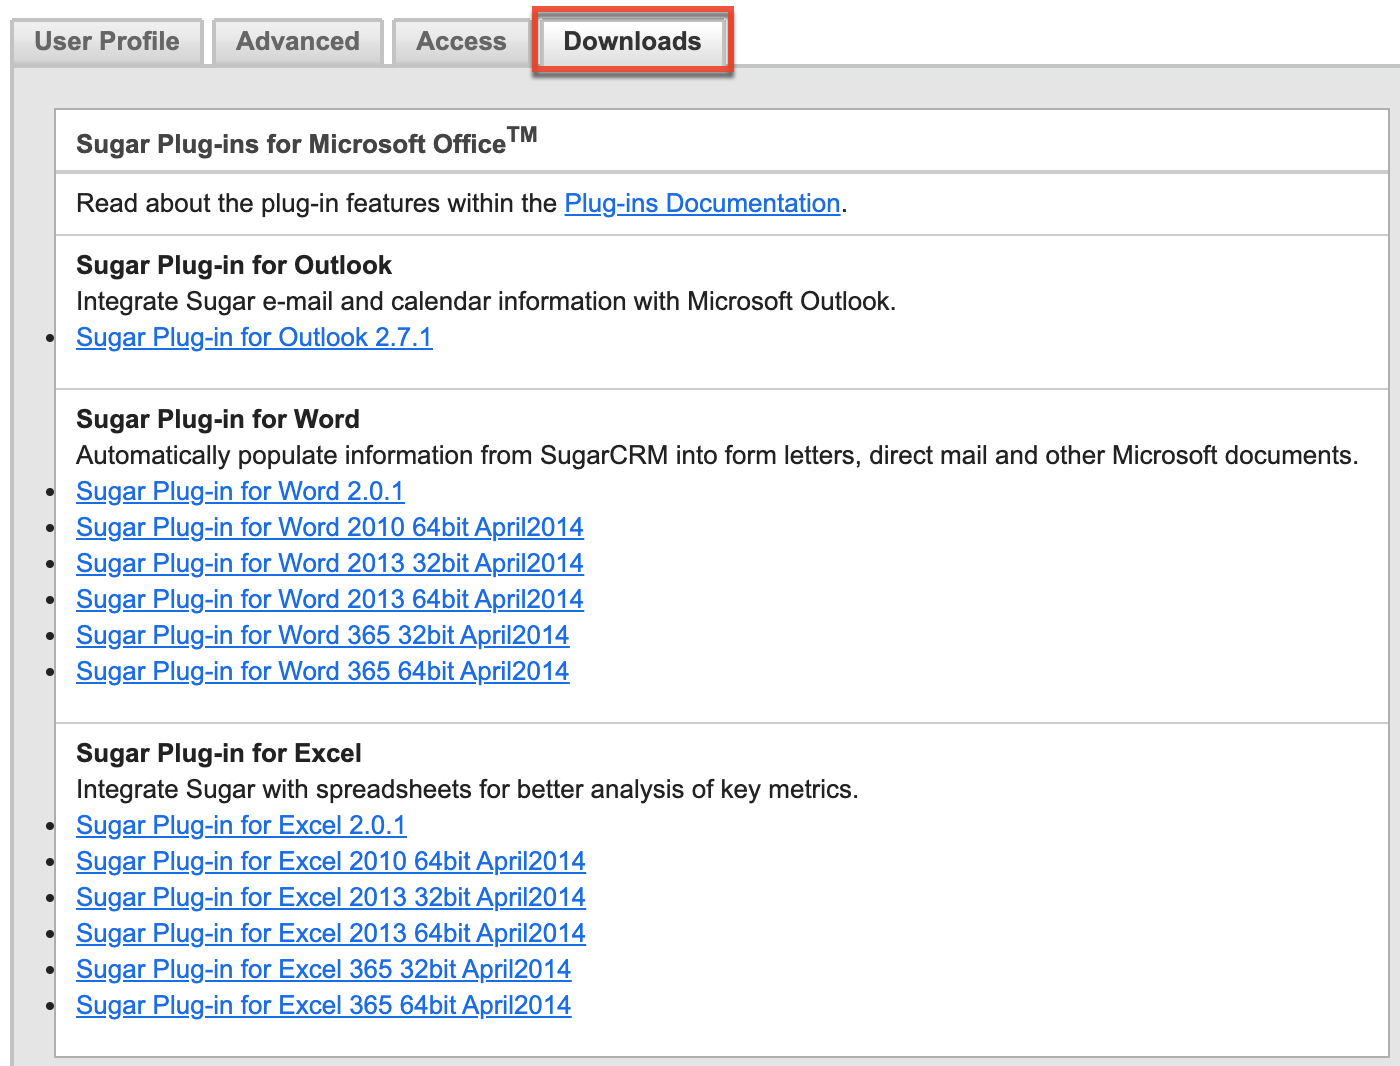
User Holidays
The User Holidays subpanel appears in the detail view (e.g., User Profile tab, Advanced tab) of the user's profile. Administrators can record the days that users will not be working so that the time off is considered when calculating project timelines in the Projects module. To add a holiday, click the Create button and enter the date of the holiday along with a description and then click "Save". Users will be able to select the scheduled holiday(s) via the Project Holidays subpanel in Projects-related modules. For more information on creating and managing projects, please refer to the Projects documentation. 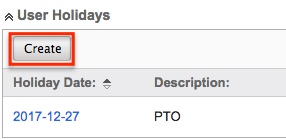
Resetting a User's Preferences
Users can reset their user preferences back to the default out-of-the-box settings, which will revert all changes made to the user preferences section (e.g., User Profile, User Settings, Locale Settings). To reset your user preference, click the Reset User Preferences button at the top of your profile in edit view or click the Actions menu then select "Reset User Preferences" in detail view.
From edit view: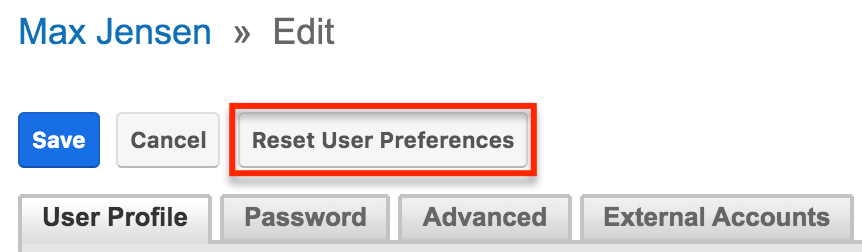
From detail view: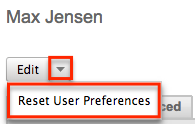
Changing Password
For Sugar instances that use SugarIdentity, users can change their password in Sugar by selecting the Change Password option under the user menu on the upper right of Sugar. The Change Password screen will open and display the Old, New, and Confirm password fields as well as the organization's password requirements (if any). Please note that passwords can be changed as often as you wish in Sugar, and it is also recommended that you update your Sugar passwords on a regular basis for the security of your account.
Note: Administrator users also have the option to change their Sugar password in SugarIdentity. 
To change your password, simply enter your current password, new password, and confirmed password making sure to meet all the password requirements listed on the screen. System administrators can configure the password requirements in SugarIdentity, which determines what users will need to include when creating new passwords. Administrators can set the minimum and maximum lengths required for the password, as well as indicate if any special characters are needed. Additional requirements such as upper case, lower case letters, and numbers can also be a part of the password requirements. If you do not remember your current Sugar password, click the "Forgot Password?" link to request a password reset.
Once you have entered the new password, click "Confirm" to preserve the change. A success message will appear once the password has been updated successfully; click "Continue" to log in and access your account. You will also receive an email notification confirming that your Sugar password has been changed.
Resetting Multi-Factor Authentication
For SugarIdentity-enabled instances that use multi-factor authentication, users will need to use a mobile authenticator app (e.g., Authy, Google Authenticator, Microsoft Authenticator) to log in to their account. When the administrator enables multi-factor authentication for your Sugar instance, the Reset Multi-Factor Auth option will appear under your user menu on the upper right of Sugar. Do not click this option if you have not already authenticated using a mobile authenticator app. Only perform this action if you need to reset the multi-factor authentication for your account, for example, when you need to set up the authenticator app on a new mobile device. Please note that administrators also have the ability to reset multi-factor authentication for your account in case you lose your mobile device, for example, and need to re-authenticate using an authenticator app on a new device to log in to Sugar.
Use the following steps to reset multi-factor authentication for your account:
- Click your user profile on the upper right of Sugar and select "Reset Multi-Factor Auth".
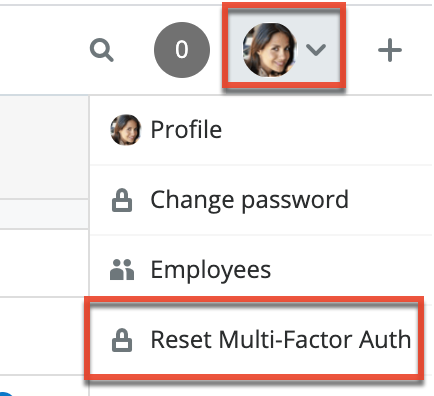
- A pop-up message will appear asking for confirmation. Performing this action will immediately log you out and you will need to re-authenticate using an authenticator app on your next log in. Click "Confirm & Log Out" if you wish to proceed.
The next time you log in to Sugar, you will be required to scan the QR code to pair the authenticator app with your Sugar account. For steps on logging in to Sugar using an authenticator app, refer to the Logging In With SugarIdentity Using Multi-Factor Authentication section of this page.
Accessing Support
The SugarCRM Support page provides access to various Sugar Support resources such as the case portal, documentation, knowledge base, etc. Users can easily access the support page by clicking the help icon in the navigation bar. To access Sugar's Support page outside of your instance, go directly to the SugarCRM Support site on your web browser.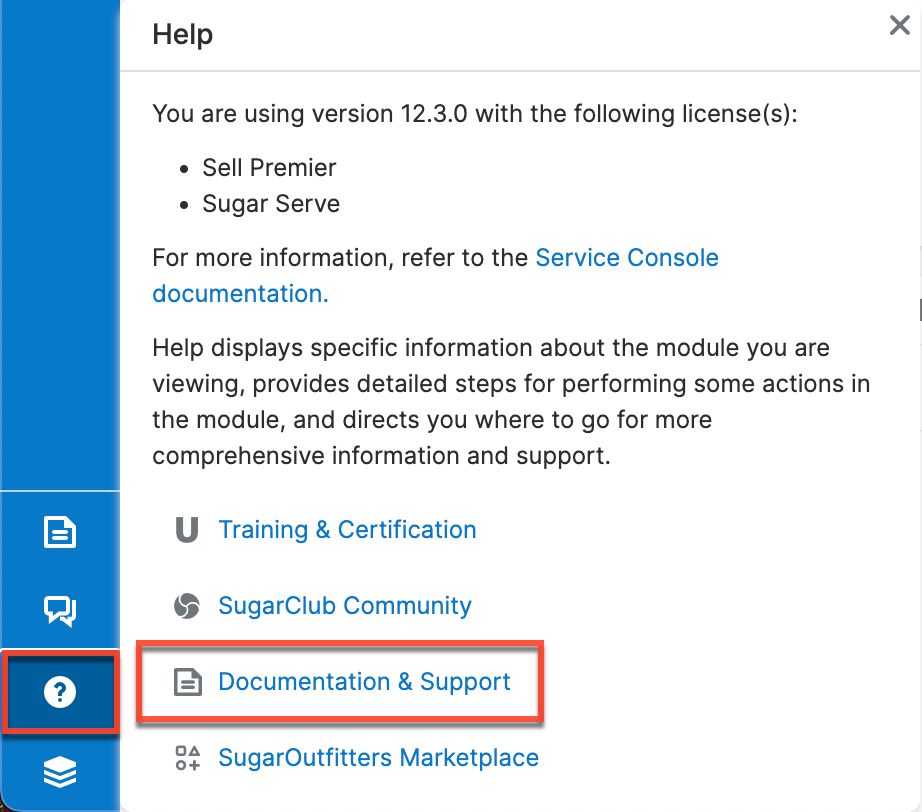
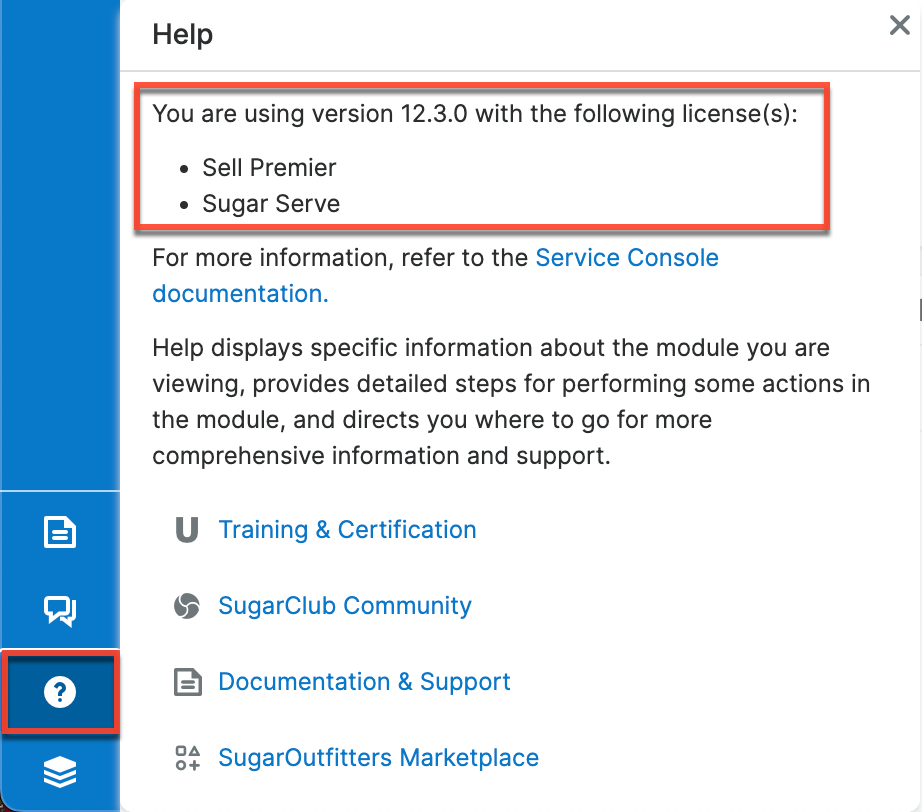
Finding Your Product and Version Information
Users can find their Sugar instance's version and build number and their assigned CRM solution licenses (e.g., Sugar Sell Advanced, Sugar Serve) by clicking their user avatar on the upper right of Sugar and selecting "About".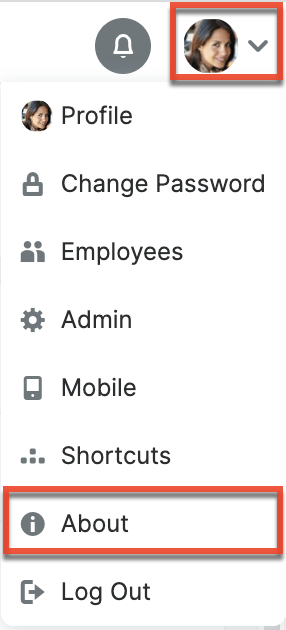
You can also find information regarding your Sugar instance's version and your assigned CRM solution licenses by clicking the Help link in the navigation bar.