Microsoft Dynamics Connector for Sugar Market
Overview
This page covers integrating Sugar Market with Microsoft Dynamics CRM, including configuring, syncing, and using data mappings.
Important: Review Integration Overview: All CRM Types before proceeding with this topic. If you are a new customer installing and configuring the MS Dynamics integration for the first time, then please also read this page on creating a Microsoft Application ID.
Topics
- Supported Versions
- Installation and Configuration
- Custom Entities
- Static Lists vs Dynamic Lists
- Uninstalling Sugar Market
- Microsoft Dynamics CRM Mappings (separate page)
Supported Versions
Refer to the Sugar Market Supported Platforms page for the current list of Microsoft Dynamics CRM versions that Sugar Market supports.
Integration With Microsoft Dynamics
The following are the two main components in the Sugar Market bundle:
Buyer's Journey Integration
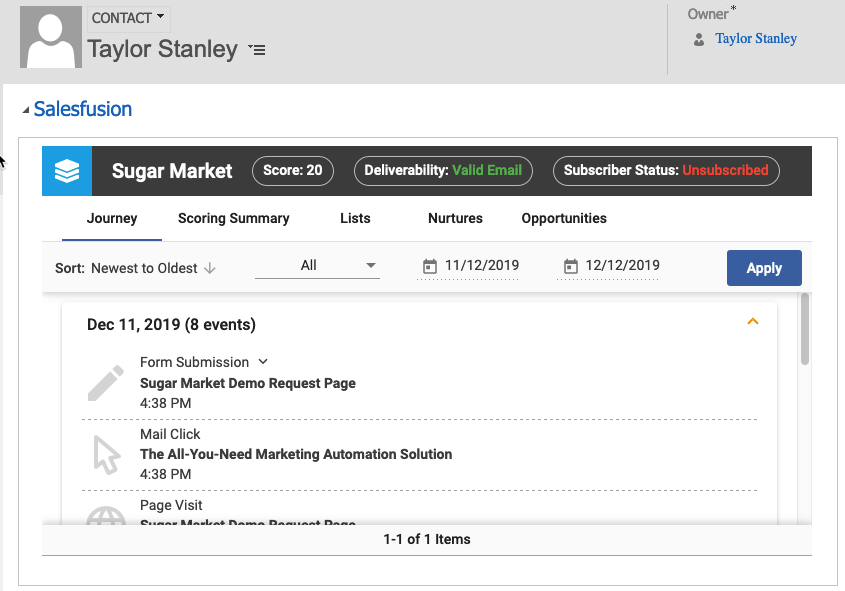
The Buyer's Journey Integration is automatically installed and added to the forms for contacts and leads and can be found near the bottom of the page under a section labeled Sugar Market when viewing a record.
Custom Entities
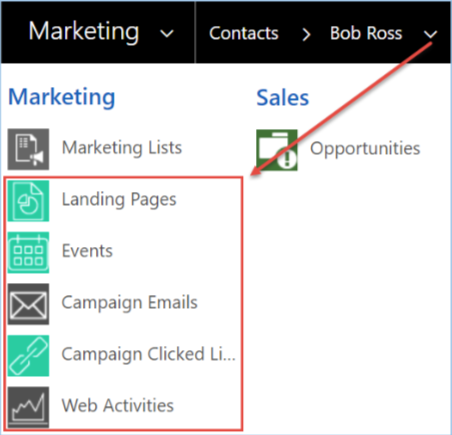
The following five custom entities are installed with the Sugar Market Dynamics bundle: Landing Pages, Events, Campaign Emails, Clicked Links, and Web Activities. They can be found under the record dropdown when viewing a contact or lead.
These custom entities can be used to store activity pushed from Sugar Market to MS Dynamics. You can also choose to push activity to the Activity Record in Dynamics instead of using the custom entities.
Emails
Once Sugar Market has captured the delivery status of an email recipient, the respective record in CRM will be updated per the options selected in the connector configuration. The two options are to create a Sugar Market Email Activity record, or a native Activity record.
Option 1: Sent Email to Sugar Market Email Entity (Campaign Emails)
Contains both the Open and Click count, the email sender, and the name of the campaign. This is a good option if you do not want to clutter up the Activity Record section as well as see more information at a glance.

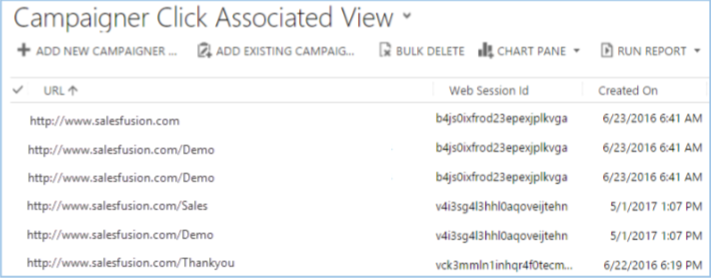
Email URL Link Clicks (Clicked Links)
Clicking into a campaign pushed to our custom entity will allow you to see the Links\URLs clicked.
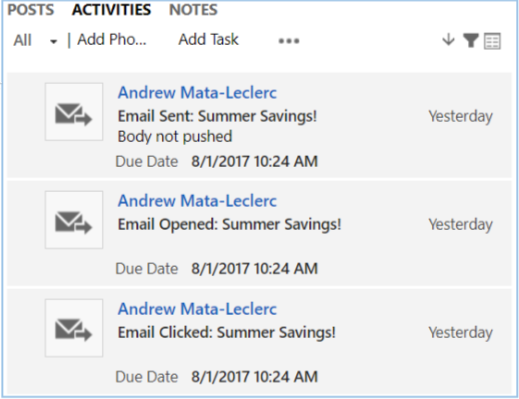
Option 2: Pushing Email Sent, Opened, and Clicked to Activity Record
This option does not have the ability to roll up to one sent email. Therefore, each activity will be pushed up as a separate activity. This can become a bit cluttered, however if your sales team lives in the Activity record, it can be a good option.
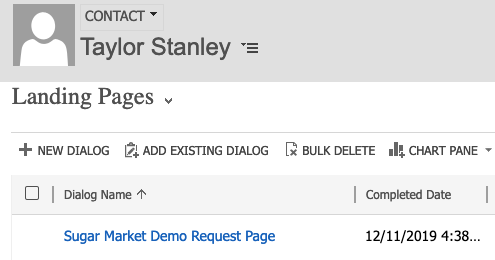
Landing Pages
Once Sugar Market has captured a landing page completion, the respective record in CRM will have a Landing Page completion added to the Landing Pages custom entity.
Completions to Custom Entity
You will be able to see the Dialog Name and completed date for each landing page completion.
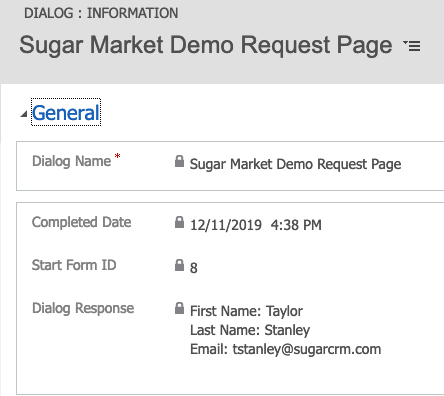
Completion Detail
Clicking into the completions allows visibility of the data submitted into the landing page. (Dialog Response)
Web Activity
Once Sugar Market has captured cookied web activity for a lead or contact, the respective record in CRM will be updated per the connector configuration. The two options are to create either a Sugar Market Web Activity record or a native Activity (history) record. You can also push up uncookied web activity at the account level.
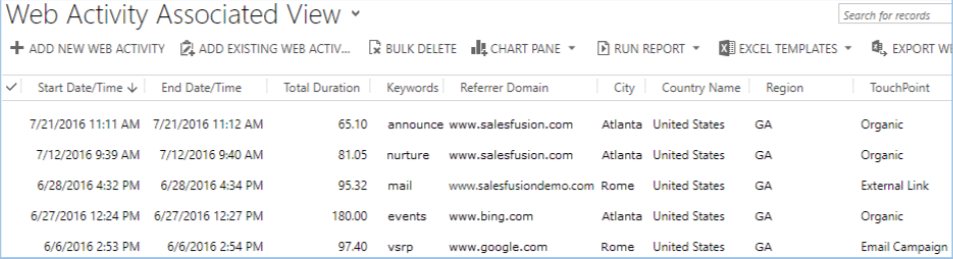
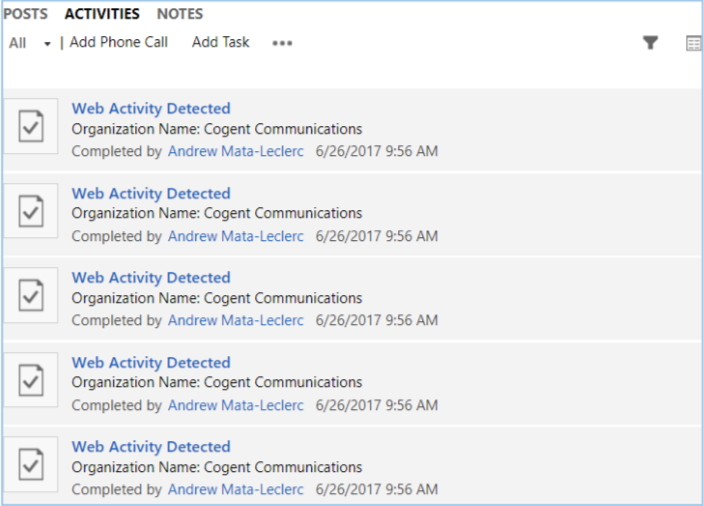
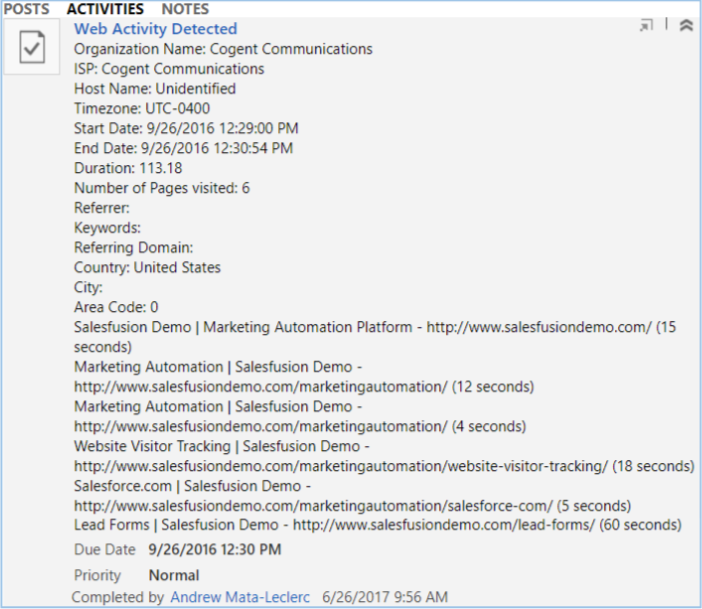
Option 1: Web Activity to Sugar Market Web Activity Entity
This allows you to see more information easily, without having to click into the activity. Pushing the activity to our custom entity also will keep your Activity History from getting cluttered with lots of web activity.
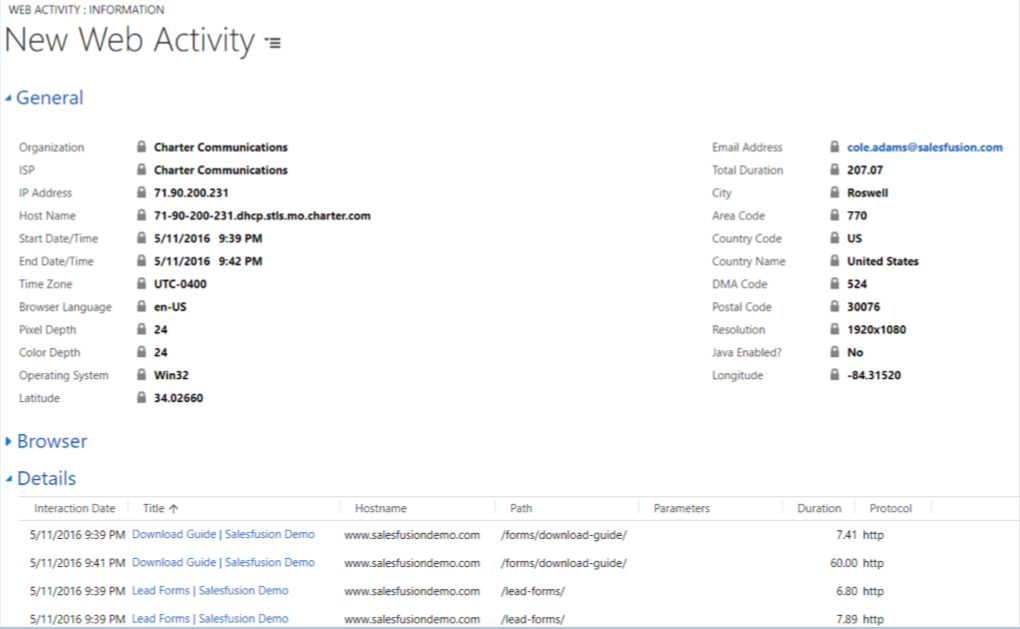
Clicking into any of the activities brings up more details on the web session.
Option 2: Web Activity to Activity Entity
This is a good option if your team lives in the Activity section of contacts and leads. The activity will be marked as completed by the syncing user.
Clicking into any of the activities expands more details on the web session.
Events
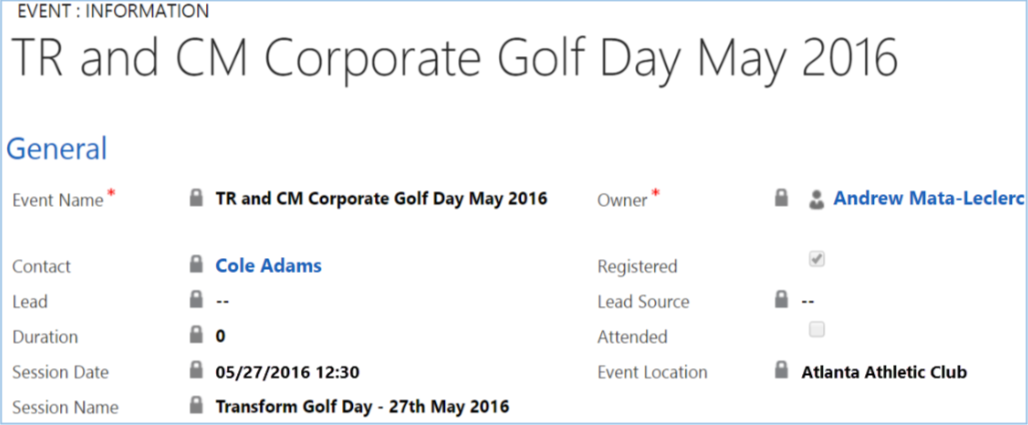
Once an event in Sugar Market is over, all registered and attended contacts and leads will have their respective records in CRM updated with the event information inserted into the custom Event Management entity.
Events to Custom Entity
This will allow you to see the event attendance information for any event that record has registered for.
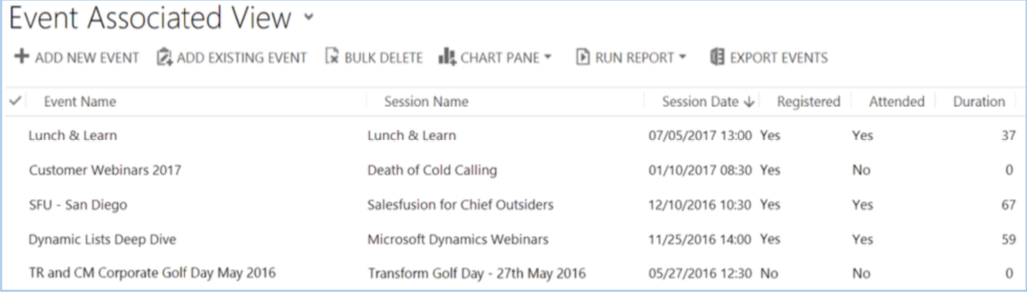
Clicking into any of these events will allow you to see additional information about the event.
Tasks
When a task is created in Sugar Market, you can push those as Open Activities to the corresponding CRM record.

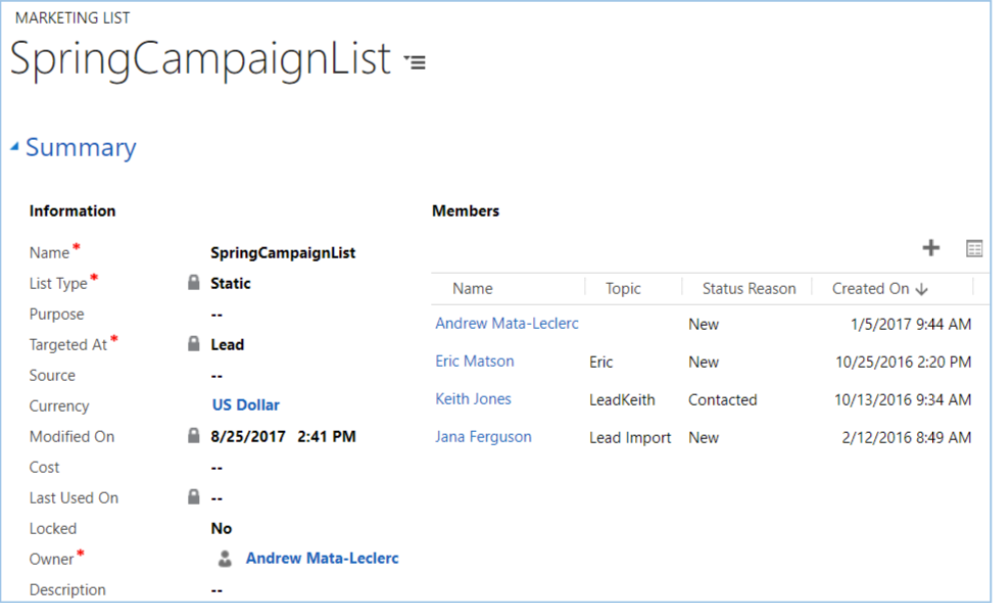
Marketing Lists
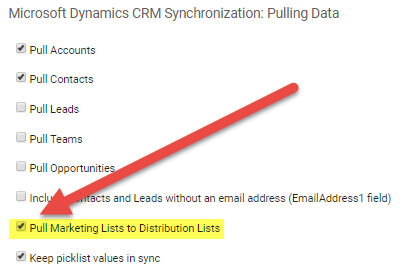
By selecting the corresponding checkbox in the Sugar Market connector screen, (Pull Marketing Lists to Distribution Lists) Sugar Market will sync down members of Marketing Lists from Dynamics into a Sugar Market distribution list, which can then be used as an include or exclude list. Static lists are synced every sync cycle, whereas Dynamic lists are synced every 24 hours from the first time we pulled the list down.
Notes regarding syncing Dynamics Marketing lists:
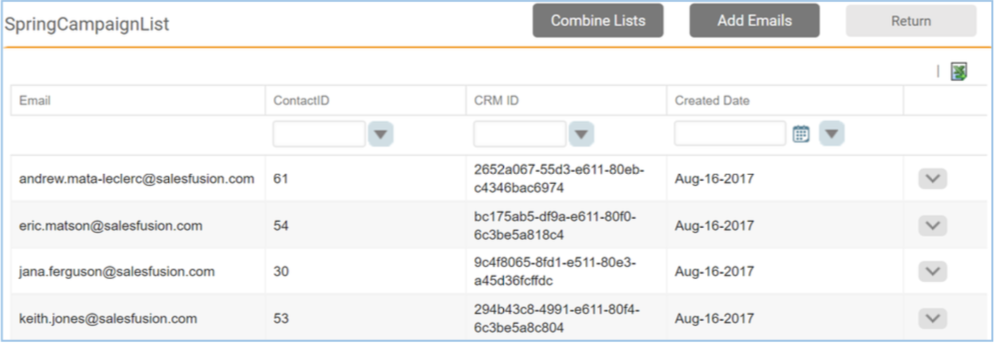
- If the records do not already exist in our database (in the Contact table), we will not sync them into the Sugar Market distribution list.
- Sugar Market distribution lists do not contain duplicate emails.
Installing Sugar Market
Follow the instructions in this section if you are installing Sugar Market for the first time. If you currently have Sugar Market installed, then please refer to the Upgrading Sugar Market section.
Prerequisites
The following are required before you can install Sugar Market:
- A Dynamics user with administrative privileges.
- A Microsoft-issued Application ID. Please refer to the Creating an Application ID for Sugar Market with Dynamics Integrations page for more information.
Note: Please publish all customizations prior to starting this process to ensure there are no errors.
Installation
The Sugar Market installation is comprised of the following steps:
- Downloading install files
- Installing the Sugar Market package
- Configuring the Buyer's Journey Integration
Download Install Files
Download one of the following packages based on your version of Microsoft Dynamics:
- Microsoft Dynamics 365 Online only: Sugar Market 1.1.0.1
- Microsoft Dynamics 2015, 2016 (Online or On-Premise) OR Dynamics 365 (on-premise): Sugar Market 1.0.0.0
Install the Sugar Market Package
To install the Sugar Market Package, in your Microsoft Dynamics instance:
- Navigate to Settings > Solutions.
- Select Import.
- In the pop-up dialog, select "Choose File", and then select the Sugar Market package you downloaded above.
- Click "Next".
- In the Post Import Actions section, ensure the "Enable any SDK Message processing steps included in the solution" option is checked, and then click "Import". A success message displays when the installation is complete. If the install fails, please export the log file and file a case with the Sugar Support team.
Configure the Buyer's Journey Integration
To configure the Buyer's Journey integration:
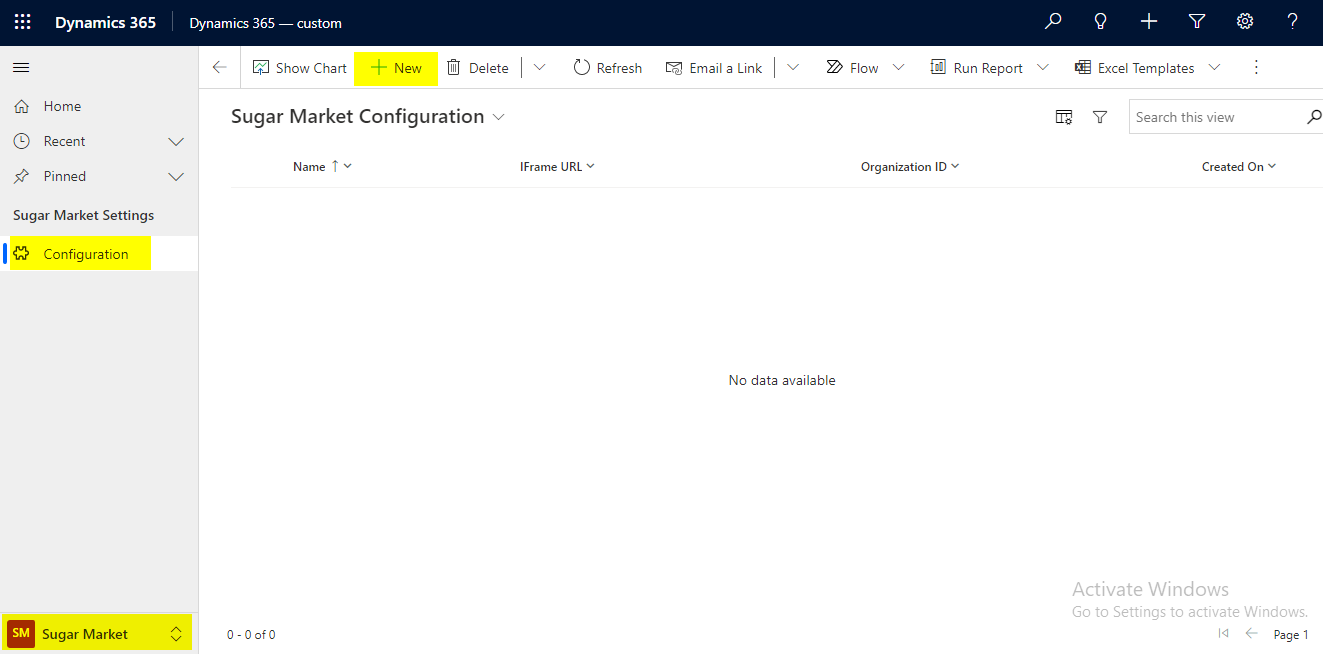
- Navigate to Sugar Market > Configuration.
- Click the New button in the toolbar.
- Create a new configuration record using the following settings:
- Name: We recommend "Sugar Market Buyer's Journey", but can be anything.
- Sugar Market URL: https://app.salesfusion.com (not applicable for Dynamics 365 Online)
- IFrame URL: https://iframe.salesfusion.com
- Organization ID: Automatically populated per your CRM's Instance ID (located in Developer Resources).
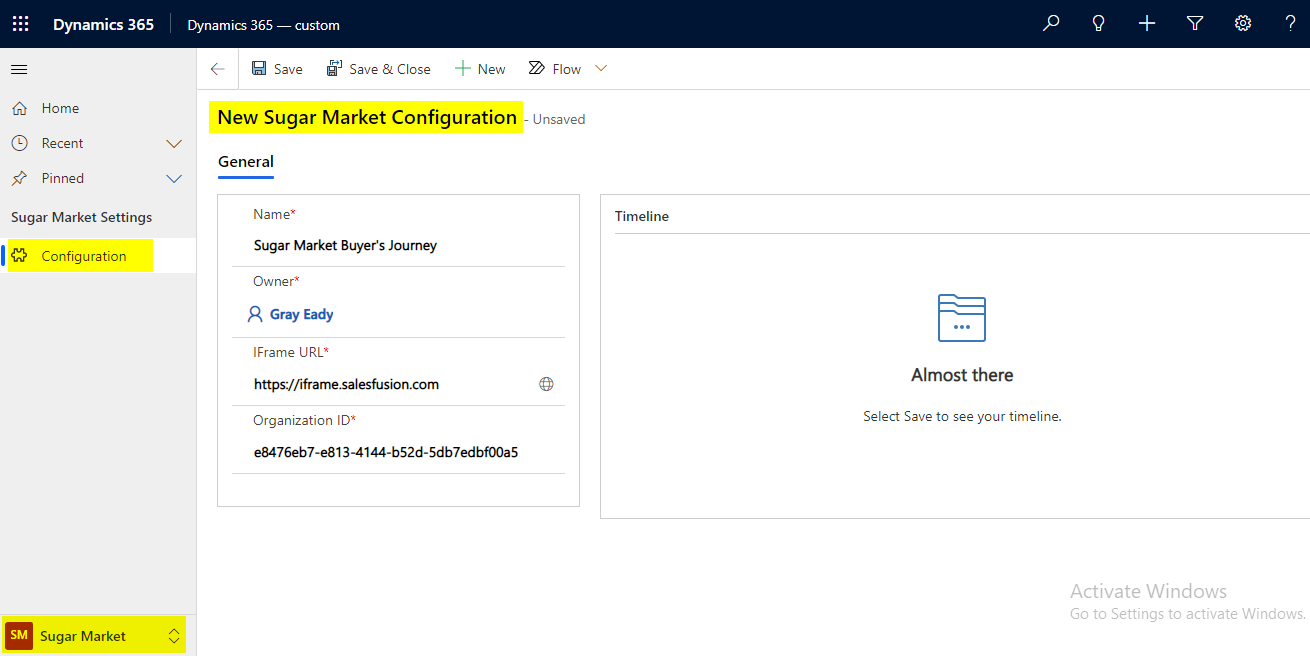
- Click the Save button in the toolbar.
In some cases, the Buyer's Journey configuration may need to be done manually. Follow these steps to configure the Buyer's Journey manually:
- Navigate to Settings and click "Customizations".
- Click "Customize the System".
- Expand "Entities" and expand either Contact or Lead (configuration will need to be added for both form layouts).
- Expand Contact (or Lead) and select "Forms".
- Locate and select the Form layout that is currently in use for Contact or Lead.
- Add a new tab for the Buyer's Journey to the layout by selecting the "Insert" tab at the top of the toolbar and then selecting "Insert Ribbon" > "One Column".
- Click on the newly created tab in the layout to access the tab's properties and give the tab a "Name" ex. "Sugar_Market" and a "Label".
- Click on the "Section" in the newly created tab to update the "Name" and "Label" for the section properties.
- From the "Insert" toolbar select the Web Resource option.
- From the Web Resource drop-down field select "WebResourceLookup for HTML" and search for and select the iFrame URL.
- Add a "Name" and "Label" to match the name of the Section and click OK.
- Return to the "Home" tab of the toolbar, click "Save" and then click "Publish".
After publishing, then test a Lead or Contact based on which form was edited. A Sugar Market tab should be present, based on how it was named in the steps above, showing the Buyer's Journey information in the iFrame.
Repeat these steps for the other form layout.
Upgrading Sugar Market
To upgrade an existing version of Sugar Market, please follow the instructions in this section. Never uninstall your current version of Sugar Market since you will lose any data that was pushed up to the Sugar Market custom entities.
Download the Sugar Market Package
Use the following chart to determine the correct package to download. To locate the version of Sugar Market that is currently installed, navigate to the Settings menu, and then select "Solutions".
| Microsoft Dynamics Version | Installed Sugar Market Version | Download Package | ||
| 2013 to 2015, 2016 (online or on-premise) | 4.x.x.x | Sugar Market 4.0.2.7 | ||
| 3.x.x.x | Sugar Market 3.0.2.7 | |||
| Dynamics 365 (on-premise only) | 4.x.x.x | Sugar Market 4.0.2.7 | ||
| 3.x.x.x | Sugar Market 3.0.2.7 | |||
| Dynamics 365 (online only) | 4.x.x.x | Sugar Market 4.0.2.9 | ||
| 3.x.x.x | Sugar Market 3.0.2.9 | |||
| 1.x.x.x | Sugar Market 1.1.0.1 | |||
Upgrading from Microsoft Dynamics CRM 2011 to 2015
When upgrading from Microsoft Dynamics CRM 2011 to Microsoft Dynamics CRM 2015, you need to upgrade Sugar Market in two steps. After upgrading from 2011 to 2013, upgrade Sugar Market according to the chart above. Then, after upgrading from 2013 to 2015, upgrade Sugar Market again according to the chart above.
Install the Package
Complete the following steps to install the upgrade package.
- Navigate to Settings > Solutions.
- Select "Import".
- In the pop-up dialog, select "Choose File", and then select the Sugar Market package downloaded above.
- Click "Next", and then select the following options:
- Solution Action (only available for Online 365): Update (not recommended)
- Previous customizations on components included in this solution: Overwrite customizations (not recommended)

- In the Post Import Actions section, ensure the "Enable any SDK Message processing steps included in the solution" option is checked, and then click "Import". A success message displays when the installation is complete. If the install fails, please export the log file and file a case with the Sugar Support team.
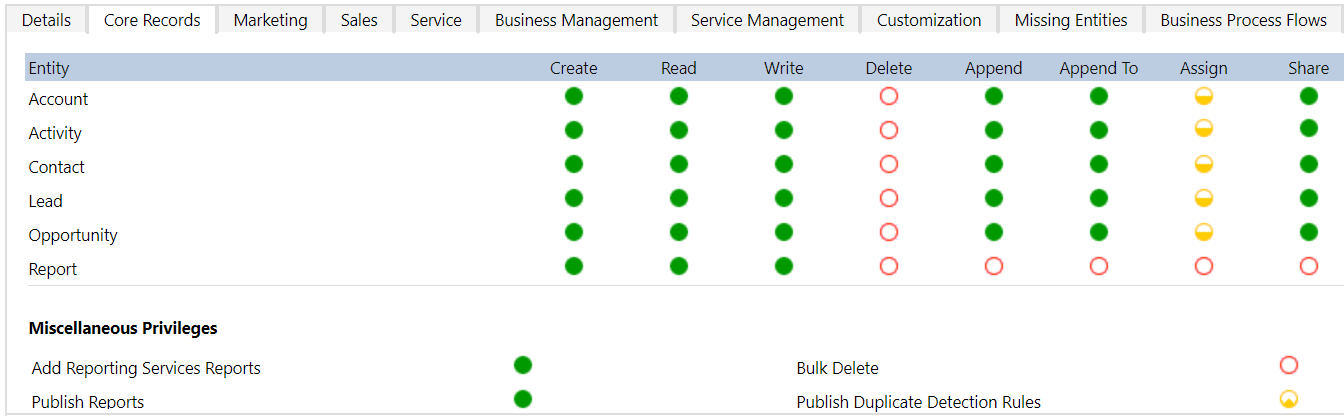
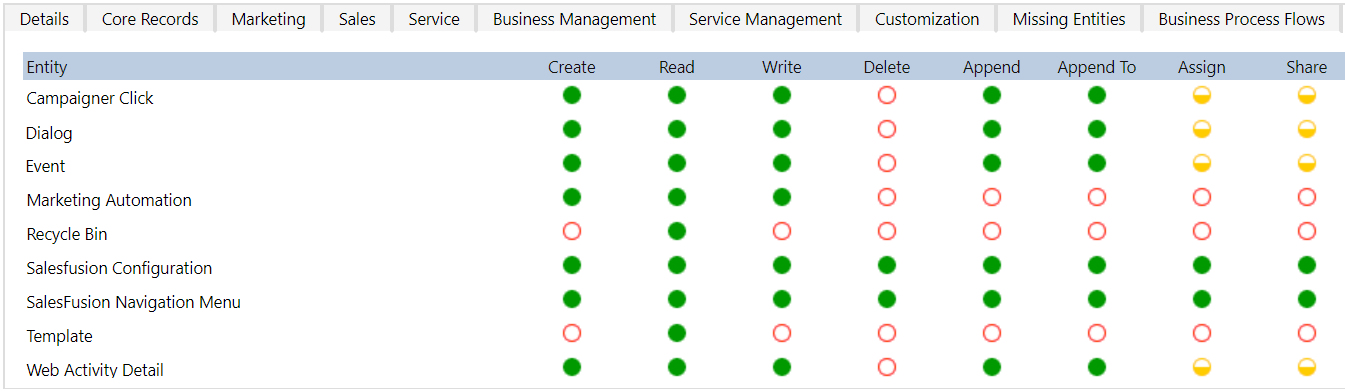
Minimum Permissions for Syncing Users
Below are the minimum permissions required for the user you use to authenticate against your Microsoft Dynamics CRM to push and pull data (sync). You may add more permissions if desired since using this user in Microsoft Dynamics will be limited to minimum permissions, which is likely to make troubleshooting any sync issues difficult.
Please note that the screenshots below show only the required permissions. Any permissions that are mentioned are not necessary.
Core Records
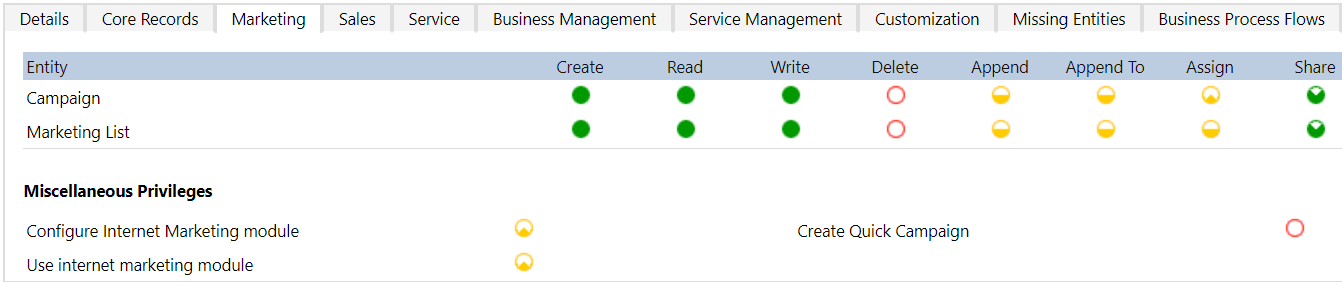
Marketing
Sales

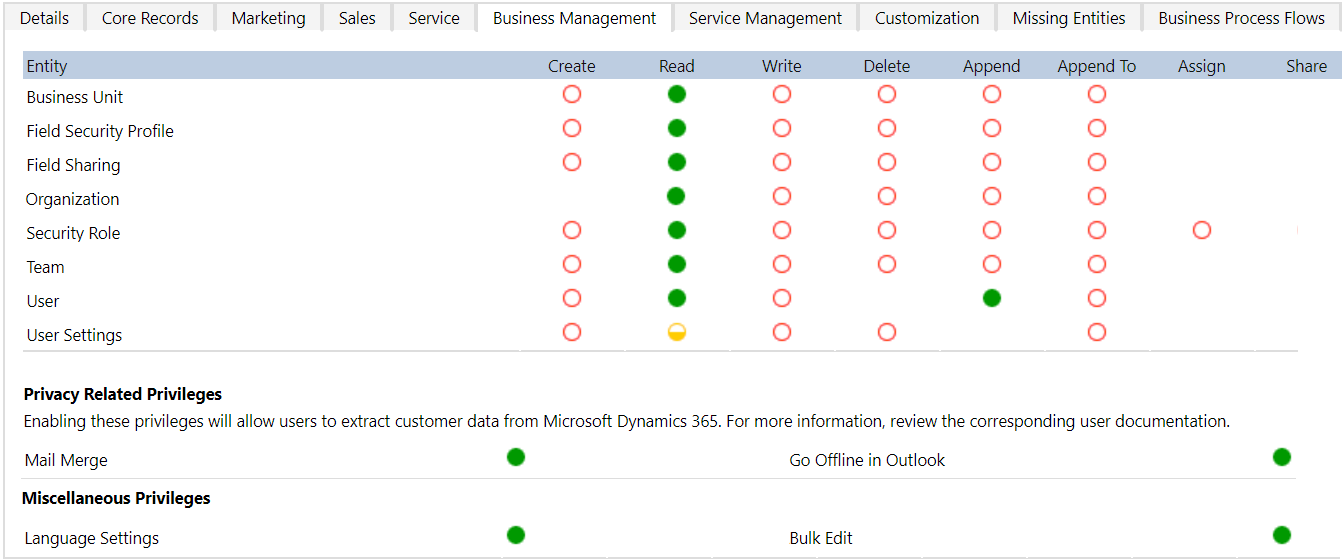
Business Management
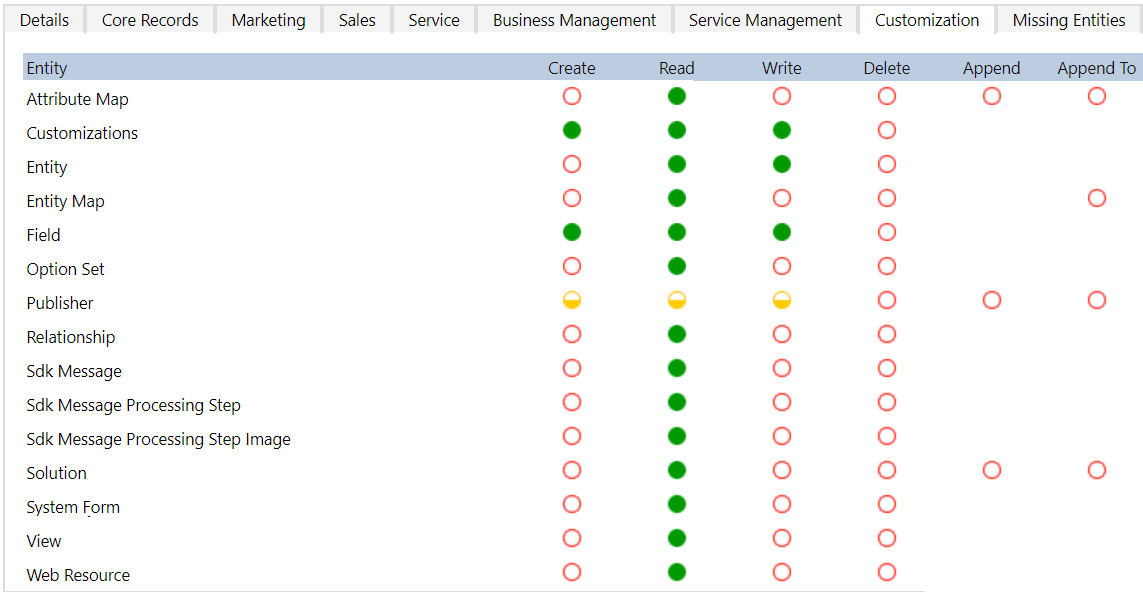
Customization
Custom Entities
Minimum Requirements for Sugar Market Tab or Sugar Market Iframe Only
Below are the minimum permissions required for users to interact with the Sugar Market Configuration tab and to see the iframe.

Configuring the Microsoft Dynamics Connector
The Sugar Market CRM Connector provides access to set up and modify your password access, synch preferences, and a timetable of the last completed sync with your CRM.
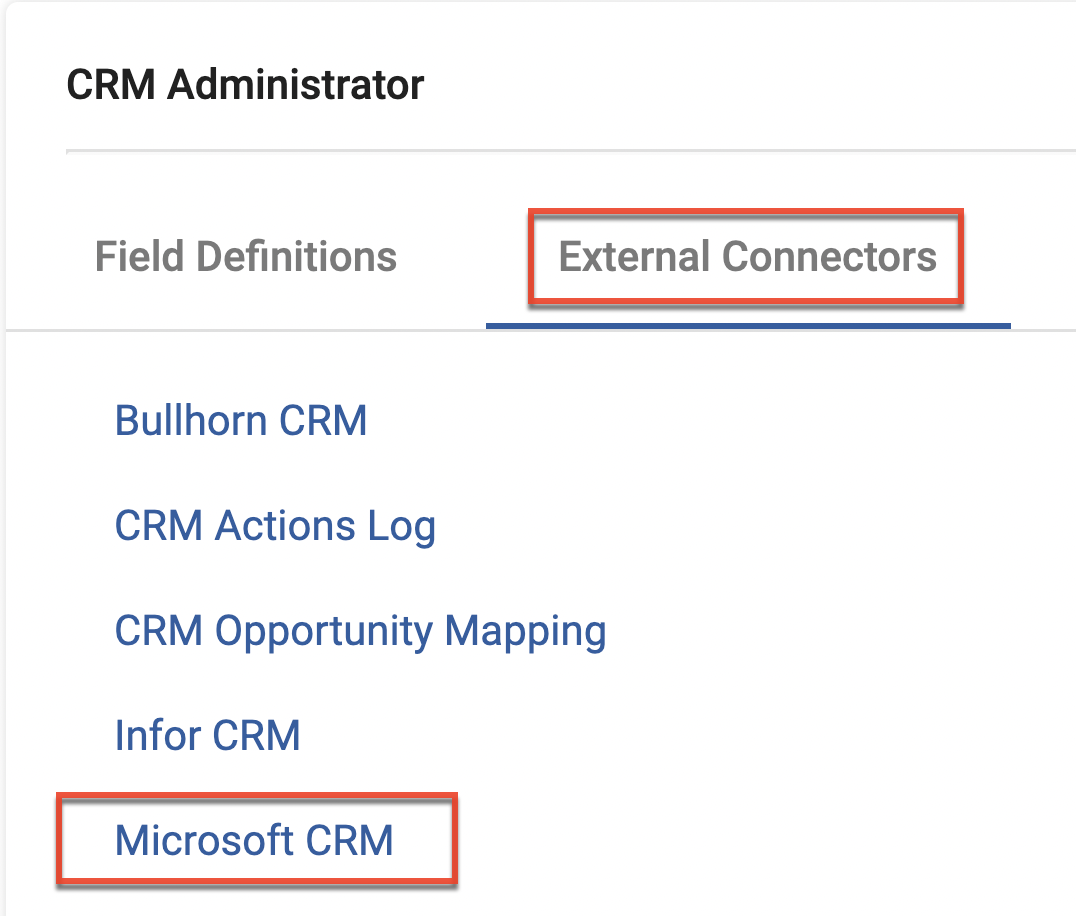
To access the Microsoft Dynamics Connector:
- Log in to your Sugar Market account and from the user menu, click "Admin".
- In the CRM Administrator section, within the External Connector tab, click "Microsoft CRM".
Complete the following steps to configure the connector:
- Connect Sugar Market to Microsoft Dynamics.
- Inform your Implementation Consultant that your connection settings have been completed and verified. Your Implementation Consultant will then enable the initial sync of your data.
- Set up your sync preferences.
- Set up your sync filters (optional).
Step 1: Syncing Credentials
To allow the sync between Microsoft Dynamics and Sugar Market, you need to first identify the Microsoft CRM user name and password that Sugar Market will use to sync with your CRM. You may create a new user or use a preexisting user since Microsoft CRM allows for concurrent logins, but be aware that all records created or updated by the Sugar Market sync will be attributed to the syncing user. The syncing user must have the necessary permissions to read and update all records you want to sync with Sugar Market.
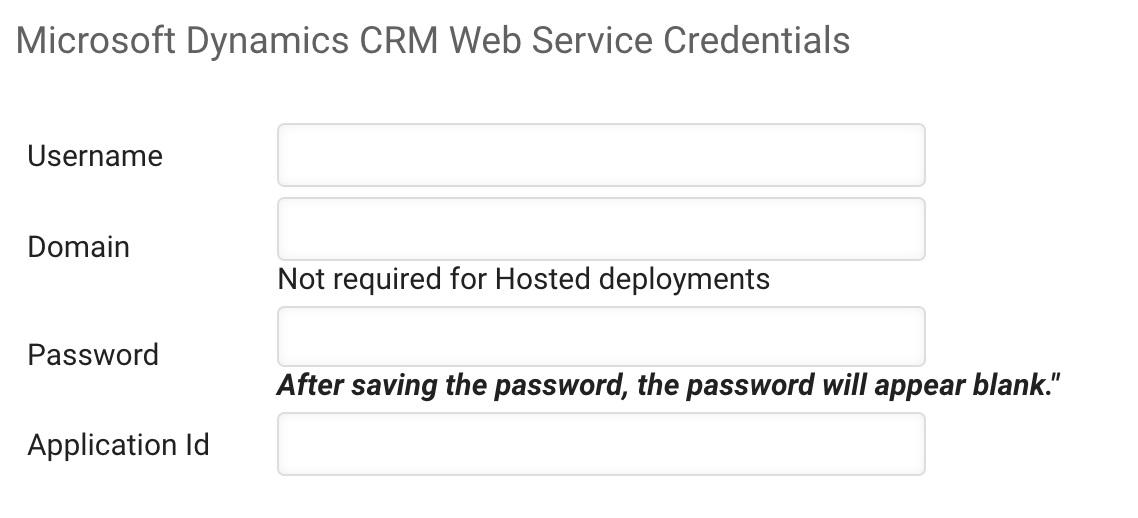
To set syncing credentials:
- Complete the following fields in the Microsoft Dynamics CRM Web Service Credentials section:
- Username: The Microsoft CRM CRM username we will use to authenticate via your web services
- Domain: If necessary, the domain is located before the backslash (\) when logging in
- Password: The password for above user
- Application ID: The Microsoft-issued unique identifier for your application. Please refer to the Creating an Application ID for Sugar Market with Dynamics page for more information.
- After entering the credentials as mentioned above, click the Save Connection button. The password field will appear blank after the connection is saved.
Step 2: Web Services and Organization Information
Complete the following fields:
- On Premise/Hosted: Select what version of Dynamics you have. If you are hosted by Microsoft or a partner, select "Hosted". If you are self-hosted with IFD (claims-based, ADFS), select "IFD". If you are self-hosted without IFD (published web resources externally), select "On-Premise".
- CRM Organization Name: Found in Developer Resources
- Organization ID: GUID Found in Developer Resources
- Organization Service URL: Found in Developer Resources
- Default user for new leads: The user assigned as the default (catchall) owner of a new lead when it is pushed up to Dynamics and the user does not already exist in Dynamics (the user only exists in Sugar Market). When the user does not already exist in Dynamics, Sugar Market assigns the defined user in this setting as the lead record owner. The user name only populates this list after the initial sync is complete.
To Access Developer Resources in Microsoft Dynamics:
- Navigate to Settings.
- Select Customizations.
- Click Developer Resources.
Once the information above is complete, click the Save Profile button.
Step 3: Syncing Dates
No Action Needed - this table will show you the last time Sugar Market has synced with your CRM. These will be up-dated once we have completed the initial integration. See the Integration With Microsoft Dynamics section for a deeper explanation on this component.
Step 4: Syncing Preferences
Set up your syncing preferences. This includes what information you want Sugar Market to sync down and what information you'd like Sugar Market to update and create, among other preferences. See the full explanation of each item below.
Note: In order for any table to push data up to the CRM, you must sync that table down first to Sugar Market. Example, if you select the option "Allow creation of new Lead/Contact" in the Push section then you must also select "Pull Contacts/Leads" respectfully as we only pull the table schema during the pull cycle.
Pull Data (Sync From CRM)
|
Pull Accounts |
Whether or not Sugar Market should sync down Accounts from Dynamics CRM |
|
Pull Contacts |
Whether or not Sugar Market should sync down Contacts from Dynamics CRM |
|
Pull Leads |
Whether or not Sugar Market should sync down Leads from Dynamics CRM |
|
Pull Teams |
Whether or not Sugar Market should sync down Teams from Dynamics CRM |
|
Pull Opportunities |
Whether or not Sugar Market should sync down Opportunities from Dynamics CRM |
|
Include Contacts and Leads without an email address (EmailAddress1 field) |
Whether or not Sugar Market should sync down Contacts and Leads from Dynamics CRM that do not have email addresses assigned to them (These do not count against your database size) |
|
Pull Marketing Lists to Distribution Lists |
Whether or not Sugar Market should sync down Marketing Lists from Dynamics CRM as a distribution list in Sugar Market |
|
Keep Picklist values in sync |
Whether or not Sugar Market will sync down the picklist values from Dynamics CRM, and keep those lists updated as values are added or removed. This will allow these picklists to be used in landing page questions or selected in a drop down on the contact card. *Note – Sugar Market picklists are not restrictive, so values outside of the picklist values will still be allowed. |
Push Data (Sync From CRM)
|
Allow Updates for Lead and Contact Records |
Allow Sugar Market to push updated values to Lead and Contact records in Dynamics CRM |
|
Allow creation of New Leads and/or Contacts |
Allow Sugar Market to create new Lead and/or Contact records in Dynamics CRM. The Sugar Market default is to create new records as Leads, unless the collected record has a specified CRMType as "Contact". |
|
Allow Updating of Unsubscribe Status |
Allow Sugar Market to update the Unsubscribe status (DoNotBulkEmail field) of Lead and Contact records in Dynamics CRM |
|
Allow Updating of Score Field |
Allow Sugar Market to push scoring values to MS Dynamics as mapped by scoring profiles. Scores are pushed in batches of 2,000 records. |
|
Push Sent Email to |
Choose where, if at all, Sugar Market should push Sent Email records. The options are: • Disabled: Do not push Web Activity records • Activity Entity: Sent Emails will be pushed to CRM as a completed Activity record with references to the corresponding Lead/Contact • Sugar Market Email Activity Entity: Sent Emails will be pushed to the Sugar Market-specific Email Activity entity, with references to the corresponding Lead/Contact
|
|
Do not push Email Body to Activity Record |
Omit the Email body from the pushed record, reducing space consumed in the remote database. |
|
Push Email Opens to Activity Record |
Push Email Opens to the Activity entity |
|
Push Email Clicks to Activity Record |
Push Email Clicks to Activity Record |
|
Push Emails Click Data to Sugar Market Campaigner Clicks |
Push URL's in campaigns clicked to the Sugar Market Email Custom entity |
|
Push Identified (known Lead & Contact) Web Activity to |
Choose where, if at all, Sugar Market should push known Web Activity. The options are: • Disabled: Do not push Web Activity records • Activity Entity: Web Activity will be pushed to CRM as a completed Activity record with references to the corresponding Lead/Contact • Sugar Market Web Activity Entity: Web Activities will be pushed to the Sugar Market-specific Web Activity entity, with references to the corre-sponding Lead/Contact
|
|
Push Unidentified Web Activity to Sugar Market Web Activity Entity |
Push unknown, account-level web activity to the Sugar Market web activity entity |
|
Push Landing Page Completes to Sugar Market Landing Page Entity |
Push landing page completes to Sugar Market's custom entity for Landing Page Completes |
|
Push Attended Events to Sugar Market Events Entity |
Push event attendance information to Sugar Market's custom Events entity. |
|
Push Tasks to Activity Record |
Allow Sugar Market to create Activity records in Dynamics CRM from Tasks created in Sugar Market |
|
Push Opportunities created from Scoring |
Allow Sugar Market to create new Opportunity records in Dynamics CRM |
|
Push Delivery Status |
Allow Sugar Market to push up the delivered or bounced reason to a custom field in CRM. Note: You will want to create a custom field in your CRM on the Contact/Lead table as a nvarchar(100) data type. Once the initial sync is complete and you have successfully pulled down Contacts and/or Leads, you will see your field in this drop down menu to select from. |
Step 5: Database Integrity
Recycle Bin - When our bundle is installed, a few triggers are added which add any records deleted in Dynamics to a custom table. This table is referenced in the sync, and any records contained in this table are removed from Sugar Market's database. This is an important feature if you do not plan on marketing to any records deleted from CRM. If this box is checked at any point in time, all records that were deleted since the bundle was installed in CRM will be retroactively in Sugar Market as well.
Post-sync Cleanup Reports - Only if your database contains reports that meet the criteria mentioned in the UI, they will be displayed in a drop down. The minimum criteria for the reports are as follows:
Contacts
- View: ViewAccountContact
- Minimum Column: ContactID
- Minimum Filter: CRMType = Contact
Leads
- View: ViewAccountContact
- Minimum Column: ContactID
- Minimum Filter: CRMType = Lead
After a sync cycle completes, any records that fall into the report criteria will be removed from Sugar Market's database, as well as any lists or campaigns they may be in.
Microsoft Dynamics uses inactive and active for contacts. Records that are set as inactive are not considered "deleted" for the recycle bin, and therefore Sugar Market will continue to sync them. If you want to re-move inactive records from Sugar Market, autodelete reports can be used to do so. Below is the filter you can use to do so. To learn more on Statecodes and StatusCodes, please see this article.
Contacts
- Statecode = 1
Step 6: CRM Alerts
Insert the email addresses of whom should be alerted should there be an credential issue with your sync. We typically recommend you include the CRM Admin and the syncing user. You can separate multiple email address with a semicolon.
Step 7: Initializing the sync
Once you have completed installing our solution and configuring the connector screen you will need to reach out to the Sugar Market team to initiate the sync. Please contact your Sugar Market representative to initiate this process.
Static Lists vs Dynamic Lists
When integrating with Microsoft Dynamics, there are two types of lists we pull down to Sugar Market:
- Static Lists
- Dynamic Lists
When selecting the "Pull Marketing Lists to Distribution Lists" option in the Microsoft Dynamics connector screen, we will pull down both static and dynamic lists.
This is what the connector setting looks like:
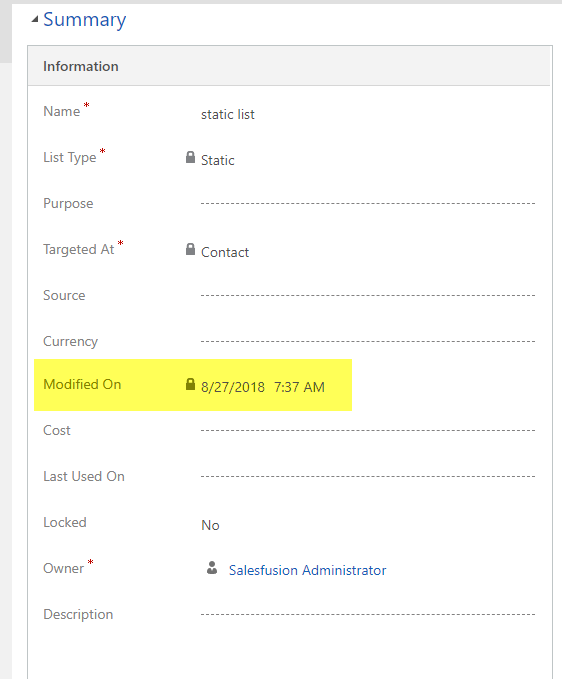
First we pull down Static Lists, for which we check the date the list was last modified as our pulling criteria. In short this means, if the last modified time is current, then we will pull down the list in the next sync cycle. Some updates to static lists in Dynamics or some custom workflows are able to add records without updating the modified date, which means Sugar Market will not know to pull down the changes. Make sure that you check the modified date when making changes to your static lists so that they will get pulled down to Sugar Market.
This is what the Modified On field will show in Microsoft Dynamics:
The second list type is Dynamic Lists. Since these are dynamic in nature, we do not have the same modified date available to check when the sync pulls down lists. When we pull the dynamic lists, we pull the entire list from it's created date. Since this could be an enormous number of records, we do not run this in the normal sync cycle. We run the dynamic lists once per day to avoid a backlog of records in the normal sync process. Typically this sync runs in the late evening on eastern time. To avoid prolonged sync processing please remove any unused dynamic lists periodically. If you need to add records and send to them the same day it would be better to use either a static list, or manually import the records via the File Import feature in Sugar Market.
Note: As Dynamic Lists only sync once per day, it's normal to see the Last Completion Date as the night before when looking at the synchronization summary in the External Connectors settings in the Administration view.
Uninstalling Sugar Market
Disclaimer: You are deleting a managed solution. The solution and all of its components, including data in the components, will be deleted. This action cannot be undone. This solution might take several minutes to uninstall, and you cannot cancel the uninstallation after it starts.
- Navigate to Settings > Solutions. Click the Sugar Market solution, and then select Delete.
- Confirm uninstall of solution. After selecting Delete in step 1, a confirmation prompt will appear. Select OK to continue with the removal process.
- Verify Uninstall Complete. The uninstall process will take at least a few minutes, but may take much longer, depending on the amount of marketing data that has been pushed up to the custom entities within the bundle.
Once the uninstall pop up disappears, please verify that the Sugar Market solution is no longer mentioned in the solutions list.
If there are any errors in the uninstall, please download the log file and file a case with the Sugar Support team with the log file attached.
Note: If you also installed the Report Control for Dashboard (Prerequisite for versions 3.0.2.3 and 4.0.2.3 and earlier), you may repeat steps 1-3 for that solution as well.