Customer Journey Plug-in User Guide
Customer Journey Plug-in has been renamed Sugar Automate.
Overview
The Customer Journey Plug-in lets administrators create easy-to-follow, visual business processes for users to complete against their Sugar records. Each journey is an end-to-end process that is split into color-coded stages, and each stage contains one or more call, meeting, or task activities that the user can complete with optional dependencies and actions on related records. This guide covers how users can engage with the plug-in after it has been installed, activated, and configured by an administrator.
Note: This guide pertains to the latest supported version of the Customer Journey Plug-In.
For more information on installing and activating the plug-in, please refer to the Customer Journey Plug-in Installation Guide. For more information on creating new customer journey templates, which an administrator must do before users can begin any journeys, please refer to the Customer Journey Plug-in Administration Guide.
Use Case
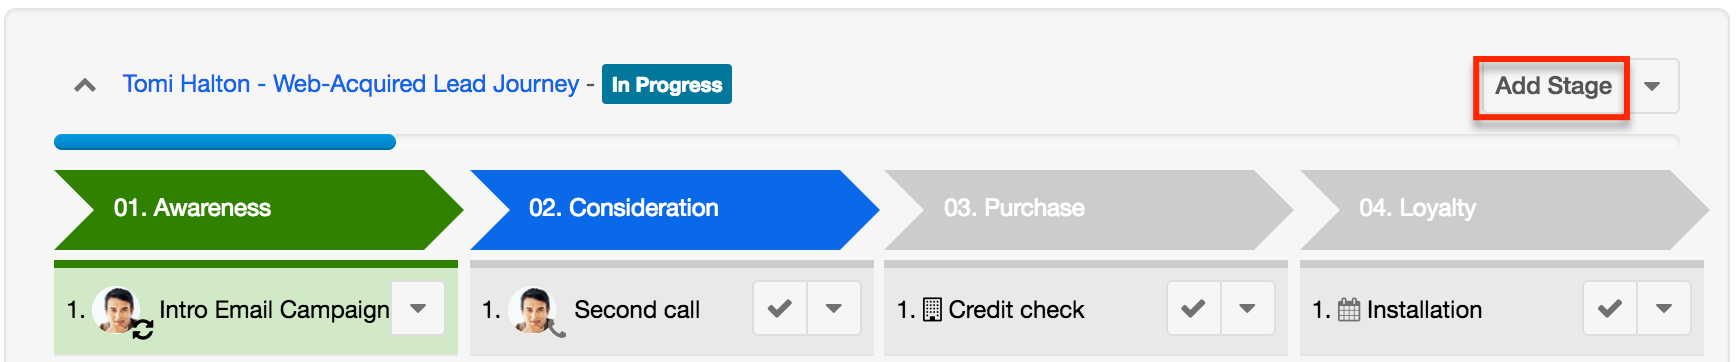
Throughout this guide, we refer to an example decision-making journey to demonstrate the features of the Customer Journey Plug-in. The journeys in your Sugar instance have been custom-built by your Sugar administrator and will, therefore, look different from the one shown here. The following image shows the example journey that we refer to throughout this guide:
The example journey contains four stages of customer decision-making (Awareness, Consideration, Purchase, and Loyalty). Each stage contains several activities which must be completed as calls, meetings, and tasks.
Beyond managing the decision cycle, alternative use cases for journeys in Sugar include managing the internal sales process (e.g. Target, Convert, Sell, Nurture) or other internal processes that do not require a lot of logic but do require a standardized sequence of events.
Because a Sugar record may participate in more than one journey, it is possible to attach multiple, complementary journeys to a record. For example, you could start the decision-making journey and the sales-process journey at the same time to ensure that the customer's Awareness stage aligns with the selling cycle's Target stage and so on.
Core Concepts
A customer journey is a set of chronological stages through which most customers proceed as they participate in the decision-making process. With the Customer Journey Plug-in, your administrator has the freedom to create multiple, unique journeys specific to your various customers' journeys or even for regulating your internal business processes.
Customer Journeys
A customer journey in Sugar is the multi-stage process shown just above the subpanel area in the Customer Journey panel. The journey contains all of the stages and the activities that make up those stages. The Customer Journey panel is where users can build, update, and track every task or action that must be completed to help a customer advance to the next stage in their journey. The result is a streamlined process that synchronizes every piece of your customer-facing activities from marketing and sales through to onboarding and renewal.
For more information about customer journeys, please refer to the Starting a New Customer Journey section of this page.
Customer Journey Stages
Customer journey stages are the major steps within a journey. A traditional journey is sometimes characterized by stages such as Awareness, Consideration, Purchase, and Loyalty or Bonding. Depending on your business needs, you may have more or fewer stages or even several variations of the journey for different types of consumers or audiences. A journey's stages are represented in the Customer Journey panel as arrow-shaped column headers: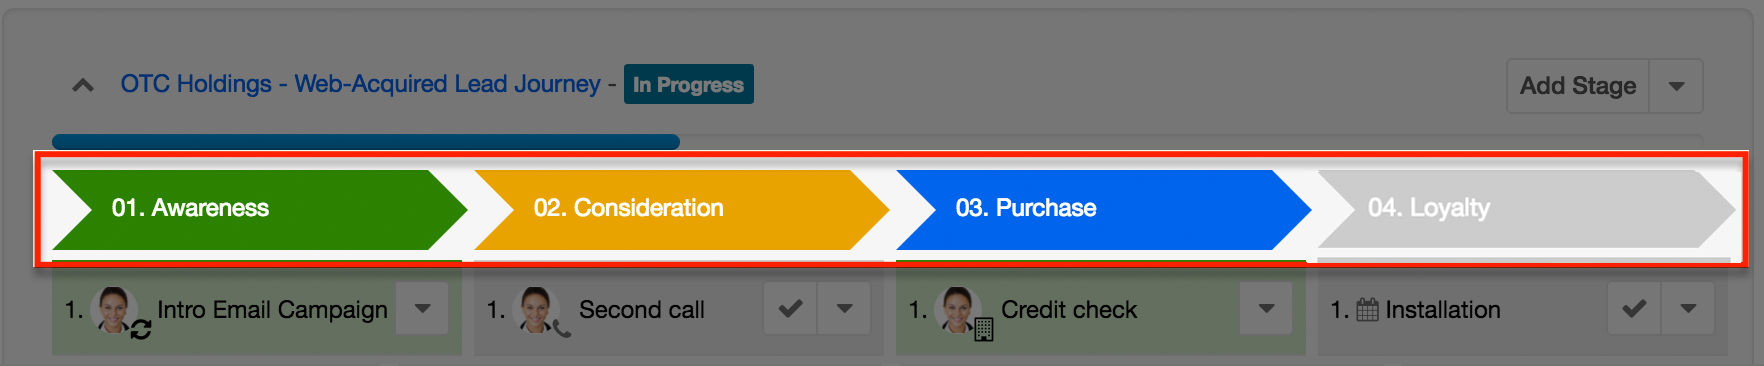
For more information about journey stages, please refer to the Completing Journey Stages section of this page.
Customer Journey Activities
Each stage in a customer journey may be broken into one or more activities that must be completed before the journey considers the activity's stage complete. When a new journey is created, a record is created in Sugar's Calls, Meetings, or Tasks module to represent each activity in the journey. In the Customer Journey panel, a stage's activities always appear directly below the arrow-shaped column header for the corresponding stage: 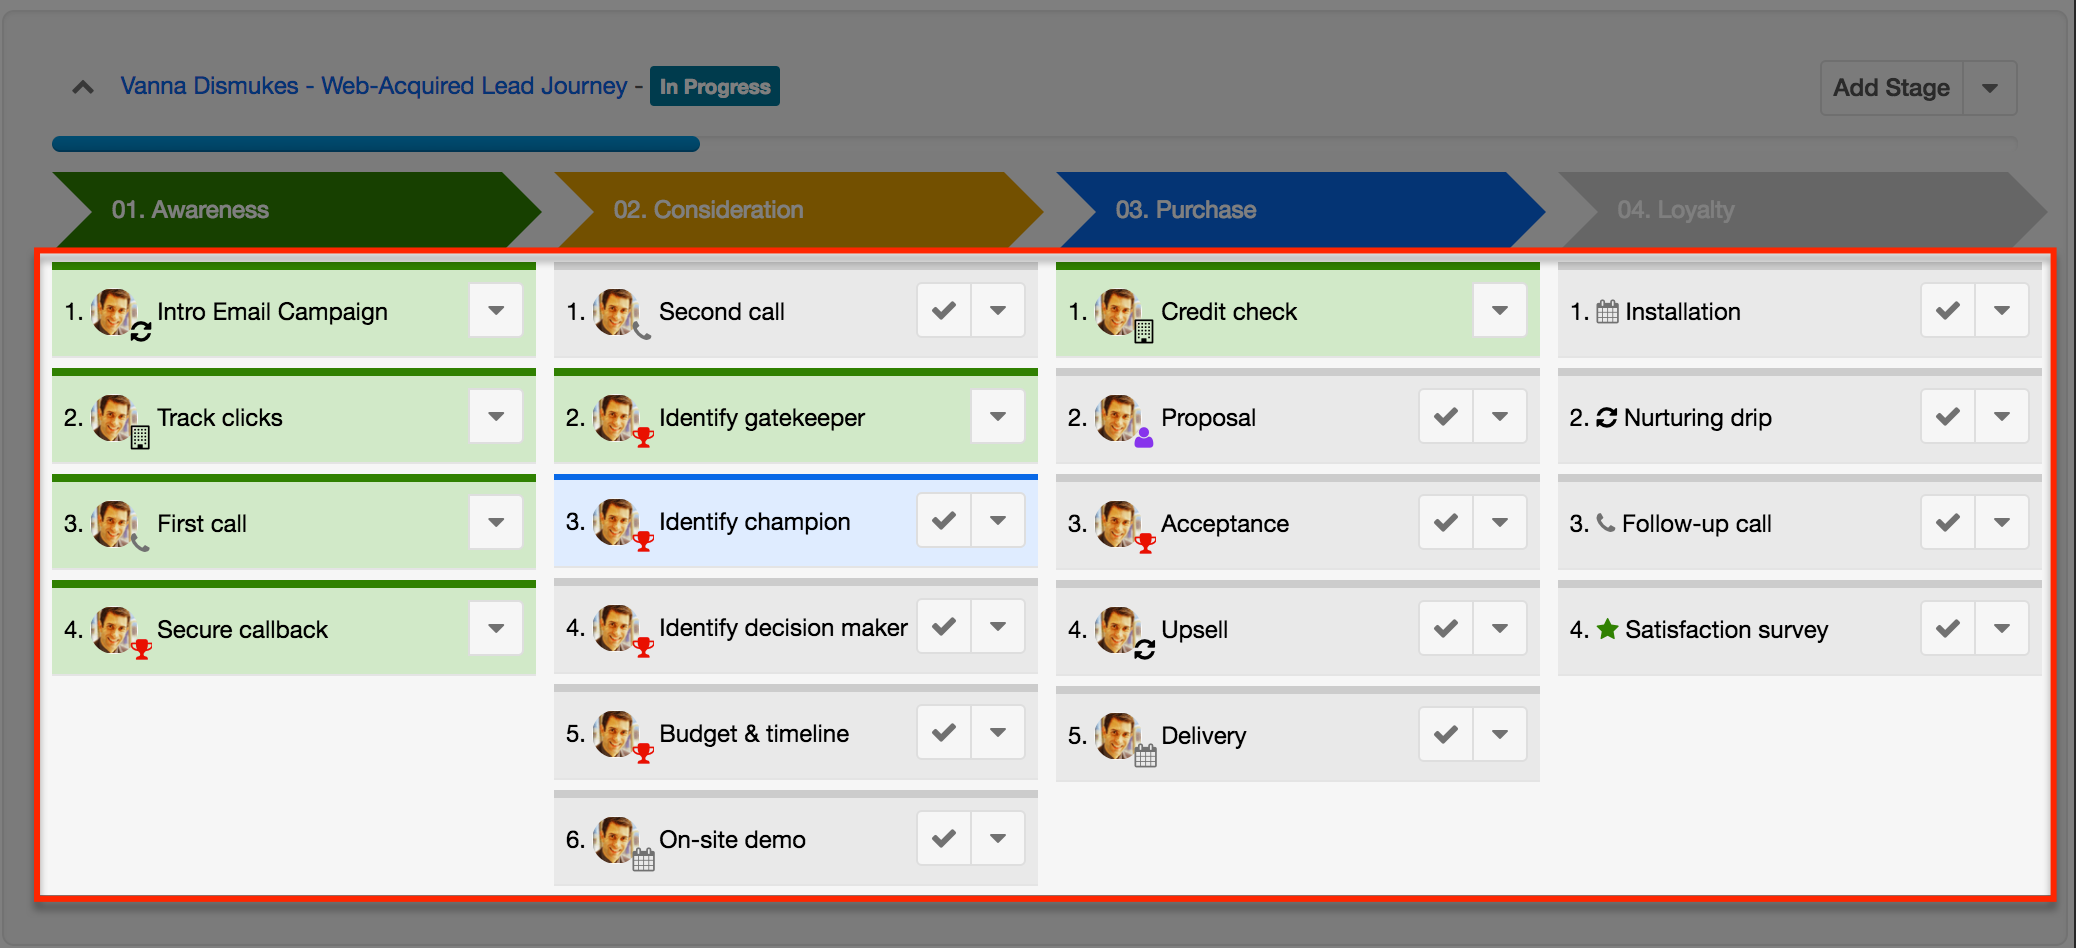
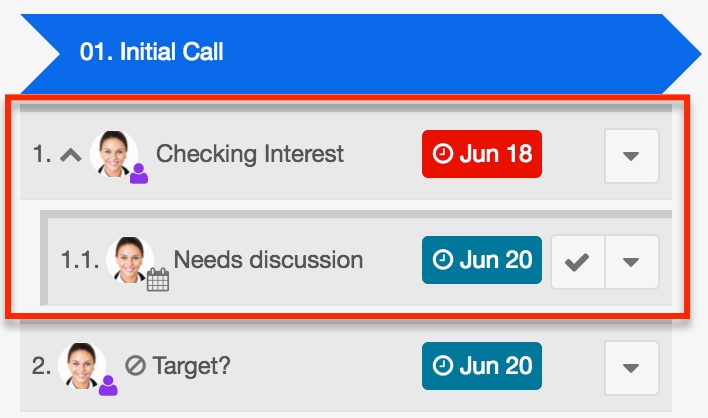
Activities in a journey may also contain one or more sub-activities. When sub-activities exist, you must expand the parent activity to access them. Simply click on the downward-facing arrow to the left of the activity's name to reveal its sub-activities: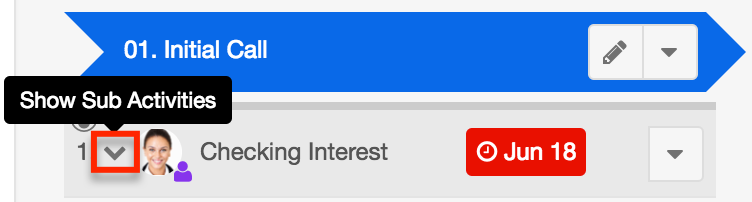
Sub-activities will be slightly indented and display the default order number x.1, where x is the order number of the parent activity. For example, if an activity numbered 3 contains two sub-activities, the sub-activities will be numbered 3.1 and 3.2 by default.
For more information about activities, please refer to the Completing Journey Activities section of this page.
Starting a New Customer Journey
Customer journeys may be related to any combination of records in the modules configured by your administrator to work with the plug-in. The journeys in your Sugar instance have been custom-built by your Sugar administrator and may be available in all or some of these modules. The following steps to create a new journey will apply to any journey-enabled module.
Note: For more information on configuring modules for Journey access, please refer to the Customer Journey Plug-in Administration Guide.
Notice: Starting a new journey may trigger email notifications if the journey is started by a user who is not the assigned user for the journey's activities. For more information, refer to the Assignment Notifications section of the Customer Journey Plug-in Administration Guide.
- Navigate to the lead's record view and locate the Customer Journey panel or tab. The administrator may have configured journeys to show as a panel under the record view or as a tab as shown here on an account record:
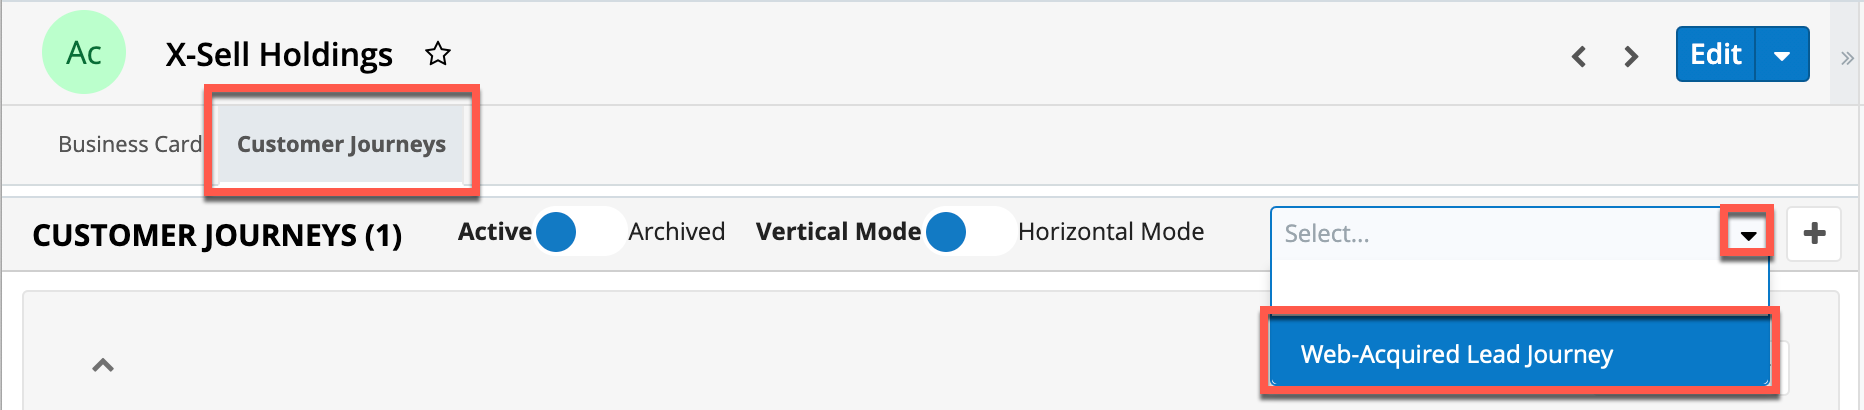
- In either view, the selector menu will be on the right side of the Journey Options Bar. Click on the down arrow to see the available journeys listed in alphabetical order:

- Select the journey you want, and then click on the Start (+) icon to start that journey for the current record.
 '
'
The customer journey is now active.
Please refer to the sections under Working With Customer Journeys for information on managing the journey.
Working With Customer Journeys
To move through a journey, simply progress through the stages by completing one activity at a time. The following sections explain how to complete stages and activities in a journey.
Completing Journey Stages
Journey stages are the major steps represented in the Customer Journey panel as arrow-shaped column headers. To complete a stage within a journey, you must complete all of the activities under the stage. When all of the stage's activities are complete, the stage header will turn green to indicate that it is complete. In the image below, notice that the first stage is considered complete even though the Track Clicks activity is yellow. The yellow activity was marked "Not Applicable" and, therefore, is considered complete.
Note: Many instances have been configured to use different statuses (e.g. Closed, In Progress, Invalid) for records than the statuses used in a stock Sugar instance. Your administrator may define which statuses the Customer Journey plug-in considers "closed" for your instance. For more information, refer to the Customer Journey Plug-in Administration Guide.
For more information on the various color states for journey stages, please refer to the User Interface section of this page. For more information on completing activities within a stage, please refer to Completing Journey Activities.
Adding Journey Stages
At any time during a customer journey, you may choose to add a new stage to the cycle. Adding a stage to one journey will only affect the current journey and will not affect other journeys that may be using the same template. Follow these steps to add a new stage to an existing customer journey:
- Click on the Add Stage button at the top of the Customer Journey panel:
The quick-create drawer will appear, showing the edit view of a journey stage record. The Customer Journey field should already contain the name of the active journey that will have the new stage: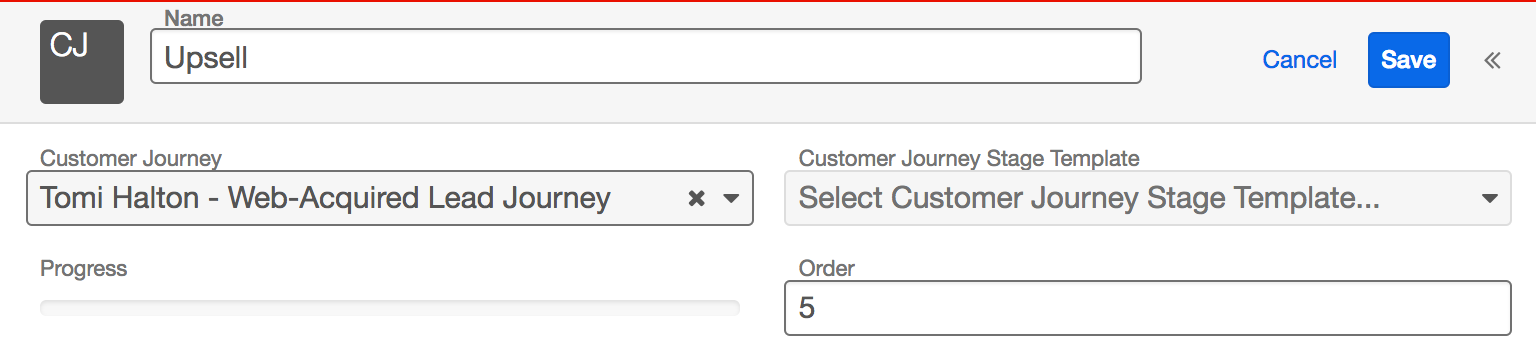
- Complete the following fields for the new journey stage:
- Name: Enter a label for the stage in the journey. For this example, we have named the new stage "Upsell".
- Customer Journey Stage Template: Your administrator has likely created pre-configured stage templates in Sugar as part of the setup and administration process. A stage template usually contains pre-defined activities attached to the stage. If you choose to use a customer journey stage template, the related activities will automatically carry over to your journey in a not-started state. If you choose not to use a customer journey stage template, the new stage will not contain any activities. Instead, you must manually add them as explained in the Adding Journey Activities section of this page.
- Order: Enter the step number that corresponds to where the stage should appear under the overall journey.
- The order number is displayed to the left of the stage's name in the Customer Journey panel.
- By default, a new stage's order number is the next sequential number after the last stage in the existing journey (e.g. if the journey contains four stages, then the new stage's default "Order" value will be 5).
- If you want to override the default order number to position the stage earlier in the journey, you will need to adjust the numbers of the stages that occur after the new stage. To adjust the journey's stage numbers after saving the new stage, click the Edit button on the misnumbered stage(s) and type the correct number into the Order field.
- Click "Save" to return to the record view of the customer journey with the new stage. If the journey becomes too wide for the row, then the stages will wrap around to the next row.
To configure activities within the new stage, please refer to the Adding Journey Activities section of this page.
Removing Journey Stages
If you need to remove a stage and its activities' point values from a running customer journey, simply choose "Delete Stage" from the stage's actions menu.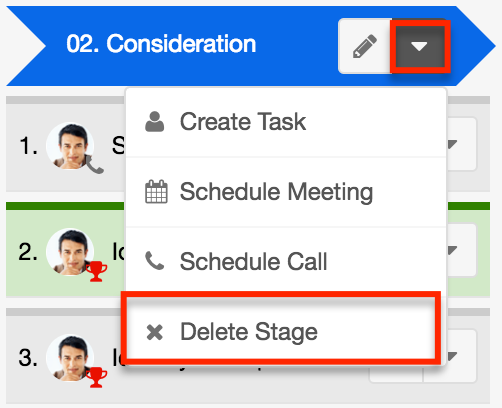
Keep in mind these important points regarding deleted journey stages:
- The deleted stage will only be removed from that specific journey and will not affect other journeys in Sugar.
- Deleting a journey's stage also deletes any call, meeting, and task records from Sugar that were created by the stage.
- If the deleted stage is not the final stage of the journey, then we recommend re-numbering the stages that occur after the deleted stage. For example, if your journey has four stages and you delete the third stage, the remaining stages will retain their original numbers: 1, 2, and 4. To resolve the numbering, click the Edit button on the misnumbered stage (e.g. stage 4) and type the correct number (e.g. "3") into the stage's Order field.
Completing Journey Activities
The activities in a journey represent calls, meetings, and tasks in their corresponding modules in Sugar. Because they exist in Sugar as normal records, you can work with activities as you normally would in the Calls, Meetings, and Tasks modules, or you can manage them via dashlet, calendar, or in the Customer Journey panel. This section explains how to complete activities using the Customer Journey panel. For information on using the other methods, please refer to the Sugar Application Guide.
A journey's activities exist under the stage they belong to. A stage may contain any number of activities and sub-activities. The following sections explain each type of activity in detail.
Calls and Meetings
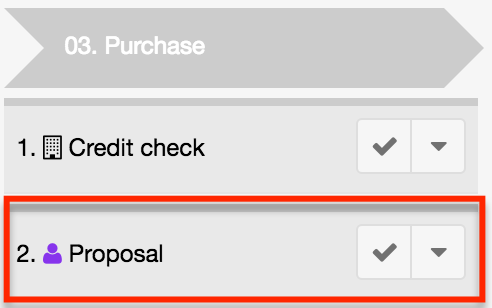
Call and meeting activities in the customer journey link to the Calls and Meetings modules respectively. The activity's start time and duration are determined by the administrator and are relative to the journey's timeline (e.g. 7 days after the stage begins or 1 day after the previous activity has been completed). The connector will automatically add the activity's assigned user and the person associated with the journey's parent Sugar record (e.g. the lead or contact) as guests for the activity. This ensures that the activity appears on the assigned user's calendar and that the call or meeting shows up in the lead or contact's subpanel. You can add or remove guests via the call or meeting's record view as usual. A call and a meeting activity are highlighted in our example journey below: 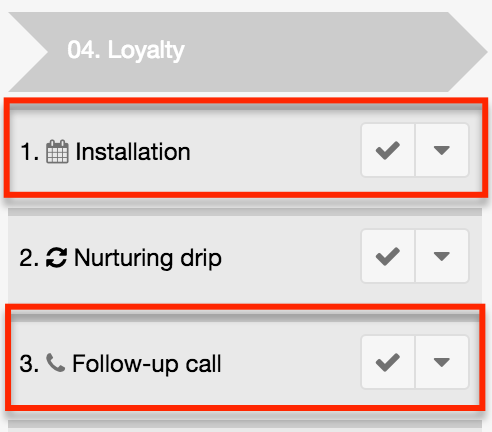
Note: The administrator can configure Sugar to send guest invitations for call and meeting activities. This option is set on a per-activity basis and may not apply to all calls and meetings in a journey. Depending on how this is configured, the invitations will either send to the activity's assigned user and the related lead or contact at the beginning of the journey, or the invitations will send to the activity's guest list when the parent stage begins.
To complete a call or meeting activity, you can simply close it in Sugar as you would normally close any other call or meeting or you can complete it directly in the Customer Journey panel by clicking the Complete checkmark on the activity:
Upon completing the activity, it immediately turns green in the Customer Journey panel and 100% of its point value is credited toward the progress of this journey in the progress bar and dashlets. For more information on how points are tallied, please refer to the Progress Bar section.
Additional options for calls and meetings are available via the activity's actions menu: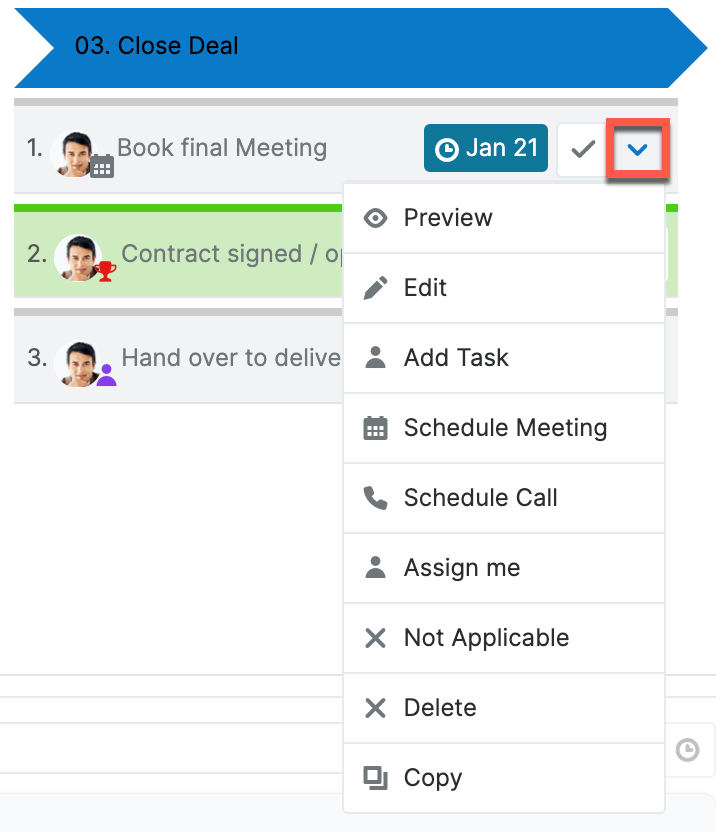
- Preview: Click on "Preview" to expand or refresh the intelligence pane and view details about the activity without leaving the current page. To close the preview, simply click the "X" in the corner of the intelligence pane.
- Edit: Click on "Edit" to open the edit view of the call or meeting record related to the activity. From the edit view, you can add and remove guests, assign the call or meeting to another user, change the call or meeting dates, and edit the fields on the record.
- Add Task, Schedule Meeting, Schedule Call: Select one of these options to create a sub-activity directly under this activity. For more information, please refer to the Adding Sub-Activities section.
- Assign Me: Choose "Assign Me" to instantly change the Assigned To user of the call or meeting to yourself.
- Not Applicable: The Not Applicable option sets the related call or meeting's status to "Canceled" in Sugar and marks the activity as complete in the customer journey. The activity will turn green in the Customer Journey panel and 100% of its point value is credited toward the progress of this journey in the progress bar and dashlets. For more information on how points are tallied, please refer to the Progress Bar section.
- Activities that are blocked by an earlier activity will not display the "Not Applicable" option until the block has been removed.
- When "Not Applicable" is chosen for a call or meeting activity that contains one or more sub-activities, the parent activity will save as "Canceled" (green) and its sub-activities will close as "Not Applicable" (yellow). The administrator will have defined whether the activities marked Not Applicable be recognized as complete or simply ignored in the journey's progress and momentum calculations via the "Not Applicable Action" field on the Journey template.
- Delete: If the administrator has permitted "delete" actions for activities on this template, you will see a delete option in this menu, as well. For more information on deleting activities, refer to the Removing Journey Activities section of this page.
- Copy: Create a new call or meeting for this journey by copying the current one. You will be given the opportunity to edit the call or meeting details before saving.
Note: Many instances have been configured to use different statuses (e.g. Closed, In Progress, Invalid) for records than the statuses used in a stock Sugar instance. Your administrator may define which statuses the Customer Journey plug-in considers "closed" for your instance. For more information, refer to the Customer Journey Plug-in Administration Guide.
Tasks
Task activities are completed as records in Sugar's Tasks module.
- Agency Task: This task represents an action to be completed by a third-party supplier or a non-Sugar user such as a credit check or procurement approval. This activity links to the Tasks module and must be closed by a Sugar user after the agent has completed it.
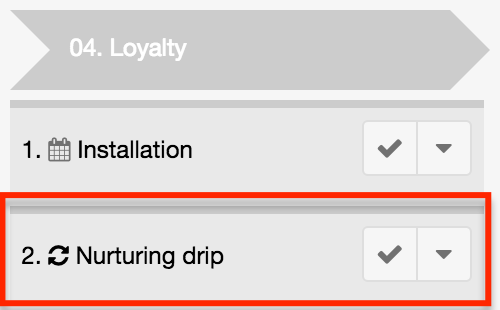
- Automatic Task: This task represents an activity that is performed by an automated process, typically within Sugar (e.g. workflows or Advanced Workflow) or in a connected app. The journey's target assignee must manually close this task in Sugar to complete the activity in the journey.
- Customer Task: This task represents an action to be completed by the customer, such as a survey or request for information. This activity links to the Tasks module and must be closed by a Sugar user after the customer has completed it.
- Internal Task: This task represents an action in the Tasks module assigned to a Sugar user such as sending a proposal.
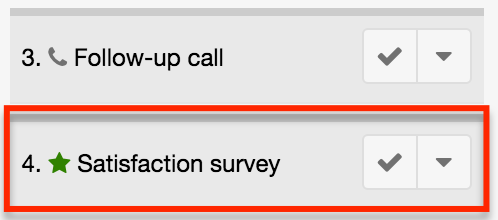
- Milestone: This task represents a significant decision or moment in the customer's journey that requires no action. Milestone activities are represented as records in the Tasks module and must be closed by a Sugar user or via an automated process. For example, an Advanced Workflow process could be configured to detect a milestone of $10,000 in revenue from a customer and then automatically close the related milestone task.

To complete a task activity, you can simply close it in Sugar as you would normally close any other task or you can complete it directly in the Customer Journey panel by clicking the Complete checkmark on the activity:
Upon completing the activity, it immediately turns green in the Customer Journey panel and 100% of its point value is credited toward the progress of this journey in the progress bar and dashlets. For more information on how points are tallied, please refer to the Progress Bar section.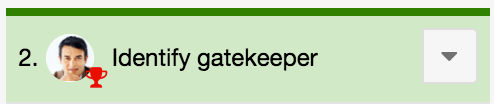
Additional options for tasks are available via the activity's actions menu: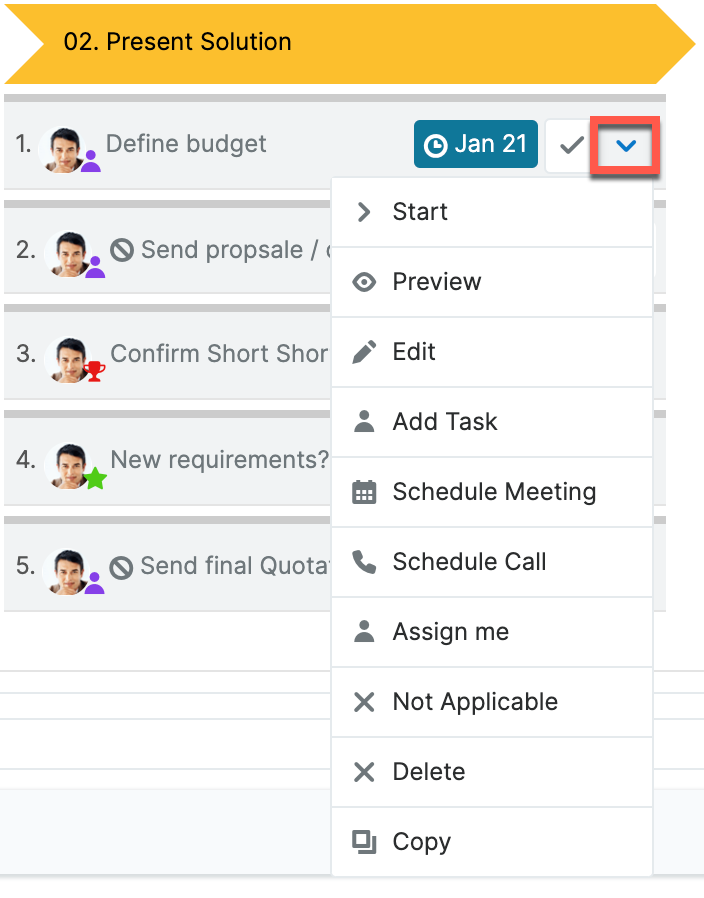
- Preview: Click on "Preview" to expand or refresh the intelligence pane and view details about the activity without leaving the current page. To close the preview, simply click the "X" in the corner of the intelligence pane.
- Edit: Click on "Edit" to open the edit view of the task record related to the activity. From the edit view, you can assign the task to another user, change the task's due date, and edit the fields on the record.
- Start: Starting the activity will update the task's status to "In Progress" and change the activity to blue in the Customer Journey panel.
- Add Task, Schedule Meeting, Schedule Call: Select one of these options to create a sub-activity directly under this activity. For more information, please refer to the Adding Sub-Activities section.
- Assign Me: Choose "Assign Me" to instantly change the Assigned To user of the task to yourself.
- Not Applicable: The Not Applicable option sets the related task's status to "Not Applicable" in Sugar. The activity will turn yellow in the Customer Journey panel and 100% of its point value is credited toward the progress of this journey in the progress bar and dashlets. For more information on how points are tallied, please refer to the Progress Bar section.
- Activities that are blocked by an earlier activity will not display the "Not Applicable" option until the block has been removed.
- When "Not Applicable" is chosen for a task activity that contains one or more sub-activities, the parent activity will save as "Completed" (green) and its sub-activities will close as "Not Applicable" (yellow).The administrator will have defined whether the activities marked Not Applicable be recognized as complete or simply ignored in the journey's progress and momentum calculations via the "Not Applicable Action" field on the Journey template.
- For more information, refer to the Removing Journey Activities section of this page.
- Delete: If the administrator has permitted "delete" actions for activities on this template, you will see a delete option in this menu, as well. For more information on deleting activities, refer to the Removing Journey Activities section of this page.
- Copy: Create a new task for this journey by copying the current task. You will be given the opportunity to edit the task's details before saving.
Note: The plug-in automatically adds "Not Applicable" to the available status list options for the Tasks module on installation. Activities that are blocked by an earlier activity will not offer the "Not Applicable" option until the block has been removed.
Adding Journey Activities
You can add an activity to a journey via the actions menu on the stage where you would like the activity to go. The added activity will only be available for that specific journey and will not affect other journeys in Sugar. You may also add sub-activities under the activities in a journey. For more information, please refer to the Adding Sub-Activities section.
Follow these steps to add a new activity to a stage in an existing customer journey:
- Expand the stage's actions menu by hovering over the stage header and select one of the first three options for a task, call, or meeting as desired. Alternatively, click "Copy" from a similar activity's Actions menu to duplicate, edit, and save a new activity in the journey.
The quick-create drawer will open for the corresponding Sugar module. At the bottom of the form are customer journey fields that apply to the running journey: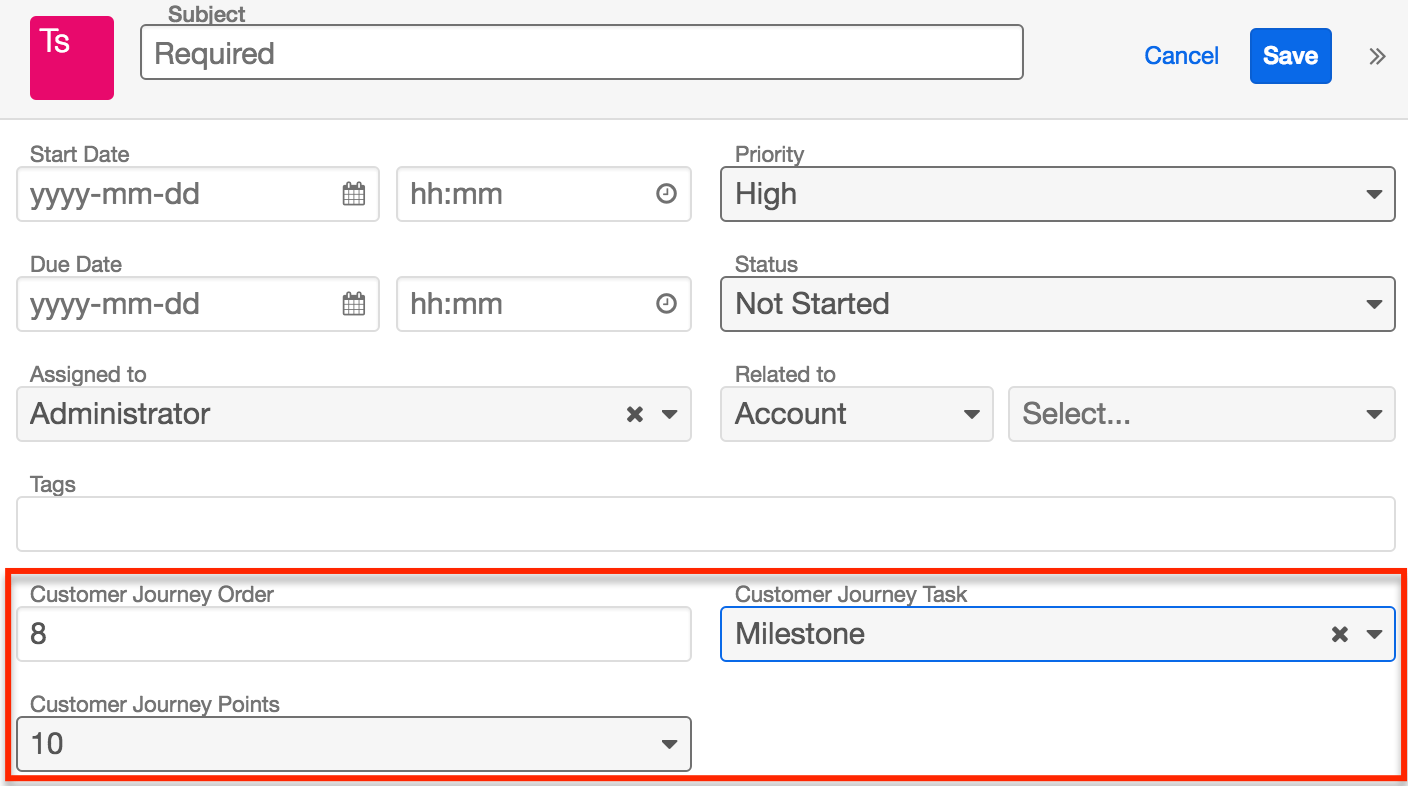
- Complete the record's standard fields as well as the following journey-specific fields for the new activity:
- Subject: Enter a label for the activity in the journey (e.g. "Call customer").
- Customer Journey Order: The activity's Customer Journey Order is the step number that corresponds with where the activity chronologically appears under the stage header. By default, this number will reflect the order in which the activities are created, but can be edited as needed.
- The order number is displayed to the left of the activity's name in the Customer Journey panel.
- By default, a new activity's order number is the next sequential number after the last activity in the stage (e.g. if the stage contains four activities, then the new activity's default Customer Journey Order value will be 5).
- If you want to override the default order number to position the activity higher in the stage, you will need to adjust the order numbers of the activities that occur after the new activity. To adjust the stage's activity numbers after saving the new activity, click the Edit button on the misnumbered activities and type the correct number into the Customer Journey Order field.
- Customer Journey Points: The Customer Journey Points field controls the growth of the progress bar that is displayed for every running customer journey in Sugar.

You can assign 1 to 10 points to an activity using the dropdown, which defaults to 10. Each time you assign points to an activity, the parent stage's total point value increases and so does the overall journey's point value. Later, when a user engages with a journey, the progress bar will grow commensurate with each completed activity's point value respective to the journey's total point value. For more information on how points are tallied, please refer to the Progress Bar section. - Customer Journey Task: The Customer Journey Task field is only shown for Task activities and allows you to specify the type of task you are creating. For a detailed explanation of each available task type, please refer to the to Completing Journey Activities section.
- Click "Save" to return to the record view of the customer journey with the new activity.
Adding Sub-Activities
You can add a sub-activity to a journey via the actions menu on the activity where you would like the sub-activity to go. The sub-activity will only be available for that specific journey and will not affect other journeys in Sugar.
Follow these steps to add a sub-activity under an activity in a journey:
- Find the parent activity that should contain your sub-activity and expand the parent activity's actions menu.
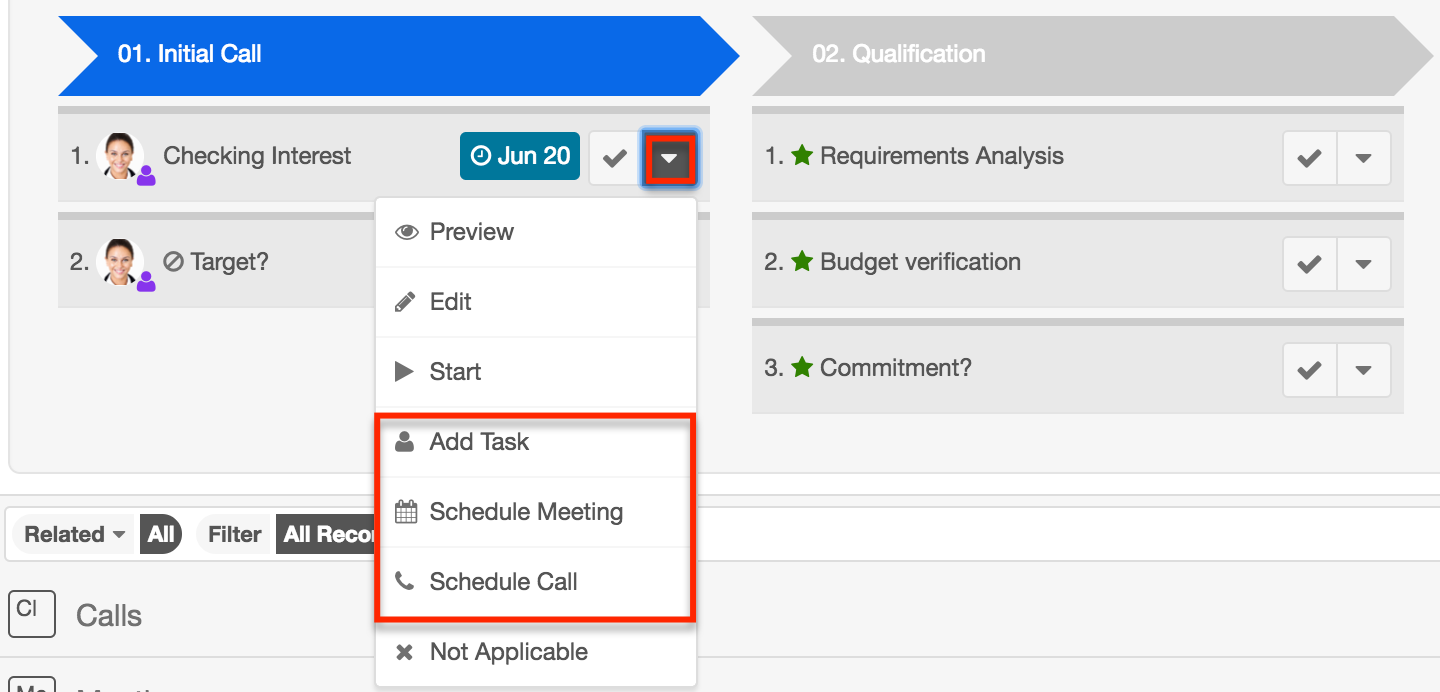
- Click on "Add Task," "Schedule Call," or "Schedule Meeting" to create an activity record under the current activity.
- The quick-create drawer will open for the corresponding Sugar module. Please refer to the Adding Journey Activities section for more information on completing the journey-specific fields appropriately.
- After completing the activity's fields, click "Save." The sub-activity will be slightly indented and display the default order number x.1, where x is the order number of the parent activity.
- To add another sub-activity to the same parent, return to the parent activity's actions menu and select the appropriate activity type to create. Complete the activity's details and save. The second sub-activity will display the default order number x.2 when shown in the journey panel.
- Click "Save" to return to the record view of the customer journey with the new sub-activity.
Removing Journey Activities
If you need to remove an activity from a running customer journey, check the activity's actions menu. The administrator may or may not have configured this journey to allow deleting activities. For information on disabling the ability to delete activities, refer to the Customer Journey Plug-in Administration Guide.
If there is no Delete option in the activity's actions menu, you may choose "Not Applicable" from the activity's actions menu. This will change the status of a call or meeting activity to "Canceled" or will change the status of a task activity to "Not Applicable". A journey activity that has been marked "Not Applicable" is considered completed by the journey and 100% of its point value is credited toward the progress of the journey in its progress bar and dashlets.
If you do see the Delete option for the activity, carefully consider whether you truly want to delete the activity or if you should simply mark it "Not Applicable" instead.
For more information on how points are tallied, please refer to the Progress Bar section. For more information on the options available in the actions menus for activities, please refer to the Completing Journey Activities section.
User Interface
Journeys are easy to follow in Sugar because they utilize intuitive colors and symbols that quickly convey information about their progress.
Journey Options Bar
The Journey Options Bar appears in the Customer Journey panel or tab above any journeys related to the current record. If no journeys have been related to the record, then you will still see the options bar, where you can choose to start a new journey for the record. The following options are available for the journey:
- Journey counter: Next to the subpanel label, a number in parentheses represents the number of journeys related to the current record.
- Widget Layout Configuration button: The gear button opens a configuration screen with the following options:
- Active/Archived toggle: Only "active" journeys are shown by default. To view archived journeys, switch this toggle to "Archived". For more information on archiving journeys, refer to the Journey Actions Menu section.
- Vertical/Horizontal Mode toggle: Use this option to switch to the presentation mode that you prefer. There are two presentation modes available for a journey: vertical mode and horizontal mode. In the default vertical mode, stages will wrap to the next row when a journey is wider than the visible area; in the horizontal mode, stages are presented left-to-right continuously with a scroll bar for viewing stages beyond the visible area. When the journey loads, it should automatically scroll ahead to the first stage that is in progress.
- Journey selector menu: The selector menu shows the list of journeys that have been configured by your administrator for the current module in alphabetical order. For more information on creating new journeys, refer to the Customer Journey Plug-in Administration Guide.
- Start button: After choosing a journey from the journey selector menu, click the Start button to create a new, running journey related to the current record. For more information on completing the journey, refer to the Working With Customer Journeys section of this page.
Journey Colors
The Customer Journey Plug-In relies on a color scheme to quickly communicate the status of stages and activities in a journey. The following chart explains the colors utilized by the plug-in:
| Color | Example | Description |
| Gray |  |
Scheduled (Not Started) |
| Blue |  |
In Progress |
| Green |  |
Completed |
| Yellow |  |
Incomplete (or Not Applicable for activities) |
A stage will not turn green until all activities in that stage have been completed and are also green (or for Not Applicable activities, yellow). If you start completing activities in a future stage without completing activities in a previous stage, then the incomplete stage will be yellow to remind you that you have missed activities that you need to complete.
In the example journey, the first stage, Awareness, is yellow because we have commenced work on stage two, Consideration, without completing all of the Awareness stage's activities. Complete the two gray activities to change the Awareness stage's header to green, indicating that it has been completed.
The same colors are used to reflect the journey's progress when viewing the Customer Journey dashlet. When we look at the same journey via dashlet, the first stage remains yellow, and the second stage remains blue: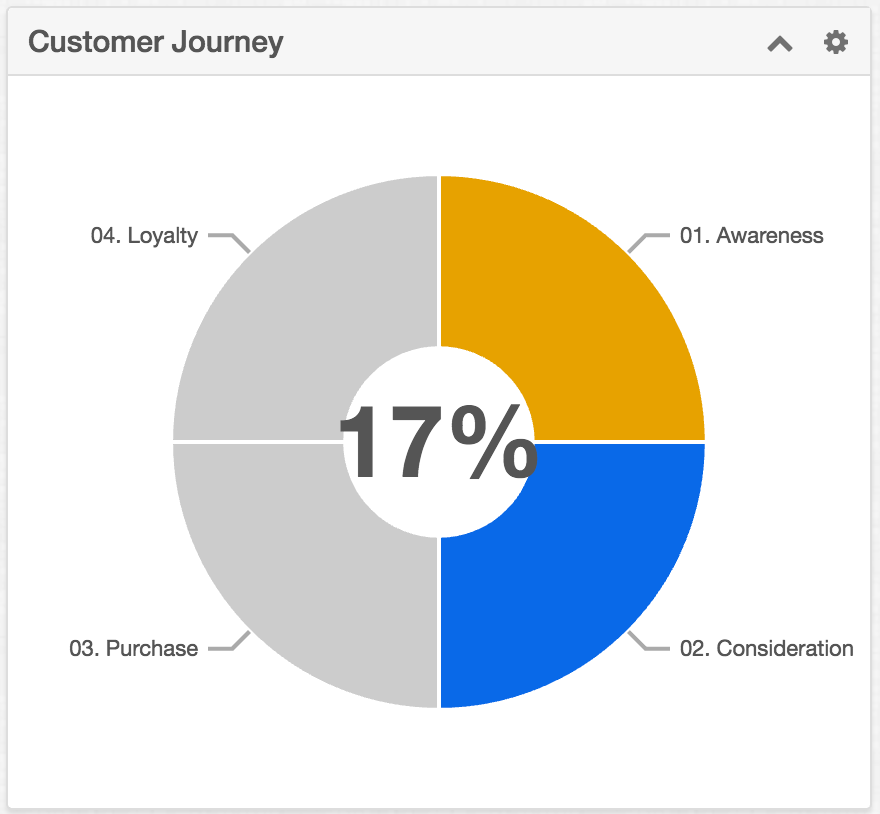
Note: Many instances have been configured to use different statuses (e.g. Closed, In Progress, Invalid) for records than the statuses used in a stock Sugar instance. Your administrator may define which statuses the Customer Journey plug-in considers "closed" for your instance. For more information, refer to the Customer Journey Plug-in Administration Guide.
Progress Bar
The Customer Journey panel contains a progress bar that represents how far along a journey is based on the point values and statuses of the journey's activities. For more information, please refer to the Understanding Progress and Momentum section of the Customer Journey Plug-in Administration Guide.
Note: If a user adds activities or stages to a running journey, that journey's point value and Progress Bar will adjust accordingly.
Momentum Bar
The Momentum Bar is available as a column in the list view dashlet and offers an alternative view of the Customer Journey Momentum dashlet. The Momentum Bar represents how efficiently the journey is moving toward completion based on the expected time-to-complete that has been defined for each activity. For more information, please refer to the Understanding Progress and Momentum section of the Customer Journey Plug-in Administration Guide.
Keep in mind that the Momentum Bar will not always show a 100% value for completed journeys; this is in contrast to the Progress Bar, which will always reflect 100% for completed journeys. Once a journey loses momentum points, the points cannot be recovered, permanently impacting the overall momentum of the in-progress journey.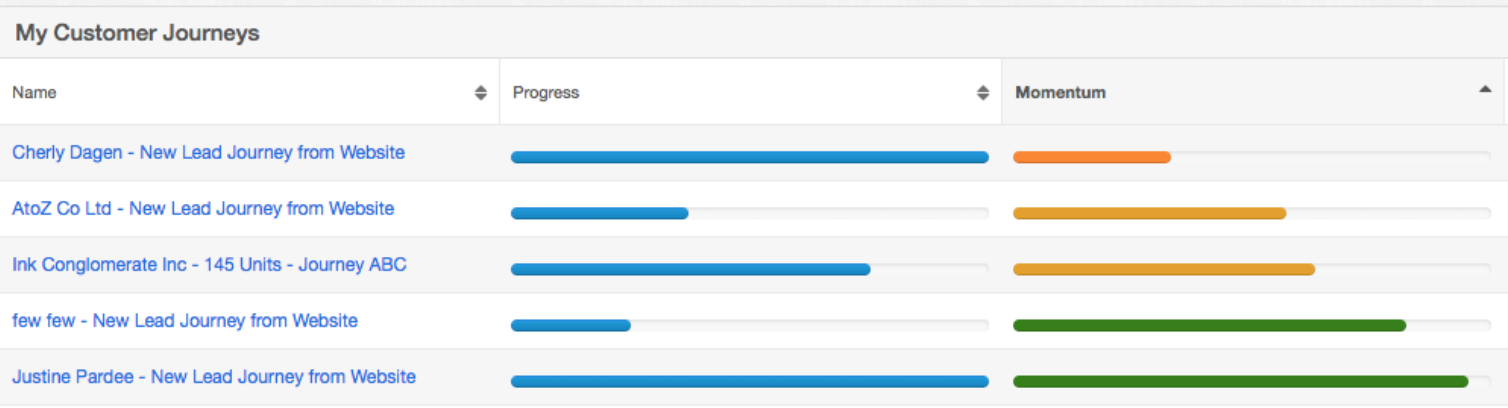
However, if the administrator has not assigned any momentum point values to the activities in your journey, the Momentum Bar will always display a 100% momentum value.
Note: If a user adds activities or stages to a running journey, that journey's momentum point value and momentum bar will adjust accordingly.
Due Dates
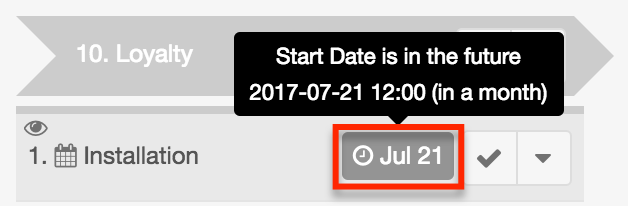
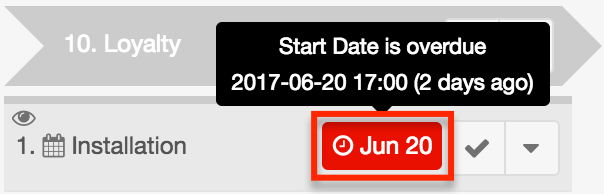
When viewing a Customer Journey panel on a record, activities that have a specified due date will display that due date as a color-coded tag on the activity in the journey.
The due dates shown on activities in the Customer Journey panel are color-coded as follows:
- Gray: The activity has not been completed and its start time occurs more than 24 hours from the current date and time.
- Blue: The activity has not been completed and its start time occurs within the next 24 hours.

- Red: The activity has not been completed and its start time occurs in the past.
Icons
When viewing a Customer Journey, you may see one or more icons on a journey activity. The following icons are used for journey activities:
| Icon | Example(s) | Description |
| Activity Type | The type of activity (e.g., call, meeting, internal task) to perform. | |
| Blocked | The activity cannot be completed because it is dependent upon the completion of an earlier activity. | |
| Link | The link icon can be clicked to navigate to a URL that is related to the activity. | |
| Preview | The preview icon can be clicked to view the activity's details in the intelligence pane. | |
| Related Sugar Action | An activity showing a Related Sugar Action icon requires the user to create, view, or edit a Sugar record that is related to the journey's parent record. |
Click on the name of an icon in the above table to access detailed information about its meaning and functionality.
Activity-Type Icons
The activities under a stage in a journey represent calls, meetings, and tasks in their corresponding modules in Sugar. A small symbol located on the color-coded activity communicates the activity's type. The following symbols represent the different activity types in a customer journey:
| Symbol | Activity |
| Agency Task | |
| Automatic Task | |
| Call | |
| Customer Task | |
| Internal Task | |
| Meeting | |
| Milestone (task) |
For more information on working with journey activities, please refer to the Completing Journey Activities section on this page.
Blocked Icon
When an activity displays the Blocked icon (a circle with a slash) it means that the activity cannot be completed until one or more dependent activities have been completed first. This is further evidenced by the absence of options to complete the activity from the Customer Journey panel: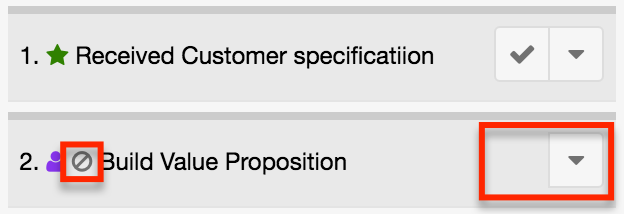
Hover over the Blocked icon to reveal the name of the blocker activities that must be completed; click directly on the icon to identify the activity's blocker activities in red.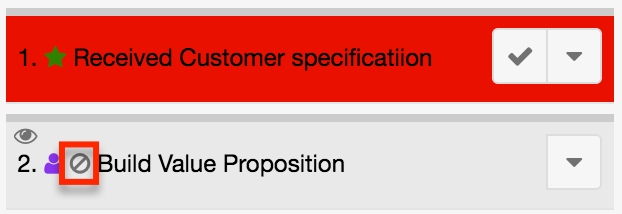
Furthermore, if a user attempts to complete the activity via its Sugar task, call, or meeting record directly, they will be prohibited: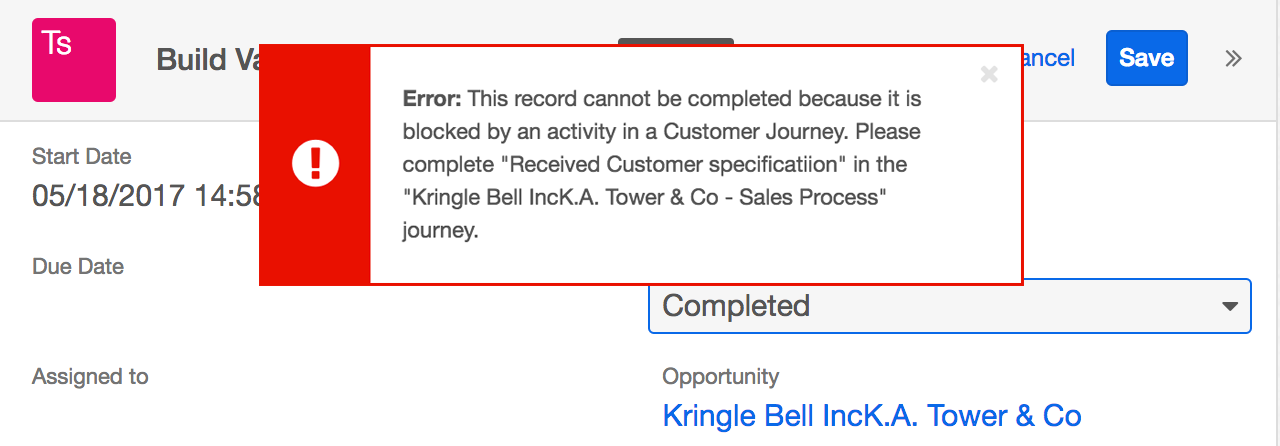
After completing the blocker activities, the dependent activity will allow access to the options to complete it and will no longer display the Blocked icon.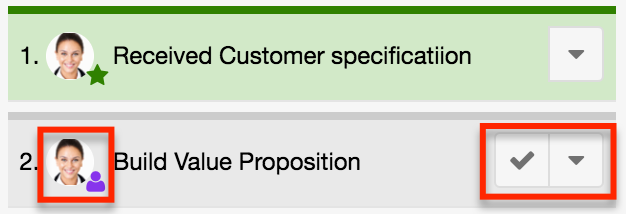
Link Icon
Some journey activities may display a Link icon that, when clicked, takes you to a pre-determined web address. When you hover over the icon, a preview of the link's address will appear. The link will usually be set to a URL that will assist you when completing this activity. Click on the icon to navigate to the URL in a new browser tab.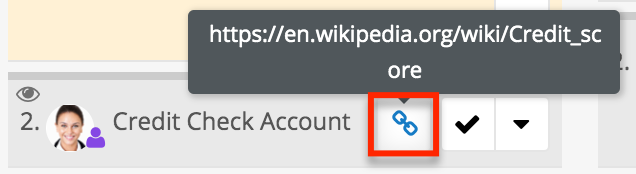
The link provided in this shortcut has been set within the template by your Sugar administrator. For more information on configuring the Link shortcut for activities, refer to the "URL" field description in the Customer Journey Plug-in Administration Guide.
Preview Icon
All journey activities can be previewed as regular Sugar records in the parent record's intelligence pane. Simply hover over an activity to expose and click on the Preview icon (an eye).
Alternatively, expand the activity's actions menu and click on "Preview".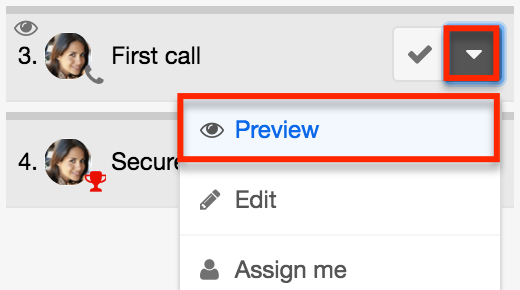
The record (i.e. call, meeting, or task) associated with the activity will appear in the intelligence pane on the right. Sugar displays the topmost fields from the module's record view and the record's most recent activity stream entries in the intelligence pane. For more information on previewing records in Sugar, please refer to the User Interface documentation.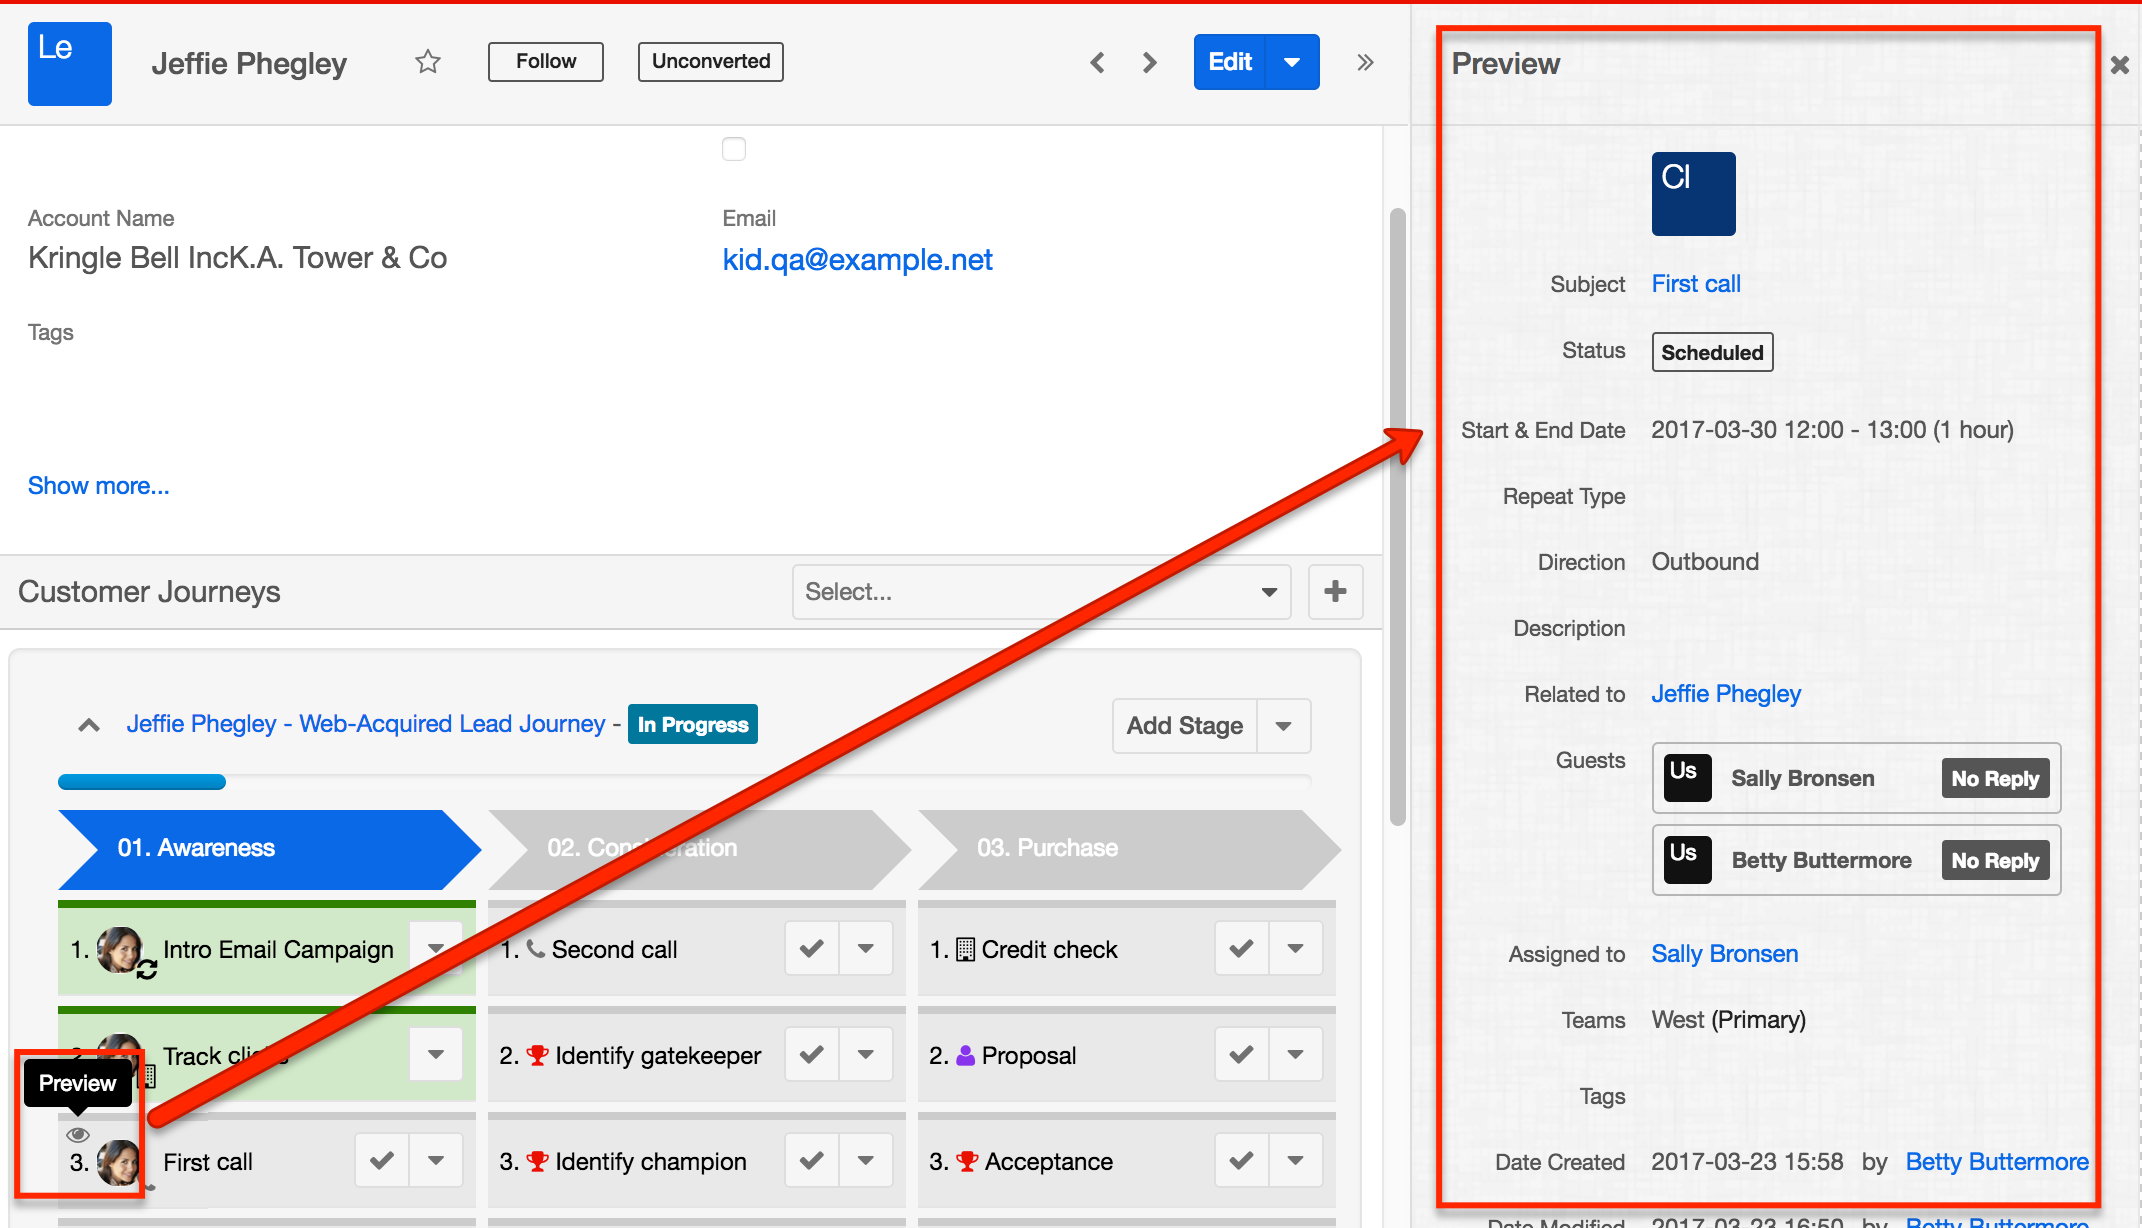
Related Sugar Actions
An activity may contain as many as four Related Sugar Actions that will prompt you to create, view, or edit a Sugar record that is related to the journey's parent record. The administrator may have programmed the Related Sugar Action to automatically launch when its activity has started or finished, but you can hover over the icon to read a description of the action and click on the icon at any time to perform the action. In some cases, the administrator may have also programmed certain field values to pre-populate in the related record's form, such as a standardized subject line or description.
Related Sugar Actions will appear on the activity in the journey as the following icon: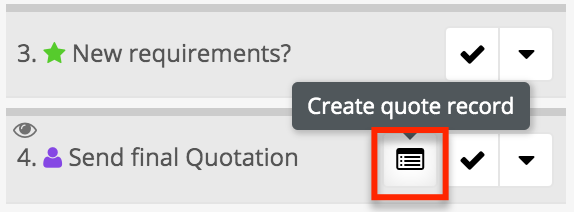
Note: Proactively performing a Related Sugar Action without waiting to be prompted will not prevent the prompt from occurring at the designated Trigger Event time, but you can click "Cancel" to reject the prompt when it occurs if desired.
For more information on adding and configuring Related Sugar Actions, refer to the Customer Journey Plug-in Administration Guide.
Journey Menus
Customer Journeys give users options at three levels: journey actions, stage actions, and activity actions. The next three sections explain the available options for each level.
Journey Actions Menu
The Actions menu allows you to perform the following operations:
| Menu Item | Description |
| Add Stage | Add a new stage to the current journey. |
| View | Navigate to the journey's record view. |
| Configure | Shown for administrator users only, the Configure option will direct you to this journey's template where the template can be modified according to the Customer Journey Plug-in Administration Guide. |
| Archive | Shown for completed journeys only, "Archive" will hide the current journey from the Customer Journeys subpanel. The journey will no longer show under the parent record when the "Active" view is enabled but will remain visible in the Customer Journeys list view and remain reportable. To view archived journeys related to a record, switch to "Archive" view in the journey options bar. |
| Cancel | Shown for in-progress or not-started journeys only, "Cancel" will stop the current journey without deleting it. The journey will no longer show under the parent record but will remain visible in the Customer Journeys list view and remain reportable. The journey's incomplete activities will either be set to "Not Applicable" or will be deleted, depending on the Cancel Action configuration set by the administrator on the journey template. Journeys that have been completed cannot be canceled and will not have a "Cancel" option. |
| Delete | Stop the current journey and delete it and all of its related activities (tasks, calls, meetings) from Sugar. |
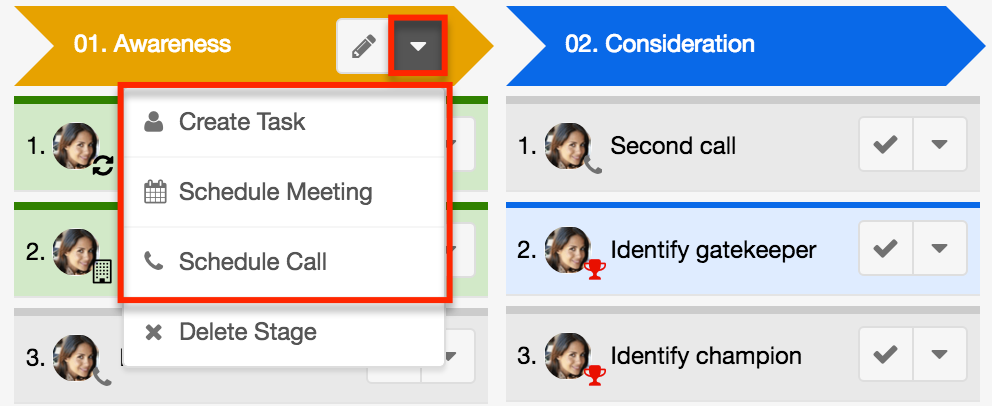
Stage Actions Menu
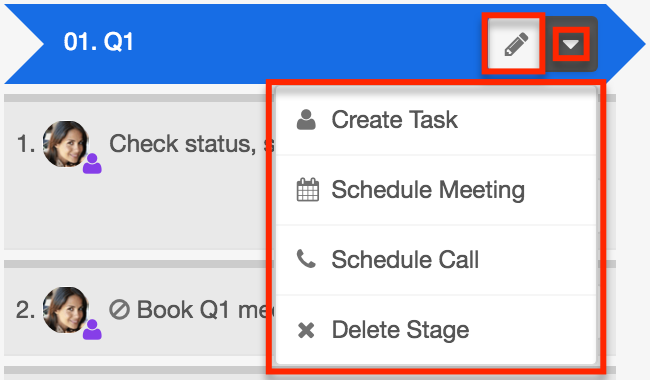
The Actions menu allows you to perform the following operations:
| Menu Item | Description |
| Edit | Edit the stage's settings. |
| Schedule Meeting | Add a new meeting to the stage. |
| Schedule Call | Add a new call to the stage. |
| Delete Stage | Remove the stage and all of its related activities from the journey. |
Please note that the available options in the stage Actions menu may vary based on the configuration of the journey by your administrator. For more information on disabling stage actions, please refer to the Customer Journey Plug-in Administration Guide.
Activity Actions Menu
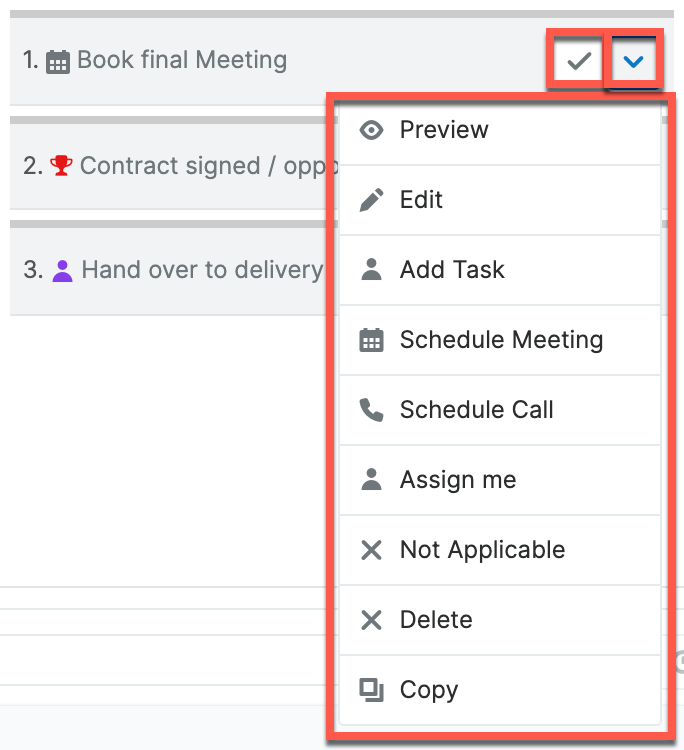
The Actions menu allows you to perform the following operations:
| Menu Item | Description |
| Complete | Close the current activity as "Completed". |
| Preview | View the activity record's details in the preview pane. |
| Edit | Edit the call, meeting, or task record. |
| Start | Set the call, meeting, or task by changing its status to "In Progress". |
| Add Task | Add a new task to the stage. |
| Schedule Meeting | Add a new meeting to the stage. |
| Schedule Call | Add a new call to the stage. |
| Not Applicable | Close the activity as "Not Applicable". |
| Delete | Delete the activity record from the journey and Sugar's database. This option is only available if the administrator has enabled it. For more information on deleting activities, refer to the Removing Journey Activities section of this page. |
| Assign Me | Re-assign the activity to yourself. This option is unavailable when the activity is already assigned to you. |
| Copy | Create a new call or meeting for this journey by copying the current one. You will be given the opportunity to edit the call or meeting details before saving. |
Please note that the available options in the activity Actions menu may vary based on the configuration of the journey by your administrator. For more information on disabling activity actions, please refer to the Customer Journey Plug-in Administration Guide.
Dashlets
To further understand the journeys in Sugar, the Customer Journey Plugin includes configurable dashlets that summarize journey progress. The list view dashlet for customer journeys can be used to display a summary of all journeys or just to show a summary of the journeys related to the current record. The plug-in also includes a pie-chart style dashlet that can be placed on the record view to show a color-coded summary of the current record's journey(s). The following sections explain both ways to use the Customer Journey List View dashlet and the plug-in's color-coded Customer Journey dashlet in detail.
Customer Journey List View Dashlet
To see a list of journeys on your intelligence pane or dashboard, you can add a list view dashlet for the Customer Journeys module. The list view dashlet can be configured to show the progress bar and momentum bar for each journey plus the current stage and activity that must be completed.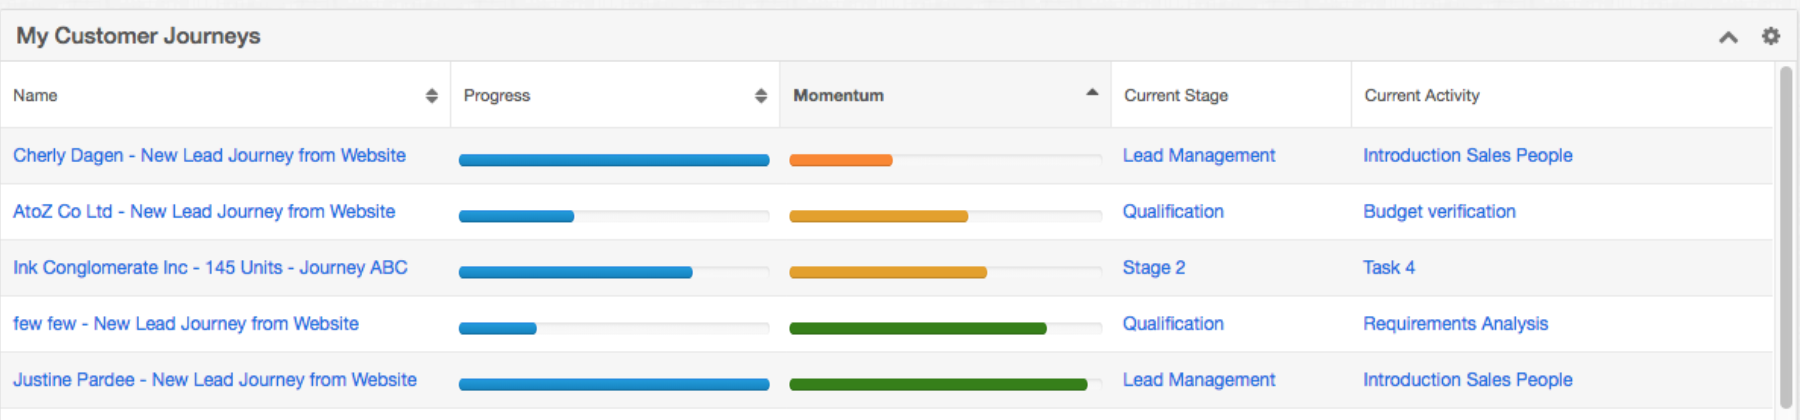
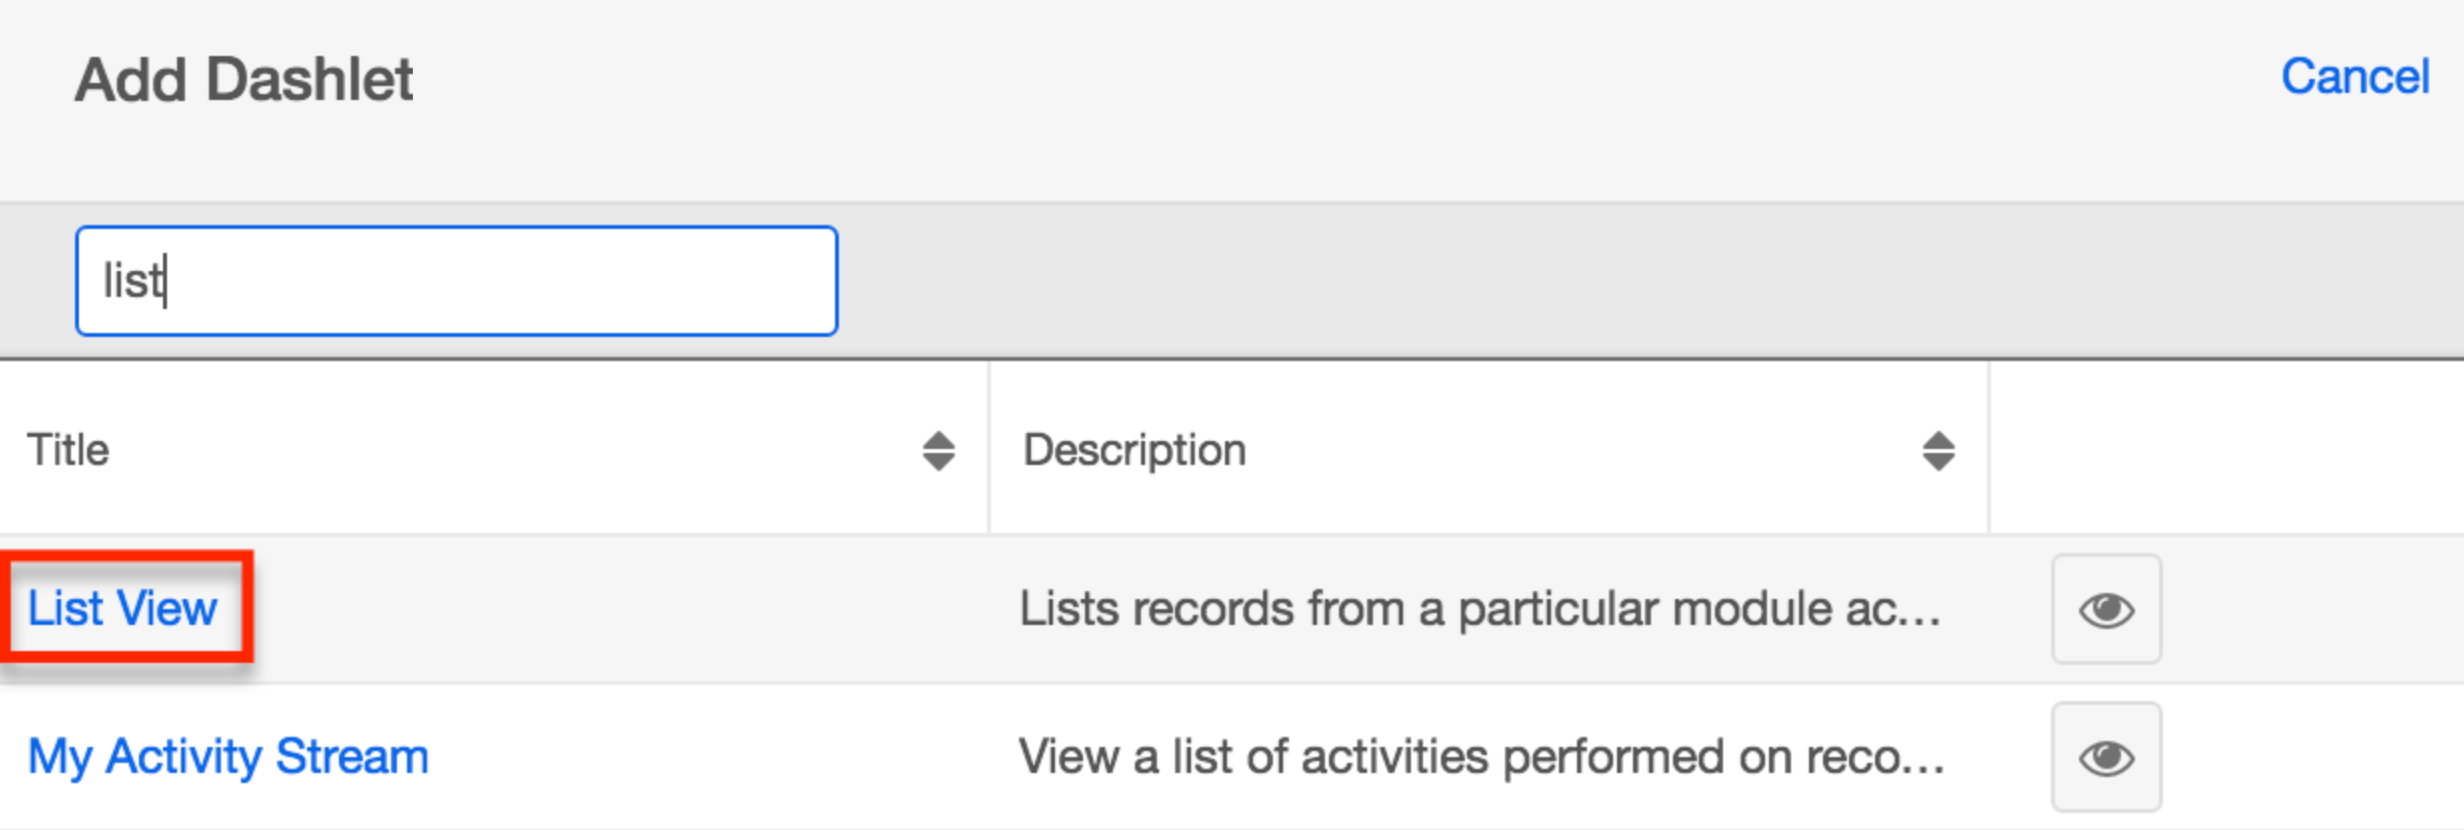
To add this list view dashlet to a dashboard, choose "List View" from the Add a Dashlet page and "Customer Journey" as the module. For more information on Sugar dashlets, please refer to the Dashboards and Dashlets documentation.
Intelligence Pane List View Dashlet
A Customer Journey list view dashlet on a record's Intelligence Pane can be configured to display only journeys related to the record you are currently viewing.
The following steps cover how to add a contextual Customer Journey list view dashlet to the Contacts module's record-view intelligence pane as an example.
- Navigate to any record view in the module where you want to see the dashlet. For this example, simply click on an existing contact to see the record view for the Contacts module.
- If needed, reveal the intelligence pane by clicking on the double arrow next to the contact's Edit button.
- Click the triangle next to the intelligence pane's Create button and select "Edit" from the actions menu.
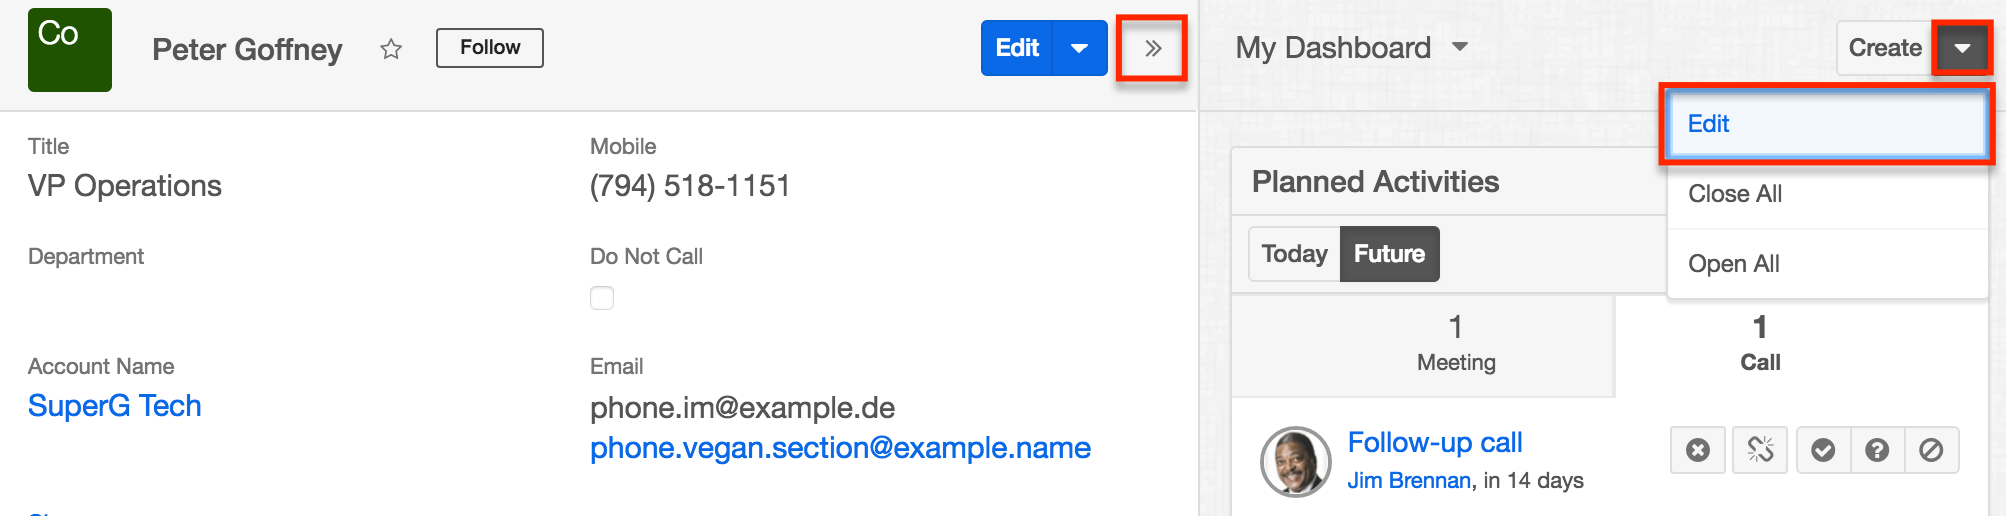
- Add a new dashlet to the intelligence pane, selecting "List View" from the Add Dashlet menu.
For more information on adding Sugar dashlets, please refer to the Dashboards and Dashlets documentation. - Select "Customer Journeys" as the dashlet's module, place a checkmark next to "Relate to current record", and remove the "My Customer Journeys" data filter to be sure you see all of the related journeys that your team membership permits.
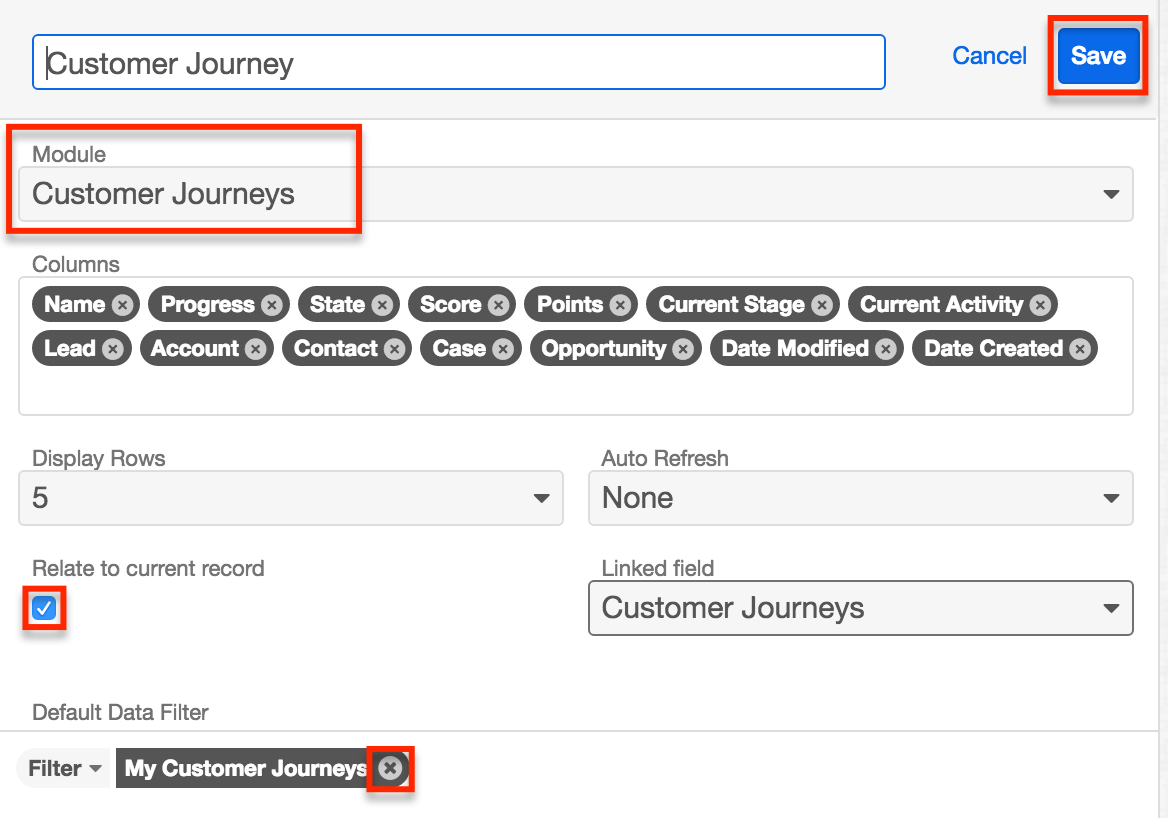
- Adjust any desired data filters or display columns and then click "Save" to add the dashlet to the intelligence pane. Click "Save" again on the intelligence pane's edit layout to apply the changes to the current module's record view.
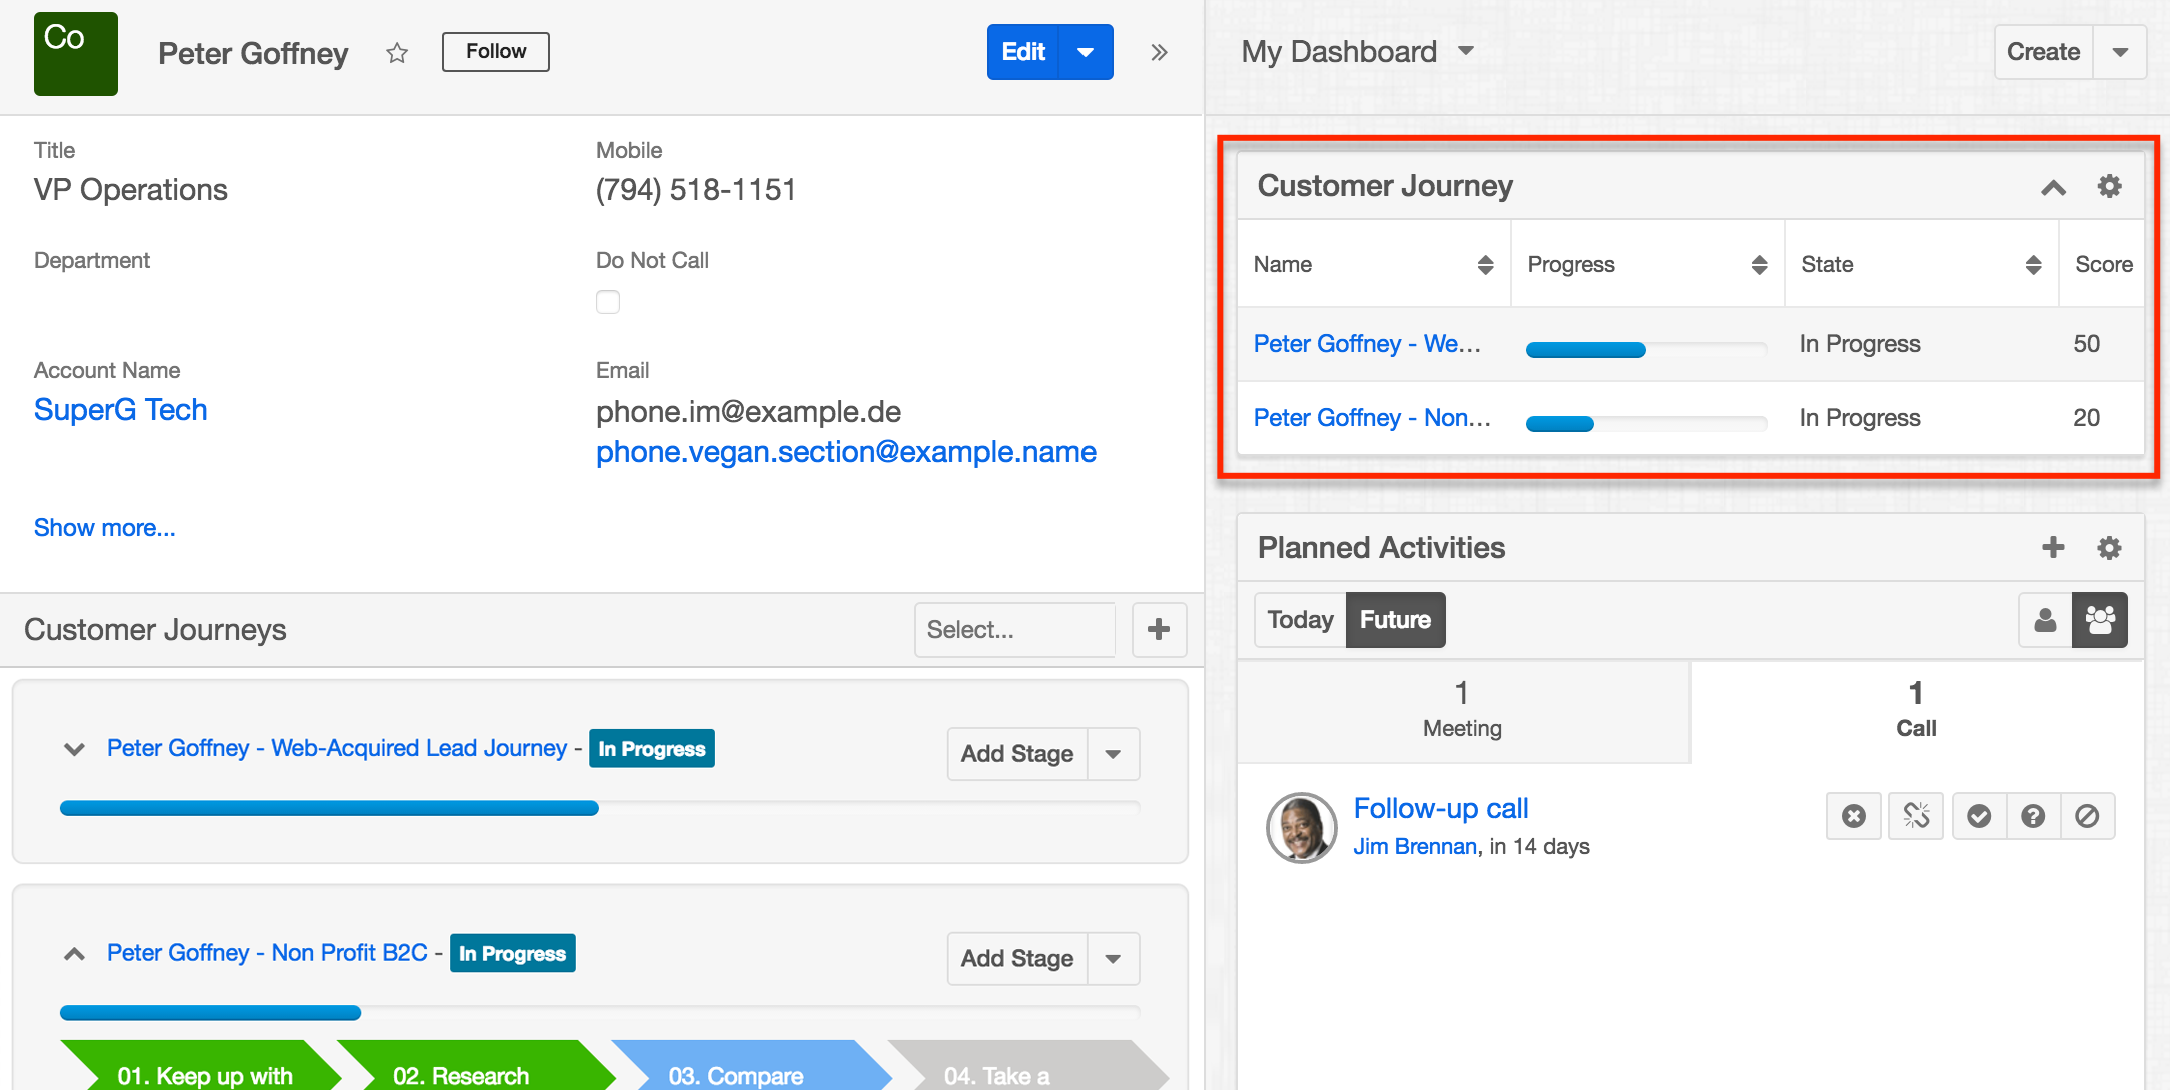
You will now see a summary of journeys related to the current record in the intelligence pane for all contacts in Sugar.
Customer Journey Progress Dashlet
The plug-in's Customer Journey dashlet displays a pie-chart summary of the current record's customer journey in the intelligence pane. If a record is related to more than one journey, click on one of the Customer Journey subpanels to instantly refresh the pie chart's data accordingly.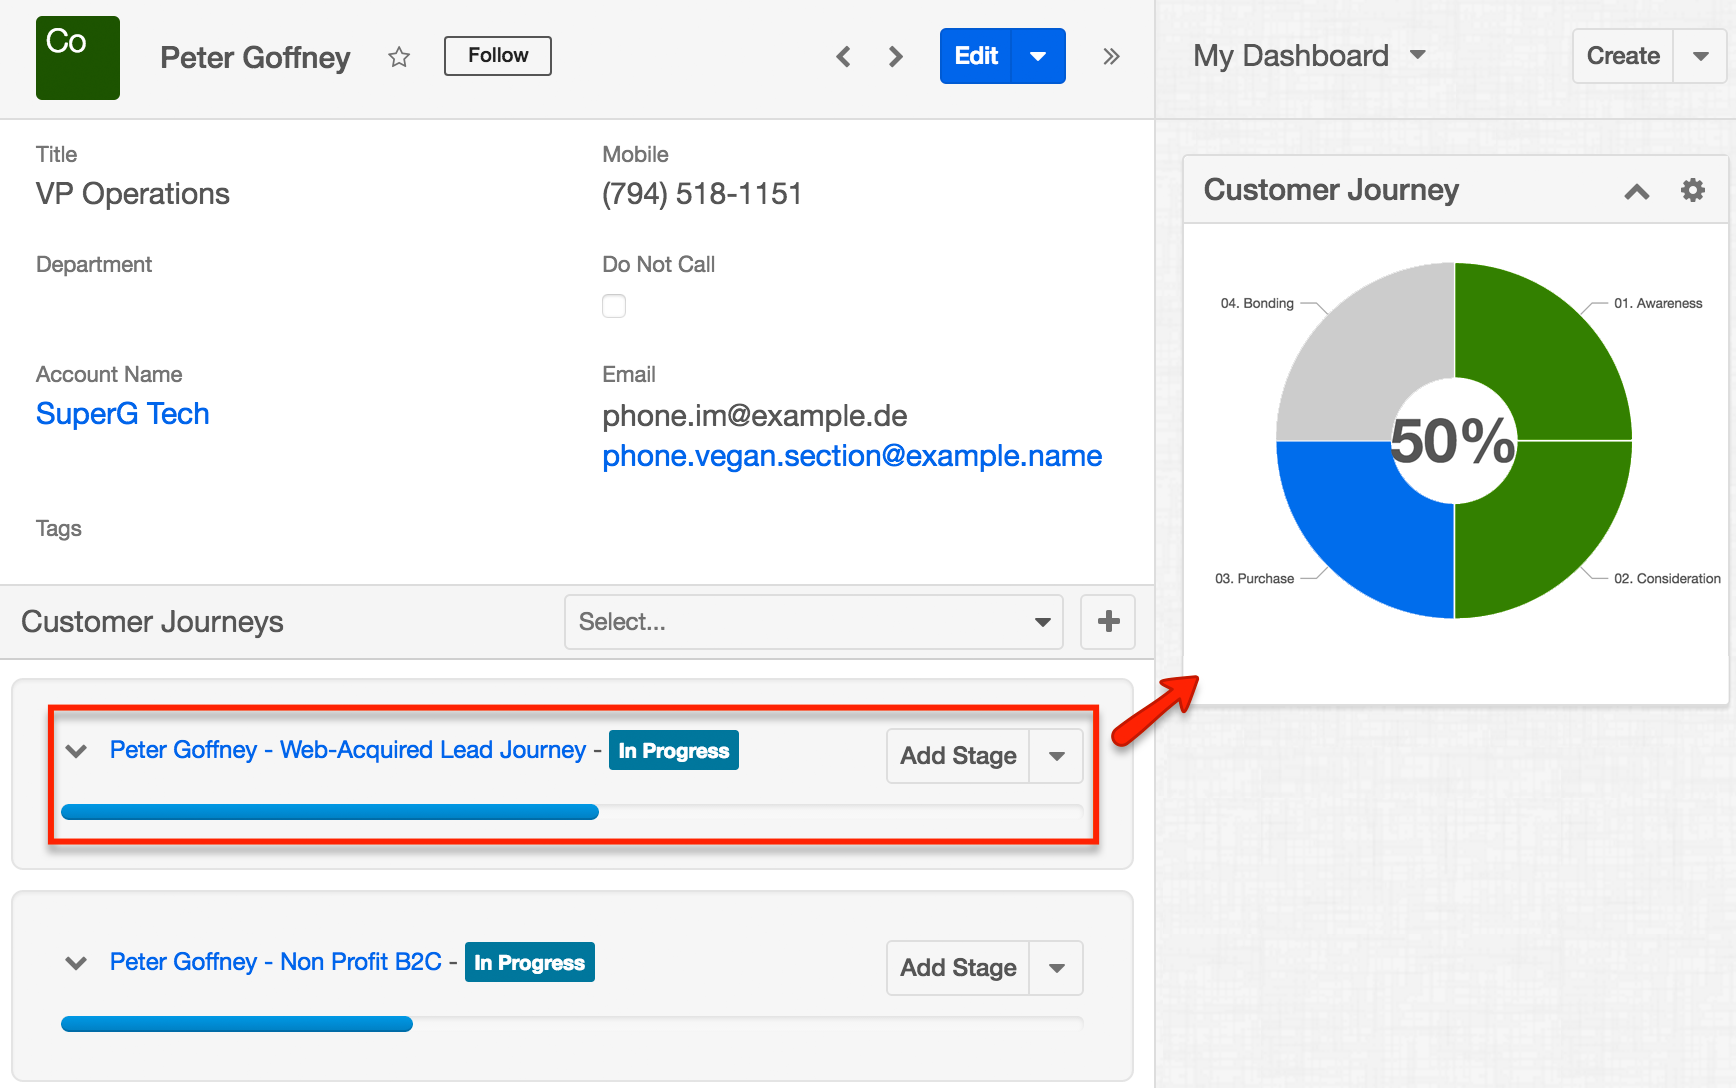
To add the pie chart dashlet to a record view, simply edit the intelligence pane where you would like to see the dashlet, selecting "Customer Journey" from the Add a Sugar Dashlet menu. For more information on adding Sugar dashlets, please refer to the Dashboards and Dashlets documentation.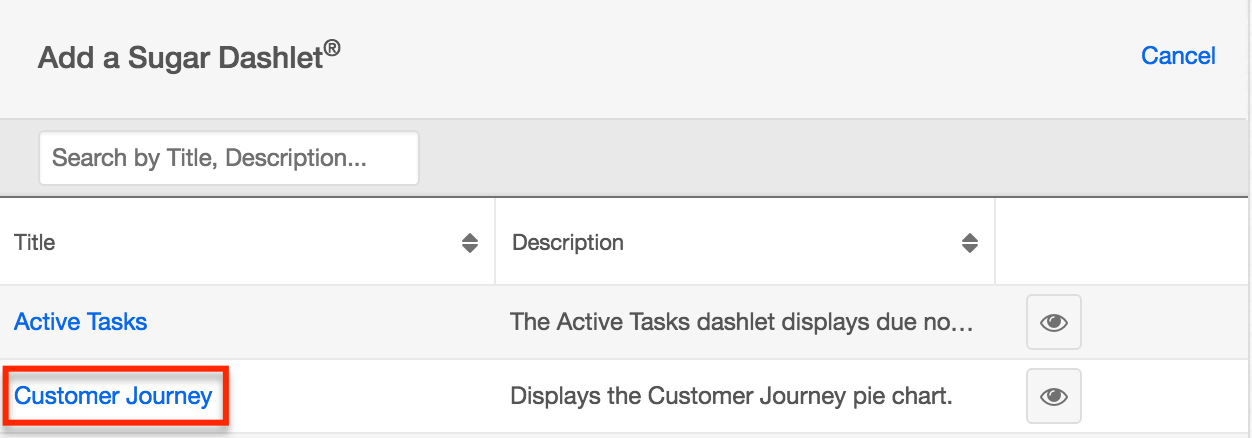
After saving the edited dashboard, you will see the Customer Journey dashlet in the intelligence pane for all of the records in the current module.
Customer Journey Momentum Dashlet
The Customer Journey Momentum dashlet is available only on the record view dashboard for modules enabled for Customer Journey access. The dashlet offers an alternative, gauge-chart view of the Momentum Bar, which represents how efficiently the journey is moving toward completion based on the expected time-to-complete that has been defined for each activity. If the administrator has not assigned any momentum point values to the activities in your journey, the Momentum Bar will always display a 100% momentum value. For more information, please refer to the Understanding Progress and Momentum section of the Customer Journey Plug-in Administration Guide.
Keep in mind that the Momentum dashlet will not always show a 100% value for completed journeys. Once a journey loses momentum points, the points cannot be recovered, permanently impacting the overall momentum of the in-progress journey.
Note: If a user adds activities or stages to a running journey, that journey's momentum point value will adjust accordingly.
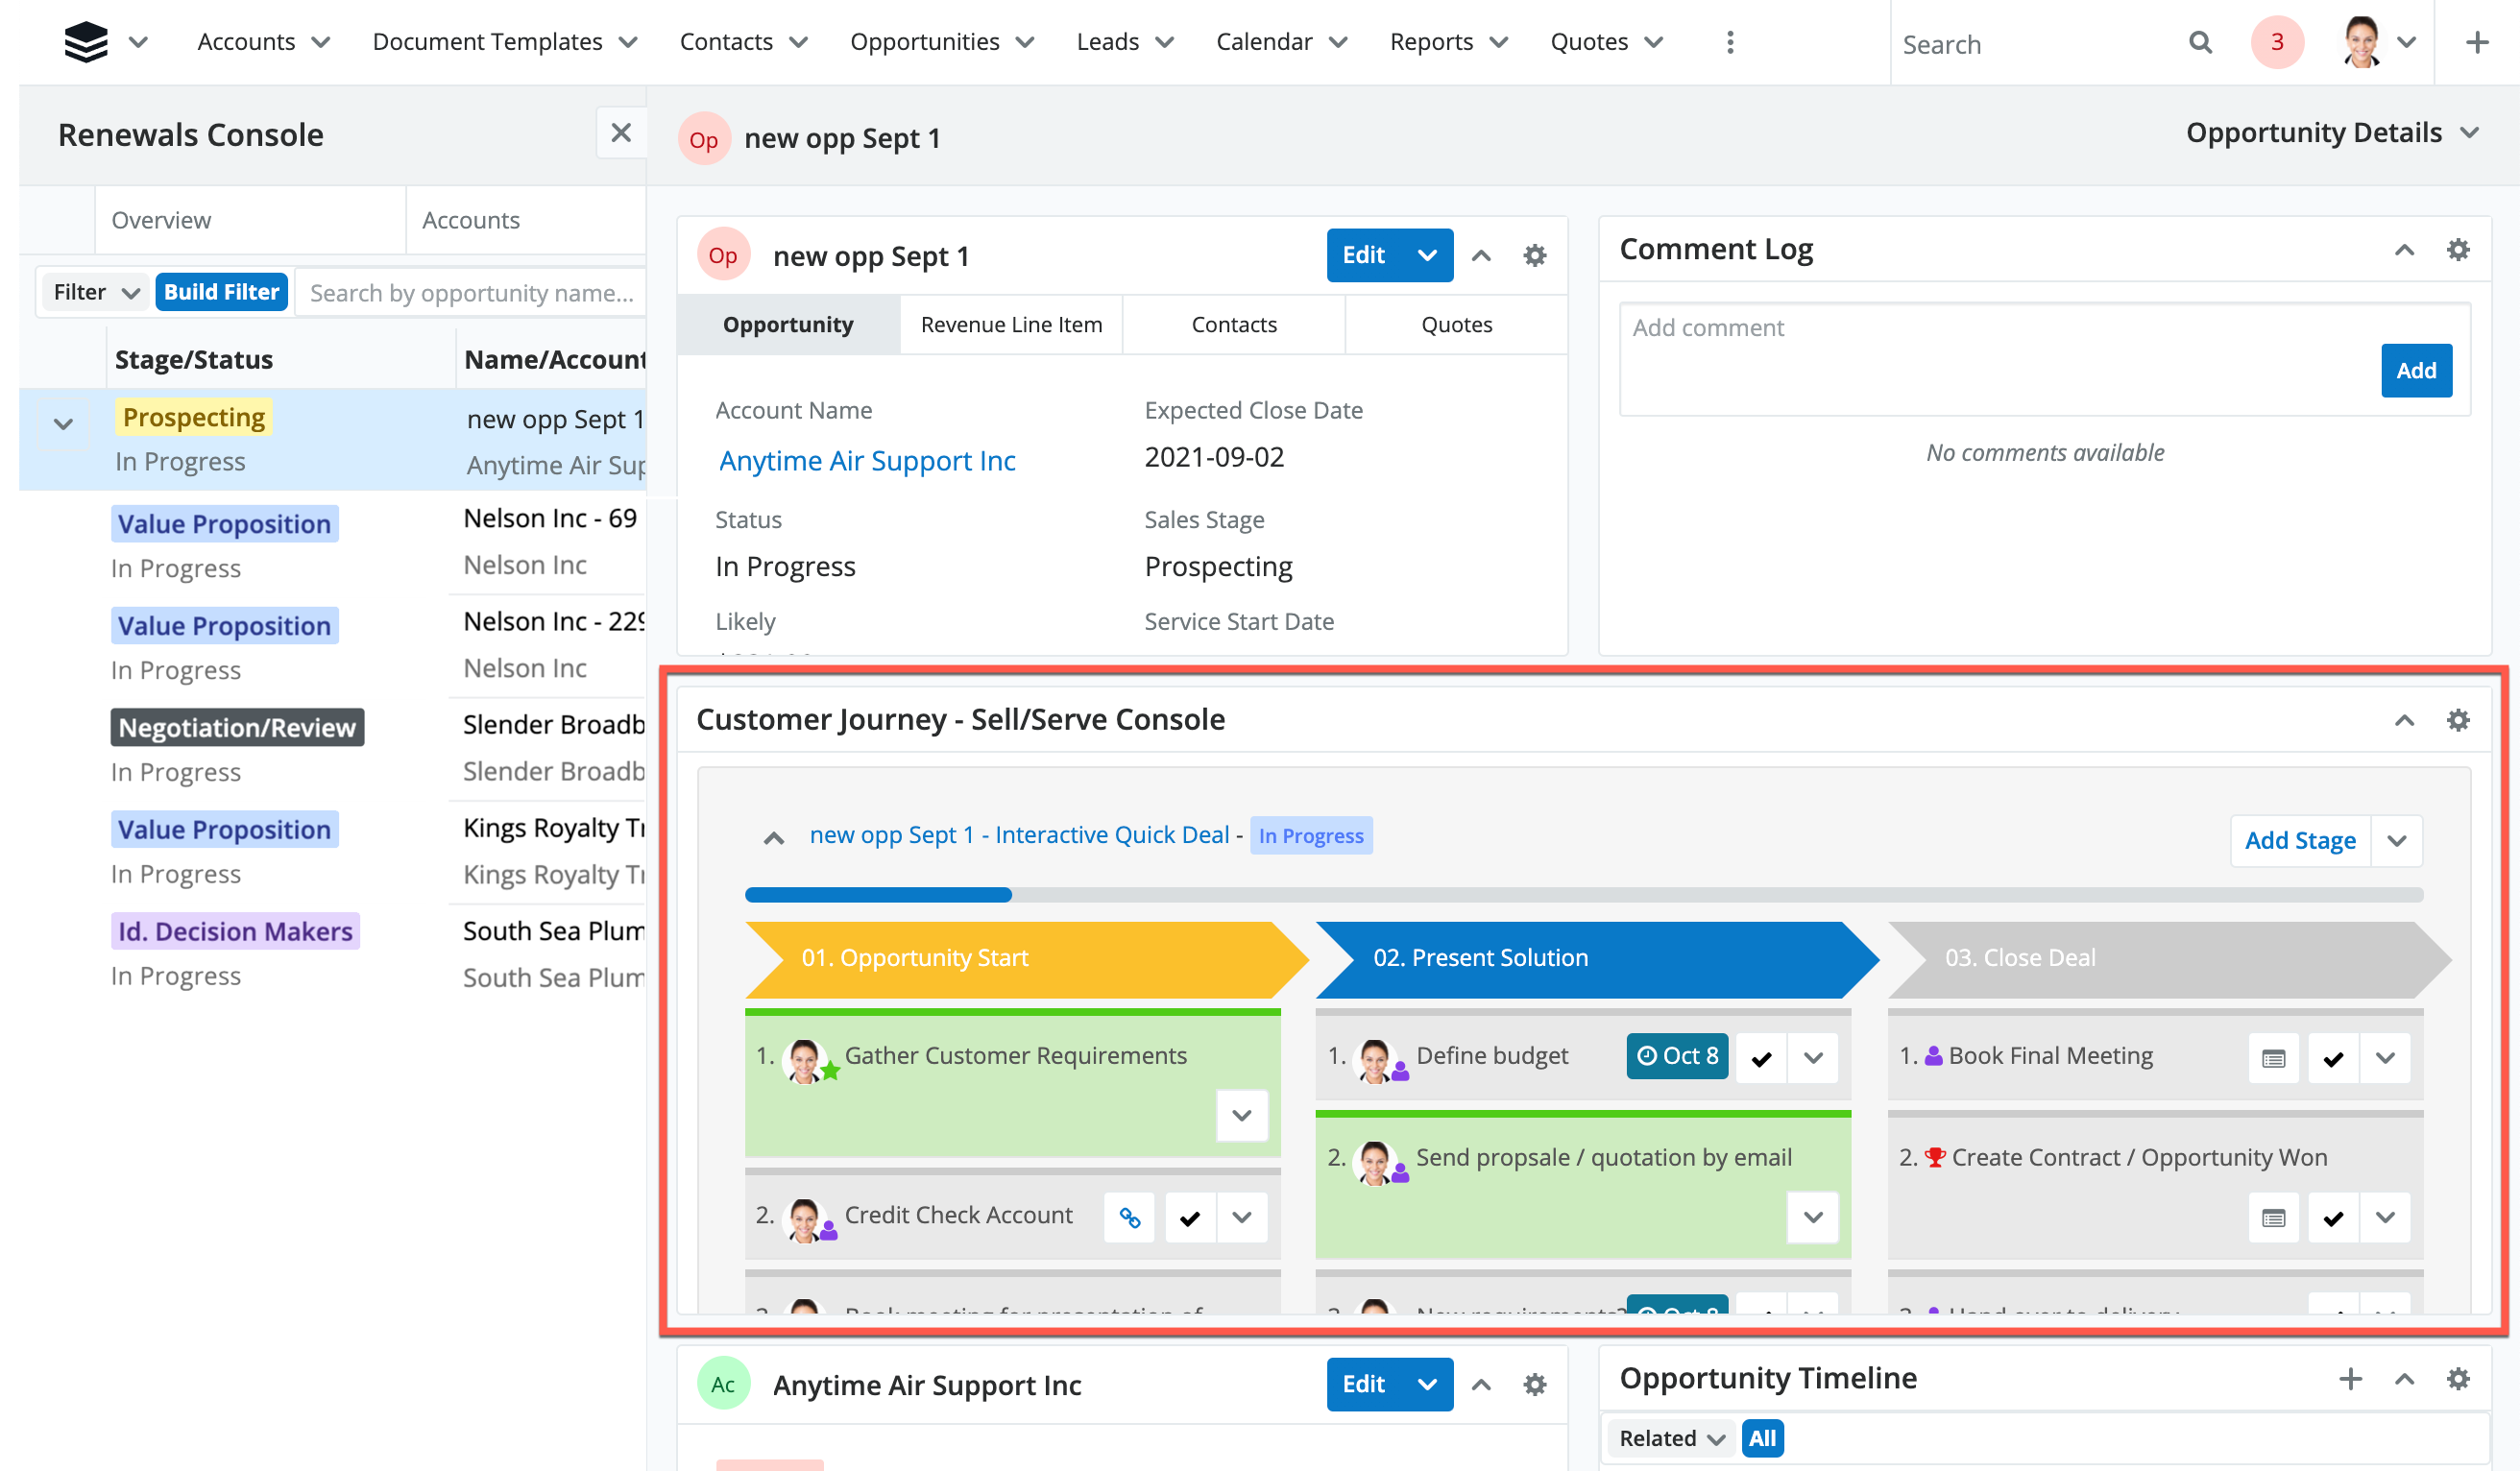
Customer Journey - Focus Drawer and Sell/Serve Console Dashlet
Users with a Sugar Serve or Sugar Sell license can view running journeys for their accounts, cases, or opportunities on the Case Detail drawer on the Service Console and the Account Detail drawer and Opportunity Detail drawer on the Renewals Console. You can also add a dashlet to the Focus Drawer dashboard for modules that work with journeys.
To add the Customer Journey dashlet to a console, follow these steps:
- Navigate to the Case, Opportunity, or Account tab on the Service or Renewals Console.
- Click on a record in the list and view the detail drawer for that record.
- Expand the floating actions button and select "Add Dashlet".
- Select the "Customer Journey - FocusDrawer & Sell/Serve Console Dashlet" from the available dashlets and then click "Save".
To add the Customer Journey dashlet to a focus drawer dashboard, expand the focus drawer by clicking on the focus icon, click on Add Dashlet in the floating actions button, and then choose "Customer Journey - FocusDrawer & Sell/Serve Console Dashlet" from the available dashlets and save.
Searching for Journey Activities
The activities in a journey represent calls, meetings, and tasks in their corresponding modules in Sugar. Because they exist in Sugar as normal records, you can work with activities as you normally would in the Calls, Meetings, and Tasks modules. If you would like to search for a particular journey-related call, meeting, or task, simply navigate to the relevant module's list view and create a search filter using one of the journey-specific filter options.
As an example, follow these steps to find all of the meetings that have been created as part of the "Purchase" stage of a Customer Journey:
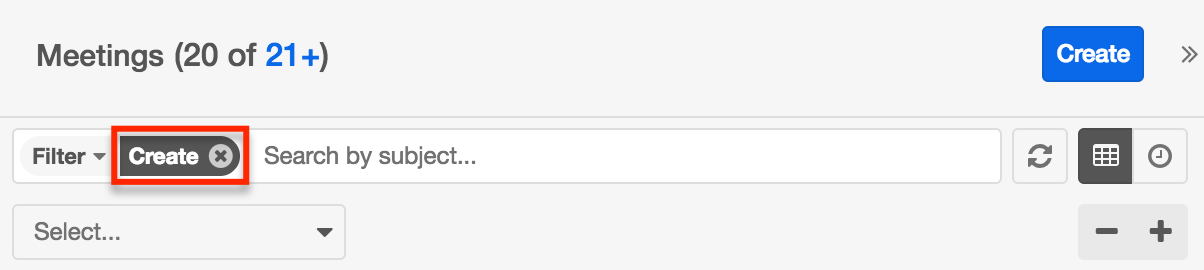
- Navigate to the list view of the Meetings module by clicking on "Meetings" in Sugar's navigation bar.
- If needed, cancel any filters that may already be active on the list view and then click "Create" in the filter bar to start a new filter.
- Expand the Select field under the filter bar and start typing "journey" to see the Customer Journey options appear.
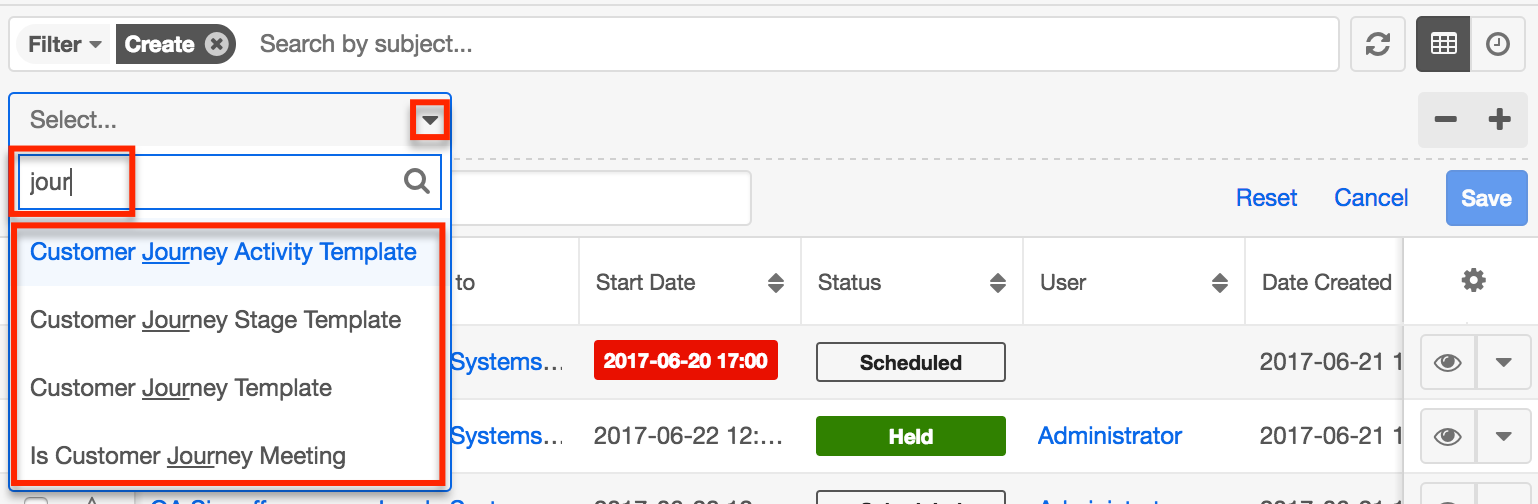
- Select one of the template options to find meetings from a specific journey, stage, or activity, or select "Is Customer Journey Meeting" to view all meetings created by the Customer Journey plug-in. For this example, select "Customer Journey Stage Template" so that we can specify the activity's parent stage.
- In the next cell, choose "is any of" and then use the Search and Select field to find the stage titled "Purchase".
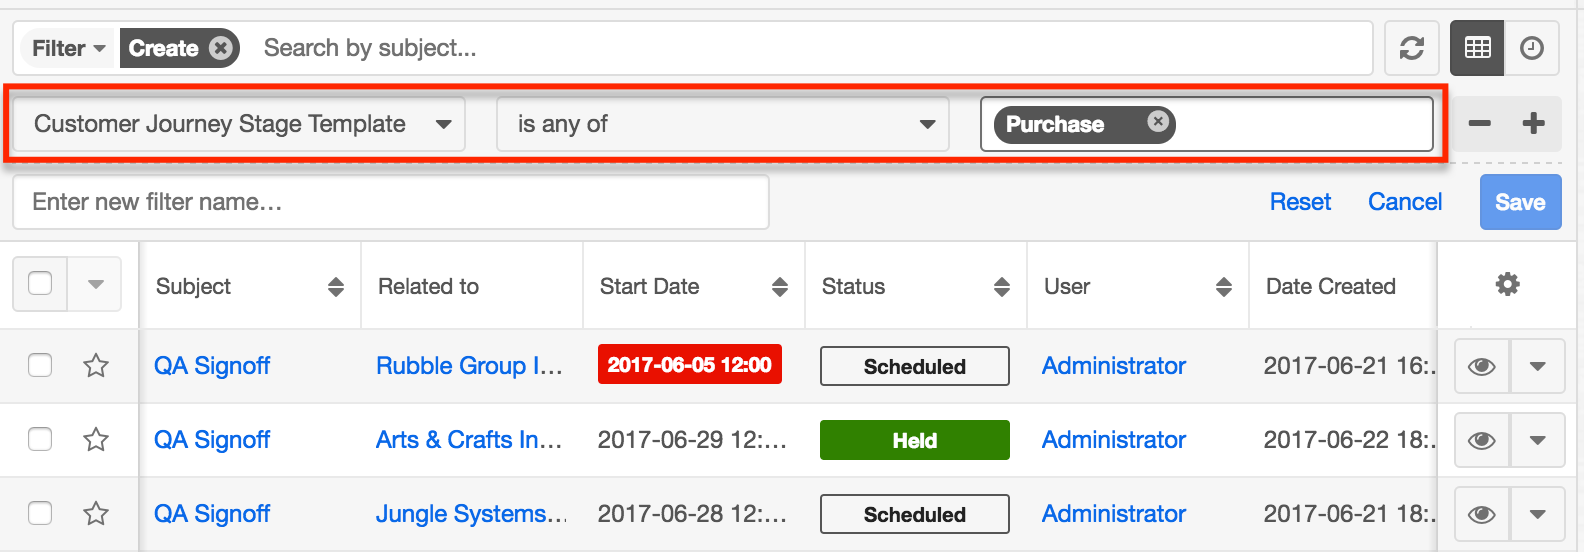
The list view should now be filtered to display all meetings that were created as part of a Customer Journey's "Purchase" stage. Please note that you will only be able to view records according to your team membership, user type, and role restrictions. For more information on teams and roles, please refer to the Team Management and Role Management documentation.
Journey-Specific Fields
The Customer Journey Plug-in adds many new fields to your Sugar instance, and some of these may be exposed on your task, call, or meeting records. The following fields are some of the more likely ones to be shown:
- Customer Journey Activity Start Date: The date and time that the task's status was set to "In Progress".
Customer Journey Activity Completion Date: The date and time that the task's status was set to "Completed".
Customer Journey Days to Complete: The amount of time in days, hours, minutes, and seconds that passes between a task's status being set to "In Progress" and it being set to "Completed". - Customer Journey Order: The step number that corresponds with where the activity chronologically appears under the stage header. By default, this number will reflect the order in which the activities are created, but can be edited as needed. For more information, refer to the Adding Journey Activities section.
- Customer Journey Points: The Customer Journey Points field controls the growth of the progress bar that is displayed for every running customer journey in Sugar. For more information, please refer to the Progress Bar section.
- Customer Journey Task: The Customer Journey Task field is only shown for Task activities and allows you to specify the type of task you are creating. For a detailed explanation of each available task type, please refer to the to Completing Journey Activities section.
Archiving Customer Journeys
To hide a completed customer journey, simply select "Archive" in the journey's actions menu on the right side of the Customer Journey panel.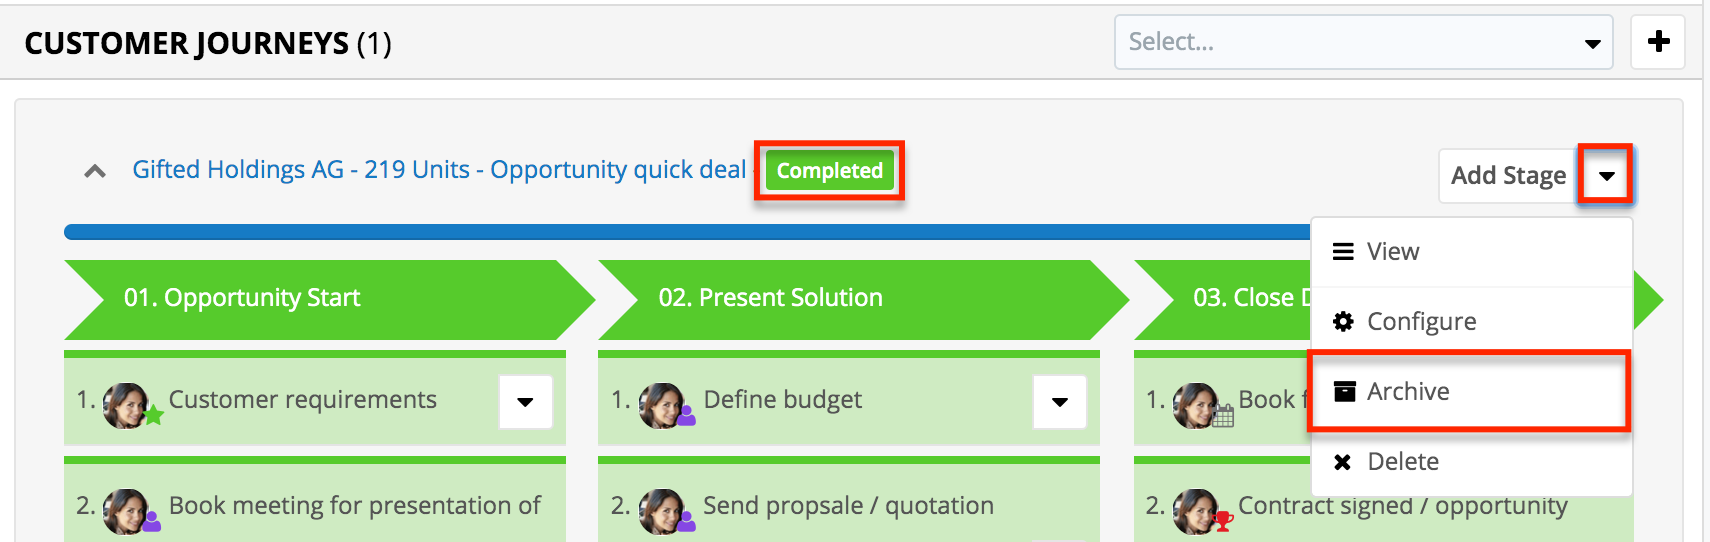
Shown for completed journeys only, "Archive" will hide the current journey from the Customer Journeys subpanel. The journey will no longer show under the parent record but will remain visible in the Customer Journeys list view and remain reportable.
Un-Archiving Customer Journeys
To un-archive a journey that was previously archived, navigate to the Customer Journeys list view and click on the name of the journey to access its record view. If necessary, you can create a filter to display only journeys with an Archived value of "True":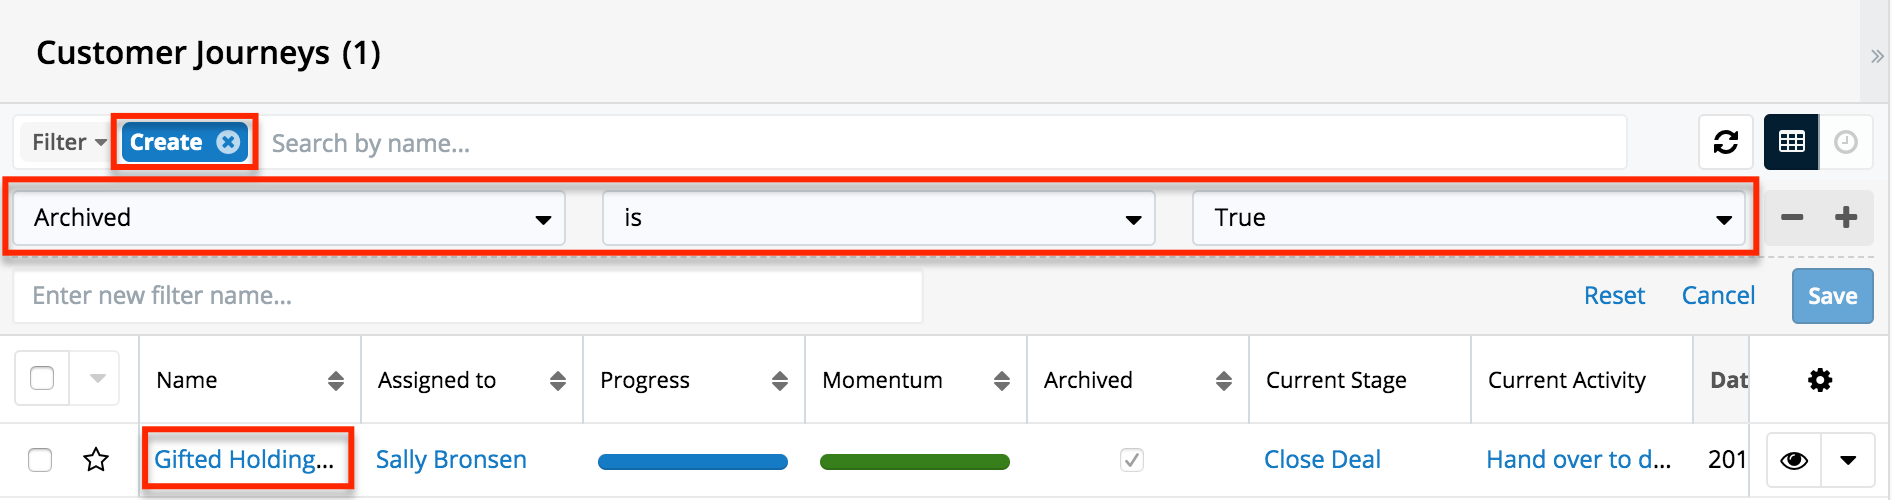
From the journey's record view, use the journey actions menu (located in the panel below the record view) to select "Un-archive":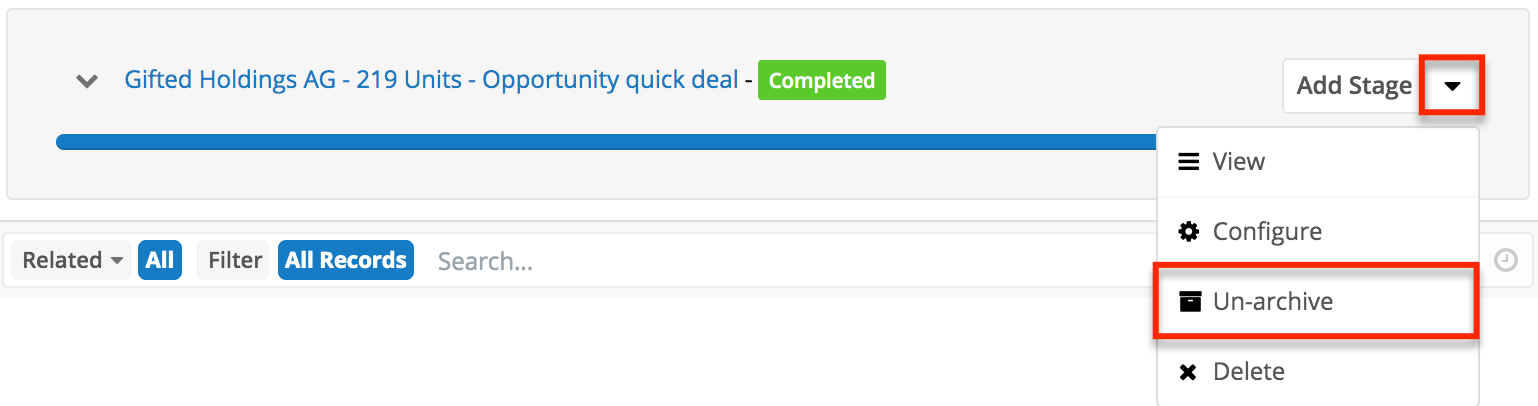
Canceling Customer Journeys
Shown for in-progress or not-started journeys only, the "Cancel" option in the journey's actions menu will stop the current journey without deleting it. The journey will no longer show under the parent record but will remain visible in the Customer Journeys list view and remain reportable. The journey's incomplete activities will either be set to "Not Applicable" or will be deleted, depending on the Cancel Action configuration set by the administrator on the journey template. Journeys that have been completed cannot be canceled and will not have a "Cancel" option.
Deleting Customer Journeys
In the case that you mistakenly start a customer journey, simply select "Delete" in the journey's actions menu on the right side of the Customer Journey panel. 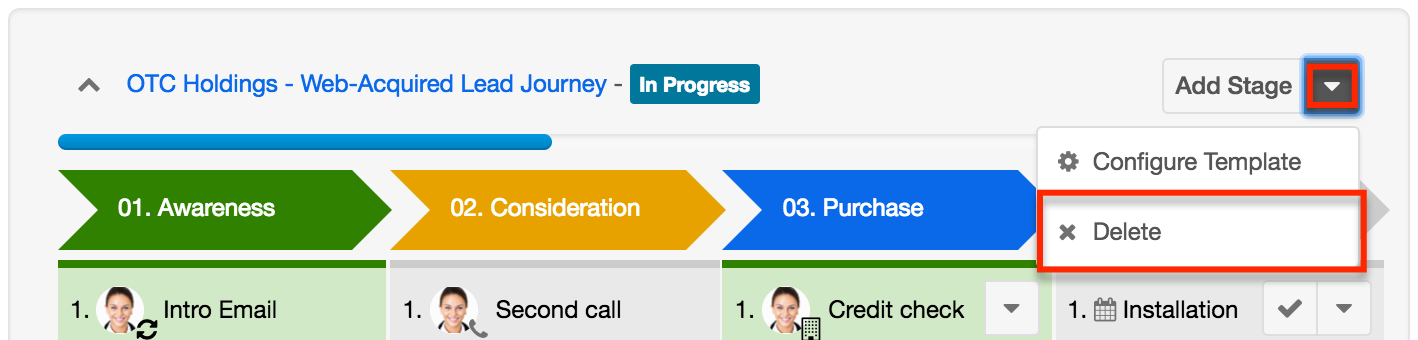
Please note that the call, meeting, and task records that were created by the journey will also be deleted from Sugar when you remove a customer journey via the Delete option.