Using Legacy Workflows to Notify a User of Upcoming Calls and Meetings
Overview
Sugar's Calls and Meetings modules allow users to set reminders via pop-up alert or an email to all invitees. To create a notification for only the meeting's assigned user, a workflow can be created which automatically emails a reminder for all call and meeting records. Please note that this workflow will only trigger for meetings created or whose start date is edited after the workflow has been activated. Meetings scheduled in the past for future dates will need to be edited and re-saved once the workflow is in place.
Each user's license type (e.g., Sugar Serve, Sugar Sell Premier) determines what functionality is available as described in the License Types matrix.
Prerequisites
- You must be an administrator or have developer-level access in Sugar to create the workflow.
- Schedulers, specifically the Process Workflow Tasks scheduler, must be running.
- Sugar must be configured to send outbound emails via Admin > Email Settings.
For more information, please refer to the Workflow Management, Schedulers, and Email documentation.
Steps to Complete
Three related tasks must be completed in order to configure the workflow:
- Configuring a 15-minute threshold in the dropdown editor
- Creating a workflow alert template
- Creating the workflow
The following instructions will walk you through each of these processes.
Configuring a 15-Minute Threshold in the Dropdown Editor
In order to create a workflow that sends an email 15 minutes before the start date of a call or meeting, we must first add the 15-minute time interval to the relevant dropdown list. We can then use this dropdown option during the workflow creation. If you would prefer the alert email to be sent a different length of time prior to the call or meeting, add a dropdown option with the number of seconds and display label you desire. Use the following steps to create a 15-minute option as an example:
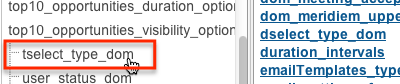
- Navigate to Admin > Dropdown Editor.

- Click on the tselect_type_dom dropdown list
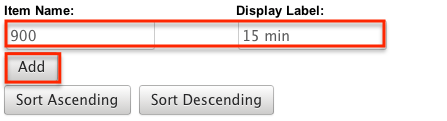
- Click "Add" and type values for the new time interval. "Item Name" is the number of seconds and "Display Label" is what will be shown when a user selects this option. For a 15-minute value, use "900" 15 minutes x 60 seconds = 900) as the Item Name value and "15 min" for the Display Label value.
- Click "Save" to preserve your changes to the dropdown list.
Creating a Workflow Alert Template
Now we will create the email alert template that will be used to generate the individual emails sent by the workflow. If you are creating alerts for both calls and meetings, an alert template will need to be created for each module. Use the following steps to create a workflow alert template for the Calls module as an example:
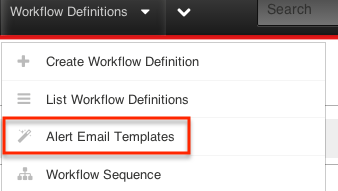
- Navigate to Admin > Workflow Management. From the Workflow Definitions menu, choose "Alert Email Templates".
- To create a new template, choose "Calls" from the module dropdown and then click "Create".

- Name the template "Reminder Upcoming Call".
- Configure the email's subject line to display the Subject field of the upcoming call:
- Click the Link to Record dropdown and select "Subject".
- The textbox below this field will update with the corresponding variable markup code,
{::future::Calls::name::}. - Copy this string and paste it into the field labeled "Subject" on the template. Prepend the code with "Call Reminder! " in order to standardize the subject line format in your email inbox. Be sure to include a space before the code snippet.
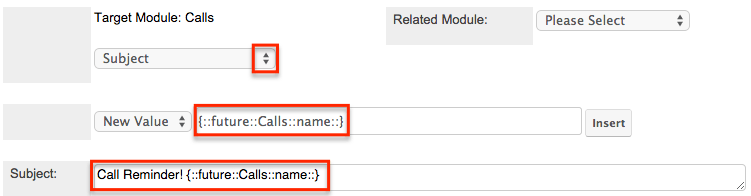
- Edit the Body section of the email as you would like it to appear, for example, "This is an automated reminder that you have an upcoming call."
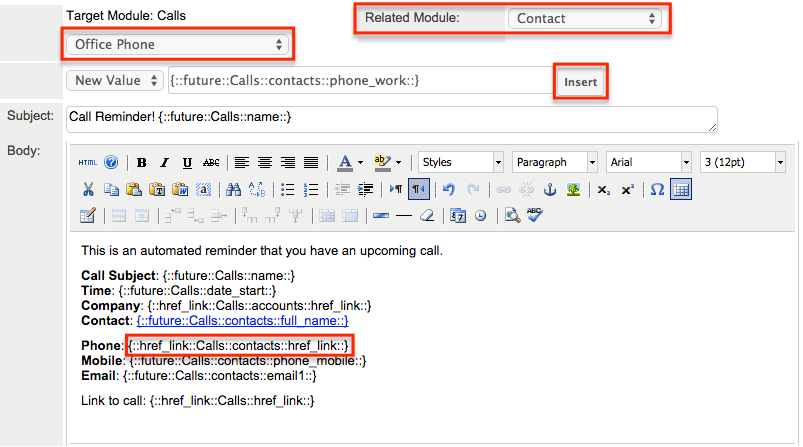
- Optionally, add custom variable fields from the call record to the body of the message.
- Click the Target Module's fields dropdown and select any available field.
- Place your cursor in the body of the email message where you want to place the text.
- Click "Insert".
- Repeat with additional fields until you are satisfied with the content of the message. Note that you can also include data from related modules by changing the Related Modules dropdown. This will automatically update the available field variables. The design of the template can also be customized with your organization's logo or graphic elements.
- Click "Save" to preserve your new template.
The workflow email template is now available to be added to workflows with Calls set as the target module. Repeat these steps for the Meetings module to create a template for upcoming meetings.
Creating the Workflow
Now that the time interval and email templates have been created, you will need to create the workflow definition. If you are creating alerts for calls and meetings, a workflow will need to be created for each module. Use the following steps to create the workflow for the Calls module as an example:
- Navigate to Admin > Workflow Management.
- From the Workflow Management actions menu, select "Create Workflow Definition".

- Complete the form fields as follows and then click "Save".
- Name : A descriptive name of your choosing, e.g. "Call Reminder Email".
- Execution Occurs : After time elapses
- Status : Active
- Target Module : Calls
- Applies to : New and Updated Records
- Processing Order : Alerts then Actions
- Description : Workflow to trigger an email reminder to the call's assigned user 15 minutes before a call is scheduled.
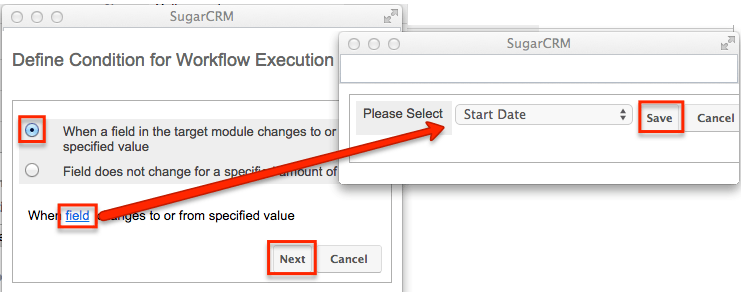
- Click "Create" on the Conditions subpanel to configure the first condition. This condition will specify that the call must begin in less than 15 minutes.
- Choose "When a field in the target module changes to or from a specified value" and then click the hyperlinked text "field".
- In the popup window, select the field "Start Date" and then click "Save".
- When returned to the previous window, click "Next".
- Click the hyperlinked text "value".
- In the popup window, select "is less than" and "15 min" from the dropdowns. Click "Save".
- When returned to the previous window, click "Save" again.

- Click "Create" on the Conditions subpanel to configure the second condition. This will confirm that the call is still in the planned status and not already held or canceled.
- Choose "When a field in the target module contains a specified value" and then click "Next".
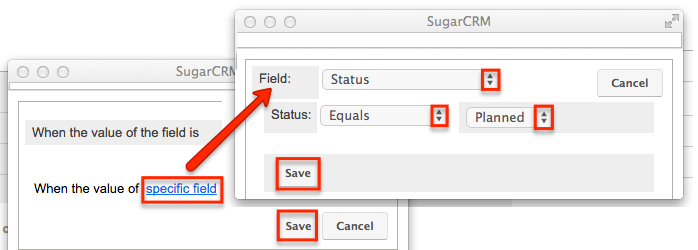
- Click the hyperlinked text, "specific field".
- In the popup window, select the field "Status", then choose "Equals" and "Planned" (or "Scheduled" depending on your Sugar version) for the next two options. Click "Save".
- When returned to the previous window, click "Save" again.
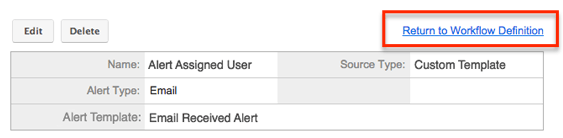
- Proceed to the Alerts subpanel and click "Create". Populate the form fields as follows and then click "Save".
- Name : Notify assigned user 15 minutes before call
- Alert Type : Email
- Source Type : Custom Template
- Custom Template : Choose the email alert template created in the previous section.

- Populate the Alert Recipient List to cause the alert to be emailed to the call's assigned user.
- Click "Create".
- In the popup window, choose "A user associated with the target module" then click "Next".
- Select "User who is assigned the record" and then click the hyperlinked text "type".
- Select address type "To:" and then click "Save".
- When returned to the previous window, click "Save" again.

- Navigate back to the Workflow Definition by clicking "Return to Workflow Definition".
The workflow definition is now complete. For all calls created or updated after this workflow is set up, the assigned user will receive an email 15 minutes before the call's start time. Repeat these steps for the Meetings module for alerts to also be sent for upcoming meetings.
Application
To test the workflow, create a meeting assigned to yourself with a start time at least 30 minutes in the future. When cron runs on your server within 15 minutes of the meeting's start time, the Process Workflow Tasks scheduler job will run and trigger an alert to the user assigned to the meeting. The alert will contain all of the pertinent contact information that the assigned user will need to make the scheduled call or meeting, and also provide a link to the record in order to quickly log details of the conversation and close the call or meeting.