Creating an Alert Email Template for Legacy Workflows
Overview
Alert email templates are used to send out alert notifications to a list of recipients via workflows. Administrators or users with a Developer role have the ability to create alert email templates via Admin > Workflow Management. This article will walk through how to create an alert email template for workflows.
Each user's license type (e.g., Sugar Serve, Sugar Sell Premier) determines what functionality is available as described in the License Types matrix.
Use Case
You can create various types of alert email templates for any workflows where you need to send out an alert notification. The steps below will cover how to create an email alert template to notify new leads created from a Web-to-Lead form as an example.
Steps to Complete
- Navigate to Admin > Workflow Management.

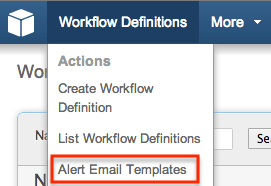
- Hover over the Workflow Definitions tab and select "Alert Email Templates".

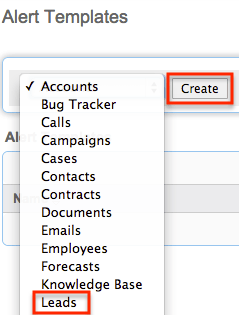
- In the modules dropdown list, select "Leads" and click "Create".

- Enter in the values for the following fields on the alert template:
- Name : The name of the alert email template
- From Name : The name displayed as the sender of the received email
- From Address : The email address displayed as the sender of the received email
- Description : Brief description of the alert email template
- Subject: The subject displayed on the received email

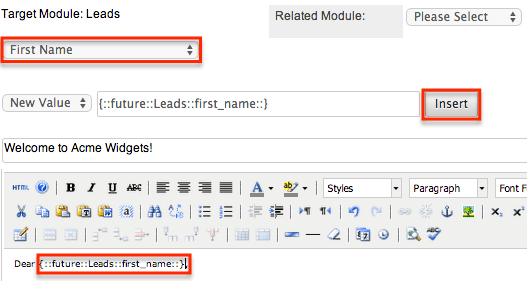
- When composing the template, specific field variables may be inserted into the body. Build the variable using the dropdowns, then click "Insert" to insert the variable into the email body.
- Target Module: Leads : To insert a field from the target module (e.g. Leads), choose the desired field from the dropdown list on the left, then click "Insert" to add it at your cursor's location in the email body. For example, selecting "First Name" and clicking "Insert" will place a variable in the email template (e.g. Dear {::future::Leads::first_name::}) which, when sent by the workflow, will be replaced by the first name of the relevant lead record. So, if the email is triggered for a lead Sam Jones, then the email will reflect "Dear Sam".
Note: The "Link to Record" option will insert a link to the lead which other Sugar users may click to access the record in your Sugar instance.
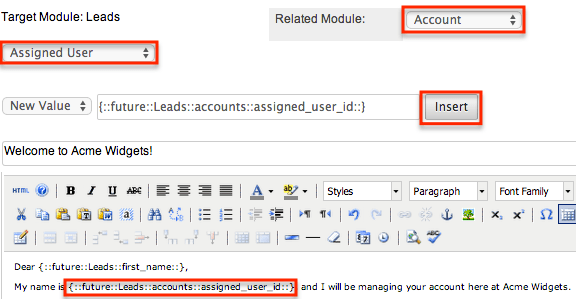
- Related Module : To insert a field from a record related to the lead, choose the related module from the dropdown to the right. Doing so will update the left dropdown with fields from the related module. After selecting the related module (e.g. Campaign), then select the desired field from that module (e.g. Assigned User). Once you have built the variable using both dropdowns, click "Insert" to place it in the email template at your cursor's location. So, if the email is triggered for a lead Sam Jones who is related to an account assigned to the user Alex Adams, the email will reflect "Alex Adams".

- New Value/Old Value : You can choose to include the new or old field value in the dropdown menu to the left of the field variable. For example, if the workflow triggers when a lead changes status, you can create the alert to show both the previous and the current values of the Status field by building and inserting two variables, one with "Old Value" selected an one with "New Value" selected.
- Target Module: Leads : To insert a field from the target module (e.g. Leads), choose the desired field from the dropdown list on the left, then click "Insert" to add it at your cursor's location in the email body. For example, selecting "First Name" and clicking "Insert" will place a variable in the email template (e.g. Dear {::future::Leads::first_name::}) which, when sent by the workflow, will be replaced by the first name of the relevant lead record. So, if the email is triggered for a lead Sam Jones, then the email will reflect "Dear Sam".
- Finalize and format the text for the email body and move any field variables as desired.
Note: Mark the Alt Text checkbox at the bottom of the page if you wish to enter a plain text version of the email template which will be displayed instead of the html version should email recipients choose to view emails in plain text. - Once the email template is complete, click "Save".
Application
Now that the workflow alert template has been created, it will be available to select when building a workflow based on the Leads module. For more information on the basics of setting up workflows, please refer to the article Understanding and Setting Up Workflows.