Automating Common Tasks Using a Dropdown Field and Legacy Workflows
Overview
Many common business tasks can be streamlined in Sugar® using a simple dropdown field. By triggering workflows based on the value of the dropdown, it is possible to create several different automated actions, all driven by a single field. In this article, we will add a dropdown field to the Contacts module that allows users (or certain users restricted by role) to execute a common business activity such as sending an email or creating a follow-up call or task. This field could also be leveraged during imports in order to mass create related records for many different contacts.
Each user's license type (e.g., Sugar Serve, Sugar Sell Premier) determines what functionality is available as described in the License Types matrix.
Use Case
In this tutorial, we will create a custom field on the contact record. When a user selects any value other than blank, a workflow definition will trigger that performs one of the following actions:
- Send a thank-you email message to the contact.
- Automatically create a task for the assigned user.
- Schedule a call for 6 months in the future.
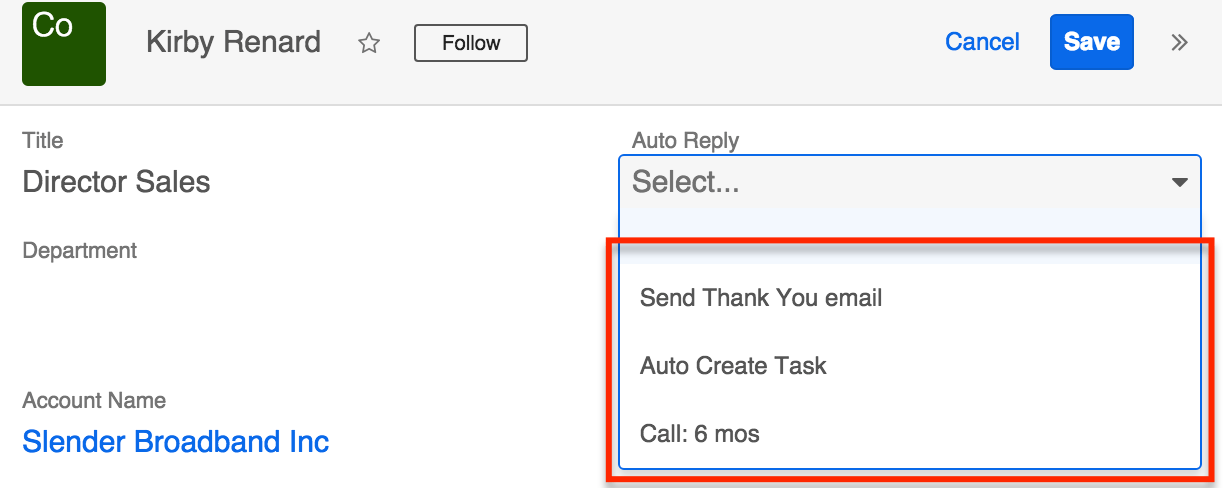
This field could include additional options such as different email templates for specific occasions or scheduling activities at various time increments in the future.
Prerequisites
- This tutorial directly utilizes four administrator tools: Studio, Dropdown Editor, Workflow Definitions, and Alert Email Templates. You must be an administrator user or have developer-level access to use these features in Sugar.
- Schedulers, specifically the Process Workflow Tasks scheduler, must be running.
- Sugar must be configured to send outbound emails via Admin > Email Settings.
For more information about Schedulers and Email settings in Sugar, please refer to the Schedulers and Email documentation. For more information about workflows, please refer to the Workflow Management documentation.
Steps to Complete
Four related tasks will be completed in order to configure the use case scenario:
- Creating a custom dropdown list
- Creating a custom dropdown field
- Creating a workflow alert template
- Creating three workflow definitions (one for each dropdown menu item)
The following instructions will walk you through each of these processes.
Creating a Custom Dropdown List
Before creating a new dropdown field, the list of field values must be configured in the Dropdown Editor. These dropdown lists can be re-used in multiple fields throughout Sugar, so if you plan to add an Auto Reply field to additional modules, consider creating a single list that can be referenced by each dropdown field.
- Navigate to Admin > Dropdown Editor.
- Click on "Add Dropdown" to create the dropdown values.
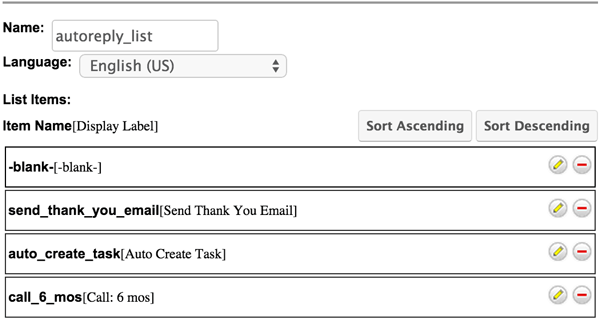
- Name : autoreply_list
- List Items :
- Create a blank value by leaving the item and label fields empty and clicking "Add".
- Item Name: send_thank_you_email, Display Label: Send Thank You Email
- Item Name: auto_create_task, Display Label: Auto Create Task
- Item Name: call_6_months, Display Label: Call: 6 mos
- Click "Save" to navigate back to the Dropdown Editor.
Creating a Custom Dropdown Field
Now that the dropdown list is ready, create a field in the Contacts module that will display the list of auto-reply options.
- From the Dropdown Editor's main screen, click on the "Studio" shortcut button at the bottom of the screen. Alternatively, navigate to Admin > Studio.
- In Studio, click Contacts > Fields > Add Field.
- Configure the new field with the following settings:
Field Attribute Field Setting Data Type DropDown Name auto_reply (Display: Auto Reply) Dropdown List autoreply_list Default Value blank value Mass update Yes Dependent No Required No Importable Yes - Click "Save" and wait for a confirmation message to appear.
- Navigate to Studio > Contacts > Layouts > Record View.
- Place the Auto Reply field on the contact template and then click "Save and Deploy".
Creating a Workflow Alert Template
Now we will create the email alert template that will be used to generate the thank-you emails sent by one of the workflows. If you do not plan to include a send-email event, then you can skip this step.
- Navigate to Admin > Workflow Management.
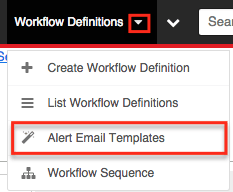
- From the module tab's actions menu, click "Alert Email Templates".
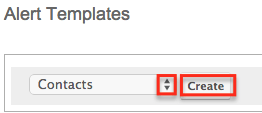
- Choose "Contacts" from the dropdown menu and then click "Create".
- Complete the email content as explained in the Creating an Alert Email Template for Workflows article. To personalize the message, use related module variables to insert the name of the related contact and the related user's information in the signature line:
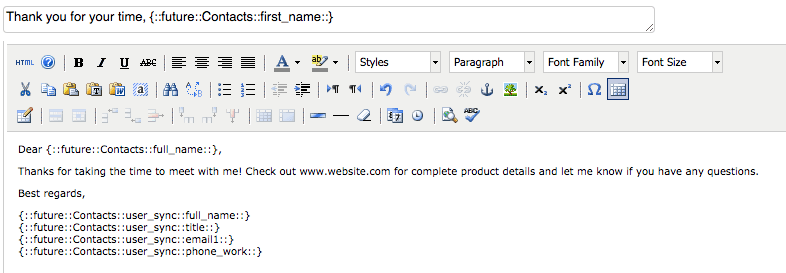
- Save the template.
The workflow email template is now available to be added to workflows with Contacts set as the target module.
Creating the Workflow Definitions
Follow the steps below to automate a business task based on a user's selection in the Auto Reply field. This field can be set by editing the record, by a mass update, or via import for a large data set.
Sending a Thank You Email to the Contact
When the user changes the Auto Reply field to "Send Thank You Email" and the contact record is saved, this workflow will trigger, sending a standardized email message to the contact. The workflow will then reset the Auto Reply field to a blank value so that it may be set again the next time the contact is edited.
- Navigate to Admin > Workflow Management.
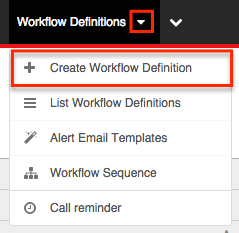
- From the Workflow Management actions menu, select "Create Workflow Definition".
- Complete the form fields as follows and then click "Save".
- Name : Auto-Reply - Thank You Email
- Execution Occurs : When Record Saved
- Status : Active
- Target Module : Contacts
- Applies to : New and Updated Records
- Processing Order : Alerts then Actions
- Description : Workflow to trigger an email message to a contact.
- Click "Create" on the Conditions subpanel to configure the first condition. This condition will specify that the contact's Auto Reply field changes to "Send Thank You Email".
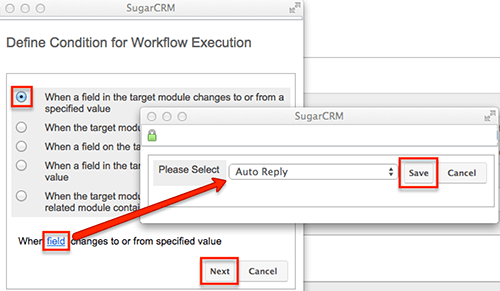
- Choose "When a field in the target module changes to or from a specified value" and then click the hyperlinked text, "field".
- In the popup window, select the field "Auto Reply" and then click "Save".
- When returned to the previous window, click "Next".
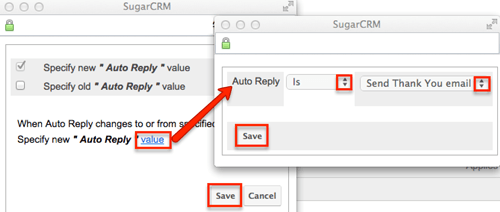
- Click the hyperlinked text, "value".
- In the popup window, select "Is" and "Send Thank You Email" from the dropdown menus. Click "Save".
- When returned to the previous window, click "Save" again.
- Proceed to the Alerts subpanel and click "Create". Populate the form fields as follows and then click "Save".
- Name : Send Email to Customer
- Alert Type : Email
- Source Type : Custom Template
- Custom Template : Choose the Auto-Reply email alert template created in the previous section.

- Populate the Alert Recipient List to cause the alert to be emailed to the contact's email address.
- Click "Create".
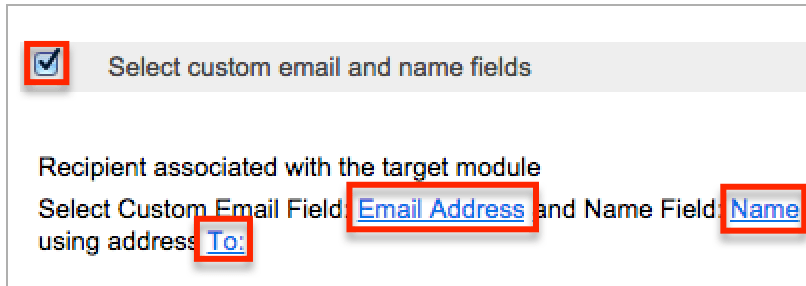
- In the popup window, choose "Recipient associated with the target module" then click "Next".
- Place a checkmark next to "Select custom email and name fields".
- Click on the hyperlinked words "Field", "Field", and "type", select the appropriate values for each, and then click "Save".
- When returned to the previous window, click "Save" again.
- Optionally, add additional recipients like the assigned to user in the cc: or bcc: fields so they can see that the message has sent successfully.
- Navigate back to the Workflow Definition by clicking "Return to Workflow Definition".

- Next, create an Action that will add a note to the contact confirming that an email has been sent.
- Click "Create" in the Actions subpanel.
- Select "Create a record in a module associated with target module" and then click "record".
- In the pop-up window, choose "Note" and then click "Save".
- Click "Next" when returned to the previous window.
- Click on the hyperlinked word "Subject" and in the resulting pop-up window, type "SENT: Thank You email".
- Populate any other desired fields and then click "Save" to complete the action.
- Finally, create another Action that will set the Auto Reply field value back to blank.
- Click "Create" in the Actions subpanel.
- Select "Update fields in the target module" and then click "Next".
- Select "Modify the field: Auto Reply".
- Click on the hyperlinked words "Auto Reply" and in the resulting pop-up window, click "Save" to set the field to "-none-" (blank value).
- Click "Save" again to complete the workflow.
This workflow is now ready to use. When a user sets "Auto Reply" to "Send Thank You Email", the target contact will receive an email from the record's assigned user, a note will be added to the contact, and the Auto Reply field will be reset for subsequent use.
Creating a Task for the Contact's Assigned User
When the user changes the Auto Reply field to "Auto Create Task" this workflow will trigger, creating a task record related to the contact. The workflow will then reset the Auto Reply field to a blank value so that it may be set again the next time the contact is edited.
- Navigate to Admin > Workflow Management.
- From the Workflow Management actions menu, select "Create Workflow Definition".

- Complete the form fields as follows and then click "Save".
- Name : Auto-Reply - Auto Create Task
- Execution Occurs : When Record Saved
- Status : Active
- Target Module : Contacts
- Applies to : New and Updated Records
- Processing Order : Alerts then Actions
- Description : Workflow to relate a task to a contact.
- Click "Create" on the Conditions subpanel to configure the first condition. This condition will specify that the contact's Auto Reply field changes to "Auto Create Task".
- Choose "When a field in the target module changes to or from a specified value" and then click the hyperlinked text "field".
- In the popup window, select the field "Auto Reply" and then click "Save".
- When returned to the previous window, click "Next".

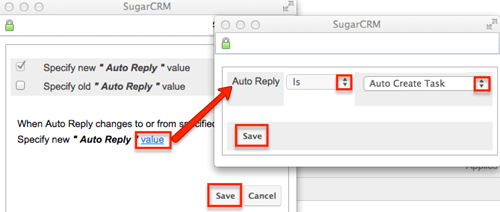
- Click the hyperlinked text "value".
- In the popup window, select "Is" and "Auto Create Task" from the dropdown menus. Click "Save".
- When returned to the previous window, click "Save" again.
- Next, create an Action that will create a task record related to the contact.
- Click "Create" in the Actions subpanel.
- Select "Create a record in a module associated with target module" and then click "record".
- In the pop-up window, choose "Task" and then click "Save".
- Click "Next" when returned to the previous window.
- Click on the hyperlinked words "Subject", "Status", and "Priority" and select default values for each of these required fields.
- Place a checkmark next to "Modify the field: Assigned User Id".
- Click on the hyperlinked words "Assigned User Id".
- Click on the words "Advanced Search":

- Select "User assigned to the triggered record" from the advanced user dropdown and then click "Save".

- Populate any other desired task fields (such as Date Due) and then click "Save" to complete the action.
- Finally, create another Action that will set the Auto Reply field value back to blank.
- Click "Create" in the Actions subpanel.
- Select "Update fields in the target module" and then click "Next".
- Select "Modify the field: Auto Reply".
- Click on the hyperlinked words "Auto Reply" and in the resulting pop-up window, click "Save" to set the field to "-none-" (blank value).
- Click "Save" again to complete the workflow.
This workflow is now ready to use. When a user sets "Auto Reply" to "Auto Create Task", the contact's assigned user will be assigned a task record, and the Auto Reply field will be reset for subsequent use.
Scheduling a 6-month Follow Up Call With the Contact
When the user changes the Auto Reply field to "Call: 6 mos" this workflow will trigger, creating a call record related to the contact. The workflow will then reset the Auto Reply field to a blank value so that it may be set again the next time the contact is edited.
- Navigate to Admin > Workflow Management.
- From the Workflow Management actions menu, select "Create Workflow Definition".

- Complete the form fields as follows and then click "Save".
- Name : Auto-Reply - Call 6 months
- Execution Occurs : When Record Saved
- Status : Active
- Target Module : Contacts
- Applies to : New and Updated Records
- Processing Order : Alerts then Actions
- Description : Workflow to relate a call to a contact.
- Click "Create" on the Conditions subpanel to configure the first condition. This condition will specify that the contact's Auto Reply field changes to "Call: 6 mos".
- Choose "When a field in the target module changes to or from a specified value" and then click the hyperlinked text "field".
- In the popup window, select the field "Auto Reply" and then click "Save".
- When returned to the previous window, click "Next".

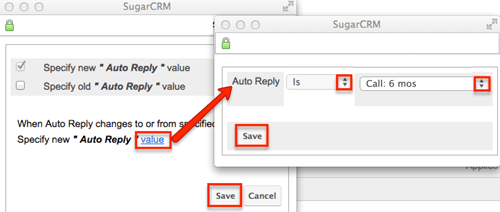
- Click the hyperlinked text "value".
- In the popup window, select "Is" and "Call: 6 mos" from the dropdown menus. Click "Save".
- When returned to the previous window, click "Save" again.
- Next, create an Action that will create a call record related to the contact.
- Click "Create" in the Actions subpanel.
- Select "Create a record in a module associated with target module" and then click "record".
- In the pop-up window, choose "Call" and then click "Save".
- Click "Next" when returned to the previous window.
- Click on each of the hyperlinked required fields and specify default values for each.
- Set the Subject field to "6 month check-in call".
- Set the Start Date field to "180 days" from the day the workflow is triggered.

- Place a checkmark next to "Modify the field: Assigned User Id".
- Click on the hyperlinked words "Assigned User Id".
- Click on the words "Advanced Search":

- Select "User assigned to the triggered record" from the advanced user dropdown and then click "Save".

- Populate any other desired call fields (such as Date Due) and then click "Save" to complete the action.
- Finally, create another Action that will set the Auto Reply field value back to blank.
- Click "Create" in the Actions subpanel.
- Select "Update fields in the target module" and then click "Next".
- Select "Modify the field: Auto Reply".
- Click on the hyperlinked words "Auto Reply" and in the resulting pop-up window, click "Save" to set the field to "-none-" (blank value).
- Click "Save" again to complete the workflow.
This workflow is now ready to use. When a user sets "Auto Reply" to "Call: 6 mos", the contact's assigned user will be assigned a call record, and the Auto Reply field will be reset for subsequent use.
