Using SugarBPM to Escalate Cases
Overview
When cases are assigned to users in Sugar®, there may be occasions where the case remains idle in the "New" status for a length of time. For example, user John Smith is assigned a new case but fails to address the case even after two days have passed. To prevent situations like this, you can use SugarBPM to create escalation processes that automatically route cases up through the tiers of your organization to ensure they are addressed in a timely manner. This article walks you through creating an automated case escalation process that reassigns cases to the next support tier based on how long the case has been open.
Sugar Sell and Serve include an Escalations module, used to bring extra attention to specific records, such as a case. It is important to note that the type of escalation discussed in this article involves routing a case to a higher support tier when left unaddressed. The Escalations module in Sugar Sell and Serve is used for a different use case and is not needed for this article.
Use Case
In this tutorial, we will explain how to automatically re-assign a case record based on the amount of time it remains open. For example, if a case is not closed two days after the date it was created, the case will be escalated to a member of the Tier 2 Support team. If two more days pass and the case remains open, it will then escalate to a member of the Tier 3 Support team. Finally, if the case's status has not changed to "Closed" after six days, an alert will be sent via email to the manager of the case's assigned user.
Prerequisites
- Before performing the steps in this article, it is recommended that you have a basic understanding and knowledge of SugarBPM.
- You must have administrator or developer access in Sugar to create and manage teams and SugarBPM records.
- Schedulers, specifically the SugarBPM™ Scheduled Job, must be running.
- A manager-subordinate relationship should exist for all users who may be assigned cases. This relationship is established on user records via the Reports To field.
For more information on these items, please refer to the User Management, Role Management, SugarBPM, and/or Schedulers documentation.
Steps to Complete
This article's use case is completed in three sections. First, create the Sugar teams that will represent the tiers of support. Next, design a process email template, and finally, refer to that template in a well-designed process definition.
Creating Support Teams
This article uses Sugar teams to define the different tiers of support. Create the following teams in your instance:
- Tier 1 Support
- Tier 2 Support
- Tier 3 Support
Assign the appropriate users to each of the new teams before proceeding. For more information on creating teams and assigning users to teams, please refer to the Team Management documentation.
Creating the Process Email Template
In the final steps of the process we will create, if the case remains "New" for six days, a message will be delivered to the manager of the case's assigned user. Manager relationships are defined in the user profile settings for each user. As a best practice, the administrator should populate this field when a new user account is created. For more information on defining the user's manager, please refer to the User Management documentation.
Use the following steps to create the alert template that will be used to deliver this message:
- Create a new process email template record according to the Process Email Templates documentation. Name the record "Case Escalation Notification" and set the Target Module to "Cases".

- Click the Save & Design button to design the template content.
- Enter a Subject line and message as desired. Be sure to use content variables to reference specific case information (e.g., case number and name) in the email template.

- Click "Save & Exit" to preserve the template.
Proceed to the next section to create a process definition that utilizes this email template.
Creating the Process Definition
The support teams and email template can now be used within a process definition. The resulting processes will assign cases to the new teams and use the email template if it is necessary to alert management when a case is idle.
Use the following steps to create a case escalation process definition:
- Create a new process definition record according to the Process Definitions documentation. Name the record "Case Escalation" and set the Target Module to "Cases". Click "Save & Design" to continue to the Visual Designer canvas.
- Drag a Start event onto the canvas. Rename this event "New Case Created".

- Right-click the Start event and select "Settings" to configure the Start event criteria.
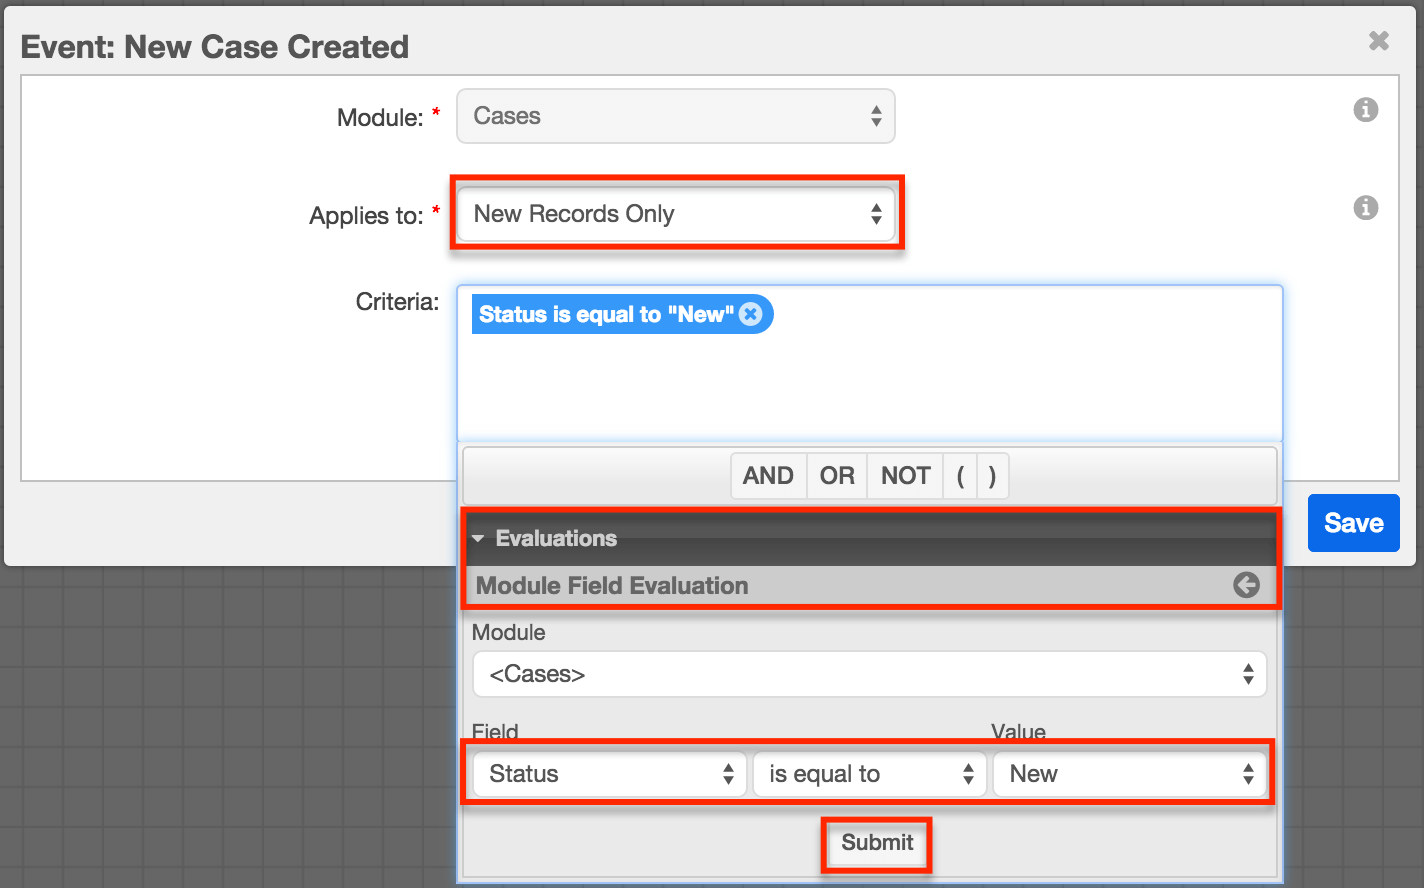
- Specify when the process definition should activate in the required field, "Applies To". For this use case, select "New Records Only" so that the evaluation is only activated one time per case.
- Click inside the Criteria box to add conditions for when the process definition will activate. To eliminate cases that are immediately resolved or claimed, the criteria should include a Module Field Evaluation where the case's Status field must be "New", as shown here:
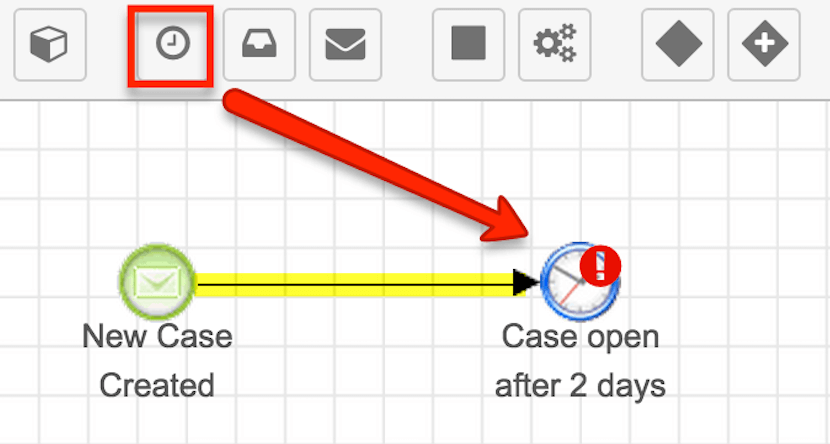
- Drag a Wait event to the design canvas and change the label to "Case open after 2 days". Connect the Start event to this Wait event.
- Right-click on the Wait event and select "Settings". Set the duration to two days. Click "Save".

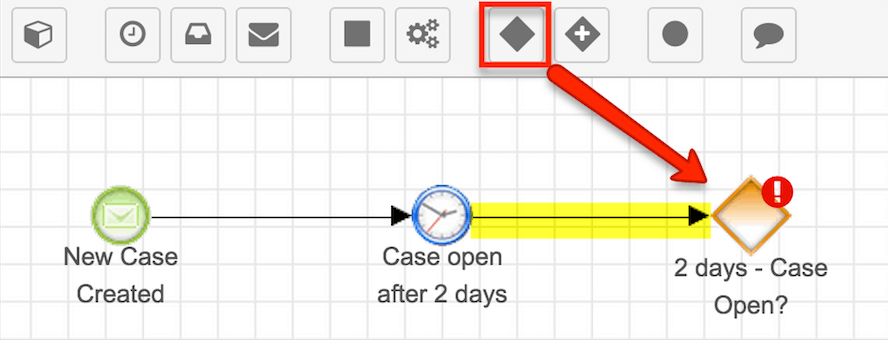
- Drag an Exclusive Gateway to the canvas and change the label to "2 days - Case Open?". Connect the Wait event to this Gateway.
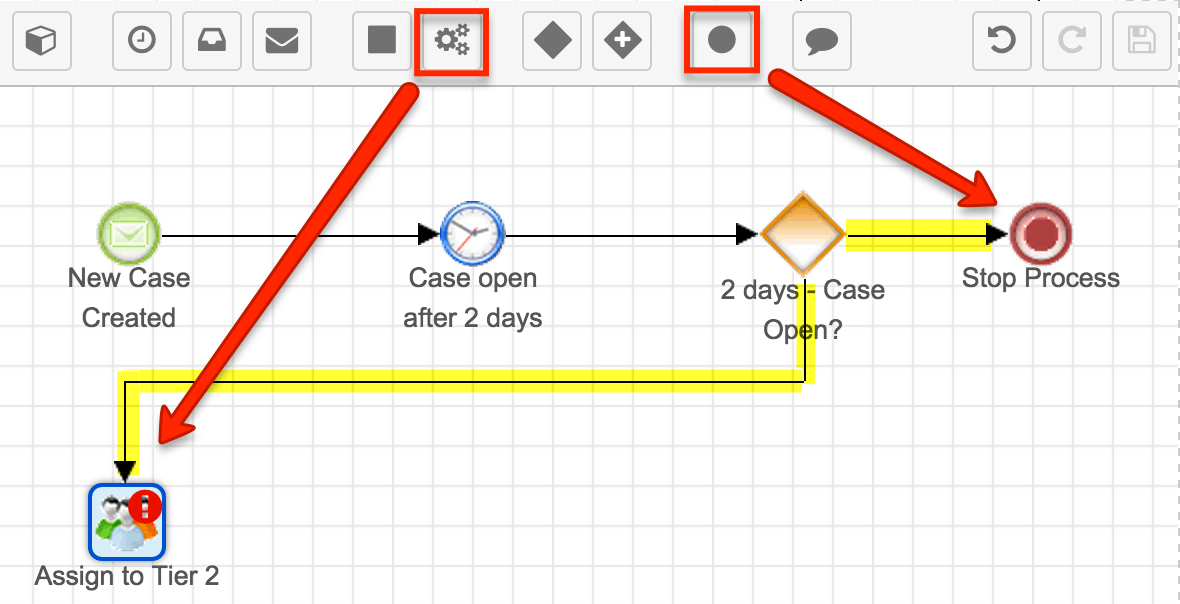
- Drag an End event and an Action event, as shown below, to the canvas.
- Drag connector lines from the Exclusive Gateway to these two elements.
- Set the Action event's type to "Round Robin" and then change its label to "Assign to Tier 2".
- Set the End event's Result setting to "Terminate Process". This will ensure that the entire process halts if the case's status is closed within two days after it was created.
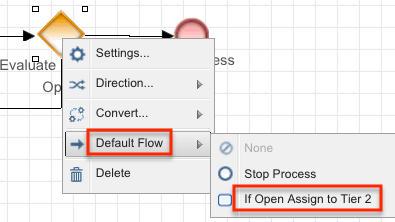
- Right-click on the Exclusive Gateway and set the Default Flow to "Assign to Tier 2". This will ensure that the case is escalated for review if the case's Status field is unpopulated or not recognized.
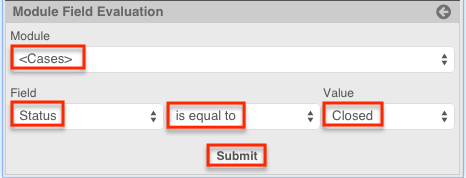
- Right-click on the gateway again, this time selecting "Settings". Click inside the "Stop Process" criteria window and define a Module Field Evaluation where the case's Status field equals "Closed". Click "Submit" to add the evaluation then save the criteria.
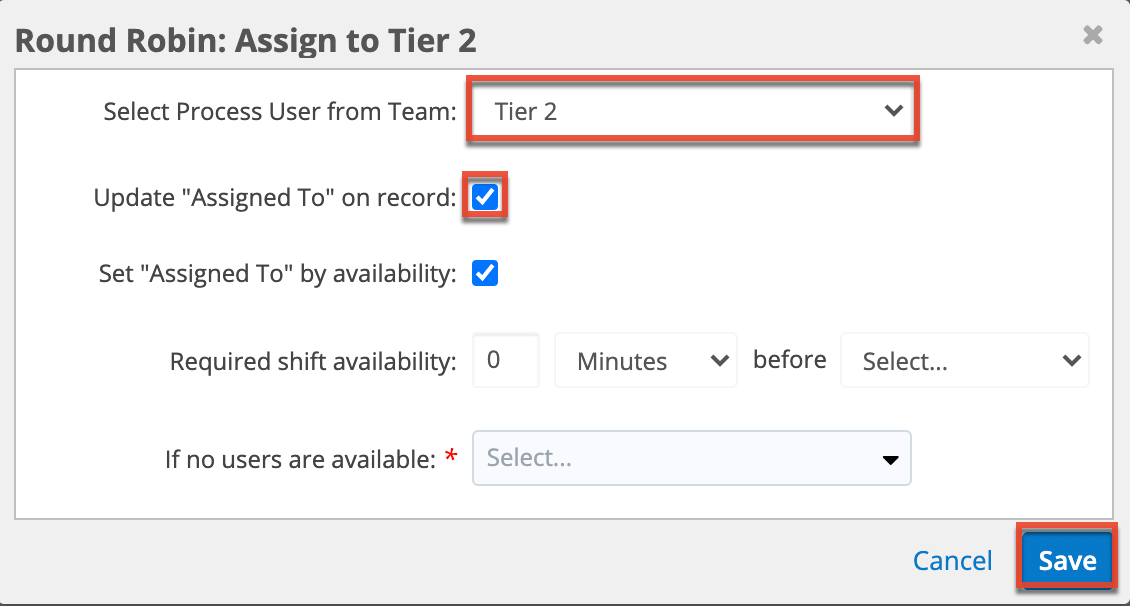
- Right-click on the "Assign to Tier 2" Action event again, this time selecting "Settings". In the settings window, set the team to "Support Tier 2" and enable the checkbox next to "Update 'Assigned To' on record". Optionally, you can configure the fields that appear to only assign records to users who are available for work; see the Process Definitions documentation for more details. Click "Save" to return to the Visual Designer canvas.
- Drag a second Wait event to the design canvas.
- Change its label to "Case open after 4 days".
- Drag a connector to the new Wait event from the Round Robin action.
- Note: Notice that we set the duration to two days even though it will occur four days into the process. This is because the settings for each element need only account for the two-day span between timed events, and not its relative distance from the start of the process.Right-click on this Wait event and select "Settings". In the Wait event's configuration window, set the duration to "2 Days", just like we did in Step 5 for the first Wait event.
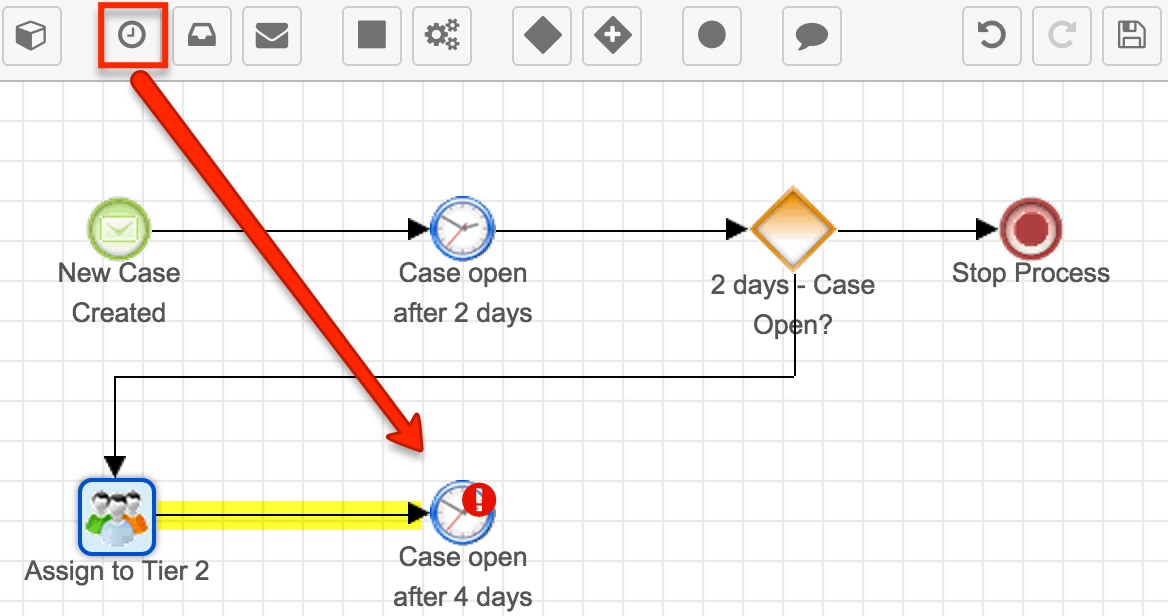
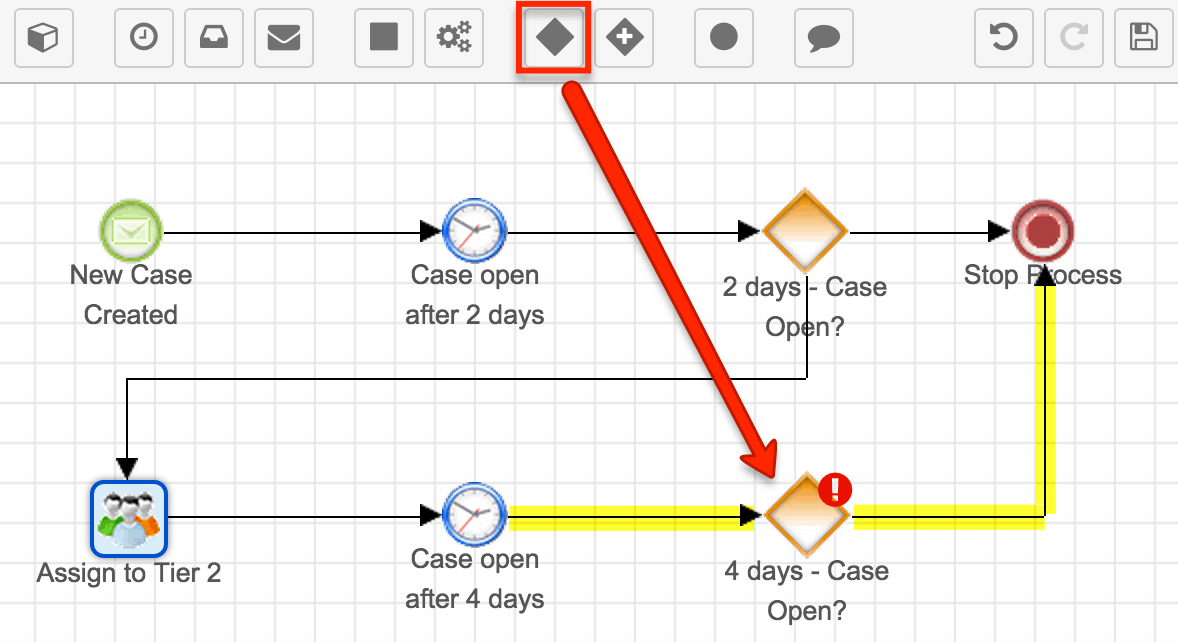
- Drag a second Exclusive Gateway onto the design canvas and change the label to "4 days - Case Open?" and then drag a connector line from the 4th-day Wait event to this gateway, and from the gateway to the existing End event, as shown here:
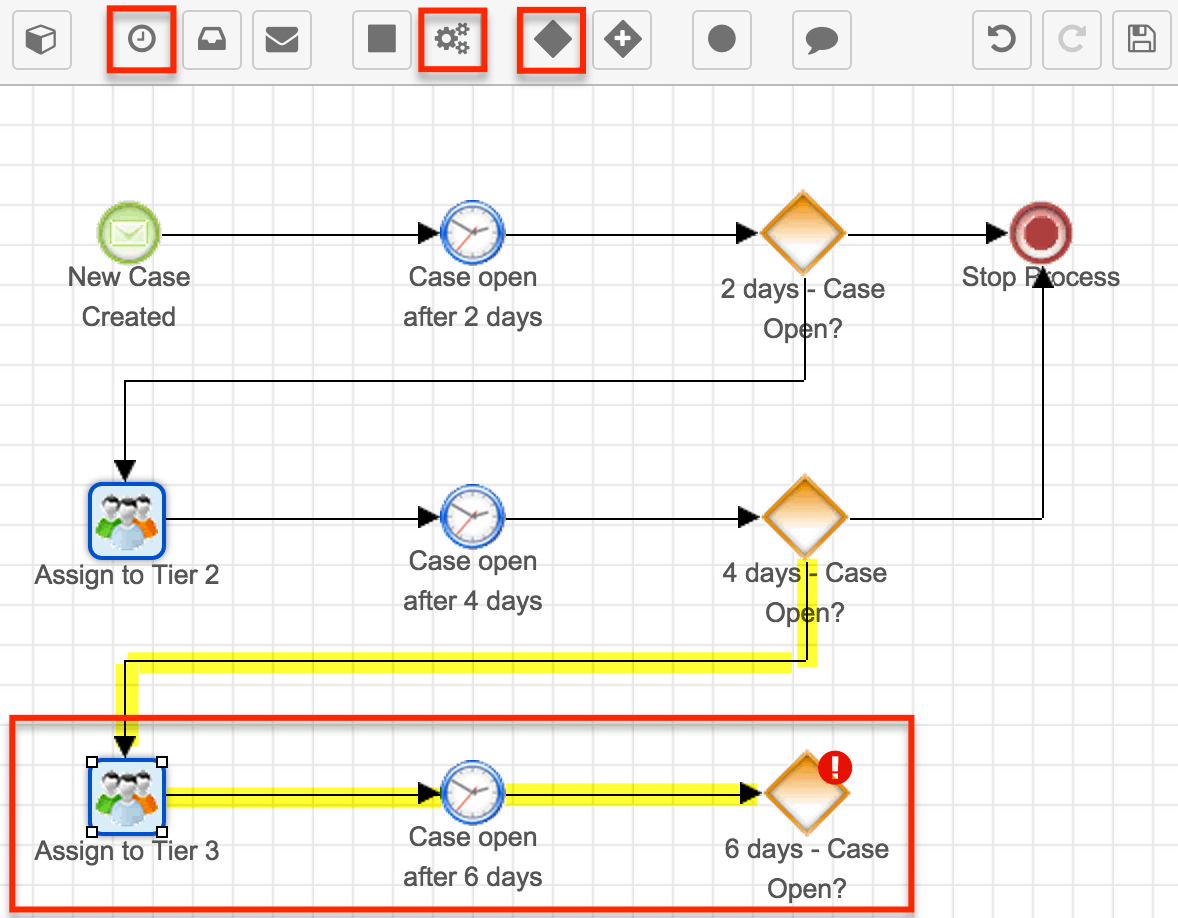
- Repeat the last three events on the bottom row of the process definition, with connectors from the 4th-day gateway to the new Action, the Action to the new Wait event, and the Wait event to the new gateway.
Configure the elements as follows:- Action event
- Name: Assign to Tier 3
- Action Type: Round Robin
- Settings: "Select Process User from Team" = Support Tier 3, "Update 'Assigned To' on record" = Enabled
- Wait event
- Name: Case open after 6 days
- Duration: 2 Days
- Exclusive gateway
- Name: 6 days - Case open?
- Name: 6 days - Case open?
- Action event
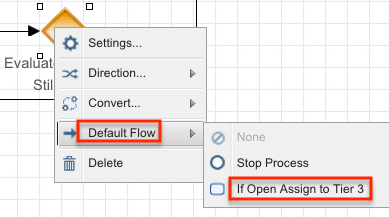
- Right-click on the gateway labeled "4 days - Case Open?" and set the default flow to "If Open Assign to Tier 3".
- Right-click on the gateway labeled "4 days - Case Open?" again, this time choosing "Settings". Click inside the "Stop Process" criteria window and define a Module Field Evaluation where the case's Status field equals "Closed" (same criteria set in Step 9).
- Finally, drag a Send Message event to the bottom of the process definition design and rename it "Notify Manager". Connect the last gateway to both the Send Message event and the End event. Use an outgoing connector to also connect the Send Message event to the End event.
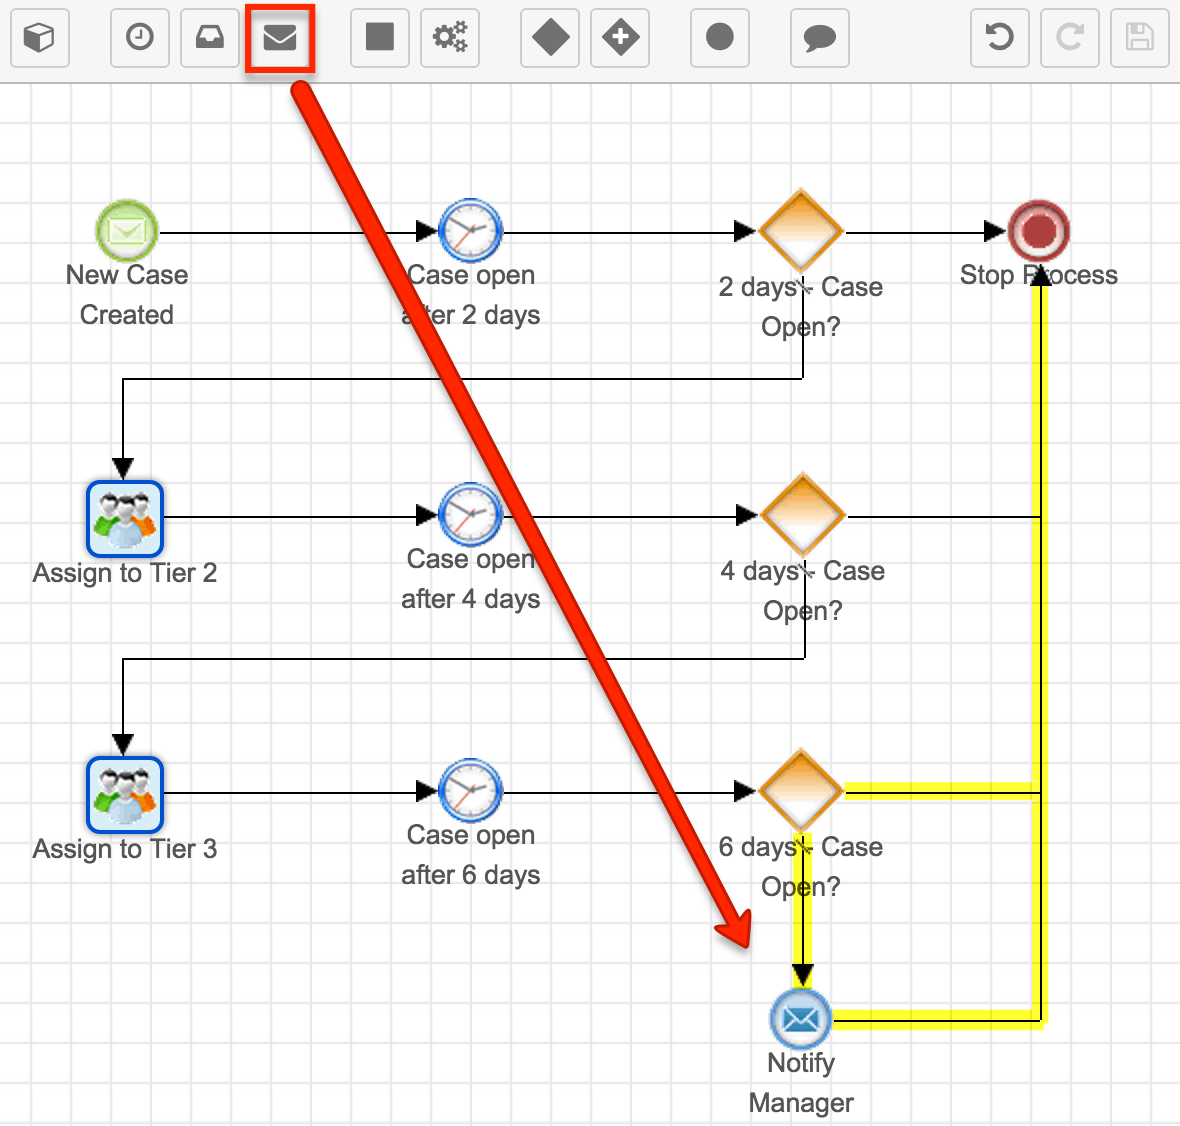
- Right-click on the gateway labeled "6 days - Case Open?" and set the default flow to "Notify Manager".
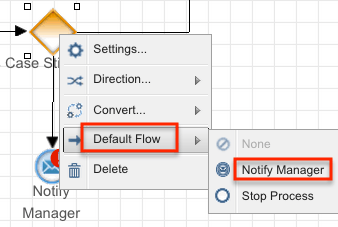
- Right-click on the gateway labeled "6 days - Case Open?" again, this time choosing "Settings". Click inside the "Stop Process" criteria window and define a Module Field Evaluation where the case's Status field equals "Closed" (same criteria set in Step 9).
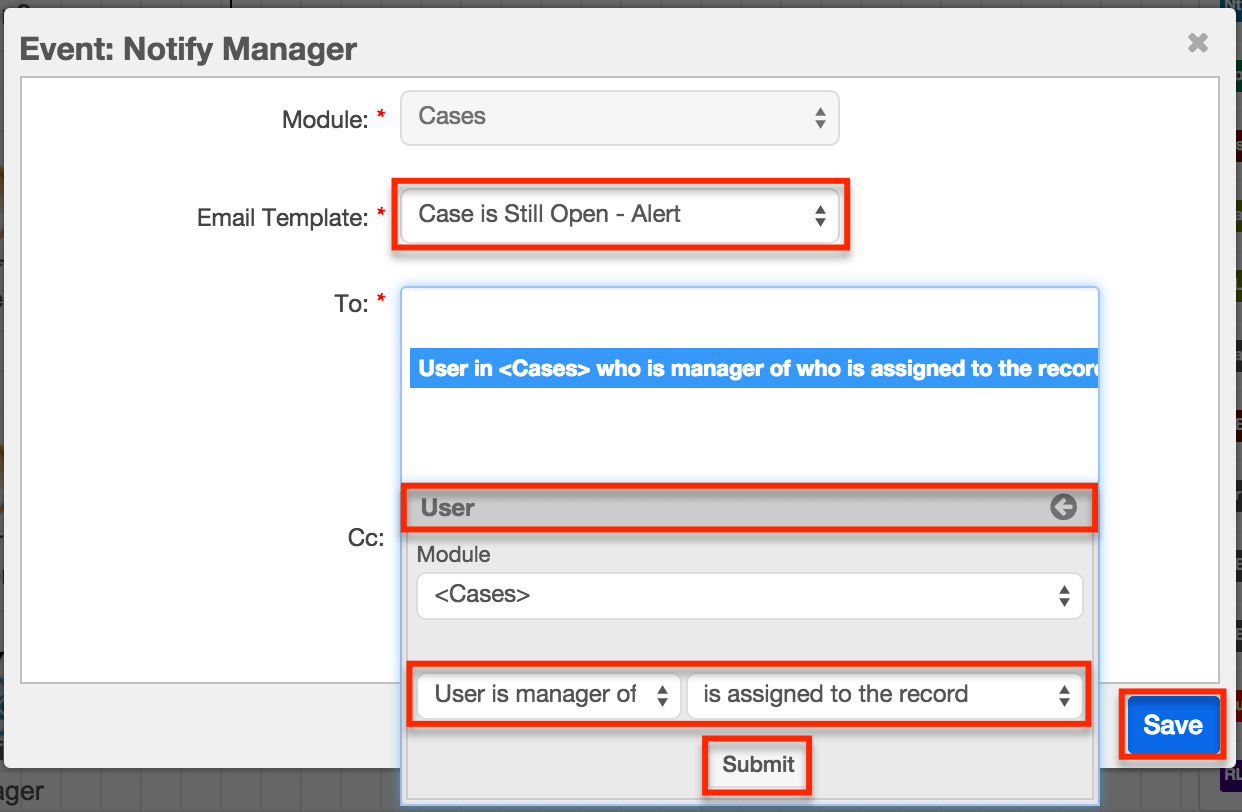
- Right-click on the Notify Manager message event and select "Settings".
Configure the settings as follows:
- Module: Select "Cases".
- Email Template: Select "Case Escalation Notification" or the template created earlier in this tutorial.
- To: Select "User" then choose the following conditions: "User is manager of who", "is assigned to the record".
- Click the Save icon in the design toolbar to ensure that all changes have been saved.
- Note: The Visual Designer auto-saves every 15 seconds. If the Save icon is grayed out, this indicates that your most recent changes have already been saved automatically.
The completed Process Definition will look like this:
Enabling the Process Definition
Now that the process email template and process definition are configured and saved, enable the process definition. Please refer to the Process Definitions documentation for the steps to do this.
Application
To test this process definition, you can temporarily edit the three Wait events to wait for only two minutes each (instead of two days), and add yourself to the cc or bcc email address section of the Send Message event. Next, create a new case in Sugar with the Status field set to "New" and confirm that the assigned user updates as expected every two minutes. Six minutes after the case has been created, you should receive an email notification. After confirming these steps, revert the changes you made to the Wait and Send Message events.
Downloads
The two module records created in this article are provided here for your convenience. While these records are importable to their respective modules, keep in mind the following:
- Import the process email template first.
- You must re-configure the settings for the Send Message event before enabling the process definition.
- Always review the settings of imported SugarBPM files to confirm that they are configured as expected.
- Process definition files may import in a "Disabled" state. Please enable the process definition after confirming its elements' settings.
For more information about importing SugarBPM records, please refer to the SugarBPM documentation.