Using SugarBPM for Territory-Based Lead Assignment
Overview
In many businesses, new leads, opportunities, and accounts are assigned to sales representatives or other employees based on location. For example, one employee may be responsible for accounts located in California, while another employee is responsible for the accounts located in New York. Using SugarBPM, organizations can leverage the Process Business Rules and Process Definitions modules to automatically assign records based on the geographic location of the person or business in the record.
Sugar Sell includes a stock process definition that automates lead routing, but for users on Enterprise, this article explains how to create a process definition to handle a similar use case.
Use Case
In this tutorial, we will explain how to automatically assign lead records based on the US state where the lead is located. Will Westin is the Sales Manager for the Northeast territory (New Hampshire, Vermont, Maine, New York, Connecticut, Massachusetts, and Pennsylvania) while Sarah Smith is the Sales Manager for the Northwest territory (Washington, Oregon, California, Nevada, Arizona, Idaho, and Montana). Max Jensen handles business in the states outside of Will and Sarah's territories.
Prerequisites
- You must have administrator or developer access in Sugar to create and manage SugarBPM records.
- Before performing the steps in this article, it is recommended that you have a basic understanding and knowledge of SugarBPM™. For more information please refer to the SugarBPM documentation.
Steps to Complete
The following sections walk through setting up a lead-routing business rule and how to reference that rule in a well-designed process definition.
Creating the Process Business Rule
- Create a new process business rule record. Name the record "Lead Assignment by US State" and set the Target Module as "Leads". Please refer to the Process Business Rules documentation for complete steps to create a new business rule record.
- Click "Save & Design" to view the Business Rules Builder.

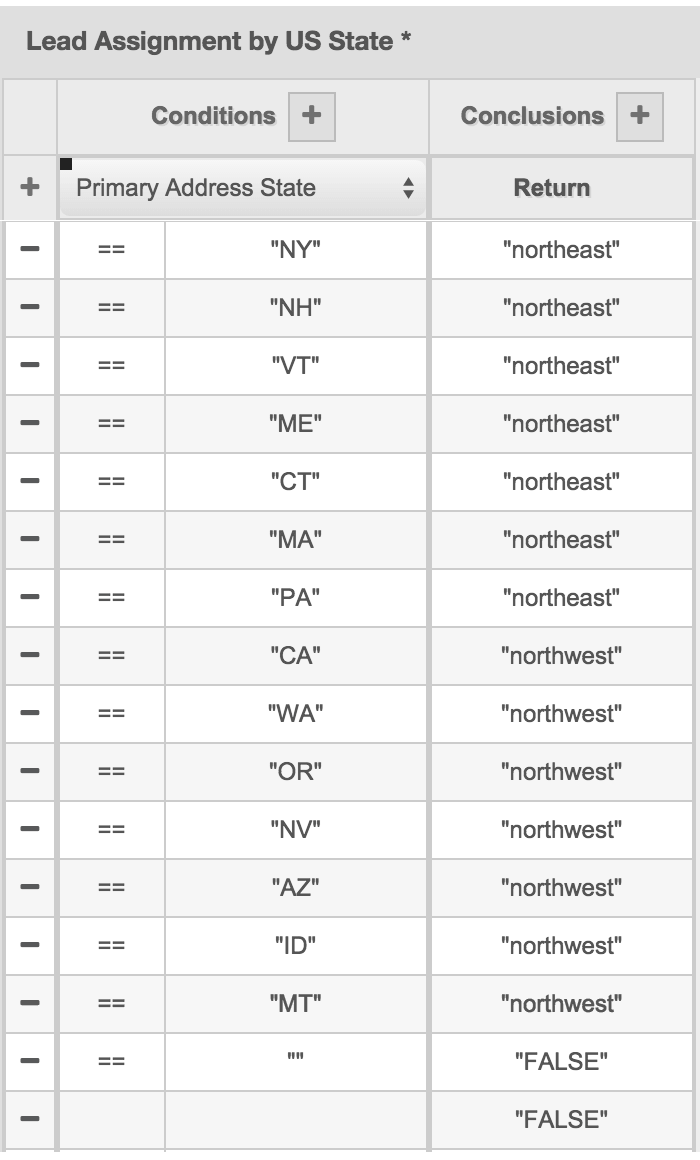
- Begin entering condition lines for the value of each US state in the Northwest and Northeast territories (all other states will default to Max in the process definition, and do not need to be accounted for in this rule) according to the following steps:
- Click inside the cell in the first row under "Conditions".
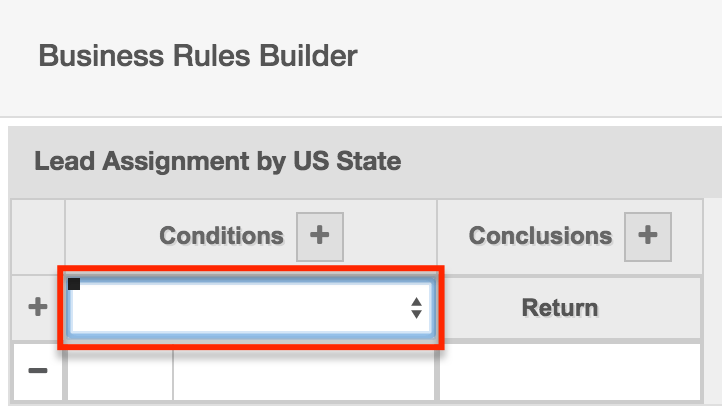
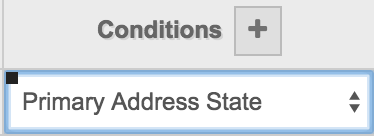
- From the dropdown, select "Primary Address State".
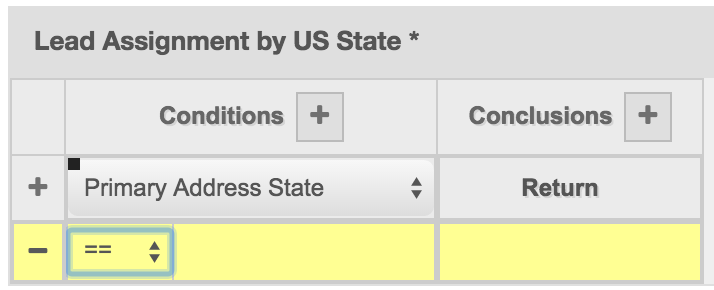
- Click inside the leftmost cell under "Primary Address State" and select "==".
- Click on the Conditions box under the Primary Address State header and then click Constants > String, Number and Boolean to add the appropriate state in the Value field. Enter a single state name for each row using the same format as is used throughout your Sugar instance. For example, if you typically use two-letter abbreviations, such as CA for California, use those same abbreviations in the process business rule. Do not type quotation marks unless the quotation marks are expected as part of the field's string. Sugar will automatically wrap the string in quotation marks in the Condition field. Note that each state must be on its own row; multiple states cannot be listed within the same row.
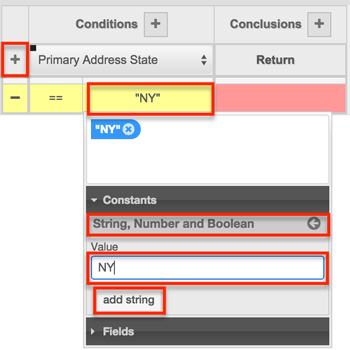
- Specify a Return value for each condition by clicking inside the row's corresponding "Return" cell. Select "Constants" then click on "String, Number, and Boolean". Indicate whether each row is the Northwest or the Northeast territory according to the state that has been entered for this row. For example, type "northeast" (without the quotes) to designate the Northeast territory for the rows that have the states New Hampshire (NH), Vermont (VT), Maine (ME), New York (NY), Connecticut (CT), Massachusetts (MA), and Pennsylvania (PA). Click the Add String button to populate the Return value for each respective row.
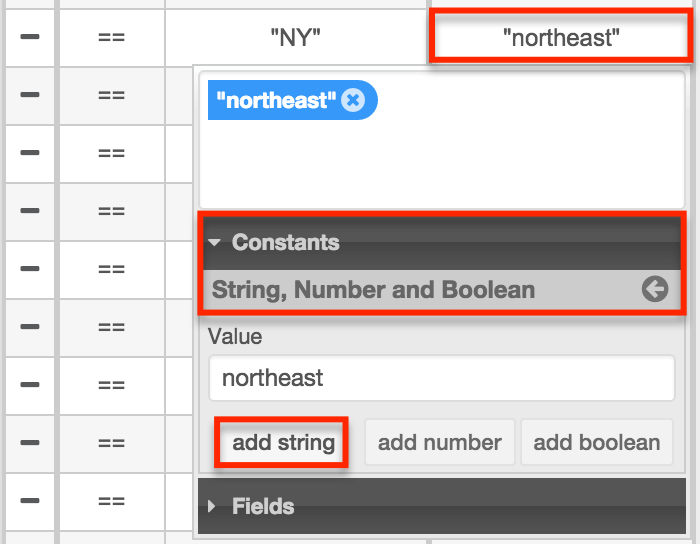
- Click inside the cell in the first row under "Conditions".
- Repeat step 3 for each state in the Northwest and Northeast territories.
- Add new condition rows as needed by clicking on the + sign next to the Primary Address State cell.

- For each row, select == as the operator.

- Note: In this example, any state that is not otherwise assigned to the Northeast or Northwest territory will assign to a default user. While this could be configured through the process business rule, it is more efficient to configure this through the process definition that will contain this business rule.
- Add new condition rows as needed by clicking on the + sign next to the Primary Address State cell.
- Define two final conditions, which will account for occurrences of empty and unrecognized values in the Primary Address State field.
Note: It is important that the following conditions exist as the final rows of the rule set because the business rule operates in a "single-hit" fashion. This means that each row will be evaluated independently in descending order. When a rule in the rule set evaluates as true, the evaluation process stops and that rule's conclusions are executed. Therefore, preferred values should always occur before any default or catch-all rows.- Add another row to the rule set and select == as the operator.
- Specify an empty string value by clicking Constants > String, Number and Boolean > Add String. By leaving the Value field blank, this will populate a pair of double quotes with no characters in between, which will account for the State field containing no value.
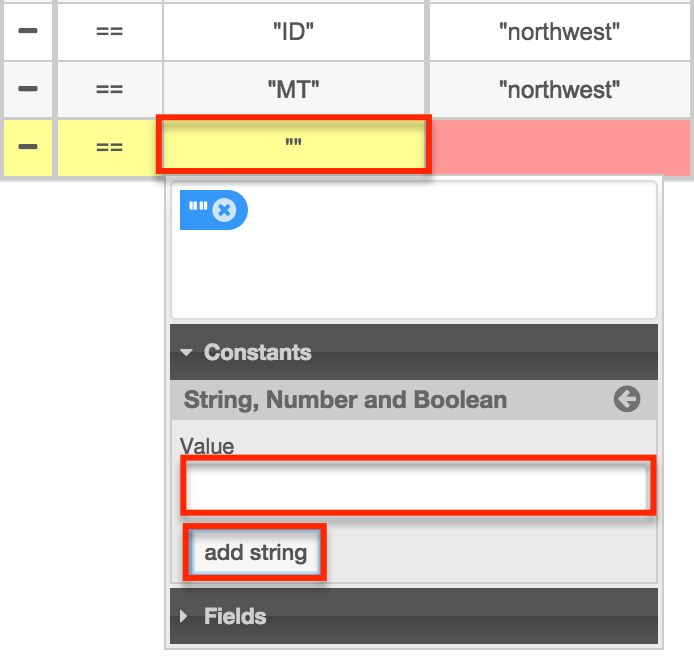
- Specify the Return value for this condition by clicking inside the cell beneath "Return".
- Click on Constants > String, Number and Boolean.
- Type the word FALSE without quotes in the Value field and then click "Add String" to add it to the Return cell.
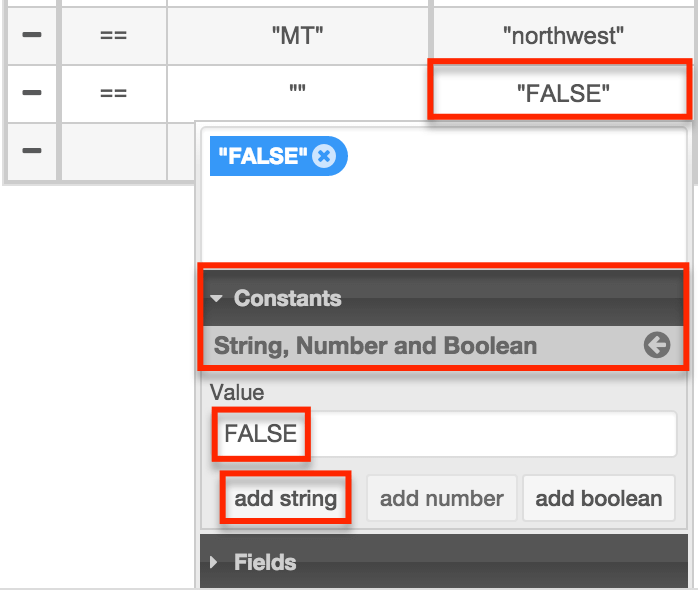
- Define the final condition, which will account for occurrences of unrecognized values in the Primary Address State field.
- Click the plus sign next to "Primary Address State" to add a new row of conditions.
- Do not set the operator field or the Condition value field for this row.
- Specify the Return value for this condition by clicking inside the second row's "Return" cell.
- Click on Constants > String, Number and Boolean.
- Type the word FALSE without quotes in the Value field and then click "Add String" to add it to the Return cell.
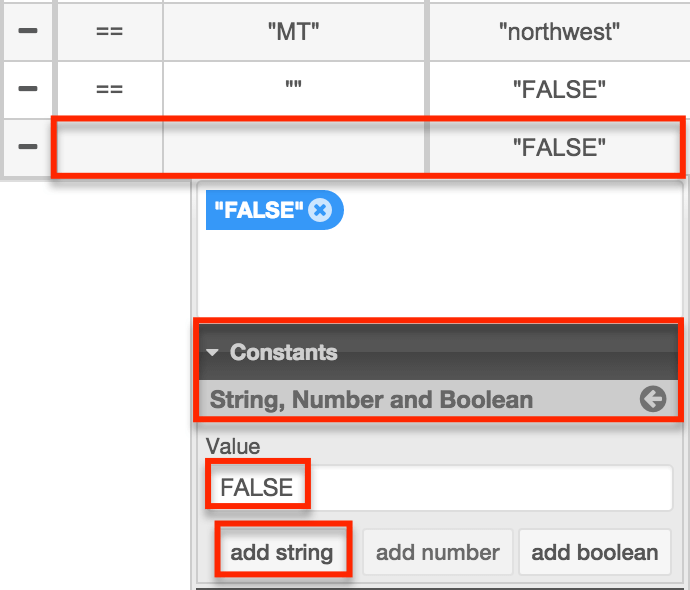
- Click the Save & Exit button once you have finished entering all of the conditions. When complete, the process business rule will look similar to this:
Proceed to the next section to create a process definition that utilizes this rule.
Creating the Process Definition
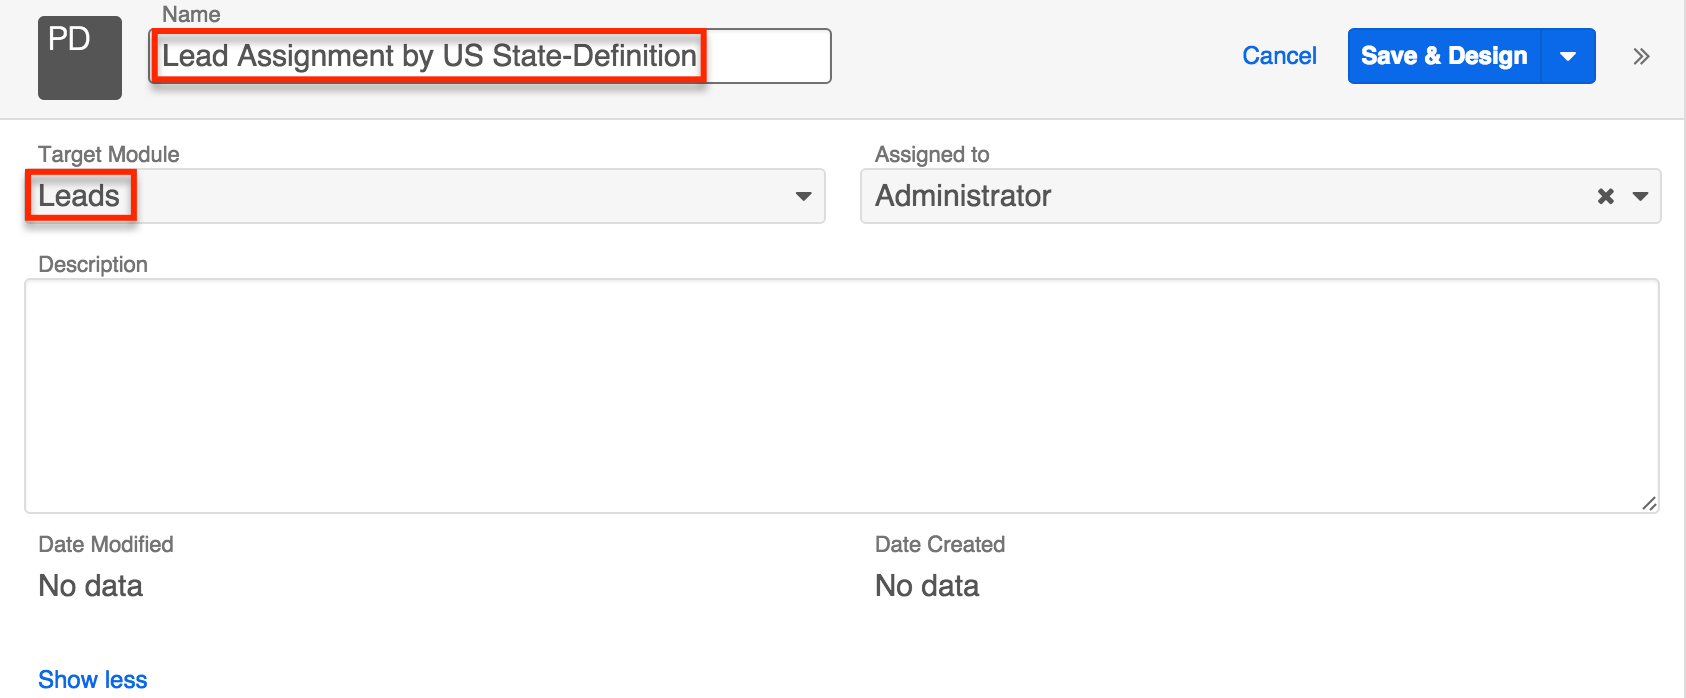
- Create a new process definition record. Name the record "Lead Assignment by US State-Definition" and set the Target Module as "Leads". Please refer to the Process Definitions documentation for complete steps to create a new process definition record.
- Click "Save & Design" to continue to the Visual Designer canvas.

- Drag a Start event onto the canvas.

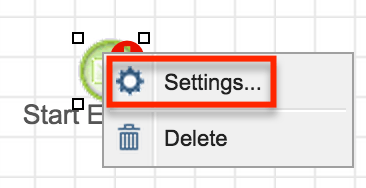
- Right-click the Start event and then select "Settings".
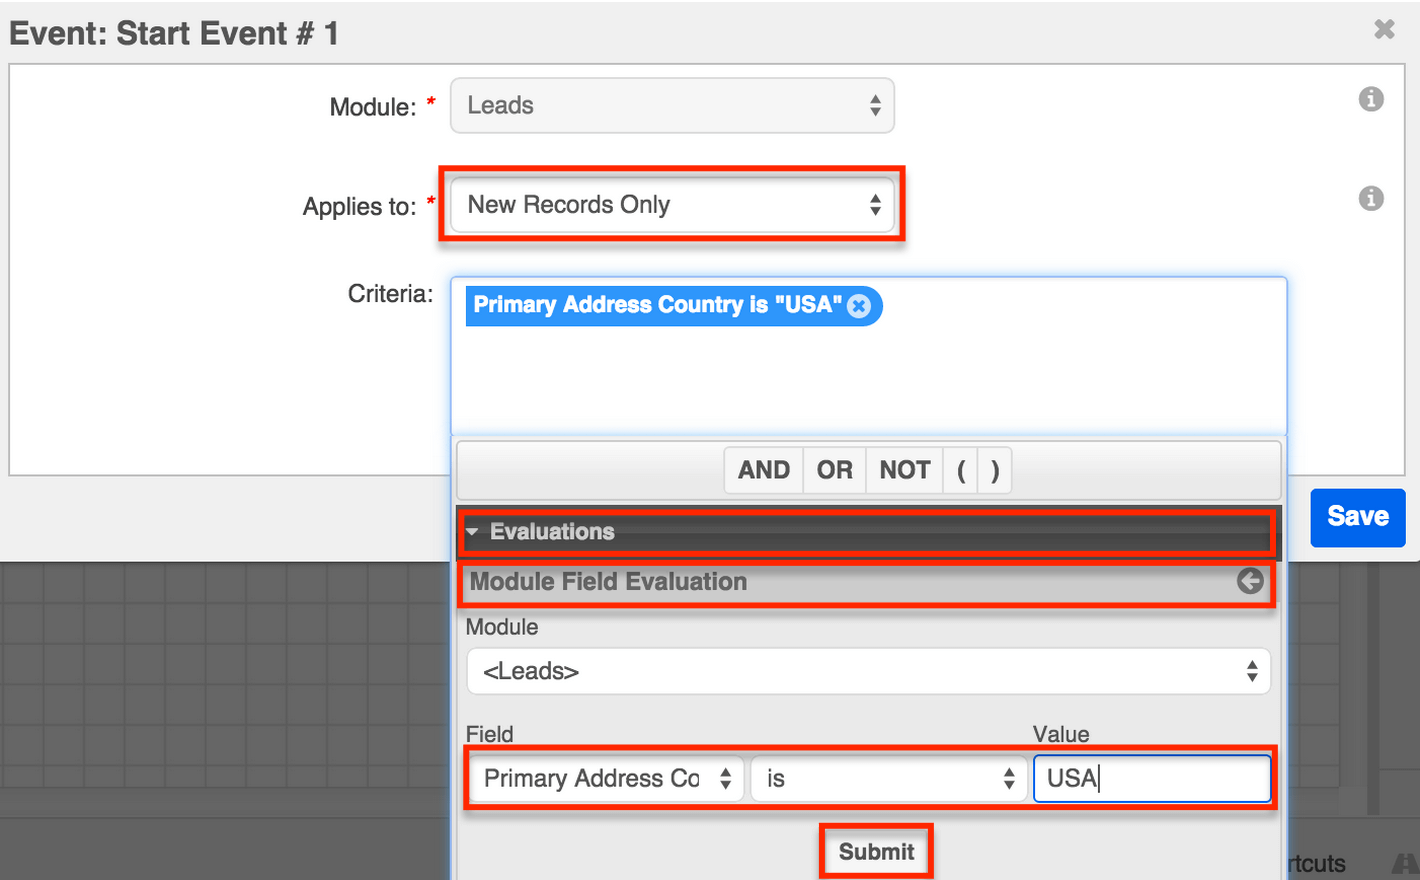
- Using the Applies To dropdown menu, determine when the process definition should activate. For this use case, select "New Records Only" so that the assignment of lead records will only take place when a lead is first created.
- Click inside the Criteria box to add conditions for when the process definition will activate. Because this process definition is specifically for leads that are based in the United States, the criteria should include a Module Field Evaluation where the field Primary Address Country is set to the value USA, as shown below.
Note: If your organization does not standardize the spelling of values in the Country field, it may be necessary to account for multiple variations of "USA" using the OR operator. In this case, the Criteria field would contain a condition similar to: Primary Address Country is "USA" OR Primary Address Country is "United States" OR Primary Address Country is "United States of America" OR Primary Address Country is "U.S.A." - Drag an action element onto the canvas. This action will associate the process business rule that we created above with the current process definition.

- Right-click the action, select "Action Type", and then click "Business Rule".
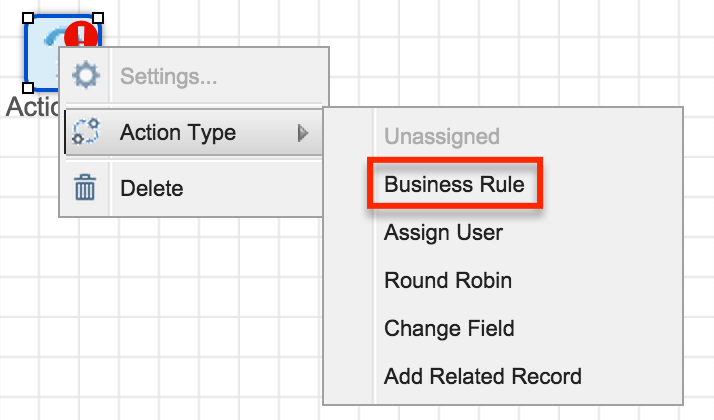
- Right-click the action element again and select "Settings". A window will appear where you can choose the rule that we created above, named "Lead Assignment by US State". Click "Save".

- Drag your mouse cursor from the Start event to the Business Rule action to connect these two objects with a sequence connector.

- Drag an Exclusive Gateway onto the canvas.
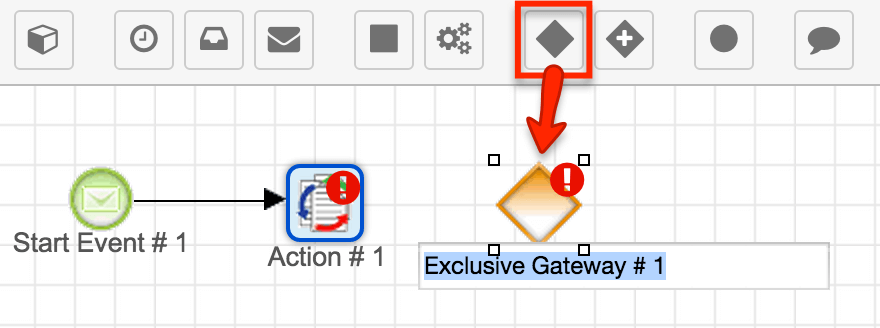
- Drag three more action objects onto the canvas.
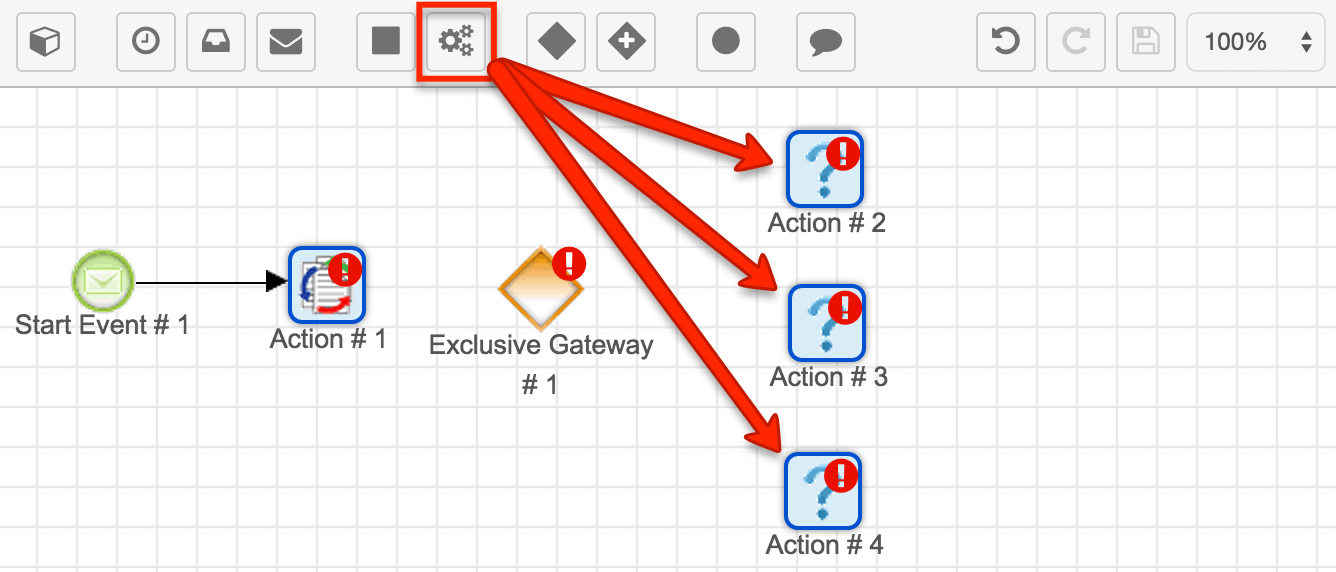
- Right-click each of the three newly-added actions, go to "Action Type", and then select "Assign User".
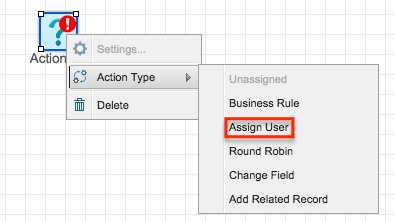
- Rename each Assign User action, respectively, "Other Territories", "Northeast", and "Northwest".
- One at a time, right click each Assign User action and select "Settings". In the dropdown menu next to "Select Process User", choose the user who corresponds with the action's label. Enable the checkbox next to "Update 'Assigned To' on Record". This option is responsible for populating the Assigned To field on the lead record. Save your changes after configuring each action to return to the Visual Designer canvas.


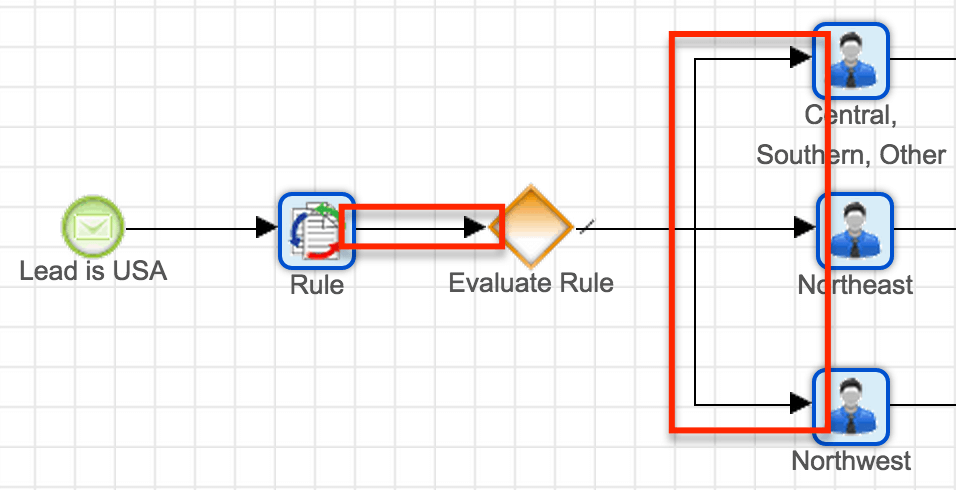
- Drag a sequence connector from the Business Rule Action to the Exclusive Gateway. Then drag sequence connectors, one by one, from the Gateway to each of the Assign User Actions.
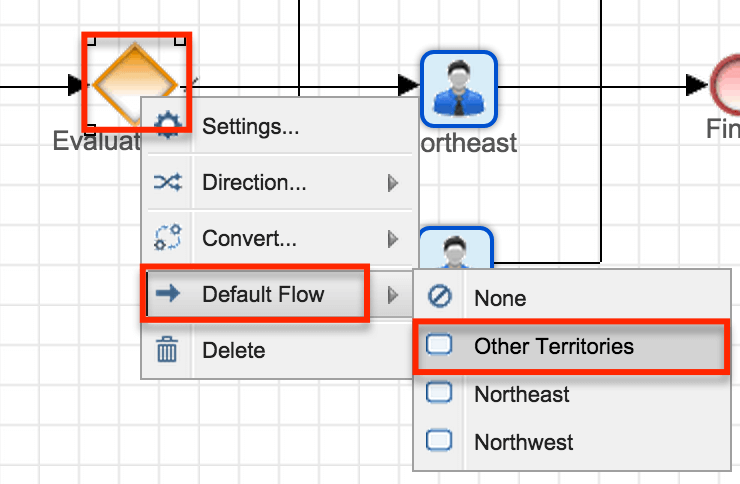
- Right click on the Exclusive Gateway and set the Default Flow to "Other Territories". This will ensure that leads from any state other than those specified for Will or Sarah get assigned to Max.
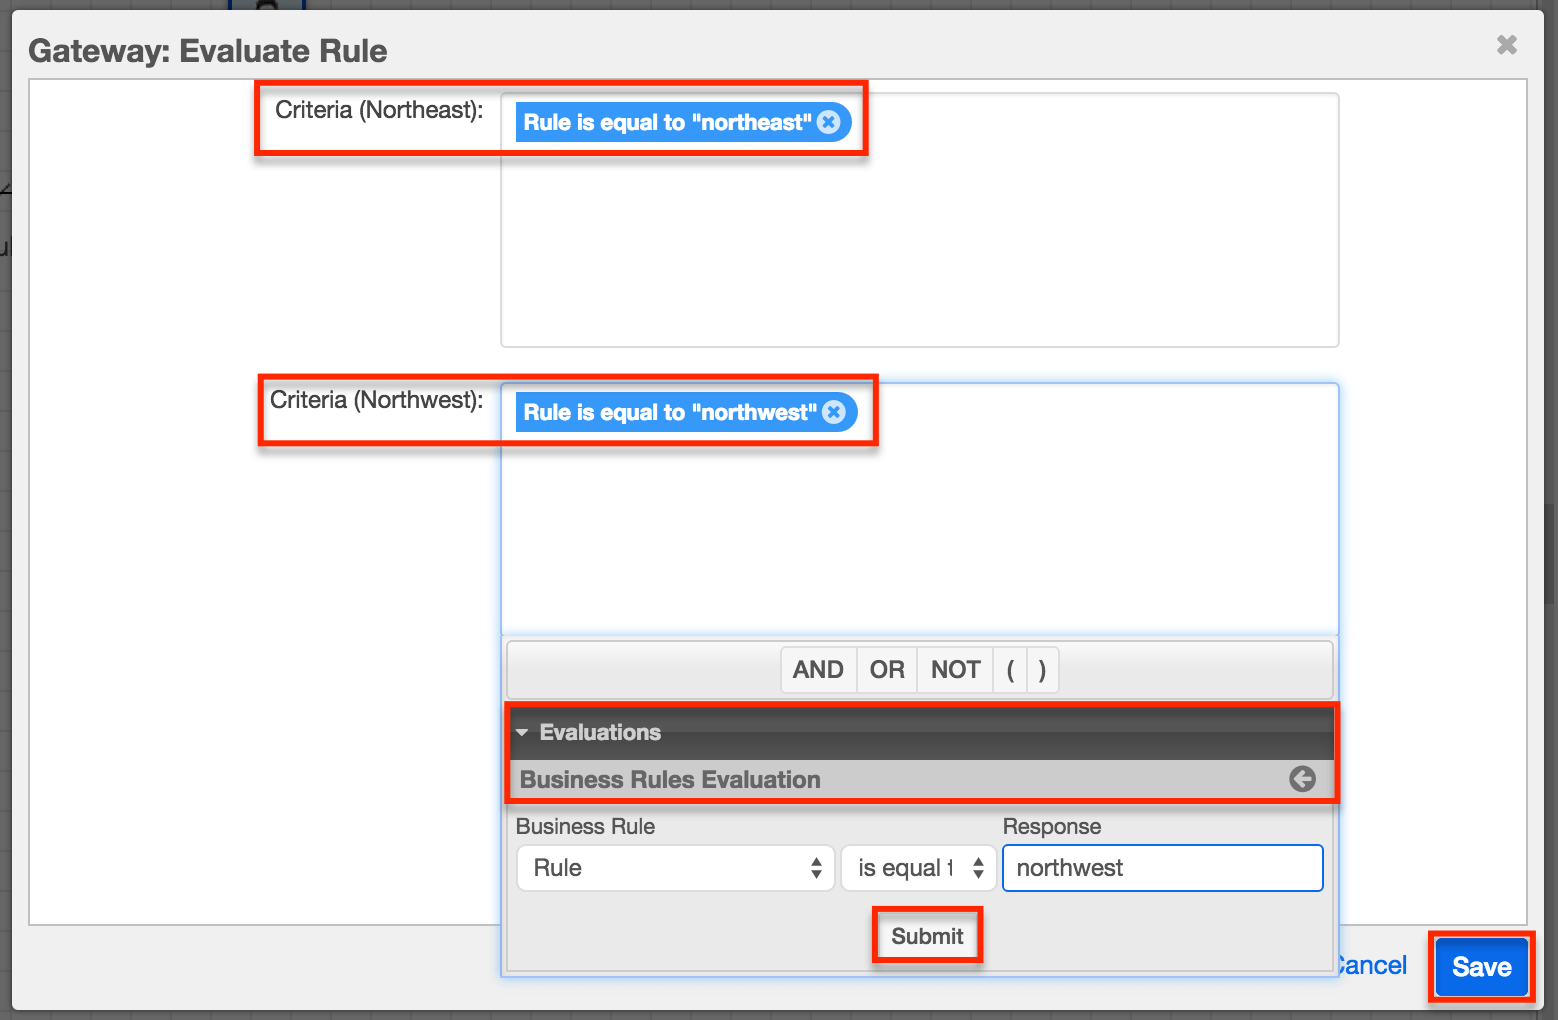
- Right-click on the Exclusive Gateway again, this time choosing "Settings". In the window that appears, there will be two Criteria windows: one for Northeast and one for Northwest. The action labeled "Other Territories" does not require criteria because it is the default flow, meaning that, if the criteria for Northeast and the criteria for Northwest are not met (i.e., the rule's Return value equals "FALSE"), then the Gateway will default the process flow through the Other Territories action.
- To configure the settings for Northeast, define a Business Rules Evaluation where the rule called in the Business Rule action results in a Response of "northeast". Do not type quotation marks; Sugar will automatically wrap the string in quotation marks.
- To configure the settings for Northwest, define a Business Rules Evaluation where the rule called in the Business Rule action results in a Response of "northwest". Do not type quotation marks; Sugar will automatically wrap the string in quotation marks.
- After configuring both windows, click "Save" to preserve the changes and return to the Visual Designer canvas.
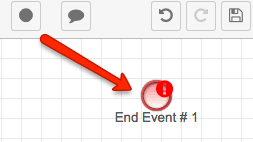
- Drag an End event onto the canvas.
- Drag sequence connectors, one by one, from each of the Assign User actions to the End event. Click the Save icon in the design toolbar to ensure that all changes have been saved.
Note: The Visual Designer auto-saves every 15 seconds. If the Save icon is grayed out, this indicates that your most recent changes have already been saved automatically.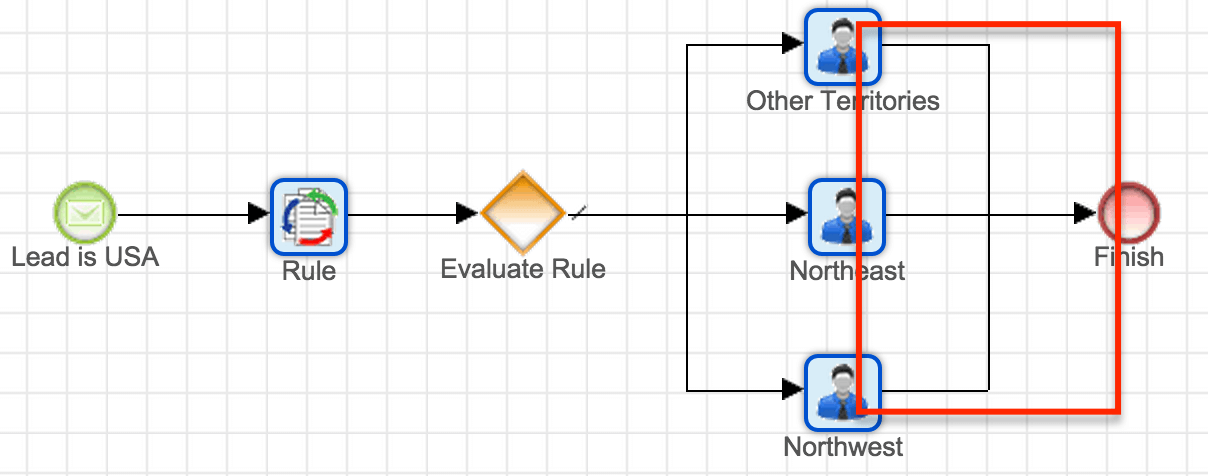
After properly labeling and annotating the process definition design, the completed process definition will look like this: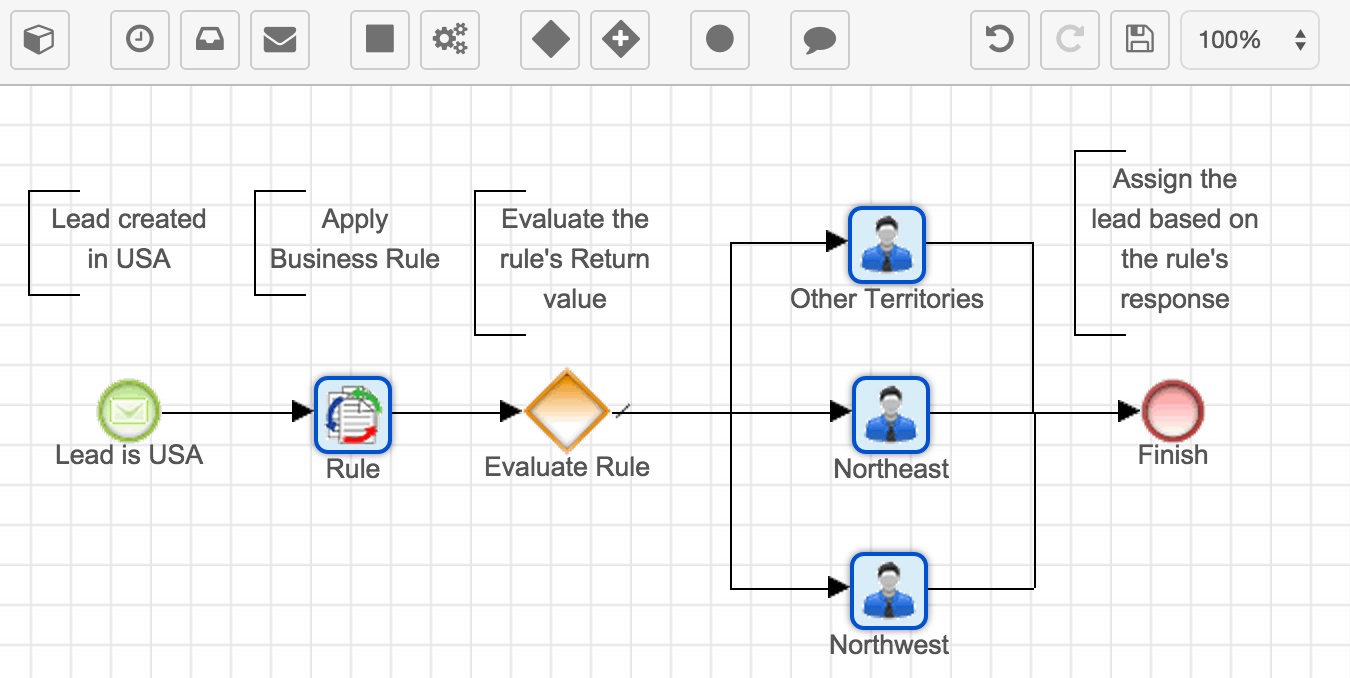
Enabling the Process Definition
Now that the process business rule and process definition are configured and saved, enable the process definition. Please refer to the Process Definitions documentation for steps to enable the process definition.
Application
To test this process definition, create a new lead in Sugar, entering "USA" for the Primary Address Country and "NY" for the Primary Address State. On save, the lead's Assigned To user should change to Will Westin. Next, create a new lead in Sugar, entering "USA" for the Primary Address Country and "CA" for the Primary Address State. On save, the lead's Assigned To user should change to Sarah Smith. Finally, create a new lead in Sugar, entering "USA" for the Primary Address Country and "TX" for the Primary Address State. On save, the lead's Assigned To user should change to Max Jensen.
As your organization changes and, for example, a new user takes over the Northwest territory, simply edit the process definition's corresponding Northwest action to reflect the new user assignment. To add, remove, or adjust territory divisions, simply edit the process business rule.
Downloads
The two module records created in this article are provided here for your convenience.
- Process Business Rule: Lead_Assignment_by_US_State.pbr
- Process Definition: Lead_Assignment_by_US_State_Definition.bpm
Both of these records are importable to their respective modules, but keep in mind the following:
- A process definition (.bpm) file that contains a reference to an email template or business rule should be imported after those related records have been created in or imported to the instance.
- The users referenced in this article will not exist in other Sugar instances and, therefore, must be replaced in the Change User actions.
- Always review the settings of imported SugarBPM files to confirm that they are configured as expected.
- The attached process definition file will import in a "Disabled" state and must be enabled after its settings have been confirmed.
For more information about importing SugarBPM records, please refer to the SugarBPM page in the Administration Guide.