Changing a Dropdown Option's Database Name
Overview
While utilizing Sugar®, there may be occasions where you may need to change an existing list item in your dropdown list. For example, you might need to alter the dropdown options available when setting an account's type. There are two components to dropdown list items, the item name and the display label. The display label is what Sugar displays in the application and can be edited any time via Admin > Dropdown Editor. The item name is what Sugar stores in the database and cannot be edited after creation.
This article will cover making a change to both elements of a list item, the database item name as well as the display label, for situations where just changing the display label does not suffice. Because the database name cannot be edited, you will need to create a new, replacement list item and make sure all affected records are updated with the new dropdown option before removing the old option.
For more information altering a list item's display label in situations where the item's database name can remain unchanged, please refer to the Editing Dropdown Lists section of the Developer Tools page in the Administration Guide specific to your Sugar product and version.
Use Case
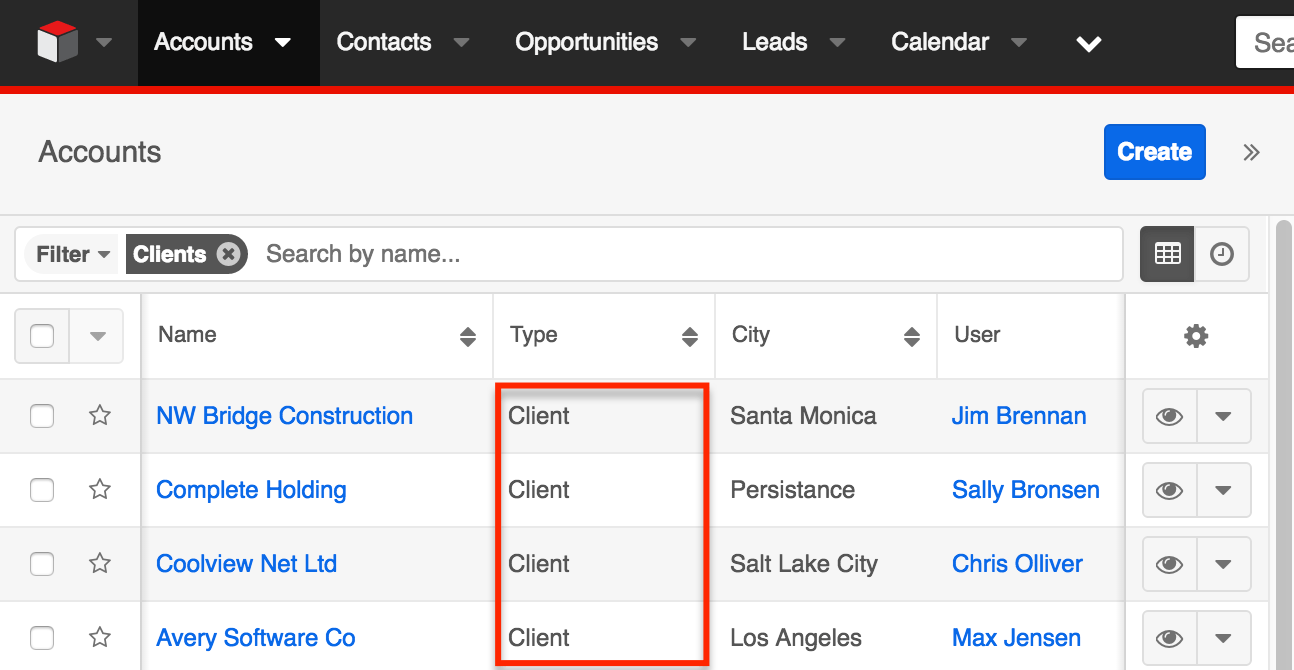
As an example, we will change the Type dropdown field on the Accounts module to include an option called "Client" rather than "Customer".
Prerequisites
- You must be an administrator or have developer-level role access to make the necessary changes in Admin > Dropdown Editor.
- You should have existing records associated with the old dropdown option that will be updated per the steps below.
- You must have access to all existing records that need to be updated to the new dropdown value either by being an administrator or by belonging to any teams to which the records are assigned.
Steps to Complete
We will change the dropdown option for the Type field in the Accounts module from "Customer" to "Client" by creating a new list item via Admin > Dropdown Editor. We will then update all records associated with the old dropdown option, "Customer", to the new dropdown option, "Client". Once the appropriate changes have been made, we will remove the old option from the dropdown list so that it is no longer available to select in the Type field.
Adding a New List Item
First, we will add a new list item called "Client" to the dropdown list that will replace the old dropdown option. Use the following steps to add a new list item to your dropdown list:
- Navigate to Admin > Studio > Accounts > Fields and select the Type field.
- Under the dropdown list, "account_type_dom", click "Edit".

- To add the new list item, simply enter the "Item Name" and "Display Label" then click "Add". For our example, we will enter "Client" in both fields.

- Drag and drop the newly created list item into the appropriate position on the dropdown list.
Note: Do not delete the existing dropdown option (e.g. Customer) from the list at this time. - Click "Save" to finalize your changes.
Updating Affected Records
Depending on the number of records associated with the old dropdown value (e.g. Customer), the steps for updating these records may vary. If there are less than 1000 records, then you can mass update the records via the module's list view. If there are more than 1000 records, then it is recommended that you import a .CSV file to update the affected records with the new dropdown value. The following sections will cover how to update the affected records via mass update and import.
Updating Via Mass Update
The following steps cover mass updating account records with the new dropdown value when there are less than 1000 affected records:
- Navigate to the Accounts list view by clicking the Accounts module tab.
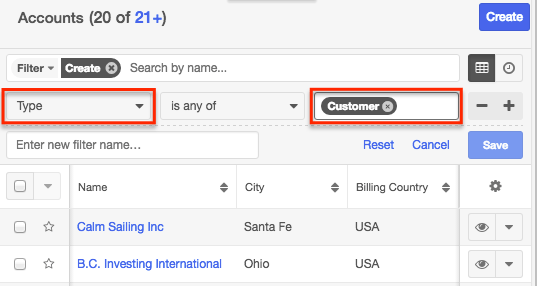
- Use the list view's search to locate all records associated with the old dropdown value, "Customer". For our example, we will create a filter for the Type field with a value of "Customer". For more information on creating search filters, please refer to the Search page in the Application Guide specific to your Sugar product and version.
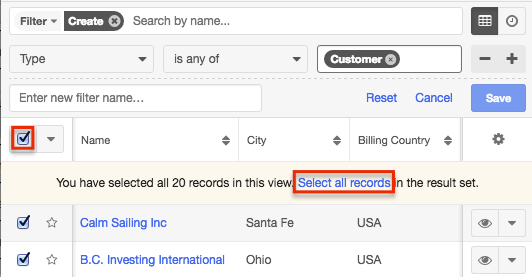
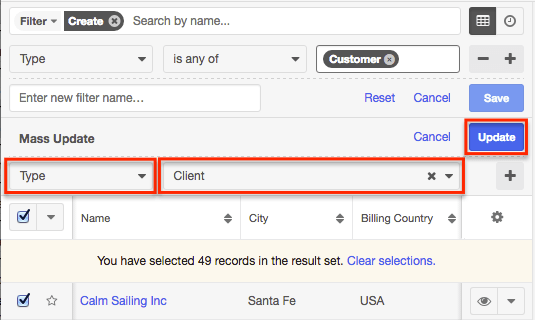
- Select all records displayed on the current set of list view results by clicking the checkbox to the left of the column headers. A dialog will appear below the list view column headers where you can click "Select all records" to capture all records for update in the module's list view search results.
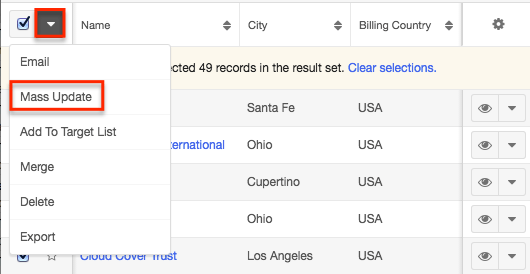
- Now choose "Mass Update" from the Mass Actions menu.
- The Mass Update panel will appear below the search bar. For our example, we will choose "Type" from the fields list then select the list item (e.g. "Client") created in the above section. Click "Update" to start the mass update process and save the changes to all of the selected records. You will receive a confirmation when the records are updated successfully.
Note: If there are more than 1000 records that need to be updated, you can use the filter option in the module's list view search to perform the updates in smaller batches. However, it is more efficient to import a file to update the existing Sugar records when there is a large number of affected records.
Updating Via Import
If there are more than 1000 records that need to be updated, it is recommended that you import a .CSV file to update all affected records with the new dropdown value. The following sections will cover creating a report to export the affected records along with the record's ID then importing the manipulated .CSV file to update the Sugar records.
Creating a Report
The following steps cover creating a Rows and Columns report to capture all account records with Type field set to "Customer" as an example:
- Click the triangle in the Reports module tab and select "Create Report".
- Choose "Rows and Columns Report" as the report type and "Accounts" as the base module.
- On the Define Filters page, select "Type" from the Available Fields list and choose "Is" as the operator then set the field value as "Customer". Click "Next".

- On the Choose Display Columns page, choose "ID", "Type", and any required fields such as "Name" for the Accounts module. Click "Next".
- Enter a name for the report and click "Save and Run".
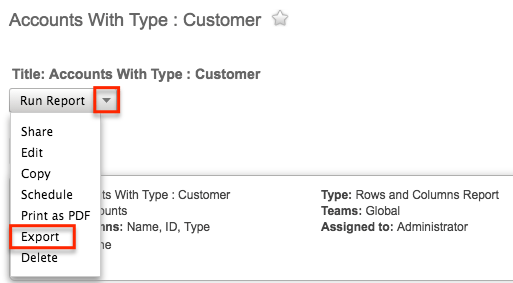
- Choose "Export" from the report's Actions menu to create a .CSV file of your data. Save the file to your local computer.
Preparing the Import File
Use the following steps to alter the exported file and change the dropdown option of the exported records:
- Using Microsoft Excel or another spreadsheet application, open the .CSV file generated in the previous section.
- Locate the Type field column on the .CSV file and change "Customer" to "Client" for all listed account records.
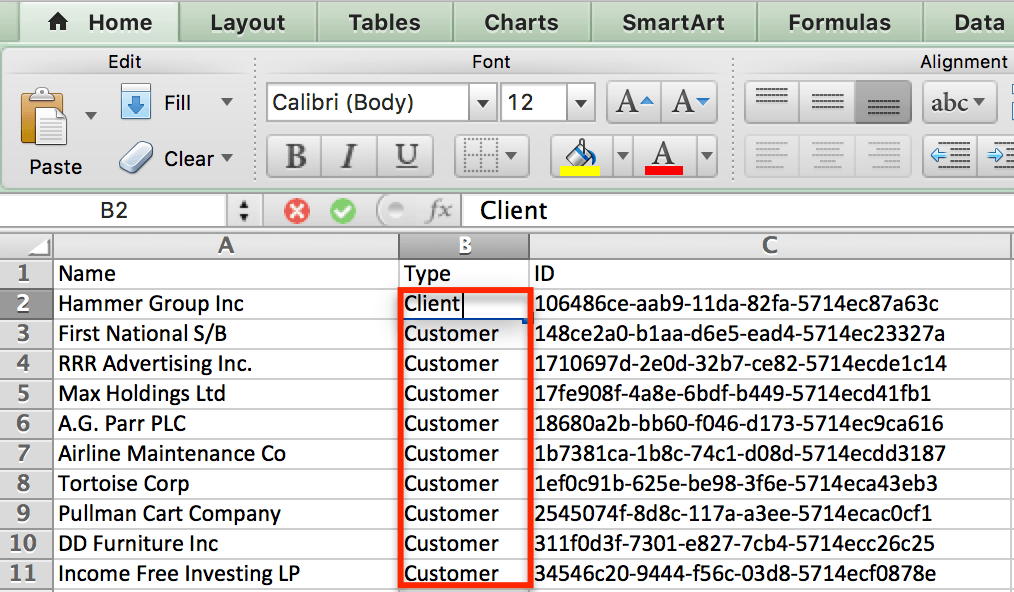
Note: Be sure to replace the spreadsheet's values with the item name specified in your new dropdown option, not the display label. These values may be different depending on how you defined the new dropdown list item. - Save the file to preserve your changes.
Importing the Updates
Use the following steps to import the altered .CSV file in order to update the dropdown field for the affected records:
- In sugar, click the triangle in the Accounts module tab and select "Import Accounts".
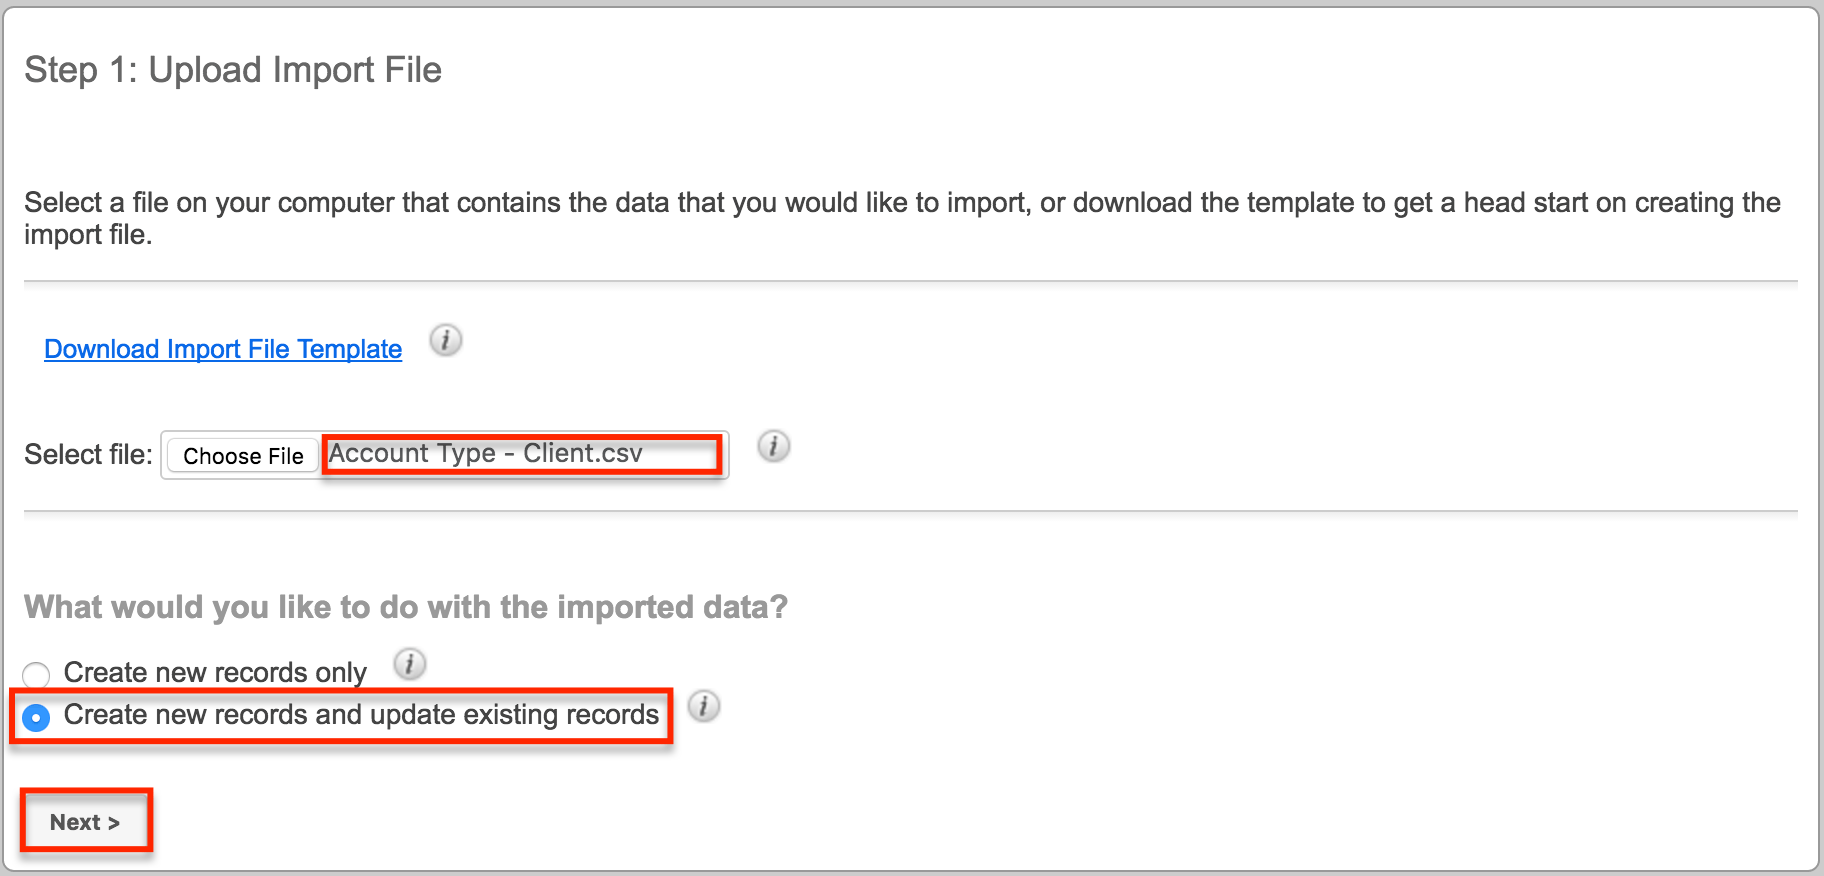
- In Step 1, click the Choose File button and select the .CSV file you saved above. Choose "Create new records and update existing records" then click "Next".
- Complete the import wizard as instructed in the Updating Records Via Import article.
- Once the import completes, the View Import Results Summary will display the total number of successfully updated records.
Removing the Obsolete List Item
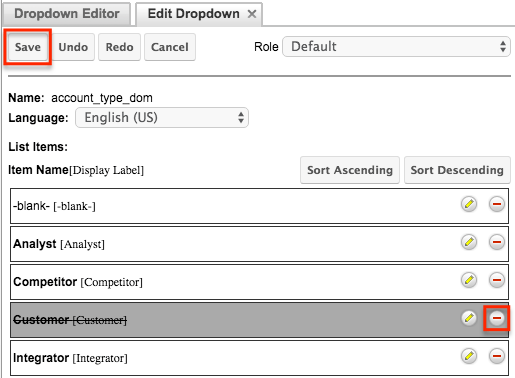
Once all records with the old dropdown option have been successfully updated with the new dropdown option, you can now delete the old dropdown option (e.g. Customer) from the dropdown list. This ensures that users will not accidentally select this option in the future when editing or creating account records.
- Navigate to Admin > Studio > Accounts > Fields and select the Type field.
- Under the dropdown list, "account_type_dom", click "Edit".

- Click the Minus button to the right of the obsolete list item.
- Click "Save" to finalize your changes.
Application
Now that all affected account records have been updated successfully, the Type field will now display "Client" when viewing those records. You can also select this new dropdown option for new and existing records going forward. Furthermore, the Customer dropdown option will no longer be available to select from the Type field when creating or editing account records. 