Troubleshooting Expired Schedulers
Overview
You may need to update some schedulers in your Sugar instance to prevent them from expiring. If your schedulers have stopped running, it may be from the effects of a known issue that was resolved in Sugar 10.2.x where the schedulers' end date values occur in the past. This article explains how to identify if your instance is affected and the steps to resolve the issue.
Prerequisites
To identify and resolve the issue, you must meet the following criteria:
- Your Sugar instance is running version 10.0.2 or lower, with the exception of version 9.0.6.
- You must be an administrator or have developer-level role access to make the necessary changes in Admin > Scheduler.
Symptoms
For Sugar versions 10.0.2 or lower (except 9.0.6), many out-of-the-box schedulers were set to end on December 31, 2020. For example, in the list of schedulers, you will see a date range of "2005-01-01 16:30 - 2020-12-31 23:59". Please note, the appearance of the date range will vary depending on the date format, time format, and time zone values that you have selected in your profile. Because these schedulers are set to end on December 31, 2020, any schedulers whose end dates have not been updated by the end of 2020 will stop running come January 1, 2021.
Note: Upon upgrade to version 9.0.6 or 10.0.3, any stock schedulers that still have an end date of December 31, 2020 will be updated to an empty end date value. Fresh installs of Sugar versions 11.0.0 and higher will no longer have end date values populated for schedulers.
Resolution
Follow the steps below to identify and update any schedulers that have expired or may be set to expire in your instance:
- Navigate to Admin > Scheduler.
- Identify all schedulers that end on December 31, 2020 (e.g. "2005-01-01 16:30 - 2020-12-31 23:59").

- Click the Pencil icon to edit the scheduler.
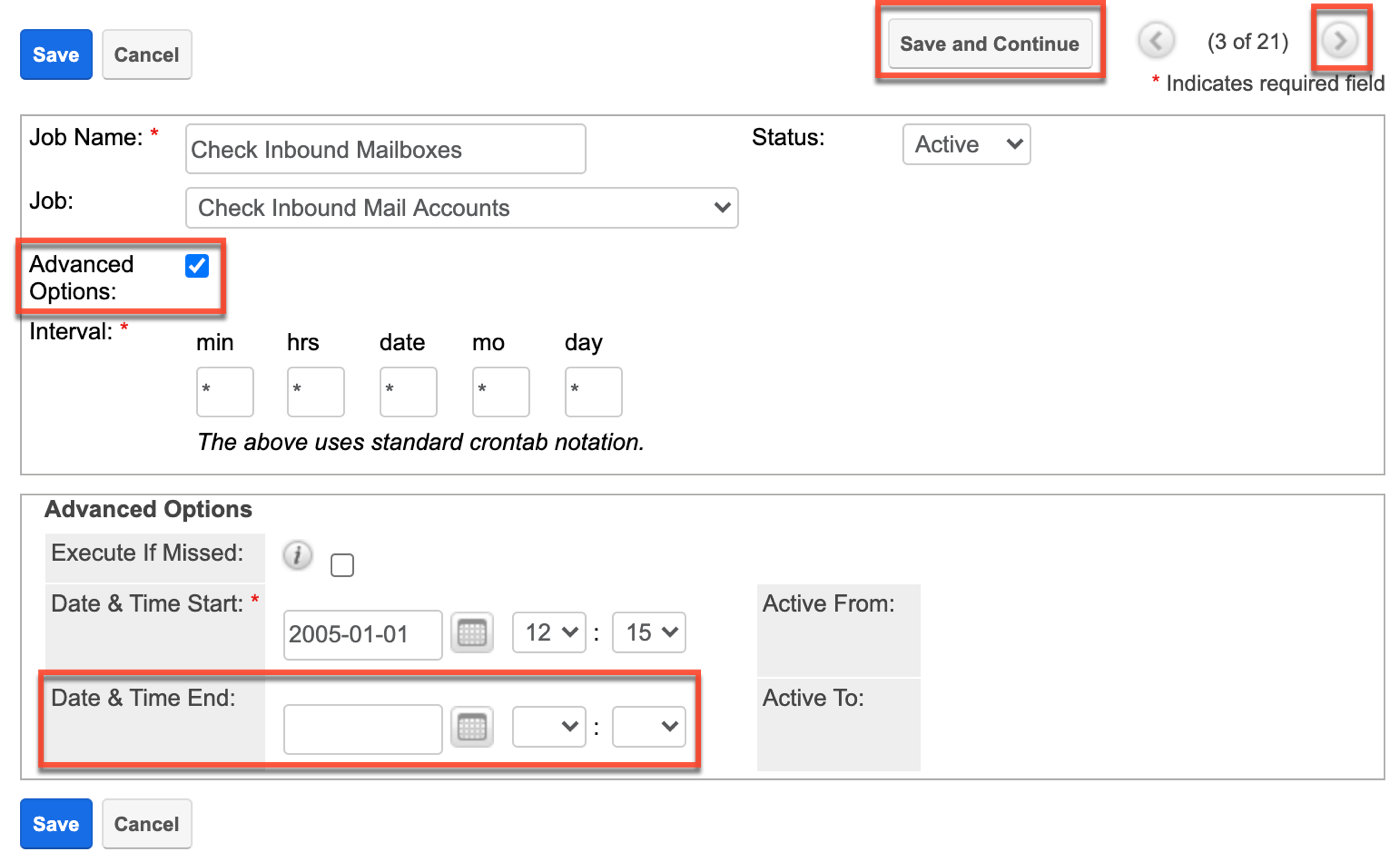
Note: While Sugar's scheduler list view doesn't allow mass updating to an empty "Date & Time End" value, you may choose to set a new end date even further into the future. This carries the same risks as the initial issue, so we recommend manually updating each affected scheduler via record view to have an empty end date value. - Enable the Advanced Options checkbox.
- Clear out all values for the "Date & Time End" field.
- Click "Save and Continue" to save the current scheduler and move to the next one.
Note: If no changes are required, click the Next button to take you to the next scheduler to evaluate.
- Repeat steps 4-6 as necessary.
Summary
The schedulers populated with end dates run the risk of expiring without further action. Following the steps above will resolve, or even prevent, the issue.