Configuring SSO With Okta Using OIDC
Overview
SugarIdentity allows single sign-on (SSO) authentication using Okta and OpenID Connect (OIDC) so that it can be integrated with a connected system using a single user ID and password. This article walks through configuring Okta to allow external authentication using OpenID Connect for instances that use SugarIdentity.
For more information about external authentication methods, please refer to the following pages:
Prerequisites
- Your organization must have an active Okta account. For information on setting up an Okta account for your organization, please refer to their website at https://www.okta.com/.
- Your SugarIdentity users should be users in your organization's Okta account.
- You must have access to an Okta administrator account in order to complete the steps in this article. For more information regarding the administrator role, please refer to this Okta documentation.
- You must be familiar with Okta and how to set up the SSO configurations that meet your organization's needs.
- You must be a Sugar administrator to configure the OIDC settings in SugarIdentity.
Steps to Complete
The following sections cover how to configure Okta to allow external authentication using OpenID Connect.
Creating OIDC Application in Okta
Use the following steps to create a new OIDC application for SugarIdentity in Okta:
- Navigate to https://developer.okta.com/ in your web browser and log in with your admin credentials.
- Follow steps 1 - 5 in the "Task 1: Launch the Wizard" section of the Create OIDC app integrations article on the Okta Docs website.
Note: For step 4, select "Web Application" as the Application type. - Next, follow steps 1 - 4 in the "Task 2: Configure initial settings" section of the Create OIDC app integrations page. You will need to complete the New Web App Integration form to create your new OIDC application.
- Under the General Settings section, enter an application name of your choice (e.g., SugarCRM OIDC) in the "App integration name" field.

- To complete the Sign-in redirect URIs field on this form, you must obtain the Redirect URI value from SugarIdentity. In a new browser tab, access SugarIdentity, then click "OIDC Settings" on the home page, and select the "Enable OIDC Authentication" option on the OIDC Settings page. Copy the Redirect URI value as shown below, as this is required to complete the next step.
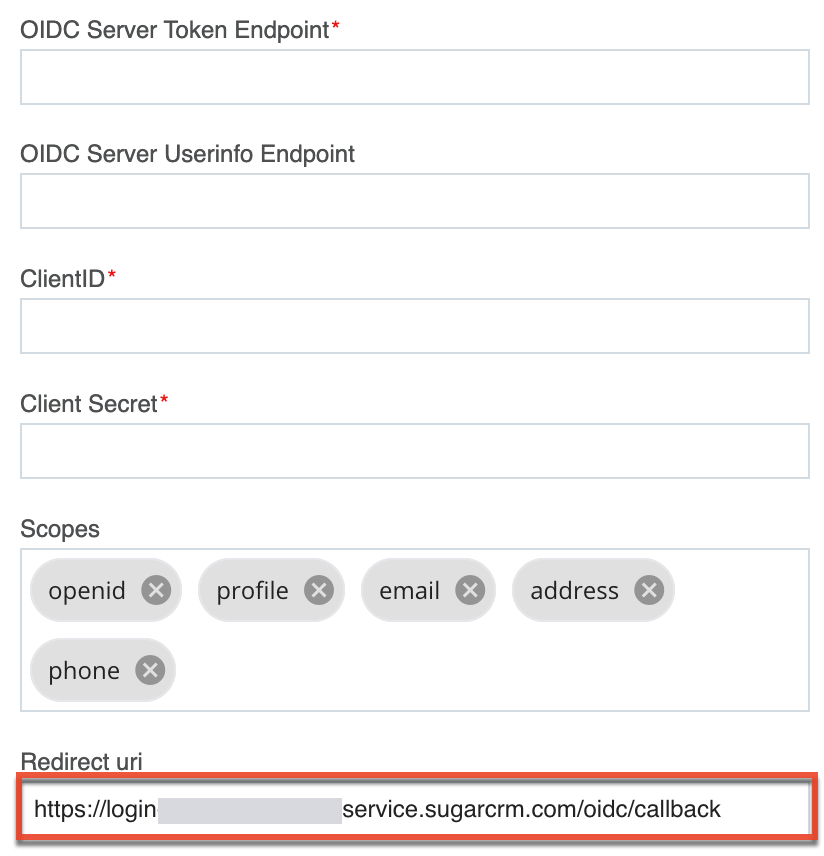
- Navigate back to the New Web App Integration form in Okta and paste the Redirect URI value into the Sign-in redirect URIs field.
- In the Assignments section at the bottom of the New Web App Integration form, select the appropriate option (e.g., Skip group assignment for now) for the "Controlled access" field. For more information on this field, refer to step 3 in the "Task 2: Configure initial settings" section of the Create OIDC app integrations page.
- Click "Save" to finish creating your OIDC application.
- Under the General Settings section, enter an application name of your choice (e.g., SugarCRM OIDC) in the "App integration name" field.
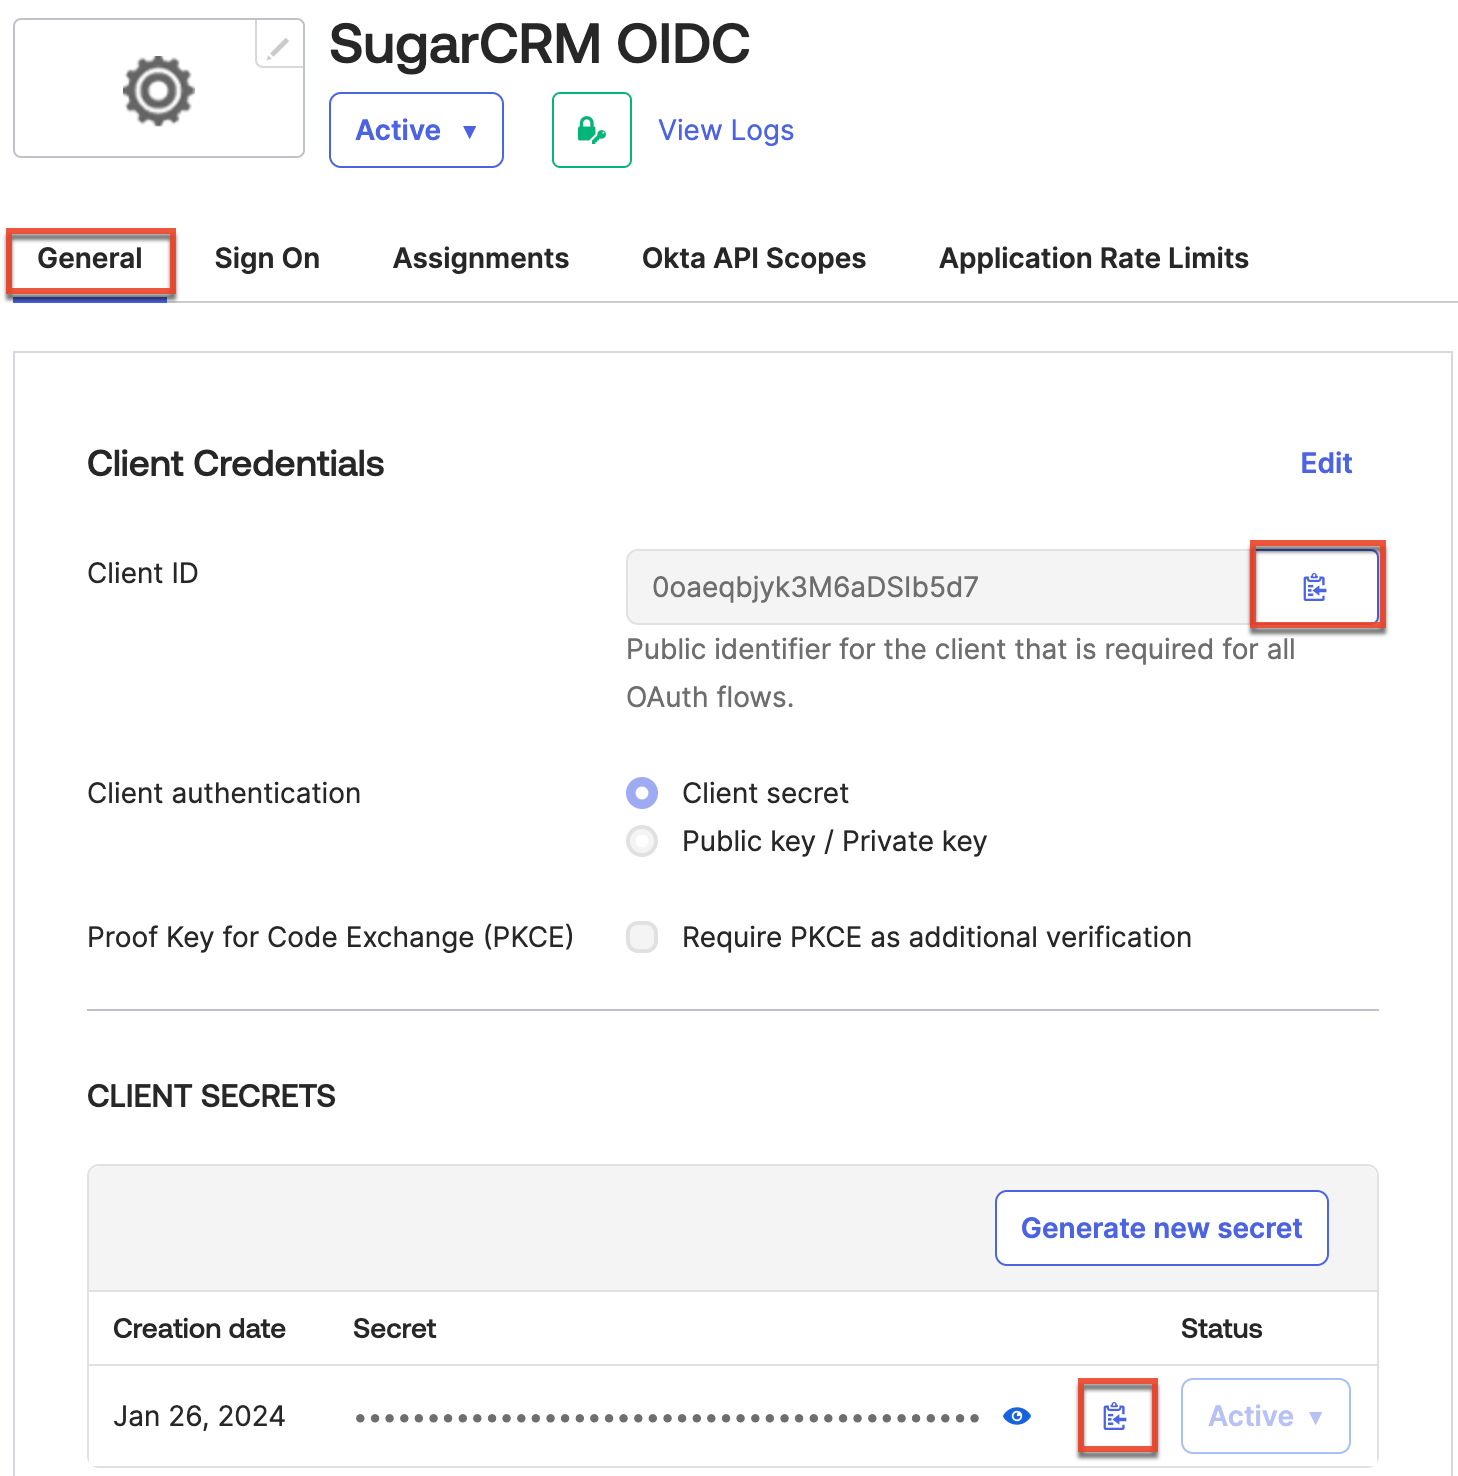
- On the following screen, record the "Client ID" and "Client Secret" values under the General tab of your new application, as this is required when configuring OIDC in SugarIdentity.
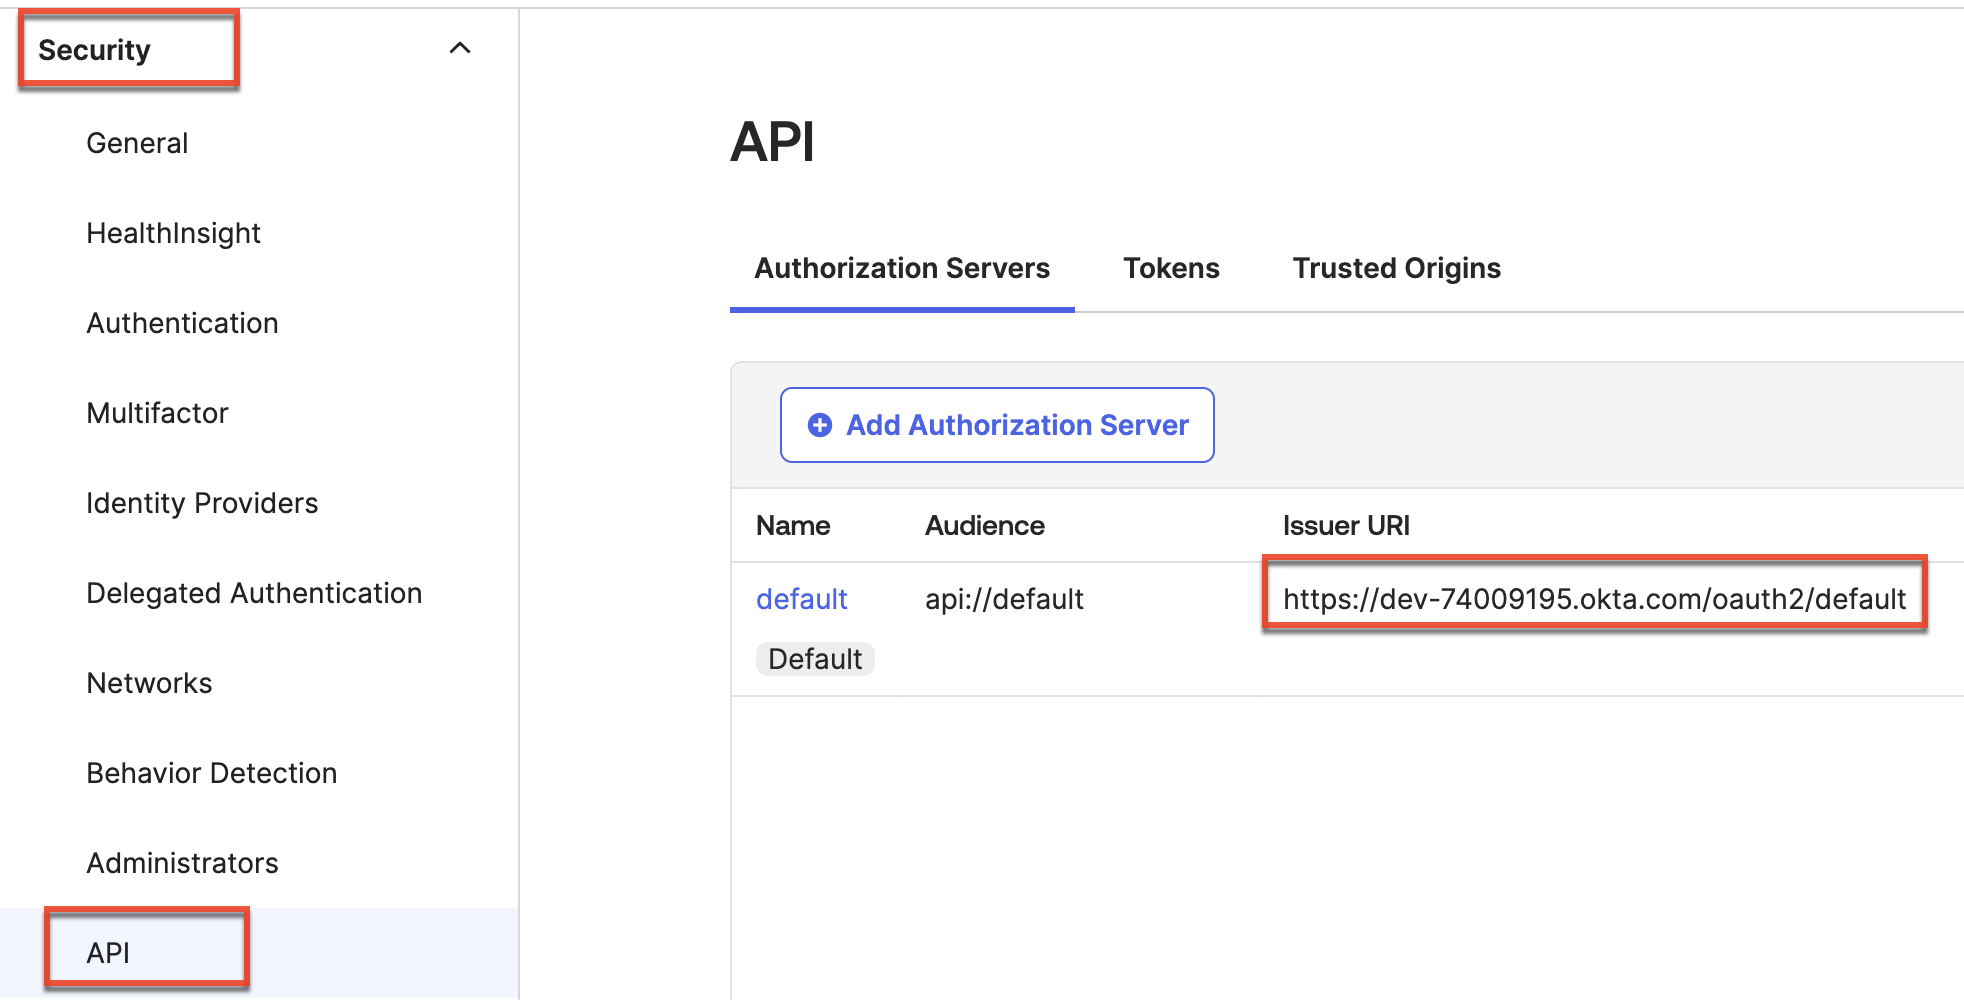
- Finally, click "Security" on the left tree menu and select "API". Record the Issuer URI value under the Authorization Servers tab, as this is required when configuring OIDC in SugarIdentity.
Once you have obtained the Client ID, Client Secret, and Issuer URI values, navigate back to SugarIdentity to configure the OIDC authentication, and complete the fields as follows:
Note: Replace {Issuer URI} in the following URLs using the value obtained in step 5 above.
- OIDC Server Authorization Endpoint: {Issuer URI}/v1/authorize
- OIDC Server Token Endpoint: {Issuer URI}/v1/token
- OIDC Server Userinfo Endpoint: {Issuer URI}/v1/userinfo
- Client ID: Enter the Client ID obtained in step 4 above.
- Client Secret: Enter the Client Secret obtained in step 4 above.
Mapping Attributes for Okta
If you wish to have the Title and Department attributes from Okta map to the SugarIdentity user fields, you will need to set up the attribute mapping in Okta. Please note that other attributes such as first name, last name, email, sub, preferred_username, phone, and address will map automatically once you configure OIDC in SugarIdentity.
Use the following steps to set up the attribute mapping for title and department:
- Follow steps 1-3 in the Configuring SAML Attribute Mapping for SugarIdentity article.
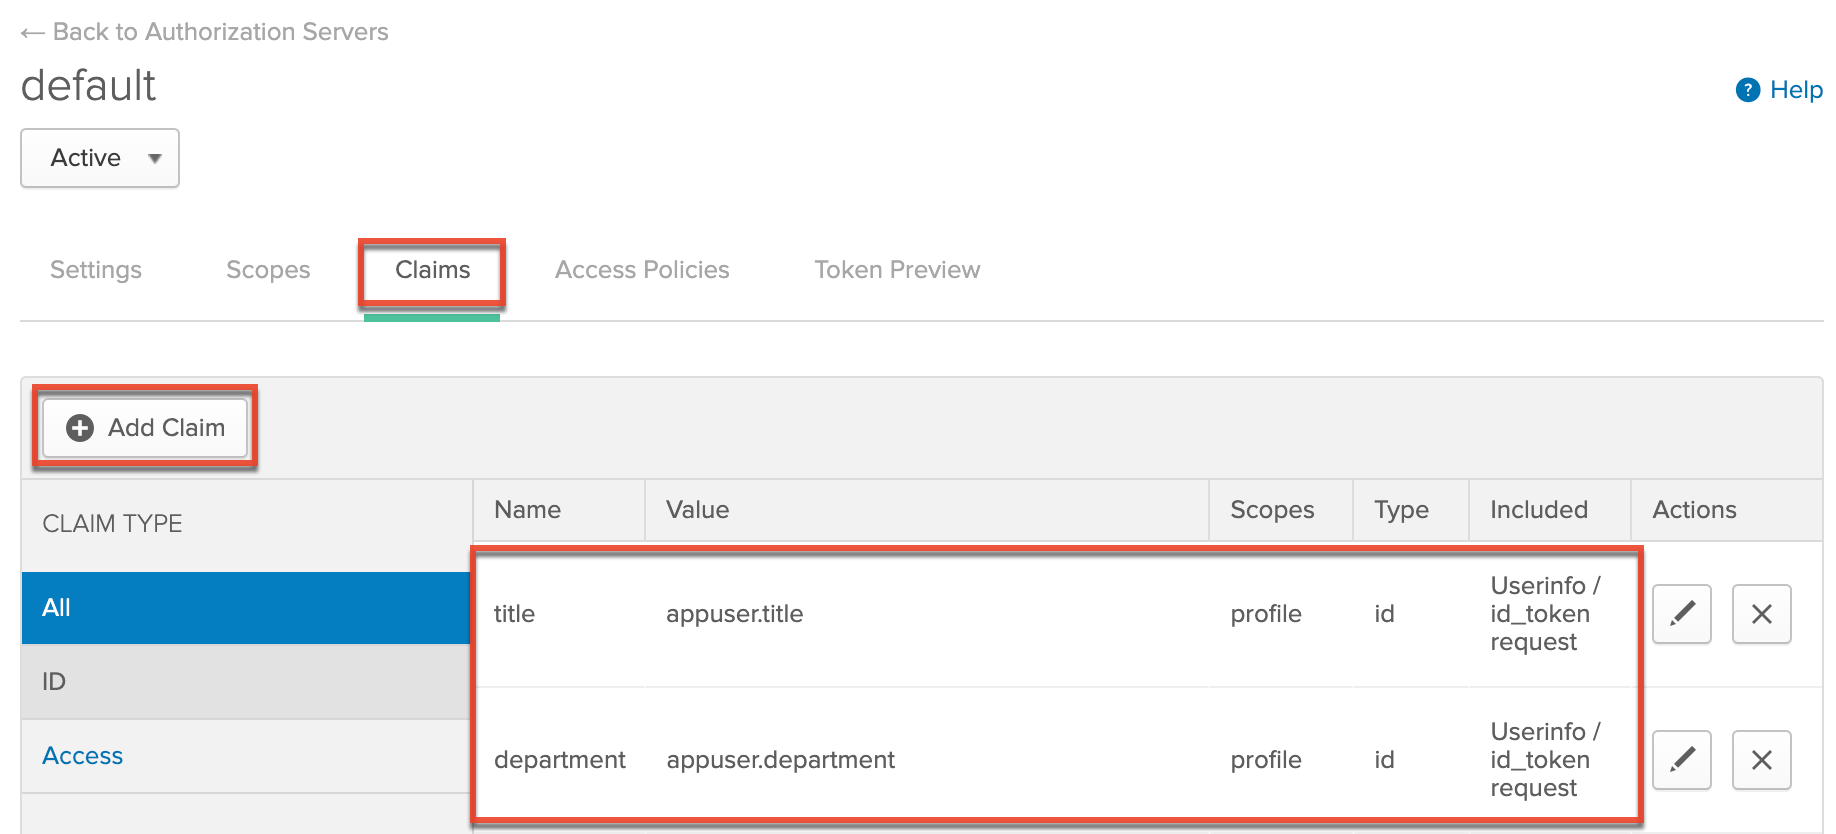
- Next, click "API" in the navigation bar then select "Authorization Servers".
- Click the Default link for your application, then click the Claims tab on the following page.
- Click the "+ Add Claim" button and populate the fields as follows:
- Name: Enter the attribute name (e.g., title).
- Include in token type: Select "ID Token" and "Userinfo / id_token request".
- Value type: Leave as "Expression".
- Value: Enter "appuser.{attribute name}" (e.g., appuser.title).
- Include in: Select "The following scopes" then enter and select "profile" in the open text box.
- Click "Create" to add the claims for title and department.
Once the attribute mapping is configured for title and department, going forward, when a new Okta user is created or the user's title/department attributes are modified in Okta, the changes will sync to SugarIdentity when the user logs into Sugar.
Assigning the SugarCRM App to Okta Users
In order for SugarIdentity users to leverage Okta's login capability with Sugar, you must assign the SugarCRM app from the section above to your organization's users in Okta. For information on assigning applications to users in Okta, please refer to the Using the Applications Page documentation in Okta.
Once you have assigned the SugarCRM app to Okta users, you can then configure OIDC authentication in SugarIdentity.
Application
Once you have configured Okta and completed the OIDC configuration in SugarIdentity, going forward, when a user that is provisioned in SugarIdentity navigates to Sugar they will be redirected to Okta's login page to enter their Okta credentials. Once the user's login credentials are authenticated in Okta, they will be directed back to their Sugar instance and be automatically logged in. Please refer to the SugarIdentity Guide for best practices on creating users in SugarIdentity.