Creating a Trigger Email for Gated Content
Overview
As a marketer, you can require visitors to fill out their contact information prior to receiving an email with downloadable content. Sending your downloadable content in a trigger email lets you require your visitors to provide a valid email address to receive the downloadable content. This can help maintain that your contact database has correct contact and lead information. In addition, by sending the information through an email, Sugar Market will run through any suppression list rules. If you have suppression lists set up for competitor email domains, this will prevent the emails from sending to competitor email addresses.
Accessing Legacy Tools
To access legacy features:
- Click the open button at the top of the navigation bar to view all available modules.
- Click the Legacy Features module.

- Select the tool you need to access from the Legacy Features section.
Step-by-Step Guide
- It's always best to generate the trigger email first so it is ready to connect to the landing page on setup. From the marketing tab select triggers. Choose to create a new trigger.
- Give your email a name using your established naming conventions (example: Email Name - Initial Confirmation with Asset).
- You will build out your email as usual by adding in your "Email HTML," "Email Text," and your subject line, from/reply-to addresses, and display name under the "Email Info" tab.
- Remember to include a link to your Downloadable Content.
- If your downloadable content is uploaded to your company website and you have a URL where users can access the download, then you can use this link.
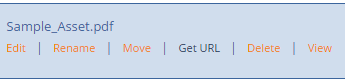
- Additionally, you have an option of uploading your content to the Sugar Market Asset Library (on the main menu) Accepted file formats are: *.jpg, *.jpeg, *.gif, *.png, *.bmp, *.js, *.pdf, *.css, *.zip, *.ics up to 10 MB. Once you have uploaded the file, find the file in the Asset Library, and use "Get URL" to retrieve the link. This will be the download link you can reference in your trigger email.
- You WILL NOT need to set up a "Send date and time" as this will be automated whenever the user completes the action.
- At the bottom, you will see a new section called "Trigger Info"
- Make sure that "Trigger Active" and "Instant Release" are checked. This means the email will go out immediately after the form is submitted.
- Do not click "Allow Duplicates" unless you want them to receive another copy of the email each time they fill out the form. In the case of assets, sometimes it is good for a prospect to go back and request the asset again in case they cannot locate it in their inbox.
- You can add "Exclude Lists" to exclude competitors, etc. under the "Exclude Lists" tab.
- Click "Save and Return," then we will build out the follow-up that will send a week after they fill out the form.
- Under the "Trigger Campaigns (Auto-Responders)" section, click "New."
- Give your email a name, and don't forget to use your naming conventions: (example: Email Name - 7 Day Followup).
- Under the Email Info section, give the email a subject, from/reply-to addresses, display name, etc.
- Under the "Trigger Info" section at the bottom, make sure that "Trigger Active" is checked.
- Uncheck "Instant Release" and change the number in the days box to 7. You can control at what time on the 7th day the email sends out. This email will now go out 7 days after the initial confirmation email.
- Update the Email HTML and text.
- Click "Save and Return."
Next steps: Check out how to link the trigger up with a Landing Page in our Landing pages section! Take your Drip and Trigger skills to the next level with Nurture.