Creating a Newsletter Subscription Page
Overview
A newsletter subscription page is a way for your customers to request a copy of your newsletter. Customers can enter their email address and automatically be signed up to receive your monthly newsletter, or they can select a number of different types of communications to receive newsletters for specific product lines.
Why are they important?
As a marketer, you may want to allow your customers to define which types of communications they receive (or don't receive) from you, instead of blindly unsubscribing from (or subscribing to) everything. With Sugar Market, you can allow your clients to sign up or opt out of newsletters through a landing page.
Accessing Legacy Tools
To access legacy features:
- Click the open button at the top of the navigation bar to view all available modules.
- Click the Legacy Features module.

- Select the tool you need to access from the Legacy Features section.
Step-by-Step Guide
Step 1: Create your custom fields in Sugar Market or your external CRM.
- If you're using an external CRM, the best practice is to create a field in the external CRM and allow Sugar Market to pull down the field. Create a field for all types of communications you wish to send (in both the contacts and leads tables), and wait 30 minutes for the field to sync down into Sugar Market. Typically checkboxes or yes/no options work best.
- If you do not need the field in your external CRM or if you only use Sugar Market as your CRM, then you can create the field in Sugar Market through the Administration Tab and selecting Administration.
- Click on Generate Field Name, then click on Create Field.
- You have the option to make the field required, but for this purpose, it is best to not require the information.
- If you chose a dropdown data type, insert the list items of 'Yes' and 'No'
- Save. This will create the field in both the contacts and leads table.
Step 2: Create a new landing page.
- Select the Landing Pages Tab, and from the library option, choose New Landing Page. You should create a two-page landing page for managing newsletter subscriptions, one page for the form, and the second for confirmation.
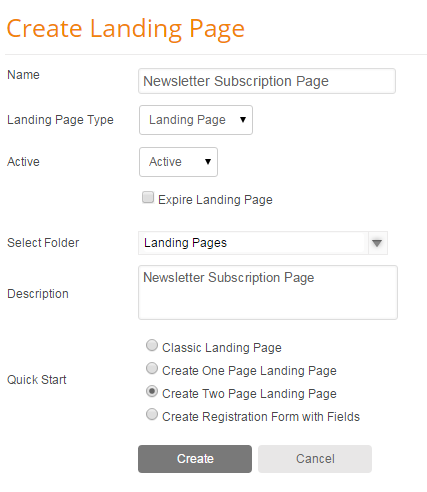
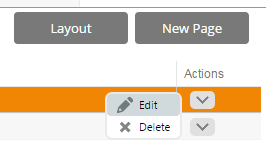
- From the drop down menu on the right side of the page, select edit.
- On Page Properties, rename Page 1 with a page title and description of your choice. Remember the page name will be visible in web analytics and the contact record, so a name specifying the type of form is helpful.
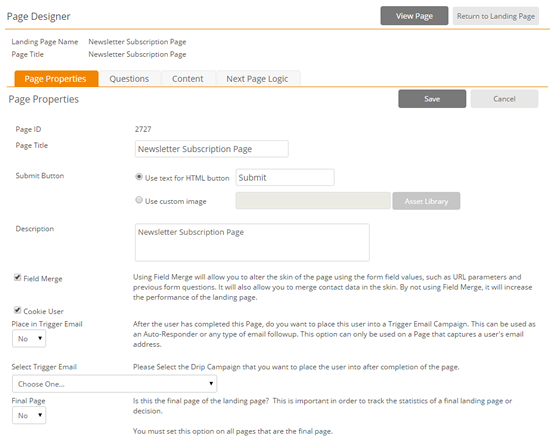
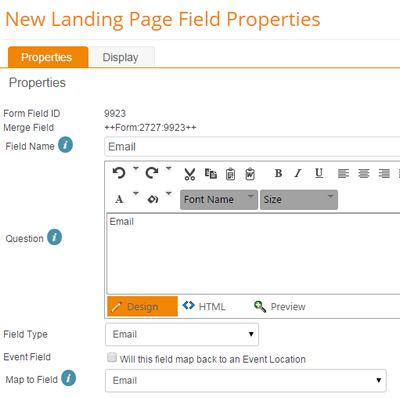
- Click on the Questions tab. Add a field for Email so this form can be tied back to the appropriate contact.
- Add a field for the Monthly Newsletter and map to the field that was created in Step 1.
- You can repeat the step above if you have additional subscription options (monthly newsletters, product updates, etc.)
- Save page 1, and open page 2 to edit. This is your confirmation page, so no new fields need to be added, we just recommend editing the HTML to communicate that the form was submitted successfully
Step 3: Create a segmentation for the newsletter field
- From the Marketing tab, select Segmentation.
- Create a new segmentation. When naming your segmentation, use something that is easily identifiable as to who is included in the list (ie. Monthly Newsletter List)
- Click New to add conditional logic for the Monthly Newsletter field.
- Any count of contacts that meet this criteria will be displayed. Remember segmentations are dynamic, so as new contacts sign up to receive your newsletter, they should be automatically added to this list.
Step 4: Send the newsletter to the segmentation
- In the newsletter email, view the Send-to tab, click on Add Include List to add the segmentation.