Migrating Data From a Previous CRM System
Overview
One of the first challenges in implementing Sugar® when moving from a previous CRM system is migrating your existing data to Sugar. This article will cover the basics of that migration process. If you wish to get personal assistance in migrating your data to Sugar, please refer to the Additional Assistance section below.
Migrating via Import
The basic migration model involves exporting data from your previous system, manipulating the exported files to prepare them for Sugar, and importing the manipulated files into Sugar. We will discuss each portion of the process below.
Exporting from a Previous CRM System
Most CRM systems on the market allow you to export your data from the application. These exported files can then be imported into Sugar. If you need any assistance in exporting your data for migration, please reach out to your CRM provider. Once you have the appropriate files, you will need to manipulate the data for import. Please note that the recommended format for import into Sugar is a CSV (Comma Separated Value) file, which typically uses a comma character (,) to separate data fields.
Preparing the Import Files
When migrating data from another CRM system, it is important to keep in mind that the required formatting for data may be different in Sugar. To ensure that the import goes through properly, you will need to manipulate the CSV file in order to meet the format Sugar uses when importing data. To help with this process, Sugar provides a sample import file template for each module (e.g. Accounts and Contacts) that has the ability to import. The import file template can be downloaded from the Upload Import File step of the import wizard. For more information regarding the import file template, please refer to the Import documentation and the Introduction to Importing article for best practices on importing to Sugar.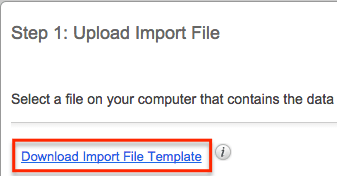
The import file template includes the appropriate header rows for all available fields (e.g. Name, Office Phone, and Email Address) in the specific module, as well as sample data showing how the information in the file should be formatted. Please note that Sugar uses these field labels (e.g. Name and Email Address) to map the data housed in each column to the matching fields in the application. If you wish to use this template for import, you can simply remove the sample rows and help text, then copy/paste your data into the appropriate columns. Please leave the ID column (Column B) blank to create new records in Sugar and a unique alphanumeric ID will automatically be generated in the system for each record.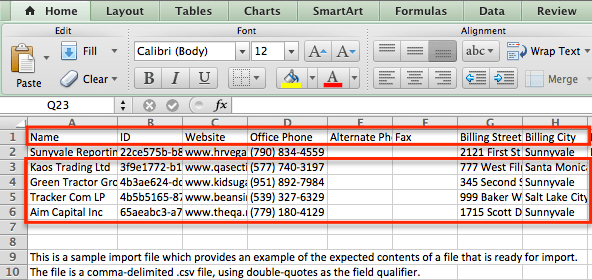
Once the file is scrubbed properly and ready for import, save the file to your local machine. Please keep in mind that you will need to create a separate import file for each module in Sugar. Please refer to the Importing Related Records article for help with the import order and the required format for creating relationships between your records during the import process.
If you have data that needs to be imported but does not apply to any of the stock fields in the module, you can create new custom fields via Admin > Studio. Once the fields are created, download the import file template again to capture these new fields in the header row. For more information on creating fields, please refer to the Studio documentation.
If the out-of-the-box Sugar modules do not meet your organization's needs, a custom module can be built via Admin > Module Builder. Please note that you will need to enable importing for the custom module in order to import data. For more information on creating modules, please refer to the Module Builder documentation and the Best Practices When Building Custom Modules article.
Importing the Files to Sugar
Sugar allows users to easily import new records to modules using the import wizard. The import wizard walks you through the various steps of uploading your import file, confirming the import file properties, confirming the field mappings, and reviewing the results. For more information regarding importing, please refer to the Import documentation.
Note: Users with administrator access can also perform an import via Admin > Import Wizard. A dropdown list of all importable modules (e.g. Accounts and Contacts) is available to select in one convenient location. Simply select the appropriate module (e.g. Accounts) from the list to proceed with the import wizard.
The following steps cover importing your data into the Accounts module as an example:
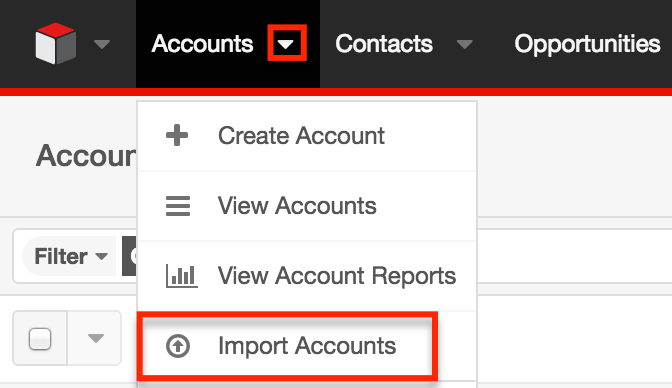
- Choose "Import Accounts" from the module's Actions menu.
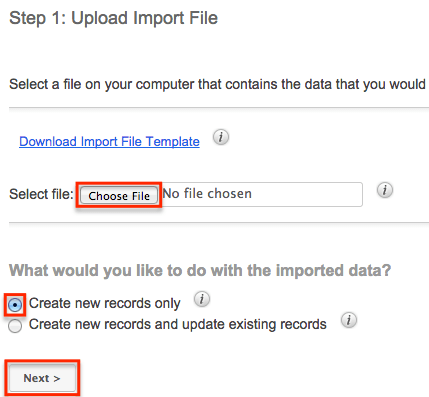
- In Step 1, click the Choose File button to open a file selection window from your browser. Select the appropriate import file then choose "Create new records only". Click "Next".
Note: For certain modules (e.g. Contacts), the first step of the import wizard will be to select the data source (e.g. a file on my computer). Then you will upload the import file in Step 2 of the import wizard. - To complete the import, please follow steps 5-22 on the Importing New Records section of the Import documentation.
Once the import is completed successfully, your new records will appear in the specific module's list view and you can click the record's name to access the record view.
Migrating via API Tools
As an alternative to importing, Sugar provides REST API which can be used by developers to input data directly into Sugar. Please refer to the REST API page for more information.
Additional Assistance
If you run into any issues or need assistance in migrating your data to Sugar and already have a relationship with a Sugar partner, you can work with them to perform the migration. If not, please refer to the Partner Page to find a reselling partner to help with your development needs.