Embedding Images in Emails
Overview
Sugar allows images to be embedded directly in emails through the use of email templates. There are two ways to go about embedding images to the email templates. Publicly-accessible URL references for each image may be added to the email template. Alternatively, image files may be attached and sent with the template. In addition to allowing the use of images, email templates can also be especially useful when sending the same or similar content multiple times.
Note: Images may not be embedded when composing an individual email except by the use of an email template.
For more information about using email templates for Campaigns or Emails, please refer to the Campaigns and Emails documentation.
Prerequisites
Your user account must be configured to send emails from Sugar. For information on configuring your email account, please refer to the Emails documentation.
Steps to Complete
Embedding via Public URL
Embedding images via public URL uses an HTML tag to refer to images that are hosted on the internet in a place where the general public can download them. The benefit to this is the message is lightweight because it does not have to contain the actual image. The email client (Outlook, Gmail, Apple Mail, etc) will download a copy of the graphic from the hosting site when the message is opened. The disadvantage to this method is that you need a public place from which you can host these graphics.
The following steps cover embedding remote images via URL:
- Navigate to the Emails module and select "Create Email Template" from the module tab's actions menu.

- Provide a template name, subject, and any other desired fields. Required fields will be indicated by a red asterisk.
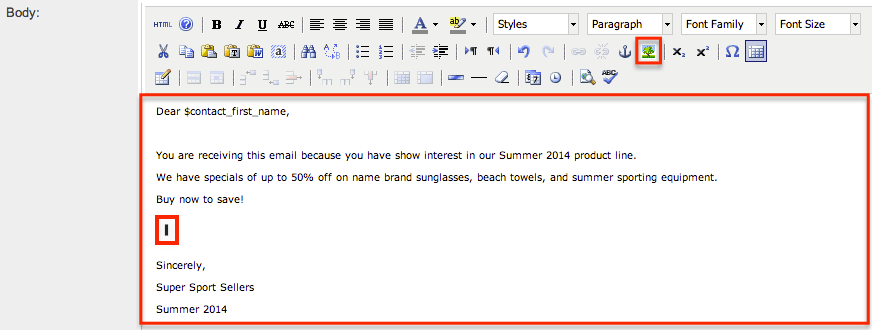
- In the email body, place your cursor in the location where you would like the embedded image to appear and click the Insert/Edit Image
 icon.
icon. 
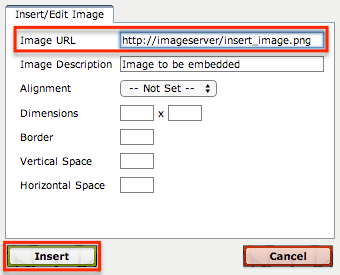
- Enter the publicly accessible URL for the image you would like to embed and click the Insert button. Formatting changes may also be made in this window.

- Click the Save button, and your email template is ready for use.

Embedding via Attached File
Embedding images as attachments sends the graphic as an attachment within the email using MIME encoding. The benefit to this method is once the user downloads the message, there is nothing more for him to download - the text and the graphic are one self-contained unit. The disadvantage to this method is MIME encoding is not very efficient and therefore makes the file being sent larger than it normally is. If you are restricted by the volume of data you send, this method may use too much of that allowance.
The following steps cover attaching and embedding images as attachments:
- Navigate to the Emails module and select "Create Email Template" from the module tab's actions menu.

- Provide a template name, subject, and any other desired fields. Required fields will be indicated by a red asterisk.
- Scroll to the bottom of the page and click "Choose File" to add the image as an attachment.

- Once the image is uploaded, place your cursor in the location where you would like the embedded image to appear and click the paperclip icon next to the uploaded attachment.

- Click the image in your email body and click the Insert/Edit Image
 icon to modify the image attributes as needed.
 - Click the Save button, and your email template is ready for use.

Note: When attaching and embedding images, you must attach and embed them in the same editing session.
Application
When composing a new email, click on the Template icon in the editor's toolbar to open a list of available templates. Search for and select the template that contains the image file you want to use, edit the template as desired for your message, and then send your email as usual.

