Data Privacy Guide
Overview
While good data privacy practices can be applied in any version of Sugar, the 8.0 release introduced new features specifically built to support customers as they carry out their organization's data privacy policies. This article describes these enhancements and the configuration steps an admin must complete before users can access the new functionality. It also provides guidance for end users and Data Privacy Managers in the execution of various privacy-related tasks. These steps and recommendations are suggestions based on best practices for managing data privacy in Sugar; your use of these features will depend strongly on your organization's data privacy strategy and policies.
Data Privacy Features
The following enhancements were added in the Sugar 8.0 release to support data privacy practices, including adherence to the EU's GDPR:
| Feature | Versions | Description |
| Data Privacy module | 8.0+ | The Data Privacy module allows users to record and track data privacy requests (e.g., data subject request to be forgotten) and events (e.g., gaining consent from the data subject). |
| Data Privacy Manager role | 8.0+ | This out-of-the-box role provides regular users the ability to close data privacy records and to permanently erase personal information via the Data Privacy module. |
| Personal information fields | 8.0+ | Admins can designate fields as personally identifying information via Admin > Studio, enabling them to be included in the record's View Personal Info option or permanently erased. |
| Permanent erasure | 8.0+ | Users in the Data Privacy Manager role can immediately and permanently erase personal information fields from their Sugar database via an erasure request in the Data Privacy module. |
| View Personal Info screen | 8.0+ | The View Personal Info option on record views displays the record's personal information fields along with the current field value, source of the value, and date the value was set. |
| Consent tracking | 8.0+ | The acquisition or withdrawal of consent can be tracked via the Data Privacy module. Users can record the business purposes to which an individual has consented in the Business Purposes Consented For field in person-type modules (e.g contacts). |
| Email opt-out default | 8.0+ | Admins can configure whether new email addresses added to Sugar records default to opted-in or opted-out via Admin > System Email Settings. |
| Opt-in via web-to-lead forms | 8.0+ | Web-to-lead forms containing email address fields automatically have an opt-in checkbox added to allow visitors to explicitly indicate that they wish to receive marketing emails. |
| Opt-in via link | 8.1+ | In Sugar 8.1 and higher, opted-out email addresses display a Link button in record view. Clicking this button will copy a link to your computer's clipboard which you can send to the email address owner in order to request that they confirm their desire to receive marketing emails from your organization. When the copied link is visited in a web browser, Sugar will automatically set the email address to opted-in. |
| Disabling activity streams | 8.0+ | In Sugar 8.0.1 and higher, erasing personal information via the Data Privacy module also erases the values from activity stream entries. For Sugar 8.0.0 customers making use of the erasure feature, Sugar recommends disabling activity streams and removing existing activity stream entries from the database which are related to an erased record. Doing so will ensure full removal of the individual's information from your system. Starting in Sugar 8.0, admins have the ability to stop activity streams from displaying or storing new entries via Admin > System Settings. |
| Record audit log | 8.0+ | Record audit logs store every time audited fields values are set as well as the source and time of the change. Email addresses are also audit logged to track the marking of addresses as opted-out or invalid. This information provides vital historical information about the use of personal information in accordance with your organization's data privacy practices. |
Data Privacy Manager Role
Starting in Sugar 8.0, the Data Privacy Manager role became available out of the box. Assigning regular users to the Data Privacy Manager role grants them the following abilities:
- Access to all accounts, contacts, leads, targets, and data privacy records: Admin-level role access to these modules ensures Data Privacy Managers can work with all accounts, contacts, leads, targets, and data privacy records regardless of team membership.
- Ability to permanently erase data: For data privacy records of type "Request to Erase", admin-level role access to the Data Privacy module allows Data Privacy Managers to immediately and permanently erase a related record's personal information fields (e.g., a contact's phone number).
- Ability to close data privacy records: Admin-level role access to the Data Privacy module allows Data Privacy Managers to modify data privacy records' Status field by clicking "Complete" or "Reject" in the record's header.
System admin users are also able to perform the above actions, but regular users must belong to the Data Privacy Manager role or a role with equivalent role access (specifically, admin-level role access to the Accounts, Contacts, Leads, Targets, and Data Privacy modules) to perform these actions.
If you wish to grant additional abilities to users in the Data Privacy Manager which are typically reserved for system admins, the out-of-the-box role's Access Type can be changed from "Admin" to "Admin & Developer" for relevant modules. Refer to the Roles documentation for more information about developer-level role access. Adding developer-level role access to the Contacts, Leads, Targets, Accounts, and Data Privacy modules will grant the following additional abilities:
- Ability to designate personal information fields
- Ability to enable other modules for use with the Data Privacy module
- Ability to add Consent fields to contacts, leads, and targets layouts
Instructions for adding users to the Data Privacy Manager role are available in the Granting Data Privacy Manager Permissions section below.
Personal Information Fields
Fields that contain personal information for an individual are of particular importance in data privacy. Starting in Sugar 8.0, fields can be designated as personal information via Admin > Studio. These should typically be fields by which individuals can be personally identified such as name, birthdate, or email address.
Fields marked as personal information will have the following additional capabilities:
- Available on the View Personal Info screen: The View Personal Info option available in the record view's Actions menu displays all of a record's personal information fields, the current values, along with the date and source of the most recent change. This provides a condensed view that can be leveraged when fulfilling a request from an individual to know what personal data your organization has, as explained in the Providing an Individual's Personal Information section below.
Note: For instances that use SugarIdentity, administrators have the ability to log in as other users in their organization using the "Impersonate (Log in as)" option in SugarIdentity. If the admin user makes any changes to the record's personal information fields (e.g., email address, phone), the Personal Info screen will capture the change as being made by the administrator on the user's behalf. The Source column will display the administrator's name next to a mask icon to indicate changes made by the admin while impersonating the user. - Ability to permanently erase field values: Depending on your organization's data privacy policies, data may occasionally need to be immediately and permanently erased from your Sugar instance. This kind of erasure is only available for fields designated as personal information. For more information, refer to the Permanent Erasure of Data section below.
By default, Sugar has marked the following fields in the Accounts, Contacts, Leads, and Targets list as personal information:
| Field | Accounts | Contacts | Leads | Targets |
| Salutation | ✔ | ✔ | ✔ | |
| First Name | ✔ | ✔ | ✔ | |
| Last Name | ✔ | ✔ | ✔ | |
| Title | ✔ | ✔ | ✔ | |
| Facebook Account | ✔ | ✔ | ✔ | |
| Twitter Account | ✔ | ✔ | ✔ | |
| Google Plus ID | ✔ | ✔ | ✔ | |
| Home Phone | ✔ | ✔ | ✔ | |
| Mobile Phone | ✔ | ✔ | ✔ | |
| Office Phone | ✔ | ✔ | ✔ | |
| Other Phone | ✔ | ✔ | ✔ | |
| Fax | ✔ | ✔ | ✔ | |
| Primary Address | ✔ | ✔ | ✔ | |
| Alternate Address | ✔ | ✔ | ✔ | |
| Assistant | ✔ | ✔ | ||
| Assistant Phone | ✔ | ✔ | ||
| Birthdate | ✔ | ✔ | ✔ | |
| Email Address | ✔ | ✔ | ✔ | ✔ |
Additional fields in these or other modules can also be marked as personal information as described in the Designating Personal Information Fields section below.
Note: Some fields should not undergo erasure due to unexpected behavior that may result. These fields and field types should not be marked as personal information in order to prevent them from being inadvertently erased. For more information, refer to the Fields Not to Erase section below.
Permanent Erasure of Data
Depending on your organization's data privacy policies, there may be occasions when you need to immediately and permanently remove information from your Sugar instance. One example is fulfilling a request to erase an individual's personal information.
Deleting a record (e.g., a contact) in Sugar does not immediately remove it from your Sugar database. Instead, the record is marked as deleted so that it no longer appears in the Sugar application. If your instance's Prune Database on 1st of the Month scheduler is active, the record will be removed from the database the next time the scheduler runs. However, even if your admin has activated this scheduler, there will be a delay between deleting a record in Sugar and its removal from Sugar's database.
In order to fulfill data privacy policies that require immediate and permanent removal of information, Sugar 8.0 introduced the ability to erase fields that have been designated as personal information.
In Sugar 8.0.1 and higher, erasing personal information via the Data Privacy module also erases the values from activity stream entries. Please note that activity stream entries will only reflect erasures after cron has run on your server.
For Sugar 8.0 customers making use of the erasure feature, Sugar recommends disabling activity streams and removing existing activity stream entries from the database that are related to an erased record. Doing so will ensure full removal of the individual's information from your system. Starting in Sugar 8.0, admins have the ability to stop activity streams from displaying or storing new entries via Admin > System Settings.
Erasures can only be performed:
- Via a data privacy record with Type set to "Request to Erase Information" in the "Open" status
- By users in the Data Privacy Manager role (or with equivalent role access) or system admin users
- For modules with a relationship to the data privacy module via Admin > Studio
- For fields that are marked as "Personal Information" via Admin > Studio
- For individual records linked to the erasure-type data privacy record and appearing in its subpanels
Fields Not to Erase
Some fields and field types should not be erased in order to avoid unintended consequences. Sugar recommends not designating these fields as personal information via Admin > Studio in order to ensure they cannot undergo an erasure event:
- Calculated fields
- Auto-increment fields such as Case Number
- Date Created and Date Modified
Working With Erased Fields
Erasure is executed via a data privacy record by an admin user or a user in the Data Privacy Manager role as described in the Permanently Erasing Data section of this document. Once a field has been erased, a Value Erased pill will be displayed. This pill serves as a placeholder where the value used to appear, and it also serves to alert users that an erasure has occurred for this information. The pill will not appear when editing a record because users have the ability to re-populate the erased field. However, the field should only be re-populated if the individual has provided their consent for your organization to use the information, or as specified by your organization's data privacy policy.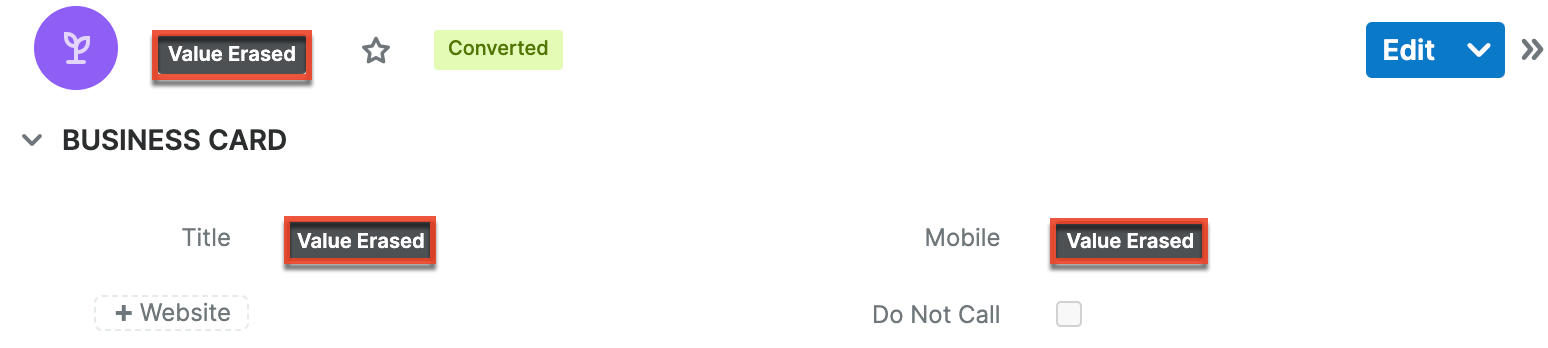
When the field value is normally clickable (e.g., a record name in a list view), a link icon will appear within the Value Erased pill. Clicking the pill will open the record. 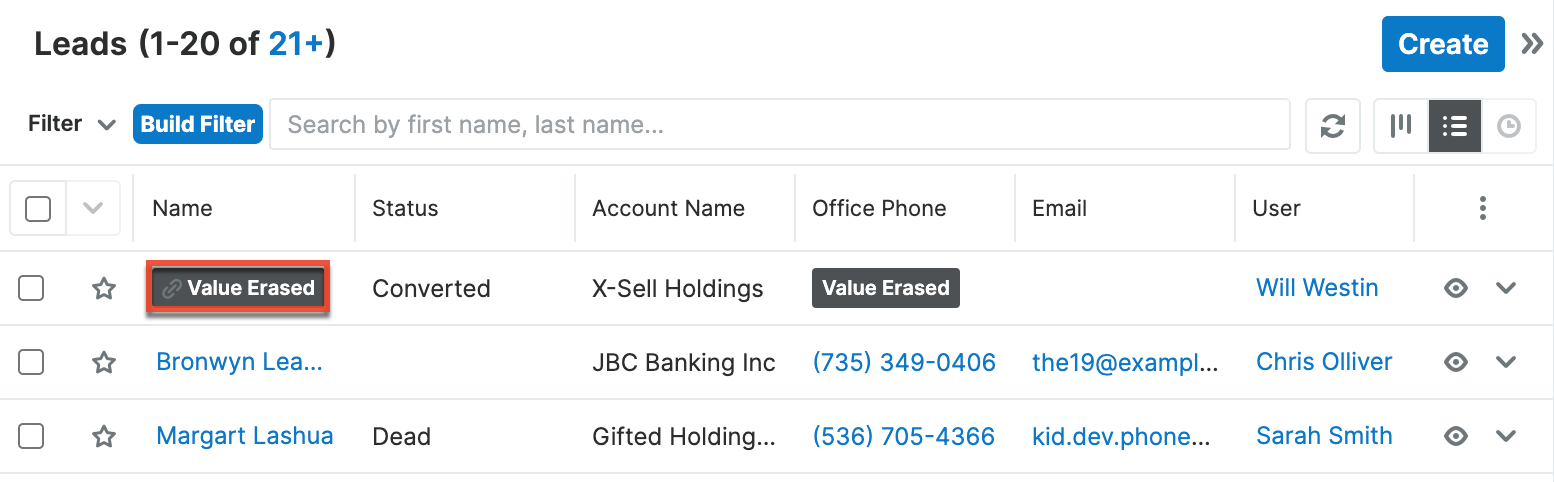
Note: When only a portion of a name is erased, the erasure pill will not be displayed if the remaining portions have values. For example, if contact John Smith's first name is erased but the Last Name field remains, places where the full name is displayed will simply show "Smith".
Consent
Your organization's data privacy policies will determine when consent is required from an individual. For many organizations, due to regulations such as GDPR, consent for specific business purposes must be received within a certain time limit from when the individual's information is acquired. The Data Privacy module allows you to track the gaining of consent as well as recording business purposes to which the user has provided or withdrawn their consent. For more information, refer to the Tracking Consent section below.
Also starting in Sugar 8.0, two consent-focused fields are available to be added to your Contacts, Leads, and Targets layouts. Should you wish to use these fields, they can provide a current snapshot of the business purposes for which an individual has provided consent. For more information, refer to the Adding Consent Fields to Layouts section below.
Opted-Out Email Addresses
Each email address in Sugar has three accompanying flags: Primary (star icon), Opt-out (circle-with-a-line icon), and Invalid (exclamation icon). The opt-out flag indicates that the individual has not consented to receive marketing messages. 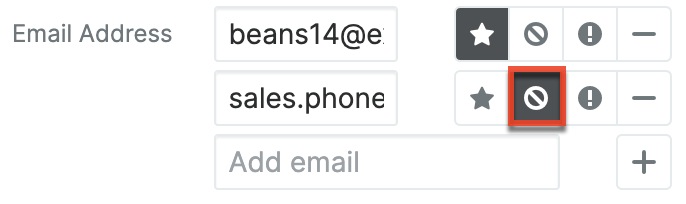
An email address can be marked as opted-out by several means:
- Starting in Sugar 8.0, admins can specify whether new email addresses should default to opted-out or opted-in, according to your organization's data privacy practices. Defaulting email addresses to opted-out is recommended when your organization requires a specific opt-in before an individual can be marketed to.
- Users can manually set an email address to be opted-out for a variety of reasons according to your organization's data privacy policies. For example, a user may opt out of a contact's email address when their consent for marketing business purposes is lost.
- If the opt-out link on an email-type campaign message is clicked by the recipient, the receiving email address is automatically marked as opted-out in Sugar. For more information on campaigns and opt-outs, refer to the Understanding Campaign Opt Outs article.
Web-to-lead forms generated in Sugar 8.0 and higher will automatically have an Opt-in checkbox added to the form. This allows individuals to explicitly provide their consent to receive marketing messages when providing their information. For more information, please refer to the Web-To-Lead Forms documentation.
Opted-out email addresses are indicated by a blue circle with a line through it. Starting in Sugar 8.1, opted-out email addresses also display a Link button in record view. Clicking this button will copy a link to your computer's clipboard which you can send to the email address owner in order to request that they confirm their desire to receive marketing emails from your organization. When the copied link is visited in a web browser, Sugar will automatically set the email address to opted-in.
The specific use of the opt-out flag will depend on your organization's data privacy practices. Sugar allows users to send transactional emails to opted-out email addresses via the Emails module. Sugar campaigns, however, are unable to send emails to opted-out addresses. Opted-out email addresses are always displayed with the opt-out icon to alert users to heed the address' status in accordance with their organization's policies.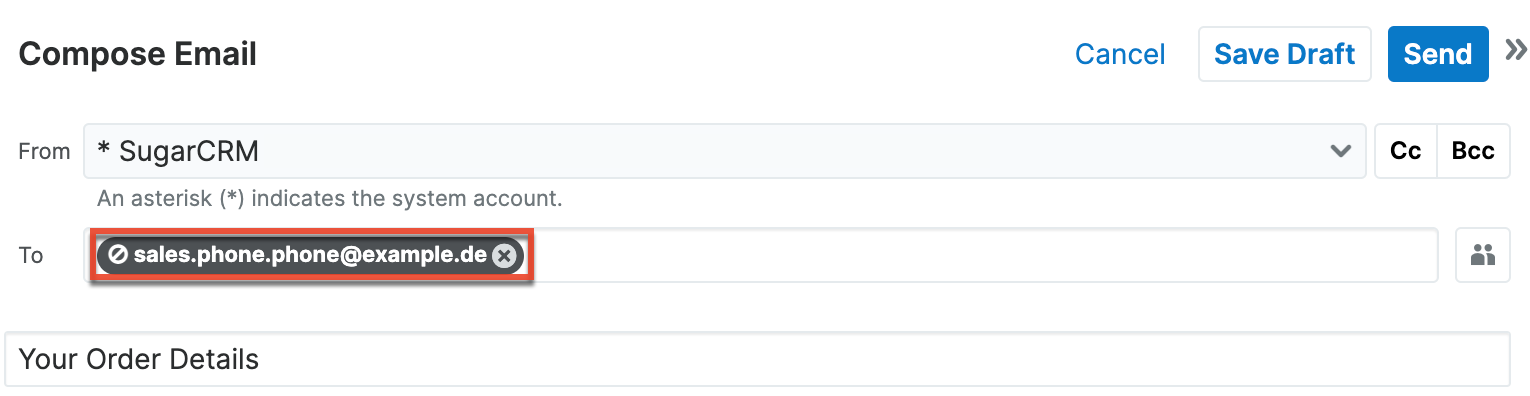
Admin Configuration Steps
Before users can begin taking advantage of the new data privacy features, an admin user will need to complete several setup and configuration tasks. The configurations you make will depend on your organization's overall data privacy policy and your strategy for data privacy in Sugar. The following tasks should be considered, but your actions in these areas will ultimately depend on how your organization plans on handling data privacy in Sugar.
These admin configuration steps are covered individually in the following sections:
- Enable the Data Privacy module
- Enable additional desired modules for use with the Data Privacy module
- Designate personal information fields
- Configure dropdown and multiselect values
- Grant Data Privacy Manager permissions
- Add consent fields to layouts
- Configure the default email opt-in setting
Enabling the Data Privacy Module
Starting in version 8.0, the Data Privacy module was added to Sugar. By default, the module and its subpanels are hidden. If you wish to make use of Sugar's data privacy features, including the ability to permanently erase data, an admin user must first make the module available for use. For more information about enabling modules and subpanels, refer to the Developer Tools documentation.
Use the following steps to enable the Data Privacy module for use in your instance:
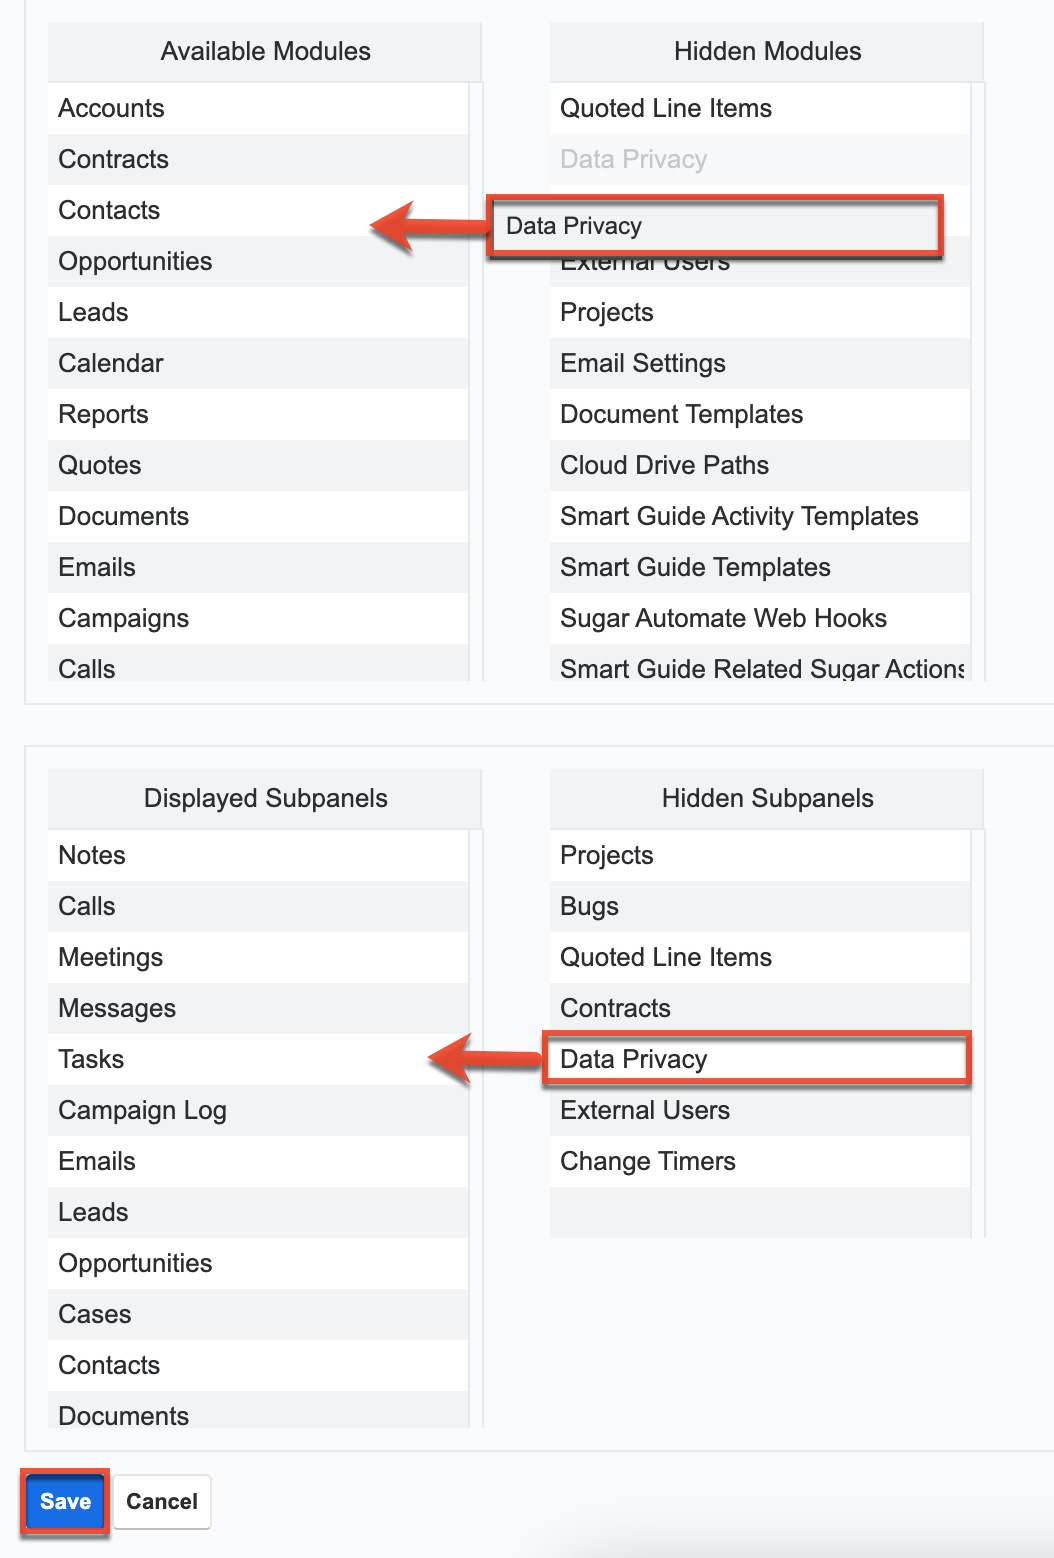
- Log in as an admin user and navigate to Admin > Navigation Bar and Subpanels (or "Display Modules and Subpanels" for older unsupported versions of Sugar).
- Drag "Data Privacy" from the Hidden Modules column to the Displayed Modules column.
- Drag "Data Privacy" from the Hidden Subpanels column to the Displayed Subpanels column.
- Click "Save" to finalize your changes.
Enabling Modules for Use With the Data Privacy Module
To use Sugar's data privacy functionality for an individual that your organization works with or markets to, you must be able to link that individual's Sugar record with a data privacy record. Establishing that link requires that the module containing the individual's record has a many-to-many relationship to the Data Privacy module. By default, the following modules have this relationship and are thus enabled for use with the Data Privacy module:
- Accounts
- Contacts
- Leads
- Targets
Your organization may have personal information stored in other stock or custom modules. In order to link data privacy records with records within these additional modules, you must create a many-to-many relationship for each.
The following steps create a many-to-many relationship between the Data Privacy module and a custom module called "Vendors" as an example:
- Log in as an admin user or a user with developer-level role access.
- Navigate to Admin > Studio > Data Privacy > Relationships and click "Add Relationship".
- Select "Many-to-Many" as the relationship type and select the desired module on the right-hand side, "Vendors".
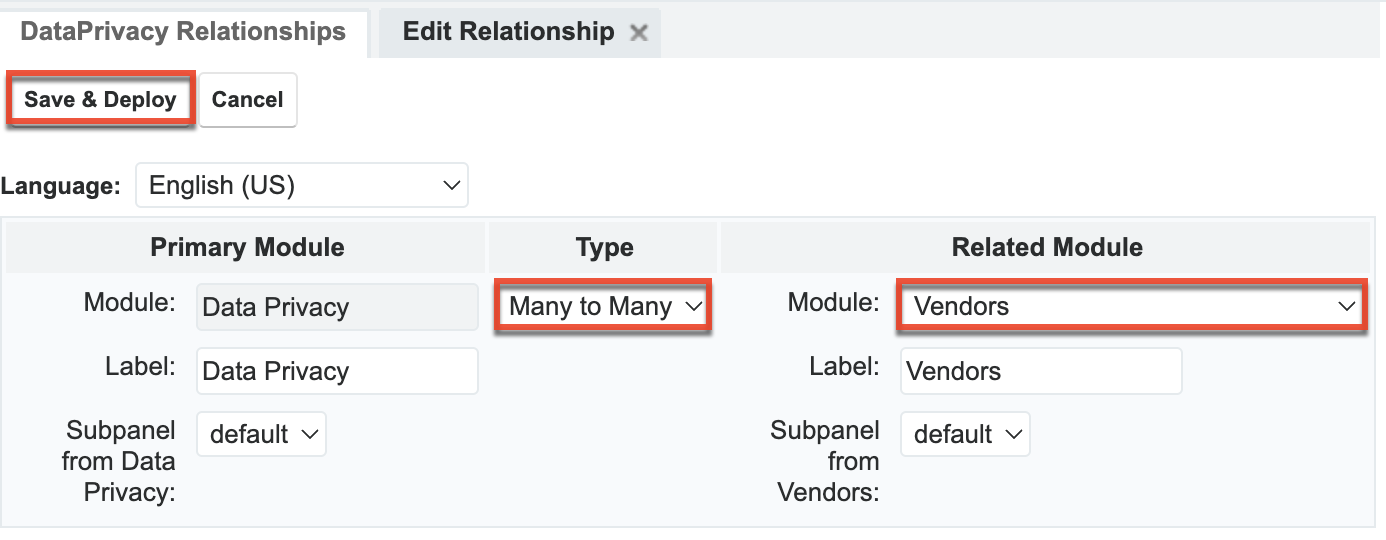
- Click the Save and Deploy button to create the relationship.
Once the relationship is created, a Data Privacy subpanel will appear when viewing vendors, and vice versa. Fields on the new module (Vendor in our example) will then need to be marked as personal information in order to fully enable the module for Sugar's data privacy functionality. For more information about creating relationships, refer to the Studio documentation.
Designating Personal Information Fields
Fields marked as personal information have additional data privacy functionality enabled as described in the Personal Information Fields section above. While Sugar has already marked some fields in the Accounts, Contacts, Leads, and Targets modules, you may need to designate additional fields or fields in additional modules as personal information to suit your organization's needs.
As an example, the following steps designate a custom Contacts module field, Spouse Name, as personal information:
- Log in as an admin user or a user with developer-level role access.
- Navigate to Admin > Studio > Contacts > Fields and open the desired field, Spouse Name.
- Enable the "Personal Information" checkbox. Doing so will automatically check and grey out the Audit option.
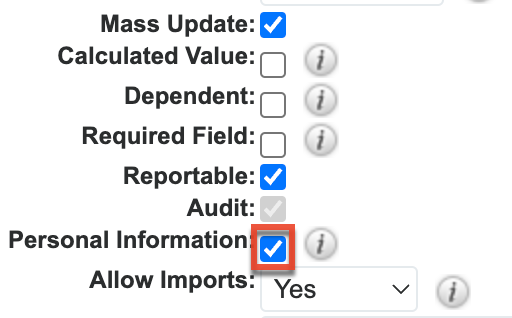
- Click "Save" to finalize your changes.
Similarly, you may wish to prevent the erasure or auditing of fields Sugar has defaulted as personal information. You can do this by disabling the Personal Information checkbox for these fields.
Fields can only be designated as personal information for modules which are enabled for auditing. Custom modules may or may not be enabled for auditing depending on how they are configured. The following stock modules do not have auditing enabled:
- Calls
- Documents
- Employees
- Meetings
- Notes
- Projects
- Users
Configuring Dropdown and Multiselect Values
The Data Privacy module includes several dropdown and multiselect fields. You may need to modify the options available for these fields to better suit your data privacy practices. Descriptions of the field meanings are available in the Data Privacy module documentation.
- Business Purposes: This multiselect field's list of values is shared by the Business Purposes field on the contacts module. Updates to its values will be reflected in both modules.
- Priority: This dropdown field can be modified as desired.
- Status: This list of values should not be modified. The Status field is set automatically when the data privacy record is rejected or completed by a user in the Data Privacy Manager role.
- Type: Some values of the Type field cannot be removed or have their Item Name property modified without disabling data privacy functionality. For more information, refer to the Type Field section below.
Use the instructions in the Steps to Complete section below to get started modifying these lists of values.
Type Field
The Data Privacy module includes a Type field which captures the nature of the privacy event or request. You may wish to add, edit, or remove Type field values in order to match the kinds of activities and requests you will need to process and record, according to your organization's needs.
Three of the out-of-the-box Type values enable additional functionality in the Data Privacy module. You can edit their display labels, but the Item Name portions of the following options must remain unchanged in order to retain the full capabilities of the module:
| Item Name (Cannot be changed) | Display Label | Functionality Enabled |
| Request to Erase Information | Request to Erase Information | Allows users in the Data Privacy Manager role to permanently erase personal information fields on records related to the data privacy record |
| Consent to Process | Consent to Process | Enables the "Business Purposes Consented for" field on the data privacy record |
| Withdraw Consent | Withdraw Consent | Enables the "Business Purposes Consented for" field on the data privacy record |
Steps to Complete
As an example, the following steps access the dataprivacy_type_dom dropdown list for modification:
- Log in as an admin user or a user with developer-level role access.
- Navigate to Admin > Studio > Data Privacy > Fields.
- Click on the Type field then click the Edit button beneath its dropdown list.
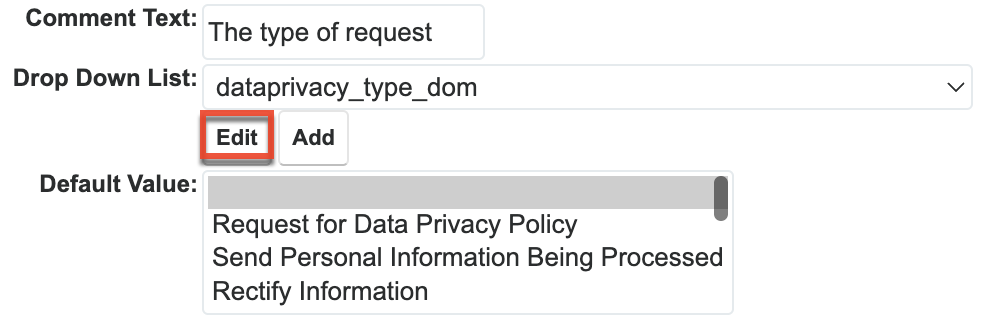
- Add, remove, or modify the list as desired, referring to the Developer Tools documentation for instructions.
Granting Data Privacy Manager Permissions
In order for non-admin users to access the full functionality of the Data Privacy module, they will need to belong to the Data Privacy Manager role or a custom role with equivalent permissions. For more information about the additional capabilities, refer to the Data Privacy Manager Role section above.
Use the following steps to add a regular user to the Data Privacy Manager role:
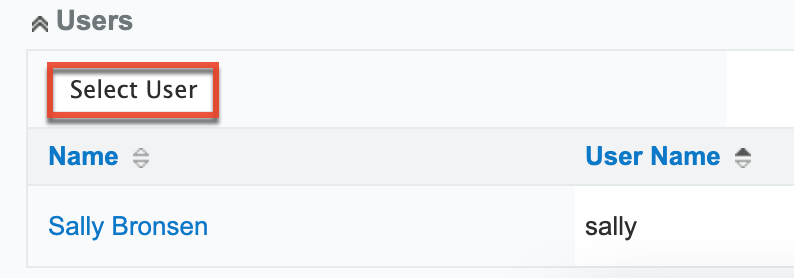
- Log in as an admin user and navigate to Admin > Role Management.
- Click the Data Privacy Manager role and scroll down to the Users subpanel.
- Click "Select Users" and select the desired user to assign them to the role.
The next time the user logs into Sugar, they will have the additional capabilities granted by the role.
Instead of using the Data Privacy Manager role, you may prefer to add the permissions it grants to an existing role. For more information about roles, refer to the Roles documentation.
Adding Consent Fields to Layouts
Starting in Sugar 8.0, the following two fields were added to the Contacts, Leads, and Targets modules:
- Business Purposes Consented For: Multiselect field which allows users to specify what business purposes (e.g., Business Communication) the individual has consented to.
- Consent Last Updated: Date field which allows users to record when consent was most recently updated.
If you wish to use these fields, they must first be added to your layouts (e.g., record views, list views, search) to make them available to users to see, edit, and filter on. For more information about editing various layouts, refer to the Studio documentation.
As an example, the following steps add the fields to the Contacts record view:
- Log in as an admin user or a user with developer-level role access.
- Navigate to Admin > Studio > Contacts > Layouts > Record View.
- Drag a new row onto the layout, then drag one or both fields onto the new row.
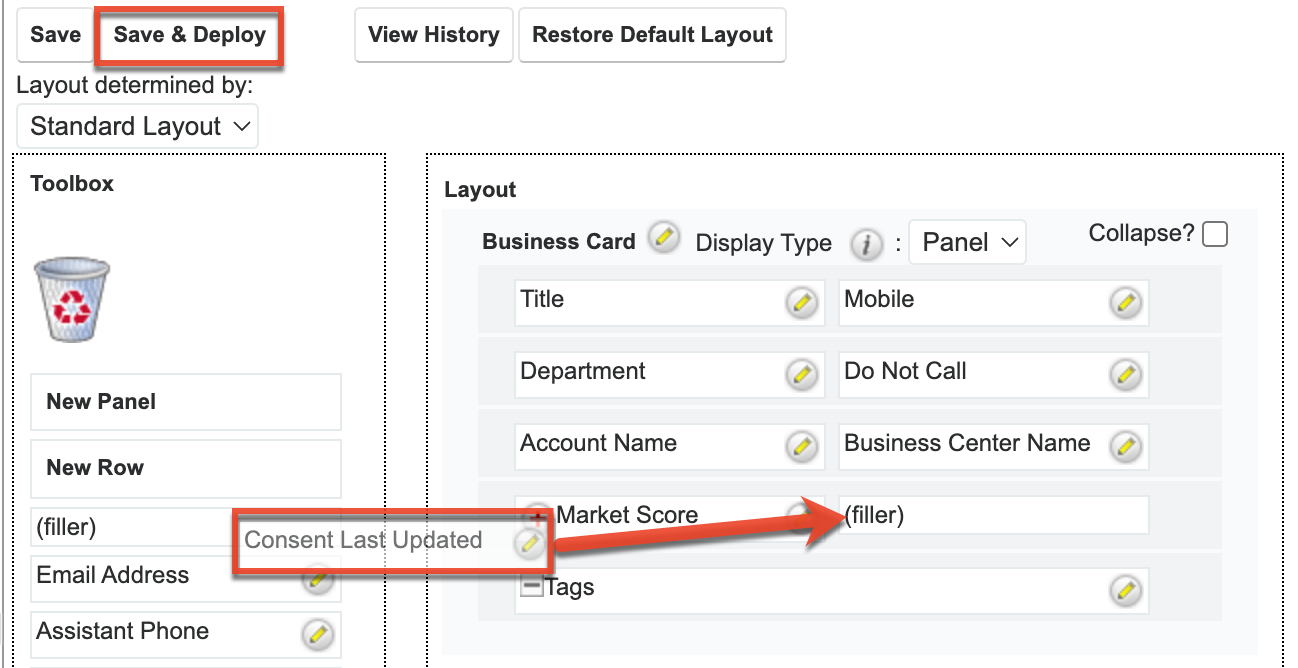
- Click "Save & Deploy" to finalize your changes.
Configuring Default Email Opt-in
Starting in Sugar 8.0, you can configure whether new email addresses added to Sugar records are automatically opted-in or opted-out. If your data privacy policy requires specific opt-ins from the individuals with whom you do business, Sugar recommends using this setting to default new email addresses to opted-out. Users will then need to manually opt the email address in once consent is received, which can be tracked via a data privacy "Consent to Process" type record. If the opt-out flag is explicitly disabled at the time the email address is created (e.g., when a customer completes a web-to-lead form and explicitly opts in), then the default will be overridden and the email address will be opted-in from the time of creation.
Use the following steps to configure all new email addresses to default to opted-out:
- Log in as an admin and navigate to Admin > System Email Settings.
- Enable the "Opt-out new email addresses by default" checkbox.

- Click "Save" to finalize your changes.
Note: This default will only be applied to new email addresses added to Sugar after the checkbox has been enabled. Existing email addresses are unaffected.
End User Steps
Depending on your organization's data privacy practices, regular users may be responsible for a variety of data privacy activities. The following sections cover creating and servicing data privacy records, tracking consent, and providing an individual's personal information.
Creating Data Privacy Records
Regular users have the ability to create data privacy records in order to track data privacy events or to start the process of servicing a data privacy request from an individual with whom your organization does business. For information about creating and modifying data privacy records, refer to the Data Privacy module documentation. While all users are able to create data privacy records and link any relevant records (e.g., contact records) to the data privacy records, only admin users or users in the Data Privacy Manager role are able to close the record and, in the case of an erasure request, perform the data erasure.
Your use of the data privacy module will depend on your organization's practices. The following steps cover creating an erasure request and linking relevant person-type records as an example:
- Upon receiving the individual's request for your organization to erase their information, perform a global search for the name, email address, or other provided personal information.

- Navigate to one of the matching records, a contact in this example, by clicking the record's name.
- Scroll down to the Data Privacy subpanel and click the plus icon at the upper right of the subpanel.

- Complete any desired fields and set the Type to "Request to Erase Information".
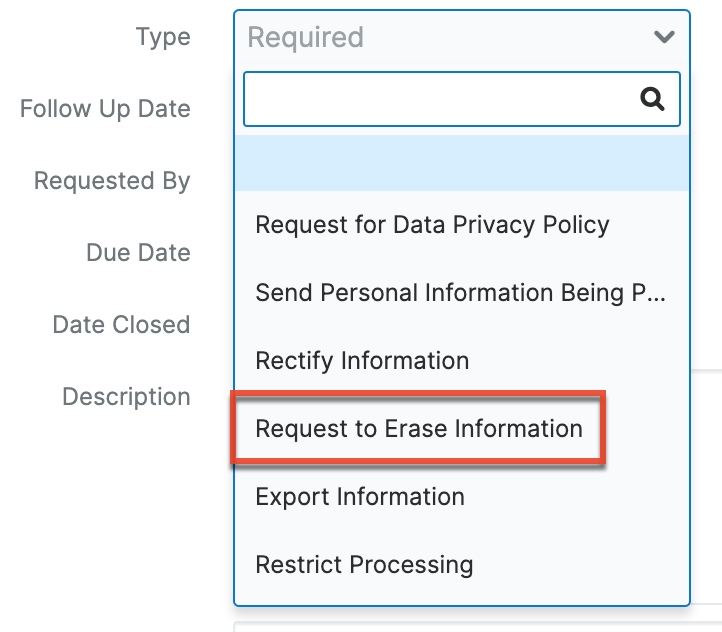
- Click "Save" to create the data privacy record.
The contact you created the data privacy record from will automatically be related and appear in the subpanels of the data privacy record. If additional Sugar records contain this individual's personal information, link these additional records in the relevant subpanel beneath the data privacy record's basic information. Consult your organization's data privacy policies to determine which types of information should be erased and which should be preserved. For example, many organizations require preserving transactional business information while erasing records used solely for future marketing.
Users acting as Data Privacy Managers can then validate the request for erasure and either reject the record or complete the erasure.
Servicing Data Privacy Records
While only users in the Data Privacy Manager role are able to close data privacy requests, regular users have the ability to take action on requests and data privacy events. By performing the necessary actions, logging the steps taken in the Work Log and Resolution fields, and reassigning the record, users can prepare the record for the Data Privacy Manager to evaluate and close as "Completed" or "Rejected" as needed.
As an example, the following steps cover the servicing of a data privacy request of the type "Rectify Information":
- Navigate to the data privacy record and click "Edit" in the upper right corner.
- Update the record's fields including the following example values:
- Work Log: Record the actions you have taken to update the individual's information (e.g., updating the contact record's Birthdate and Phone Number fields).
- Resolution: State that the individual's information has been corrected as requested.
- Assigned To: The Data Privacy Manager who can review and mark the record as "Completed".
After saving your changes, the assigned Data Privacy Manager can then mark it as "Completed".
Tracking Consent
The Data Privacy module includes two stock type values related to consent, "Consent to Process" and "Withdraw Consent". When either type is selected, the Business Purposes Consented For field will appear. These consent-related record types can be used in combination with other fields on the data privacy module to track the process of gaining consent, record consent that has already been received, and record the loss of consent, as described below.
Note: The business purposes an individual has consented to can be stored directly on the person-type record in order to make a current, consolidated list available. The Business Purposes Consented For field is available for admins to add to the Contacts, Leads, and Targets module starting in Sugar 8.0, though admins may also create a custom field on any module to accommodate this purpose. If this is part of your organization's data privacy strategy, the list should be updated each time consent is gained or lost.
Tracking the Gaining of Consent
Your organization's data privacy policies when consent is required from an individual. For many organizations, due to regulations such as GDPR, consent must be received within a certain time limit from when the individual's information is acquired.
As an example, the following steps will walk through tracking the process of gaining consent within 30 days of acquiring an individual's information, for the purpose of sending marketing communications by your organization only:
- After saving the newly created Sugar contact containing the individual's information, scroll to the Data Privacy subpanel and click the plus icon in the upper right of the subpanel.
- Set any desired fields including the following example values:
- Type: Consent to Process
- Assigned To: The Sugar user responsible for actioning and following up on this attempt to gain consent
- Due Date: 30 days from today, the date by which consent must be received from the individual
- Business Purposes Consented For: "Marketing communications by company"
- Contact the individual (e.g., by sending an email) to request their consent for the desired business purpose and record your actions in the Work Log field.
- If the individual provides their consent, complete the Resolution field with details about how the consent was received and assign the record to your organization's Data Privacy Manager who can then mark it as "Completed".
- If consent is not received prior to the due date, complete the Resolution field with this result and assign the record to your organization's Data Privacy Manager who can then mark it as "Rejected".
Recording Consent
The data privacy module can also be used to capture consent acquired outside of Sugar.
The following steps cover recording existing consent for the purpose of sending marketing communications by your organization and its partners:
- Open the individual's record (e.g., contact) in record view.
- Scroll to the Data Privacy subpanel and click the plus icon in the upper right of the subpanel.
- Set any desired fields including the following example values:
- Type: Select "Consent to Process".
- Business Purposes Consented For: Select "Marketing communications by company" and "Marketing communications by partners".
- Resolution: Specify how and when the individual provided their consent for these business purposes.
- Assigned To: The Data Privacy Manager who can review and mark the record as "Completed".
After saving the record, it will be assigned to your organization's Data Privacy Manager who can then mark it as "Completed".
Losing Consent
There may be times when an individual contacts your organization to withdraw their consent after they had already given it. Alternatively, you may no longer have a legitimate business need for the business purposes for which you had previously received consent. In both cases, the loss of consent and any resulting actions can be recorded in a data privacy module of the type "Withdrawal of Consent".
The following steps cover recording the loss of consent for the purpose of sending marketing communications by your organization's partners:
- Open the individual's record (e.g., contact) in record view.
- Scroll to the Data Privacy subpanel and click the plus icon in the upper right of the subpanel.
- Set any desired fields including the following example values:
- Type: Withdrawal of Consent
- Business Purposes Consented For: "Marketing communications by partners"
- Resolution: Specify how and when the individual withdrew their consent for this business purpose
- Work Log: Record the actions you have taken in response to this loss of consent (e.g., marking the email address as opted-out or generating a separate erasure request) according to your organization's data privacy practices.
- Assigned To: The Data Privacy Manager who can review and mark the record as "Completed"
After saving the record, it will be assigned to your organization's Data Privacy Manager who can then mark it as "Completed".
Providing an Individual's Personal Information
Depending on your organization's data privacy procedures, there may be occasions when you need to provide a list of all personal information being processed for an individual. For example, servicing a data privacy record of types "Send Personal Information Being Processed" or "Export Information" may include delivering a list of the personal information your organization has stored to the data subject. This can be accomplished via the View Personal Info option or via an export as detailed below. For more information about working with fields containing personally identifying information, refer to the Personal Information Fields section above.
Exporting All Fields
Sugar's export functionality can be used to produce a CSV file of all field values available for a particular Sugar record (e.g., contact). The fields containing personal information will be included in the exported file, in addition to all other fields belonging to the record.
The following steps cover exporting a contact as an example:
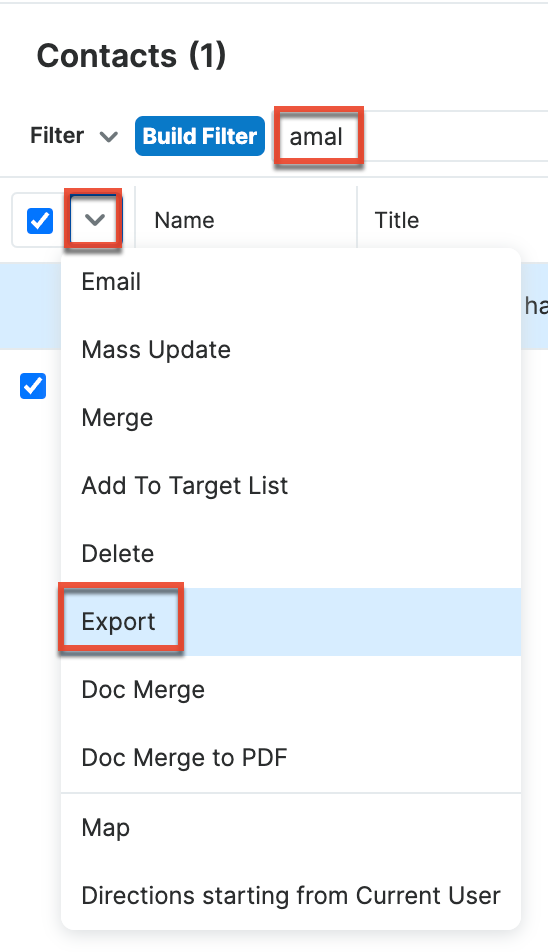
- Navigate to the Contacts module list view.
- Use search or a filter to locate the desired contact.
- Enable the checkbox to the left of the relevant contact and choose "Export" from the mass actions menu.
A CSV file will download to your computer which can then be provided to the individual making the request. Non-personal-information fields can be deleted from the spreadsheet prior to delivery should you wish to limit the information being sent. For more information about exporting, refer to the Export documentation.
Copying Personal Information Fields
Starting in Sugar 8.0, modules containing one or more fields marked as personal information include a View Personal Info option on the record view. The View Personal Info screen includes the current field values as well as the source and date each value was set. This screen can be captured or copied and pasted in order to deliver these field values to the individual making the request.
Use the following steps to copy the View Personal Info screen for an individual:
- Open the individual's Sugar record (e.g., contact) in record view.
- Select "View Personal Info" from the actions menu.
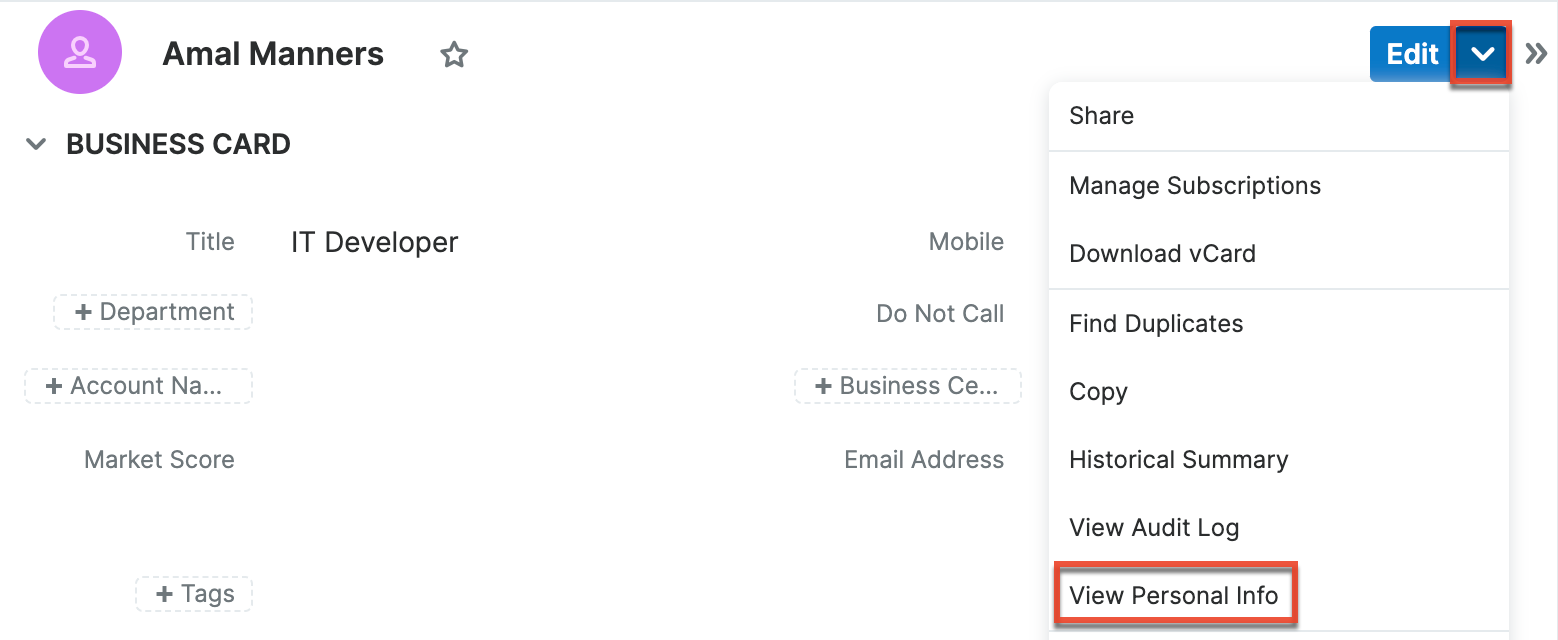
- Drag your cursor to highlight the entire table and copy the highlighted information.
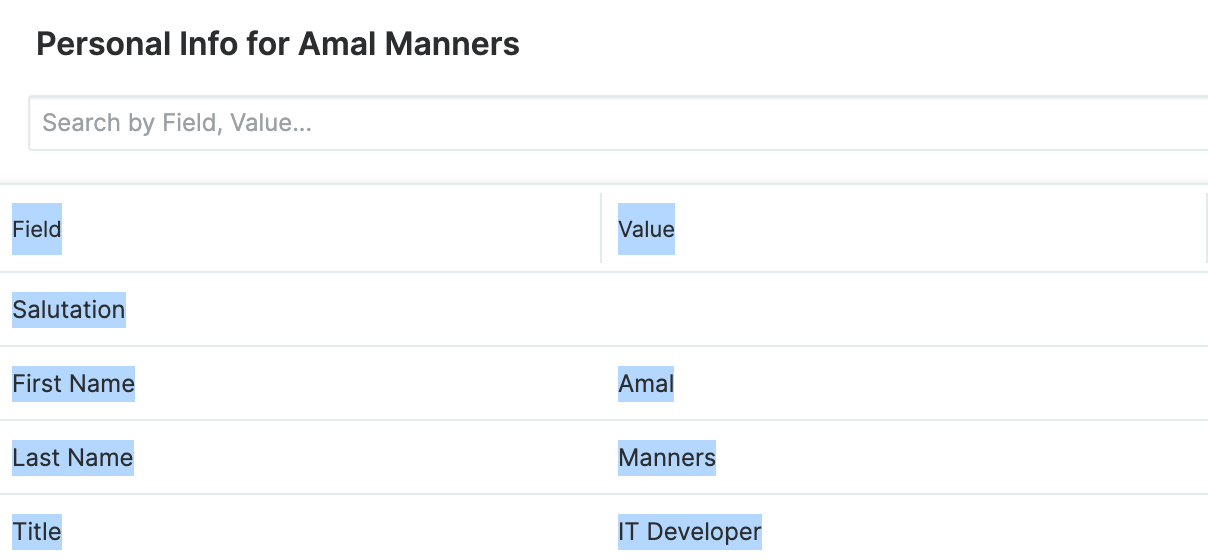
The information can then be pasted to a document or spreadsheet then sent to the requesting individual.
Data Privacy Manager Steps
Certain functionality in the Data Privacy module is only available to admins and users in the Data Privacy Manager role (or with equivalent role access), as described below.
Closing Data Privacy Records
Only admins or users in the Data Privacy Manager role have the ability to close data privacy records. Regular Sugar users can create and work with data privacy records as explained in the End User Steps section. In order to close out the record and, in the case of erasure requests, execute the erasure, a Data Privacy Manager will need to take action.
Instructions for completing data privacy records of the type "Request to Erase Information" which are valid requests are provided in the Permanently Erasing Data section.
Data privacy records of other types which are valid and have been processed can be closed by clicking the green Complete button in the header. Doing so will update the record's status to "Completed".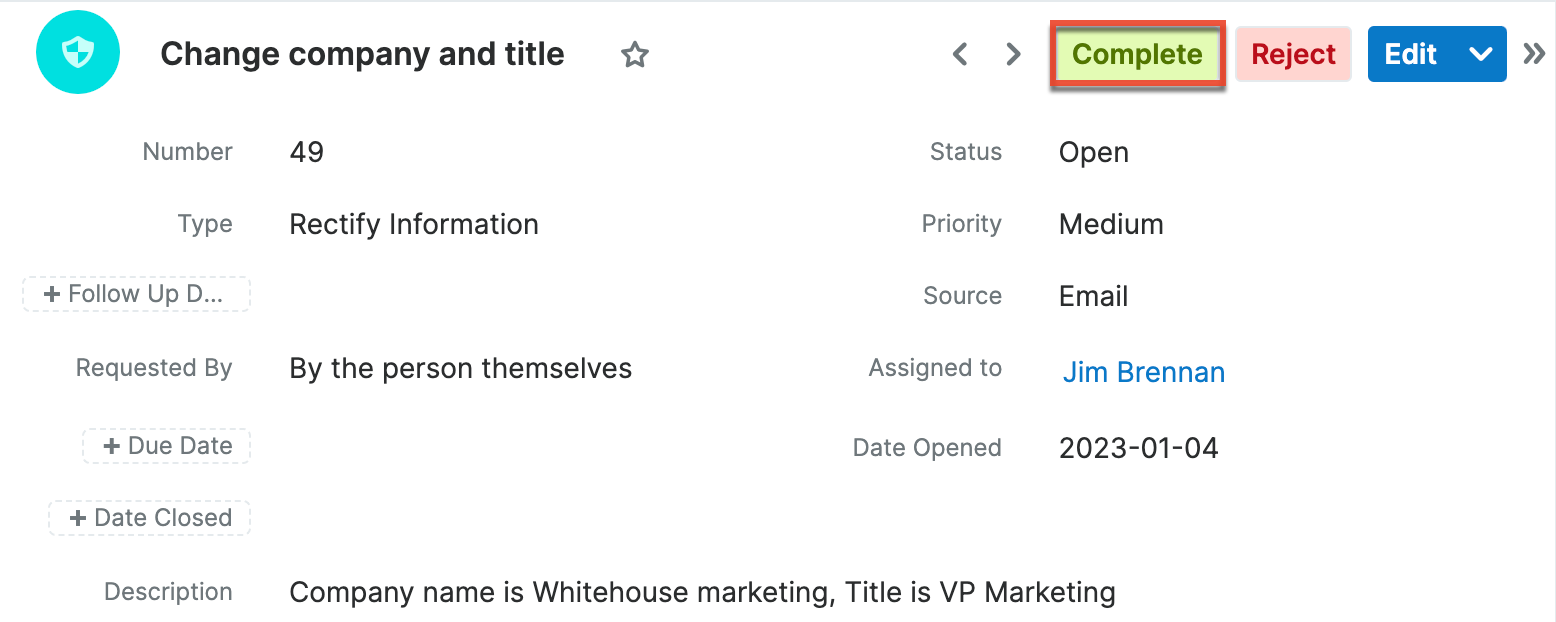
Data privacy records of any type which are not valid and will not be acted upon can be closed by clicking the red Reject button in the header. Doing so will set the status to "Rejected".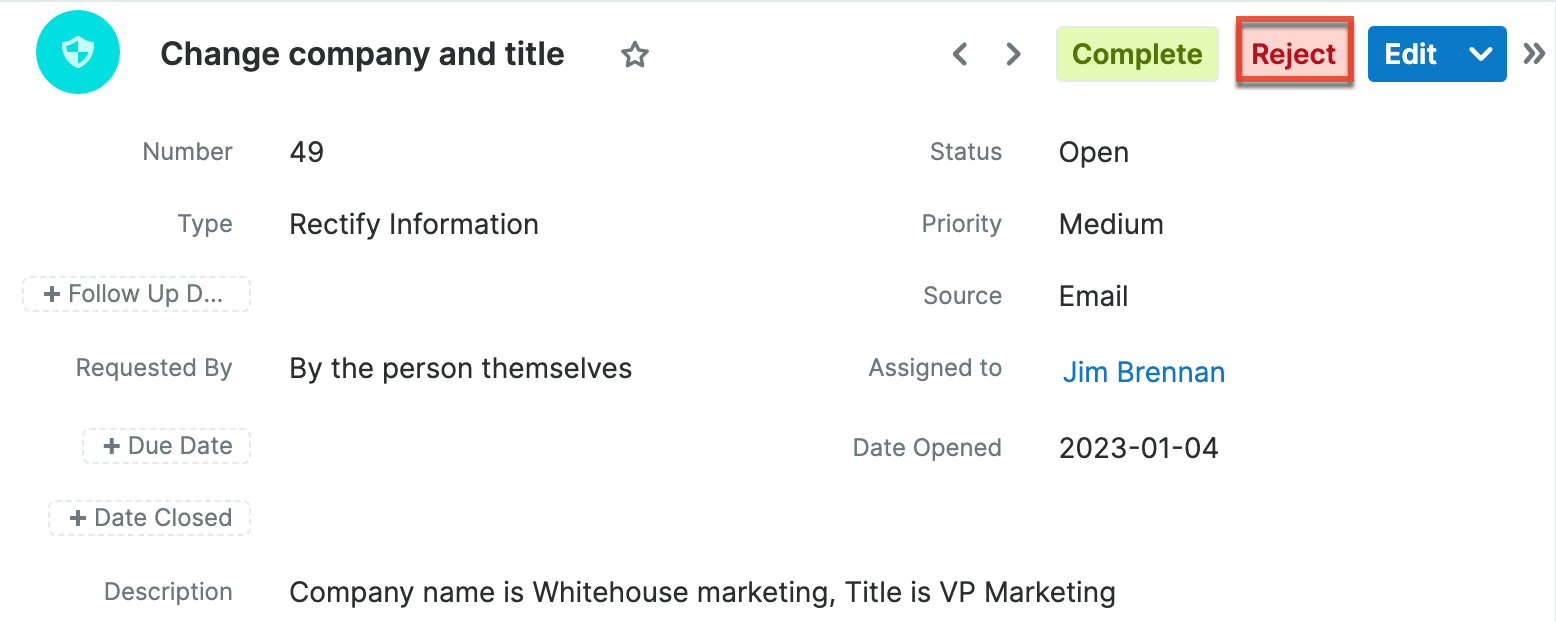
Once a data privacy record is closed, either as "Completed" or "Rejected", the status can no longer be changed and the buttons are no longer available in the record's header.
Permanently Erasing Data
There may be occasions when you need to immediately remove information from your Sugar database. One example is fulfilling a request to erase someone's personal information. For detailed information about data erasure in Sugar and the prerequisites to performing an erasure, refer to the Permanent Erasure of Data section above. This section focuses on the steps a Data Privacy Manager takes to perform an erasure.
The creation of the data privacy record and linking of relevant records requiring erasure can be handled by any Sugar user as described in the Creating Data Privacy Records section. The erasure actions themselves can only be performed by a user in the Data Privacy Manager role or an admin user.
Once the data privacy record has been created and all records that require erasure have been linked to it, use the following steps to complete the erasure and close the data privacy record:
- Log in as a user in the Data Privacy Manager role or as an admin user.
- Navigate to the relevant data privacy record and open it in record view.
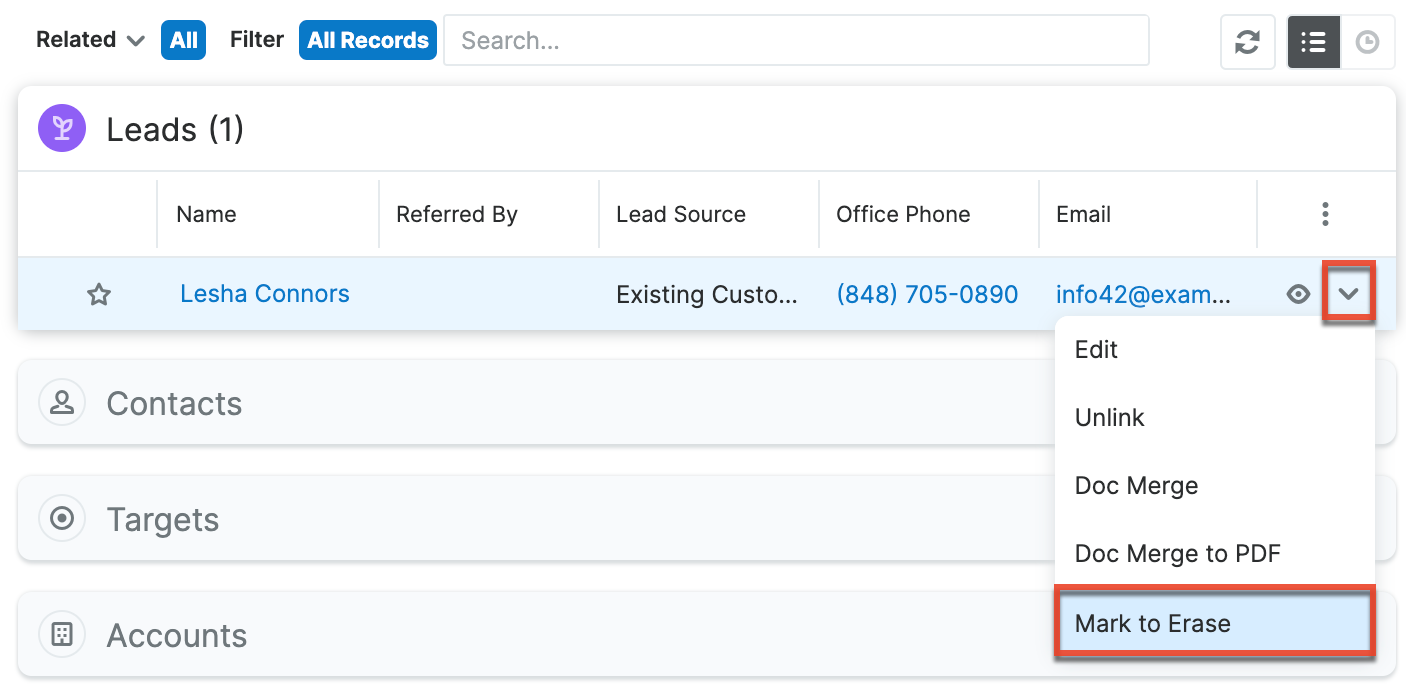
- Scroll down to the subpanels and complete the following steps for each related record:
- Select the Mark to Erase option from the record's row actions.
- Enable the checkboxes of the fields you wish to erase or click the checkbox at the top right to mark all of the record's personal information fields for erasure.
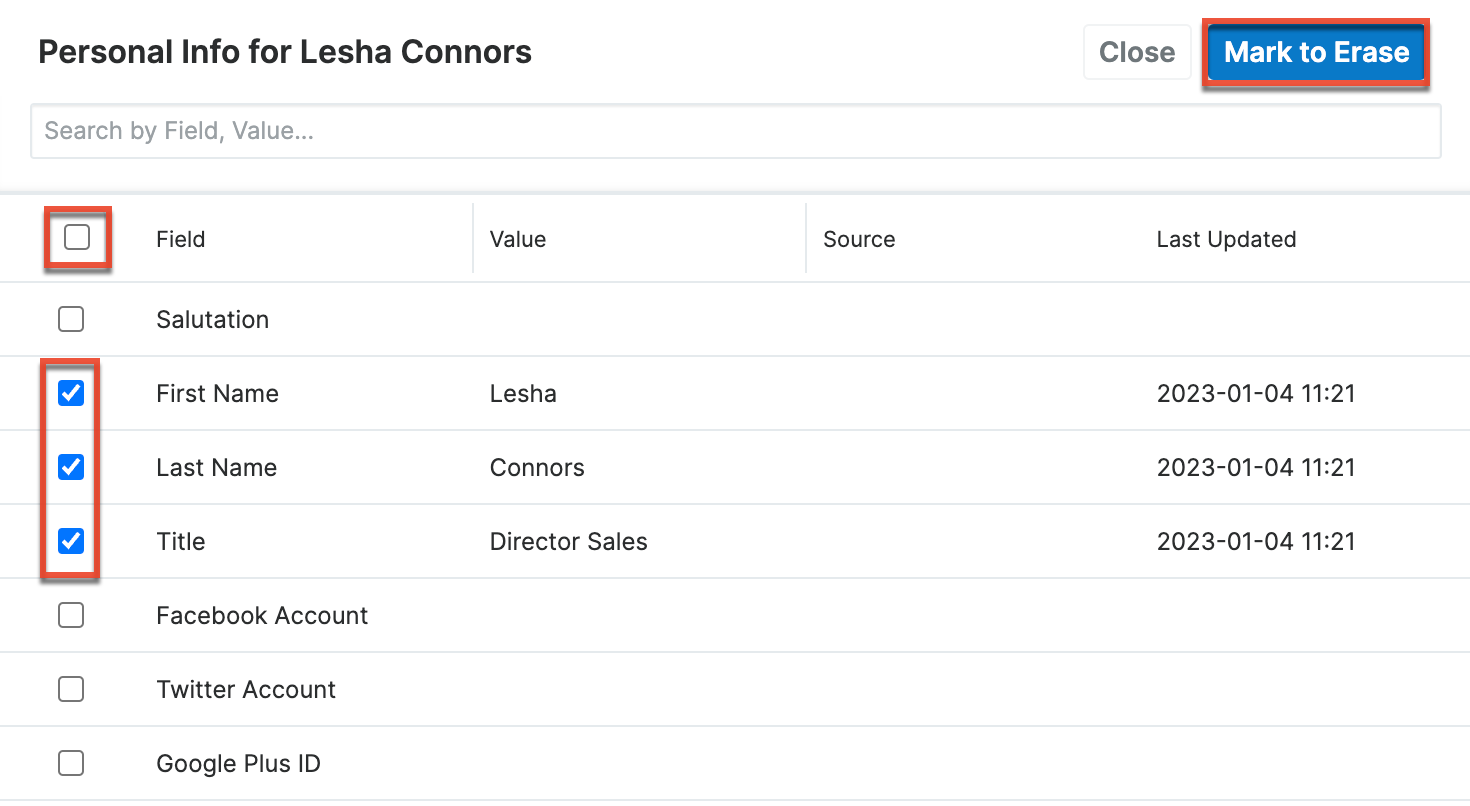
- Click the Mark to Erase button to finish your selections for this record.
- Repeat this procedure for each related record that requires erasure.
- Select the Mark to Erase option from the record's row actions.
- Review the Records Marked for Erasure dashlet to confirm records and field counts that will be erased.

- Click the Erase & Complete button in the header of the data privacy record.
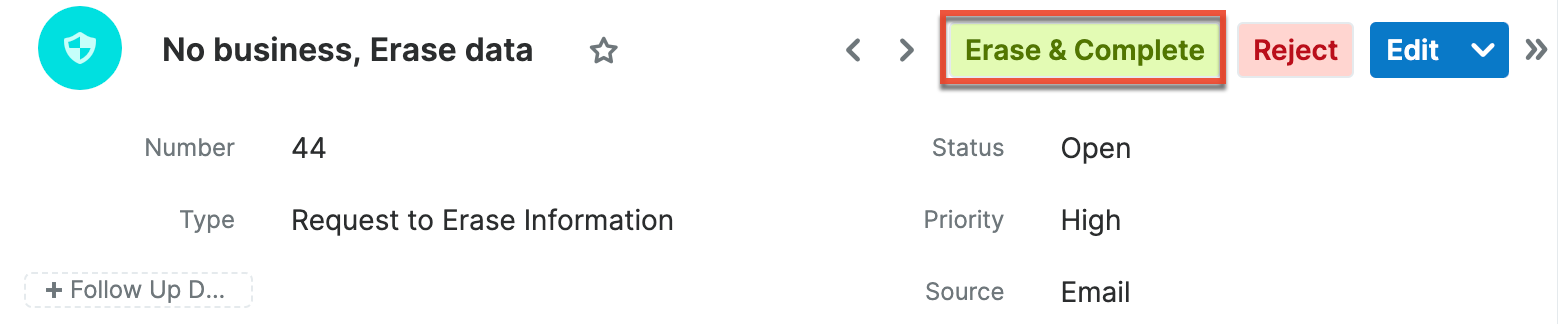
Once the erasure finishes, the data privacy record's status will automatically be changed to "Complete". The status can no longer be changed, and the "Erase & Complete" and "Reject" buttons will no longer be available.
If the confirmation message you are shown when clicking "Erase & Complete" says "You are about to permanently erase 0 field(s)", please click "Cancel" and use the instructions in step 3 above to select fields to erase via the subpanels.