Integrating With Google for Admins
Overview
Sugar's Google connector allows users to import their Google contacts to Sugar (for Sugar versions 14.0 and higher), link documents in Sugar to documents stored on the Google Drive online storage service, and beginning with Sugar 12.0.0, access Google Drive files via the Cloud Drive dashlet. Beginning with versions 10.0.3 and 9.0.5, the connector also allows Sugar to connect to Google mail via OAuth2 when the system email settings, outgoing user email accounts, and inbound mail accounts are configured.
This article will cover the administrator's configuration of the Google connector which must be completed before users can enable and use the connector and/or configure Sugar's system email settings/outgoing user email accounts using Google mail. Information on enabling the connector for user accounts and utilizing the Google connector is available in the Integrating With Google for End Users article. For information on configuring the system's outbound email settings, system inbound email accounts, and the outgoing user email accounts, refer to the Email and Emails documentation in the Administration Guide and Application Guide, respectively. For more information on using cloud drives in Sugar, refer to the Cloud Drive documentation.
Prerequisites
- You must be an administrator user to enable the Google connector for your instance.
- You must have an active Google or Google Apps account to configure the Google connector for your instance.
Steps to Complete
Before users may connect their Google accounts to Sugar, an admin user must complete the initial, system-wide Google connector configuration. The following sections explain how the administrator can acquire the proper API credentials from Google and use those credentials to set up the connector in Sugar. For information on how users can then connect their individual Google accounts to their Sugar user profiles, please refer to the Integrating With Google for End Users article.
Enabling Google APIs and Creating Credentials
To set up the Sugar Google connector, you must first enable the appropriate Google APIs and create credentials to obtain a Client ID and Client Secret. To allow users to use the Cloud Drive dashlet, you will need to enable only the "Google Drive API", as covered in step 17 below. To allow users to import the Google contacts to Sugar, you will need to enable the "Google Drive API" and "Google People API" (for Sugar versions 14.0 and higher), as covered in step 18 of the instructions below. Beginning with versions 10.0.3 and 9.0.5, you can enable the "Gmail API", as covered in step 19 below, which will allow you to configure Sugar's system email settings (outbound, inbound) and outgoing user email accounts using Google mail once the connector has been configured.
- Navigate to the Google Developers site in your web browser.
- Sign in using the Google account under which you would like to register the application.
- Create a new project using one of the following methods:
- Via the Manage resources or Dashboard page:
- Click the Create Project button.
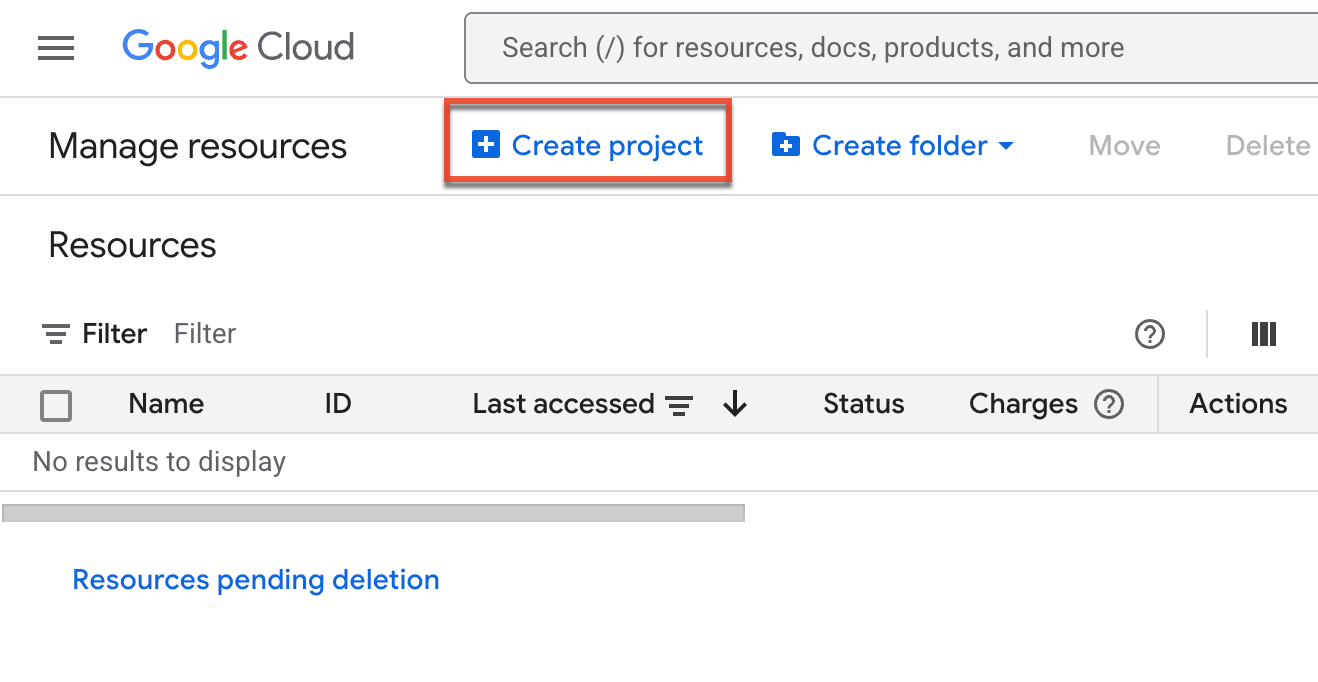
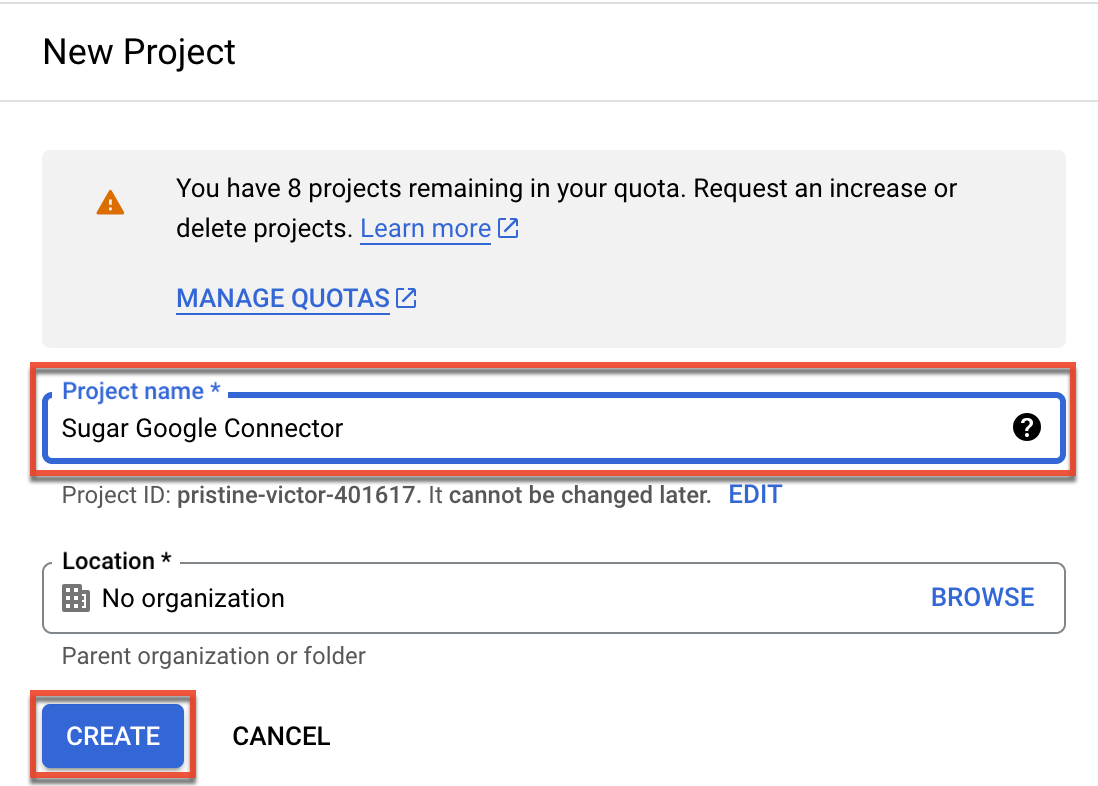
- Enter a project name of your choice (e.g., Sugar Google Connector) and click "Create".
- Click the Create Project button.
- Via the Select a project menu in the navigation bar:
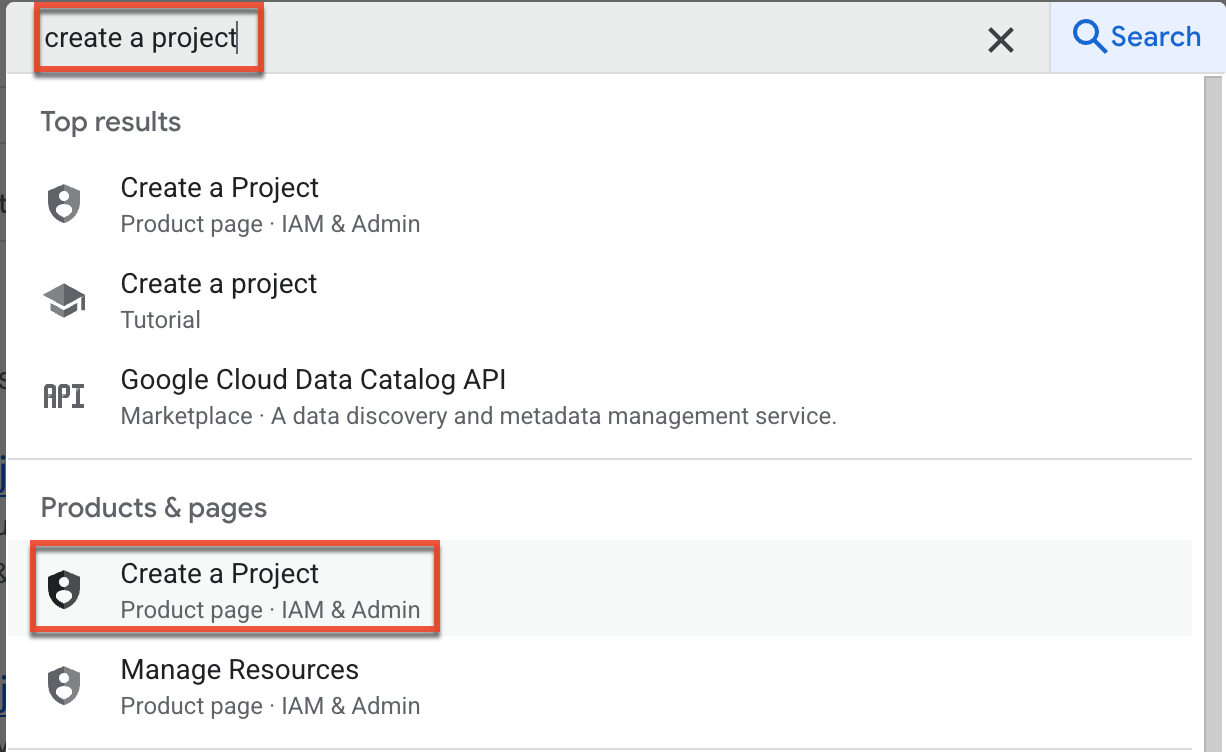
- If you do not see the Create Project button, type "create a project" into the navigation bar and select the appropriate option from the resulting options.
- Enter a project name of your choice (e.g., Sugar Google Connector) and then click "Create".
- If you do not see the Create Project button, type "create a project" into the navigation bar and select the appropriate option from the resulting options.
- Via the Manage resources or Dashboard page:
- Click the Google Cloud Platform text in the top left of the screen and ensure that you are working in your newly created project (e.g., Sugar Google Connector). Click "Dashboard" to open the dashboard.

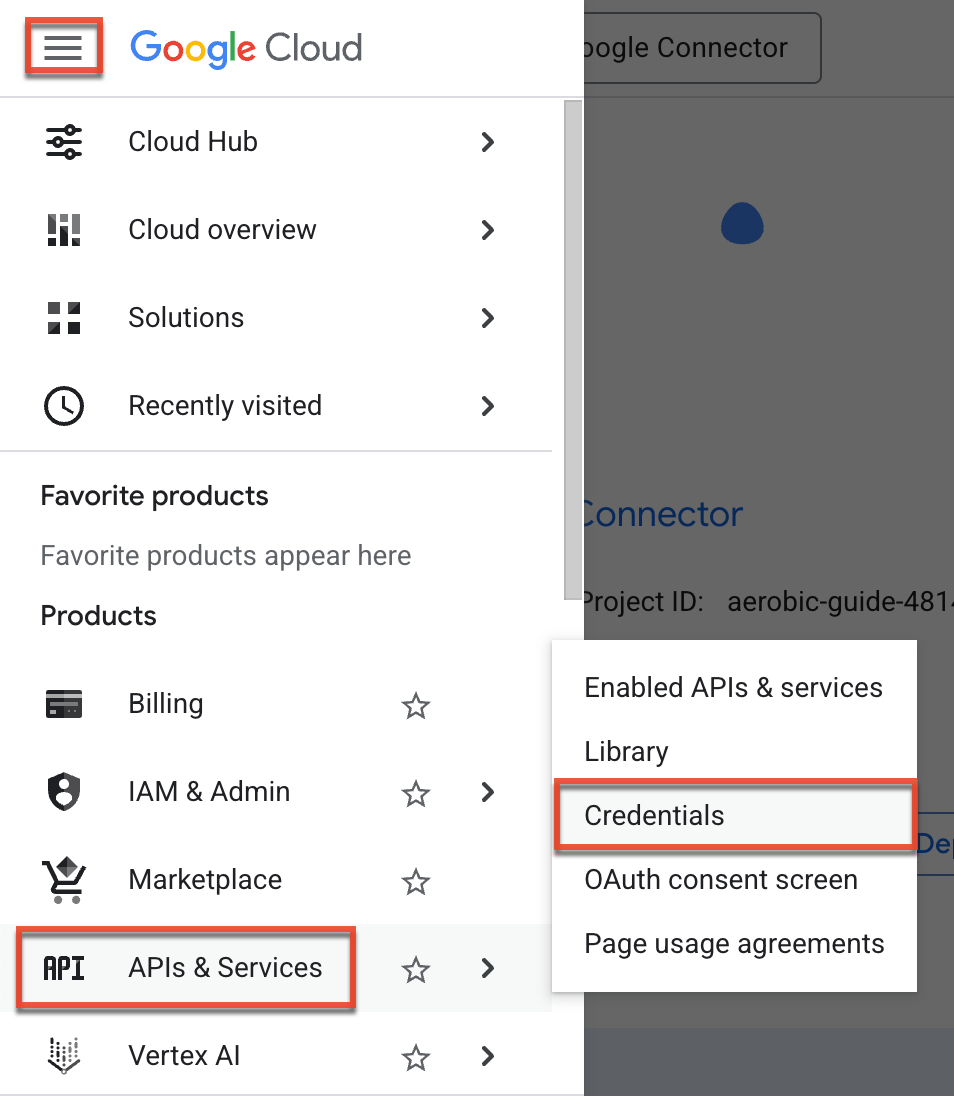
- Click the Navigation menu icon (three-lines icon) in the top left corner of the page, open the "APIs & Services" menu, and click on "Credentials".
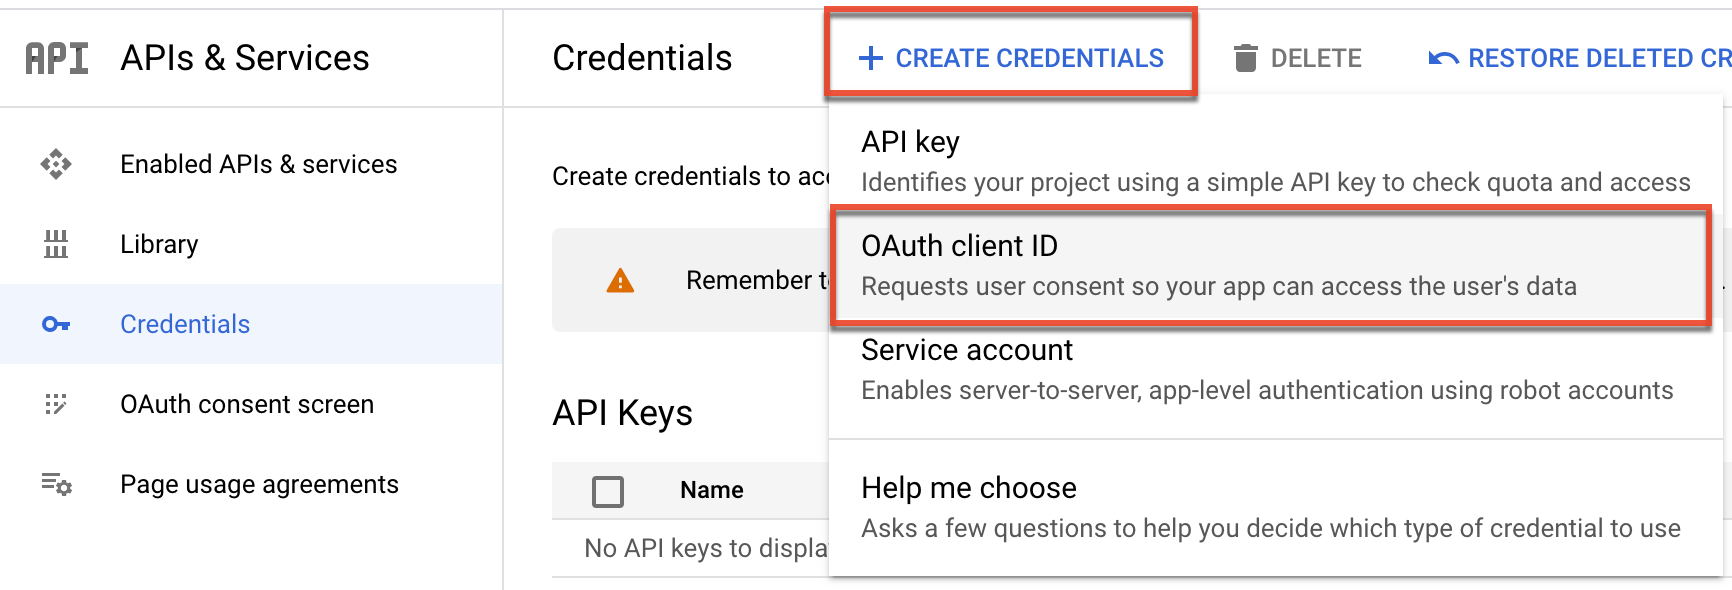
- On the Credentials page, click "+ Create Credentials" and then select "OAuth client ID" for the credential type.
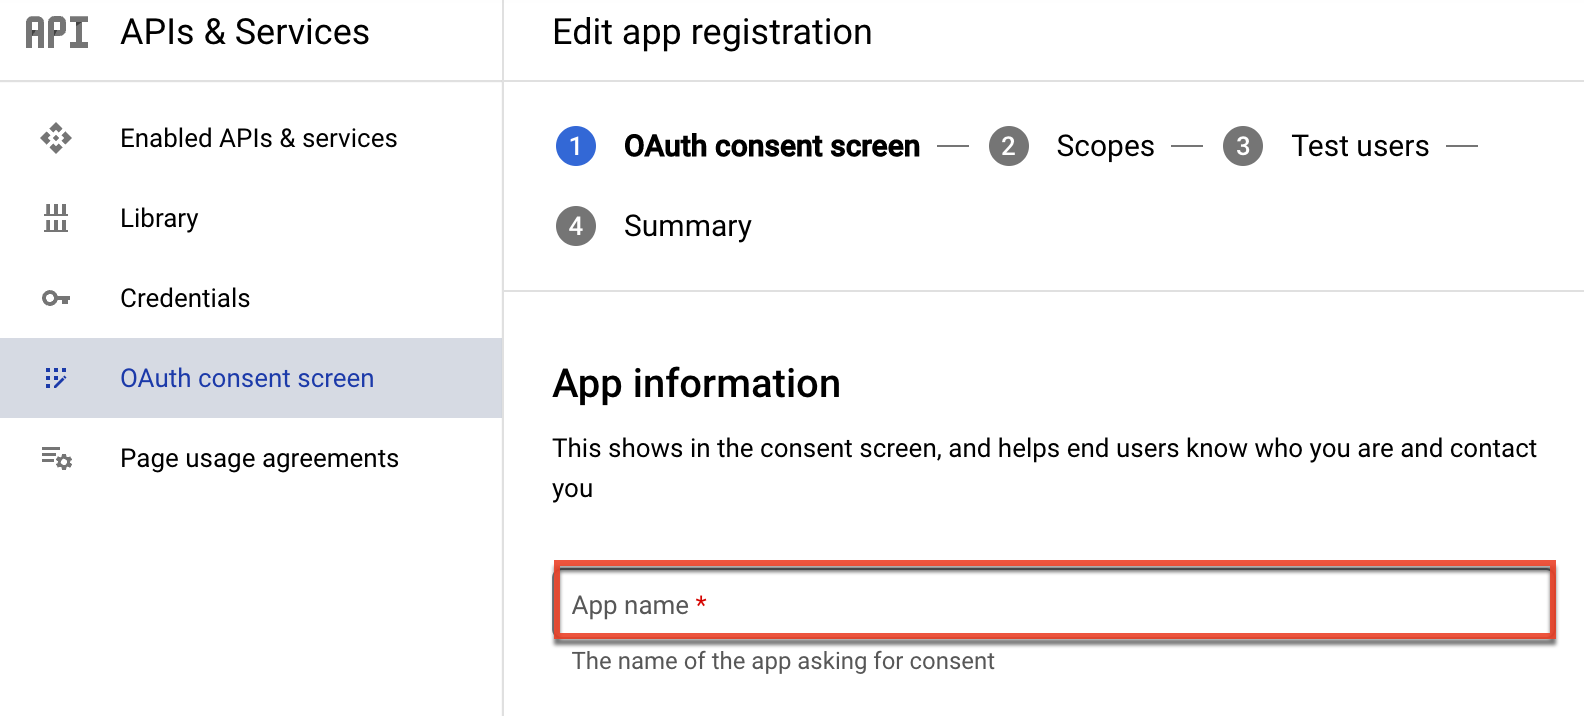
- If this is your first API project, Google will prompt you to configure the OAuth consent screen first. Users will see this screen when your application requests access to their private data. Click "Configure Consent Screen". If you have already configured the consent screen, proceed to step 14.

- Provide the required information in the fields marked with an asterisk (e.g., App name) then click "Save and Continue".
- Enter your desired contact email on the "Contact Information" screen and select "Next".
- Check the box on the Finish screen and select "Continue".
- Select "Create".
- Select "Audience" from the left-hand menu, then select "Internal" as the user type if you want to restrict access to only users in the same organization (based on email address). Select "External" as the user type if you want to allow users outside the organization to have access. Click "Create".
Note: If you do not have a Google Workspace account, you must choose "External". - On the "Test users" section of the Audience Page, if the user type is external and the user that will test the application in Sugar will use an email address that is part of the organization, you do not need to add anything on this page. If the user type is external and the test user will use an email address that is not part of the organization, you must enter the email address by clicking "+ Add Users" to give access to the application. Then, click "Save and Continue".

- Now, click "Clients" on the left side menu, click "+ Create Client", and select "OAuth client ID".

- Select "Web application" on the "Create OAuth client ID" screen, then enter the Authorized redirect URI:
{Your Sugar URL}/index.php?module=EAPM&action=GoogleOauth2Redirect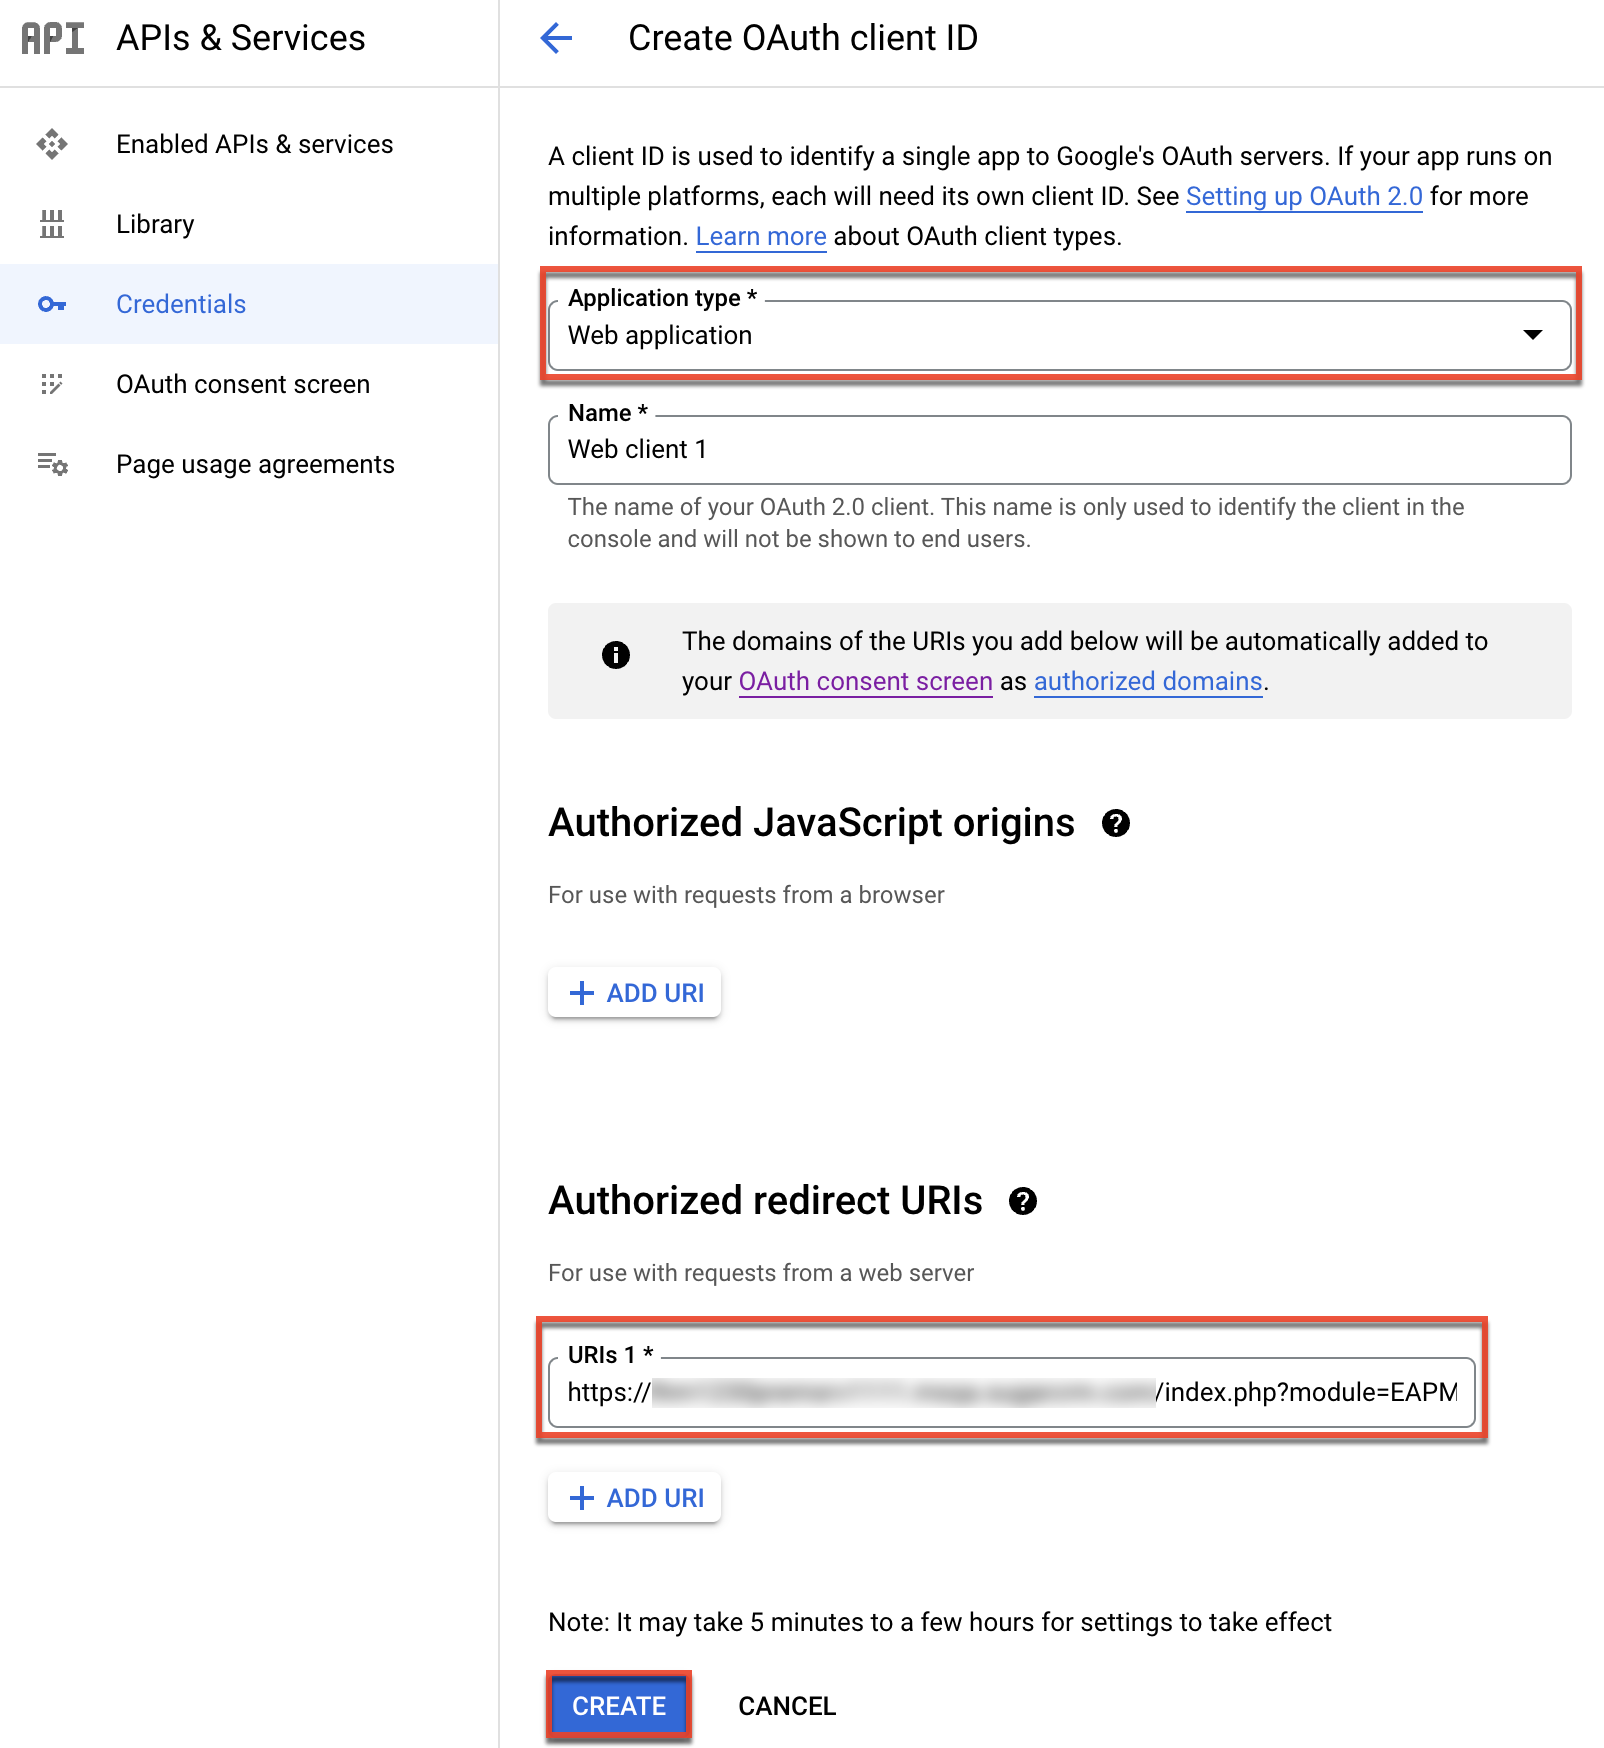
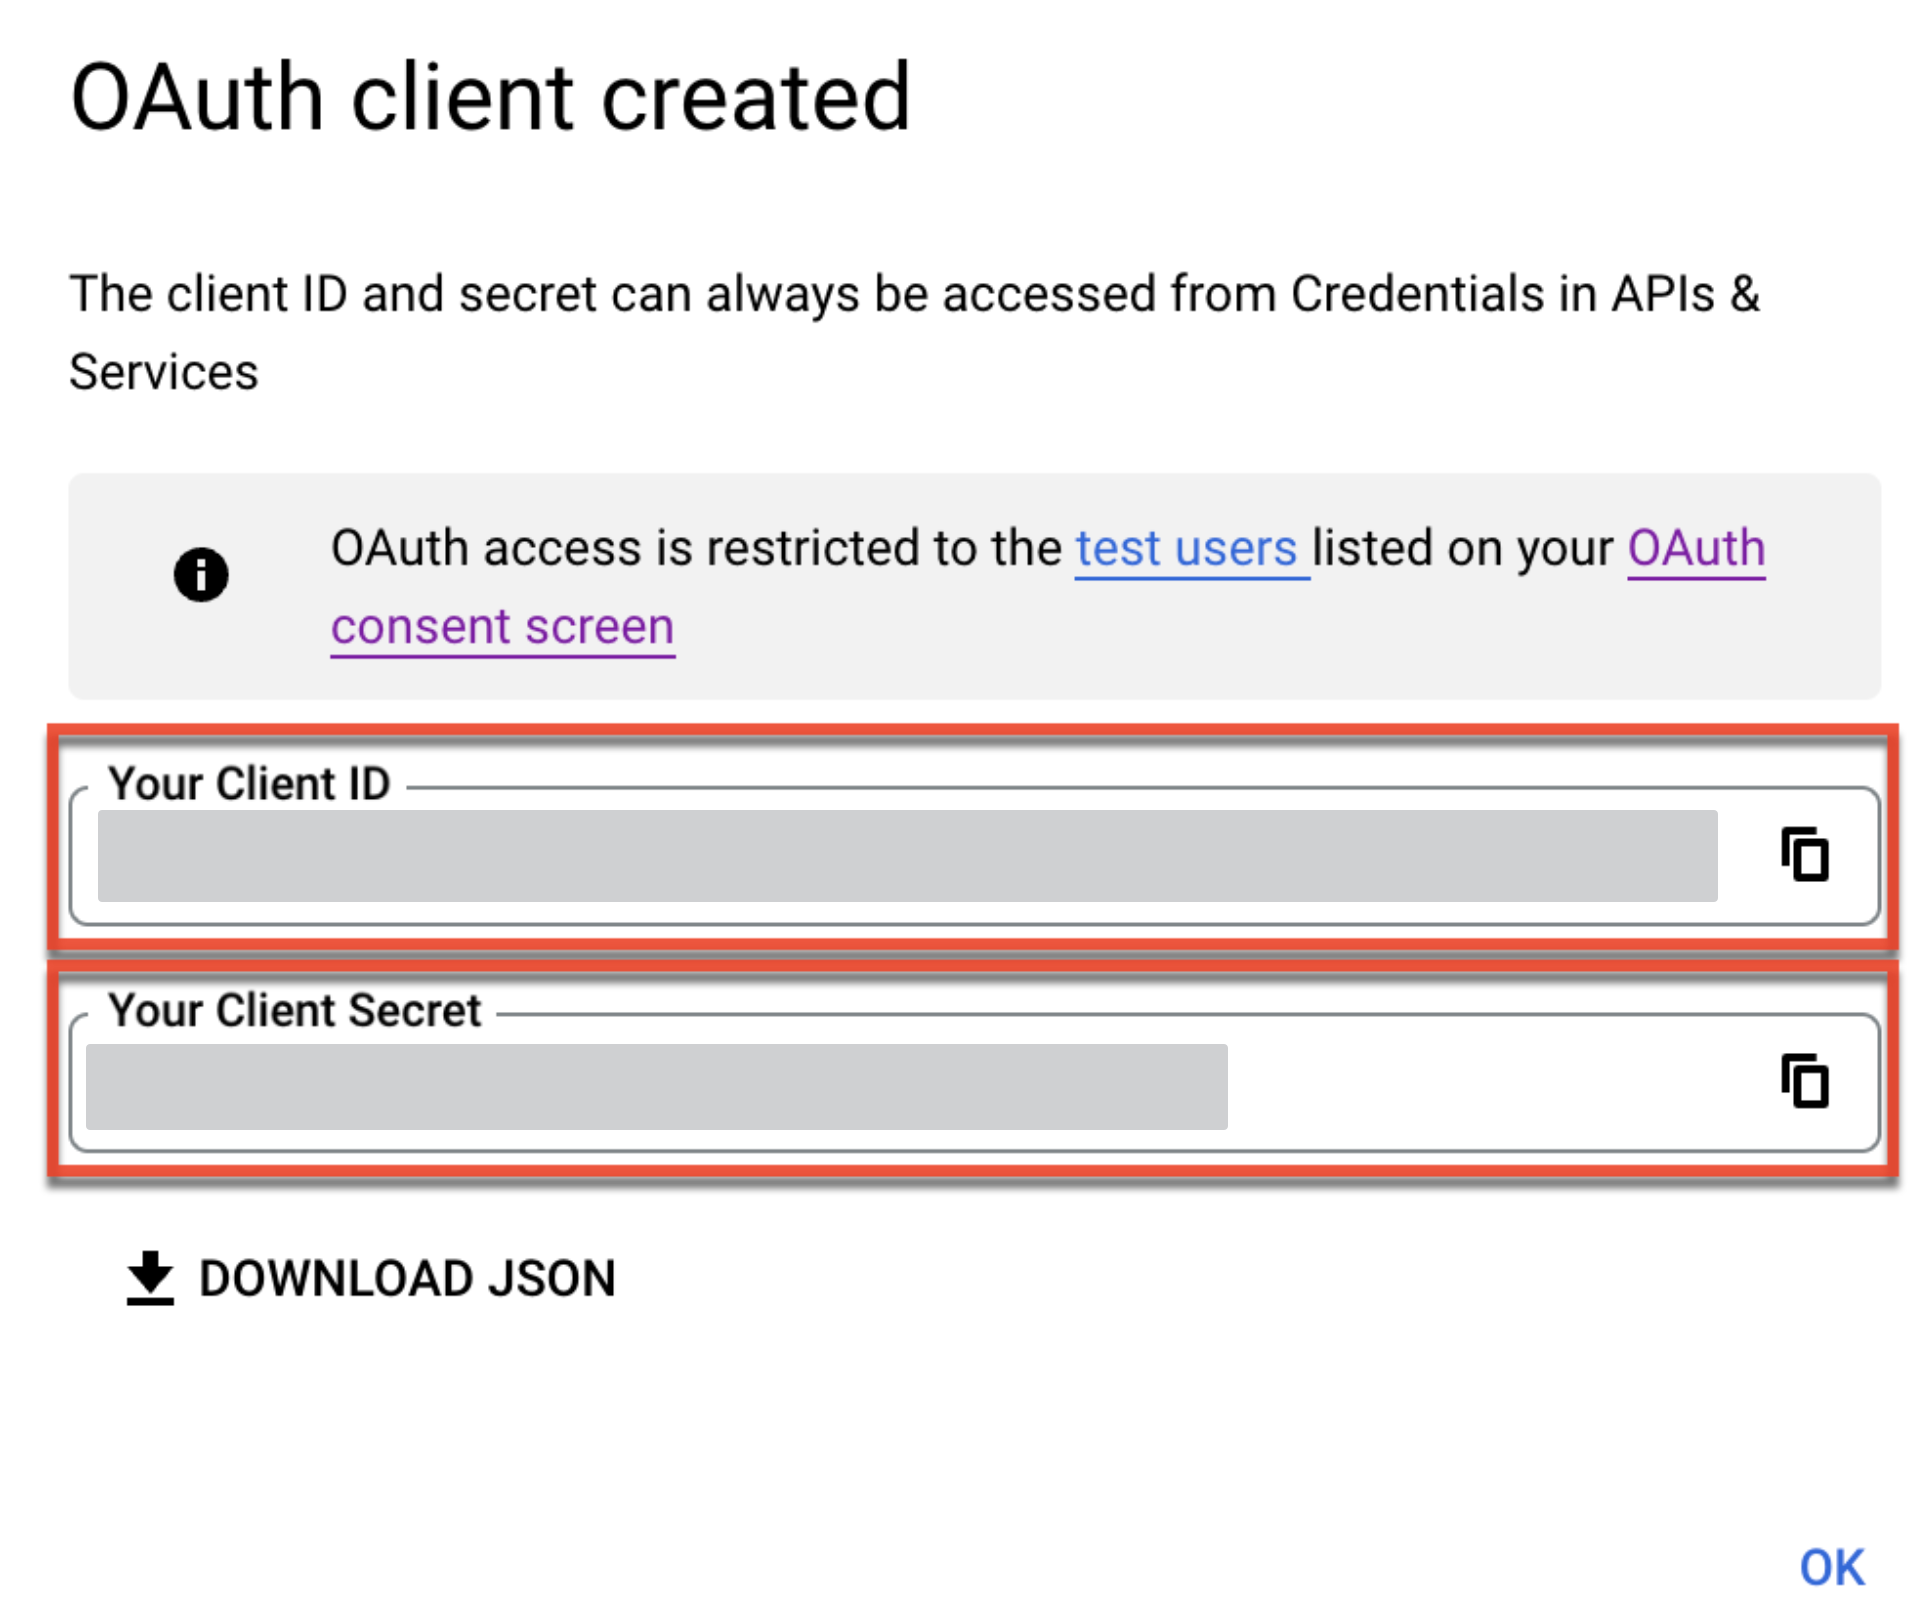
- Click "Create" to generate your unique credentials. The Client ID and Client Secret information will display in a pop-up window. Record both of these values so that you can enter them into Sugar.
- Click "Dashboard" on the left side menu. If you do not see "Dashboard", click the Navigation menu icon (three-lines icon) then select "APIs & Services" followed by "Enabled APIs & Service".

- Click "+ Enable APIs and Services" at the top of the page.

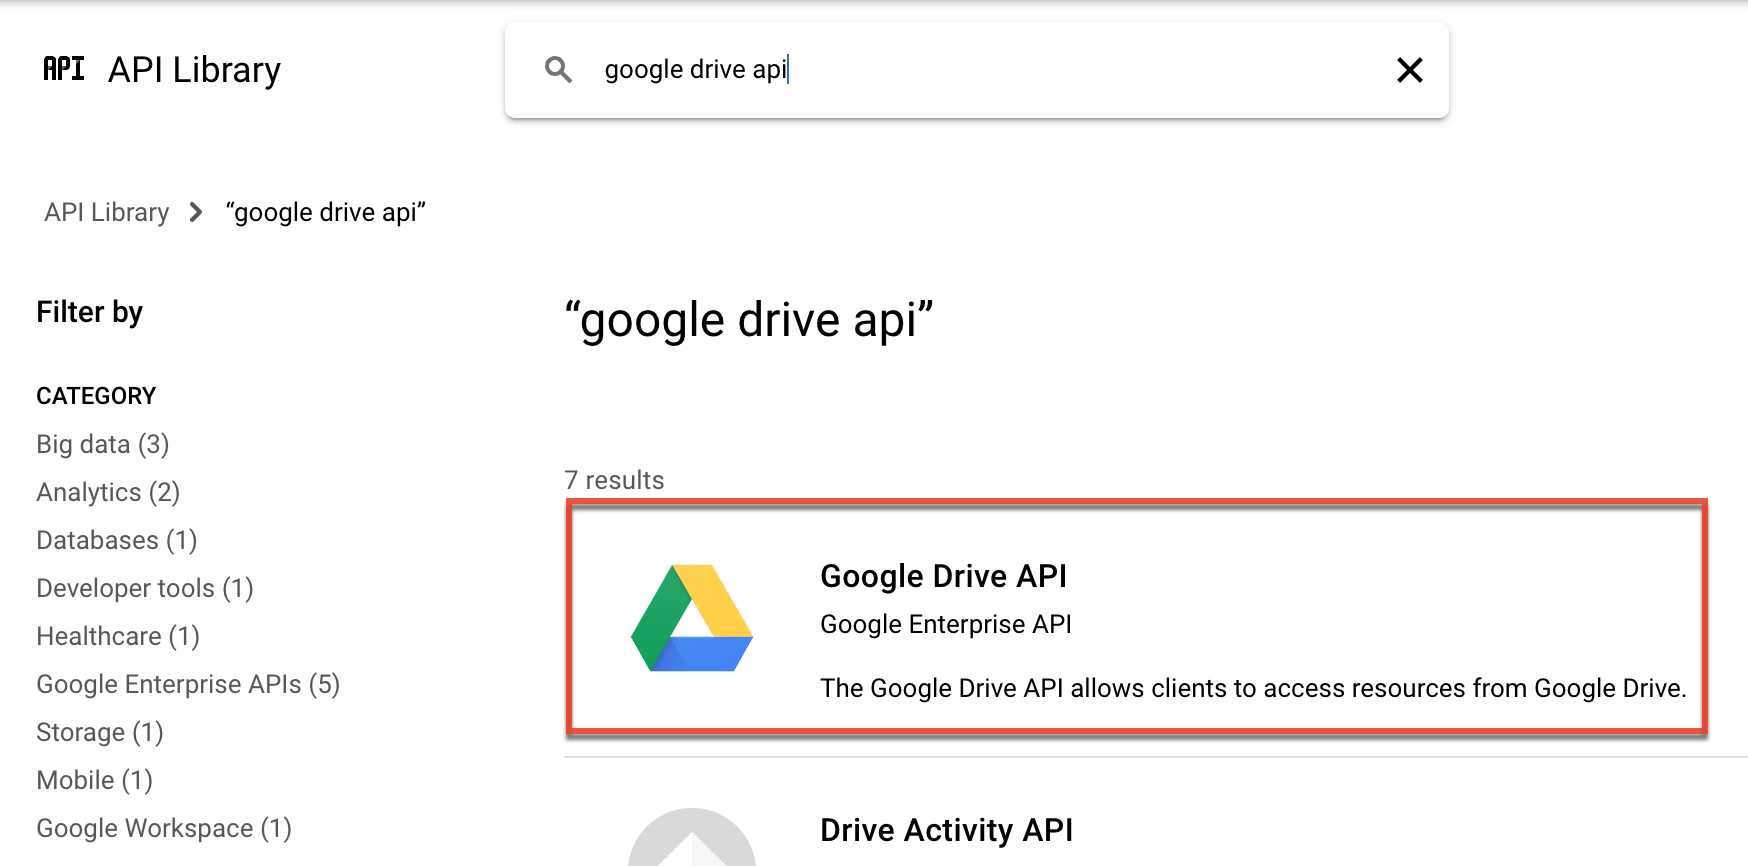
- If you wish to allow users to use the Cloud Drive dashlet to view and manage their Google Drive files in Sugar dashboard, locate the "Google Drive API" on the API Library page and click on it. Then, click "Enable".
- If you wish to allow users to import their Google contacts to Sugar (for Sugar versions 14.0 and higher), perform the following actions:
- Locate “Google Drive API” on the API Library page and click on it. Then, click the Enable button if it is not already enabled.
- Navigate back to the API Library, then locate “Google People API” and click on it. Then, click the Enable button.
Note: If you already configured the Google connector in Sugar and wish to allow your users to import their Google contacts (for versions 14.0 and higher), please enable the "Google People API". Sugar users should also reconnect to their external Google account via their user preferences as covered in step 5 of the Integrating With Google for End Users article.
- If you wish to configure the email settings in Sugar using Google mail via OAuth2, locate "Gmail API" on the API Library page and click on it. Then, click the Enable button.
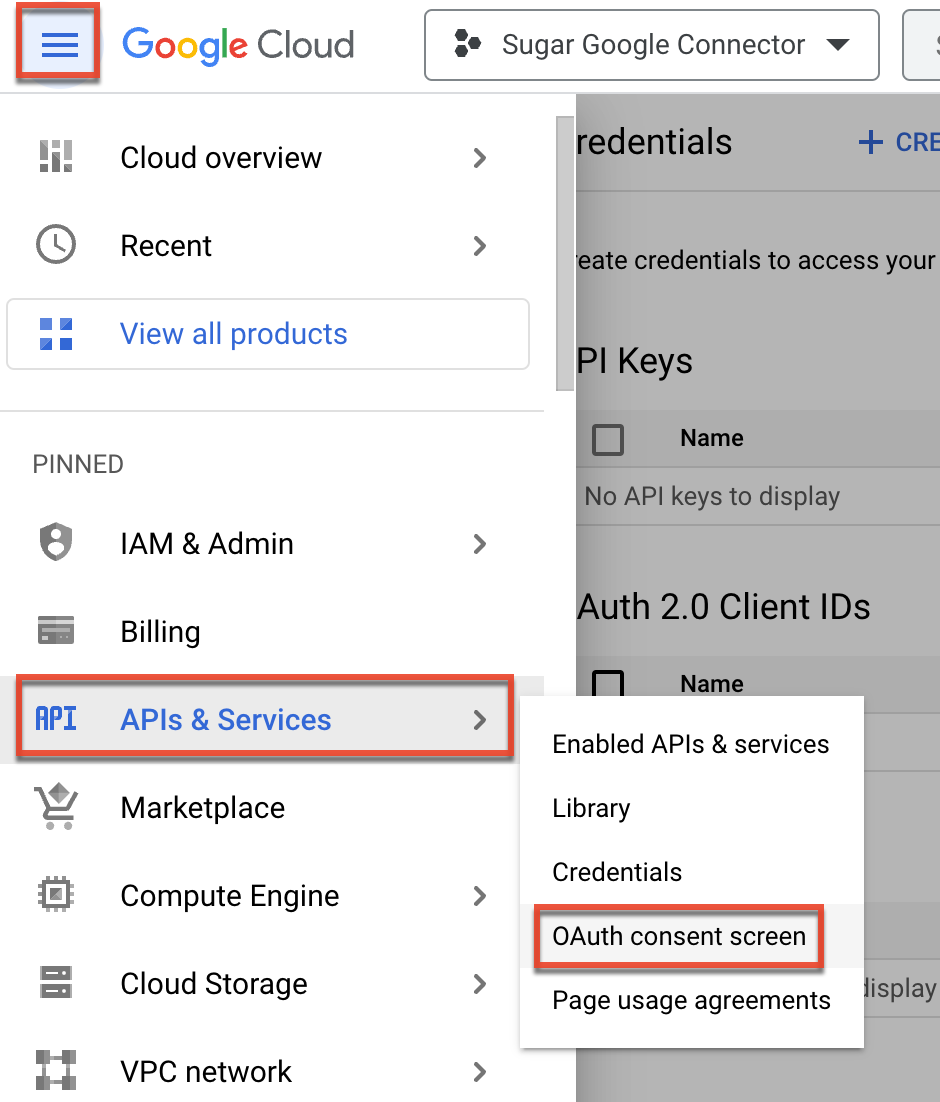
- Finally, go to the Navigation menu icon (three-lines icon) in the top left corner, open the "APIs & Services" menu, then click "OAuth consent screen".
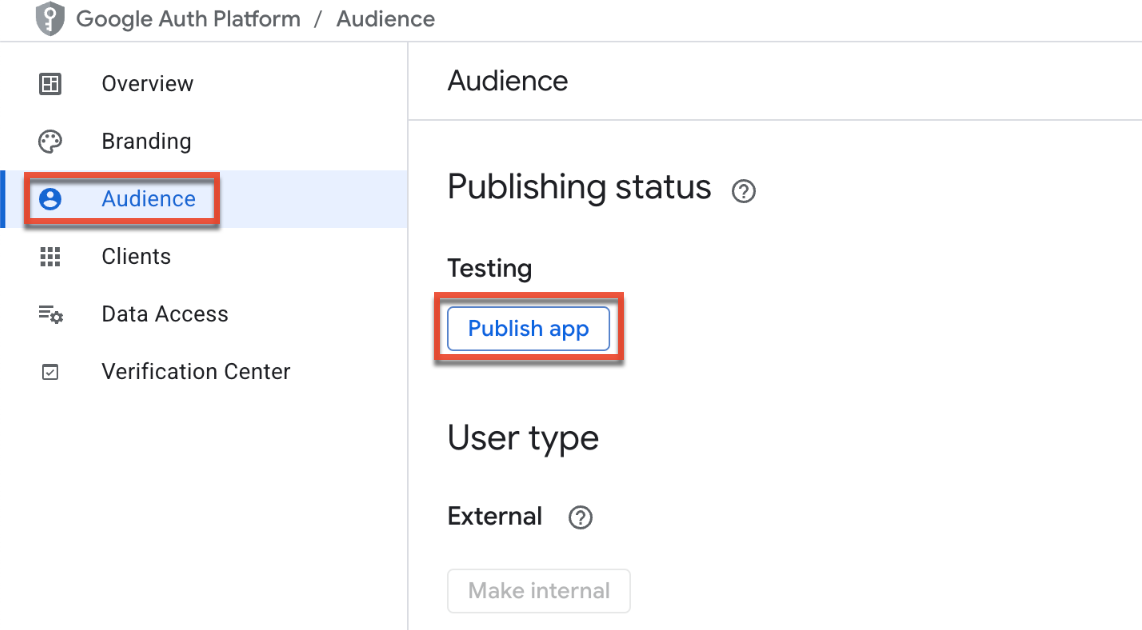
- Navigate to OAuth Consent Screen > Audience to access the Publish App screen. You must either click the Publish App button under "Publishing status" or, if you prefer to leave the app in testing mode, continue to step 22. If you click "Publish App", you will be asked to confirm the push to production.
- In testing mode, if the user will use the same email address that is part of the organization, you do not need to add them as test users on this page. If the user type is external and the user will use an email address that is not part of the organization, you must enter the email addresses on this page.
Configuring Sugar's Google Connector
Once you have obtained the Client ID and Client Secret, use the following steps to set up the Google connector in Sugar:
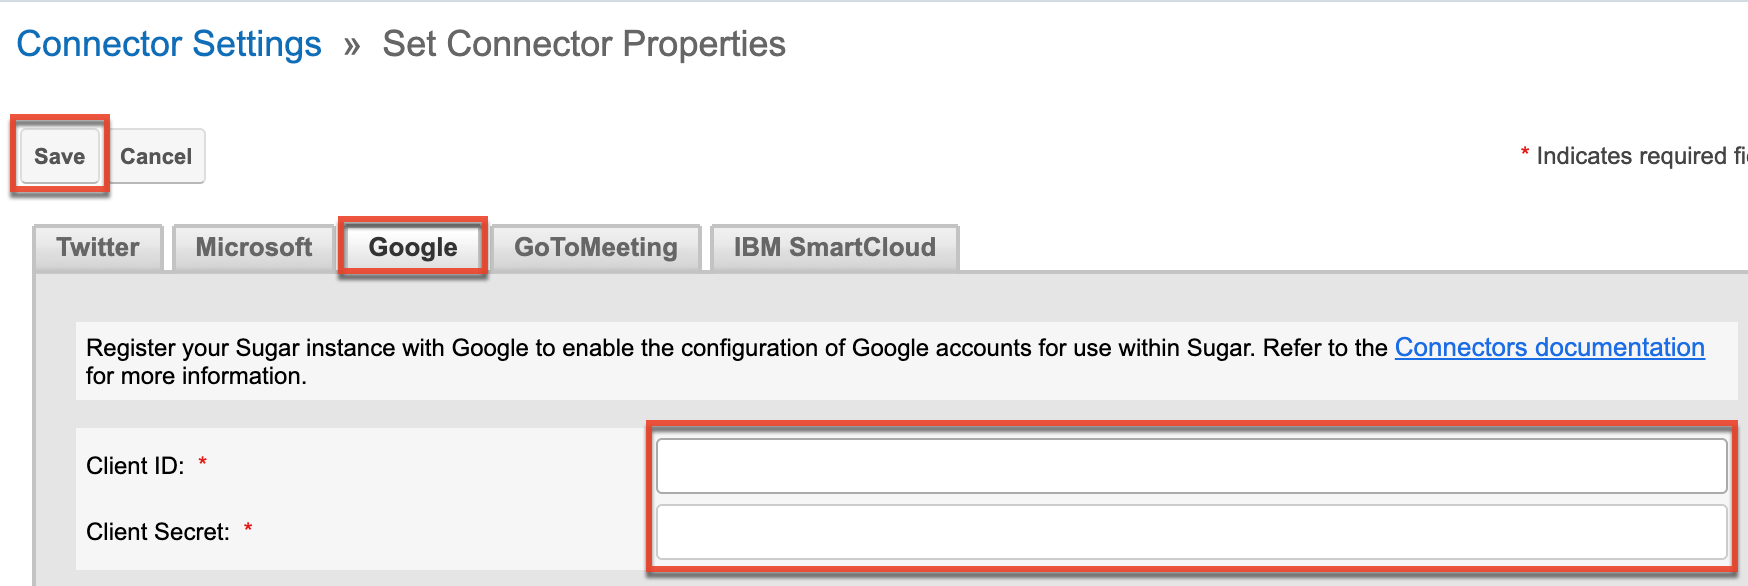
- Log in to your Sugar instance and navigate to Admin > Connectors > Set Connector Properties.
- Click the Google tab and fill in the Client ID and Client Secret values obtained in step 13 of the section above. Click "Save".
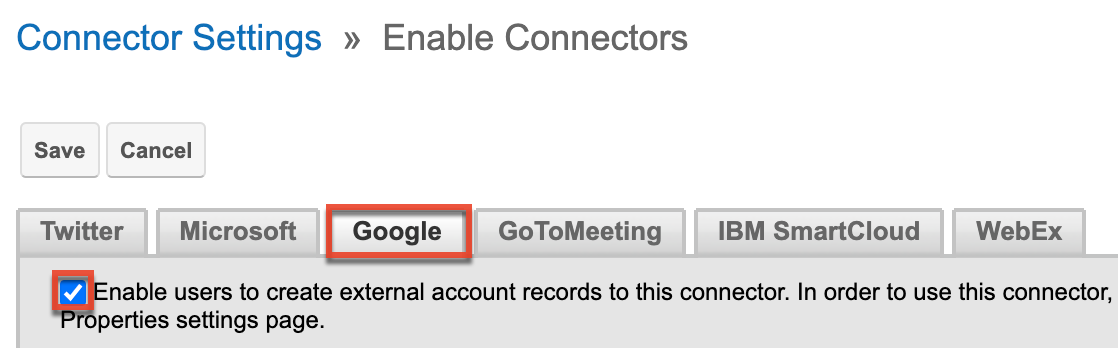
- Next, navigate to Admin > Connectors > Enable Connectors.
- Click the Google tab and ensure that there is a checkmark in the box next to "Enable...".
Configuring Sugar Email Settings
Once the Google connector has been configured in Sugar, you can then configure Sugar's email settings using Google mail. Admin users can configure the system's outbound email settings via Admin > System Email Settings and the system inbound email accounts via Admin > Inbound Email. For more information, refer to the Email documentation. Sugar users can also create outgoing email accounts by clicking on the Emails module tab and selecting "Email Settings". For more information, refer to the Emails documentation.
Steps for End Users
Information about enabling the connector for user accounts and utilizing the Google connector is available in the Integrating With Google for End Users article.