SugarIdentity Activation Guide for On-Site Instances
Overview
SugarIdentity allows customers to securely manage user identities and authentication as well as securely access applications and services in the SugarCRM ecosystem. SugarIdentity provides a federated identity solution based on industry standards and supports comprehensive single sign-on (SSO) for products such as the Sugar application, Sugar Connect, and Sugar Market. SugarIdentity can be enabled for instances running Sugar on-site. Once activated, administrators can access SugarIdentity via Admin > SugarIdentity to manage user records, configure external authentication (e.g., SAML, OIDC) for login using SSO, etc. This activation guide covers the requirements for activation and the steps to activate SugarIdentity for on-site instances, as well as additional resources to help get you started with SugarIdentity.
Prerequisites
Before SugarIdentity can be enabled for your on-site instance, the following requirements must be met:
- Your instance must be on a supported version (e.g., 13.0) of Sugar.
- Your Sugar URL must be added to Sugar's allowlist. Please create a new case for the Sugar Support team to review and add your Sugar URL to the allowlist. Be sure to include the following information on the case:
- Sugar URL for instances (e.g., production, sandbox) that you wish to activate SugarIdentity.
- SugarCRM license key associated with your Sugar subscription, which can be found in Sugar via Admin > License Management.
- If your Sugar instance uses other Sugar products (e.g., Sugar Connect, Market, Hint), verify the service region. It is important to have the Sugar products hosted in the same region as you will select the matching region when activating SugarIdentity. To verify the service region for the Sugar product:
- Sugar Connect: Check your Sugar Connect Portal URL.
- Sugar Hint: Check the
hint.hint_install_target_geoconfig setting inconfig_override.phplocated in the root folder. - Sugar Market: Check your Sugar Market login URL.
- Confirm and add the appropriate region-specific IP addresses to your allowlist so that SugarIdentity can connect to your SugarCRM REST endpoints.
Activating SugarIdentity
To activate SugarIdentity for your on-site instance, you must be a Sugar administrator and complete the steps below. Please note that it is recommended to activate SugarIdentity after business hours, as your instance will be in maintenance mode during the activation period. Regular users will not be able to log in to their Sugar account during this time. As a best practice, please notify all affected users in advance if the activation will be done during business hours.
- Click the appropriate region below that matches the service region for Sugar Connect, Hint, and/or Market. For information on how to verify your service region, refer to the Prerequisites section above.
Note: If your instance does not use a hosted Sugar product (e.g., Sugar Market), please select the region where you are hosting your on-site Sugar instance.
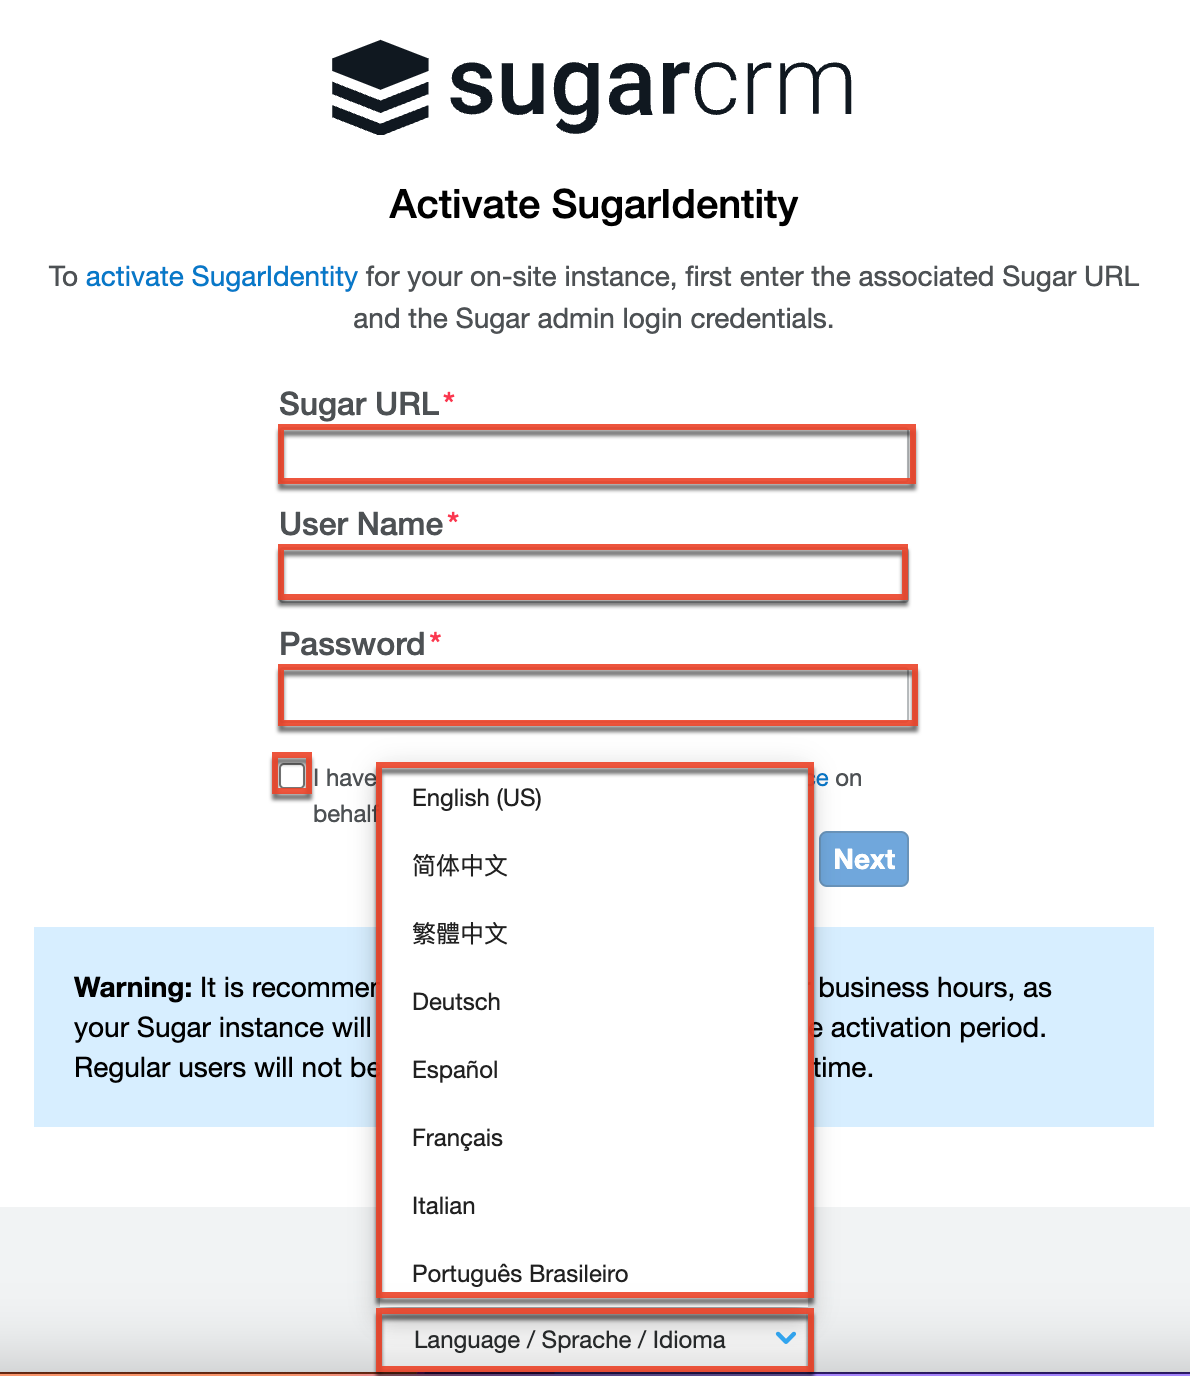
- The Activate SugarIdentity page will open in a new tab. You have the option to select the primary language you want displayed in the Activation portal by clicking the Language option at the bottom of the screen. Select the desired language you wish to display from the Language dropdown list.

- Enter the Sugar URL for your on-site instance and your Sugar admin login credentials. Then read and accept the terms of service and click "Next".
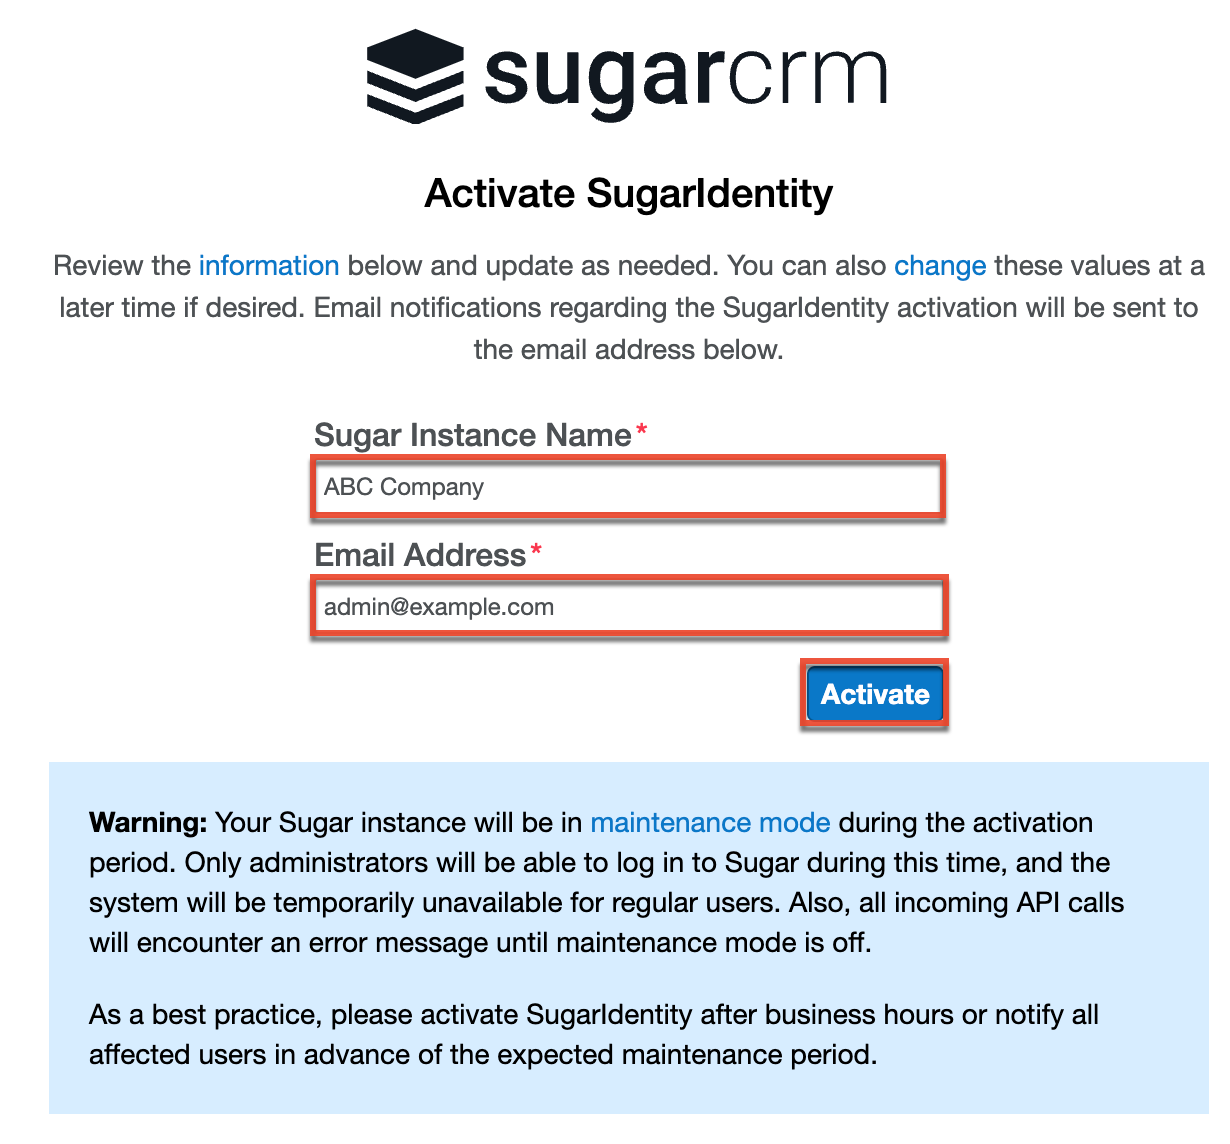
Note: The system will check to ensure that your instance meets the required criteria to proceed with the activation process. The Troubleshooting Errors section below provides information on certain errors you may encounter and the next steps to take to try to resolve the issue. - On the following screen, the Sugar instance name, pulled from the System Settings page, and the current administrator's primary email address, pulled from the user profile, will appear in the corresponding fields. Please review the information on the screen and update as necessary. You can also change the Sugar instance name at a later time in SugarIdentity if desired.
Note: All email notifications regarding the SugarIdentity activation will be sent to the email address identified on this screen.
- Click "Activate" then click "Confirm" in the following dialog box to initiate the activation. Once the activation process is complete, an email notification will be sent to the email address identified in step 3 with the activation results.
Accessing SugarIdentity
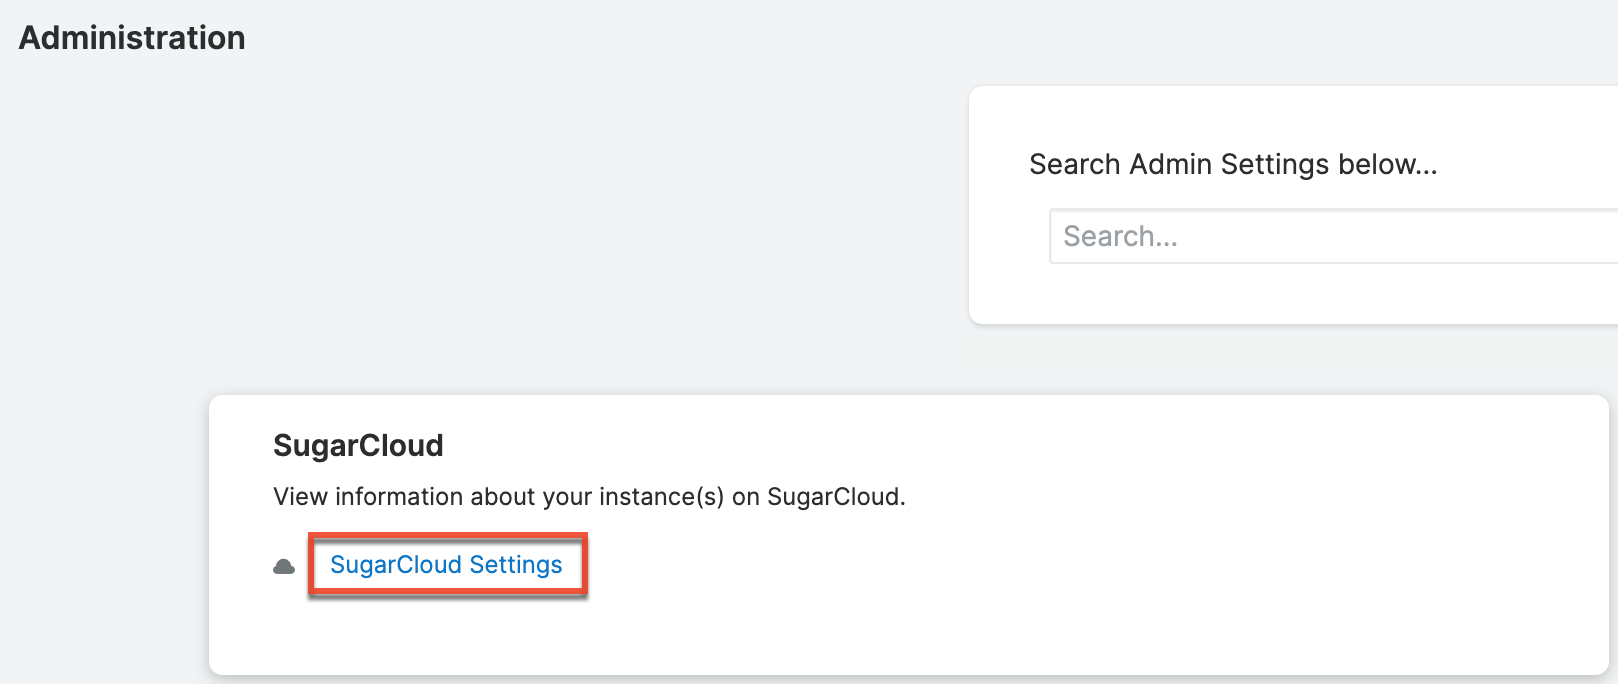
Now that SugarIdentity is activated successfully for your instance, the SugarIdentity link will appear on Sugar's Admin page, as shown in the image below. Click the link to access SugarIdentity. Please note that you will be automatically authenticated in SugarIdentity since you have an active Sugar session. 
For more information on how to use SugarIdentity to create and manage user records, set up password requirements, configure external authentication (e.g., SAML, OIDC) for login using SSO, etc., refer to the following SugarIdentity documentations:
If your organization wishes to stop using SugarIdentity at any time, you can click "Deactivate SugarIdentity" on the home page in SugarIdentity and complete the deactivation form.
Enabling License Management in SugarIdentity
Once your instance is SugarIdentity-enabled, you can enable license management to manage your users' licenses in SugarIdentity instead of Sugar. To activate license management, click "Enable License Management" on the home page in SugarIdentity. Then click "Confirm" in the following dialog box to initiate the license management activation process.
Once the activation process is complete, an email notification will be sent to your primary email address on file with the activation results. Going forward, the users' licenses will be managed from the Users module in SugarIdentity.
Troubleshooting Errors
The following covers some potential errors you may run into when activating SugarIdentity and the next steps to take:
Activation Error
During the activation process, the system confirms and validates that your Sugar instance meets the required criteria for activation. In certain circumstances, the following error message may appear, which must be resolved to activate SugarIdentity:
- The activation process cannot proceed as SugarIdentity is not able to communicate with your instance.
The following table provides some possible reasons for this error and the next steps to take:
| Potential Cause | Next Steps |
| Your Sugar instance is not accepting the request coming from SugarIdentity due to IP address restrictions. |
Add the appropriate region-specific IP addresses to your allowlist so that SugarIdentity can connect to your SugarCRM REST endpoints. |
| Your Sugar instance contains customizations interfering with the provisioning API. | File a case with the Sugar Support team for further assistance. |
If you run into other unexpected issues during the activation process and need further assistance, please file a case with the Sugar Support team.
Sugar Login Error
Once your Sugar instance is activated for SugarIdentity, if you see the following error message when logging in to your Sugar account, this indicates that the site_url specified in config.php does not match the Sugar URL used when activating your instance:
- Requested URL does not match any rules
To resolve this error, you will need to update the site_url in the config.php file to match the Sugar URL used when activating SugarIdentity.
Additional Resources
For additional information and help with SugarIdentity, please refer to the following resources:
- SugarIdentity Release Notes: The SugarIdentity release notes provide details of any new features, enhancements to existing features, fixed issues, etc. for the latest release of SugarIdentity.
- SugarIdentity Supported Platforms page: The SugarIdentity Supported Platforms page details the supported application versions for SugarIdentity.
- SAML Authentication help articles: The SAML Authentication help articles cover various topics such as configuring the identity provider (e.g., Okta, Google, Azure) for single sign-on using SAML, configuring SAML attribute mapping, and configuring SCIM for instances that use SugarIdentity.
- OIDC Authentication help articles: The OIDC Authentication help articles cover how to configure the identity provider (e.g., Okta, Google, Auth0) to allow external authentication using OpenID Connect for SugarIdentity-enabled instances.
- SugarCloud Status page: The SugarCloud Status page allows you to check the live SugarIdentity status for any outages in case you experience any login issues for your instance.