Developer Tools
Overview
The Developer Tools section of Sugar's Admin page contains various configuration menus that help you customize your instance to best suit your organization's needs. Developer Tools allow you to edit the look, feel, and functionality of your instance, including adding fields, changing layouts, adding automated processes, and creating entirely new modules.
The Developer Tools section contains the following menus:
| Menu | Description |
| Studio | Modify fields, relationships, and layouts for existing modules |
| Module Builder | Create new modules to be deployed into this instance or exported to other Sugar instances |
| Module Loader | Upload and manage customization packages to your instance, such as additional modules or third-party integrations |
| Sugar Portal | Configure your Sugar Portal |
| Workflow Management | Manage automated processes in Sugar to optimize and streamline your company's business process |
| SugarCRM Marketplace |
Access the official SugarCRM Marketplace, where you can explore and find a vast selection of third-party solution add-ons that can add new capabilities to your Sugar instance. Note: The SugarCRM Marketplace option does not appear for Sugar Sell Essentials customers. |
| Module Names and Icons | Change the name, select a color, and designate an icon or abbreviation for each module. |
| Navigation Bar and Subpanels | Hide or display modules and subpanels across the application |
| Package Builder and Deployer | Export configurations and customizations to move to another Sugar instance |
| Configure Navigation Bar Quick Create | Configure which modules appear in the Quick Create menu on the navigation bar |
| Configure API Platforms | Manage platform identifiers for custom API integrations |
| Dropdown Editor | Manage dropdown lists to add new lists or edit existing lists |
| Relate Fields Denormalization | Manage database optimization for large instances to improve sorting and loading speeds |
Studio
Studio enables administrators to customize stock or custom modules by modifying fields, page layouts, and more. This allows Sugar to be modified to ideally fit your organization's needs and terminology. Please note that only users with administrator or developer access have the ability to make changes via Admin > Studio. For more information on how to utilize Studio, please refer to the Studio documentation.
Module Builder
Module Builder enables administrators to create, deploy, and maintain custom modules in Sugar. For your convenience, the custom modules are based on templates such as Basic, Person, Company, etc. Modules can then be deployed within your instance of Sugar so that users can utilize the new module in their daily process. In addition, modules can be exported for additional development or published and then imported to other Sugar instances. For more information on using Module Builder, please refer to the Module Builder documentation.
Module Loader
Module Loader is used to import packages into Sugar that make changes to core files. Examples of module-loadable packages include Sugar custom modules that were created in Module Builder, language packs, third-party integrations, or any other type of file that would make changes to Sugar's core file system. Module Loader provides a portal within the application where zip files can be easily uploaded and then installed. For more information on how to use Module Loader, please refer to the Module Loader documentation.
Sugar Portal
The Sugar Portal is a powerful tool that allows Sugar users to share published knowledge base articles with customers and interact with them via notes. Your customers can log into the portal and review knowledge base articles covering a variety of topics such as common troubleshooting tips, frequently asked questions, etc. The information allowed and viewable in the portal can be updated and restricted by Sugar users as allowed by team membership, user access type, and assigned roles. Administrators can configure portal settings, the look and feel of the theme, and the layout configurations via Admin > Sugar Portal. For more information on configuring the portal, please refer to the Sugar Portal documentation.
Workflow Management
Sugar's Workflow functionality allows administrators to configure cause and effect type actions throughout Sugar and across multiple modules. Workflows can be used to update fields, send emails, or create records once certain sets of conditions are met. Workflows are a great way to configure automated processes within Sugar so that users do not need to remember manual steps and instead can focus on their primary tasks and job responsibilities. Administrators can create and manage workflows via Admin > Workflow Management. For more information on workflows, please review the Workflow Management documentation.
Module Names and Icons
Depending on your business needs, it may be necessary to alter modules' names, display options, and colors to better align with your various business components. Administrators can easily rename modules, choose to display an icon or abbreviation, and choose a background color via Admin > Module Names and Icons. Changes will be reflected globally across Sugar so that every appearance of the given module name and icon is updated to your preference, immediately and seamlessly to all users. Please review the sections below to learn how to configure your module names and module icons.
Configuring Module Names
When editing a module's name, you are given the option to update both the singular and plural versions of the word. To rename the modules in a language other than English, use the Language dropdown field at the top of the page. Selecting a new language in the dropdown clears out any changes you have made in the current language. Be sure to save the current language before selecting a new one.
The following steps cover renaming the Contacts module as an example:
- Navigate to Admin > Module Names and Icons.
- Locate the module you wish to change and enter a new singular and plural name for the module.
- Click "Save" to deploy your changes across your instance.

Configuring Module Icons
You can also configure how the module icon displays in the record view by selecting either the icon (i.e., image) or abbreviation (e.g., Co) option in the Display field. To change the module's background color in the navigation bar and the module icon, you can select the desired color in the Module Background Color field.Please note that updating the module icon options (i.e., the Display and Module Background Color fields) will apply the change across all languages after clicking "Save" for the current language you are modifying.
The image below shows what you can expect to see for the Accounts module, which is using an icon with a green background, and the Contacts module, which is using an abbreviation with a pink background.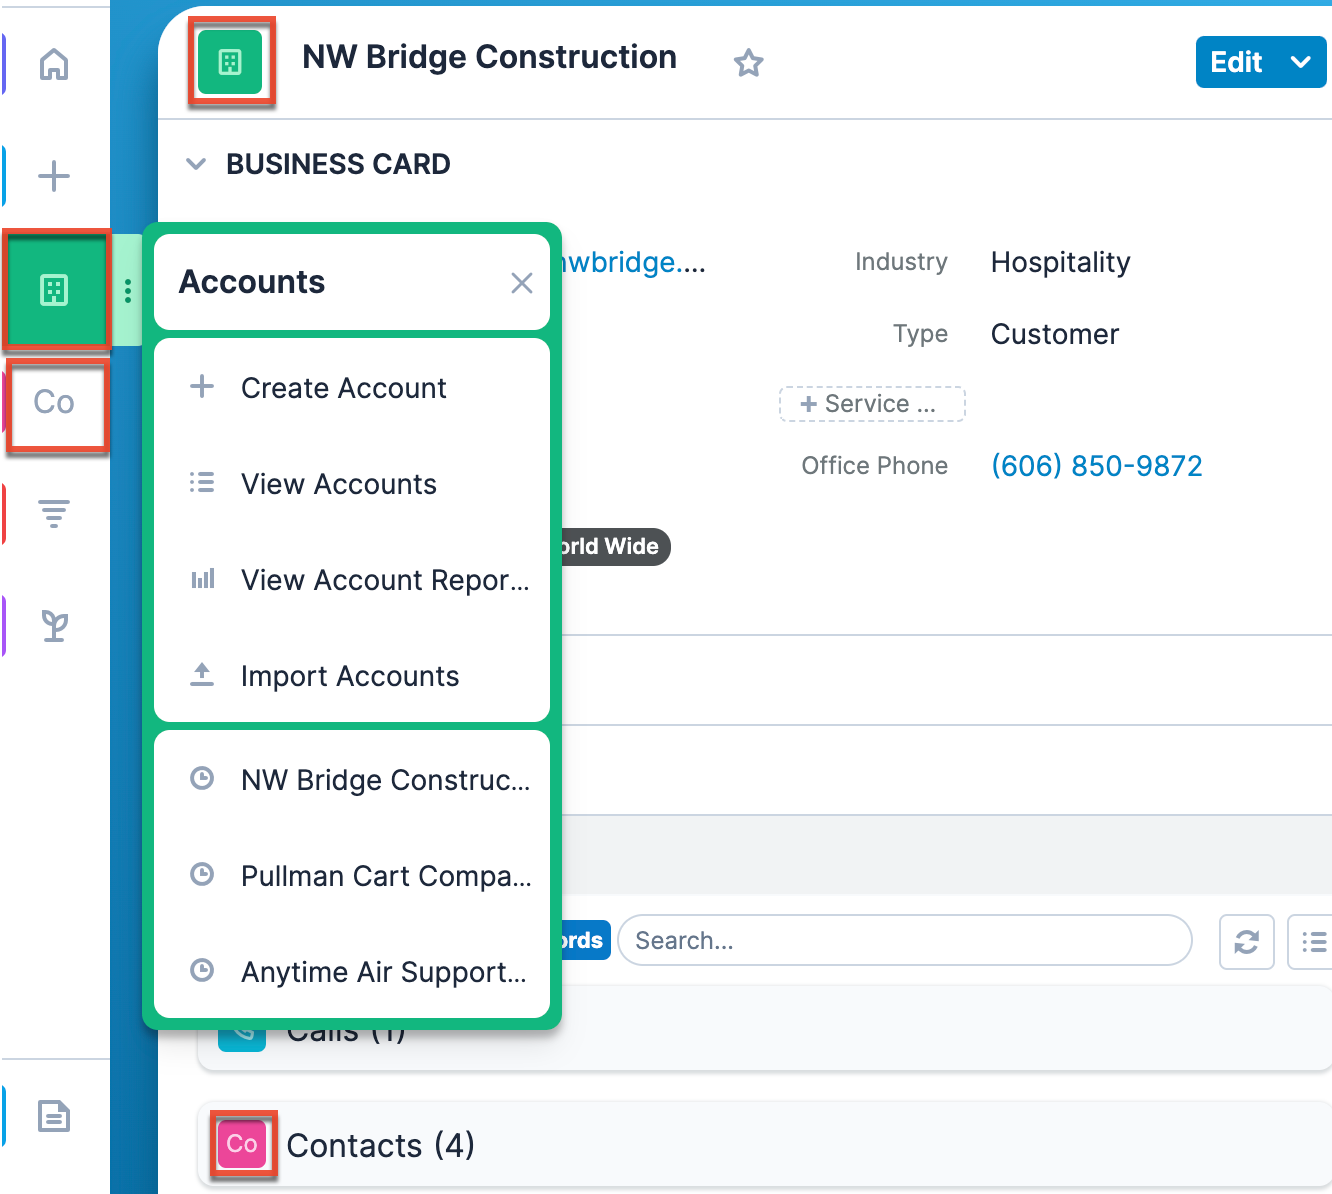
The following steps cover updating the Contacts module as an example:
- Navigate to Admin > Module Names and Icons.
- Locate the module you wish to change and select "Icon" or "Abbreviation" from the Display field.
- If you chose "Icon", select which icon you would like in the next field.
- If you chose "Abbreviation", verify the letters in the next field are correct or edit the letters as needed.
- Select a color from the available options in the Module Background Color field.
- Click "Save" to deploy your changes across your instance.

Navigation Bar and Subpanels
Administrators have the ability to configure whether users can modify their own navigation bar, set the number of pinned modules, and hide or display modules that appear in the navigation bar and as subpanels via Admin > Navigation Bar and Subpanels. This allows any unnecessary module(s) and subpanel(s) to be hidden to prevent users from accessing them and gives you the option to further define what users can configure in their own navigation bar via their User Profile. If you wish to prevent certain users from accessing specific modules in Sugar, you can keep the module enabled globally but assign a role to the user. For more information on creating and assigning roles, please refer to the Role Management documentation.
Configuring User Abilities
By default, users have the option to hide and display modules and set their number of pinned modules per their viewing preferences via the User Profile. However, administrators can choose to limit users' abilities via two checkboxes on the Navigation Bar and Subpanels page. By default, the list of available modules to display or hide and the default number of pinned modules in a user's profile is based on the modules in the Available Modules column and the Number of Pinned Modules field on the Navigation Bar and Subpanels page. To disable the users' ability to modify which modules are hidden or displayed on their navigation bar, uncheck the "Allow users to select from available modules" checkbox. To disable the users' ability to set the number of pinned modules on their navigation bar, uncheck the "Allow users to set number of pinned modules" checkbox. 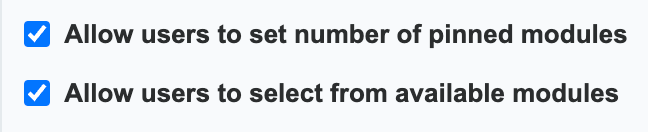
Configuring Pinned Modules
The Number of Pinned Modules field determines how many of the available modules are shown when the navigation bar is collapsed (e.g., if 5 is entered, the first five modules in your list are pinned). We recommend setting this to a realistic number of the most frequently used modules as it is likely that a large number will not be visible in most browser sizes. Values over 100 will not be respected. Please note, if the "Allow users to set number of pinned modules" checkbox is enabled, users will be able to set their own number of pinned modules via their User Profile.
Configuring Modules and Subpanels
Once the Navigation Bar and Subpanels page is open, you will see the Available Modules, Hidden Modules, Displayed Subpanels, and Hidden Subpanels columns. Please note that not every module and subpanel in Sugar is enabled by default when initially installed. To configure which modules are available in the navigation bar, drag and drop the module from the Hidden Modules column to the Available Modules column. To hide a module, simply drag and drop the module from the Available Modules column to the Hidden Modules column. To configure which subpanels appear in modules, drag and drop the module from the Hidden Subpanels column to the Displayed Subpanels column. To hide a subpanel, simply drag and drop the module from the Displayed Subpanels column to the Hidden Subpanels column. After making the necessary changes, click "Save" at the top of the page to deploy your changes or "Cancel" to revert back to your previous settings.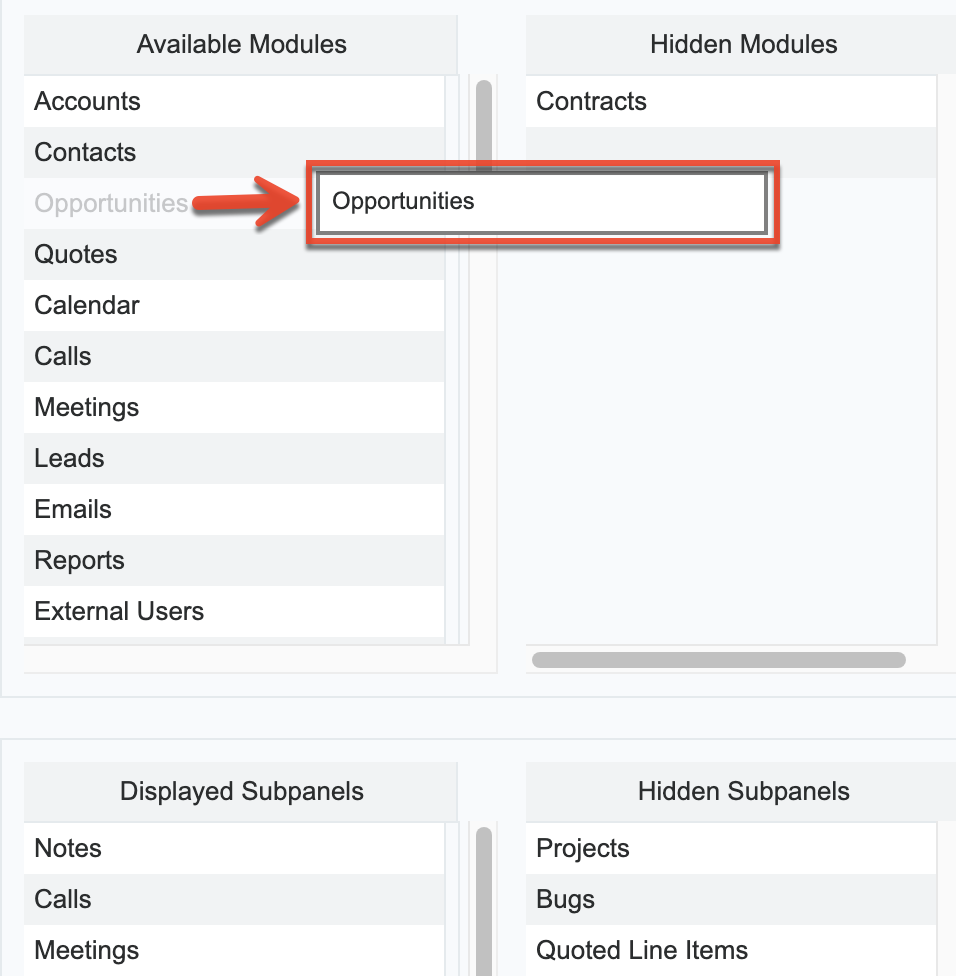
Please note that if a hidden module is related to a module that is visible in Sugar, it will display as a subpanel in the record view (for Sidecar modules) or detail view (for Legacy modules) of the related module. In addition, hidden modules continue to be available to users when viewing, creating, and managing reports via the Reports module. When a subpanel is hidden, users cannot view any related records from the record view (for Sidecar modules) or detail view (for Legacy modules) of the related module.
Configure Navigation Bar Quick Create
The Quick Create menu allows users to easily create new records from anywhere in Sugar. Simply click the quick-create button on the upper right of any Sugar page to access the menu. Administrators can easily configure the Quick Create menu via Admin > Configure Navigation Bar Quick Create menu to control which modules are enabled/disabled, as well as the order the modules will appear in the menu.
Once the "Configure Navigation Bar Quick Create" page is open, you will see the Enabled Modules and Disabled Modules columns. Modules that appear within the Enabled Modules column will display in the Quick Create menu. To enable a module to be displayed in the Quick Create menu, drag and drop the module from the Disabled Modules column to the Enabled Modules column. To disable a module, simply drag and drop the module from the Enabled Modules column to the Disabled Modules column. You can also change the order of the modules as they appear in the Quick Create menu by dragging and dropping the modules up-and-down within the Enabled Modules list. After making the necessary changes, click "Save" at the top of the page to deploy your changes or "Cancel" to revert back to your previous settings.
Note: The Quick Create menu can display a maximum of 10 modules at one time. 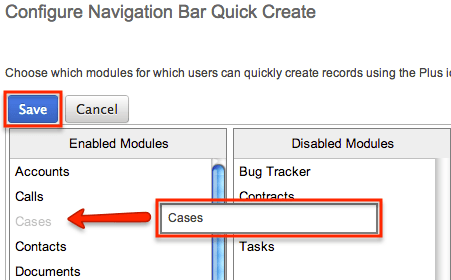
Configure API Platforms
Developers use the platform parameter to distinguish their custom platform from other clients when using the Sugar API. For example, when a user accesses Sugar via the desktop client and the mobile client simultaneously without being logged out of either, it is because the API recognizes that they are different platforms due to their unique platform identifiers. The platform identifier makes it easy for a Sugar administrator to configure which API platforms are allowed to access their instance via Admin > Configure API Platforms. In addition, you can enable or disable the "Enable Notifications" checkbox next to each platform to specify whether notifications should be sent to users for record changes applied by that platform. See the Getting Started page for details on receiving notifications for record assignments. To learn more about platform identifiers, please refer to the Dev Blog in SugarClub.
The API Platforms panel is a list of client IDs that have been given permission to interact with your Sugar instance and the checkbox indicating whether or not notifications will be sent to users for the platform's actions. The panel automatically displays some standard platform identifiers required by every Sugar instance. The stock API platforms listed in the following table cannot be removed and must not be reused as platform identifiers for a custom integration:
| API Platform Identifier | Platform/Client |
| base | Sugar desktop client (default platform) |
| mobile | SugarCRM mobile app |
| portal | Sugar Portal (Enterprise, Sell, Serve) |
| opi | Sugar Plug-in for Microsoft Outlook 2.x |
| lpi | Sugar Plug-in for IBM Notes |
| collabspot | Sugar Connect |
| collabspotbackend | Sugar Connect |
| discover | Sugar Discover |
| sugarlambda | SugarLive |
To allow a new integration for your Sugar instance, find the package's platform parameter, enter it in the text box below the API Platforms panel, and then click "Add". You may need to ask your developer to check the .custom/clients/platforms.php file for this information. Once added, "Enable Notifications" is turned on by default but can be disabled using the checkbox if you do not want users to receive assignment notifications triggered by that platform. To remove any custom API platforms from the list, click the Remove icon next to the API platform identifier that you wish to remove. Upon removing the platform, all integrations that relied upon it will stop working. 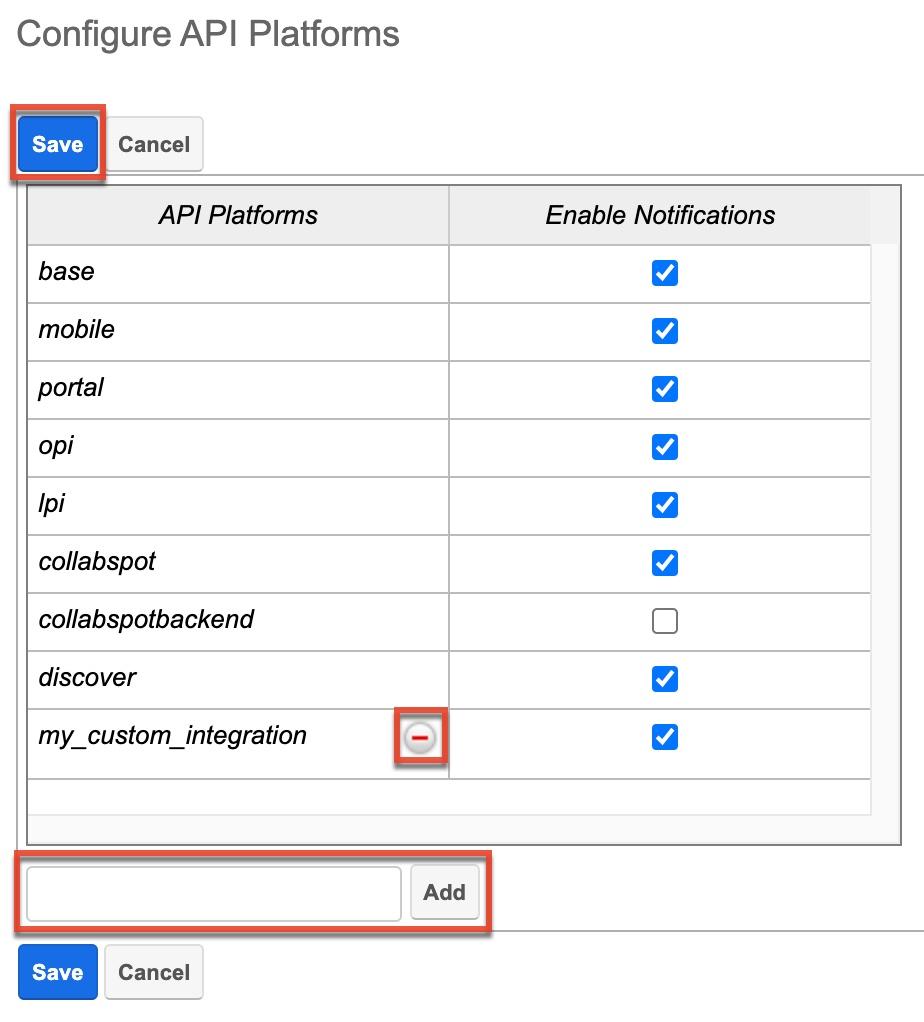
Alternatively, developers may choose to create a module loadable package to add custom identifier(s) via Sugar's Module Loader tool. To remove platform identifiers that were added via Module Loader, simply uninstall the package. More information on adding platform identifiers via Module Loader can be found on the Dev Blog in SugarClub and the Platforms documentation in the Developer Guide.
Dropdown Editor
The Dropdown Editor allows administrators to create, view, and modify dropdown lists that can be added as fields in Sugar. Because dropdown lists are not tied to specific modules, they are stored and managed centrally through the editor. Once created, these lists can be associated with dropdown, multiselect, and radio-type fields via Admin > Studio. For more information on how to associate dropdown lists to the different field types, refer to the Studio documentation.
Administrators can do more than simply add values to a dropdown list. The Dropdown Editor also supports localization of values into multiple languages, restrictions on which values are available to users based on their roles, and formatting of the values themselves. Each of these options makes it possible to tailor dropdown lists to meet the needs of different teams, regions, and business processes.
Key Considerations
Some dropdown fields (e.g., Status) are tied directly to tile views in Sugar. In these cases, the values in the dropdown determine the column headers in the tile view. Modifying a display label will automatically update the column header, but adding a new dropdown value does not immediately create a new column. If a new dropdown value has been added, navigate to Tile View Settings and click "Save" to add the new value as a column header in tile view. If the new value should not appear as a column, it can be moved to the Hidden Values column within the Tile View Settings.
It is also important to note that not all dropdown lists are managed through the Dropdown Editor. Certain lists are controlled in a separate area (e.g., Contract Types, Releases, etc.) of the Admin page. These include dropdown lists for the Forecasting, Bug Tracker, Contracts, and Products and Quotes modules. Please refer to the appropriate sections of the Administration Guide for more information regarding the fields and how they can be edited.
Finally, dropdown field values are assigned colors in Sugar to be viewed whenever the dropdown is part of a report chart. The assigned colors are consistent across various report charts and can only be edited by applying custom dropdown formatting. However, this does not apply to dropdown fields that dynamically generate their options.
Managing Dropdown Lists
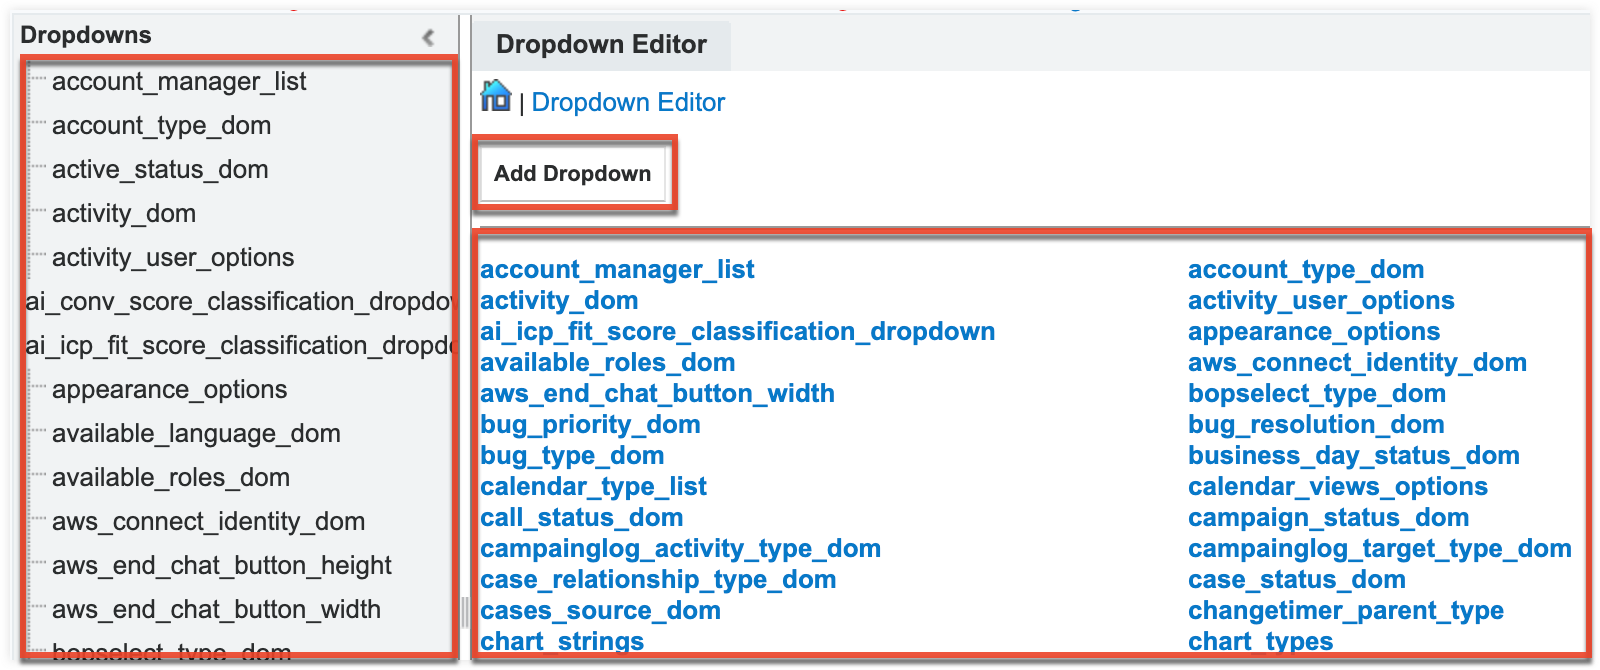
The Dropdown Editor provides a single place to view, edit, and create all dropdown lists in Sugar. On the left side of the page, the Dropdowns list displays all existing lists in alphabetical order, while the main Dropdown Editor tab shows the lists in a column layout so more can be viewed at once without scrolling.
- To view or edit a list simply click its name.
- To create a new list, click "Add Dropdown".
Both opening an existing list or creating a new one opens the Dropdown Editor drawer, where you can view the list’s name, item names, and display labels. The drawer is also where you add new values, reorder items, apply role restrictions, localize values, and enable formatting.
When creating a new dropdown, assign an alphanumeric name that clearly identifies the list; underscores must be used instead of spaces (for example, account_manager_list). Please keep in mind that this list is not module-specific, so be sure to properly name your list and any dropdown options to avoid any confusion in the future. The name of the dropdown list cannot be changed once created. Lastly, dropdown lists cannot be deleted because they can span multiple modules in Sugar and cause important data to be lost if removed in error.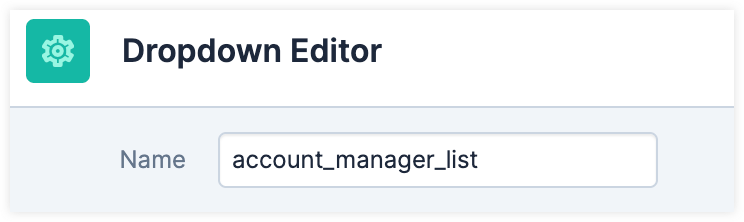
Adding/Editing List Items
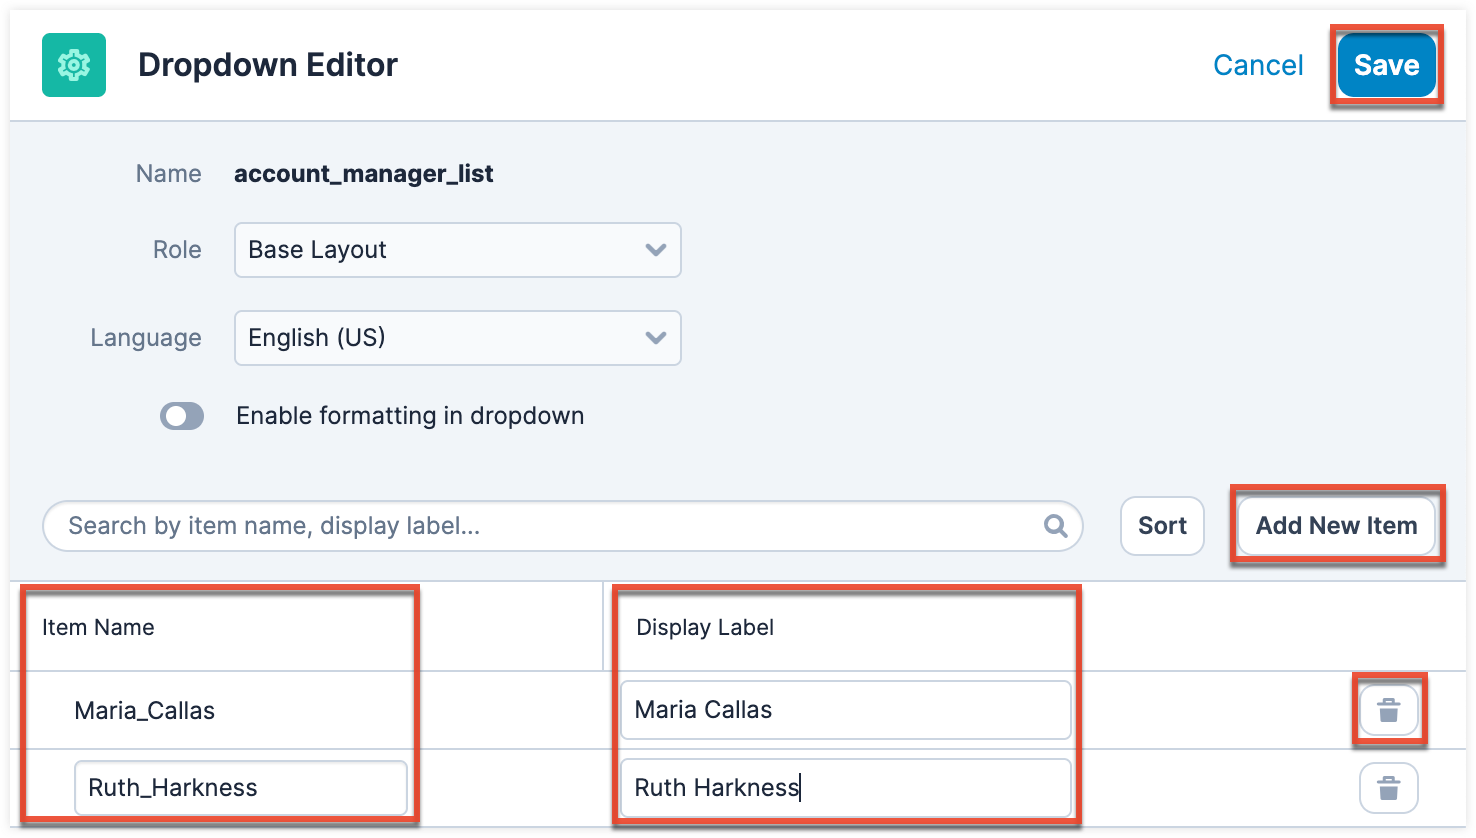
- To create the items that appear in your dropdown list, enter an "Item Name" and a "Display Label".
- Item Name: The backend system name that must be a unique value in the list and cannot be edited after saving the list.
- Display Label: Defines what is shown in the actual dropdown for users. There are no character restrictions when entering the display label.
- Blank Value: You may create one blank value by entering
-blank-in the Item Name and Display Label fields when creating your list.
- Click "Add New Item" to continue adding to your dropdown list.
- To remove a value from the list, click the trash bin icon to the far right of the item row. A confirmation message will appear to inform you that dropdown fields using this list with this item as a value will no longer display the value, and the value will no longer be able to be selected from the dropdown fields.
- Click "Save" at the top of the screen to add your dropdown list or complete your modifications. You will be directed back to the main dropdown editor page once the save completes.
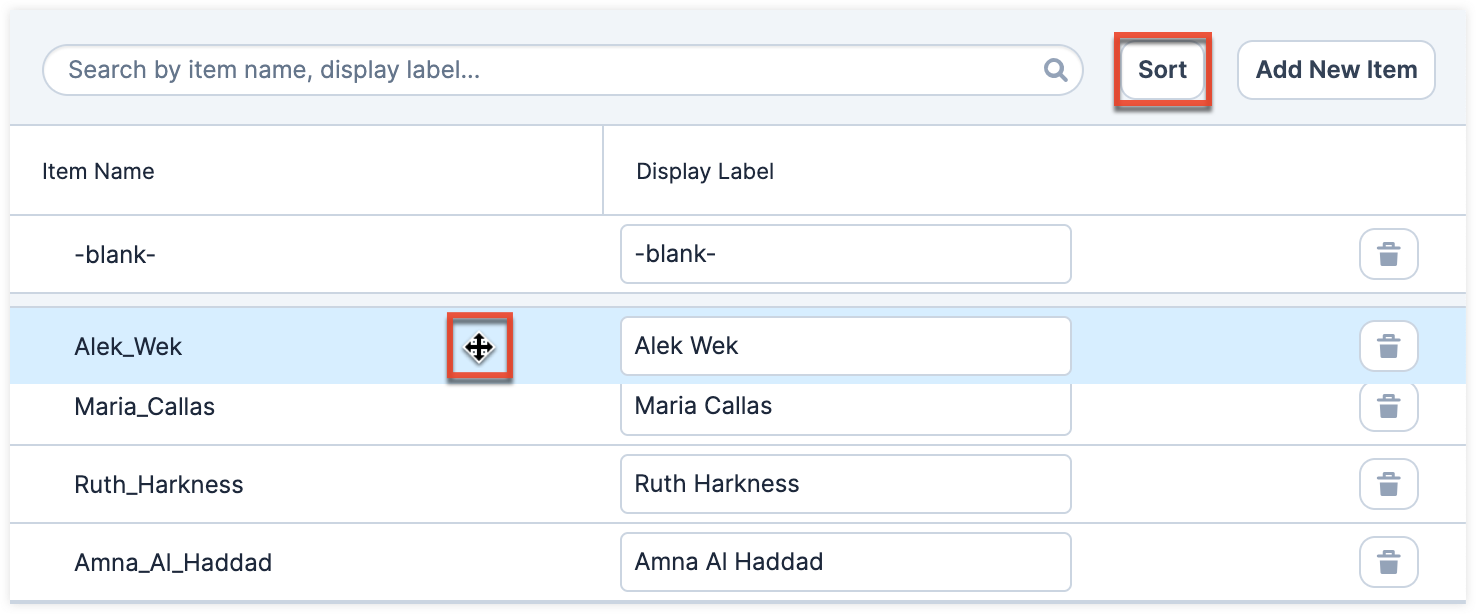
Sorting List Items
- Once all values have been added/changes made to your dropdown list, you can arrange them in the following ways:
- Click "Sort" to arrange the items alphabetically in ascending or descending order based on the display label.
- Sort the list manually by dragging and dropping the values up-and-down the list.
-
Click "Save" at the top of the screen to complete your changes.
Searching List Items
To search for a value in the dropdown list, simply begin typing in the search bar and the list will automatically filter to the items that match your input. Click the "x" to clear the search and return to displaying all values in the list.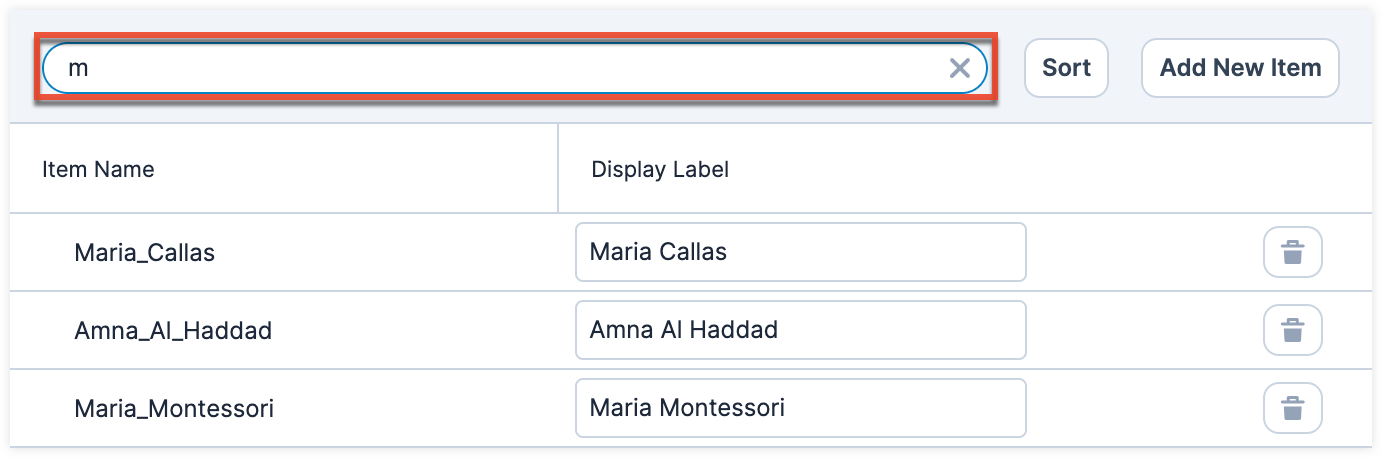
Editing Sales Stages
The Revenue Line Items module contains two fields that function unlike other fields in Sugar. When the Sales Stage dropdown field is updated, the corresponding probability is automatically populated in the Probability (%) field. This is a unique function of the Revenue Line Items module. These two fields use the two dropdown lists, sales_stage_dom and sales_probability_dom. Both dropdown lists have the same item name for all values but different display labels.
- The
sales_stage_domlist controls the Sales Stage field and displays the various sales stages (e.g., prospecting, qualification, closed won, etc.). Administrators can classify each sales stage, stock or custom, as "Open", "Closed Won", or "Closed Lost" by selecting the appropriate classification from the dropdown and saving the changes.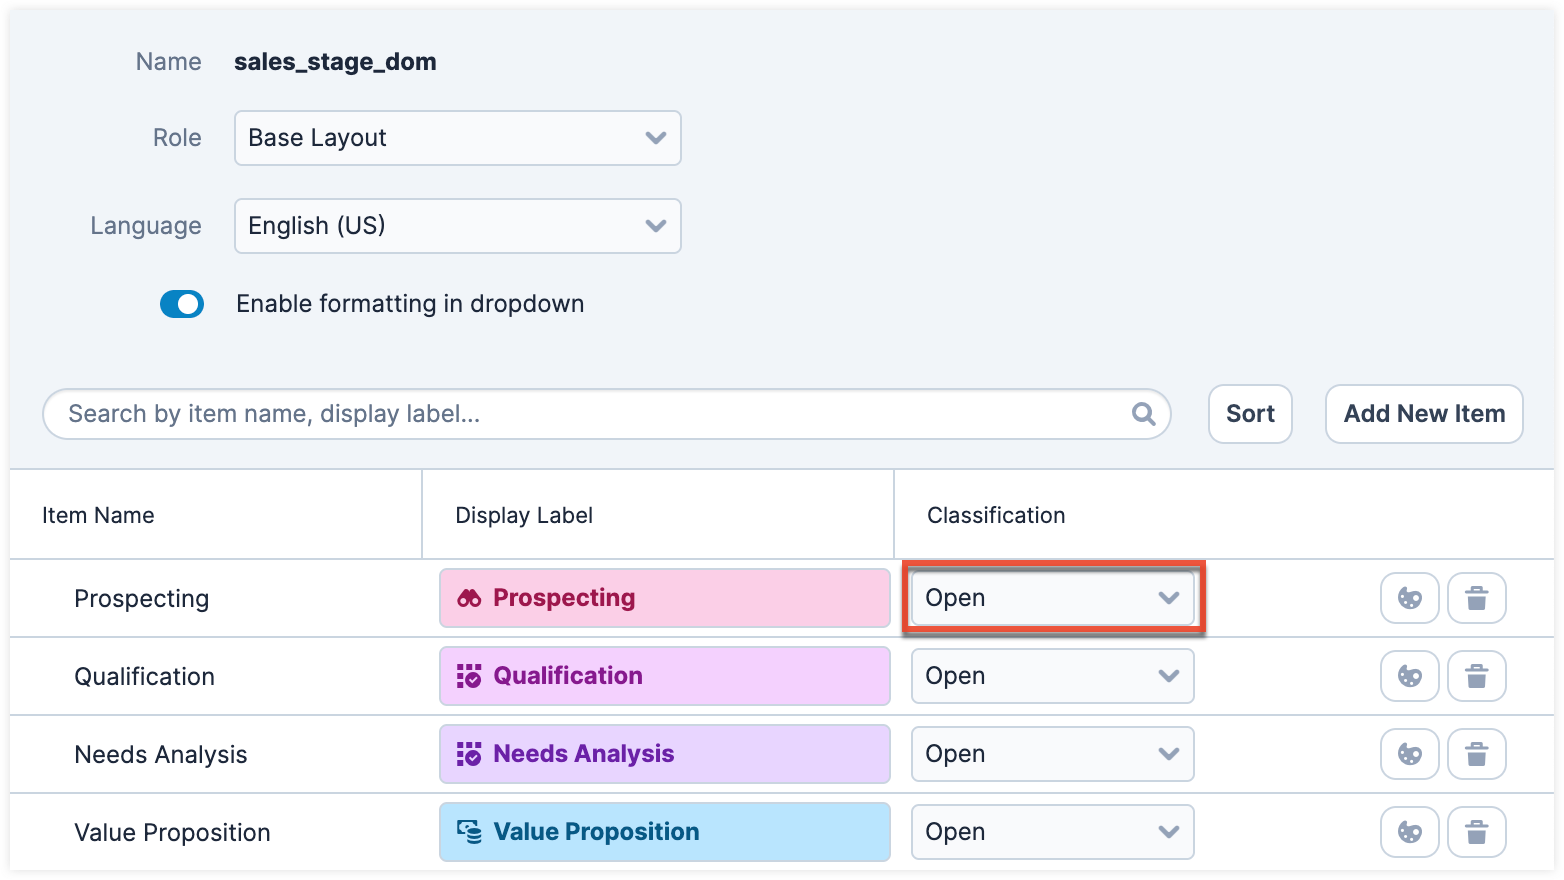
- The
sales_probability_domlist controls the Probability (%) field and displays the corresponding probability value (e.g., 10, 20, 100, etc.) for each sales stage.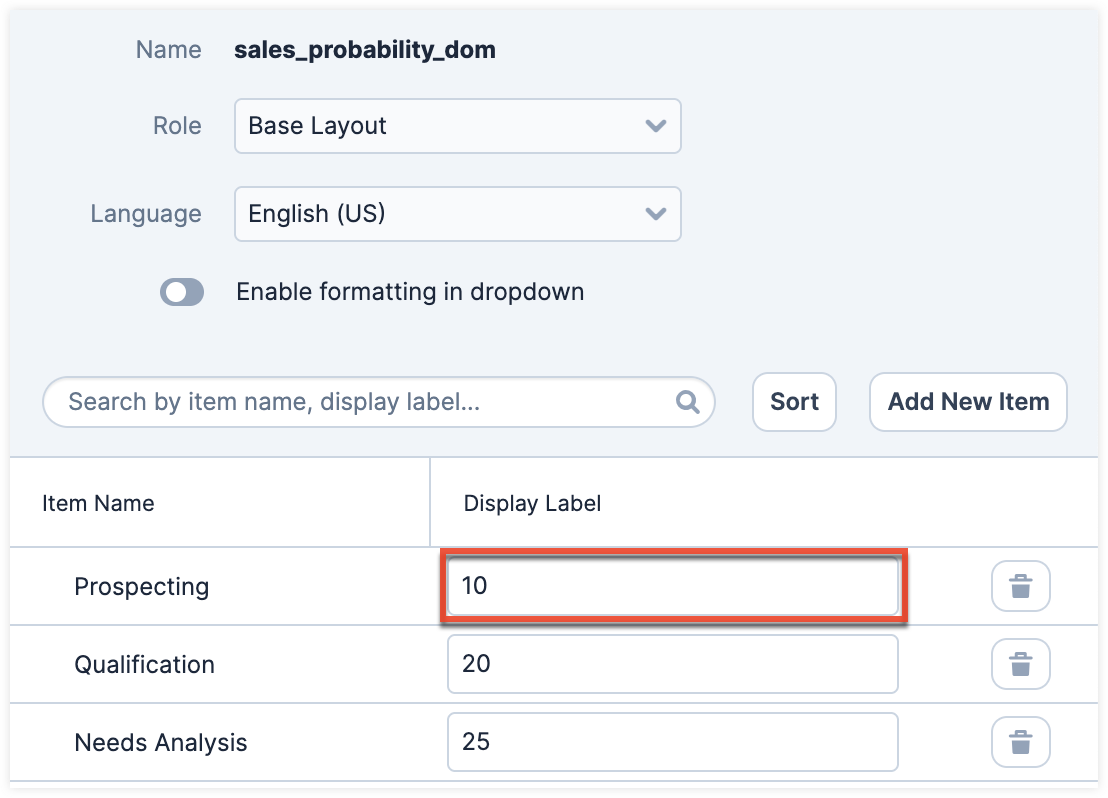
Users can create similar logic for custom fields using Sugar Logic in Studio.
Note: The dropdown lists sales_stage_dom and sales_probability_dom must have "Closed Won" and "Closed Lost" as item names in order for the Forecasts module to function correctly. Never remove or change the item names for these two options.
When any changes are made to the sales_stage_dom list, you must consider the sales_probability_dom list as well to ensure the relationship between the two fields remains intact. For example, if you add a new sales stage (e.g., Item Name: "review_stage", Display Label: "Review Stage") to the sales_stage_dom list, then you must add a corresponding probability (e.g., Item Name: "review_stage", Display Label: "50") to the sales_probability_dom list in order for it to populate properly in the revenue line item. The two lists' item names and order must match.
The Opportunities module's Status field uses the sales_status_dom list. For more information regarding the Status field, please refer to the Opportunities documentation.
Note: The Opportunities, Revenue Line Items, and Forecasts modules are not available to Sugar Serve users. For more information on license types and the functionality available for each, refer to the License Types Matrix documentation.
Localizing Dropdown List Values
If your organization uses Sugar in languages other than English, Sugar can display translated dropdown lists to localize the language. For example, Sugar will display Spanish dropdown items when a user is logged into Sugar in Spanish. You must provide the translations for each language by specifying display labels for each dropdown item.
- Finalize your list's items by adding or removing items; the item names (a.k.a. database values) and order of items will be consistent across all languages.
- Choose the desired language to edit in the Language dropdown above the list. A Comparison Language dropdown will appear beside the Language dropdown. Select a comparison language to easily compare labels in two different languages (e.g., Spanish and the system default language of English). The display label is displayed on the left and the comparison language label is displayed on the right.
- Enter the translated name into the Display Label field. You can only edit the display label, not the comparison language label in this edit mode.
- Please note, only one language list can be modified at a time and changes will be lost if you navigate to another language list prior to saving. When the labels have been translated in the selected language, click "Save" to preserve your changes. After saving, you will be redirected to the Dropdown Editor home screen.

Editing Role-Based Availability
You can restrict which options are available for a user to select when they are editing records based on the user's role. When editing a particular dropdown list, the Roles dropdown appearing on the top left contains all existing roles in the Sugar application. The Base Layout role-list allows admins to add, remove, or reorder options within a dropdown list. By default, none of the other Sugar roles have customized lists, so changes made to the Base Layout role-list will automatically be copied to the other role-lists upon save. This means that as long as no role-lists are customized here, all users will continue to see the dropdown options and order matching the Base Layout role-list. A user who is restricted by their role from a value in a list will not be able to select that value when editing a record, but they will see the value on the record view if a different user has set it.
Note: It is recommended to assign each user to a maximum of one role. Users belonging to multiple roles which each have customized role-views may experience unexpected behavior when using record views. For more information about roles, please refer to the Role Management documentation.
If you wish to restrict certain roles to use a modified list of options when editing records, select the desired role from the Roles dropdown to make changes specific to that role (e.g., Marketing Administrator).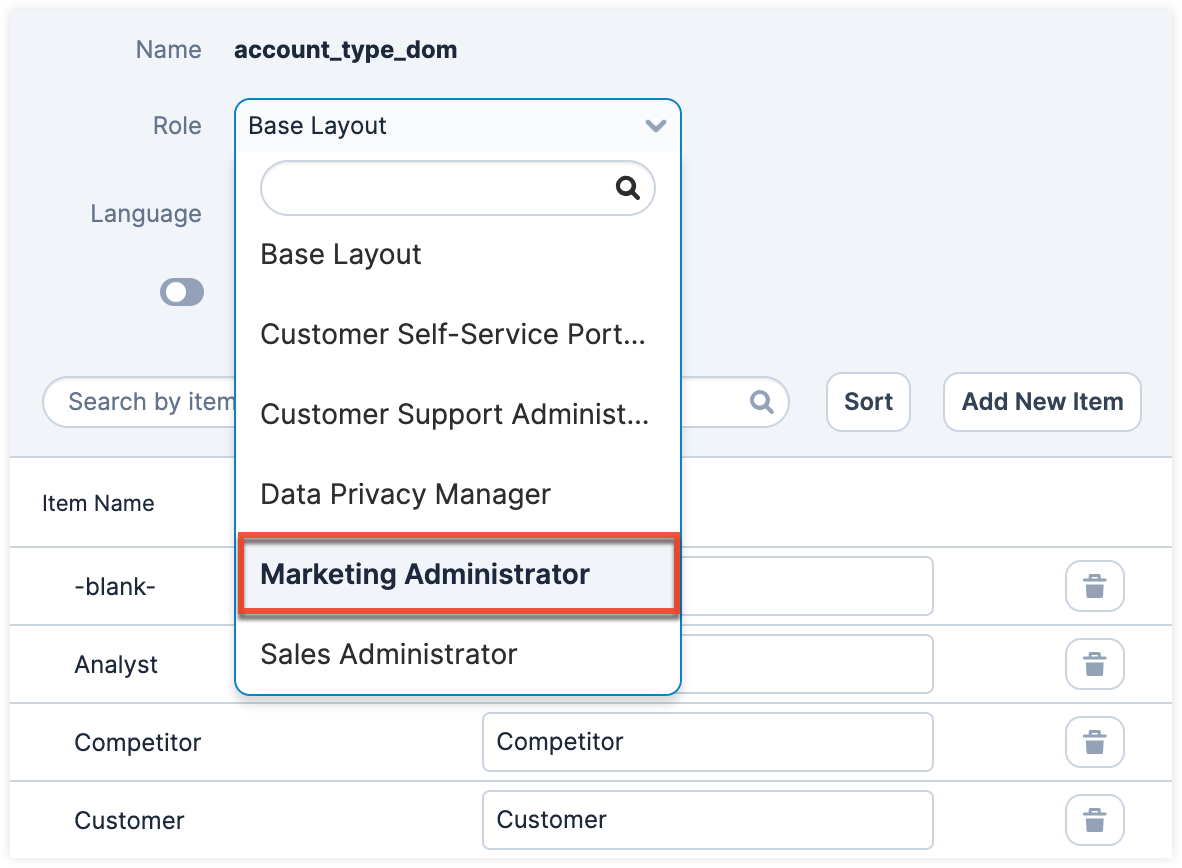
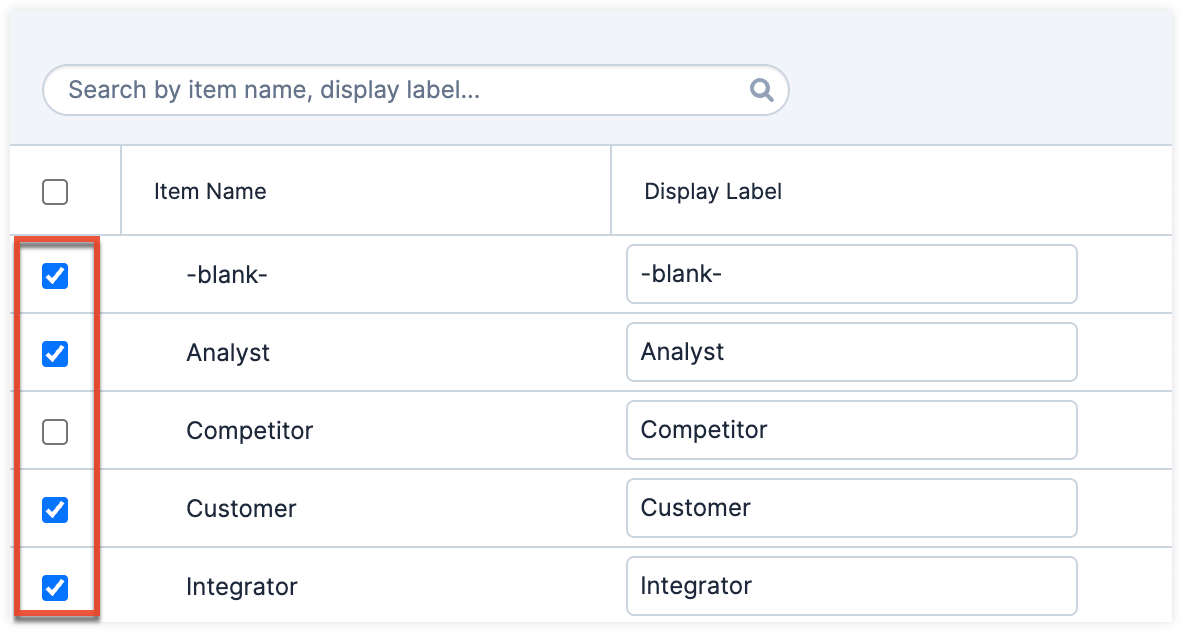
When viewing a Sugar role's role-list (e.g., Marketing Administrator), you have the option to disable, enable, or reorder the existing options. Options cannot be added or deleted via any role-list except "Base Layout". Drag and drop an option in order to change its position in the role-list's options list. To disable an option, deselect the checkbox in the option's row. Doing so will prevent the option from appearing in the dropdown when a user belonging to this role is editing or creating a record. Please note, only one role-list can be modified at a time and changes will be lost if you navigate to another role-list prior to saving. When the desired changes have been made, click "Save".
Note: Each role's role-list must have at least one enabled option.
Sorting the list, deleting an option, or changing an option's display label on the Base Layout role-list will sort, remove, or alter the option for all role-lists including customized role-lists. Items added to the Base Layout role-list will have to be enabled in any customized role-list where the option is applicable. Role-based customizations to dropdown lists are included when exporting customizations from Studio. For more information, please refer to the Studio and Module Loader documentation.
Formatting Dropdown Values
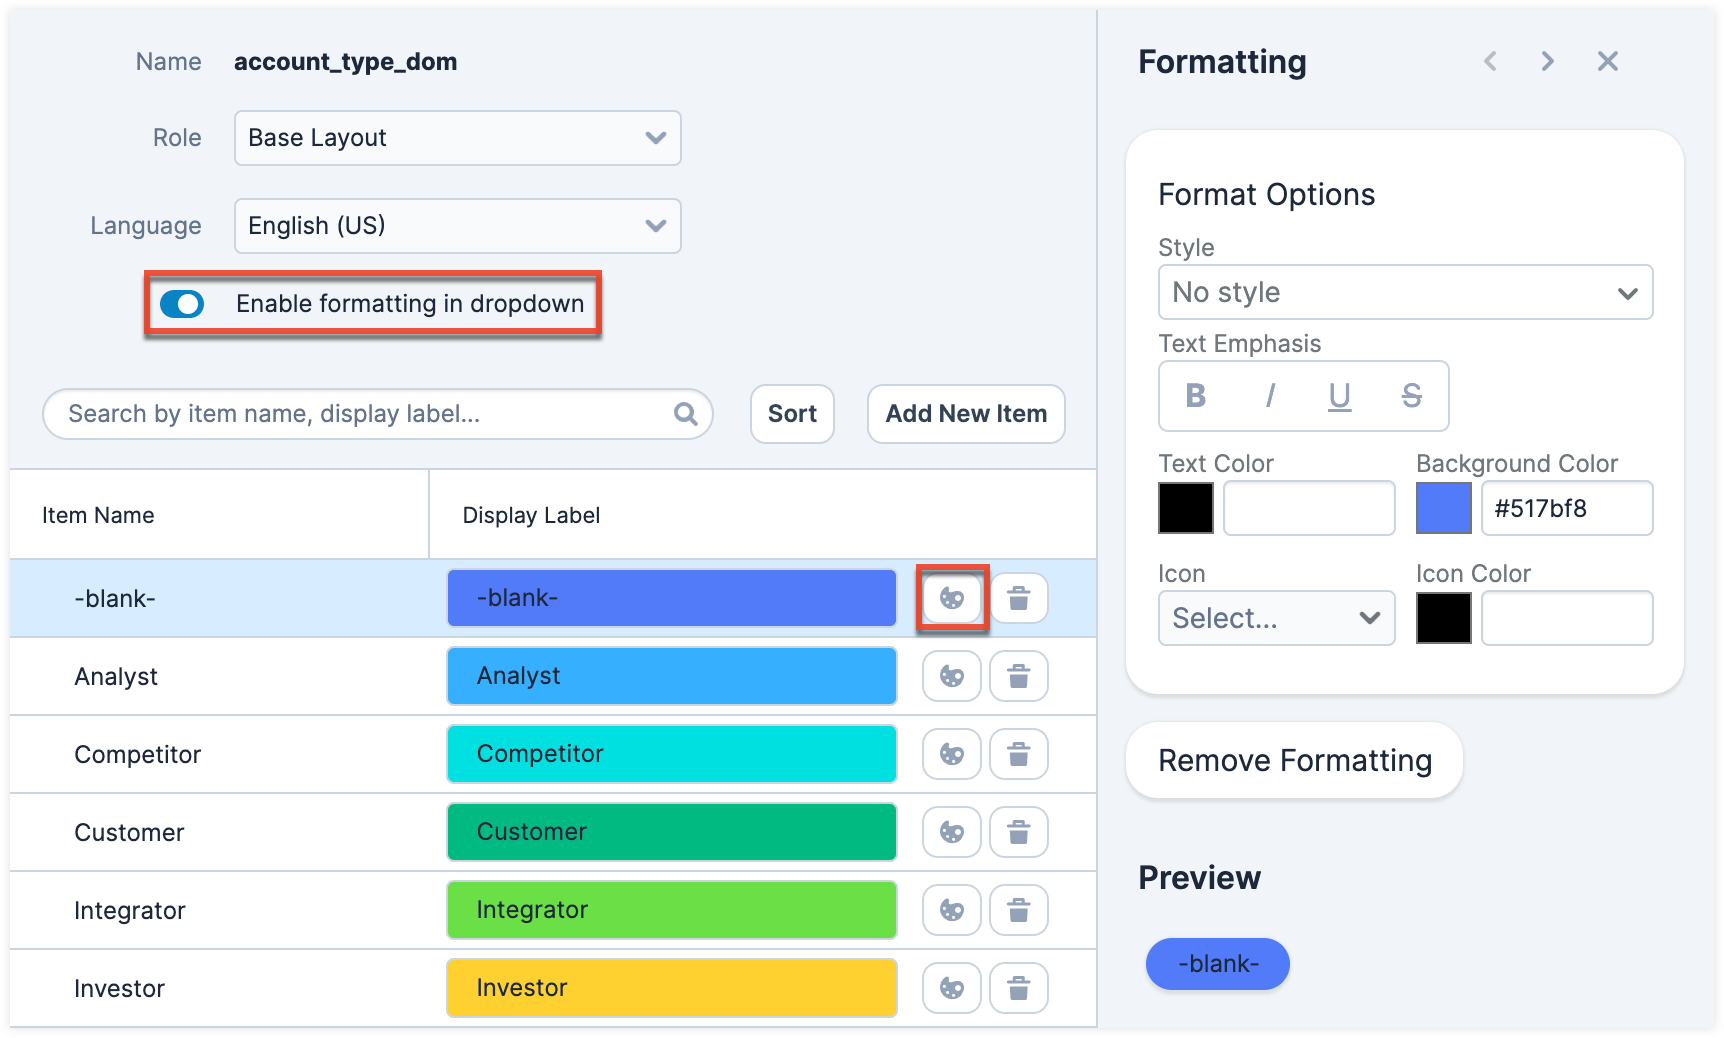
In the Dropdown Editor drawer, you can enable formatting for individual dropdown values. To do this, enable the "Enable formatting in dropdown" field. When enabled, system default colors are applied to each display label, and a Formatting button appears next to the Delete button for each value. Clicking the Formatting button opens the Formatting panel on the right side of the screen, where you can customize how each value appears in the dropdown. Once formatting is applied to your list, performing a Quick Repair and Rebuild will ensure your formatting appears across all languages, role-lists, and throughout Sugar.
Note: When formatting values, keep in mind that users are able to choose between light or dark mode in Sugar. Please choose formatting options that are accessible to both.
The panel includes the following options:
- Style: Select from predefined light, medium, and dark formatting styles.
- Text Emphasis: Add bold, italics, underlining, and strikethrough to your options
- Text Color: Choose a text color by clicking the color box or entering a hex code.
- Background Color: Choose a background color by clicking the color box or entering a hex code.
- Icon: Select an icon from a predefined list. The icon appears to the left of the display label.
- Icon Color: Choose an icon color by clicking the color box or entering a hex code.
For the color fields, clicking the color box opens the standard color picker, which supports RGB, HSL, and HEX values. You can drag along the color bar, pick a shade, or use the eyedropper tool to select a color directly from your screen.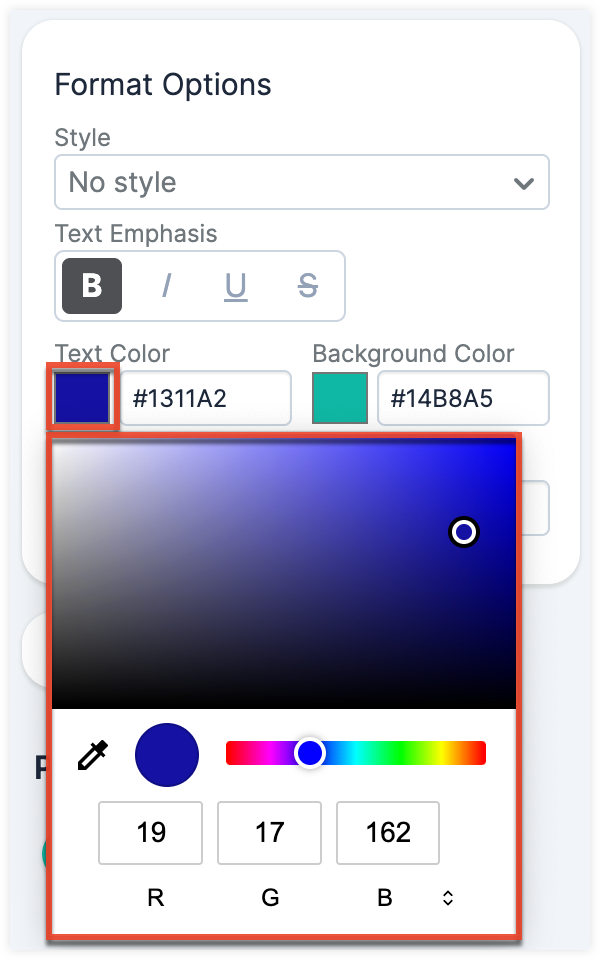
Additional features in the Formatting panel:
- Remove Formatting: Clears all formatting for the selected value.
- Preview: Shows how the formatted display label will appear.
- Navigation Arrows: Use the left and right arrows at the top of the panel to move through the list items and apply formatting individually.
- Close (X): Closes the panel without discarding changes.

Formatting changes are not saved automatically. To keep your changes, click "Save" at the top of the Dropdown Editor drawer. To discard them, click "Cancel" at the top of the drawer.
Note: To ensure your formatting options are reflected throughout your instance, you must perform a Quick Repair and Rebuild from Admin>Repair.
Editing Time Intervals
The "After Time Elapsed" workflow triggers after a specified period of time has elapsed from when a record save occurs in Sugar. For more information on "After Time Elapsed" workflows, please refer to the Workflow Management documentation. When creating the conditions for the workflow, you have the option to specify the time interval (e.g., 0 hours, 4 hours, 1 day, 1 week, etc.) used by the system to execute the workflow. The available time interval values can easily be modified via the Dropdown Editor.
The Dropdown Editor contains the "tselect_type_dom" list, which allows administrators to configure the time intervals used for time elapsed workflows. To add new time intervals to the dropdown list, simply enter the "Item Name" and "Display Label", keeping in mind that the item name must display the number of seconds corresponding to the new time interval. The display label value should have the time as it relates to minutes, hours, days, etc. For example, if you are adding 2 hours to the time interval list, the item name value will be "7200" and the display label will show "2 hours".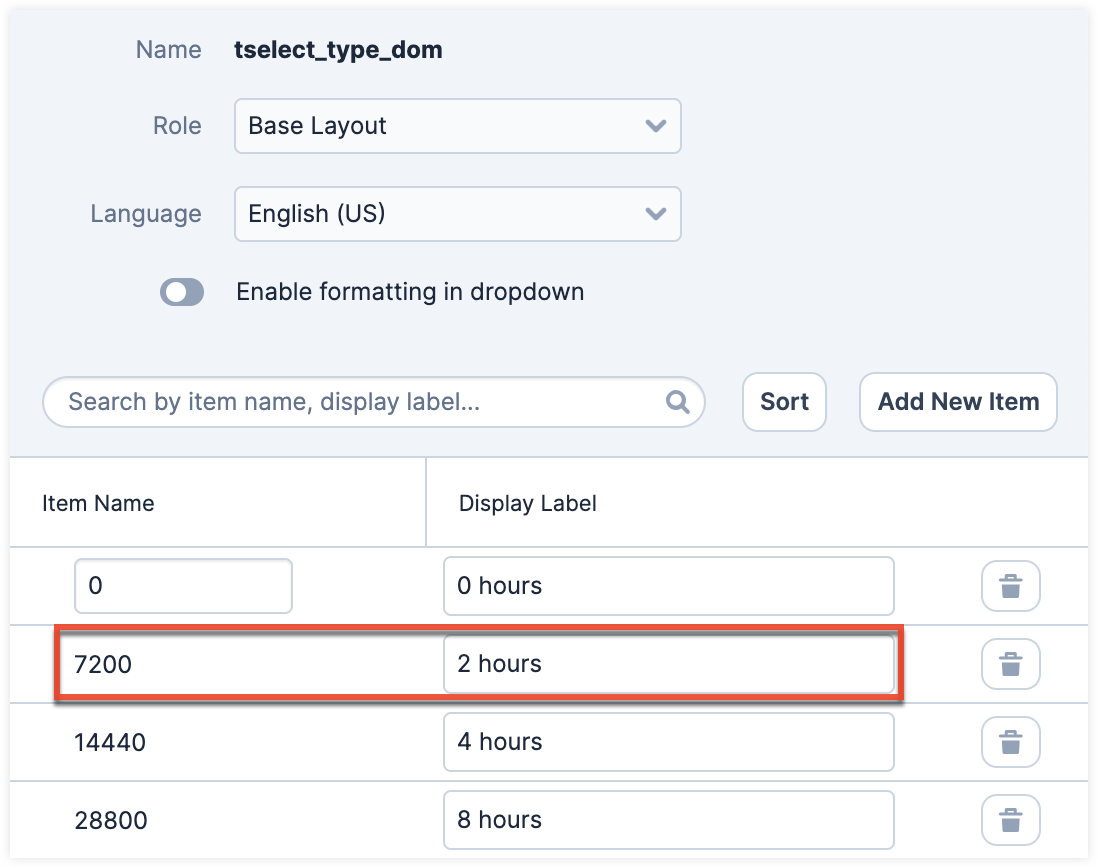
Restoring to Default
When editing dropdown lists, you have the option to restore the original, out-of-the box values at any time. Please note this is only available for stock dropdown lists and not for custom lists. When viewing the dropdown list, click "Restore to Default" at the top right of the screen, then click "Confirm" to reset this list to its original settings and remove any customizations, including sorting preferences.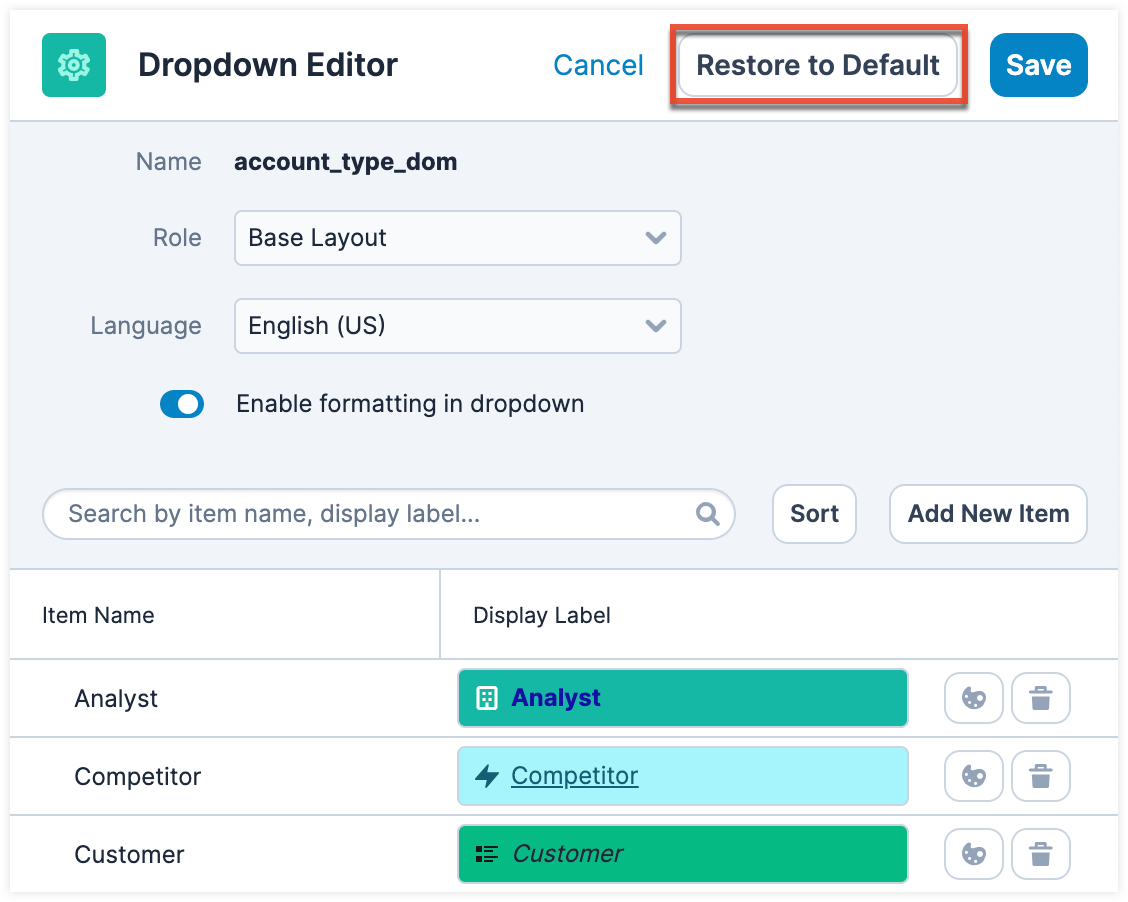
Relate Fields Denormalization
Relate Fields Denormalization is a Sugar administration tool that can be used by customers with very large database tables to optimize the database structure for faster sorting and data load of relate-type field values on list view pages. The denormalization process will copy the values of stock Sugar relate fields from their own tables into a text field (e.g., denorm_field_name) in the table of the related module (i.e., the parent table) via cron job. The new text field is then used for sorting in list views. Then, a logic hook will continue to monitor any value changes made to the relate field, the source field that the relate field points to, and to the linked record ID. The logic hook will also react to changes made to the relationship.
As an example, you may want to denormalize the Account Name relate field for the Opportunities module so that when you sort by Account Name in the Opportunities list view, Sugar will query its search against the field value in the Opportunities table instead of against the JOIN table for accounts_opportunities.
Note: While denormalizing the data will speed up sorting in list views, it may increase the time it takes to update records in the denormalized module (1-5% degradation in the worst case).
To denormalize a relate field in your instance, use the following steps:
- Navigate to Admin > Relate Fields Denormalization, located in the Developer Tools section of the page.
- Choose the module that contains the relate field you would like to denormalize. Each module's name will display a number that indicates how many relate fields are eligible for denormalization in that module. The following criteria must be met in order for a field to be eligible for field denormalization:
- The field must be a stock relate-type field. Custom fields cannot be denormalized.
- The field must be configured as "Available" in the list view layout for the module. For more information on list view layouts, refer to the Studio documentation.
- The relate field must be sortable in the list view. This is not an admin configurable option, so we recommend confirming this before continuing.
- Click on the field name that you want to denormalize under "Field List" and drag and drop it to the "Denormalized Fields" section on the right.
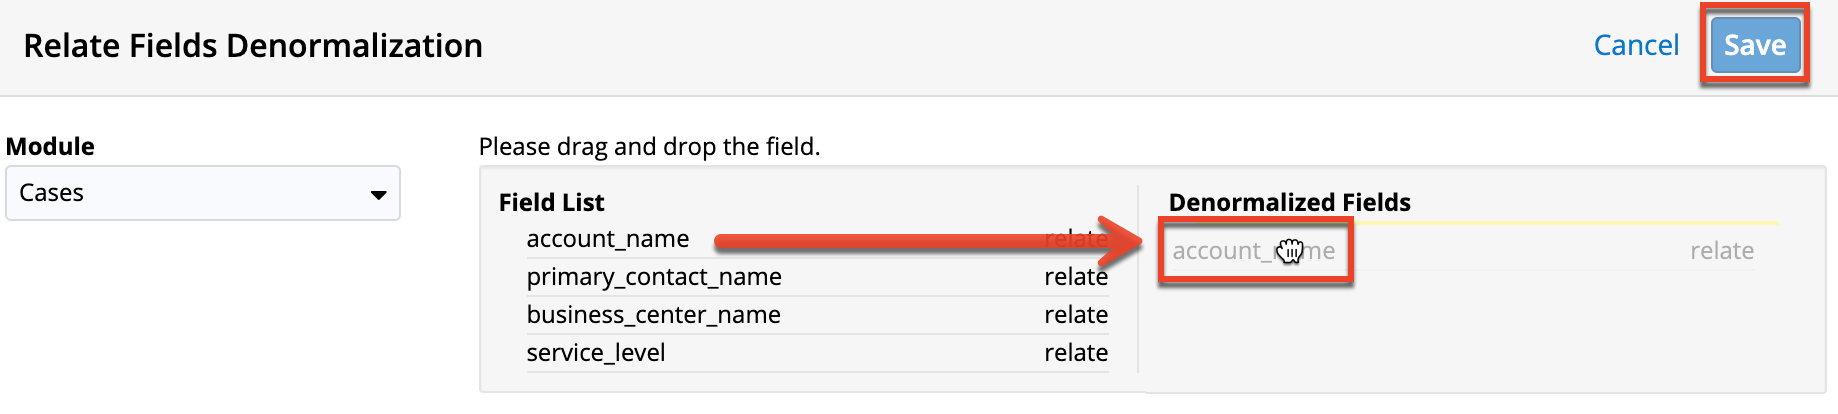
- Click Save.
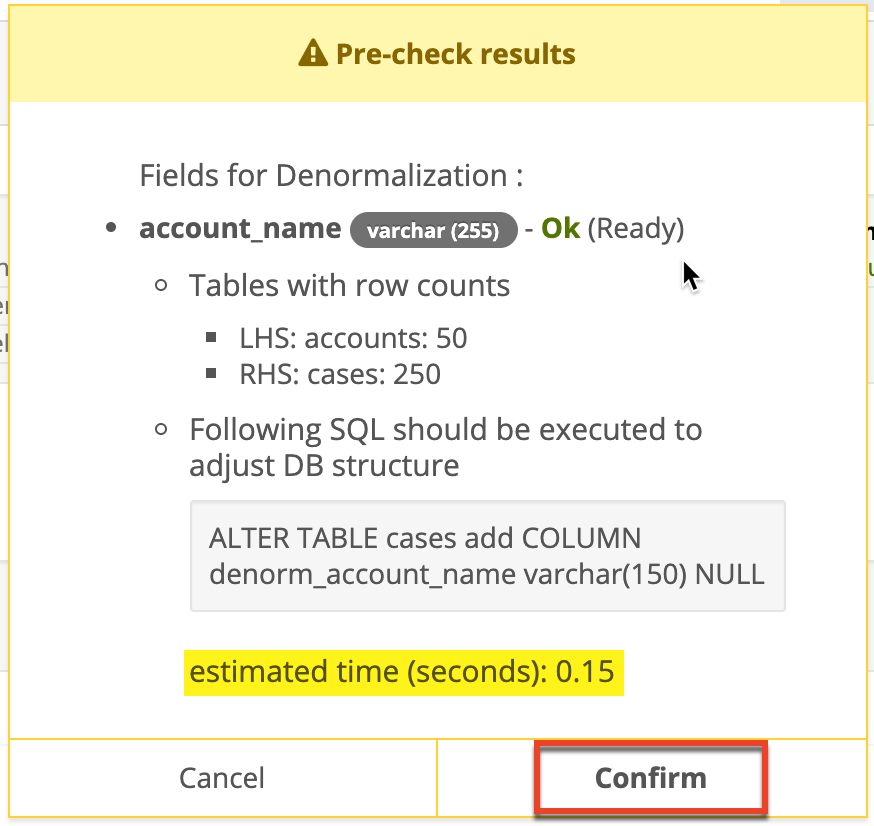
- Review the Pre-check Results window and take note of the estimated time to complete, which could take up to an hour depending on the table sizes. Click "Confirm" to continue. Alternatively, you may choose to copy the SQL shown in the window, click "Cancel", and execute the command manually if you would prefer not to initiate the cron job.
After confirming, the process will continue in the background and show its progress in the Work Status field. You may click on the refresh icon to update the latest progress until it is "Done".
You may click on the Remove (x) icon to remove your scheduled denormalization job from the job queue, but as best practice, it is recommended to allow an in-process job to fully complete without stopping it. Denormalization changes that have been applied to a field can be reversed by moving it from the "Denormalized Fields" side back to "Field List" and clicking "Save". Reversing a denormalization action will remove the related logic hook and Sugar will resume using the regular field, but the denormalized field will still exist in the database.