Getting Started for Admins
Overview
Welcome to SugarCRM! As a system administrator you have administrative rights to configure and perform key functions in Sugar such as creating, editing, and managing users and editing system-wide settings for your organization via the Administration page. You can access all modules and records in Sugar and are not subject to team or role restrictions. If your instance uses SugarIdentity, then you will need to access the SugarIdentity console to create and manage user records as well as configure password requirements and set up LDAP/SAML authentication.
When first logging into Sugar, the new user wizard will step you through configuring some basic settings (i.e., User Profile). You may skip these steps and configure these settings in your user preferences at a later time if you wish.
This documentation will cover the administrative options (e.g., new user wizard, Administration page) available when getting started as a system administrator in Sugar to help familiarize you with the various admin functionality in the application. For more information on the basics of Sugar's user interface and how to perform common tasks/operations (e.g., view, create, edit module records) in the application, refer to the User Interface documentation in the Application Guide.
Setting Up Sugar
If you are a new Sugar administrator getting ready to configure your new Sugar instance, please refer to the help article below specific to the license type (e.g., Sugar Sell Premier) purchased with your Sugar subscription to learn more about how to activate and configure your instance.
- Activating Sugar Sell Premier
- Activating Sugar Sell Advanced
- Activating Sugar Sell Standard
- Activating Sugar Sell Essentials
- Activating Sugar Serve
- Activating Sugar Enterprise
- Activating Sugar Enterprise+
Accessing Sugar
Prerequisites
The following will need to be installed and configured on your local machine prior to accessing Sugar:
- A supported web browser application (e.g., Chrome, Firefox) is required on your computer. For more information on the various supported web browsers, refer to the Supported Platforms page.
- The web browser must have JavaScript and cookie support enabled in order to access Sugar.
- Network access to a server running your Sugar instance is required.
Logging In
The Sugar login screen is where you enter your login credentials (Username, Password) to access your instance. To access Sugar's login screen, enter in your Sugar instance URL (e.g., https://example.sugarondemand.com) in your web browser. If you do not know your instance URL or login credentials, please reach out to another system administrator in your organization for assistance. If you wish to reset your password, you can click the "Forgot Password?" link on the login screen.
Sugar's user wizard will launch upon your first successful login allowing you to configure some of your basic personal settings. For more information on logging in to Sugar, refer to the Getting Started documentation in the Application Guide.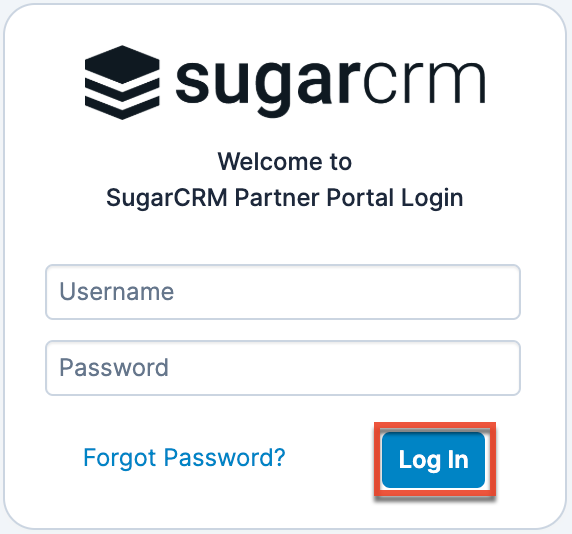
If your organization uses multiple SugarIdentity-enabled instances (e.g., production, sandboxes) and you have accessed different user accounts in the tenant(s) (e.g., ABC Production, ABC Test Sandbox), the login screen will display an account selector with the list of users you have logged in as for the current instance you are accessing.
Resetting Your Password
The "Forgot Password?" link on Sugar's login screen allows users to reset their password. For more information on resetting your password, refer to the Getting Started documentation in the Application Guide. The password requirements can be set up and managed by system administrators in SugarIdentity (for instances that are SugarIdentity-enabled) or in the Sugar application (for instances that are not SugarIdentity-enabled). For more information, refer to the Password Management documentation in the Administration Guide.
Please note that the outbound mail server for the system must be configured via Admin > System Email Settings and users must have their personal email settings configured in their user preferences in order for the password reset email to be sent. For more information on setting up the system email settings, refer to the Email documentation in the Administration Guide.
Setting Your Language
You also have the option to choose the primary language you want to be displayed in Sugar by clicking the Language link at the bottom of the Login screen. The Language dropdown list will appear allowing you to select the appropriate language you want to be displayed in your Sugar account. The out-of-the-box default language in Sugar is English (US), but system administrators can change the default language globally via Admin > Locale. For more information on configuring the default language in Sugar, refer to the System documentation in the Administration Guide. Once the default language is changed, it will display as the default selection on the login screen for all users.
Administrators can also configure what languages are available to select in the Language dropdown list via Admin > Languages. For more information on managing the available languages, refer to the System documentation in the Administration Guide.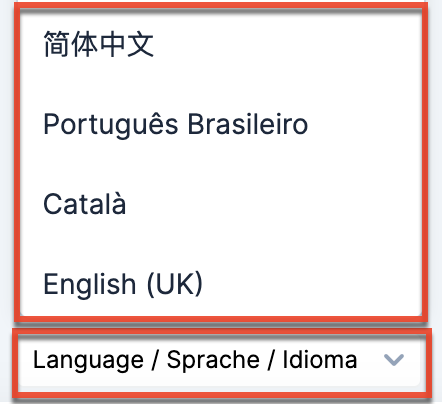
User Wizard
The new user wizard will launch upon your first successful log in to Sugar allowing you to configure some of your basic personal settings (e.g., User Locale Settings) for your user profile. For more information on the user wizard, refer to the Getting Started documentation in the Application Guide. You may skip these steps if you wish to configure these settings in your user preferences at a later time. Once your user profile set up is complete, you will be able to navigate to a specific area of Sugar to perform various administrative functions (e.g., import data, configure system settings). Please note that system administrators can also set up each user's basic settings when creating a user in Sugar.
Help Pane
When you get logged in to your Sugar account you will see Sugar's home page and a navigation bar spanning top to bottom on the left of the screen. The Help icon at the bottom of the navigation bar displays useful information such as your Sugar instance's version, your assigned CRM solution licenses (e.g., Sugar Sell Advanced, Sugar Serve), as well as a brief introduction to the current module (e.g., Accounts) you are accessing and a link to its corresponding documentation. You can click the Help icon at anytime to quickly find this information and access the various learning resources that are available:
- Training & Certification: Navigate to the SugarU space in SugarClub, where you can enroll in online classes, engage with live training, and get Sugar-certified.
- SugarClub Community: Engage, learn, and explore with others around the world in the SugarClub online community. Level up your Sugar knowledge and share your expertise with other users, Sugar partners, and Sugar employees.
- Documentation & Support: Navigate to the Sugar Support Site, where you can access the case portal and official product documentation.
- SugarOutfitters Marketplace: Navigate to the SugarOutfitters site, the SugarCRM marketplace, where you can explore and find a vast selection of third-party solution add-ons that can add new capabilities to your Sugar instance.
Note: The SugarOutfitters Marketplace link does not appear in the help pane for Sugar Sell Essentials customers.
Sugar Administration Page
The majority of the admin functionality in Sugar can be found on the Admin page, which can be accessed via your user menu on the upper right of Sugar. 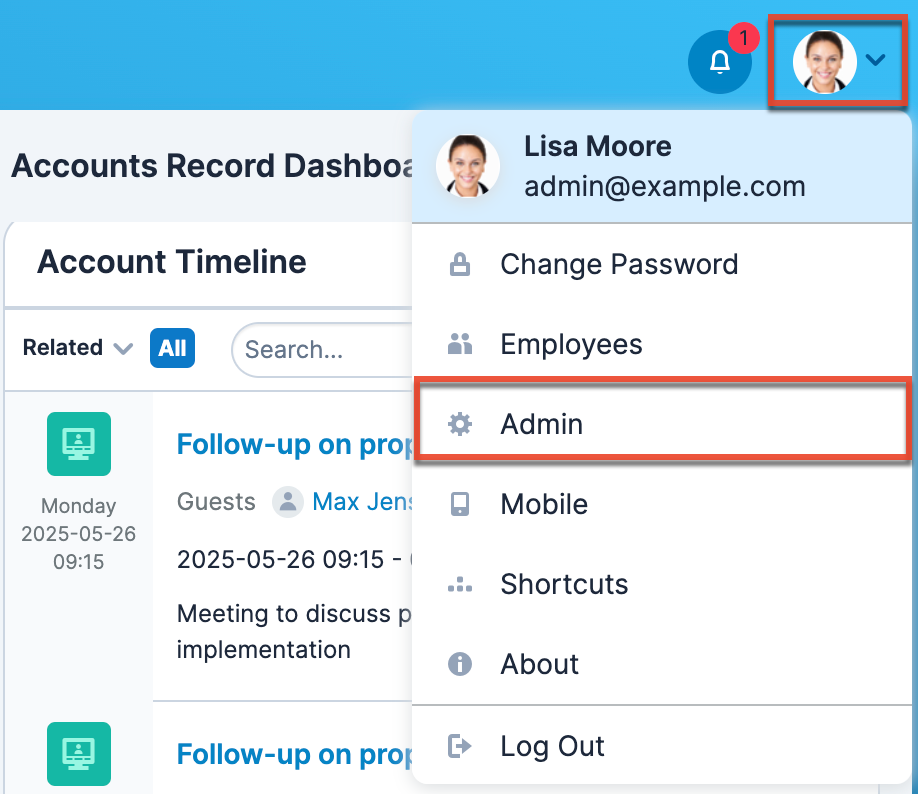
The Admin page contains links to a wide variety of settings and tools for configuring and customizing your Sugar instance. The page is grouped by topic (e.g., System, Users, Email) and is also searchable using the search bar on top. Hover over any link on the Admin page to see a quick summary of the linked page and what can be configured/managed.
The following table highlights some key Admin settings that are available to configure and manage on the Admin page:
| Admin Settings | Description |
| SugarIdentity | Only available if your instance is SugarIdentity-enabled. Manage user identities (e.g., create/edit users, assign license types), configure password requirements, and set up external authentication (e.g., SAML, OIDC). |
| User Management | Manage basic and advanced user data in Sugar. If your instance is SugarIdentity-enabled, you will need to access SugarIdentity to edit the read-only fields (e.g., name, email address, work phone) in the user's record. |
| Team Management | Create and manage team memberships and properties. |
| Role Management | Create and manage role memberships and properties. |
| Password Management | Manage password requirements and other policies related to user passwords in Sugar. If your instance is SugarIdentity-enabled, you will need to access SugarIdentity to configure password requirements. |
| System | Configure and manage the various system settings (e.g., Locale, Languages) to customize Sugar to best suit your organization's needs. |
| System Email Settings | Configure the system's outbound email settings as well as additional email and security options. |
| Developer Tools | Customize the look, feel, and functionality of your Sugar instance using the various configuration options (e.g., Module Names and Icons, Navigation Bar and Subpanels). |
| Studio | Customize module fields, page layouts, relationships, and more. |
| Module Builder | Create new, custom modules in Sugar to meet your business needs. |
| Opportunities Configuration | Configure the admin settings for the Opportunities module. |
| SugarBPM | Create and design workflow processes using SugarBPM to streamline various business processes in your organization. |
Please note that regular users with developer-level role access to at least one module can also access certain admin functionality on the Admin page. To understand the difference between an adamin user and a regular user with developer-level role access, see the Understanding Admin and Developer Access in Roles article. Also, refer to the Role Management documentation for details on configuring roles in your instance.
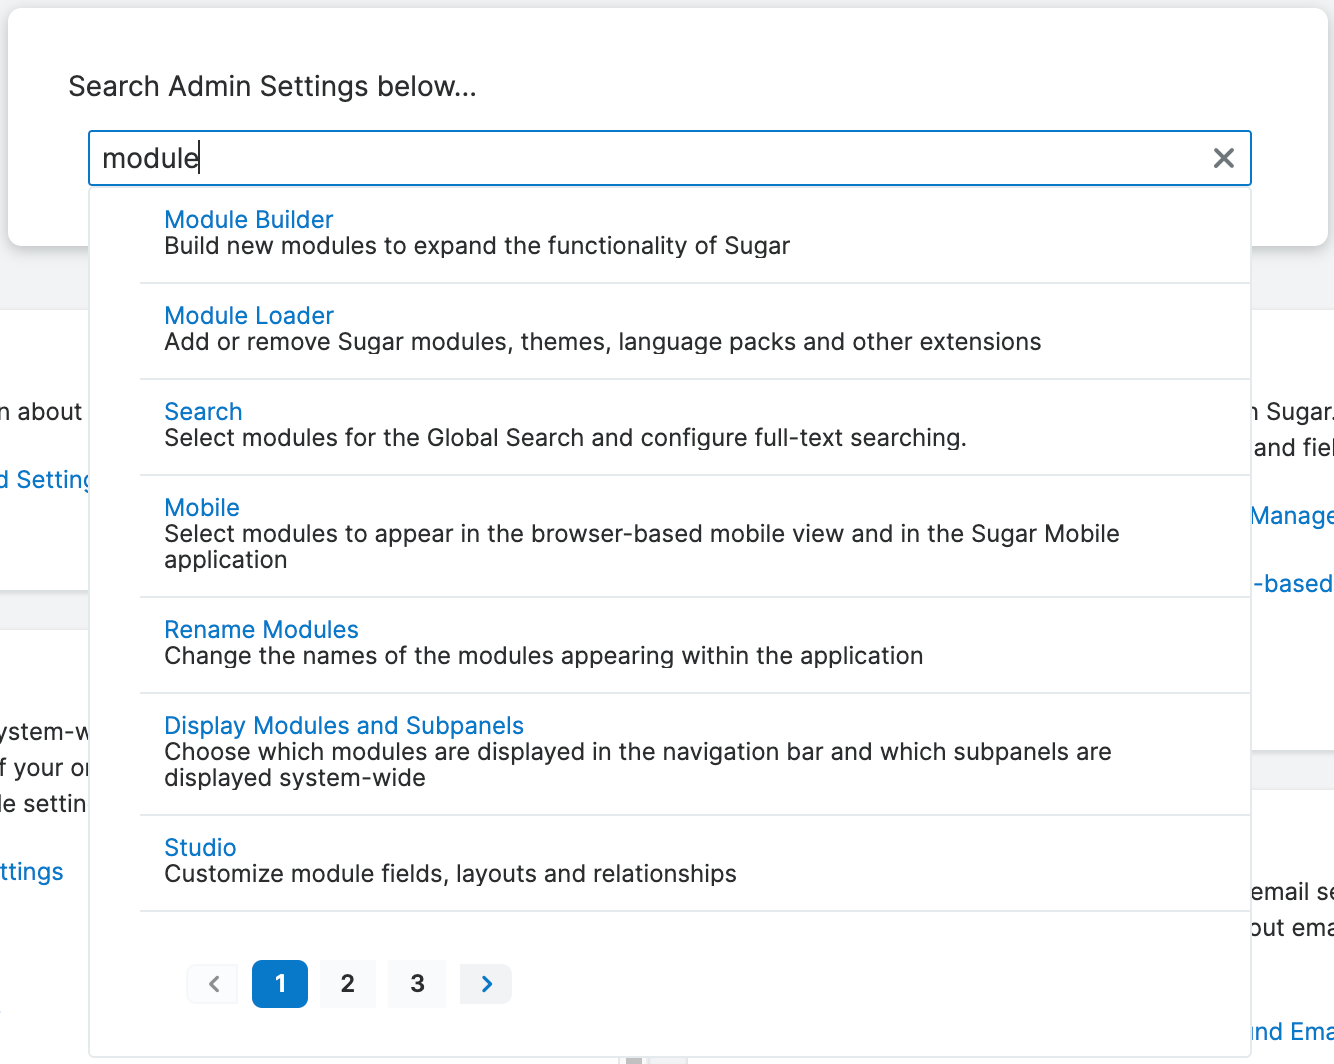
Admin Page Search
The search bar appears at the top of the Admin page to allow admins to quickly find specific links within the Admin page. When you start entering a search term, a list of matching results is displayed and is updated as you type. If there are more than seven matching results, use the page numbers and arrow buttons at the bottom to navigate between the pages of results. Click any result to open the specific link.