Cases
Overview
Sugar's Cases module is used to track and manage customer requests for assistance with products or services. As a case is opened, worked on, and resolved, its progress will be denoted by the Status field. Each case record may relate to other Sugar records such as calls, contacts, and bugs, making it easy to get the full picture of a customer's issues and history. If enabled, contacts can view and open cases via the Sugar Portal along with bugs and knowledge base articles. Cases can also be automatically created from incoming emails, and a case macro can be employed to automatically relate emails to existing cases. This documentation will cover information and actions specific to the Cases module. For instructions concerning views and actions that are common across most Sugar modules, such as creating, editing, and deleting cases, please refer to the Working With Sugar Modules section of this page.
Note: The Cases module is not available in Sugar Sell Standard or Essentials.
Users with a Sugar Serve license type can use the Service Console as their primary case workspace. Service Console is a Home page dashboard that provides a powerful work environment for customer service agents by incorporating SLAs and region-specific business hours, insightful dashlets, and a cohesive case research and action experience.
In addition, Sugar Serve provides a stock SugarBPM™ template that sets case follow-up dates on new and in-progress cases according to your organization's Service Level Agreements (SLAs). It incorporates case and related account fields when calculating follow-up dates as well as sending email notifications and updating the case Status field in certain circumstances. It also updates Case fields that are used to perform first response and resolution calculations.
Please note that you will only be able to see case records as allowed by your team membership, user access type, and assigned roles. For more information on teams and roles, please refer to the Team Management and Role Management documentation in the Administration Guide.
Case Fields
The Cases module contains a number of stock fields that come out-of-the-box with Sugar. For information on using and editing various field types, refer to the User Interface documentation. The definitions below are suggested meanings for the fields, but the fields can be leveraged differently to best meet your organization's needs. Administrators or users with developer-level role access have the ability to alter, add, or remove fields via Admin > Studio. For more information on configuring fields, please refer to the Studio documentation in the Administration Guide.
| Field | Description |
| Account Name | The account that submitted the case.
Note: In Sugar Serve or Enterprise, information from a case's related account is used by the stock SugarBPM template to calculate the Follow Up Date.
|
| AI Sentiment | The current sentiment generated by the AI Summary dashlet for a case record. Note: This field is only available with the Intelligence add-on. |
| Assigned To | The Sugar user assigned to the case. Note: Case owners receive an email whenever a case is assigned to them if the administrator has enabled email notifications. |
| Attachments | One or more files attached to the case. Note: The Sugar administrator can specify the maximum file size allowed to be uploaded via Admin > System settings. |
| Business Center Name | The business center responsible for managing this case. During case creation, selecting a related account will cause the Business Center Name field to be populated automatically, on save, with the account's business center. The value can also be manually set. The selected business center is used for business hour calculations. For more information, refer to the Business Centers and Cases section of this page. |
| Business Hours to First Response 1 | The calculated duration in business hours, using the hours of the case's business center, from the moment the case is created until its First Response Sent field is set to "true". Setting the First Response Sent field to "false" does not clear this field's value, but it is updated each time the First Response Sent field is set to "true". |
| Business Hours to Resolution 1 | The calculated duration in business hours, using the hours of the case's business center, from the moment the case is created until its Status field is set to "Closed", "Rejected", or "Duplicate". Reopening the case does not clear this field's value, but it is updated each time the case is closed. |
| Case Number | An automatically incremented number to identify every case, which cannot be edited through Sugar. |
| Claim button 3 | A button to assign a case to yourself, displayed in the header of both the Cases record view and the Cases focus dashboard. This button will only be visible if the case is not already assigned to you. |
| Close button 3 | A button in the case header to close a case, displayed in the header of both the Cases record view and the Cases focus dashboard. This button will only be visible if the case is not already in a Closed status. |
| Comment Log | A shared log of messages, comments, or other text, including the name of the user that added the log entry and the date and time it was added. It is possible to tag other users and link to other Sugar records in Comment Log entries by inserting a clickable pill; see the User Interface documentation for more details. |
| Date Created | The date the case was created. |
| Date Modified | The date the case was last modified. |
| Description | Explanation of the cause and details of the case when submitted. |
| Escalated | Displayed as a red badge with the text "Escalated" beside the record name in the header and at the top of the preview, this field indicates if the record has an open escalation related to it. If the record is not escalated, the badge is not visible. This field can also be added to other views. See the Escalations page for more details on escalating records. |
| First Response Actual Time 1 | The date and time the First Response Sent field is set to "true". Setting the First Response Sent field to "false" does not clear this field's value, but it is updated each time the First Response Sent field is set to "true". |
| First Response Sent 1 |
A checkbox that indicates whether or not the first response has been sent to the customer. In Sugar Serve or Enterprise, this field is updated by a stock SugarBPM template when the case's status changes from "New" to anything else. However, the SugarBPM template can be configured to set the field using other criteria if desired (e.g., when a note with a Note Source of "Internal" is related to the case). When this field is set to "true", Sugar updates the following fields:
Setting this field to "false" does not clear the above fields' values, but they are updated each time this field is set to "true". |
| First Response SLA Met 1 |
A dropdown field with possible values of "Yes" and "No"; its value is updated when the First Response Sent field is set to "true". If the first response was sent to the customer before the follow-up date, this field is set to "Yes"; if the first response was sent after the follow-up date, this field is set to "No". In Sugar Serve or Enterprise, the stock SugarBPM template sets this field to "No" if the follow-up date passes before the case's status is updated. Setting the First Response Sent field to "false" does not clear this field's value, but it is updated each time the First Response Sent field is set to "true". |
| First Response Target Time 1 | The calculated date and time by which the first response must be sent to meet the SLA. This field is set based on the value of the Follow Up Date field at the time the First Response Sent field is set to "true". Setting the First Response Sent field to "false" does not clear this field's value, but it is updated each time the First Response Sent field is set to "true". |
| First Response Variance from Target 1 | The calculated difference in business hours, using the hours of the case's business center, between the First Response Actual Time and First Response Target Time fields. A negative number indicates that the first response was sent before the target and a positive number indicates that it was sent after. Setting the First Response Sent field to "false" does not clear this field's value, but it is updated each time the First Response Sent field is set to "true". |
| First Response User 1 | The user the case is assigned to when the First Response Sent field is set to "true". Setting the First Response Sent field to "false" does not clear this field's value, but it is updated each time the First Response Sent field is set to "true". |
| Follow Up Date | The date and time to follow up with the customer.
Note: While this value can be manually set, it is automatically set by the stock SugarBPM template included with Sugar Serve or Enterprise.
|
| Hours to First Response 1 | The calculated duration in calendar hours from the moment the case is created until its First Response Sent field is set to "true". Setting the First Response Sent field to "false" does not clear this field's value, but it is updated each time the First Response Sent field is set to "true". |
| Hours to Resolution 1 | The calculated duration in calendar hours from the moment the case is created until its Status field is set to "Closed", "Rejected", or "Duplicate". Reopening the case does not clear this field's value, but it is updated each time the case is closed. |
| Integration Sync ID | The sync key field used by external integrations to identify Sugar records in the external application. See the Integrate REST API endpoints in the Developer Guide for more details on how to use this field. |
| Pending Processing | A system-level checkbox field that is set to true when creating a case via inbound email or relating a case to an inbound email. It is not available in Studio or the user interface and is only available in SugarBPM. |
| Primary Contact |
The primary contact for the case. This field is kept in sync with the Contacts subpanel on the case. As a result, setting the primary contact also adds the contact to the subpanel. Conversely, if the Primary Contact field is blank, the first contact that is related to the case is set as the primary contact. Clearing the value of the Primary Contact field unlinks that record from the case and likewise, unlinking the primary contact via the subpanel clears the Primary Contact field. If the case is created via the portal, the Primary Contact field is set to the portal user that created the case. |
| Priority |
The urgency of the problem which, for Sugar Serve or Enterprise, is used by the stock SugarBPM template to calculate the Follow Up Date.
|
| Request Close 2 | Indicates if the customer requested via the portal to have this case closed. This field is read-only. See the Sugar Portal User Guide for more details. |
| Request Close Date 2 | The date and time the customer requested via the portal to have this case closed. This field is read-only. |
| Resolution | Results of the investigation into the problem. |
| Resolved Date | The system-generated date and time that the Status field was set to "Closed", "Rejected", or "Duplicate". If the case is reopened, the Resolved Date field is automatically cleared. If a user manually clears the value, it is not calculated again unless the case is reopened and then subsequently closed again. |
| Show In Portal | Cases created in Sugar will be visible in the portal by default Note: Administrators can have this field disabled by default via Admin > Studio. |
| Source |
This is the method by which the case was submitted. The out-of-the-box values are Internal, Forum, Web, Email, Twitter, Portal, Phone, Chat, and Chatbot. These values should not be changed because some of them are used automatically by Sugar. For cases created via the portal, the Source field is automatically set to "Portal". In Sugar Serve or Sell, for cases created using the Quick Create menu while in SugarLive, the source is set to "Phone" or "Chat" based on the type of SugarLive session; for cases created via a chatbot in the Sugar Portal Chat, the source is set to "Chatbot".
|
| Status |
The current status of the case which, for Sugar Serve or Enterprise, is set by the stock SugarBPM template in some situations
|
| Subject | A brief statement of the problem. |
| Tags | User-created keywords that can be used to identify records in filters, dashlets, and reports Note: For more information on creating and using tags, please refer to the Tags documentation. |
| Teams | The Sugar team(s) assigned to the case. |
| Unassign 3 | An option to remove the assigned user from the case, displayed in the header of both the Cases record view and the Cases focus dashboard. This option will only be visible if the case is assigned to someone. |
| Type | Type of categorization that this case falls into. |
| Work Log | Freeform field to add activities and notable events while working on the case. |
1 To better understand how all of the case SLA and resolution fields work together, refer to the Understanding SLA and Case Resolution Calculations article.
2 This field's value is only visible to Sugar Serve or Sell users; when this field appears on layouts, users without a supported license type will see a placeholder containing the text "License Required" instead of the field's value. See the User Management page for more details on license types.
3 This Action Button or Action Menu option can be edited in Studio to fully customize it to your company's needs. Please see the Action Buttons documentation for further information.
Business Centers and Cases
Business centers represent your company's centers of operation and specify a time zone, operating hours, and holidays so that a concept called "Business Hours" can be leveraged in SugarBPM and in-field calculations. Each case's selected business center can be used for SugarBPM business hour calculations; it is also used by Sugar to calculate values for the Business Hours to First Response and Business Hours to Resolution fields. If a case does not have an assigned business center, any field calculations performed in business hours are instead performed in calendar hours.
There are several ways a case can have its business center set. As a best practice, each account in your Sugar instance should have its Business Center Name field set. Then, during case creation, the user sets the case's Account Name field and, on save, the account's business center is copied over to the new case. A case's Business Center Name field can also be set manually while creating or editing the case. Once the field is populated with a value, it will not be automatically overwritten by a related account.
Note: Cases that were created before migrating or updating your instance to a version that includes Business Centers will have blank Business Center Name fields until each is edited and resaved. On save, the related account's business center, if specified, will be copied over the case's blank value.
Case Attachments
You can attach one or more files to a case using the Attachments field. Click "Browse" to choose a file to upload from your computer or hold the Ctrl or Shift key on your keyboard to select multiple files to upload. Once you have uploaded a file, be sure to wait for the file name to appear in the Attachments field before saving the record to ensure that the file has been fully uploaded. You can open files by clicking them or use the Download or Download All button to save them to your computer in a zip file.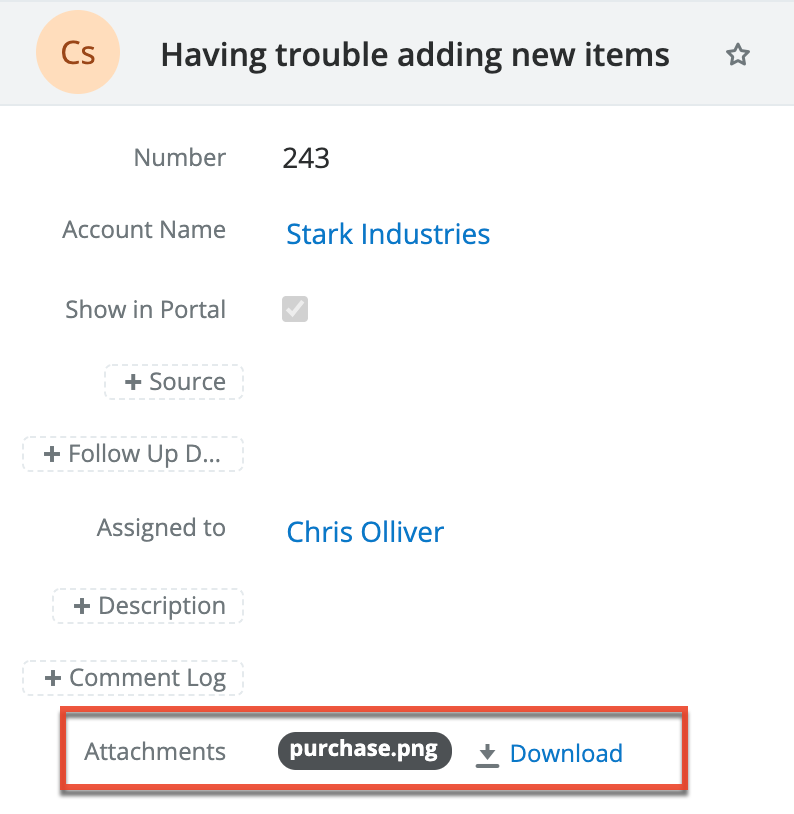
When copying case records, file attachments are not carried over. To keep the file attachments in the copied case, save them to your computer and then upload them to the newly created case.
Emails and Cases
Emails offer important functionality for working with cases in Sugar. Inbound emails can automatically generate new cases. Once the case exists, Sugar can automatically relate emails to a relevant case when the case macro is used. Emails can also be manually related to cases using the email's Related To field. These relationships allow the case's record view to display all relevant email correspondence in the Emails subpanel and History dashlet.
Creating Cases via Inbound Email
Creating cases via emails provides users with added convenience in the case creation process and helps expedite the amount of time before the support team can begin working on the issue. Cases can be automatically created when emails are sent to a group mailbox account which is monitored by Sugar.
Administrators can create group mail accounts via Admin > Inbound Email. Group mail accounts periodically poll an email account for new emails and import the emails into Sugar. The group mail account can be configured to automatically create a new case for each incoming email as well as to send an automatic reply email including the generated case's number. For more information, please refer to the Email documentation in the Administration Guide.
Email Case Macro
Sugar has the ability to automatically relate emails to their relevant cases using a case macro. The case macro is placed in the subject line of the email and contains the case number. Administrators have the ability to alter the macro's format via Admin > Inbound Email, but the default format is "[CASE:{number}]". The formatting of the macro in email subjects is imperative for Sugar to properly create the relationship. For example, a valid email subject line using the default macro would be "Re: [CASE:123] System not responding". For more information on configuring the case macro, please refer to the Email documentation in the Administration Guide.
When Sugar automatically relates an email to a case because of a case macro match, the case will be set in the email's Related To field. When viewing the case in record view, the email will appear in both the History dashlet and Emails subpanel.
Sugar will recognize the case macro and automatically relate the email to the relevant case for any email entering Sugar in the following ways:
- Group mail account: A group mail account is a monitored inbound mailbox that is created via Admin > Inbound Email. This is a mailbox on your company's mail server that Sugar is granted the ability to read. For example, creating "support@mycompany.com" as a group mail account means that any email with "support@mycompany.com" in the To or CC list will be checked for a case macro and automatically related to the case in Sugar. Support representatives can CC the address when corresponding with customers to have the emails automatically archived and related to the case in Sugar. Please note that if the account is configured to not automatically import emails, the relationship to the case will not be formed until a user imports it from the group inbox in the Emails module. For more information on configuring a group mail account, please refer to the Email documentation in the Administration Guide.
- Sugar Email Archiving: Sugar Email Archiving must be configured and enabled by administrators in Sugar via Admin > System Email Settings. Once configured, an email address will be generated that is specific to your instance of Sugar. When this email address receives an email, it scans the email for any email addresses. The email is then imported into Sugar, where the email is associated with any contact, lead, etc. containing an email address on the email. When a case macro is included in the email's subject, Sugar will also relate the email to the referenced case. For more information on setting up Email Archiving, please refer to the Email documentation in the Administration Guide.
- Sent from within Sugar: Composing and sending an email from anywhere within Sugar, including via the Emails module, clicking an email address on any record, from the History dashlet, etc., will cause Sugar to automatically search the subject for a case macro and relate the email to the relevant case. For more information on composing emails within Sugar, please refer to the Emails documentation.
Emails Subpanel
The Emails subpanel in the Cases module displays emails that are associated with the case record in a variety of ways:
- Related to the case: If the case is selected in the email's Related To field, the email and case are related, and the email will appear in the case's Emails subpanel and History dashlet. Instructions for using this flex relate field are available in the Emails documentation.
- Related to the case's related contacts: If the email is related, either explicitly or implicitly, to a contact record that is related to the case, the email will appear in the case's Emails subpanel and History dashlet.
Note: Administrators can enable or disable a case from displaying related contact emails via Admin > Related Contacts Emails. For more information, please refer to the Email documentation in the Administration Guide.
Sugar Portal and Cases
The Sugar Portal allows customers to view their organization's cases as well as submit cases directly to Sugar. Please note that customers have to be registered users of the portal in order to be able to submit cases to Sugar. For more information on enabling and configuring the portal, please refer to the Sugar Portal documentation. For information on using the portal, please refer to the Portal Deployment User Guide and Portal User Guide documentation.
Note: When cases are created via the portal, the Source field in the case's record view will automatically be set to "Portal" to indicate that the case originated from the portal.
In addition to being used by your customers to view and submit cases, the Sugar Portal can also be used as a method of communicating about cases between customers and your organization. Utilizing the portal this way ensures that all case-related communications between your users and contacts are stored in Sugar. This communication is conducted via related note records which can be created by both Sugar users and portal-enabled contacts. Sugar users can create and add notes to the case via the Notes subpanel on the case's record view in Sugar. Please note that cases created in Sugar will automatically appear in the portal as the Show in Portal checkbox is enabled by default in the case's record view. But administrators can have this field disabled by default via Admin > Studio. Customers can easily add notes to the case as well by clicking the Add a Note button on the case's record view in the portal. When a customer adds a note via the portal, the note record will appear in the Notes subpanel of the case's record view in Sugar. Likewise, when a Sugar user adds a note to a case in Sugar, the note record will appear in the Notes panel of the case's record view in the portal. Please keep in mind that notes attached to cases will automatically appear in the portal as the Show in Portal checkbox is enabled by default in the note's record view. But administrators can have this field disabled by default via Admin > Studio. These notes will only be visible to other portal users within the customer's organization. 
Contacts and Cases
On a case's record view, the Contacts subpanel is uniquely configured with an intelligent filter. Sugar presumes that any contacts related to a case will belong to the account already related to the case. Therefore, a filter for the case's account is automatically applied to search results in the Contacts subpanel.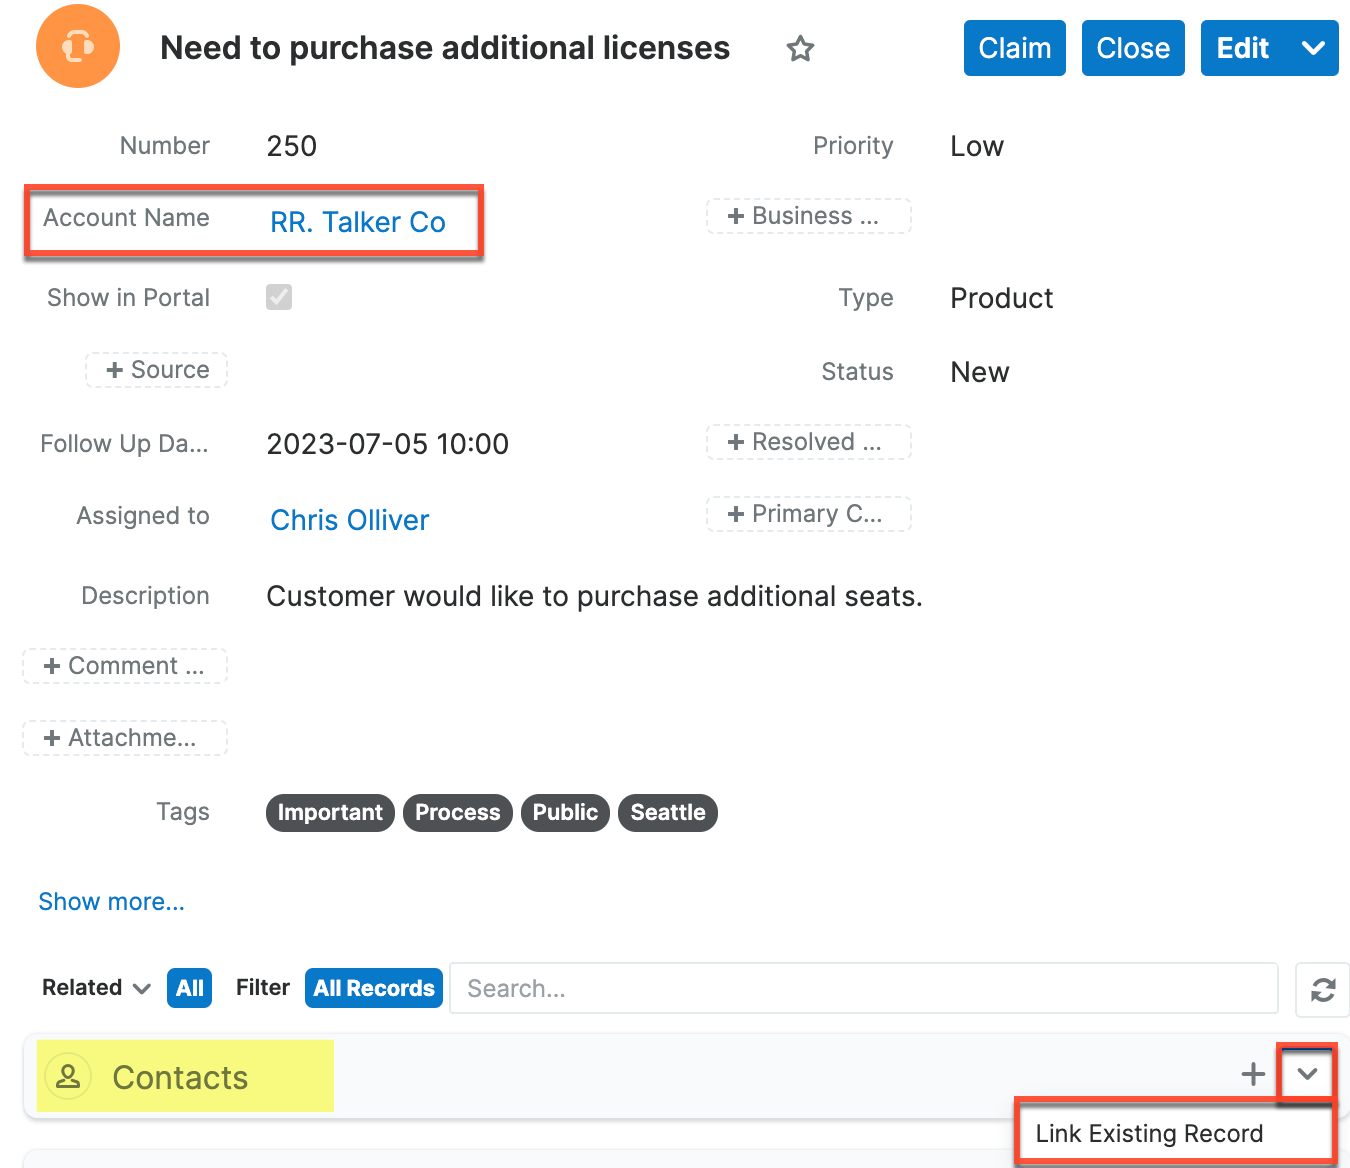
The available contacts are automatically filtered to show those related to the case's account: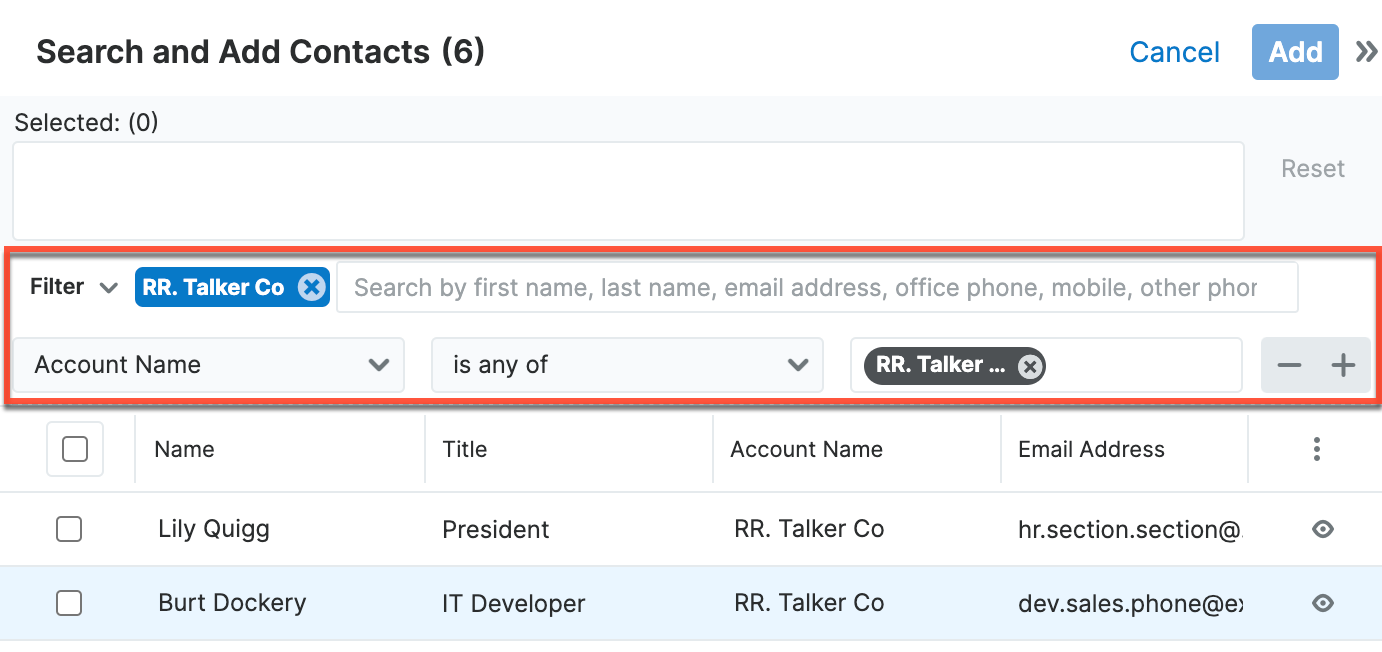
In the event that a case should be linked to a contact from a different account, you may override the default account filter by clicking on the X next to the account name filter in the search bar or by removing the filter line item: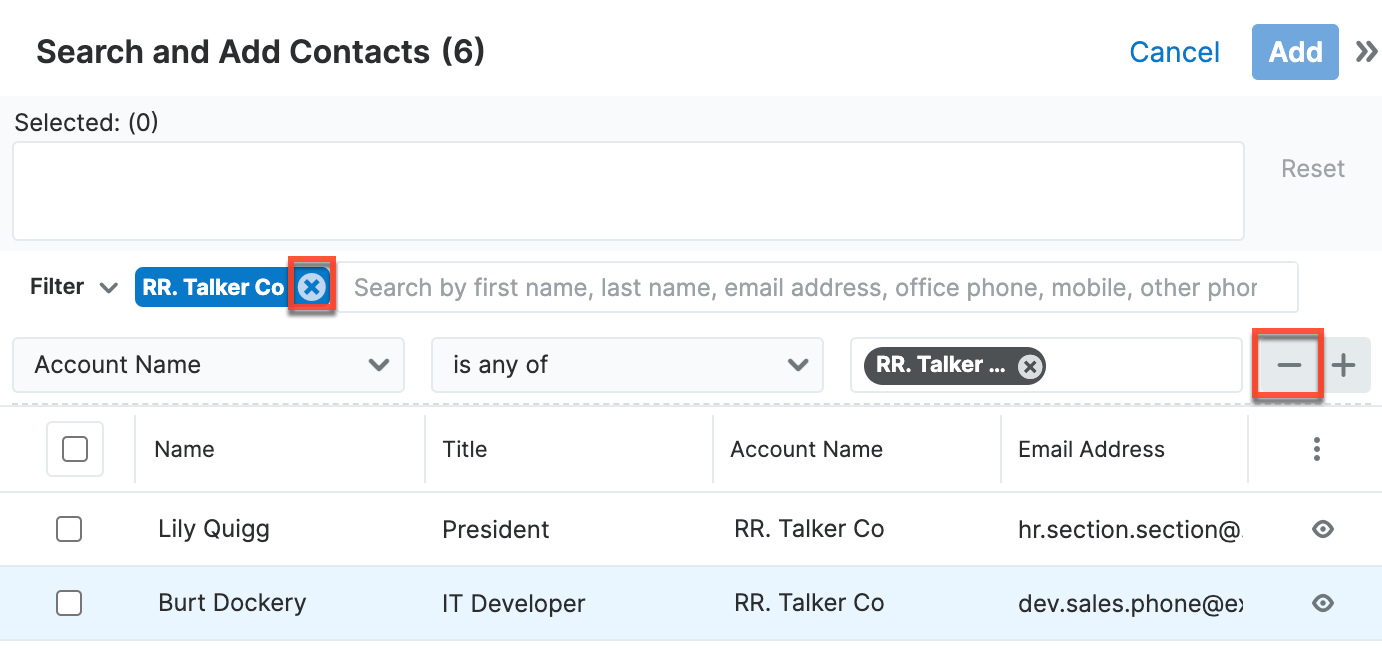
Knowledge Base Articles and Cases
You can create Knowledge Base articles based on a bug or case. This is particularly useful when the bug fix or situation will not be resolved until a later date, but a workaround currently exits. Simply click "Create Article" in the Case record view's Actions menu. The Knowledge Base record view layout will open and include all of the relevant fields for your organization's articles. For more information on creating knowledge base articles, please refer to the Knowledge Base documentation.
In order for an article to be visible in the Sugar Portal, the article must meet both of the following requirements:
- External Article = Checked
- Status = Published
Note: If either of these conditions is not met, the article will not be visible in the Sugar Portal.
Escalations and Cases
The Escalations module is used to track the escalation of a specific record, such as a case. Use the Escalate option in the case's record view Actions menu to create an escalation for the case. As long as the case has at least one open escalation in its Escalations subpanel, the Escalated field is displayed as a red badge with the text "Escalated" at the top of record view and the preview. It can also be displayed in the Record View dashlet and list view.
Escalating a case adds the case's account to the Accounts subpanel on the escalation automatically when the escalation is saved, which means that that escalation will also appear in the account's Other Related Escalations subpanel automatically. Note that if the escalation is then updated to target a different record with a related account, the new account is added but the previous account is not removed. See the Escalations page for more details on how escalations work.
Working With Sugar Modules
The Cases module uses Sugar's Sidecar user interface. The following sections detail menus, views, and actions common to Sidecar modules and contain links to additional information within the page or links to the User Interface documentation.
Case List View Filters
While universal list view filters are included with Sugar out-of-the-box, the following filters are unique to the Cases list view:
- Escalated Cases: All escalated case records.
Case Menus
The Cases module contains various options and functionality which are available via menus in the module tab, list view, and record view. The following sections present each menu and its options with links to more information about each option in the User Interface documentation or, for Cases-specific functionality, within this page.
Module Tab Menus
Click the Cases module tab in the navigation bar to access the Cases list view. You may also click the three-dots menu in the Cases module tab to display the Actions, Recently Viewed, and Favorites menu. The Actions menu allows you to perform important operations within the module. The Recently Viewed menu displays the list of cases you most recently viewed. The Favorites menu displays the list of cases you most recently marked as favorites.
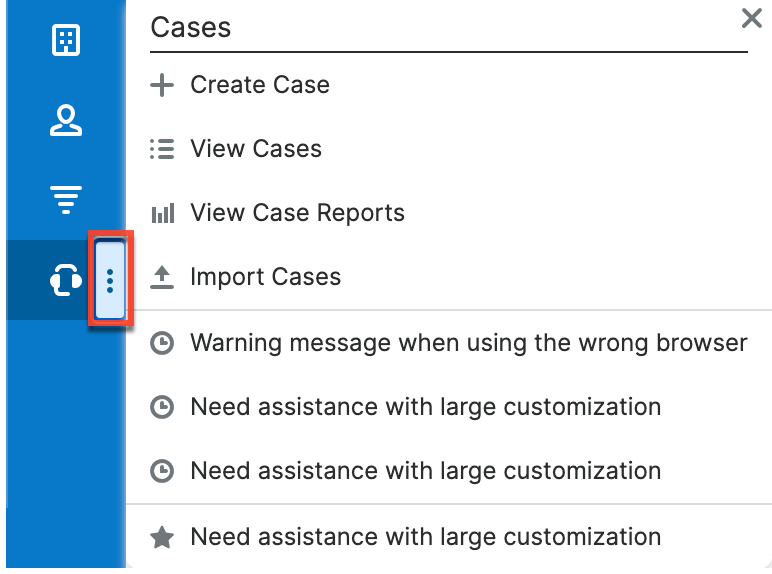
The module tab's Actions menu allows you to perform the following operations:
| Menu Item | Description |
| Create Case | Opens the record view layout to create a new case. |
| View Cases | Opens the list view layout to search and display cases. |
| View Case Reports | Displays existing reports based on the Cases module. |
| Import Cases | Opens the import wizard to create or update cases using external data. |
For more information on module tab menus including reasons a module may not be included in the menu, see the User Interface documentation.
List View Menus
The Cases list view displays all case records and allows for searching and filtering to locate specific cases. You can view the basic details of each record within the field columns of the list view or click a case's name to open the record view. To access a module's list view, simply click the module's tab in the navigation bar.
List View Mass Actions Menu
The Mass Actions menu to the right of the checkbox option in the list header allows you to perform mass actions on all currently selected records. You can use the checkbox on each record's row to select individual case records or click the checkbox in the list header to select all records displayed on the current set of list view results.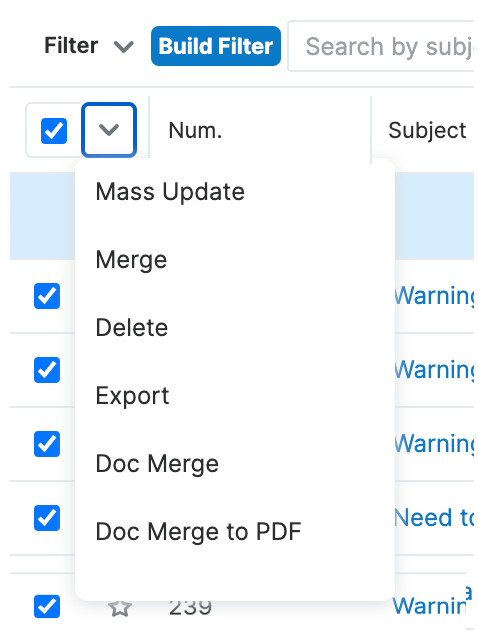
The Mass Actions menu allows you to perform the following operations:
| Menu Item | Description |
| Mass Update | Mass update one or more cases at a time. |
| Recalculate Values | Visible only if the module contains fields using Sugar Logic and only to System Administrators or users with Developer-level role access, this option will refresh the selected records' calculated values. |
| Merge | Merge two or more duplicate cases. |
| Delete | Delete one or more cases at a time. |
| Export | Export one or more cases to a CSV file. |
| Doc Merge | Select or create a DOCX template to merge record data into documents that will be accessible in the Doc Merge widget. |
| Doc Merge to PDF | Select or create a DOCX, XLSX, or PPTX template to merge record data into PDF documents that will be accessible in the Doc Merge widget. |
| Map 1 | For instances with Sugar Maps enabled, display this record or the selected records on a map. |
| Directions starting from Current User 1 | For instances with Sugar Maps enabled, plot driving directions on a map from your address to this record or all selected records. |
1 The Cases module must be enabled in Admin > Maps for the Sugar Maps option to appear.
List View Record Actions Menu
The Record Actions menu to the far right of each record's row allows you to perform actions on the individual case directly from the list view.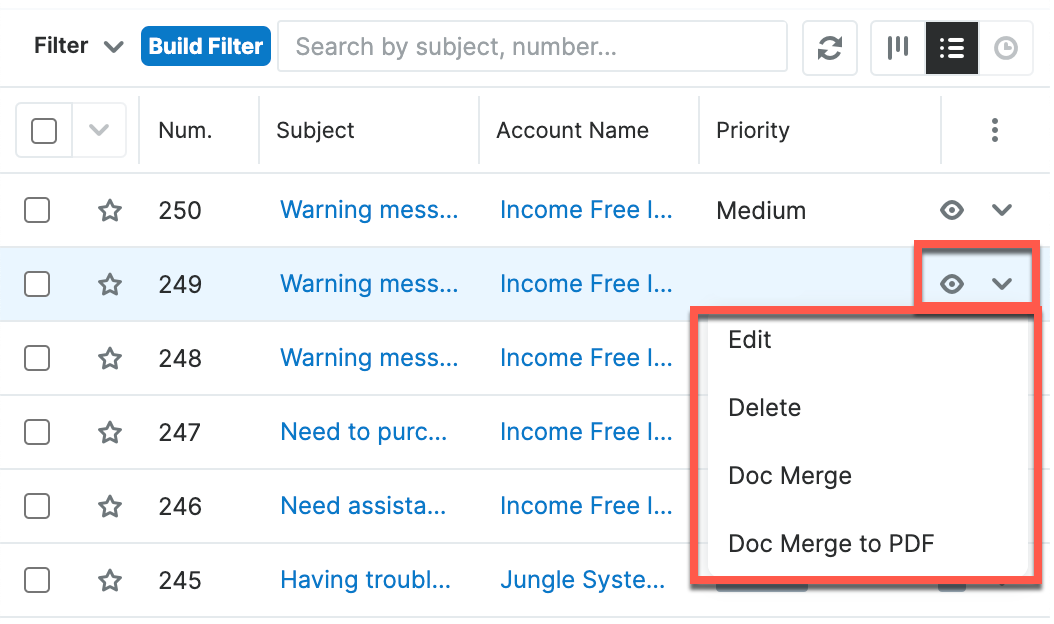
The list view's Record Actions menu allows you to perform the following operations:
| Menu Item | Description |
| Preview (Eye icon) | Preview this case in the intelligence pane. |
| Edit | Edit this case. |
| Follow | (Available if Activity Streams are enabled) Follow changes to this case in your activity stream. |
| Directions starting from this record | For instances with Sugar Maps enabled, plot driving directions on a map from this record to another record or records. Note: The Cases module must be enabled in Admin > Maps for this option to appear. |
| Delete | Delete this case. |
| Doc Merge | Select or create a DOCX, XLSX, or PPTX template to merge record data into documents that will be accessible in the Doc Merge widget. |
| Doc Merge to PDF | Select or create a DOCX, XLSX, or PPTX template to merge record data into PDF documents that will be accessible in the Doc Merge widget. |
Record View Actions Menu
The Cases record view displays a single case in full detail including its fields, subpanels of related records, and activity stream. To access a case's record view, simply click a hyperlinked case name from anywhere within Sugar. The record view's Actions menu appears on the top right of the page and allows you to perform various operations on the current record.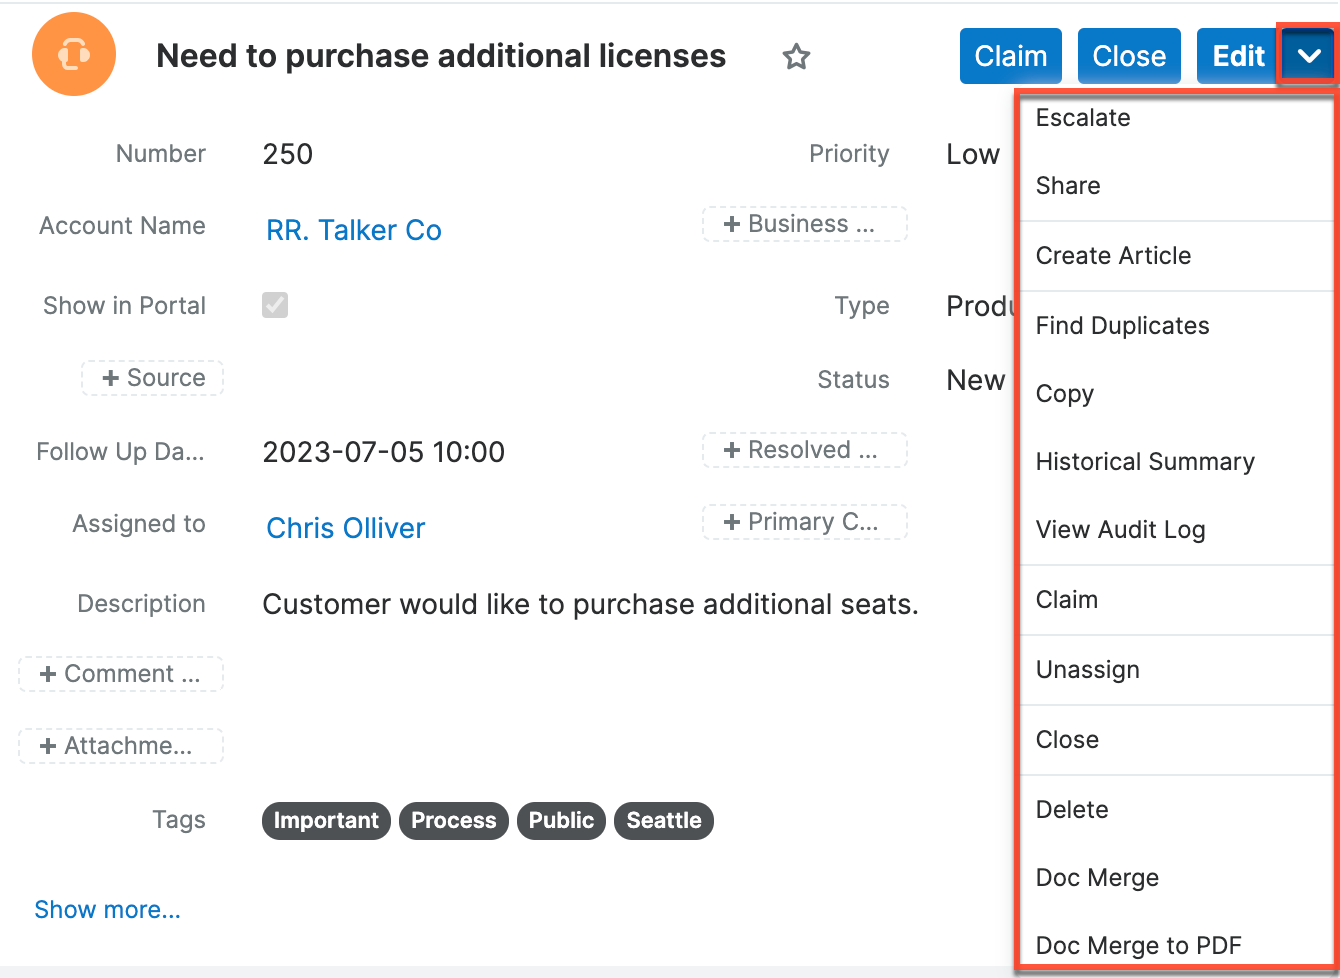
The Actions menu allows you to perform the following operations:
| Menu Item | Description |
| Edit | Edit this case. |
| Escalate | Create an escalation record related to the current record. |
| Share | Share a link to this case via email. Note: To send emails through Sugar, users must first configure a default user email account via Emails > Email Settings. |
| Download PDF |
Download the record's information as a PDF file.
|
| Email PDF |
Email the record's information as a PDF attachment.
Note: To send emails through Sugar, users must first configure a default user email account via Emails > Email Settings. |
| Create Article | Converts information from the case to the record view of a Knowledge Base article. Please refer to the Knowledge Base documentation for more information. |
| Find Duplicates | Locate potential duplicates of this case. |
| Copy | Duplicate this case to create a new case record. |
| Historical Summary | View a historical summary of activities (e.g., calls, meetings, etc.) related to this case. |
| View Audit Log | View a record of changes to this case. |
| Claim | Assign this case to yourself. This option is only available if the case is not already assigned to you. Note that this option is also displayed as an Action Button next to the Edit button. |
| Unassign 1 | Remove the assigned user from this case. This option is displayed in the header of both the Cases record view and the Cases focus dashboard. It is only visible if the case is assigned to someone. |
| Close | Close this case. This option is only available if the case is not already in a Closed status. Note that this option is also displayed as an Action Button next to the Edit button. |
| Delete | Delete this case. |
| Doc Merge | Select or create a DOCX, XLSX, or PPTX template to merge record data into documents that will be accessible in the Doc Merge widget. |
| Doc Merge to PDF | Select or create a DOCX, XLSX, or PPTX template to merge record data into PDF documents that will be accessible in the Doc Merge widget. |
| Geocode 2 | For instances with Sugar Maps enabled, manually set this record's location on a map. |
| Map 2 | For instances with Sugar Maps enabled, display this record or the selected records on a map. |
| Directions starting from Current User 2 | For instances with Sugar Maps enabled, plot driving directions on a map from your address to this record or all selected records. |
1 This Action Menu option can be edited in Studio to fully customize it to your company's needs. Please see the Action Buttons documentation for further information.
2 The Cases module must be enabled in Admin > Maps for the Sugar Maps option to appear
Common Views and Actions
In the table below, the left column contains links to the User Interface page covering topics that are applicable to all Sidecar modules. The right column has links to sections of the current page that cover topics specific to cases.
| General Instructions for Working With Sugar Modules | Cases-Specific Instructions |
| Use the links below to navigate to the User Interface page which covers topics generic to many Sugar modules. | When Cases-specific help exists for each topic, use the links below to navigate to sections of the current page. |
| Creating Records | |
| Viewing Records | |
| Searching for Records | |
| List View | List View Mass Actions Menu List View Record Actions Menu |
| Tile View | |
| Record View | Record View Actions Menu |
| Intelligence Pane | |
| Editing Records | |
| Deleting Records | |
| Emailing Records | Emails and Cases |
| Exporting Records | |
| Recalculating Calculated Values | |
| Finding Duplicate Records | |
| Merging Records | |
| Viewing Record Historical Summaries | |
| Viewing Record Audit Logs | |
| Record PDFs | |
| Favoriting Records | |
| Following Records | |
| Sharing Records |