SugarLive
Overview
SugarLive, available to users with a Sugar Serve or Sugar Sell license type, is an omnichannel tool for customer service agents and sales team members to communicate in real-time with customers. While the user is in a call or chat with the client, relevant customer information is available at all times to be viewed and updated without navigating away. To use SugarLive, your organization must have an Amazon Connect account because Amazon Connect is used to route incoming calls and chats to SugarLive. See the Prerequisites section for more details.
Please note that you will only be able to see tabs, dashlets, and records as allowed by your license type, team membership, assigned roles, and user access type. For more information, please refer to the referenced documentation in the Administration Guide.
Accessible in Sugar's footer, SugarLive comprises two sides. On the left side are the Summary panel, where a few key details on the current call or chat are available to view and edit, and the Communication panel, where you can accept incoming calls and chats and carry them out. The right side is the Detail panel and contains a tabbed dashboard that allows you to find, view, and update records in Sugar to help you efficiently assist the customer you are talking to. In this panel, the Search tab lets you find the record(s) associated with the customer you are working with so that you can open them in SugarLive. The module tabs (e.g., Contact) each present a holistic view of that record, providing you with the tools needed to find information, aid the customer, and track the details of your encounter. SugarLive can be viewed in a variety of dynamic ways throughout a chat or call session. 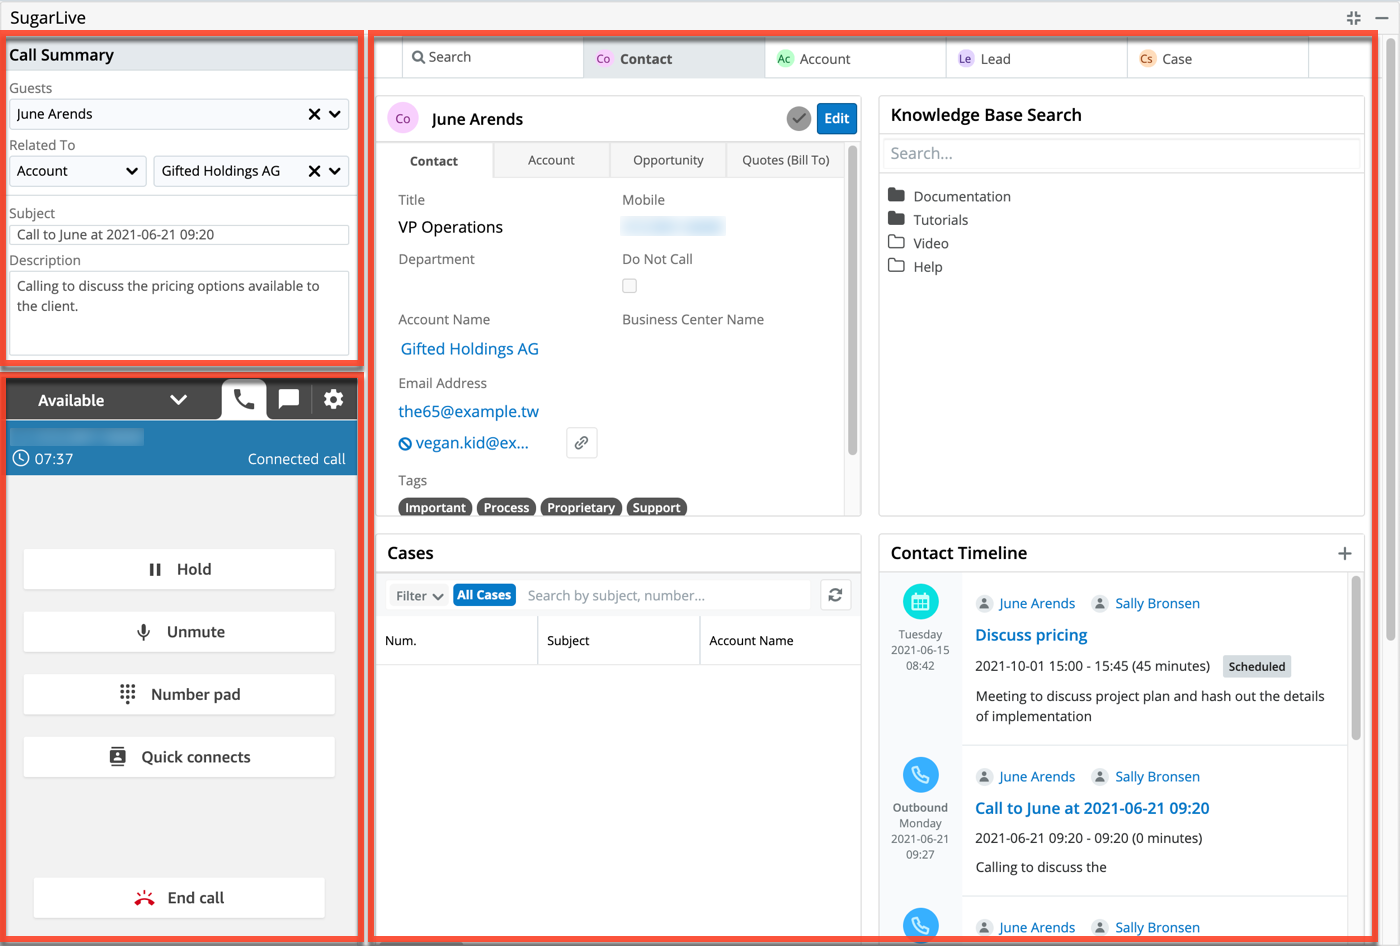
Prerequisites
SugarLive's Communication panel uses Amazon Connect to handle incoming calls and chats. As a result, SugarLive can only be used after an admin has configured your organization's Amazon Connect instance and connected it to Sugar. See the Amazon Web Services page in the Administration Guide for details on this configuration.
To access SugarLive at the bottom of the navigation bar, you must have the following:
- SugarLive is included with Sugar Sell Premier, Sell Advanced, Sell Essentials, and Serve. Please contact your Sugar partner or representative to learn more.
- An Amazon Connect user account in your organization's Amazon Connect instance
- A web browser that is supported for use with SugarLive. For more information, refer to the Supported Platforms page.
- Role access to the Calls and Messages modules
Accessing SugarLive
You can access SugarLive by clicking the icon located toward the bottom of the navigation bar: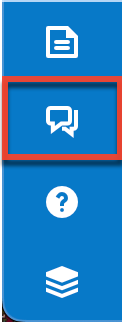
If you cannot see the icon at the bottom of the navigation bar, contact your administrator to ensure that you have a Sugar Serve or Sugar Sell license type and that your Sugar instance has been set up to connect to your organization's Amazon Connect instance.
If you are not logged in to Amazon Connect, the SugarLive icon is represented by two speech bubbles without a checkmark. The icon will have a checkmark upon login and remains this way whether your status is set to "Available" or "Offline". 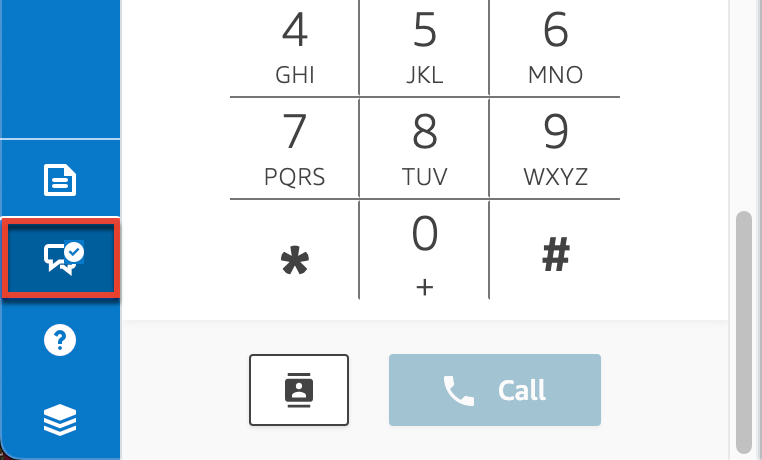
Note: Firefox is a supported browser. However, if you see an error that says "Firefox Can't Open This Page" you will need to navigate to Settings > Privacy & Security and change from "Standard" security to "Custom" security. Within the Custom security option, uncheck Cookies and Tracking Content.
SugarLive Views
SugarLive can be expanded and collapsed to allow you to work with SugarLive and your Sugar data in a variety of dynamic ways throughout a chat or call session. When making an outbound call, SugarLive will default to the view, either full or compact, you were in when your last outbound session ended. When accepting an incoming call or chat, SugarLive will default to the view, either full or compact, you were in when your last inbound session ended. Outbound calls default to compact view and inbound calls and chats default to full view if a prior session view is unknown.
Note: You can navigate within Sugar while in a call or chat but you cannot refresh your browser. Doing so will disconnect the call or chat and discard any unsaved changes in the Detail panel. This is always true, whether you are in an active session or an ended but not yet closed session, and also if SugarLive is in full view, compact view, or minimized.
Full View
SugarLive's full view displays the Summary panel, Communication panel, and Detail panel. Work with your Sugar records directly from SugarLive through the available tabs and the dashlets contained in each tab. Enter compact view or minimize SugarLive by clicking the available icons on the top right side of the Detail panel.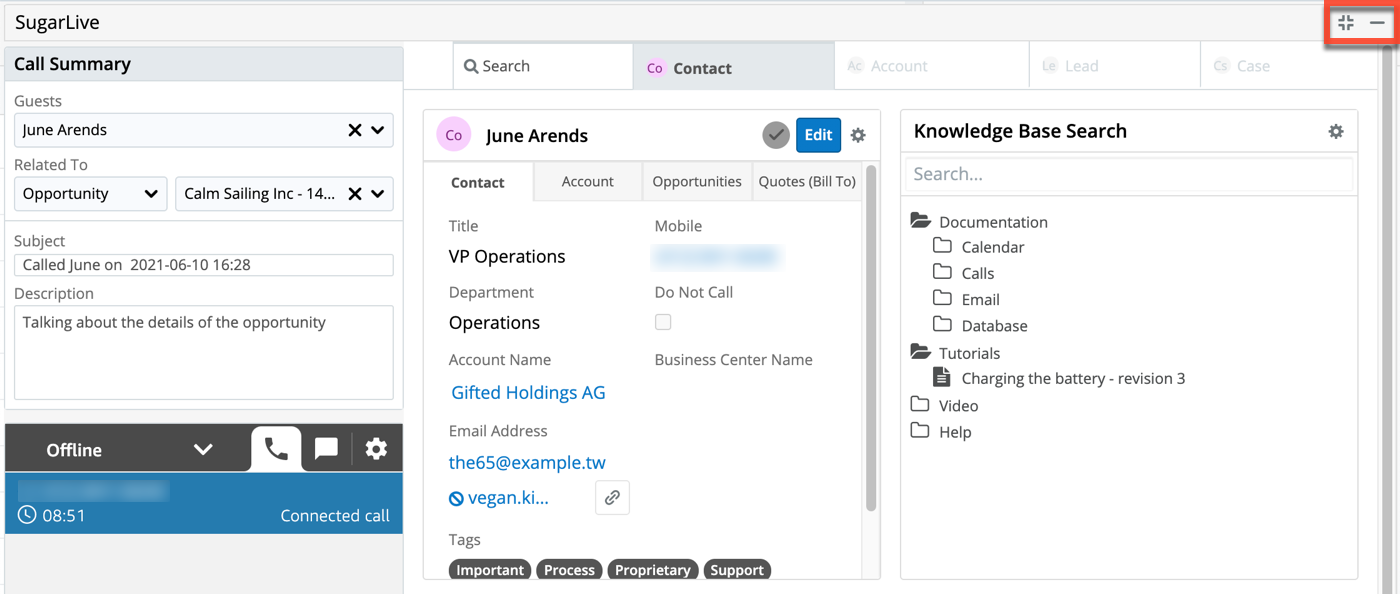
Compact View
SugarLive's compact view displays the Summary panel and Communication panel. Work with your Sugar data throughout the platform while SugarLive remains visible. From compact view, you can minimize SugarLive or enter full view where your module tabs will be updated based on the content you were viewing.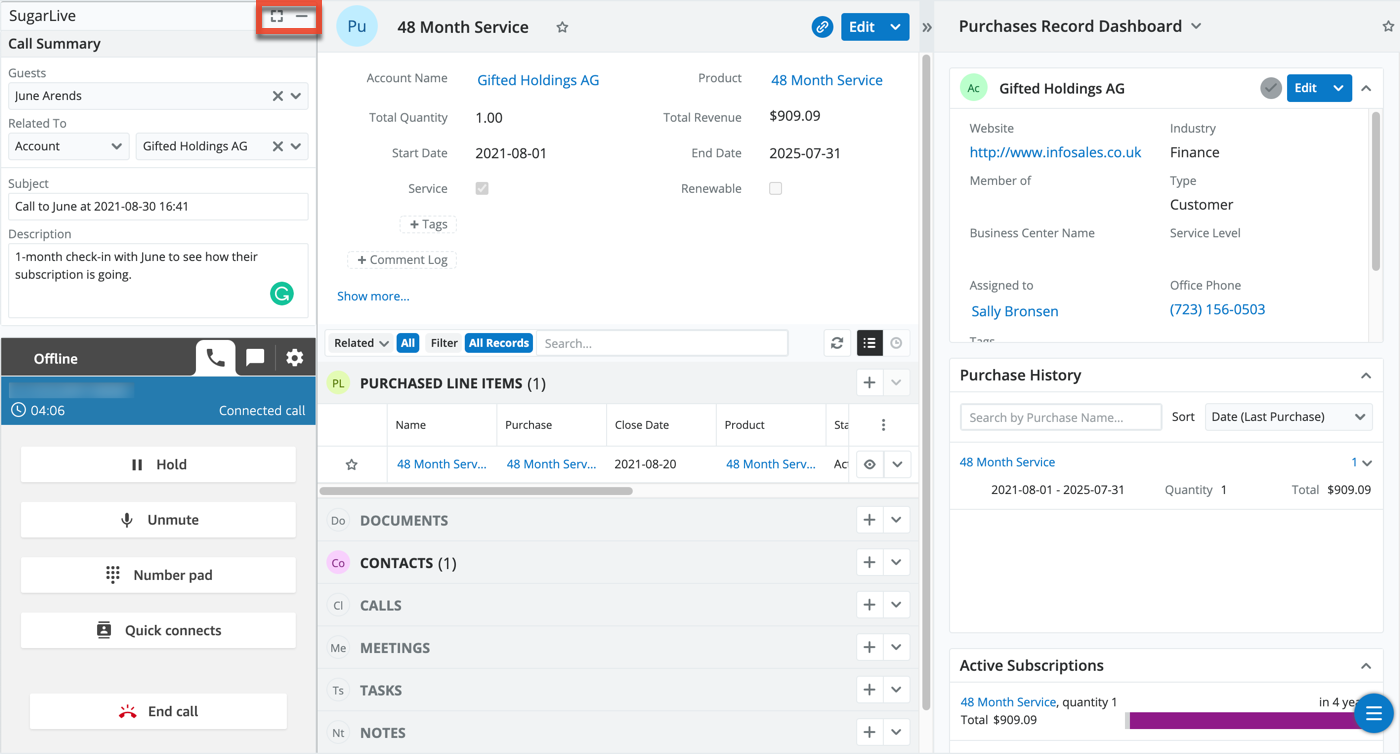
Minimize
To minimize SugarLive, either from compact or full view, use the dash ( - ) icon in the top right corner. If you receive a new chat message while SugarLive is minimized, the icon flashes green in the navigation bar until you open it again. If SugarLive is minimized and then opened again, it returns to the view (i.e., full or compact) it was in when minimized.
Logging In
You must be logged in to an Amazon Connect account to receive calls and chats. If you are not logged in, click the SugarLive icon at the bottom of the navigation bar to open it. The login behavior is different depending on if you are using the standard login or single sign-on authentication.
When you first log in, your status in the Communication panel is set to "Offline", which prevents new chats or calls from being routed to you. Change it to "Available" in the top left corner to make yourself available for new chats and calls. You cannot change your status back to "Offline" when you have active sessions but can after the call or chat has ended and you are still working in the Detail panel and Summary panel.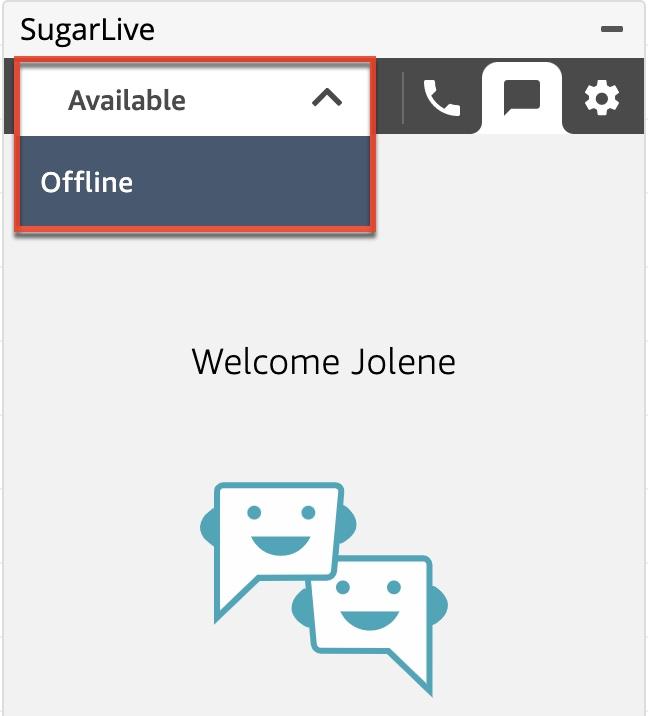
Your status in the Communication panel is preserved when you log out of Sugar and log back in before your Amazon Connect session has ended. As a result, you may wish to change your status to "Offline" before logging out of Sugar to prevent immediately receiving a new call or chat when you log back into Sugar.
Standard Login
If your instance is set up for standard login, SugarLive will open a new tab in your browser with the Amazon Connect login page. Simply log in to your Amazon Connect account and then return back to the tab with Sugar open; you will now be logged in to SugarLive and can close the Amazon Connect tab.
Single Sign-On Authentication
If your Sugar instance and Amazon Connect instance are set up for SAML 2.0-based authentication and you logged in to Sugar using single sign-on (SSO), you will be automatically logged in to Amazon Connect via your identity provider when you open SugarLive. You will remain on the same page and SugarLive will be opened with your Amazon Connect account logged in.
Communication Panel
The Communication panel is a small panel that appears in the bottom left corner when you open SugarLive with no active sessions. It uses Amazon Connect's Contact Control Panel (CCP) to route incoming calls and chats to agents. When a new incoming call or chat has been routed to you or when you have an ongoing session, it and the Summary panel fill the entire left-hand side of the screen with the Detail panel on the right. Between these three panels, SugarLive provides you with the tools you need to work on relevant records in Sugar while talking to the customer.
Accepting an Incoming Chat
When you receive a new customer chat, SugarLive opens and the Communication panel allows you to either accept or reject the chat. If you already have one or more ongoing chats, the Accept and Reject buttons are displayed in a pop-up at the top of the Communication panel instead.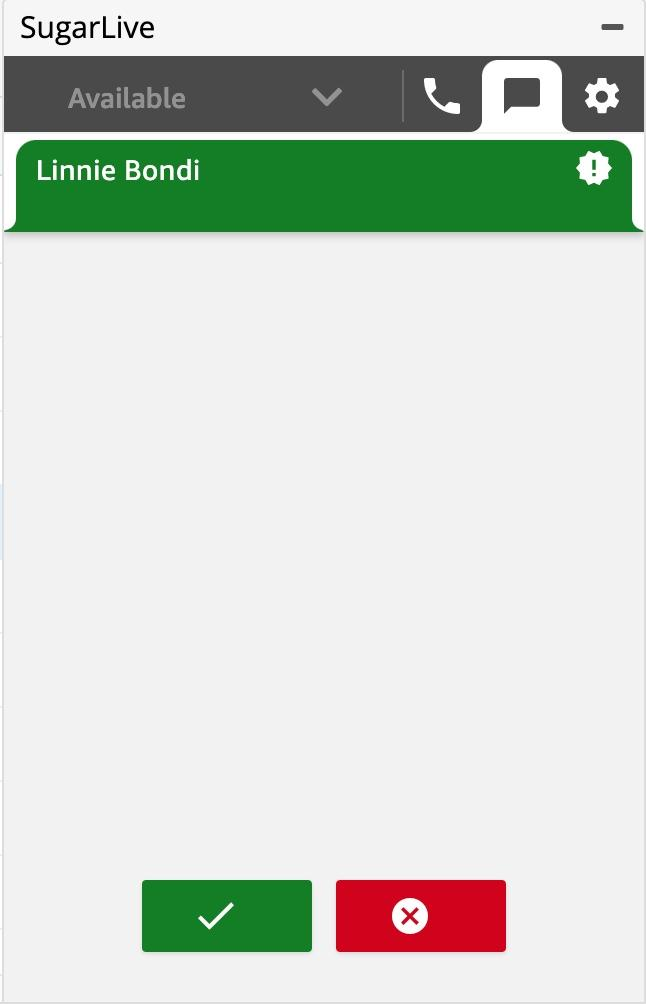
If you are using Sugar Portal Chat, your customers can start a chat session within the portal to chat with a chatbot or connect to an agent in SugarLive. See the Amazon Web Services page in the Administration Guide for the steps needed to set up Sugar Portal Chat and see the Portal User Guide for details on how the portal chat works.
After you accept an incoming chat, a message record is created and populated with certain values, such as the start date, direction ("Inbound"), and the related record(s) (e.g., contact), if known. The conversation opens in the Communication panel and the Detail panel and Summary panel open to fill the rest of the screen. Here, you can see the message from the customer and carry out your conversation while using the other panels to open and update relevant Sugar records. Use the Search tab to find the correct record or use the Quick Create menu in the top right corner of Sugar to create a new one. See the User Interface page for more details on Quick Create.
If the incoming chat is associated with a particular contact or case record in Sugar, those records are automatically opened in the Contact or Case tab and are linked to the current session's message record. For example, if a customer uses Sugar Portal Chat to contact your Customer Service department, SugarLive matches their portal user with its contact record in Sugar and opens that contact. If the customer speaks with a chatbot about a specific case before asking to connect to an agent, that case is also opened in SugarLive.
If a chat session is started using an external chat window (e.g., on an external website), the chat may be configured to send certain values to SugarLive, such as the contact's name or email address. SugarLive uses these values to open the relevant record(s) in the Detail panel. If more than one record matches the provided name or email address, they are opened in the Search tab instead so you can select the correct one to open.
If you create a new case using the Quick Create or module tab menu when you already have a contact open in the Contact tab, the Primary Contact field is automatically populated with the contact and the Account Name field is populated with the contact's account. The Source field of the case is also automatically populated with "Chat". After the case is created, the primary contact is opened in the Contact tab while the newly created case is opened in the Case tab.
When you have more than one active chat, each chat is displayed as a separate tab within the Communication panel so that you can navigate between conversations. Doing so updates the other panels in SugarLive to show the records you opened while talking to that particular customer. Note that there is a maximum number of chats that you can have open at once, which is configured by your administrator in Amazon Connect. A chat that has ended but is not yet closed counts towards this. If you have the maximum number of chats open, you are not considered available to receive more until you close a contact.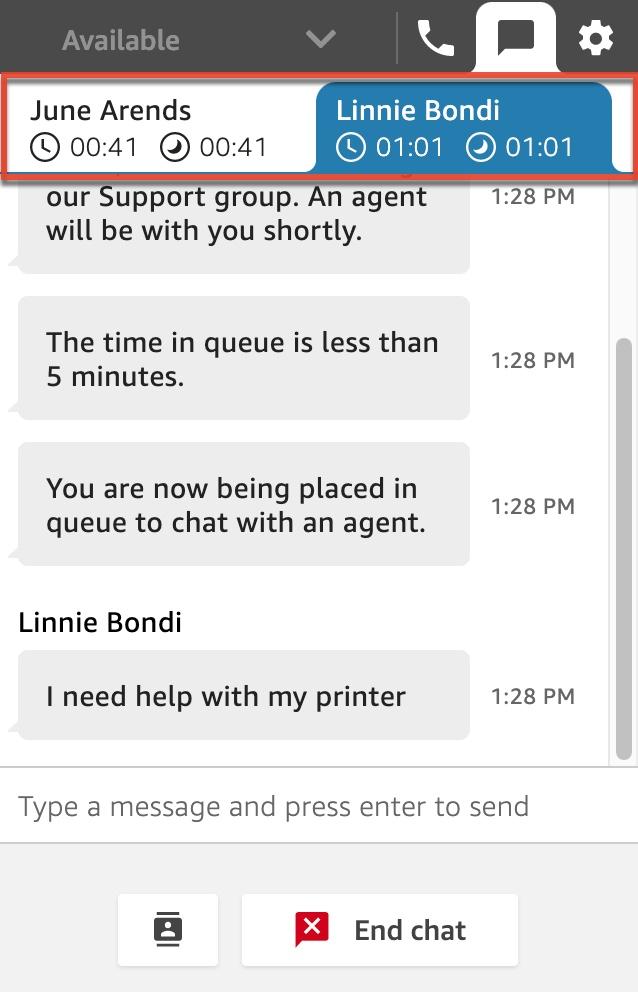
Ending a Chat
To end a chat session, click the End Chat button at the bottom of the Communication panel. When you or the customer ends a chat, the message record is updated with the end time and the Completed status. If the Guests or Related To field is set, this message will appear in the Timeline dashlet when viewing that record. See the Messages documentation for more details on this module and how SugarLive uses it.
After saving the message record, the chat remains open in an inactive state so that you can continue working in the Detail panel and Summary panel to finish updating records after the conversation ends. To close the chat and the records you have open in SugarLive, click the Close Contact button in the Communication panel. Doing so saves the chat transcript in the Conversation field on the message record.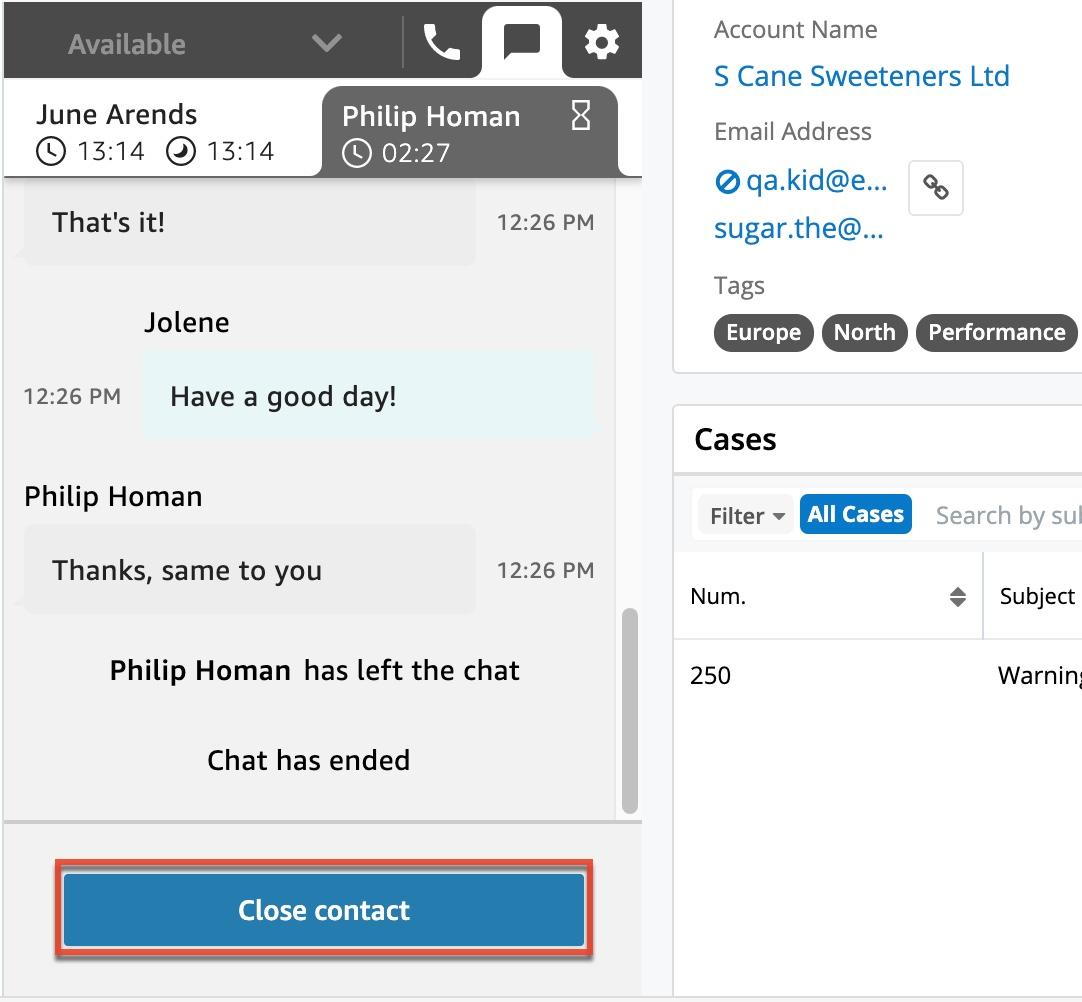
If you have unsaved changes in the Detail panel when you close the contact, you will be asked to confirm before discarding the changes. If you choose to continue editing after the chat is closed, a new Close button appears in the top right corner of the Detail panel. This allows you to close the panel later, after saving your changes, even though the chat itself has already been closed in the Communication panel.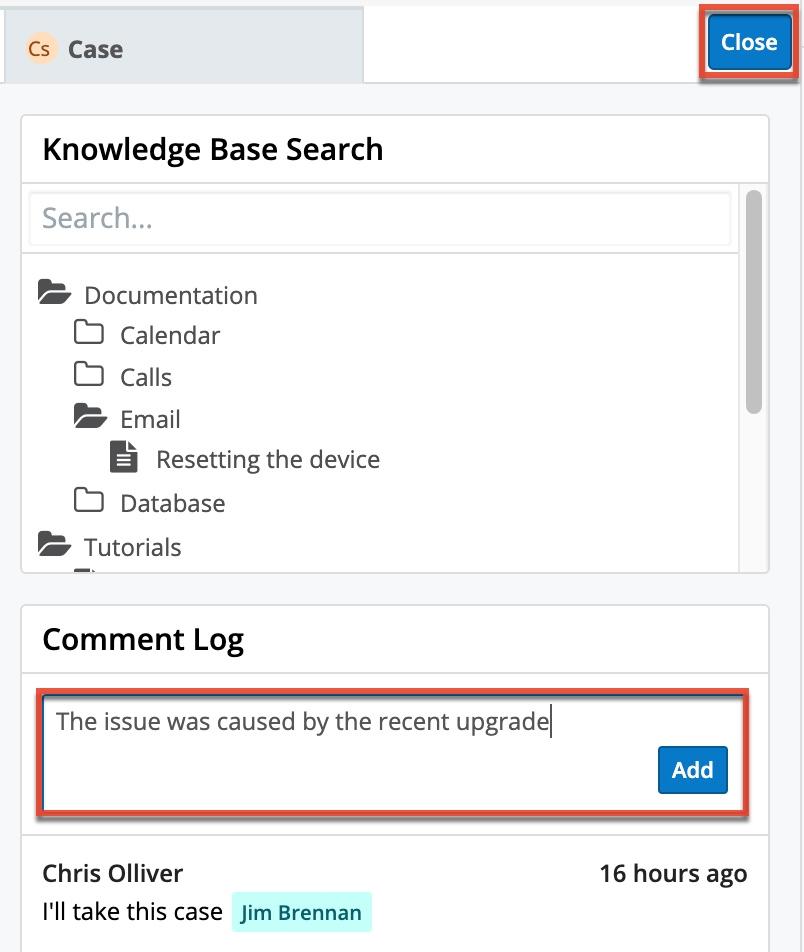
Accepting an Incoming Call
When you receive a new customer call, SugarLive opens and the Communication panel allows you to either accept or reject the call.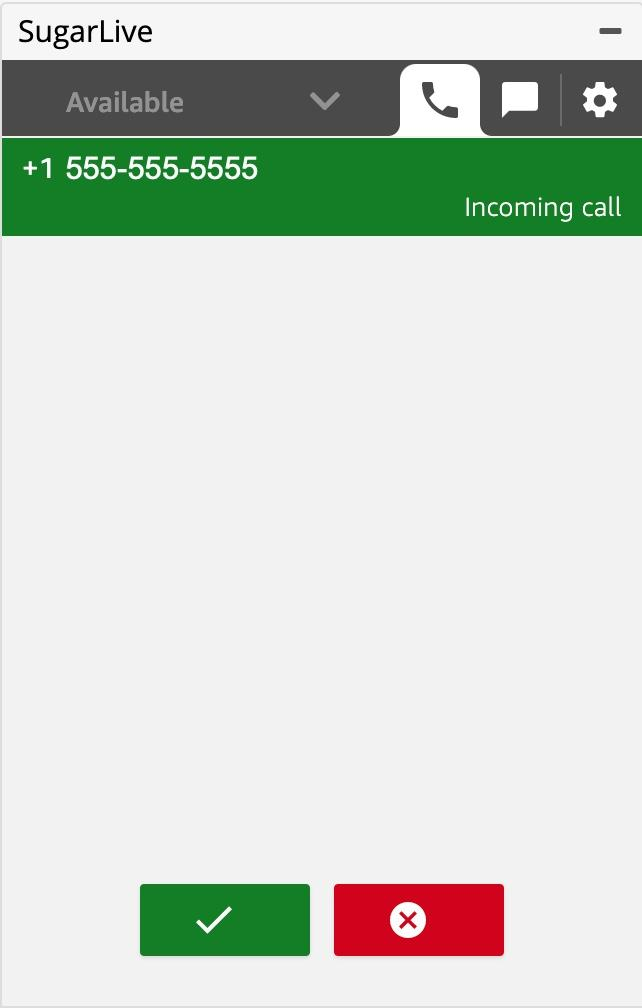
After accepting, a call record is created and populated with certain values, such as the start date, direction ("Inbound"), and the related record(s) (e.g., contact), if known. The call opens in the Communication panel and includes basic softphone features such as "Hold", "Mute", and "Number pad". You can also use the Quick Connects button to transfer the call internally or externally. The Summary panel and Detail panel appear above and beside the Communication panel, respectively, to allow you to view and update relevant Sugar records while on the phone with the customer.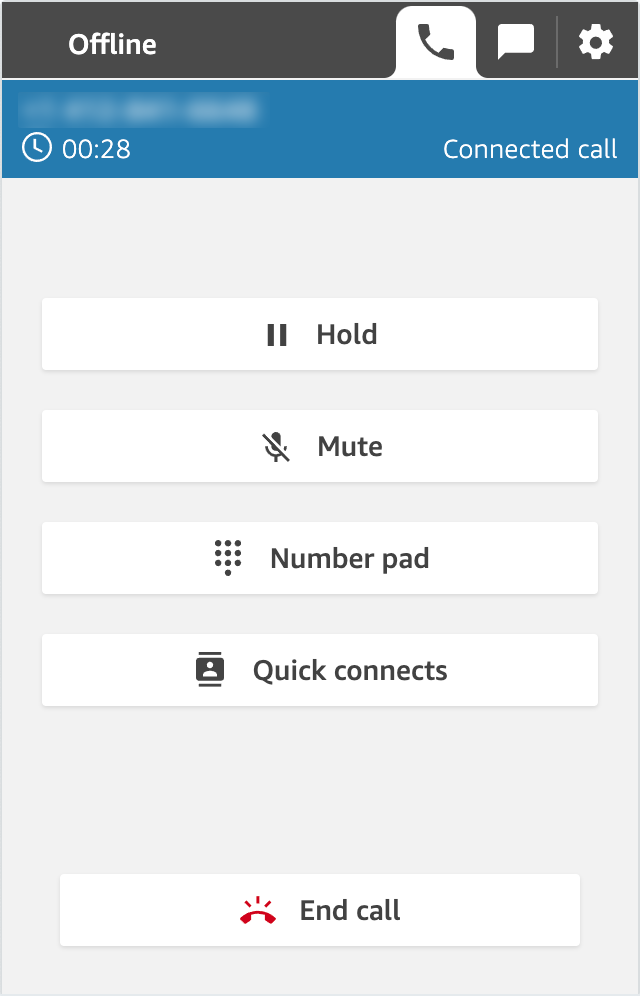
When receiving a call, SugarLive will search for a record based on the phone number. For more information on searchable fields, please refer to the Search documentation. If the incoming phone number matches a phone number in a single contact, account, or lead record in Sugar, that record is automatically opened in the respective module tab of the Detail panel so you can view and update their customer information. If there is more than one match, the records are opened in the Search tab, and the contact record will be in focus. If no contact is found, the account record and lastly the lead is prioritized. If there are no matches, you can search for the record in the Search tab or use the Quick Create menu in the top right corner of Sugar to create a new one. See the User Interface page for more details on Quick Create.
If you create a new record using the Quick Create or module tab menu, the Office Phone field is automatically populated with the phone number of the incoming call.
In order for SugarLive to match an incoming phone number to one in Sugar, the phone numbers in Sugar must use a format that is recognizable to SugarLive; the following format is the only consistently recognized format: +10123456789.
It is only possible to have one call at a time, and a call that has ended but is not yet cleared in the Communication panel counts towards this. If you have a call ongoing or open in an inactive state, you are not considered available to receive another call until you clear the contact.
Ending a Call
To end a call, click the End Call button at the bottom of the Communication panel. When you or the customer ends a call, the call record is updated with the end time and the Held status. If an admin has configured call recordings, transcripts, and sentiment evaluations to be saved in Sugar, these values are populated on the call record, although it may take some time for the values to become available. See the Calls page for details on how call recordings, transcripts, and sentiment analysis work in SugarLive.
After the call has ended, the Communication panel remains open with the call in an inactive state so that you can continue working in SugarLive to finish updating records after the conversation ends. To close the call and the records you have open in the other panels, click the Clear Contact button in the Communication panel.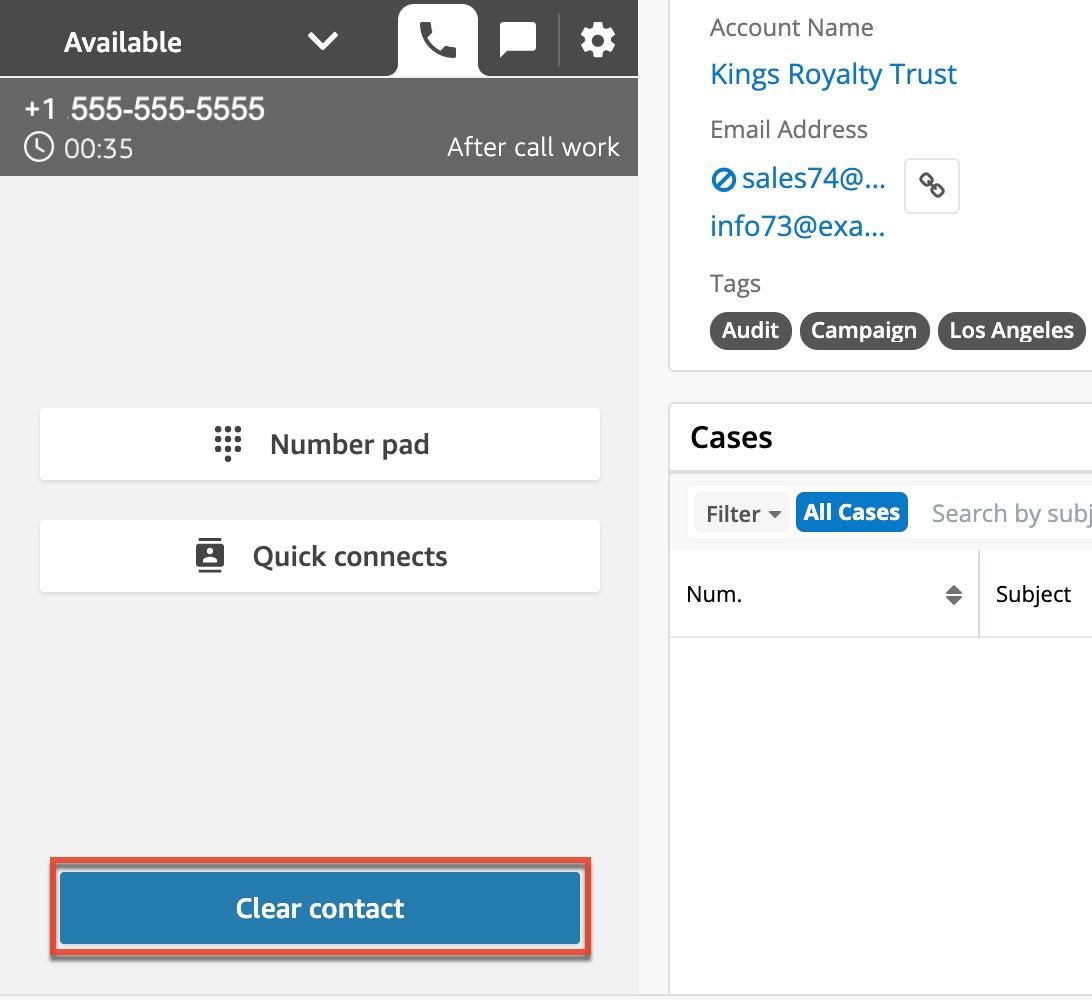
If you have unsaved changes in the Detail panel when you clear the contact, you will be asked to confirm before discarding the changes. If you choose to continue editing after the call is closed, a new Close button appears in the top right corner of the Detail panel. This allows you to close the panel later, after saving your changes, even though the call itself has already been closed in the Communication panel.
Using Quick Connects
Amazon Connect allows an administrator to create quick connects, which are saved call destinations, for agents to transfer an active call to. You can dial a quick connect when making an outbound call or transfer an active call to one by clicking "Quick connects" in the Communication panel. This opens a list of quick connects available for you to use, as configured by an admin.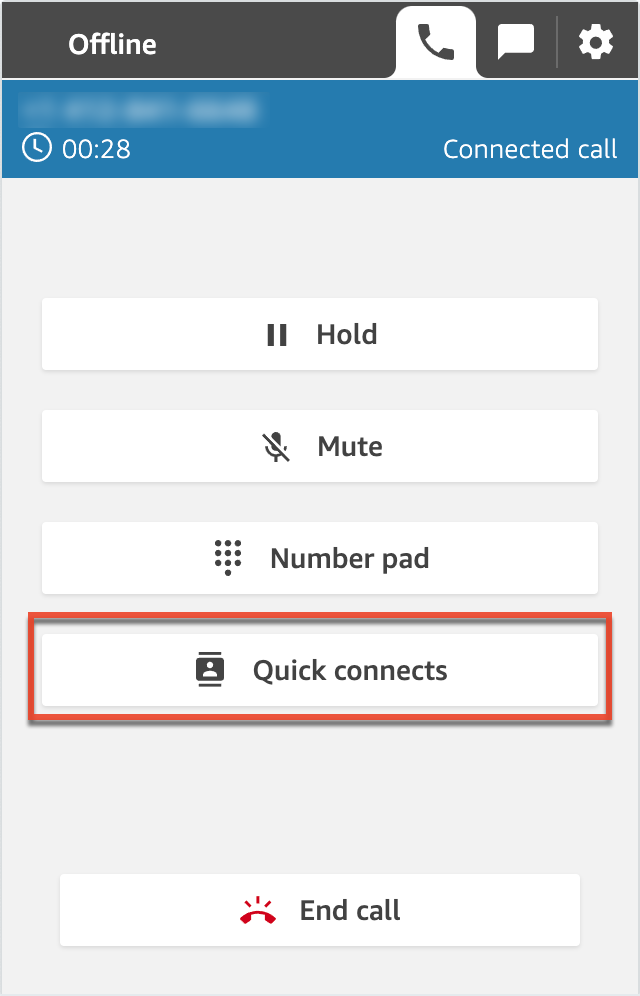
When you use a quick connect to transfer a call, the initial call record is saved in Sugar. When the recipient of the transfer receives the call, the transferred call is saved as a separate record.
Making an Outbound Call
If the Click-to-Call system setting has been enabled by an admin, simply click any phone number field in Sidecar modules in Sugar to call the number using SugarLive. Clicking a phone number in a contact, account, lead, or case record will open the record in the respective tab in the Detail panel, and the record will automatically link to the call. A linked contact or lead record is displayed in the Summary Panel in the Guests field and a linked account or case is displayed in the Related To field. In all other Sidecar modules where a relationship to the Activities module exists, clicking a phone number will automatically link the record to the call record via the Related To field.
Note: You cannot use Click-to-Call to dial if you have any chat sessions open in SugarLive. You also cannot make an outbound call while on another call, including an inactive call before the contact has been cleared.
Aside from using Click-to-Call, you can dial by entering a phone number using the number pad or by typing or copy and paste in the Communication panel of SugarLive. If the dialer is not open when you open SugarLive, simply click the phone icon at the top to open it. 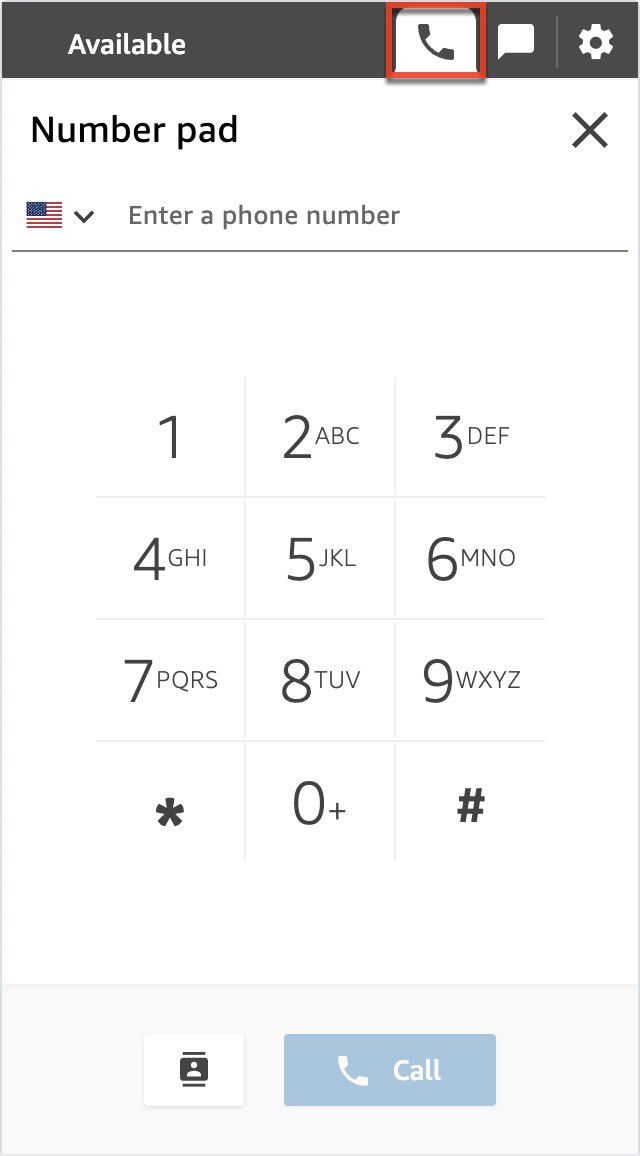
If the number you dial matches a phone number in a single contact, account, or lead record in Sugar, that record is automatically opened in the respective tab(s) of the Detail panel so you can view and update their customer information while on the call. If there is more than one match in any of the three modules, the records are opened in the Search tab and the contact record will be in focus. If no contact is found, the account record and lastly the lead is prioritized. If the number you dial does not match a phone number in any contact, account, or lead records, but you are viewing a Sidecar module record with a relationship to the Activities module (e.g., Opportunities), SugarLive will automatically link the record to the call record via the Related To field.
In order for SugarLive to match an outbound call's phone number to one in Sugar, the phone numbers in Sugar must use a format that is recognizable to SugarLive; the following format is the only consistently recognized format: +10123456789.
Configuring the Communication Panel
Several configuration settings are available in the Settings page of the Communication panel by clicking the gear icon in the top right corner. Here, you can set your phone type (e.g., softphone), choose your language, report an issue, download logs, and log out.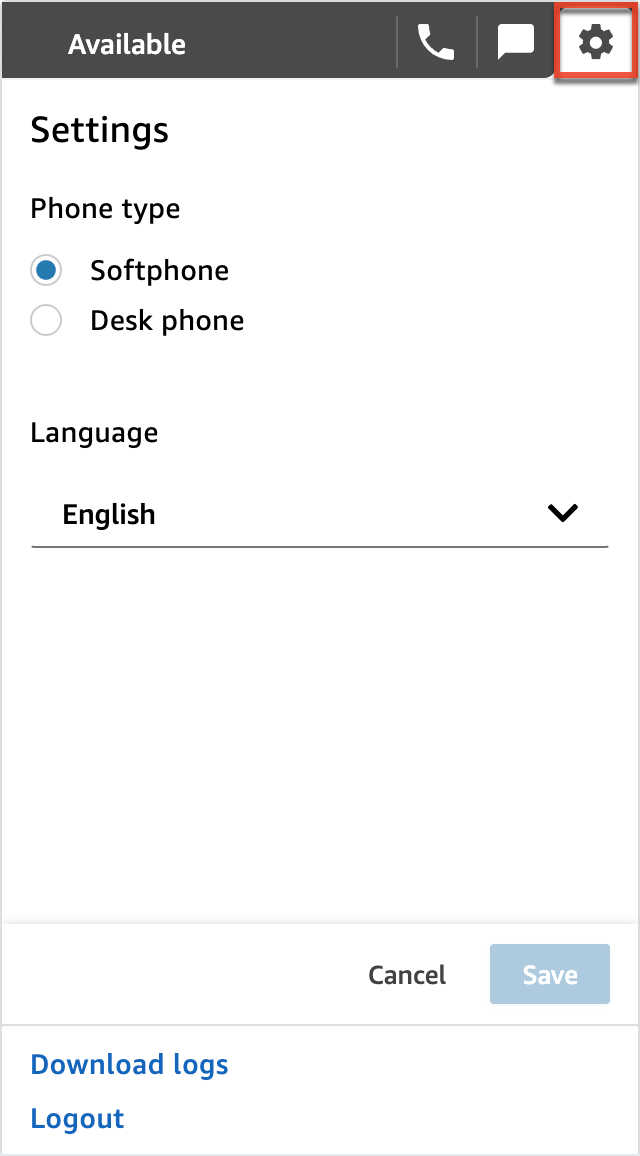
Summary Panel
The Summary panel opens when you receive an incoming call or chat in SugarLive and is displayed above the Communication panel. It displays fields from the call or message record for the active SugarLive session to keep relevant information in view and available to edit while you are working. Based on the type of session you have open, the panel title is either "Message Summary" or "Call Summary", and the fields that are displayed for each can be configured by an admin.
In the top part of the panel, the Guests and Related To fields indicate to which record(s) the current call or chat is linked, if any. The Guests field will automatically populate the lead, contact, or user record if identified by SugarLive. If not automatically populated, you can search and select a record from the Leads, Contacts, or Users modules from the Guests field. The Related To field can be automatically populated if identified by SugarLive (e.g., a customer identifies an existing case number when beginning the chat). The Related To field can be populated with a record from any of the following modules, as allowed by your license type and role restrictions:
- Account
- Contact
- Task
- Opportunity
- Quoted Line Item
- Quote
- Bugs
- Case
- Lead
- Target
- Knowledge Base
- Note
- Purchased Line Item
- Purchase
- Revenue Line Item
The Summary panel contains auto-saved fields to allow you to easily take notes while talking with the customer. During a chat session, these fields' values are saved on the message record, and during a call, the values are saved on the call record. Any values entered are automatically saved with no additional input necessary from the agent.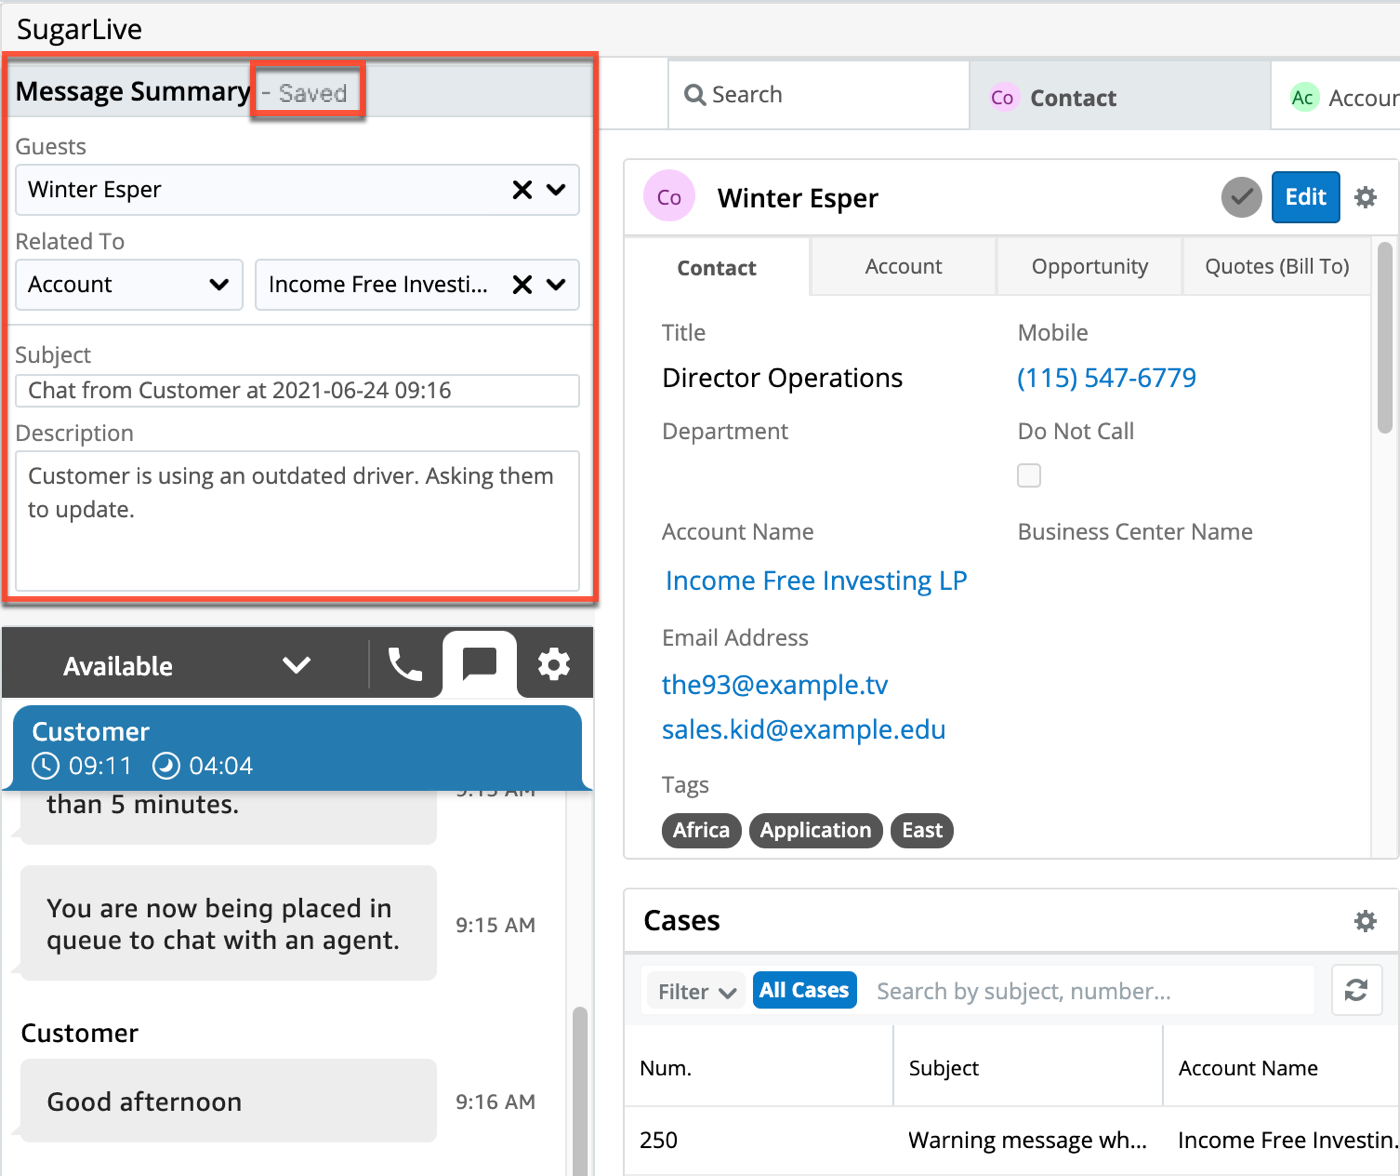
The context of the Summary panel (i.e., which record the field values are displayed for) is maintained whenever you have a specific call or chat open. If you have multiple chats open and switch between them using the tabs in the Communication panel, the Summary and Detail panels' context switches as well so that you always have the right records in view when talking with the customer.
Linking Records
To keep track of the records relevant to a specific encounter, they can easily be related to the call or message record for the SugarLive session via the Link button.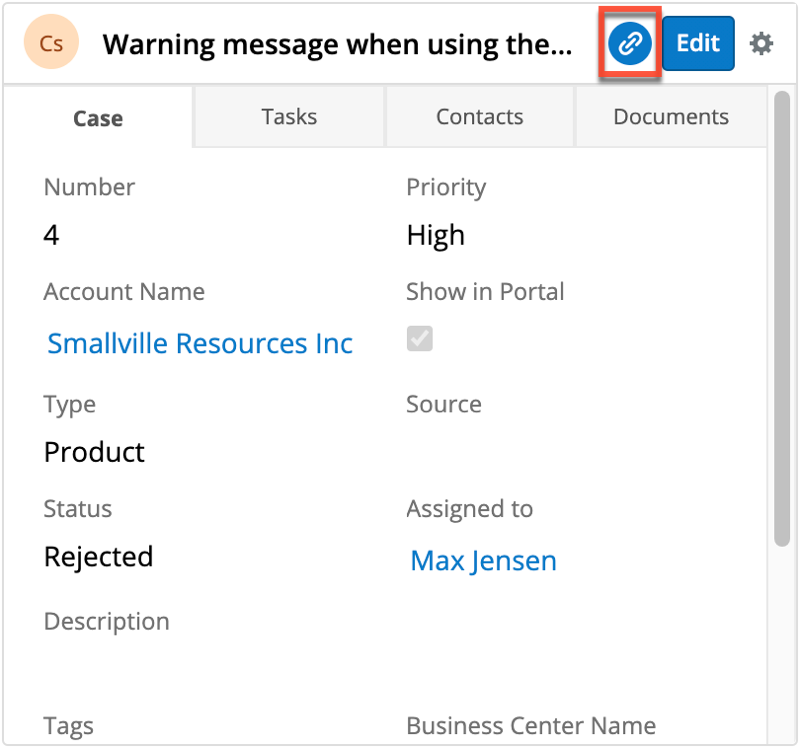
This Link button is displayed in the header of all Record views and single-record tabs of Record View dashlets for all Sidecar modules that have a relationship to the Activities module (e.g., Contacts, Cases, Opportunities, etc). Clicking the button will relate the record to the current call or chat and update the Guests and Related To fields in the Summary panel: 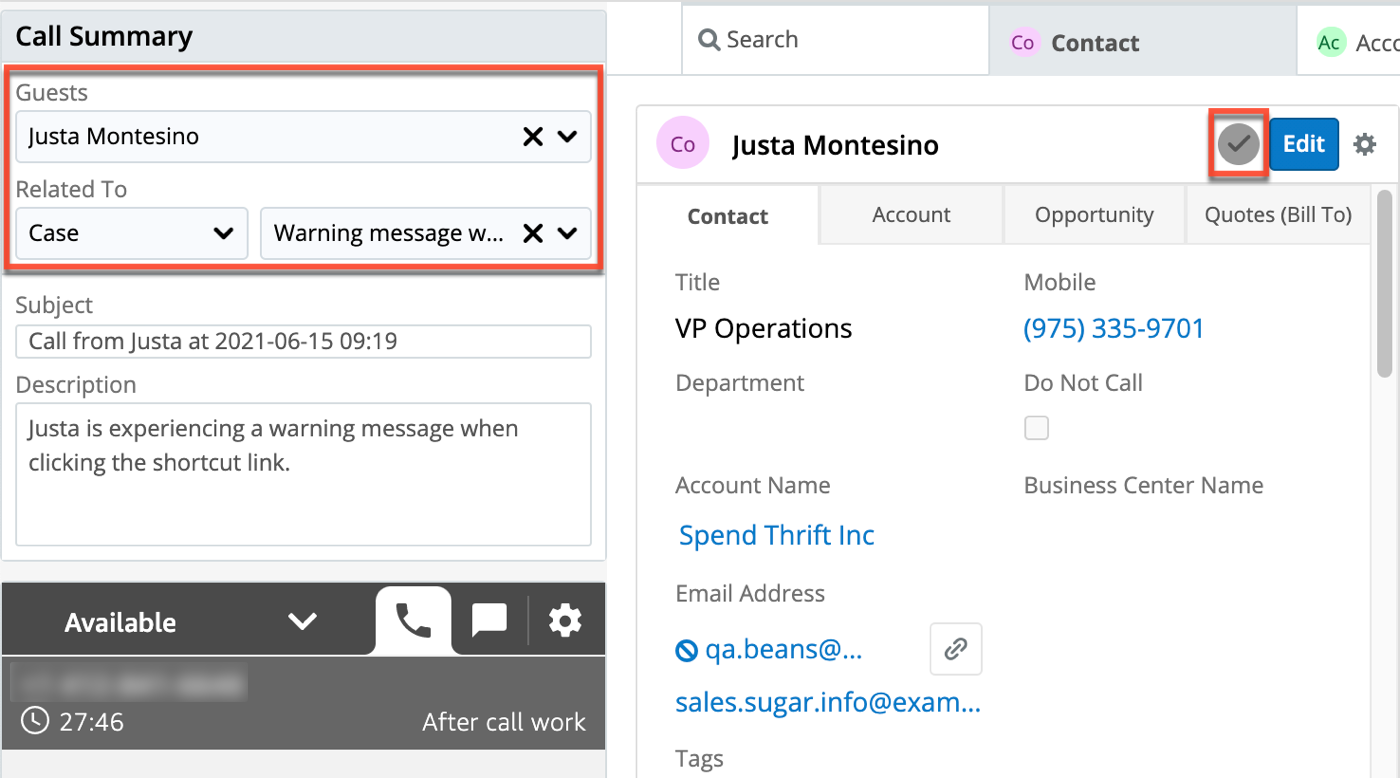
When you link a contact or lead record, the value is automatically saved as a guest on the call or message record at the time you add the link and other record types are saved in the Related To field. See the Messages and Calls pages for details on which values SugarLive sets on these modules.
Once a link has been added, the Link button becomes disabled and the link cannot be removed, but it can be replaced by opening a different record and linking it instead. If no record is linked by the end of the SugarLive session, which includes the time when the call or chat is inactive but still open, then no record will be related. However, it is still possible to update the call or message record manually at any time directly in its module.
Detail Panel
The Detail panel opens when you receive an incoming call or chat in SugarLive and fills the right-hand side of the screen next to the Communication panel and Summary panel. It consists of up to five tabs with fixed layouts: Search, Contact, Account, Lead, and Case; these tabs help you find, view, and update Sugar records while talking to the customer. The sections below discuss the default layouts of these tabs, but the layouts can also be configured by an admin.
Note: You will only be able to see tabs as allowed by your license type, team membership, assigned roles, and user access type. For more information, please refer to the referenced documentation in the Administration Guide.
The context of the Detail panel (i.e., which records are open) is maintained whenever you have a specific call or chat open. If you have multiple chats open and switch between them using the tabs in the Communication panel, the Detail and Summary panels' context switches as well so that you always have the right records in view when talking with the customer. In addition, if you have unsaved changes in a dashlet when switching between chat tabs, the unsaved changes remain when you return for you to complete and save them.
If you create a new case using the Quick Create or module tab menu while in SugarLive, the Source field of the case is automatically populated with either "Phone" or "Chat", based on the type of SugarLive session you currently have open. In addition, if you are viewing a specific contact in the Contact tab, that contact is set as the primary contact and its account is set in the Account Name field on the case you are creating. After the case is created, the primary contact is opened in the Contact tab while the newly created case is opened in the Case tab.
Search Tab
The Search tab contains a search bar at the top to locate records across the Contacts, Accounts, Leads, and Cases modules to locate the record in Sugar associated with the customer you are talking to. Click the down arrow to select which specific module(s) you wish to search. The right side contains additional filter options. Clicking a record in the search results opens them in their respective tabs within the Detail panel so that you can view information relevant to the record without leaving SugarLive.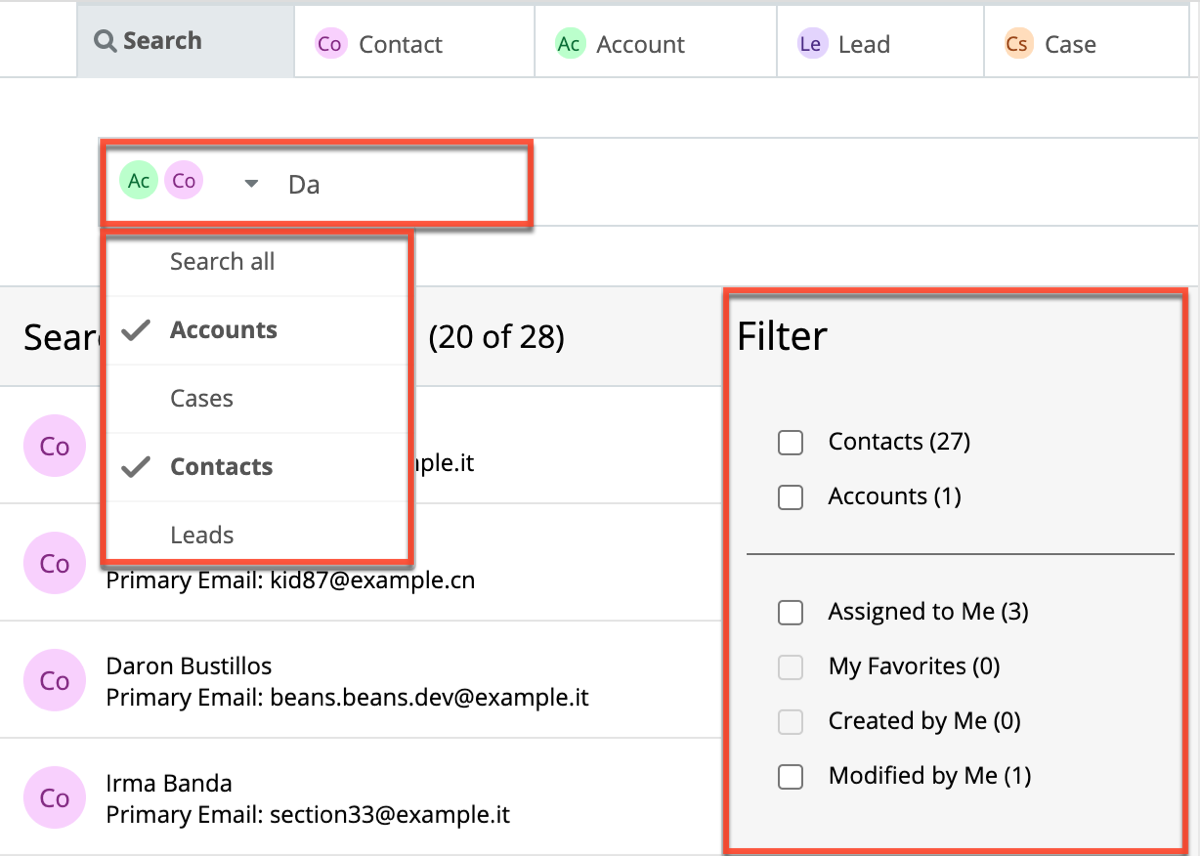
Contact Tab
The Contact tab provides an overview of the customer and the tools needed to help them without leaving SugarLive. This tab is disabled until a contact has been opened. When a contact is automatically opened by a call, manually opened via the Search tab, or created using the Quick Create menu in the top right corner of Sugar, it is opened in this tab. In addition, other related and useful information is displayed by default, including a searchable view of the knowledge base and a list of interactions with the contact. The dashlets on this tab can be configured by an admin.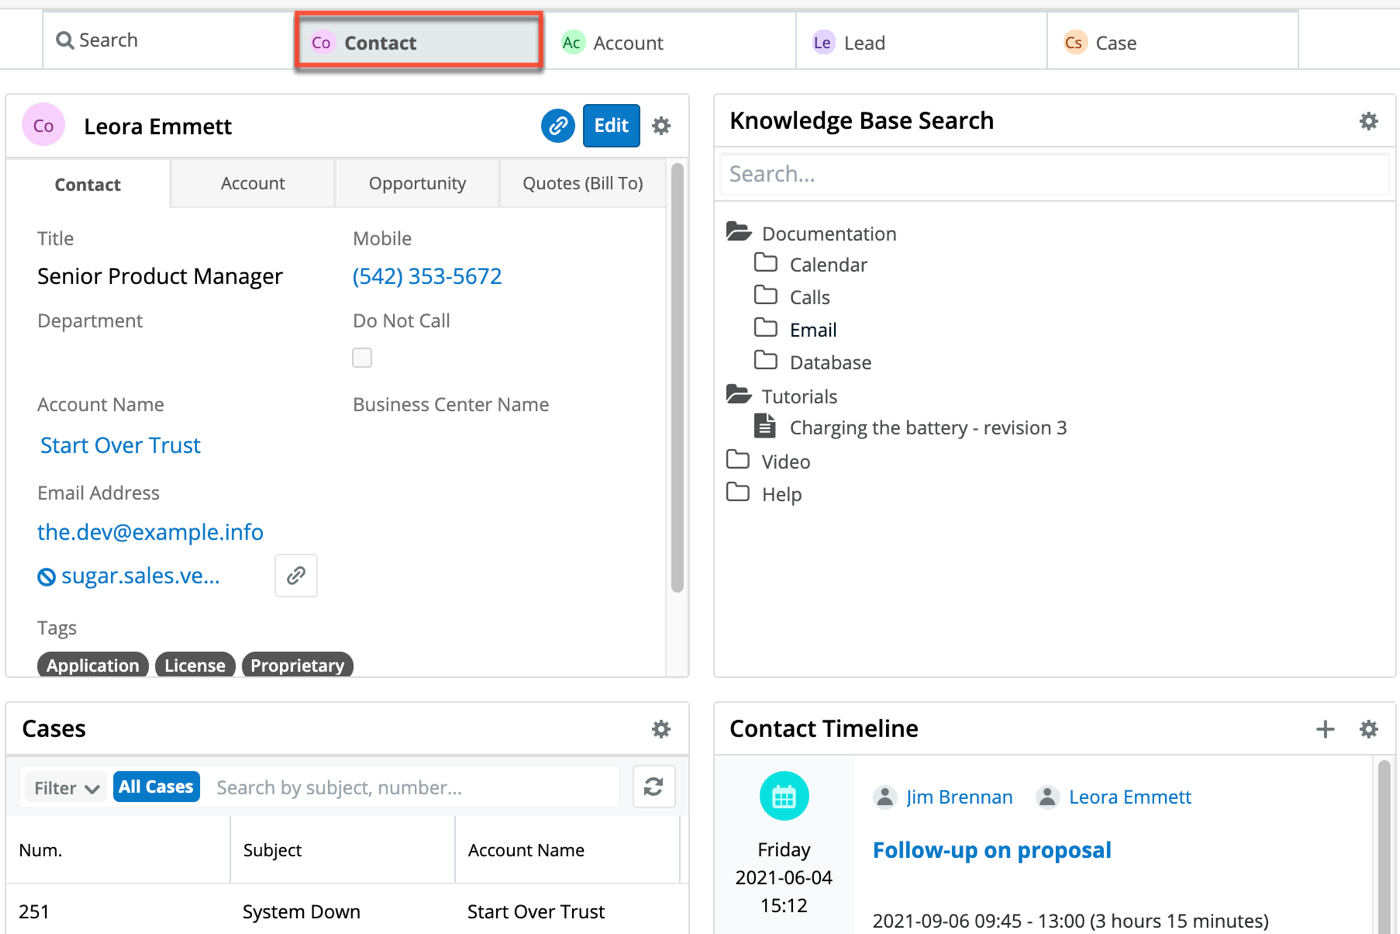
The context of the tab's dashlets (i.e., which contact the dashlets are displaying data for) is maintained whenever you have the current call or chat open. If you have multiple chats open and switch between them using the tabs in the Communication panel, the Contact tab's context switches as well so that you always have the right records in view when talking with the customer. Read more about the dashlets it contains in the following sections:
- Contact Record Dashlet
- Knowledge Base Search Dashlet
- Cases Console List View Dashlet
- Contact Timeline Dashlet
- Purchase History Dashlet
- Active Subscriptions Dashlet
Account Tab
The Account tab provides an overview of an account and the tools needed to help them without leaving SugarLive. This tab is disabled until an account has been opened. When an account is automatically opened by a call, manually opened via the Search tab, or created using the Quick Create menu in the top right corner of Sugar, it is opened in this tab. In addition, other related and useful information is displayed by default, including a timeline of interactions with the account. The dashlets on this tab can be configured by an admin.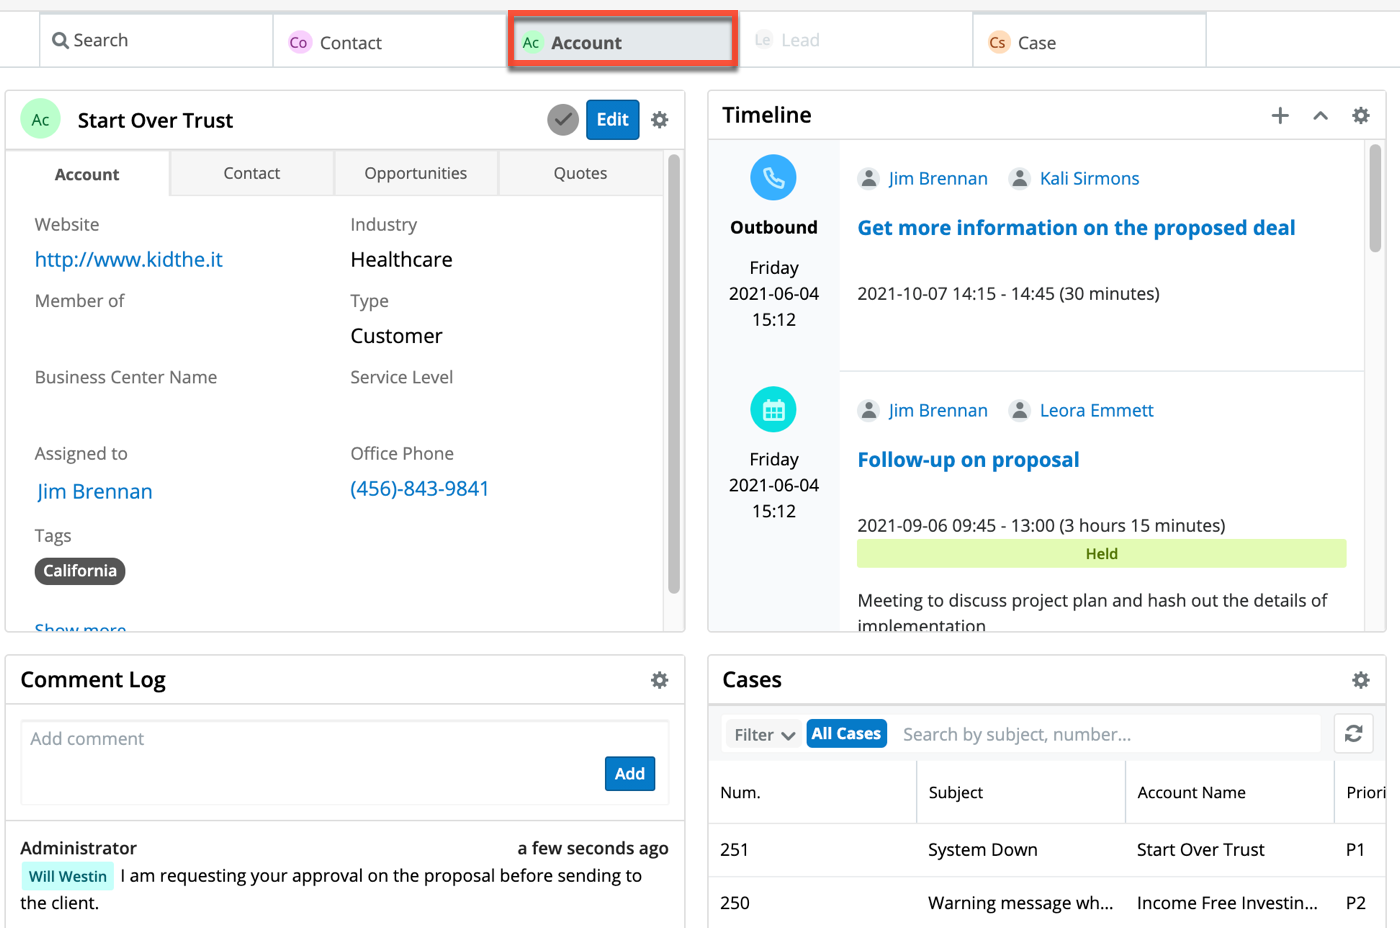
The context of the tab's dashlets (i.e., which account the dashlets are displaying data for) is maintained whenever you have the current call or chat open. If you have multiple chats open and switch between them using the tabs in the Communication panel, the Account tab's context switches as well so that you always have the right records in view when talking with the customer. Read more about the dashlets it contains in the following sections:
- Account Record Dashlet
- Account Timeline Dashlet
- Comment Log Dashlet
- Cases Console List View Dashlet
- Purchase History Dashlet
- Active Subscriptions Dashlet
Case Tab
The Case tab provides an overview of a case and the tools needed to understand and work the case without leaving SugarLive. This tab is disabled until a case has been opened. When you open a case via the Search tab or create one using the Quick Create menu in the top right corner of Sugar, it is opened in this tab along with other related and useful information by default, including a searchable view of the knowledge base and access to the case's comment log. The dashlets on this tab can be configured by an admin.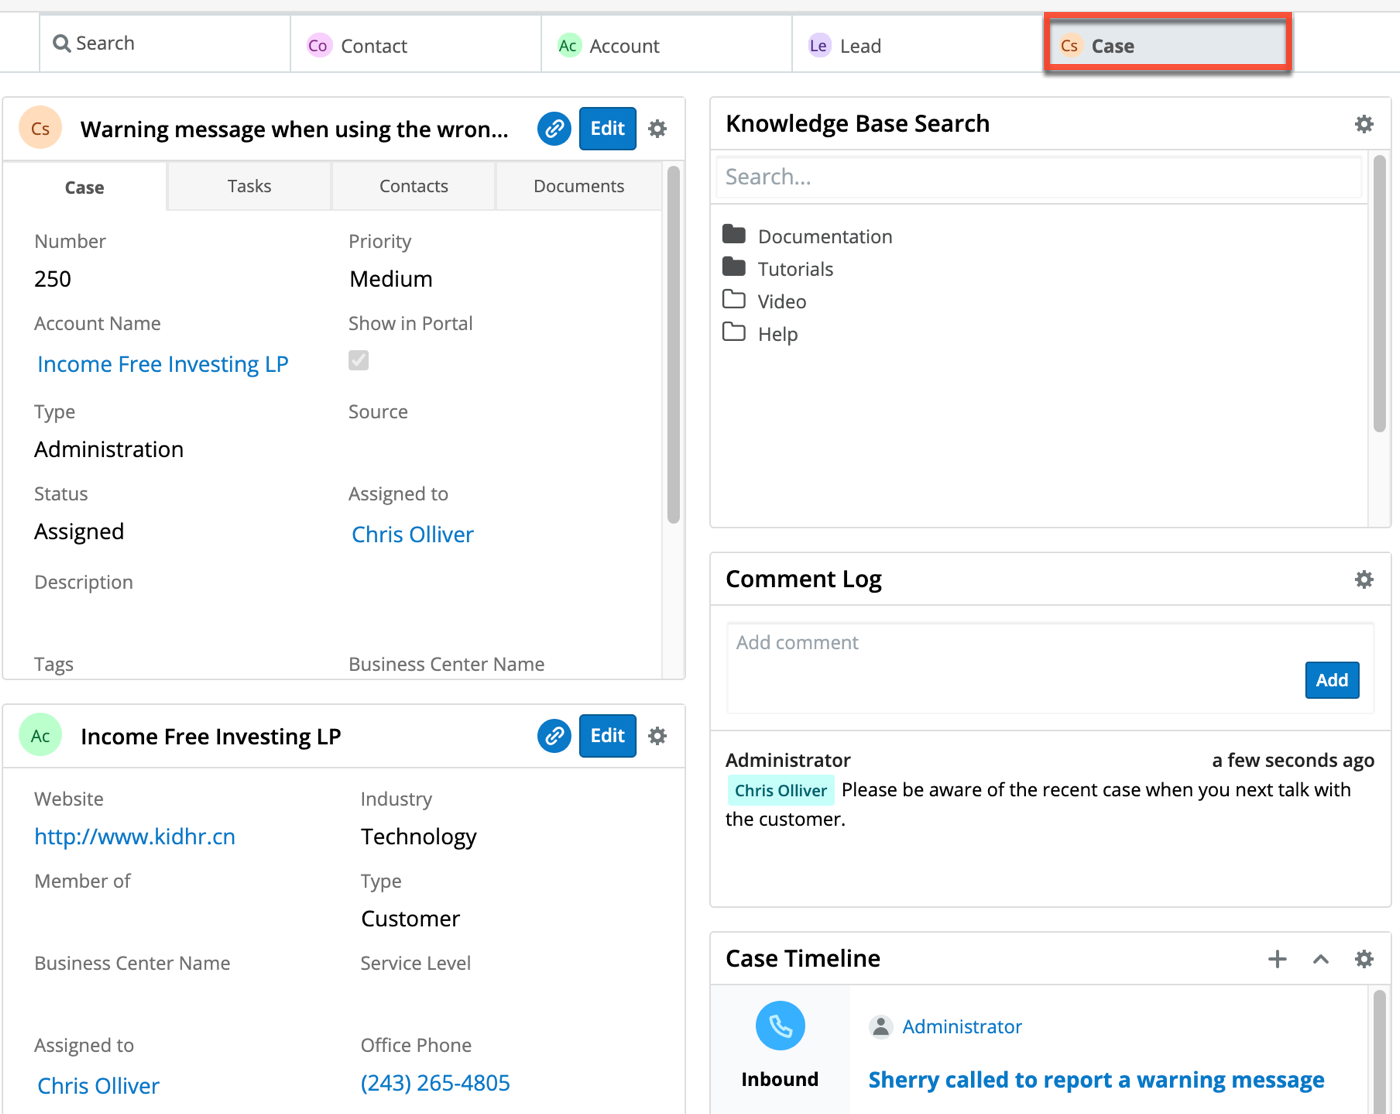
The context of the tab's dashlets (i.e., which case the dashlets are displaying data for) is maintained whenever you have the current call or chat open. If you have multiple chats open and switch between them using the tabs in the Communication panel, the Case tab's context switches as well so that you always have the right records in view when talking with the customer. Read more about the five dashlets it contains in the following sections:
- Case Record Dashlet
- Knowledge Base Search Dashlet
- Related Account Record Dashlet
- Comment Log Dashlet
- Case Timeline Dashlet
Dashlets
The Detail panel of SugarLive contains a variety of dashlets by default in a fixed three-tab layout to help you serve the customer while talking to them in the Communication panel. The sections below outline each of these dashlets and how they can be used. An admin can also configure the layouts of these dashlets within each tab.
Note: Although regular users can edit some of these dashlets outside of SugarLive, none of the dashlets are available for editing by regular users in SugarLive. An administrator must configure the dashlets if changes are required.
Cases Console List View Dashlet
The Cases Console List View Dashlet is available in the Contact and Account tabs. In the Contact tab, the list is automatically filtered to the cases with the currently displayed contact in their Primary Contact field. Clicking a record in the dashlet opens it in the Case tab rather than navigating away from SugarLive and opening its record view. The most recently selected record stays in context in the Detail panel whenever SugarLive is open to the same call or chat.
For more information on Console List View dashlets, including the searchable Case fields, refer to the Dashboards and Dashlets documentation.
Record View Dashlet
By default, on the top left of the Contact, Account, Lead, and Case tabs is a Record View dashlet. The dashlet displays the relevant record type and fields for the record you have open during the current call or chat. In addition, the Contact, Account, and Case Record View dashlets are all configured to display additional tabs containing related records. During a SugarLive session, each Record View dashlet has a Link button in the dashlet header. This button can be used to relate the record to the current call or message record. See the Linking Records section of this page for more information.
Records can be edited directly in the dashlet. Additionally, an Actions menu is available in the Record View dashlet for modules that can be escalated. For more information on escalting records, refer to the Escalations documentation. If you wish to access the record's full-page record view, simply hover over the name in the dashlet and click the arrow icon that appears to navigate to the record. 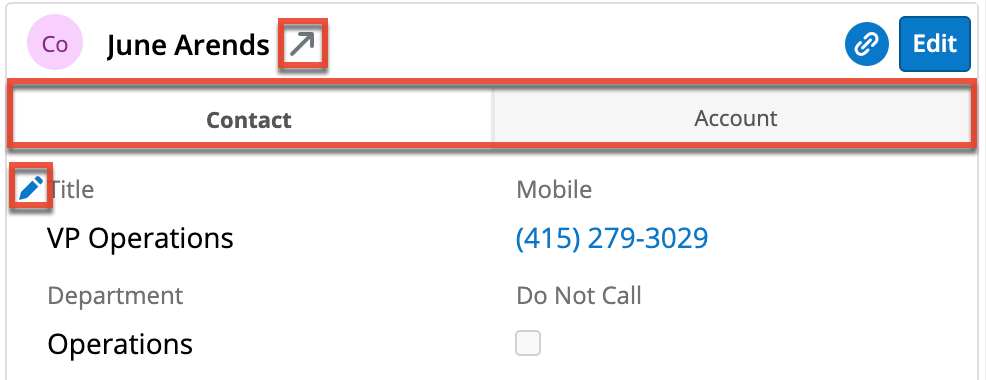
Note that in SugarLive, only administrators can change the tabs displayed in Record View dashlets. For more information, refer to the Record View dashlet documentation.
Knowledge Base Search Dashlet
The Knowledge Base Search dashlet is displayed in the top right corner of both the Contact tab and the Case tab by default to give you quick access to published articles that may help in troubleshooting a customer issue. It includes a search bar that lets you find articles with matching titles or contents. To search, simply enter a keyword and a dropdown will appear containing matching articles. Clicking an article opens it in a new browser tab.
Below the search bar, you can see a tree-based view showing the structure of the knowledge base. Here, you can navigate through the folders to browse articles in specific categories and click articles to open them in a new browser tab. See the Dashboards and Dashlets page for more details on this dashlet.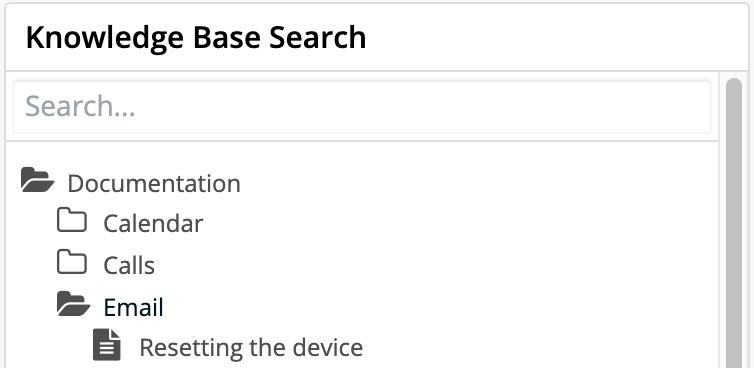
Related Account Record Dashlet
By default, on the bottom left of the Case tab is another Record View dashlet, similar to the top left. Out of the box, this dashlet displays the account related to the case you are viewing, providing additional customer information and the ability to edit the related account without having to navigate from SugarLive. If you wish to access the account's full-page record view, simply hover over the account's name in the dashlet and click the arrow icon that appears to navigate to the record. Note that only administrators can configure Record View dashlets in SugarLive. For more information on this dashlet, refer to the Record View dashlet documentation.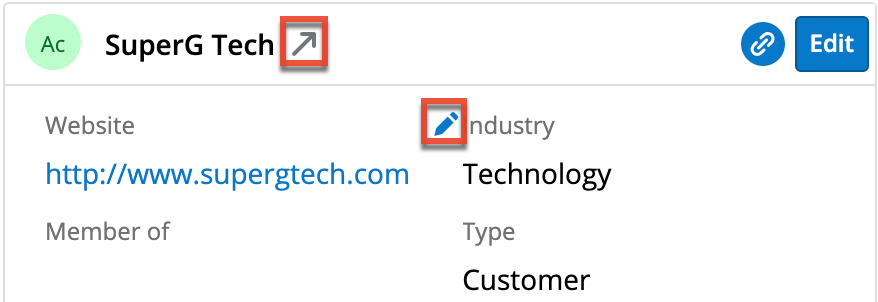
Comment Log Dashlet
This dashlet displays the case's Comment Log field's entries with the most recent entry on top. You can also quickly create new entries by typing in the open text box then clicking the Add button. For more information about comment logs including mentioning records and users, refer to the User Interface page and for details on the Comment Log dashlet itself, see the Dashboards and Dashlets page.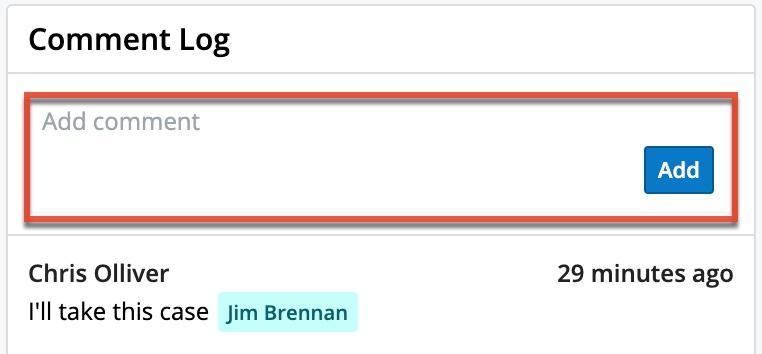
Purchase History Dashlet
By default, the bottom left of the Contact and Account tabs contain the Purchase History dashlet which shows a list of all the current account's purchases regardless of the start or end date of the purchase record. The dashlet shows each purchase's name, date range, quantity, and total. For more information, please review the Dashboards and Dashlets documentation.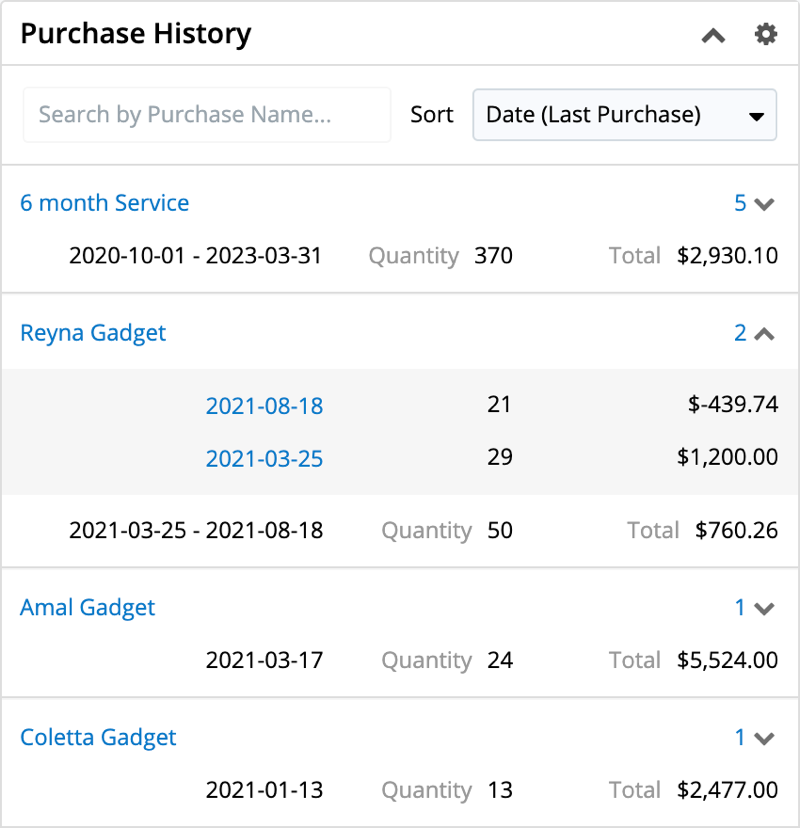
Active Subscriptions Dashlet
By default, the bottom right of the Contact and Account tabs contain the Active Subscriptions dashlet which shows a list of all of the current account's purchases that are marked "Service", have a start date in the past, and an end date in the future. The dashlet shows each purchase's name, quantity of units, and calculated revenue line item amount next to "Total". A simple bar chart visualizes the time elapsed and time remaining for the subscription, which you can explicitly view by hovering your mouse over the bar. For more information, please review the Dashboards and Dashlets section of the User Interface documentation.

Timeline Dashlet
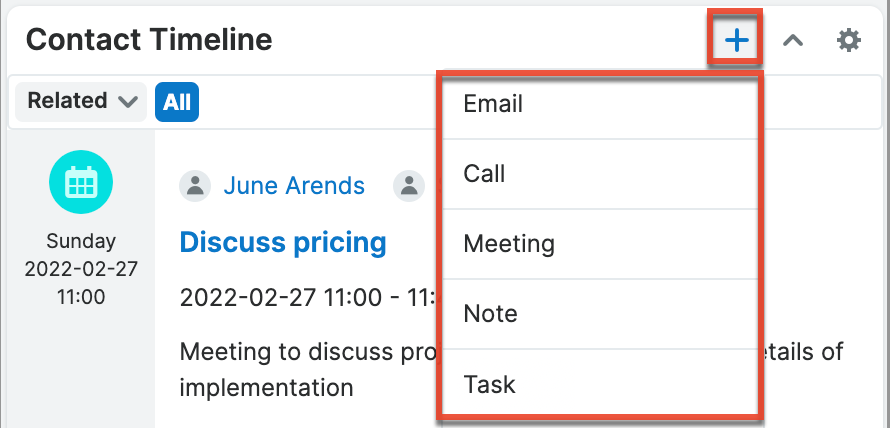
By default, the Contact, Account, Lead, and Case tabs all contain a Timeline dashlet. This dashlet displays the current record's related activities (e.g., calls, meetings) and select field updates (e.g., Assigned To) in the form of record cards. Each card in the dashlet displays key information (e.g., subject, description, guest's name) for the related record, and the cards are sorted in chronological order based on the date they occur or are due (for tasks), with the most recent at the top. You can also quickly create new activities by clicking the Plus (+) icon in the dashlet header. Selecting a type of record will open a Create drawer and automatically select the current record in the new record's Related To field. For more information on Timeline dashlet, refer to the Dashboards and Dashlets documentation.