SugarLive Management
Overview
SugarLive, available to users with a Sugar Serve or Sugar Sell license type, is an omnichannel tool for customer service agents and sales team members to communicate in real-time with customers via chat and phone. SugarLive is available toward the bottom of Sugar's navigation bar, which is also where system administrators with a Sugar Serve or Sugar Sell license type can open the configuration screen to customize the layout. In particular, admins can choose the fields available in the Summary panel and the inclusion and layout of the dashlets in the Contact, Account, Lead, and Case tabs. Please note, the Lead tab is only available to users with a Sugar Sell license, and the Case tab is only available to users with a Sugar Serve license.
To use SugarLive, your organization must have an Amazon Connect account because Amazon Connect is used to route incoming calls and chats to SugarLive. See the prerequisites outlined in the SugarLive documentation for more details.
Prerequisites
In order to configure the SugarLive layout, the following requirements must be met:
- You must be a system administrator user.
- SugarLive is included with Sugar Sell Premier, Sell Advanced, Sell Essentials, and Serve. Please contact your Sugar partner or representative to learn more.
- You must either be logged out of Amazon Connect or have your status set to "Offline" in the Communication panel. See the Configuring the Communication Panel and Logging In sections of the SugarLive documentation for details on logging out and updating your status in Amazon Connect.
Although SugarLive can only be used with certain web browsers, it is still possible to configure the SugarLive layout using all supported browsers. See the Supported Platforms page for details on which supported browsers cannot be used to access SugarLive.
For more information on license types and the module functionality available for each type, refer to the User Management documentation.
Configuring SugarLive
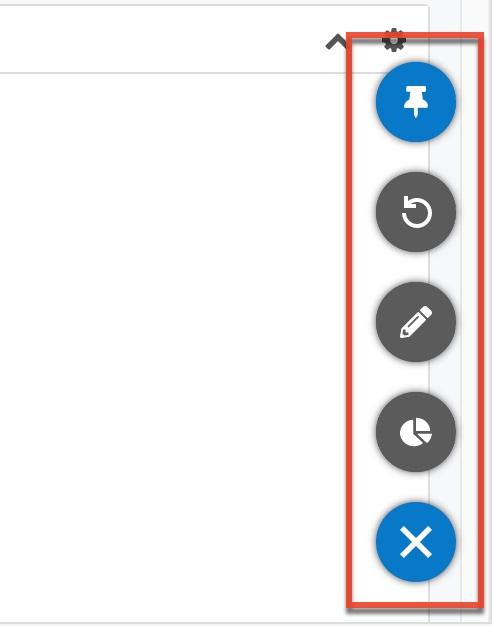
To customize the layout of SugarLive, click the three-dot menu to the right of the SugarLive icon in the navigation bar and choose "Configure Layout". This opens SugarLive in a configuration view where you can change which information is shown and in which layout. The floating actions button is open by default so you can quickly access all of the configuration tools available. Note that the three-dot menu is only available to Sugar Serve or Sugar Sell admins and can only be opened when logged out of Amazon Connect or set to "Offline". Any changes made to SugarLive will update the layout for all users who access SugarLive.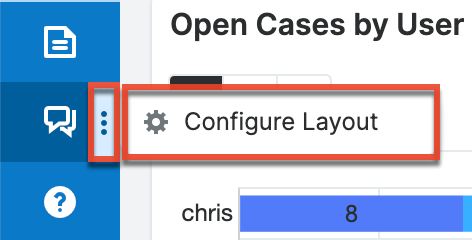
Once open, the SugarLive configuration view shows a read-only preview of what SugarLive looks like for all users without actual data. The Summary panel and Detail panel can be configured but the Communication panel cannot, so it is displayed as a placeholder to help you visualize what the final layout will look like. Certain basic settings can be configured by all users in the Communication panel during a live session; see the SugarLive page for more details on these settings. In the Detail panel, all tabs are enabled even though they are empty so that you can configure them. For more information on using each of these panels during an active session, see the SugarLive documentation.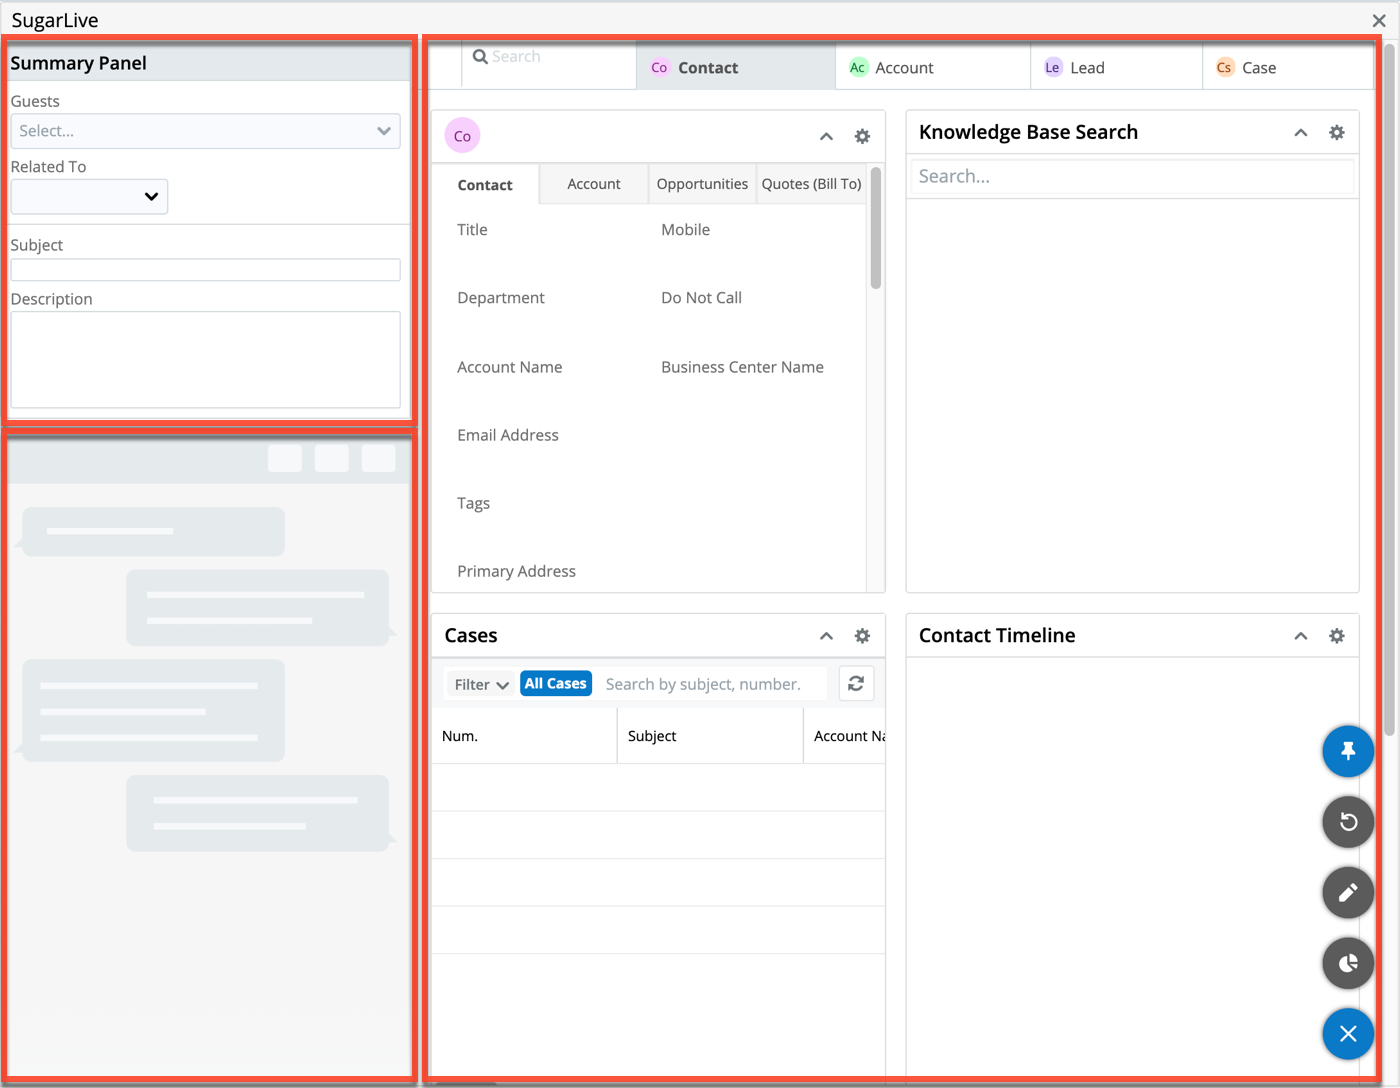
When you are done customizing the SugarLive layout, click the X button in the top right corner. This closes the configuration view, which allows you to log in to Amazon Connect or set yourself to "Available" again. All changes made to the Detail panel are automatically saved, so you can close the view at any time without losing your changes.
Configuring the Summary Panel
To change which fields are displayed in the Summary panel, click the Configure Summary Panel option with the pencil icon in the floating actions button. This opens a drawer where you can configure the fields in the Summary panel for both call and chat sessions. Changes made to the Summary panel are applied for all users once you click the Save Summary Panel button within the drawer.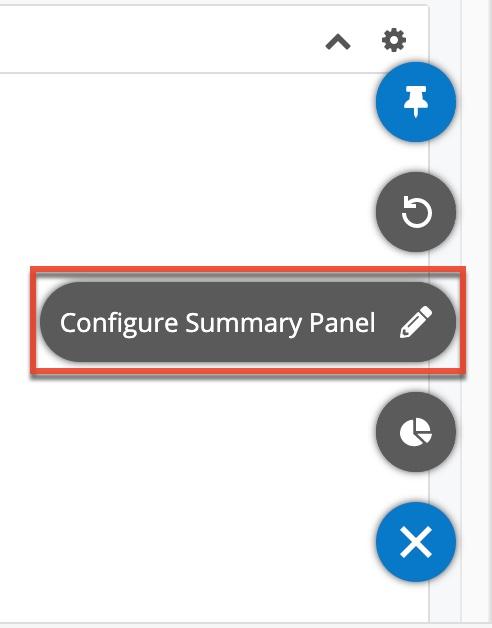
The drawer is divided into three sections: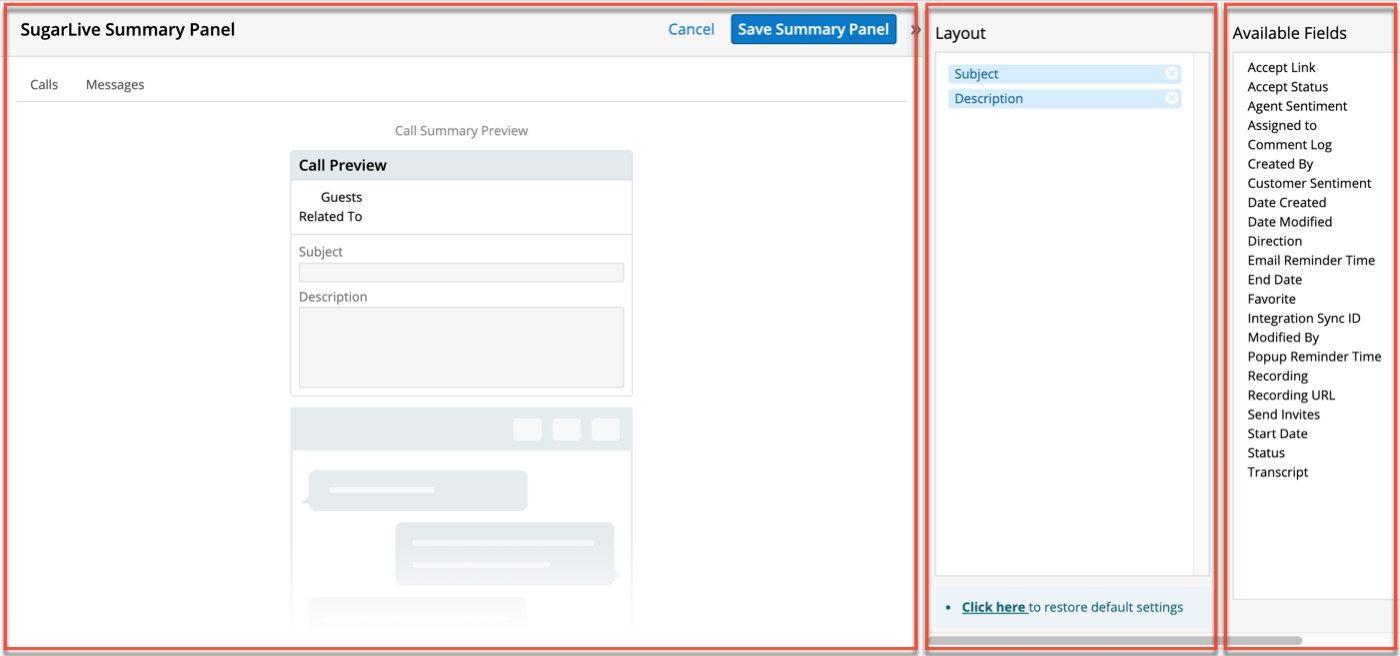
- Preview: This section shows a live preview of what the Summary panel currently looks like, including any unsaved changes you have made since opening the drawer. It contains a Calls and a Messages tab so you can configure the Summary panel differently for each.
- Layout: This section shows the fields that are currently configured to be displayed in the Summary panel and includes a link to restore the default settings for the tab.
- Available Fields: This section lists all fields for the current module (e.g., calls or messages) that are not already displayed in the Summary panel.
Note: Action Button fields are not available to add to the layout.
To add fields to the Summary panel for call or chat sessions, open the appropriate tab and drag fields from the Available Fields section to any position in the Layout section. You can also drag fields within the Layout section to reorder them. To remove a field, click the X icon that appears next to the field when you hover over it.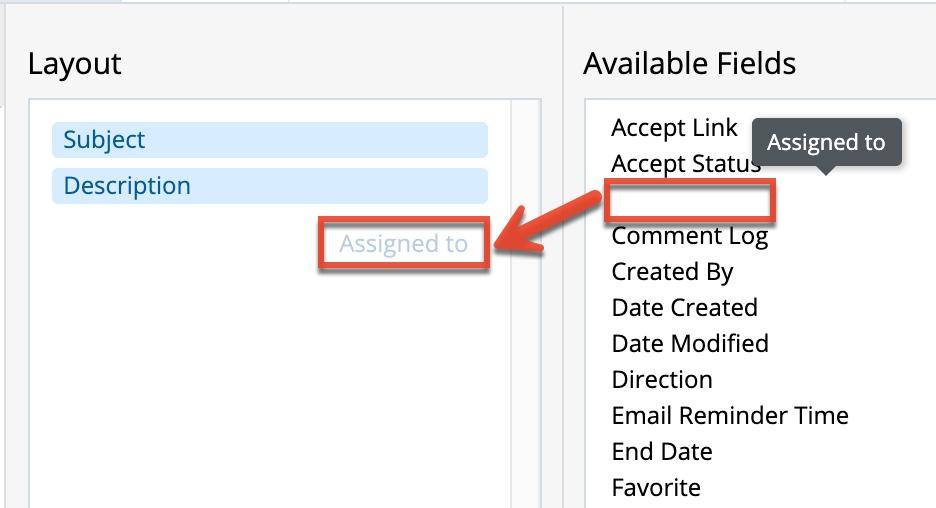
As you make updates to the layout, the preview on the left side is automatically updated to reflect your changes so you can see what each update will look like. The Summary panel has a maximum height, so a vertical scrollbar is added when more fields than can fit are added to the layout. If there is a scrollbar in the preview, there will also be one in SugarLive during an actual session.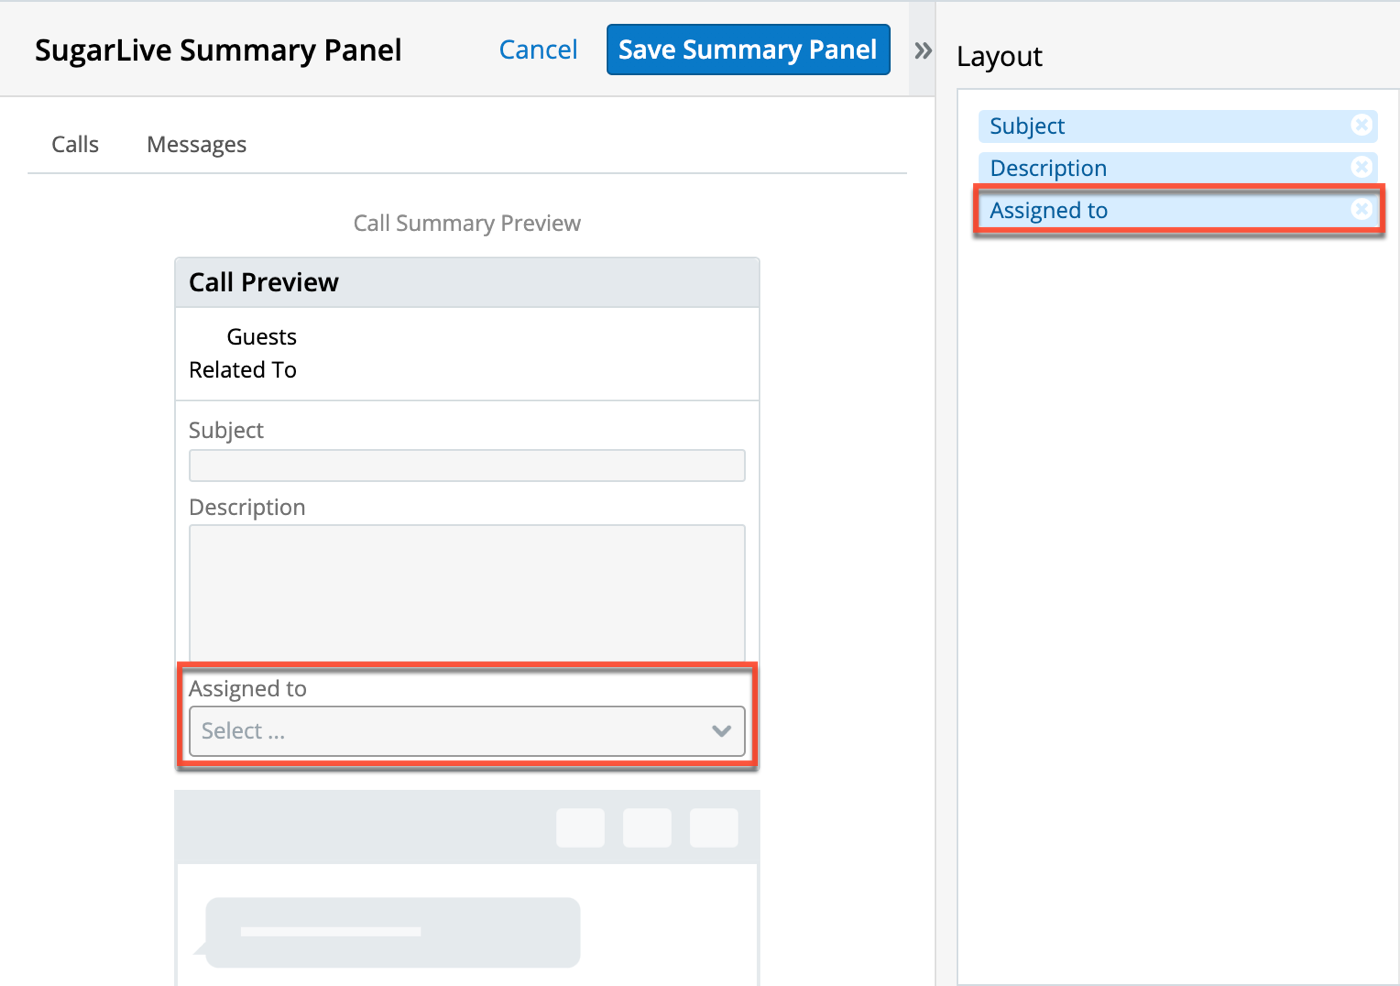
When choosing fields to add to the Summary panel, it is a good idea to take note of any fields that are required. Calls and messages can be saved with blank required fields in SugarLive, so as to help the agent complete the call or chat quickly and move on to the next inquiry. See the Adding Required Fields section for more details and best practices on this.
Note that the Guests and Related to fields at the top cannot be removed. These fields indicate to which records the current session is linked and are updated using the Link button in the Detail panel of SugarLive. See the SugarLive documentation for more details on linking records.
Once you are happy with your changes to the layout, click "Save Summary Panel" to save your changes in both the Calls and Messages tabs. Note that the main SugarLive configuration view always shows the Calls Summary panel but both can be previewed within the Configure Summary Panel drawer.
Adding Required Fields
SugarLive interacts with required fields differently than the rest of Sugar. This is because the Summary panel autosaves all data, so agents do not lose their information even if an interaction ends abruptly. Therefore, while an agent will be warned of a missing requirement, a record (i.e., call, message) could still be created without all required fields entered. To avoid this, we recommend always setting a default value for a required field in the Summary panel. You can set this in Admin > Studio. Please see the Fields documentation for more information on how to set a default value on a field.
Restoring Default Settings
To reset the layout of the Summary panel for the specific type of session you are editing (e.g., call or chat), select "Click here" in the blue box on the right side. This immediately restores the default settings for the tab. If you change your mind and want to return the layout to its previously-saved state, click "Cancel" to close the drawer without saving. Otherwise, to preserve the reset default layout, click "Save Summary Panel" to save both tabs.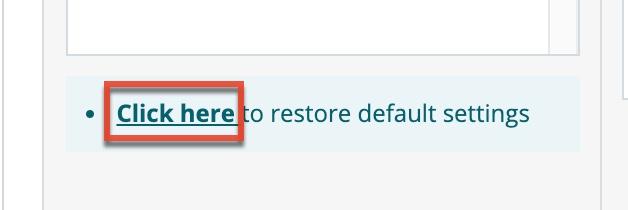
Configuring the Detail Panel
The Detail panel is a tabbed view displayed on the right side of SugarLive. For the most part, it can be configured in the same way you edit any dashboard, by dragging, resizing, adding, editing, and removing dashlets. Changes you make to each tab are immediately visible to all users the next time they open SugarLive. To avoid disruption to your customer service agents' work, it is recommended to make SugarLive configuration changes outside of regular business hours.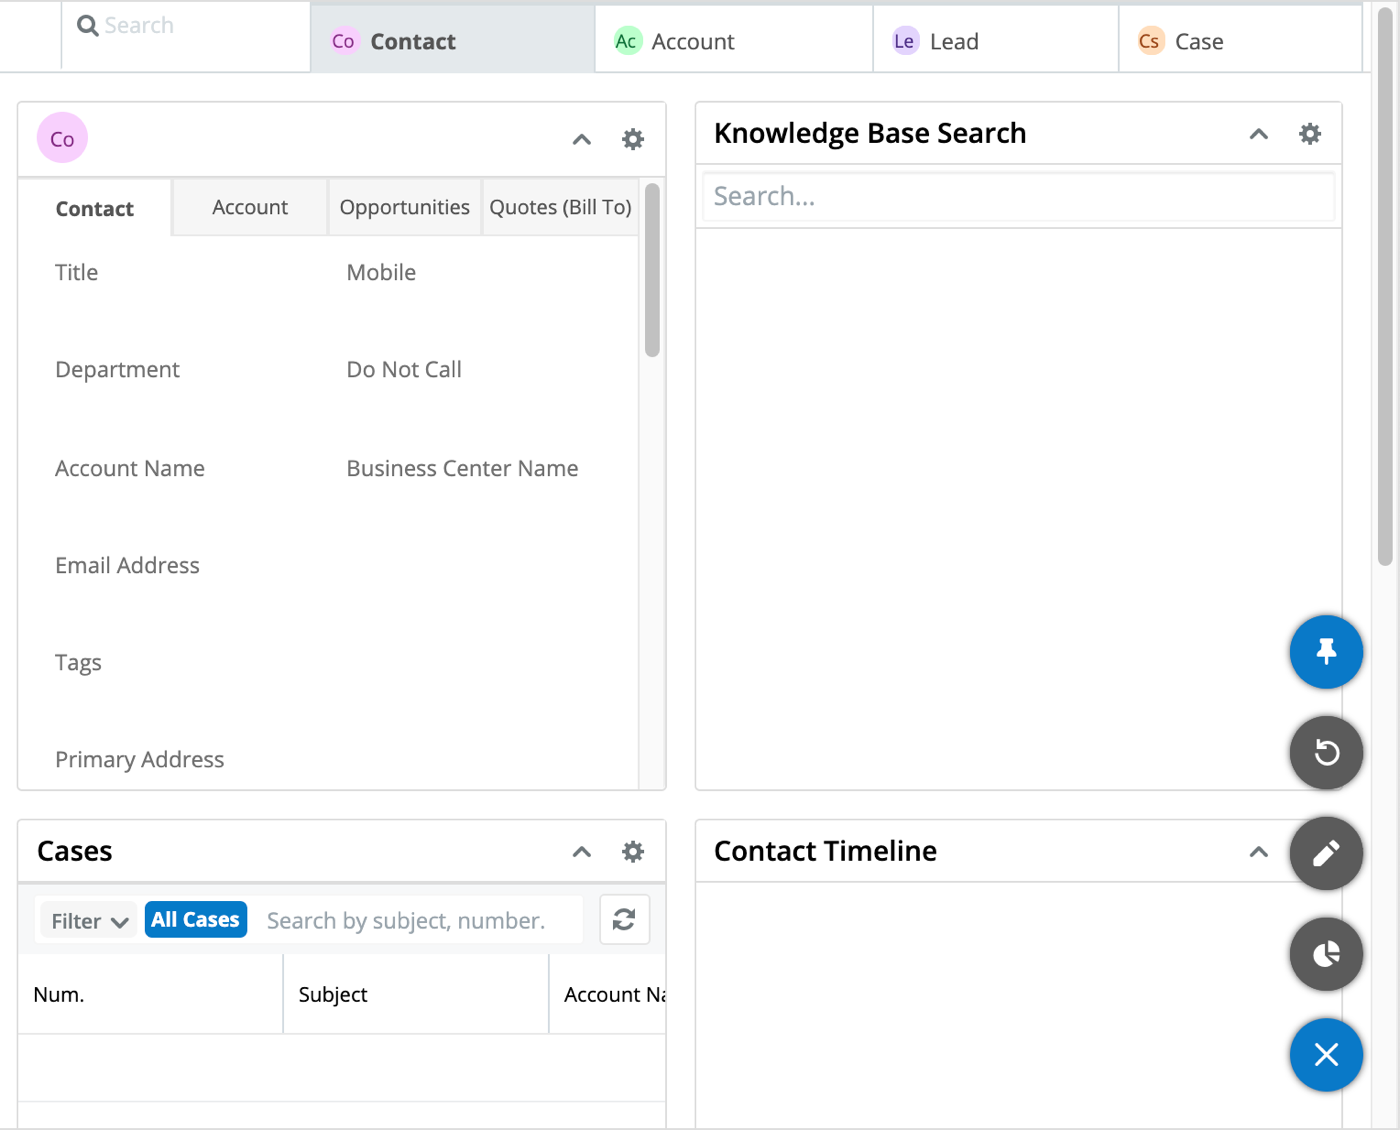
When you first open the SugarLive configuration view, the Detail panel is set to the Contact tab and the floating actions button is open so you can quickly access configuration options. See the sections below for details on configuring the Contact, Account, Lead, and Case tabs, and using the floating actions button to restore default settings or configure the Summary panel.
Note: The Search tab is not able to be configured.
Module Tabs
The Contact, Account, Lead, and Case tabs can all be completely configured in the same way you edit any dashboard, by adding, editing, removing, rearranging, and resizing dashlets. Note that the Record View dashlet in the top left corner of each tab includes the Link button to relate the current record to the call or message in context. Removing the dashlet is not recommended because it also removes the ability to choose to which contact, account, lead, or case the ongoing session should be linked. You can use the floating actions button to restore the current tab to its default layout at any time. See the Dashboards and Dashlets page for details on editing dashboards in Sugar.
Floating Actions Button
The floating actions button is shown on all tabs of the Detail panel and contains options to configure the Summary panel and restore the current tab to its default settings. On the Contact, Account, Lead, and Case tabs, it also contains an option to add a dashlet to the tab. Restoring to defaults only impacts the current tab and will restore all aspects, including the configuration of all dashlets (e.g., list view filters) and the complete dashboard layout. If you click "Confirm" in the pop-up that appears, the change is saved immediately and cannot be undone.