Amazon Connect Deployment Guide for SugarLive
Overview
To use some of the features in Sugar, you must perform specific steps in Amazon Web Services (AWS) using the files provided in the zip file available for download from your account's Downloads page. However, please note that SugarLive is a robust product and the external configuration that it requires in AWS is outside of Sugar's typical scope of support.
This guide covers the setup on the Amazon side for SugarLive and Sugar Portal Chat features. To use each of these five features, you must first complete the steps in the Creating the AWS CloudFormation Stack section and then the appropriate section for the feature after that:
- Call recording in SugarLive calls
- Call transcripts and sentiment analysis in SugarLive calls
- Sugar Portal Chat
- Chatbot in Sugar Portal Chat
- Chat window on your own website (optional)
See the Amazon Connect Settings page for details on setting up these features in Sugar.
Prerequisites
To walk through this guide, you must already have an Amazon Connect instance and a Sugar instance. To successfully create an Amazon Connect instance and the S3 bucket required by many of the SugarLive features, your AWS account must have the "AmazonConnect_FullAccess" policy attached in the IAM console on Amazon's website. To attach the "AmazonConnect_FullAccess" policy, see this article on Amazon's website: Adding and removing IAM identity permissions.
Additionally, the prerequisites in the Amazon Web Services page should be completed, including adding your Sugar instance URL to your Amazon Connect's approved origins list. See the Use an allow list for integrated applications article on Amazon's website for the steps to do this.
Note: SugarLive and Sugar Portal Chat can only be used with certain web browsers. For more information, refer to the Supported Platforms page.
Upgrading the SugarLive Package
v1.7 of the package updates the following files:
- Lambda-v1.4.zip
- Portal_Chat.zip
If you are using the files in v1.6 of the SugarLive Features package, follow these steps to start using v1.7:
- Unzip the
Portal_Chat.zipfile and importSugarServeSampleBot.zipfrom thePortal_Chatfolder into the Amazon Lex v2 console. If a bot with the same name already exists in the v1 console, rename the imported bot to avoid overwriting existing content.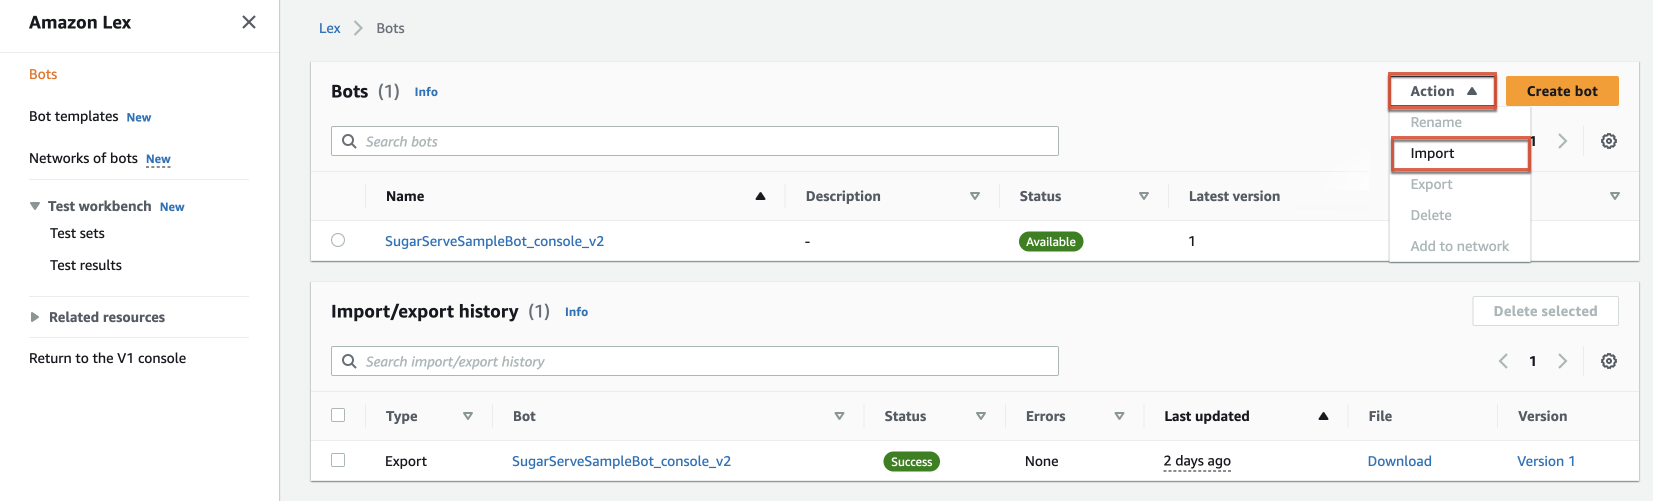
- Create a new intent by selecting the option from the menu on the left side of the screen. Click Add Intent > Add empty intent, and name the new intent
sugarFallback.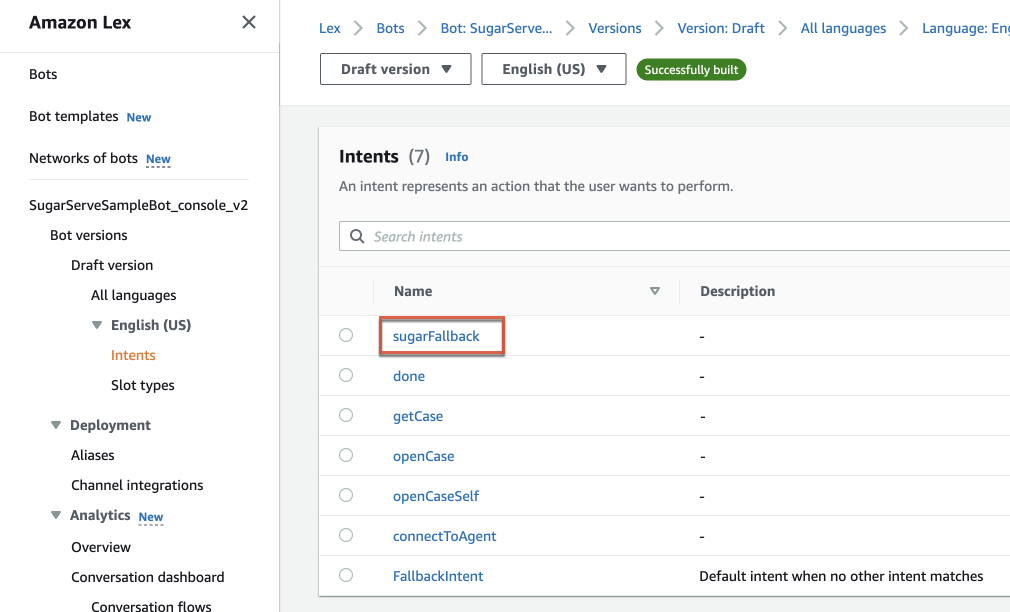
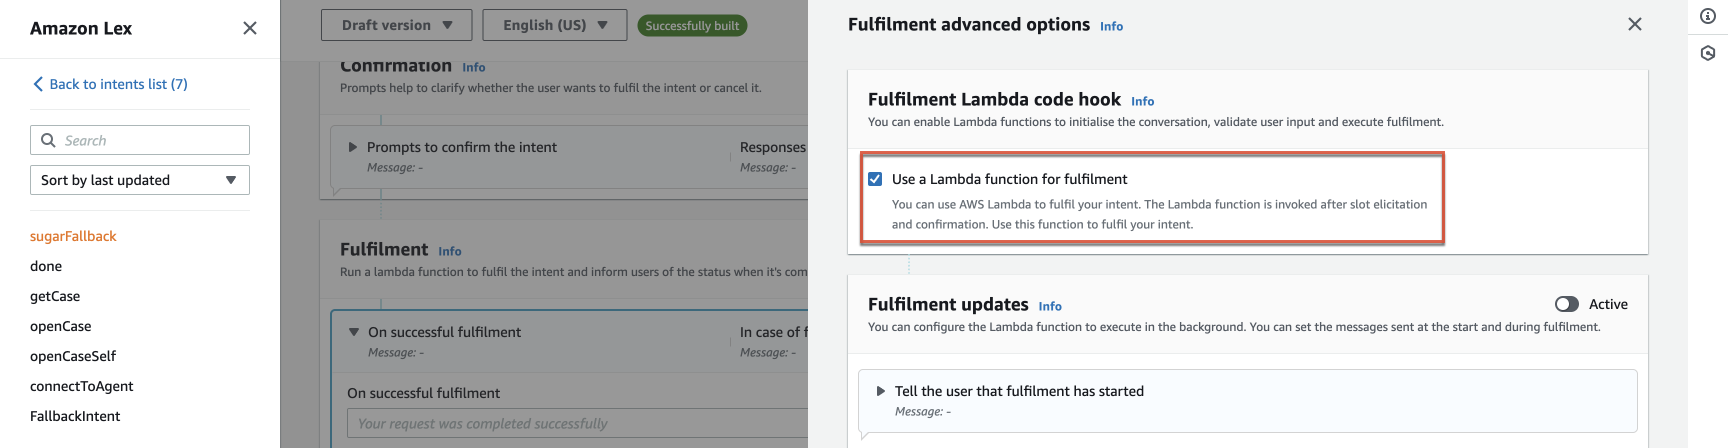
- Open the sugarFallback intent, enable "Fulfillment" in the Fulfillment panel, and under Advanced options, select the "Use a Lambda function for fulfillment" checkbox.
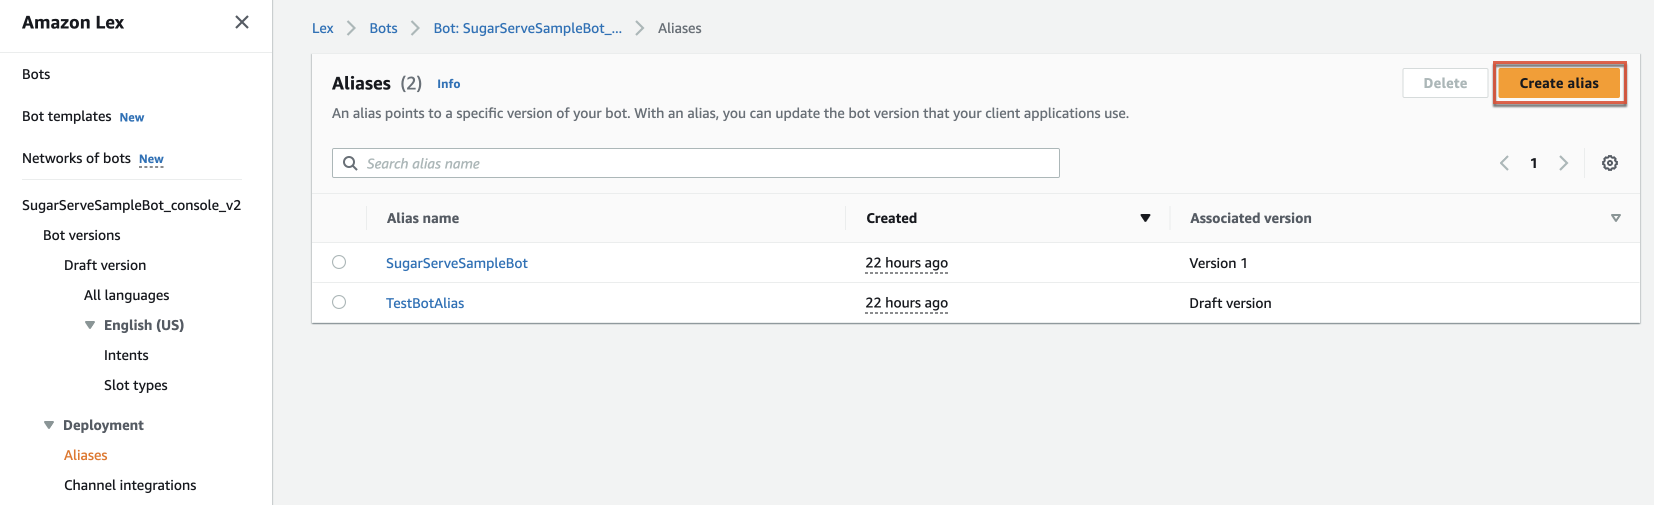
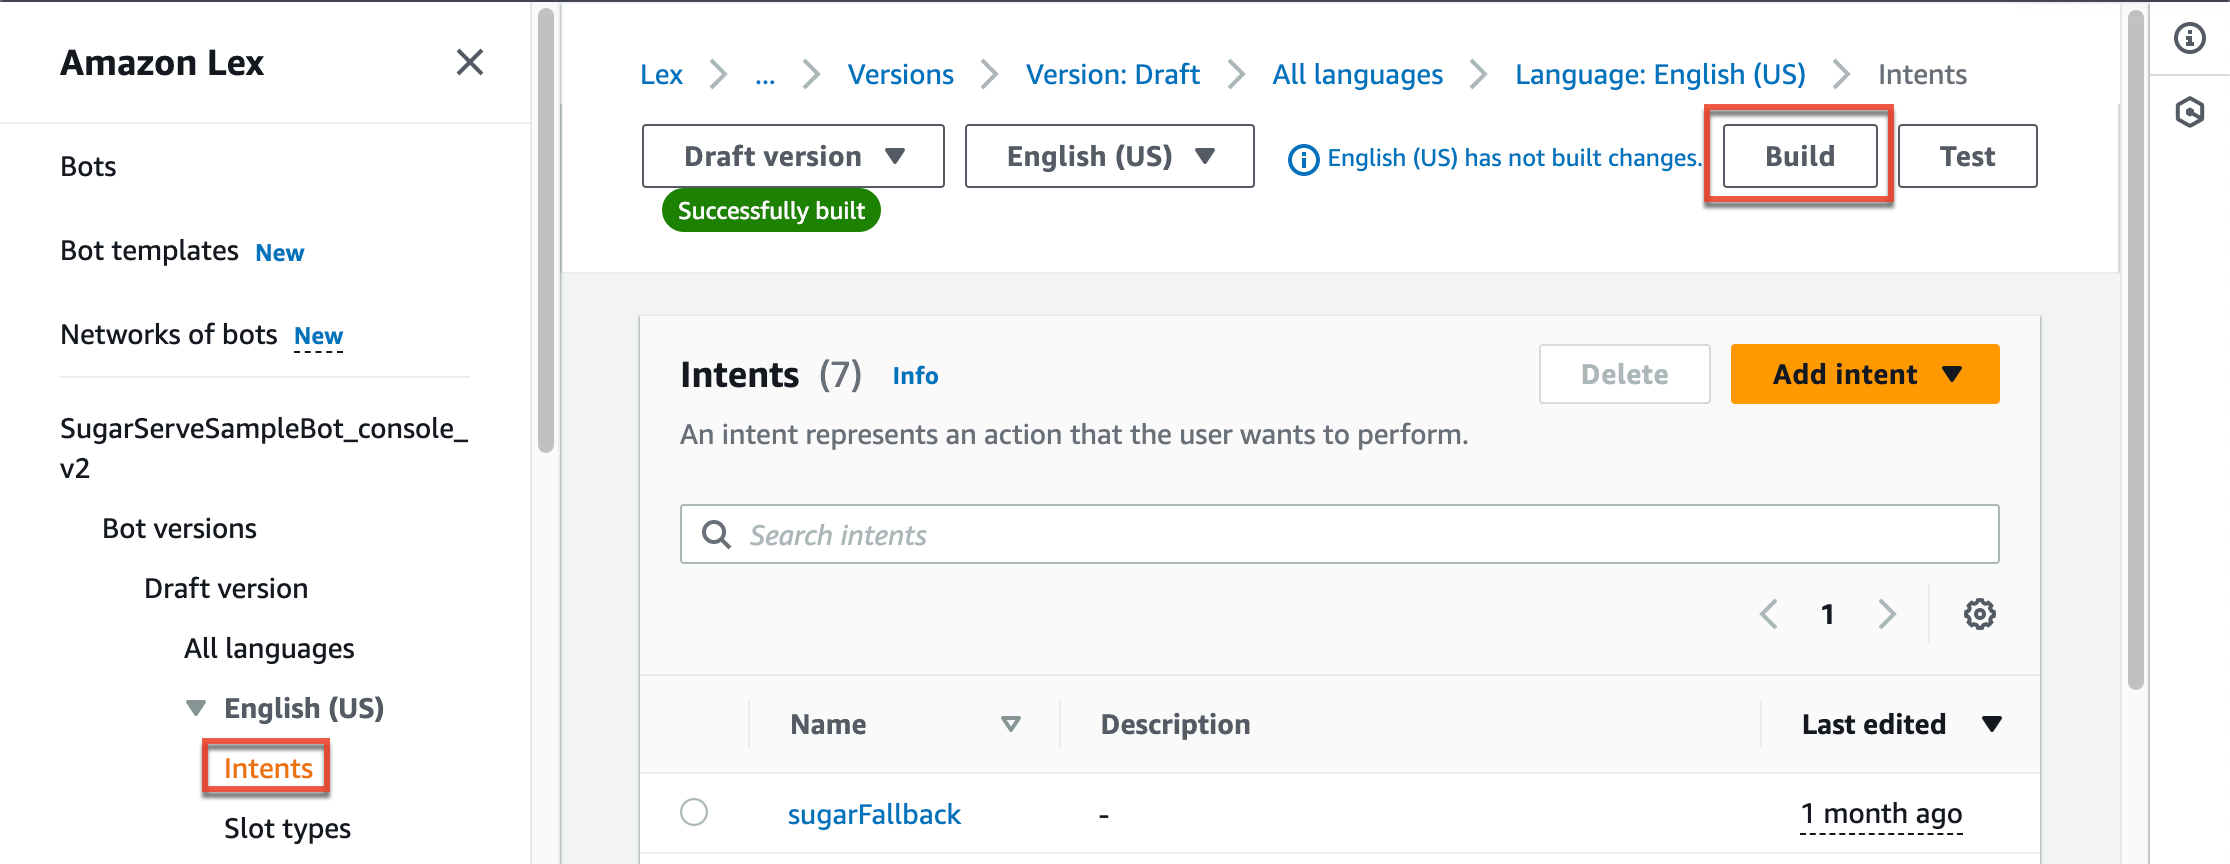
- Navigate to "Bot versions" and create a new version.

- Then, navigate to "Aliases" and create a new alias, associating it with the new Lex bot version during the creation process.
- Click back to "Intents" and click the "Build" button for this Lex bot:
-
In AWS Lambda, locate
LexGetStringFunctionand click the Code tab. From there, use the folder tree and navigate to src > handlers > lex-get-string.js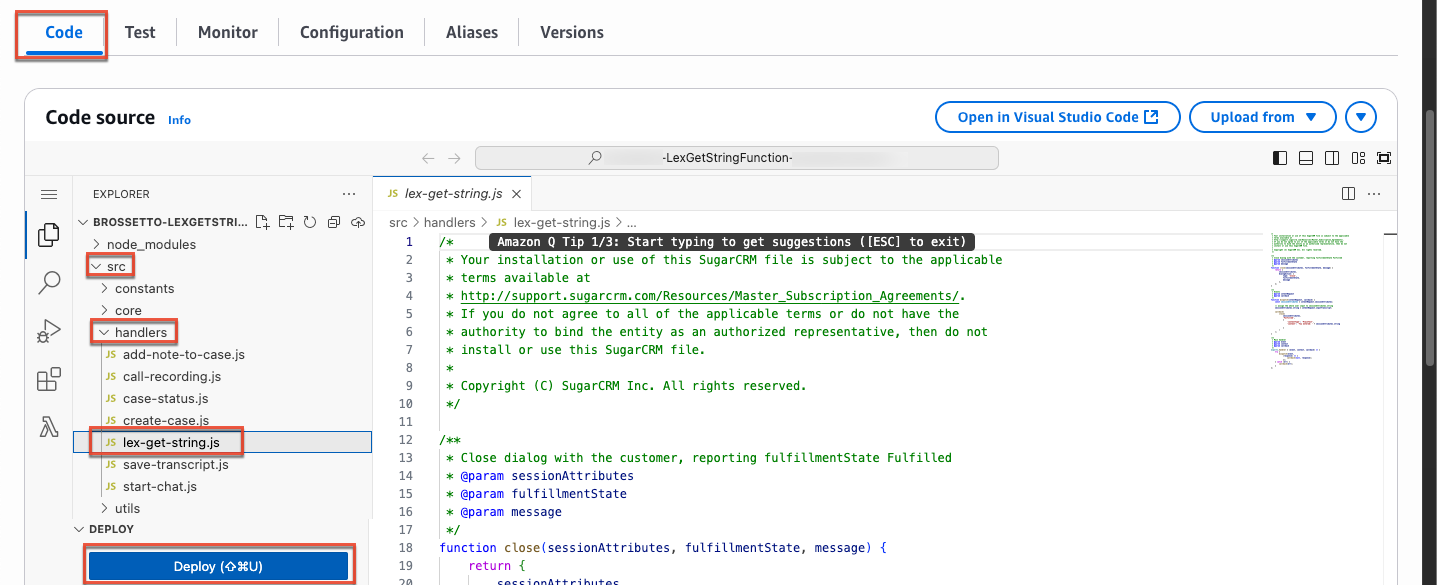
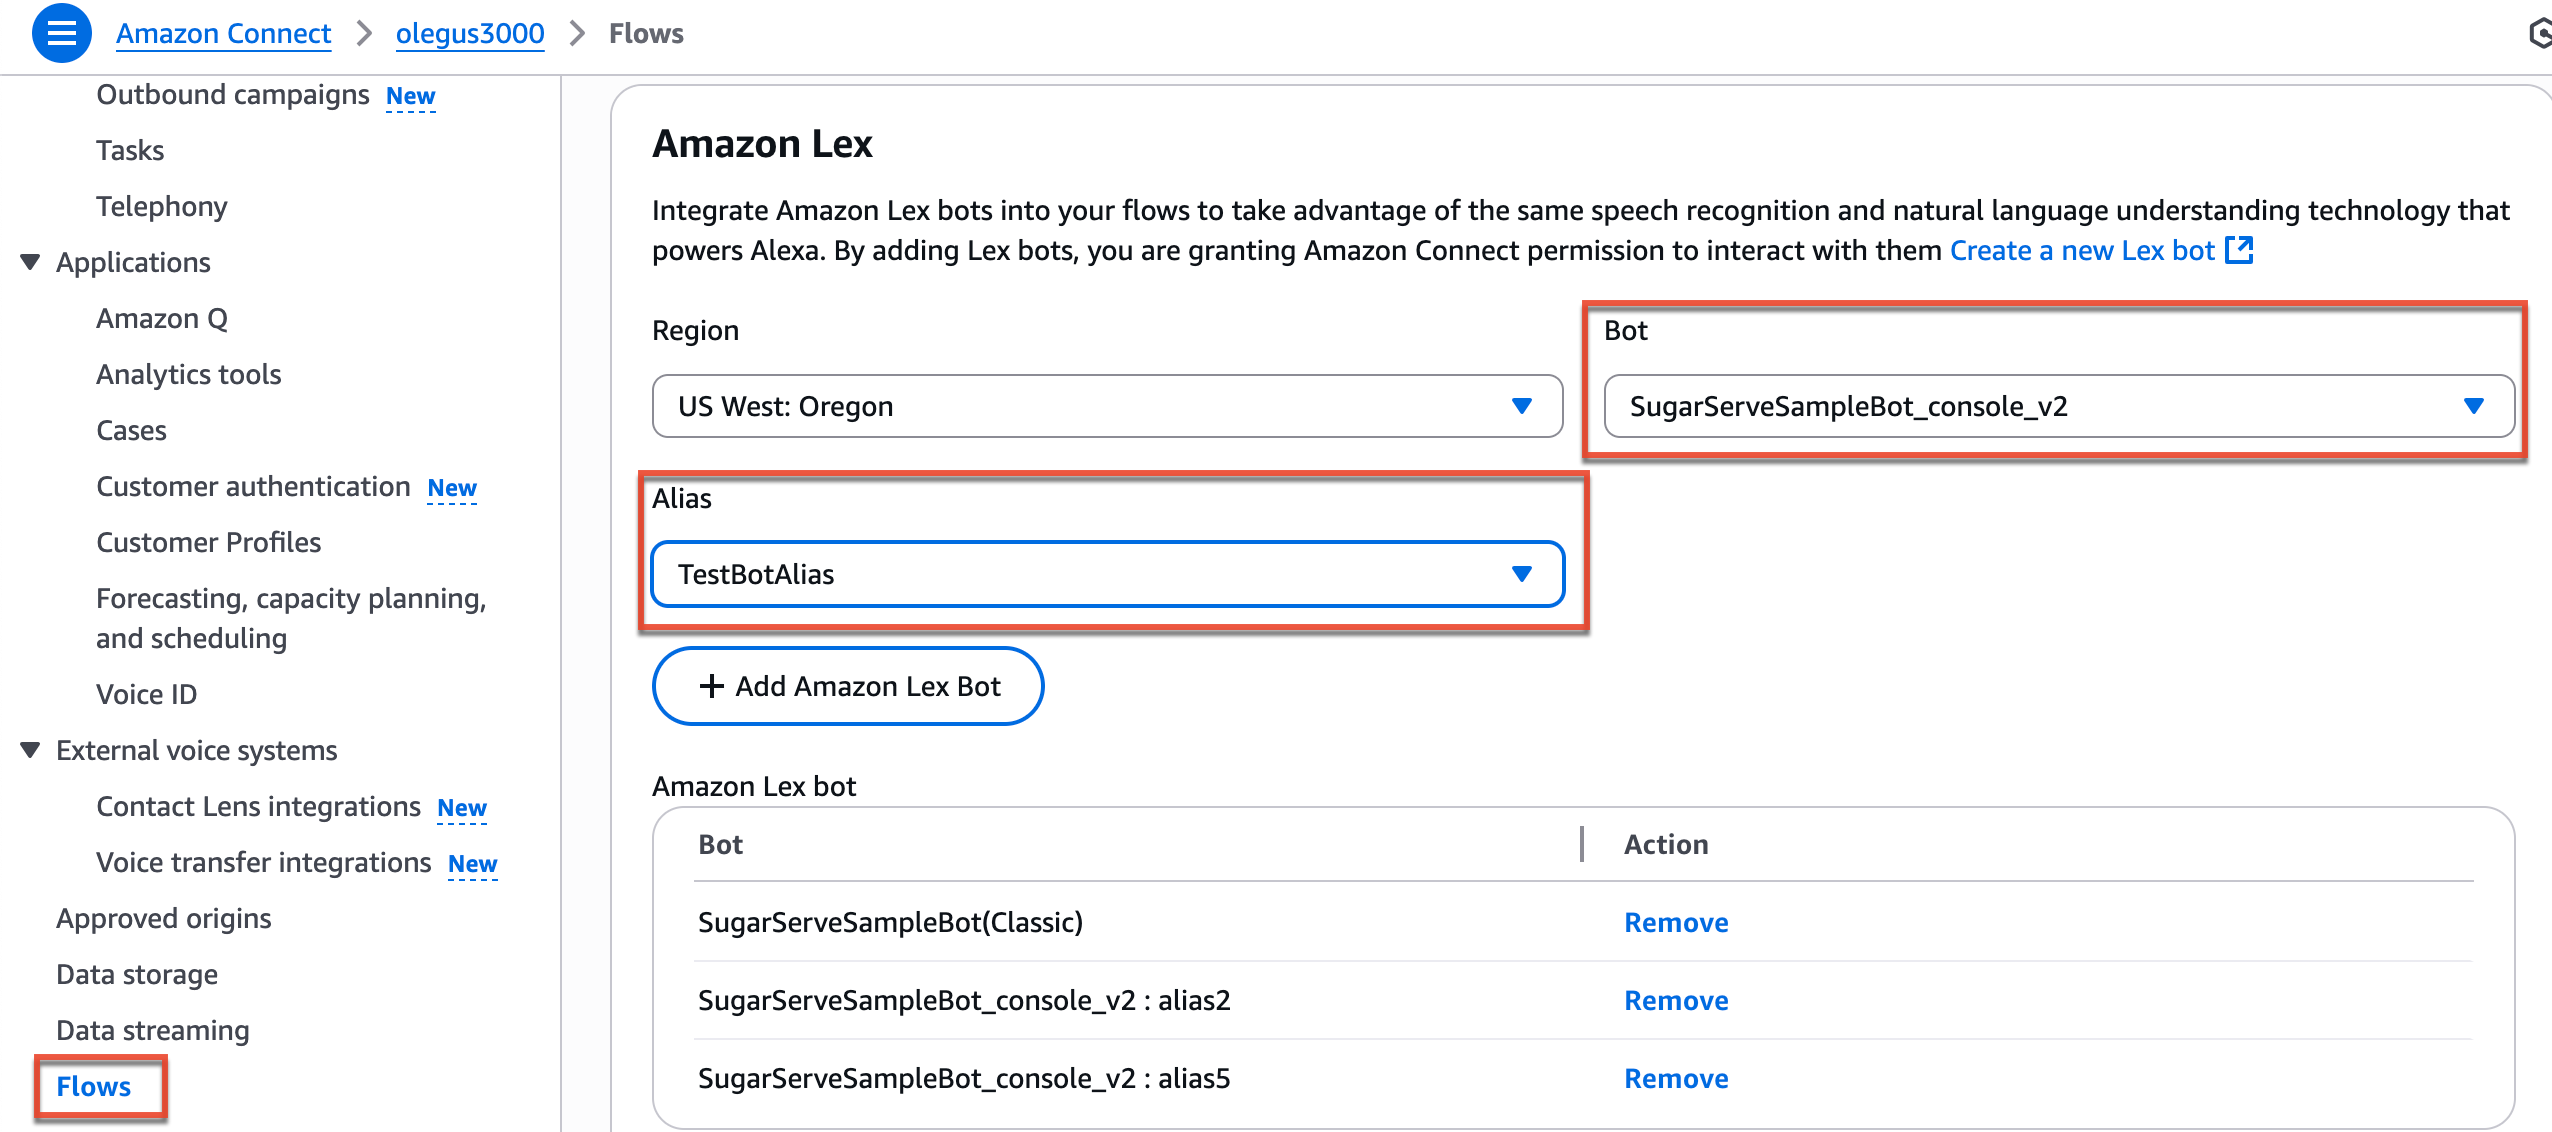
Then, manually update the function with the following code and click Deploy:/* * Your installation or use of this SugarCRM file is subject to the applicable * terms available at * http://support.sugarcrm.com/Resources/Master_Subscription_Agreements/. * If you do not agree to all of the applicable terms or do not have the * authority to bind the entity as an authorized representative, then do not * install or use this SugarCRM file. * * Copyright (C) SugarCRM Inc. All rights reserved. */ exports.handler = async (event) => { const sessionAttributes = event.sessionState.sessionAttributes || {}; sessionAttributes.string = event.inputTranscript; // Responce format Lex V2 const response = { sessionState: { sessionAttributes: sessionAttributes, dialogAction: { type: 'Close' }, intent: { name: event.sessionState.intent.name, state: 'Fulfilled' } }, messages: [ { contentType: 'PlainText', content: 'You entered: ' + sessionAttributes.string } ] }; return response; }; - Next, update the Lambda functions in Amazon Connect. Navigate to your instance, click "Flows" from the menu on the left, and select the new v2 bot in the Bot field along with the newly created alias.
- Return to Amazon Lex, open your bot, and navigate to "Aliases". Click your alias, then your language (e.g., English), and set the Source dropdown to the
LexGetStringFunctionfunction.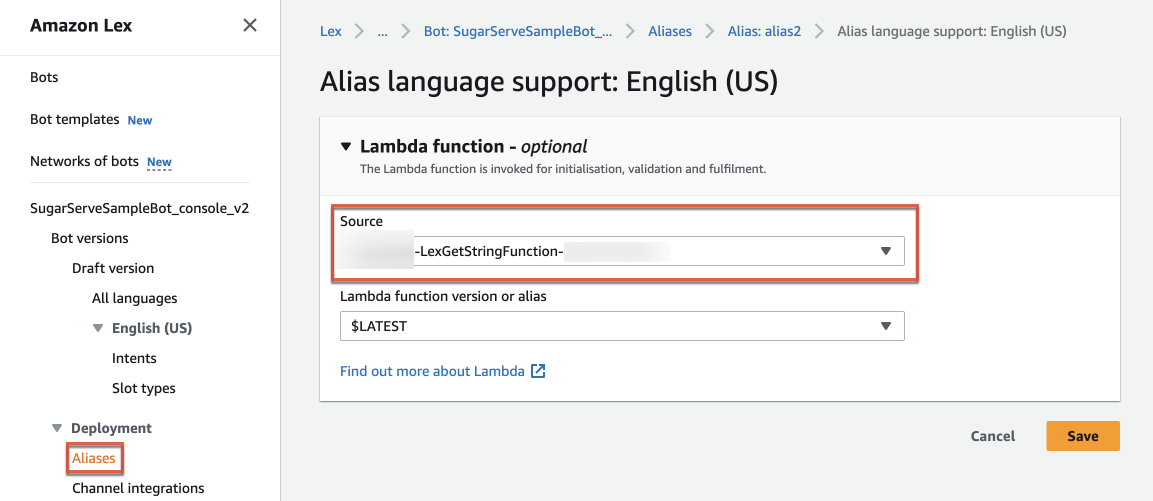
- Lastly, log in as an administrator to the Amazon Connect dashboard. Click Routing > Flows and open
SugarCRM_Portal_Chat_Contact_Flow-v1.0. In the "Get customer input" step, select the new v2 bot and its alias, then publish the flow.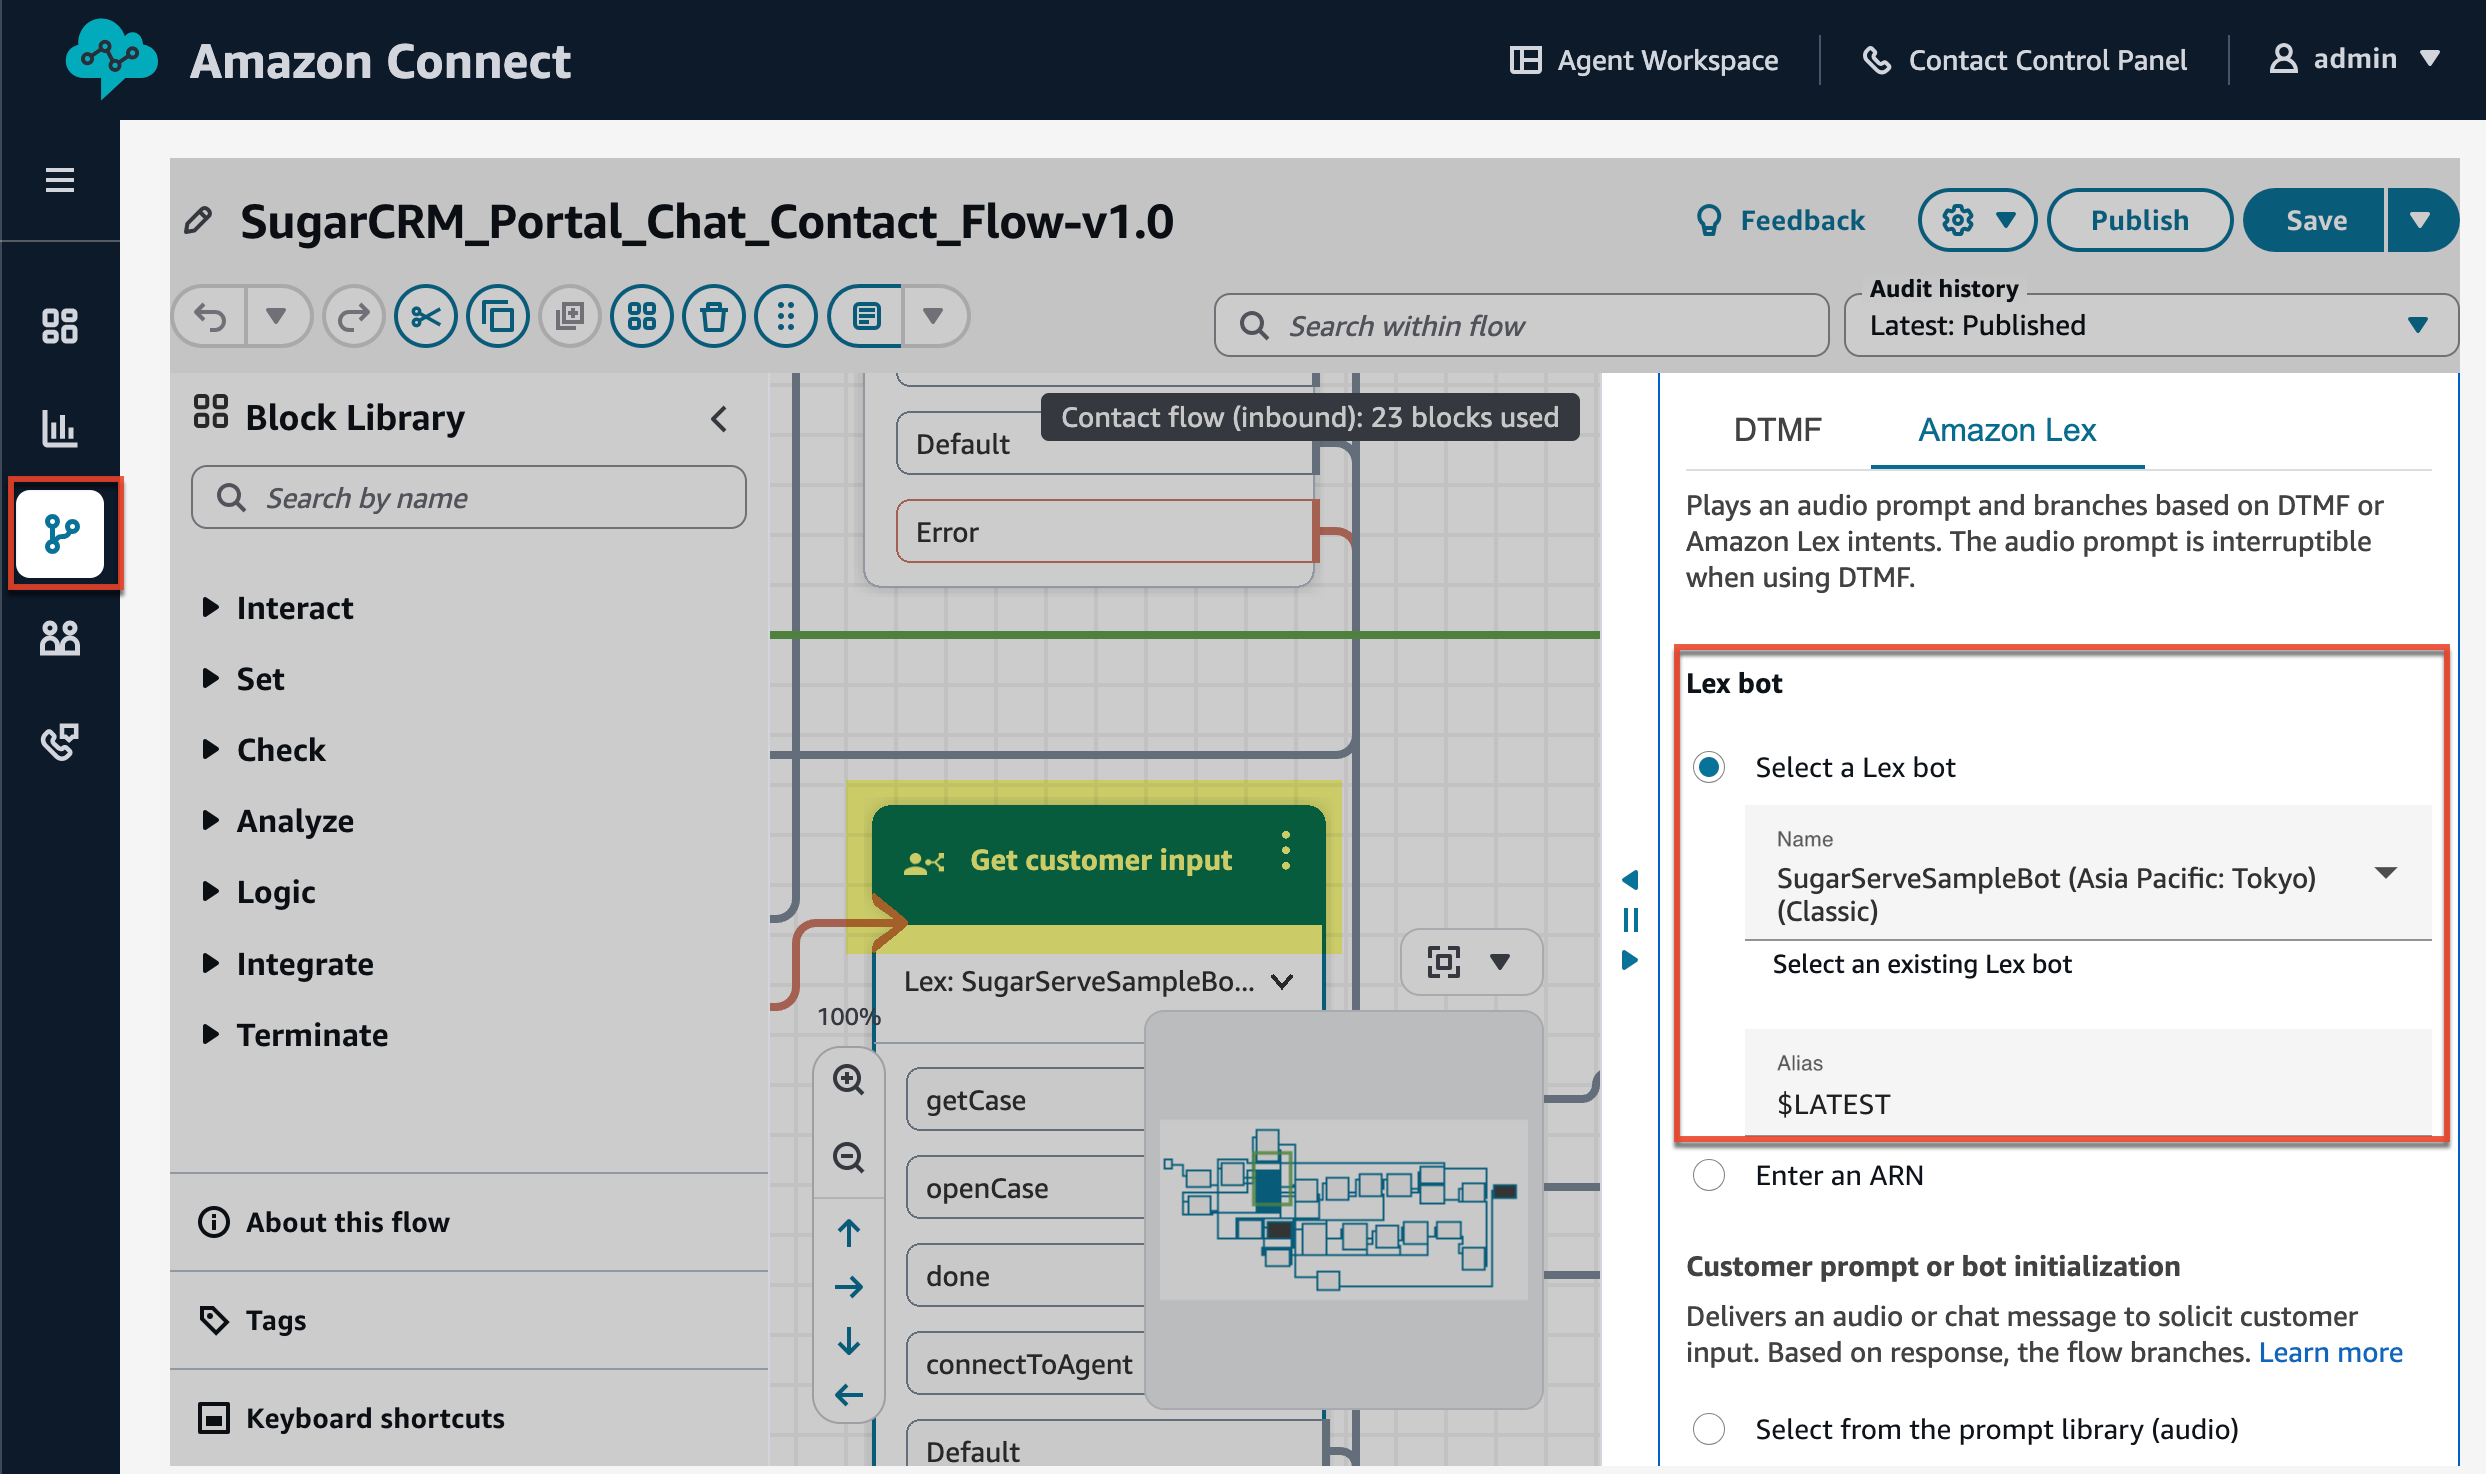 Note: If you do not see your new Lex bot, please clear your cache and cookies and try again.
Creating the AWS CloudFormation Stack
- Open Amazon S3 and either create a new S3 bucket or use an existing bucket.
- Upload Lambda-v1.3.zip to a location within the S3 bucket.
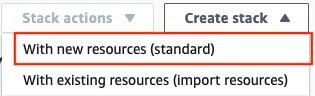
- Open AWS CloudFormation > Create Stack > With new resources.
- Select "Upload a template file" and upload CloudFormation_Template-v1.4.yaml. Click "Next".
- Enter a stack name.
- Populate the following parameters:
- InstallationS3BucketName: The bucket name created or selected in step 1
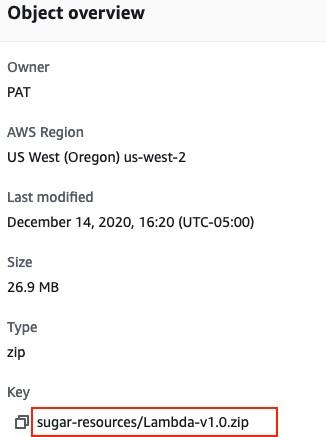
-
InstallationFile: The file, including the path within the bucket, uploaded in step 2
-
An easy way to find this value is to open the created object in step 2 and find the key
Note: The remaining parameters can be skipped at this time. You will insert values for them as needed when setting up specific features in the below sections. If you want to set them now for the features you plan to use, see the following sections for the required parameters:
-
-
Click "Next" and leave the Configure Stack Options and Advanced Options sections as is.
-
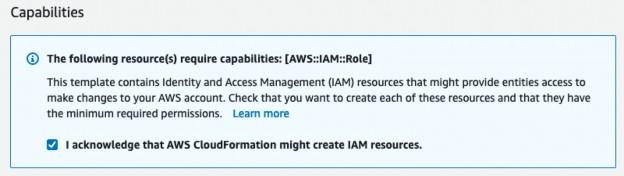
Click "Next" and enable the checkbox under the Capabilities section at the bottom.
-
Click "Create stack". This may take a few minutes, and you can refresh the Events tab of the stack to monitor the progress
Once the stack is ready, you can proceed to one of the below sections in this guide to set up certain SugarLive features.
Creating the AWS Secret
An AWS secret holding the credentials for your Sugar instance is required when setting up all of the SugarLive features. Use the following steps to create a secret that can be used in your CloudFormation stack:
-
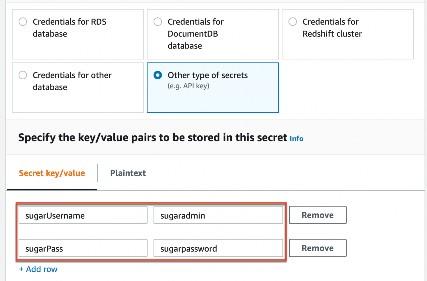
Open AWS Secrets Manager, click "Store a new secret", then select "Other type of secrets" as the secret type.
-
Add two rows in the Secret Key/Value tab and populate them with the sugarUsername and sugarPass keys listed below with their values.
-
sugarUsername: The username of a Sugar user that AWS Lambda will use to access Sugar. This user should have the privileges required to perform the necessary actions in Sugar (e.g., update call records to save the call recording URL).
-
sugarPass: The password of the provided Sugar user
-
Click "Next" and provide a name for the secret. Click "Next" again and then "Store".
-
Setting up Call Recording
-
Follow the instructions in the Creating the AWS CloudFormation Stack section.
-
Follow the instructions in the Creating the AWS Secret section to create a secret. Note its ARN, which you will copy and paste into the CloudFormation stack in a later step.
-
Once the stack has been created, update the stack parameters with more values by clicking Update > Use current template > Next.

-
Enter values for the following parameters that are required for call recording:
-
EnableCallRecordingLink: "true"
-
AWSConnectInstanceName: The instance name of your Amazon Connect instance (i.e., the first part of your instance's URL)
- AWSConnectDomain: The domain of your Amazon Connect instance (e.g., "my.connect.aws")

-
CallRecordingPartialURL: The partial URL used to construct call recording links. This value should not be changed from the default value unless AWS updates how call recording links are generated.
-
SugarURL: The URL of your Sugar instance
-
SugarSecretARN: The ARN of the secret you created
-
-
All other settings can be left as is. Click "Next" on this page and the following page and then enable the checkbox at the bottom before clicking "Update stack".
-
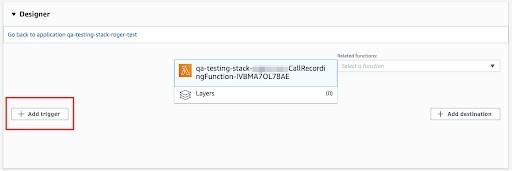
Next, add an S3 trigger to the Call Recording Lambda function by opening the Resources tab of the stack and searching for "callrecording".

-
Click on the link in the Physical ID column for the function that is returned. It will open the Lambda function in a new tab.
-
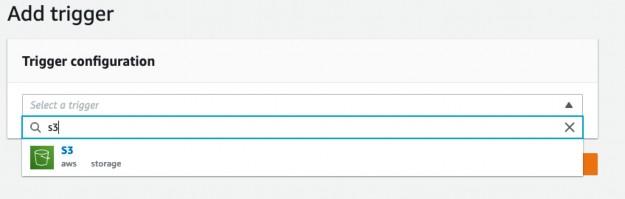
In the Lambda function, click "Add trigger".
-
Search for S3 and select it.
-
Fill out the fields that appear with the following values:
-
Bucket: The name of the bucket used by your Amazon Connect instance. To find it, open Amazon Connect > your instance > Data storage and copy the bucket name from the path where call recordings will be stored.

-
Event type: "All object create events"
-
Prefix: "connect/<your-connect-instance-name>/CallRecordings/"
-
Suffix: Leave this field blank.
-
-
Enable the checkbox at the bottom and click "Add". If you see the following error, an S3 trigger with the same prefix or suffix has already been added to the bucket:

-
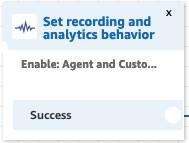
Then, in your Amazon Connect instance, ensure that your contact flows have call recording enabled by adding a "Set recording and analytics behavior" block and turning on call recording within it. This block must be added to the flow before the customer is connected to an agent.
Note: Be sure to do this for every contact flow that you want to enable call recordings for (e.g. the inbound and outbound flows).
-
Save and publish the contact flows.
After completing these steps, the link to the call recording will be stored in the Recording field on the call record for calls completed in SugarLive that use one of the contact flows you configured. Note that the link will be immediately saved, but the audio file may take a few minutes to become available at that link after you have cleared the contact in SugarLive.
Setting up Call Transcripts and Sentiment Analysis
-
Follow the instructions in the Creating the AWS CloudFormation Stack section.
-
Follow the instructions in the Creating the AWS Secret section to create a secret. Note its ARN, which you will copy and paste into the CloudFormation stack in a later step.
-
Once the stack has been created, update the stack parameters with more values by clicking Update > Use current template > Next.
-
Enter values for the following parameters that are required for call transcripts:
-
EnableCallTranscriptUpload: "true"
-
SugarURL: The URL of your Sugar instance
-
SugarSecretARN: The ARN of the secret you created
-
-
All other settings can be left as is. Click "Next" on this page and the following page and then enable the checkbox at the bottom before clicking "Update stack".
-
Next, add an S3 trigger to the Contact Lens Lambda function by opening the Resources tab of the stack and searching for "savecalltranscript".
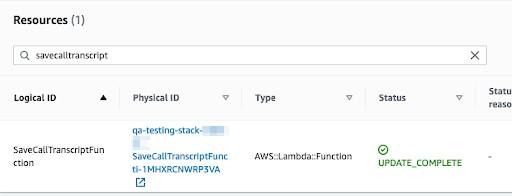
-
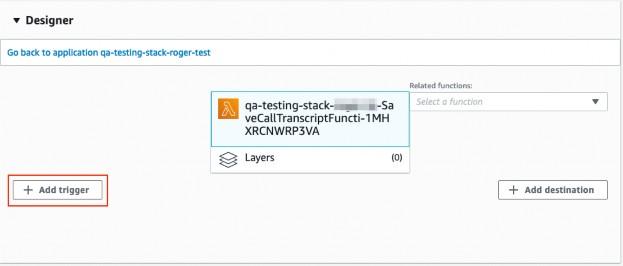
Click on the link in the Physical ID column for the function that is returned. It will open the Lambda function in a new tab.
-
In the Lambda function, click "Add trigger".
-
Search for S3 and select it.
-
Fill out the fields that appear with the following values:
-
Bucket: The name of the bucket used by your Amazon Connect instance. To find it, open Amazon Connect > your instance > Data storage and copy the bucket name from the path where call recordings are stored.
-
Event type: "All object create events"
-
Prefix: "Analysis/"
-
Suffix: Leave this field blank.
-
-
Enable the checkbox at the bottom and click "Add". If you see the following error, an S3 trigger with the same prefix or suffix has already been added to the bucket:
-
Then, in your Amazon Connect instance, ensure that your contact flows have Contact Lens enabled by adding a "Set recording and analytics behavior" block if one has not already been added. This block must be added to the flow before the customer is connected to an agent. Turn on call recording and Contact Lens speech analytics within it. Contact Lens call transcripts cannot be enabled unless call recordings are enabled in the contact flow first.

Note: Be sure to do this for every contact flow that you want to enable call transcripts and sentiment analysis for (e.g. the inbound and outbound flows).
After completing these steps, the transcript will be stored in the Transcript field on the call record for calls completed in SugarLive that use one of the contact flows you configured. The customer and agent sentiment will also be stored in the Customer Sentiment and Agent Sentiment fields on the call. These fields are not displayed by default but can be added to your record and list view layouts using Studio. Note that it may take a while for Contact Lens to process the transcript and sentiment analysis, and it will take more time for longer calls.
Setting up Sugar Portal Chat
-
Follow the instructions in the Creating the AWS CloudFormation Stack section.
-
Follow the instructions in the Creating the AWS Secret section to create a secret. Note its ARN, which you will copy and paste into the CloudFormation stack in a later step.
-
In your CloudFormation stack, update the stack parameters with more values by clicking Update > Use current template > Next.
-
Enter values for the following parameters that are required for Sugar Portal Chat:
-
EnableSugarPortalChat: "true"
-
AmazonConnectInstanceID: The ID of your Amazon Connect instance. To find it, open Amazon Connect > your instance > Overview and copy the last part of the instance ARN (i.e. everything after "instance/").

-
ContactFlowID: The ID of the contact flow you wish to use in Sugar Portal Chat. If you plan to use the sample contact flow and chatbot included with Sugar Serve, you can enter a dummy value for now. You will update this when completing the steps to set up the chatbot later. To find the ID of a contact flow, click "Show additional flow information" on the left of your contact flow and copy the last part of the ARN (i.e., everything after "contact-flow/").

-
SugarURL: The URL of your Sugar instance
-
SugarSecretARN: The ARN of the secret you created
-
-
All other settings can be left as is. Click "Next" on this page and the following page and then enable the checkbox at the bottom before clicking "Update stack".
-
In your Sugar instance, open Admin > Amazon Connect Settings > Sugar Portal Chat tab to configure the following portal chat settings:
-
Enable Amazon Connect Chat: "true"
-
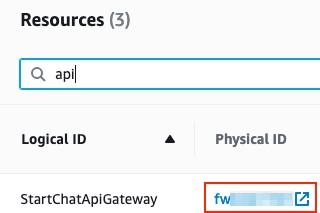
API Gateway: The Invoke URL for the API gateway you are using.
-
To find it, search for "api" in the Resources tab of your stack and click the link in the Physical ID column of the StartChatAPIGateway value. This will open the API gateway in a new tab.
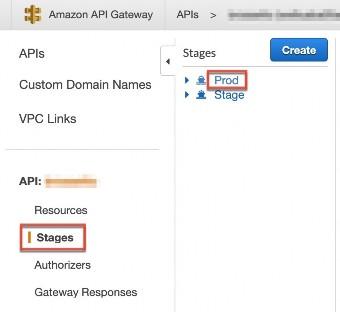
-
From there, open Stages > Prod and copy the Invoke URL to paste in Sugar.
-
-
Contact Flow ID: The ID of the contact flow you wish to use in Sugar Portal Chat. This is the same value you entered in the ContactFlowID parameter in your stack.
-
Amazon Connect Instance ID: The ID of your Amazon Connect instance. To find it, open Amazon Connect > your instance > Overview and copy the last part of the instance ARN (i.e., everything after "instance/"). This is the same value you entered in the AmazonConnectInstanceID parameter in your stack.
-
-
Save your changes to the Amazon Connect Settings page.
-
If you have not already, enable the portal under Admin > Sugar Portal > Configure Portal.
After completing these steps, Sugar Portal Chat will be enabled for your Sugar instance, and the chat window will appear for customers using the portal to connect to an agent. If you wish to also set up the chatbot, continue to the Setting Up the Chatbot in Sugar Portal Chat section.
Setting up the Chatbot in Sugar Portal Chat
-
Follow the instructions in the Creating the AWS CloudFormation Stack section.
-
Follow the instructions in the Setting up Sugar Portal Chat section.
-
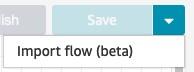
Unzip the Portal_Chat.zip file. In your Amazon Connect instance, open Routing > Contact flows > Create contact flow > Import flow and select the portal chat contact flow
in the unzipped Portal_Chat directory (e.g. SugarCRM_Portal_Chat_Contact_Flow-v1.1).
-
Save the contact flow. There is no need to publish it yet because we will publish it after making further changes later.
-
In your CloudFormation stack, update the stack parameters with more values by clicking Update > Use current template > Next.
-
Enter values for the following parameters that are required for the Sugar Portal Chat chatbot. Most values will already be accurate, but at a minimum, you will need to update the ContactFlowID parameter to use the sample contact flow included with Sugar Serve:
-
EnableSugarPortalChat: "true"
-
AmazonConnectInstanceID: The ID of your Amazon Connect instance. To find it, open Amazon Connect > your instance > Overview and copy the last part of the instance ARN (i.e., everything after "instance/").
-
ContactFlowID: The ID of the contact flow you imported in step 3. To find the ID, click "Show additional flow information" on the left of your contact flow and copy the last part of the ARN (i.e., everything after "contact-flow/").
-
SugarURL: The URL of your Sugar instance
-
SugarUsername: The username of a Sugar user that AWS Lambda will use to access Sugar
-
SugarPassword: The password of the provided Sugar user
-
-
All other settings can be left as is. Click "Next" on this page and the following page and then enable the checkbox at the bottom before clicking "Update stack".
-
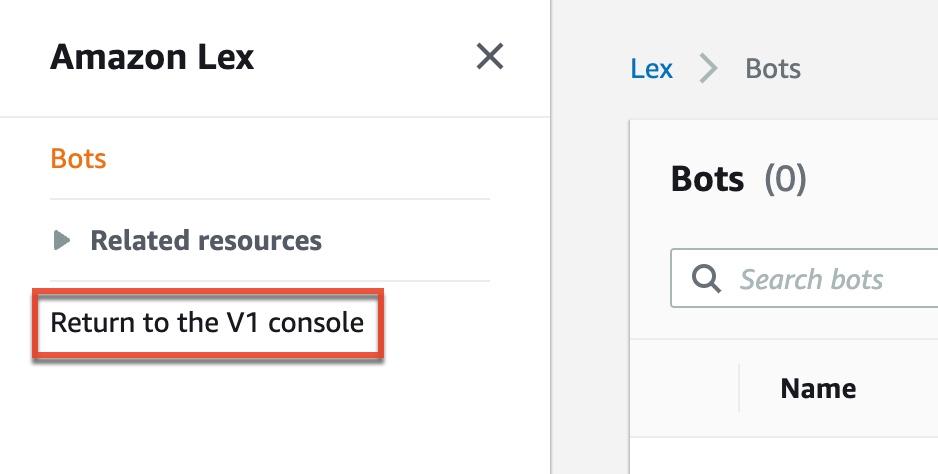
Next, in Amazon Lex, open Actions > Import and import SugarServeSampleBot.zip, which can be found in the unzipped Portal_Chat directory. Note that if you have not created a Lex bot before, you may be directed to the Get Started page at first. If so, you will need to click "Get Started" and then "Cancel" to get to the main console. In addition, there are two different versions of the Lex console. The Lex bot provided by Sugar is only compatible with the V1 console, so be sure to switch to the V1 console before importing:
Note: If you have imported the sample bot before, uploading it again will overwrite the previous one. To avoid this, rename the sample bot before importing it by unzipping the bot, opening the JSON file, and changing the "name" value of the "resource" entry to something unique. Then, zip the updated JSON file and import that zip file instead.
-
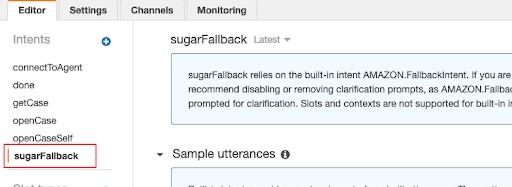
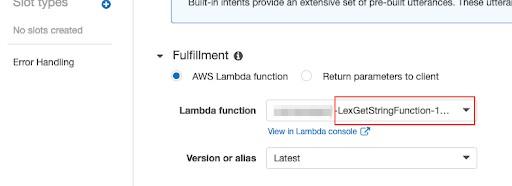
Open the imported Lex bot > Editor tab > the "sugarFallback" intent > Fulfillment and select "AWS Lambda function". In the Lambda Function field that appears, select the "<your-stack-name>-LexGetStringFunction" function. Once done, click "Save Intent".
-
Click "Build" to build the Lex bot. When that is complete, click "Publish" and enter the bot name as the alias (e.g., "SugarServeSampleBot").
-
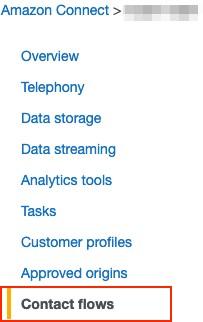
Then, open Amazon Connect > your instance > Contact flows and select the newly-created Lex bot under the Amazon Lex section.
-
Click "Add Lex Bot" to add it.

-
Under the AWS Lambda section, add the following Lambda functions:
-
<your-stack-name>-CaseStatusFunction

-
<your-stack-name>-CreateCaseFunction

-
-
Next, open your Amazon Connect instance and open the contact flow you imported in step 3. There should be four "Get customer input" blocks.
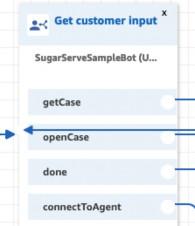
In each of these four blocks, select the newly-created Lex bot under the Amazon Lex section and save.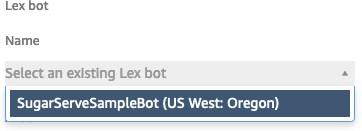
-
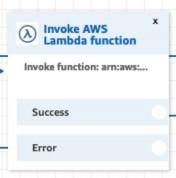
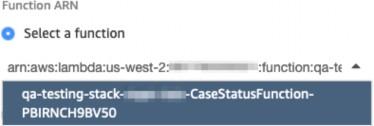
Find the "Invoke AWS Lambda function" block of the getCase flow by following the arrow from the "getCase" option in the first "Get customer input" block through to the first "Invoke AWS Lambda function" block. It should be at the top of the contact flow. Open it and select the <your-stack-name>-CaseStatusFunction Lambda function in the Select a Function field. Save the block.
-
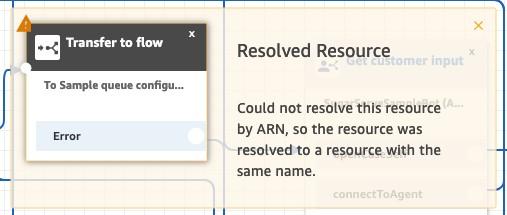
Find the other "Invoke AWS Lambda function" block, which is the one that comes after the "Transfer to flow" block. Open it and select the
<your-stack-name>-CreateCaseFunction Lambda function in the Select a Function field. Save the block.
-
Find the "Transfer to flow" block and open it. Select "Sample queue configurations flow" in the Select a Flow field and save.
-
Save the contact flow and then publish it.
-
In your Sugar instance, open Admin > Amazon Connect Settings > Sugar Portal Chat tab to configure the following portal chat settings. Most values will already be accurate, but at a minimum, you will need to update the Contact Flow ID field to use the sample contact flow included with Sugar Serve:
-
Enable Amazon Connect Chat: "true"
-
API Gateway: The Invoke URL for the API gateway you are using.
-
To find it, search for "api" in the Resources tab of your stack and click the link in the Physical ID column of the StartChatAPIGateway value. This will open the API gateway in a new tab.

-
From there, open Stages > Prod and copy the Invoke URL to paste in Sugar.
-
-
Contact Flow ID: The ID of the contact flow you imported in step 3. This is the same value you entered in the ContactFlowID parameter in your stack.
-
Amazon Connect Instance ID: The ID of your Amazon Connect instance. To find it, open Amazon Connect > your instance > Overview and copy the last part of the instance ARN (i.e. everything after "instance/"). This is the same value you entered in the AmazonConnectInstanceID parameter in your stack.
-
-
Save your changes to the Amazon Connect Settings page.
-
If you have not already, enable the portal under Admin > Sugar Portal > Configure Portal.
After completing these steps, the chatbot will be enabled in Sugar Portal Chat for your Sugar instance. Customers using the portal can work with the chatbot or connect to an agent in the portal chat window.
Setting up an External Chat Window
If you prefer, you can set up an external chat window on your own hosted website, as opposed to using the Sugar Portal. From there, you can configure the contact flow in your Amazon Connect instance to set several attributes. These attributes are read by SugarLive and can be used to open relevant customer data in the Detail panel when the chat session starts. The following attributes are available to be set:
sugarCaseNumber: The unique number assigned to the casesugarContactId: The record ID of the contactsugarContactEmail: The primary email address of the contactsugarContactName: The first and last name of the contact
They are read in the above order, which means that SugarLive opens the record(s) that match the first provided attribute.
If SugarLive receives a chat with any of these attributes, it opens the matching case and contact records in the Detail panel. If more than one contact matches (e.g., via name or email), they are opened in the Search tab instead so the agent can select the correct one to open. See the contact attributes documentation on Amazon's website for more details on how to use attributes in your contact flows.