Sugar Enterprise 14.0 Portal Deployment User Guide
Overview
The Sugar Portal is a powerful tool that allows Sugar users to interact with customers and share information related to multiple modules (i.e., Bugs, Cases, Knowledge Base). Please note that administrators have the ability to configure the look and feel of the portal, the module layouts, etc. via Admin > Sugar Portal. For more information on the configuration options available, refer to the Sugar Portal documentation. The portal allows customers to log in and review module-specific information (e.g., cases) from your Sugar instance and perform actions such as submitting cases and bugs, communicating with representatives within your organization regarding the cases and bugs, as well as viewing knowledge base articles. Please note that in order to activate the portal for your instance, the Enable Portal option must be enabled by the administrator via Admin > Sugar Portal. Enabling the Sugar portal will create a Customer Self-Service Portal Role and enable a Portal API user in Admin > User Management which must be left enabled in order for portal users to authenticate.
Note: The information viewable in the portal can be updated and restricted by Sugar users as allowed by team membership, user access type, and assigned roles. For more information on teams and roles, refer to the Team Management and Role Management documentation.
Managing Portal Users
In order for customers to be able to access your instance's portal, they have to be registered users of the portal. When a potential portal user visits the portal login page and completes the registration form, their information is entered into Sugar as a new contact record. Once the contact record is validated and approved for portal access, you can enable the Portal Active checkbox to activate their portal account. In addition to the portal registration process, a Sugar user can also manually create portal users by populating some key portal fields (e.g., Portal Name, Password) in the contact's record view.
If a portal user has forgotten their password, they can use the Forgot Password link on the login page to reset their password, but note that this feature is only available if outbound email is configured in your Sugar instance. Contact an admin to confirm if this has been set up.
The following sections cover the basics of how portal users are created, how their portal account can be enabled, and how to edit their profile information.
Creating via Portal
If a customer would like access to the portal and an admin has enabled the Sign Up link on the login page, they can sign up for a portal account via the portal login page. They will need to complete the portal registration form by providing key information such as their name, email address, company name, etc. For more information on the portal sign-up process for customers, refer to the Portal User Guide. Once the customer submits the portal activation request, a new contact record will be created in your instance and a Sugar user will need to review and approve their request before they can access the portal. The company name that the customer provides on the portal registration form will automatically populate the Portal User Company Name field in the contact's record and you will need to relate the appropriate account record to the contact via the Account Name field. Please note that contacts without related accounts will not be able to create and manage cases via the portal as the Cases module will not be available. In order to activate the contact's portal account, simply enable the Portal Active checkbox then notify the portal user that their account is ready to access.
Creating via Contacts Module
Sugar users can also manually create portal users by populating three specific fields (i.e., Portal Name, Password, Portal Active) in the Contacts module. Please note that the portal password must conform with your system's configured password requirements. For more information on configuring password requirements, refer to the Password Management documentation. In addition, the user's portal name must be unique to any other existing portal names in the instance. The contact record must also be associated with an account in order for the portal user to create and manage cases via the portal. For more information on editing a Sugar record, refer to the User Interface documentation. In order to activate the user's portal account, enable the Portal Active checkbox.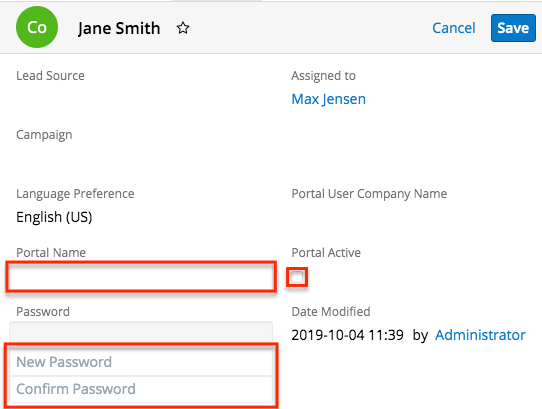
Please note that you will only be able to view and edit contact records as allowed by your team membership, user access type, and assigned roles. For more information on teams and roles, refer to the Team Management and Role Management documentation.
Editing Portal Users
Registered portal users have the ability to update their contact information as well as their portal password via the User Profile section of the portal. This allows portal users to keep their contact information up-to-date and any changes made to the user's profile in the portal will be reflected in their contact record in Sugar. Sugar users also have the ability to edit and manage the portal user's information via the corresponding contact's record view. For more information on editing records in Sugar, refer to the User Interface documentation. In addition to the contact's basic profile information, you can change the user's portal name, portal password, or deactivate their portal access by disabling the Portal Active checkbox. Please note that the contact's portal name and password information will be preserved in the system when their portal access is disabled and the portal user will be able to log in with the same credentials if their portal account is activated again at a later time. To change the portal password, simply click the Change password link below the Password field, then enter the new password and confirmed password into the "New Password" and "Confirm Password" fields. Please note that the new password must conform with your system's configured password requirements. For more information on configuring password requirements, refer to the Password Management documentation.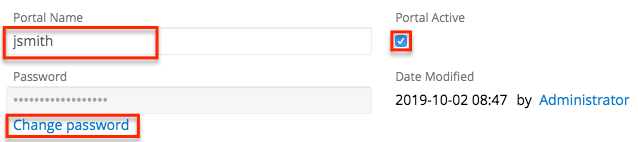
Please note that you will only be able to edit contact records as allowed by your team membership, user access type, and assigned roles. For more information on teams and roles, refer to the Team Management and Role Management documentation.
Managing Cases
The Sugar Portal allows customers to create and track their organization's cases, as well as communicate with the assigned support representative regarding any case-related questions and comments. Please note that contacts will only be able to view cases that are associated with their account, so both the contact and case will need to be associated with the same account in order for the case to appear in the contact's portal account. Contacts without related accounts will not be able to create and manage cases via the portal as the Cases module will not be available.
Portal users can create cases via the Create Case option in the Cases module tab's actions menu. Once they enter the appropriate values (e.g., subject, description) in the cases record view layout and click "Save", the case record will be created in your Sugar instance and assigned to the Sugar user that is assigned to the contact record. For more information on creating records in the portal, refer to the Portal User Guide.
Sugar users can also create cases in Sugar via the Cases module, quick create, etc. For more information on creating records in Sugar, refer to the User Interface documentation. Please note that cases created in Sugar will automatically be visible in the portal as the Show in Portal checkbox is enabled by default in the case's record view. However, administrators can have this field disabled by default via Admin > Studio if desired. 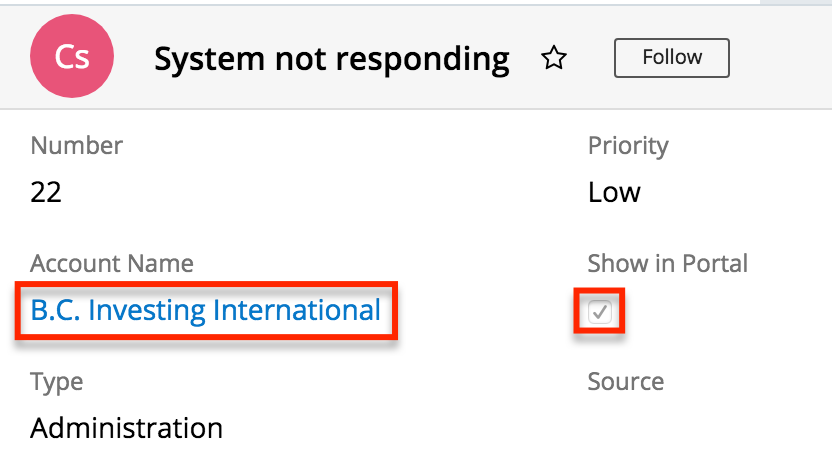
Portal users will be able to track the status of the case, view the case details, and, if an admin has enabled notes on the Knowledge Base module, create new notes and review any existing notes attached to the case. Please note that portal users will be able to view notes that the assigned support representative has added to their case. For more information on adding notes to cases in Sugar, refer to the Adding Notes and Attachments to Cases section below. Portal users can also add notes to the case via the portal, which will appear in the Notes subpanel of the Cases record view. For more information on viewing records via related record subpanels, refer to the User Interface documentation. Using notes, the support representative can engage in a collaborative conversation with the portal user regarding the progress of the case, to request any additional information (e.g., screenshots, diagnostic files) that may help to better understand or troubleshoot the issue, to respond back to the portal user's questions, etc.
Please note that you will only be able to see case records as allowed by your team membership, user access type, and assigned roles. For more information on teams and roles, refer to the Team Management and Role Management documentation.
Adding Notes and Attachments to Cases
Once cases are created, the primary method of communication between the portal user and your organization will be via case notes. This ensures that all case-related communications are preserved in the case record and can be easily viewed via the Notes subpanel. Sugar users can create and add notes to the case by clicking the Plus button on the upper right of the Notes subpanel in the case's record view. For more information on creating records via subpanels, refer to the User Interface documentation.
Please keep in mind that new notes attached to cases will automatically be visible in the portal as the Available Externally checkbox is enabled by default in the note's record view. However, administrators can have this field disabled by default via Admin > Studio if desired. Once created, the note record will appear in the Notes panel of the case's record view in the portal and the portal user can click the note's subject to view the record details (e.g., description) and download any attachments, if applicable. Please note that there is a 30-second timeout limit for all uploads, but administrators in Sugar can control the maximum file size that is allowed to be uploaded via Admin > System Settings. For more information, refer to the System documentation.
Note: Customers will not be notified when a new note gets added to their case unless the administrator has already created a workflow in Sugar to automatically send an email notification to the customer. For more information, refer to the Using Workflows to Notify a Customers of a New Note on Their Case article.
Please note that you will only be able to add notes as allowed by your team membership, user access type, and assigned roles. For more information on teams and roles, refer to the Team Management and Role Management documentation.
While notes are used for communicating about a case, it is also possible to attach files directly to cases using the Attachments field. Portal users can attach files while creating the case but cannot add further files afterward. After the case has been created, portal users can add notes with files attached instead.
Managing Bugs
The Sugar Portal allows customers to view bugs, report any bugs to your company, track the status of bugs, as well as communicate with the assigned representative/engineer regarding the bug. Please note that bugs can be seen by all portal users, regardless of any account membership. Portal users can create bugs via the Report Bug option in the Bugs module tab's actions menu. Once they enter the appropriate values (e.g., subject, description) in the bugs record view layout and click "Save", the bug record will be created in your Sugar instance and assigned to the Sugar user that is assigned to the contact record. For more information on creating records in the portal, refer to the Portal User Guide.
Sugar users can also file bugs in Sugar via the Bugs module, quick create, etc. For more information on creating records in Sugar, refer to the User Interface documentation. Please note that bugs created in Sugar will automatically be visible in the portal as the Show in Portal checkbox is enabled by default in the bug's record view. However, administrators can have this field disabled by default via Admin > Studio if desired.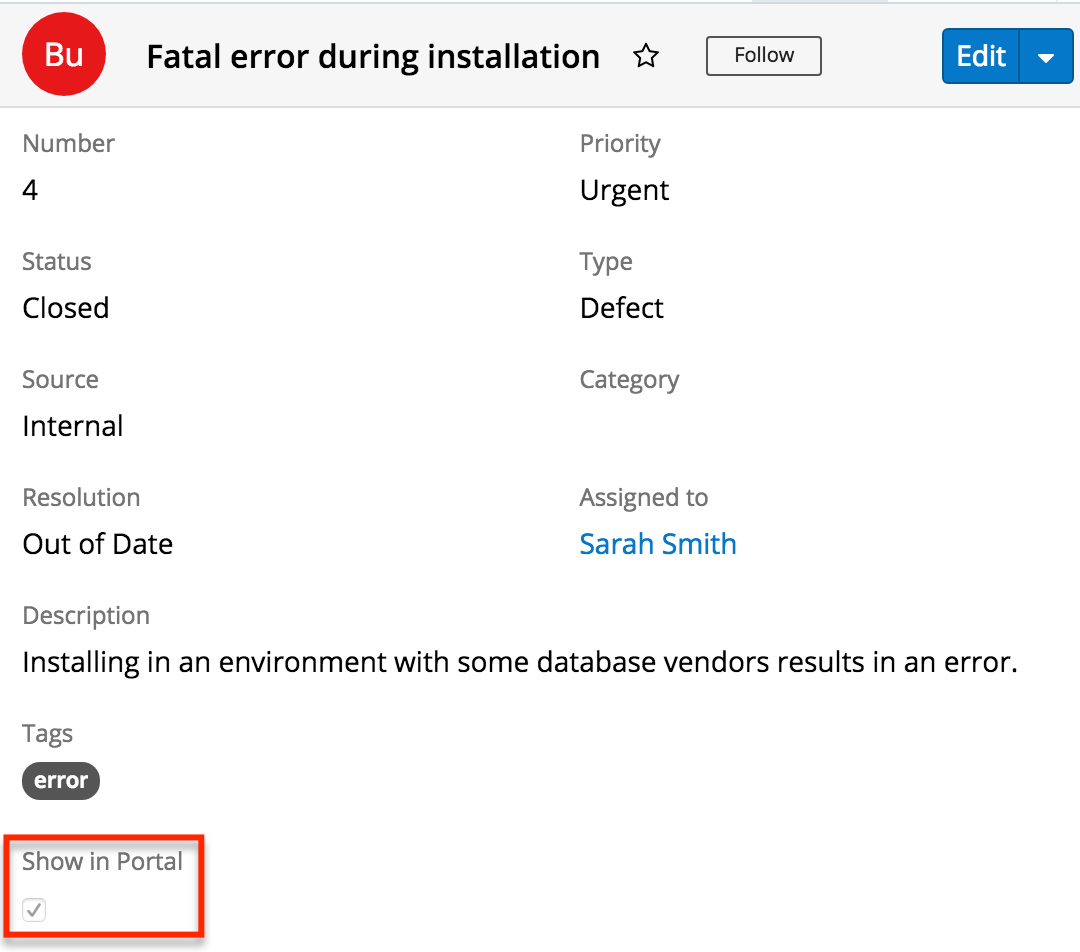
Portal users will be able to review details such as the status of the bug, track any updates regarding the fix, as well as create new notes and review any historical notes attached to the bug. Please note that portal users will be able to view notes that the assigned representative/engineer has added to the bug. For more information on adding notes to bugs in Sugar, refer to the Adding Notes and Attachments to Bugs section below. Portal users can also add notes to the bug via the portal, which will appear in the Notes subpanel of the Bugs record view. For more information on viewing records via related record subpanels, refer to the User Interface documentation. Using notes, the engineer can engage in a collaborative conversation with all portal users regarding the progress of the bug, to answer any questions from portal users, as well as provide any information regarding the bug fix/resolution.
Please note that you will only be able to see bug records as allowed by your team membership, user access type, and assigned roles. For more information on teams and roles, refer to the Team Management and Role Management documentation.
Adding Notes and Attachments to Bugs
Portal users have the option to communicate with your company regarding the status of a bug, any questions about the bug, the resolution of the bug, etc. via bug notes. Using bug notes ensures that all bug-related communications between the portal user and your company are preserved in the bug record and can be easily viewed via the Notes subpanel. Sugar users can create and add notes to the bug by clicking the Plus button on the upper right of the Notes subpanel in the bug's record view. For more information on creating records via subpanels, refer to the User Interface documentation. Please keep in mind that notes attached to bugs will automatically be visible in the portal as the Available Externally checkbox is enabled by default in the note's record view. However, administrators can have this field disabled by default via Admin > Studio if desired. Once created, the note record will appear in the Notes panel of the bug's record view in the portal and the portal user can click the note's subject to view the record details (e.g., description) and download any attachments, if applicable. Please note that there is a 30-second timeout limit for all uploads. Administrators in Sugar can control the maximum file size that is allowed to be uploaded via Admin > System Settings. For more information, refer to the System documentation.
Please note that you will only be able to add notes as allowed by your team membership, user access type, and assigned roles. For more information on teams and roles, refer to the Team Management and Role Management documentation.
Managing Knowledge Base Articles
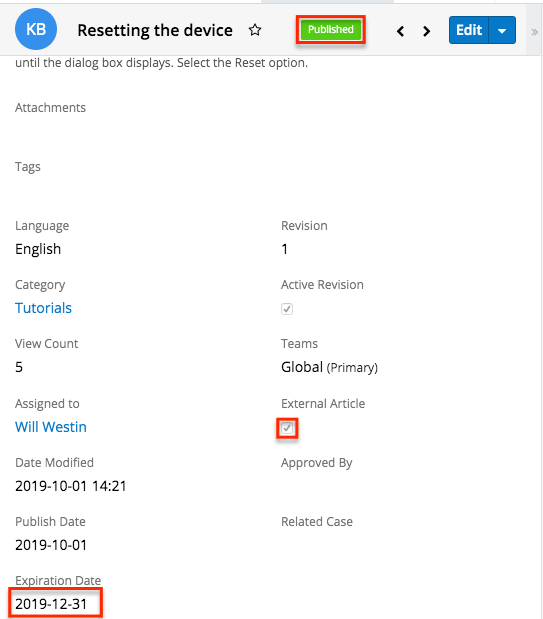
The Sugar Portal allows customers to review your company's published Knowledge Base articles, vote on the usefulness of the article, as well as provide any feedback or ask any questions related to the article via notes. The Knowledge Base can be a valuable resource to customers as it can help provide answers to some frequently asked questions, troubleshooting tips to some common issues, etc. Please note that knowledge base articles can be seen by all portal users, regardless of any account membership. In order for an article to be visible in the portal, the article must meet the following requirements:
- External Article: Field must be checked.
- Expiration Date: Expiration date must be in the future.
- Status: Status must be set to "Published".
Portal users will be able to view the body of the article which will be presented with all the HTML styling that is shown in the article's record view in Sugar, view any attachments (if applicable), and, if the admin has enabled notes on the Knowledge Base module, create new notes to add any comments or questions related to the article. When a portal user adds a note to the article, it will appear in the Notes subpanel of the Knowledge Base record view in Sugar. For more information on viewing records via related record subpanels, refer to the User Interface documentation. Please note that Sugar users can also add a note to knowledge base articles if desired and it will be viewable to all portal users via the knowledge base article. For more information on adding notes to articles in Sugar, refer to the Adding Notes and Attachments to Knowledge Base Articles section below.
Please note that you will only be able to see knowledge base records as allowed by your team membership, user access type, and assigned roles. For more information on teams and roles, refer to the Team Management and Role Management documentation.
Adding Notes and Attachments to Knowledge Base Articles
If an admin has enabled notes on the Knowledge Base module, portal users have the option to provide any comments or ask questions regarding an article by creating a note in the knowledge base record. Please note that using notes will capture all communications between the portal user and your company for the particular article and will be viewable by all portal users via the portal. Any notes added to the article by portal users will appear in the Notes subpanel in Sugar's Knowledge Base record. Sugar users can add notes to the article by clicking the Plus button on the upper right of the Notes subpanel in the knowledge base's record view. For more information on creating records via subpanels, refer to the User Interface documentation. Please keep in mind that notes attached to articles will automatically be visible in the portal as the Available Externally checkbox is enabled by default in the note's record view. However, administrators can have this field disabled by default via Admin > Studio if desired. Once created, the note record will appear in the Notes panel of the knowledge base's record view in the portal and the portal user can click the note's subject to view the record details (e.g., description) and download any attachments, if applicable. Please note that there is a 30-second timeout limit for all uploads. Administrators in Sugar can control the maximum file size that is allowed to be uploaded via Admin > System Settings. For more information, refer to the System documentation. 
Please note that you will only be able to add notes as allowed by your team membership, user access type, and assigned roles. For more information on teams and roles, refer to the Team Management and Role Management documentation.