Sugar Automate
Overview
Sugar Automate lets administrators create easy-to-follow, visual business processes for users to complete against their Sugar records. Each Smart Guide is an end-to-end process that is split into color-coded stages, and each stage contains one or more call, meeting, or task activities that the user can complete with optional dependencies and actions on related records. This guide covers how to start using Sugar Automate as an administrator.
Note: Sugar Automate was incorporated in version 12.3 of Sugar Sell and Sugar Serve and 13.0 for Sugar Enterprise. For Sugar versions 12.2 or earlier, where Sugar Automate was available as an installable connector, please refer to the separate Sugar Automate documentation.
For users to view Sugar Automate Smart Guides, they must be assigned a Sugar Automate license. For more information please refer to the License Management page. For information on using Sugar Automate after an administrator sets up a Smart Guide, please refer to the Sugar Automate page in the Application Guide.
Prerequisites
- Sugar Automate is included with Sugar Sell Premier and Enterprise+, and it enables smart guides. Sugar Automate can also be purchased as an add-on for Sugar Sell Advanced, Serve, and Enterprise. Please contact your Sugar partner or representative to learn more.
- If you purchased Sell Premier, users who are assigned the Sell Premier license type are granted access to smart guides.
- If you purchased Enterprise+, you must assign the Enterprise and Sugar Automate license types to the users so that they have access to smart guides.
- If you purchased Sugar Automate as an add-on for Sugar Sell Advanced, Serve, or Enterprise, you must assign the Sugar Automate license type and a CRM license type to users who should have access.
Understanding Smart Guides
A Smart Guide is a set of successive stages through which most customers proceed as they participate in the decision-making process. A traditional Smart Guide is often characterized by the stages of awareness, consideration, purchase, and loyalty. Depending on your business needs, you may have more or fewer stages or even several variations of the Smart Guide for different types of consumers. With Sugar Automate, administrators have the freedom to create multiple, unique Smart Guides specific to their business processes.
The Smart Guide in Sugar is presented in an easy-to-follow visual format, comprising a progression of stages and activities within those stages.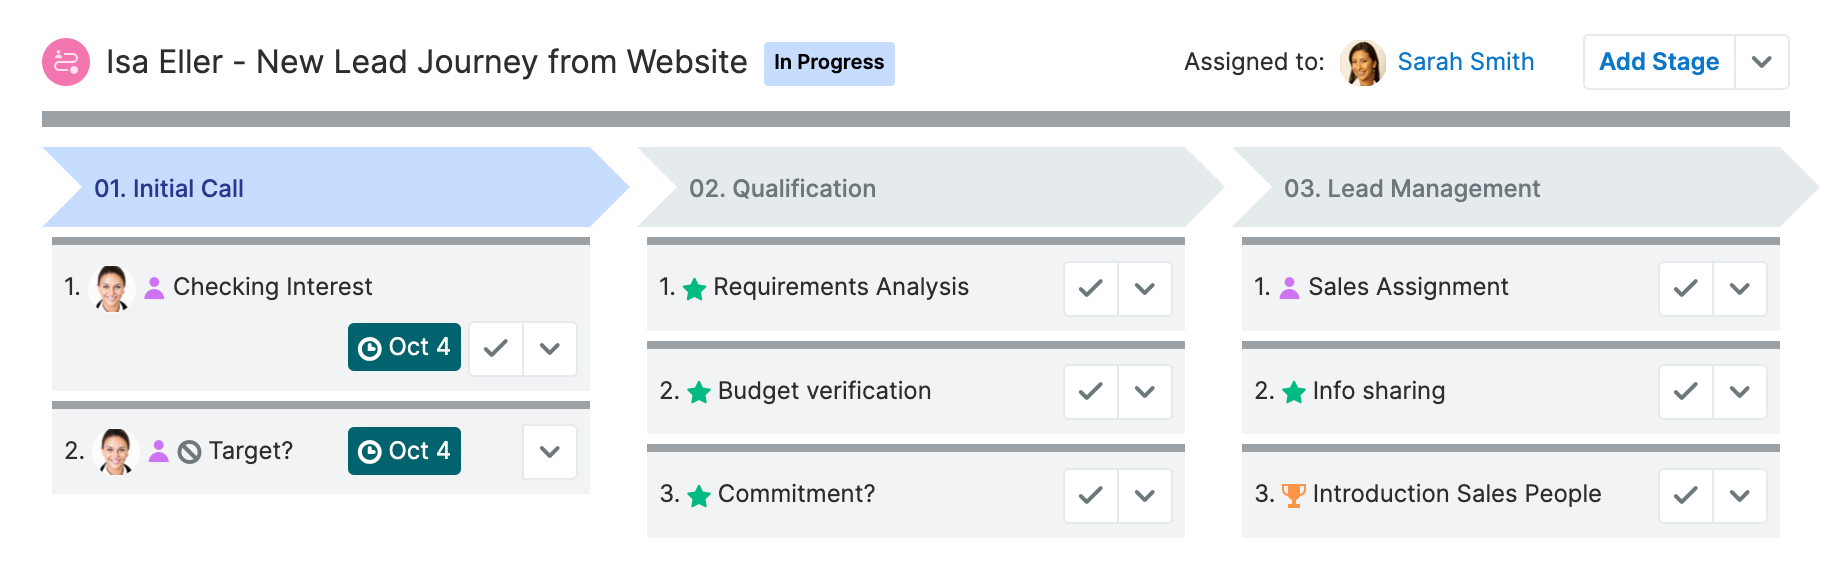
Smart Guide performance is measured in terms of progress and momentum. For more information on how these measurements are calculated and where to see them, please refer to the Understanding Progress and Momentum section of this page.
Before creating a Smart Guide template, we recommend planning the Smart Guide outside of Sugar. Take the time to fully understand the individual steps that make up the customer's decision-making process and the steps in Sugar that correlate with each part of the Smart Guide. For more complicated Smart Guides, it may help to sketch a diagram or map the Smart Guide on a spreadsheet before creating the Smart Guide template and related stages and activities in Sugar.
Configuring Smart Guide Display Settings
Smart Guides may be displayed as a panel beneath its parent record or as a separate record-view tab from the rest of the record. By default, all Smart Guides will be rendered in panel format unless the admin changes the display settings. Each Smart Guide-enabled module's display settings can be configured independently.
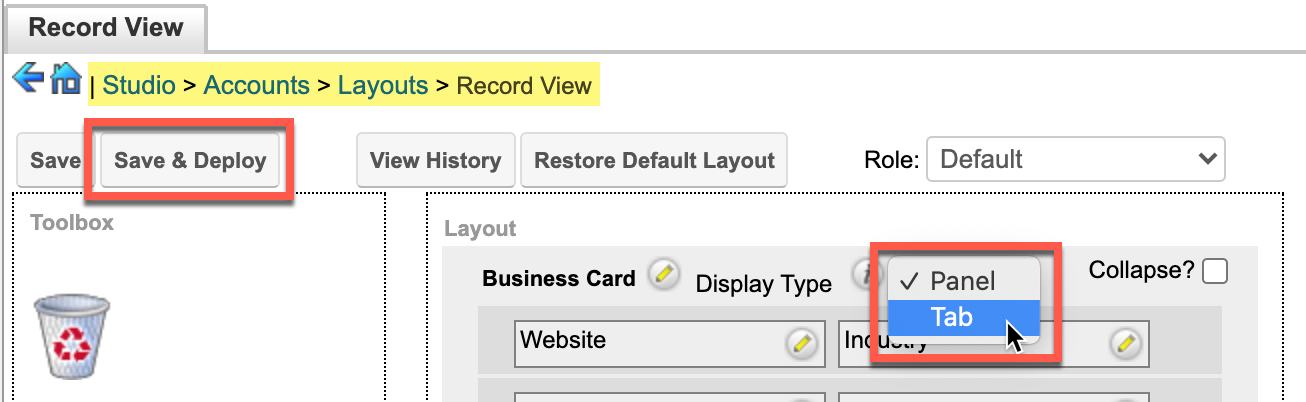
There are four display configurations available. The "tab" options will be grayed out and not selectable until you have saved the module's Display Type as "Tab" in Studio > Layouts > Record View as described in the steps below.
- Panel - Bottom (default): The Smart Guide panel will show at the bottom of the record view.
- Panel - Top: The Smart Guide panel will show at the top of the record view.
- Note: If "Panel - Top" is selected and tabs are enabled for the record view in Studio, then the Smart Guide will revert to the default display as a panel at the bottom of the record.
- Tab - First: The Smart Guide panel will be shown as the first tab of a tabbed record view layout. This option is grayed out and not selectable until you have saved the module's Display Type as "Tab" in Studio > Layouts > Record View.
- Tab - Last: The Smart Guide panel will be shown as the last tab of a tabbed record view layout. This option is grayed out and not selectable until you have saved the module's Display Type as "Tab" in Studio > Layouts > Record View.
Use the following steps to change a module's Smart Guides to display in the tabbed format:
- Navigate to Admin > Studio and select the module (e.g. Accounts) for which you want to change your Smart Guides to a tabbed view.
- Click on "Layouts" and then select the "Record View" layout to edit.
- In the upper section of the record view layout, change "Display Type" to "Tab". Then click "Save & Deploy". For more information on changing to tabbed display type, refer to the Studio documentation in the Sugar Administration Guide.
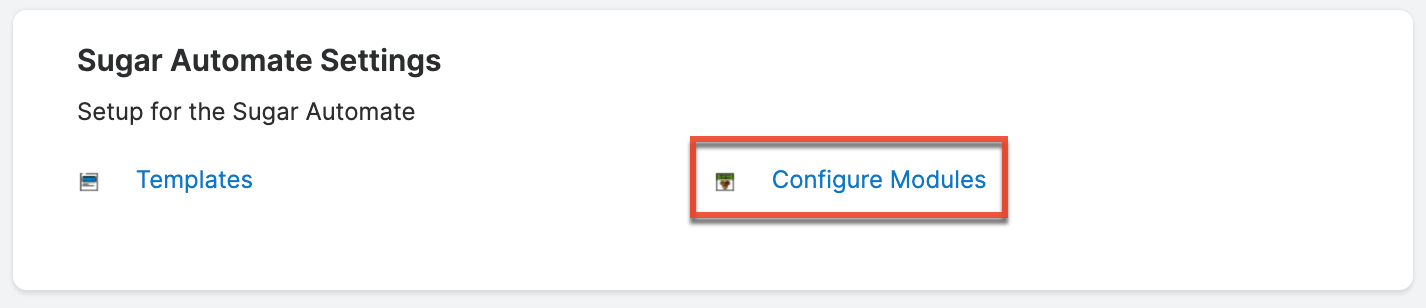
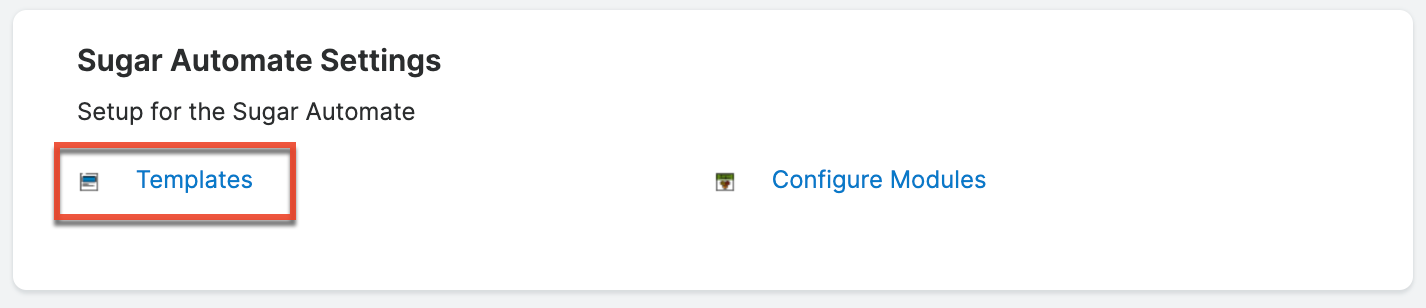
- Once you have changed the module to a tabbed view, navigate to Admin > Configure Modules in the Sugar Automate Settings section of the admin page:
- Select "Tab - First" or "Tab - Last" as desired for the module and then click "Save".
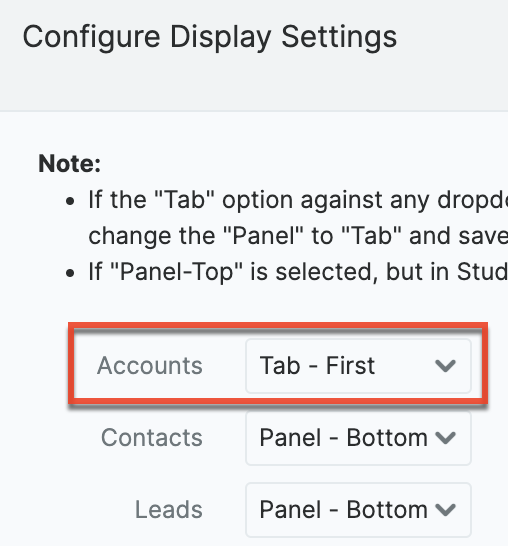
Note: If the "Tab - First" and "Tab - Last" options for any dropdown are disabled, then the Tab view has not been enabled for that module in Studio. To enable the Tab view, return to step 1 of these instructions.
The Smart Guides created within the selected module (e.g. Accounts) will now display as an additional tab in the record view instead of a panel below the record.
Sugar Automate Template Access
Templates created for Sugar Automate utilize three template modules:
- Smart Guide Templates
- Smart Guide Stage Templates
- Smart Guide Activity Templates
Administrator users can automatically access all of these modules to create new Smart Guide templates. To grant developer access to a regular user for creating Smart Guide templates, the user's role must have "Developer" access to all three template modules.
For regular users, a team is set on the activity template, stage template, and Smart Guide template records. Assuming the admin creates the template records using the global team, regular users without Developer role permissions will have access to all Smart Guides in Sugar, even if they are related to records outside of their team(s). Administrators should leverage the team fields on the Smart Guide template records if this is a concern.
For more information about teams and roles, please refer to the Team Management and Role Management documentation.
Creating Smart Guide Templates
The administrator composes a Smart Guide in Sugar using three steps:
- Create a Smart Guide template.
- Add stages to the Smart Guide template.
- Add activities (calls, meetings, and tasks) to each stage of the Smart Guide template.
A Smart Guide template is the record that controls what users see after they choose a Smart Guide from the Smart Guide picker in the Smart Guide panel under leads, contacts, and other modules participating in the Smart Guide. Each time a user chooses to start a new Smart Guide for a record, a copy of the template with its related stages and activities is created.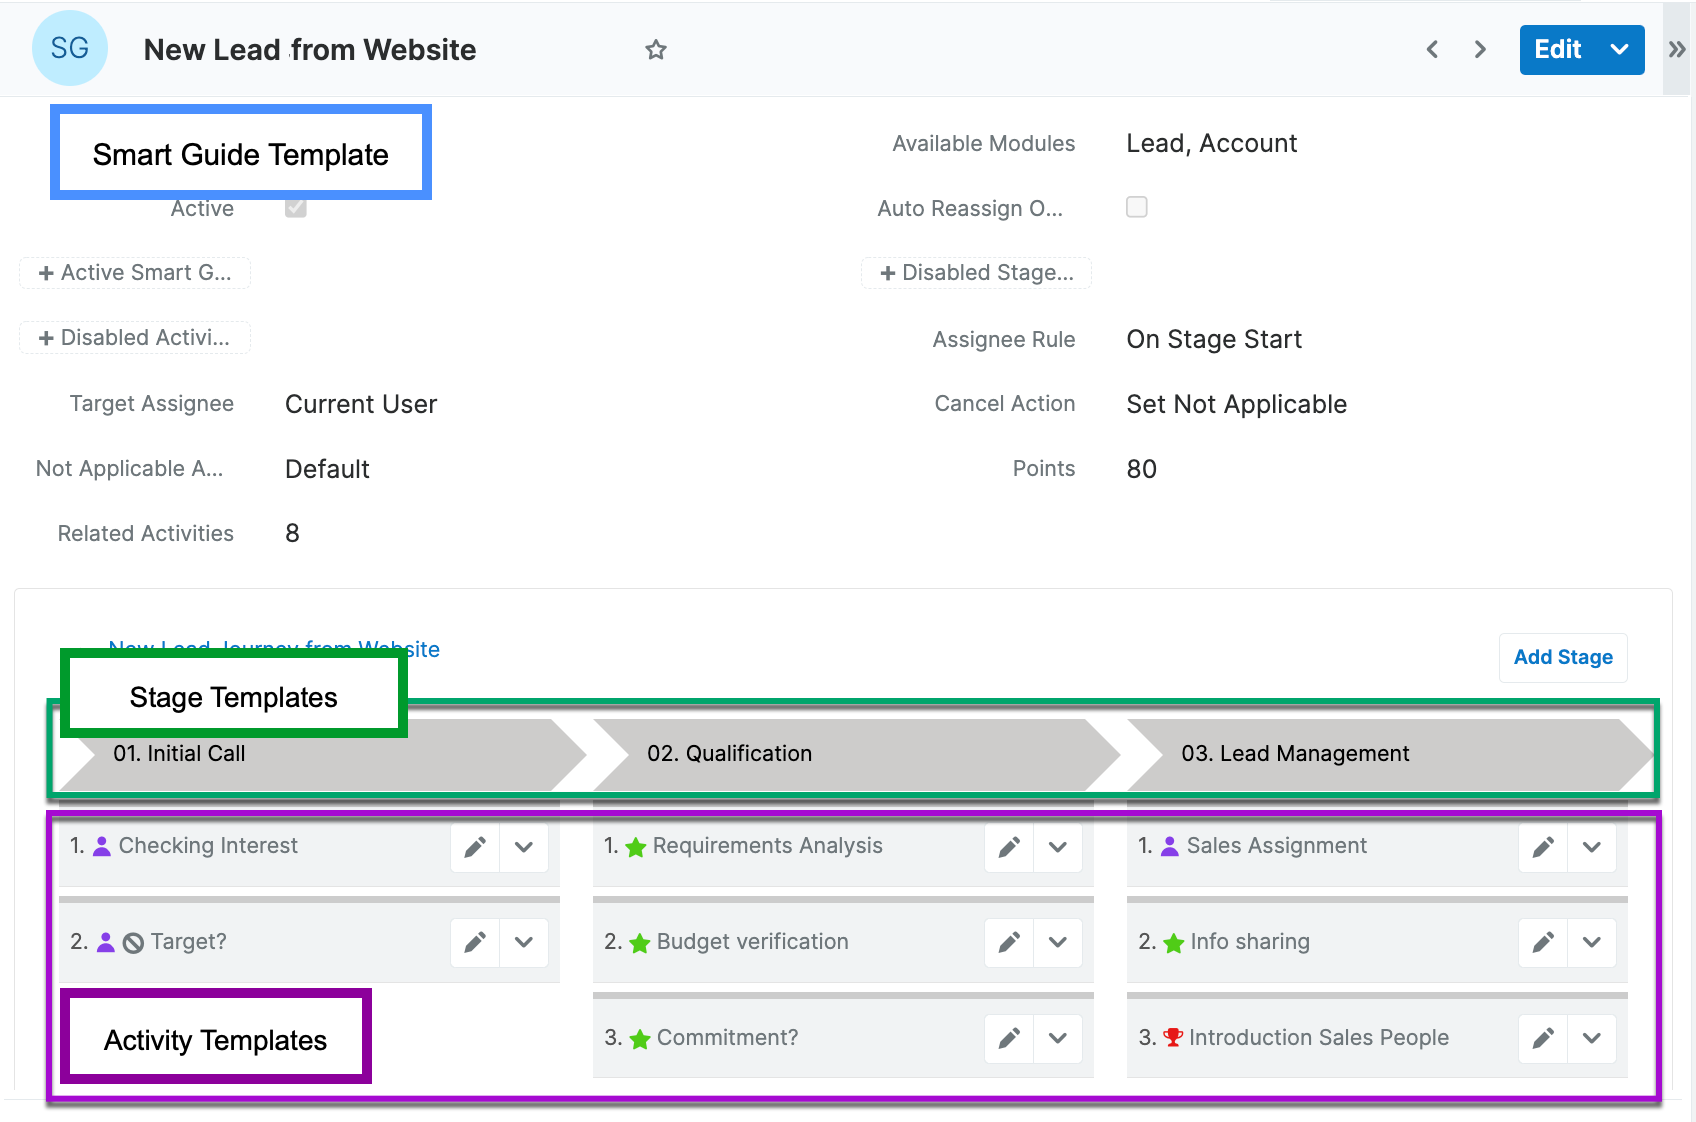
Note: Running Smart Guides are automatically named "Record Name - Smart Guide Name," where the record name is the name of the record the user is viewing when they start the Smart Guide (e.g., the account's name) and the Smart Guide name is the name of the Smart Guide template that they choose.
The following steps cover creating a Smart Guide template.
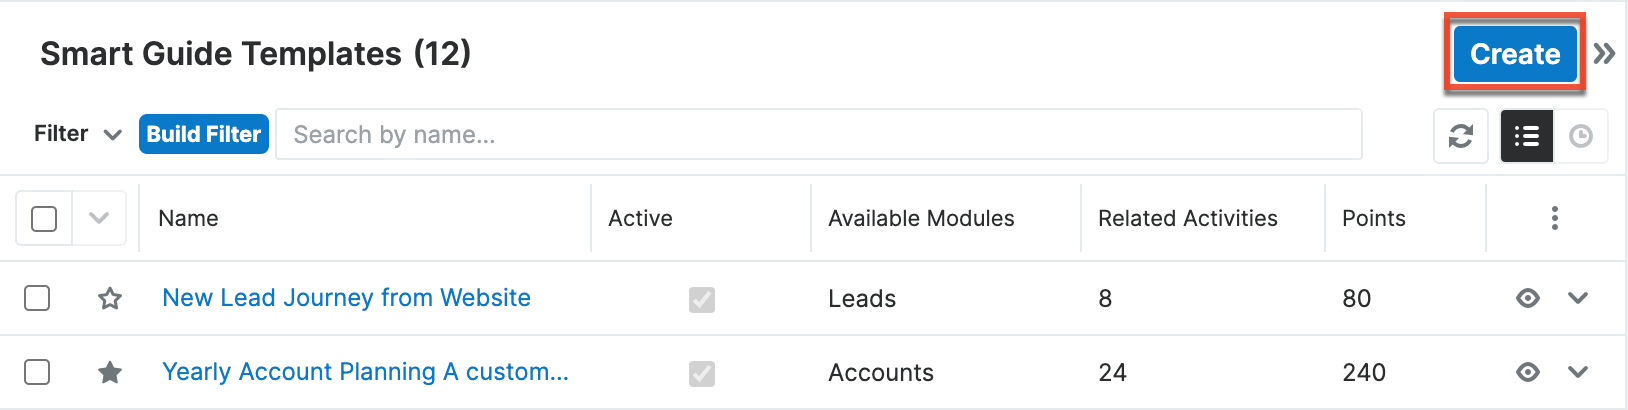
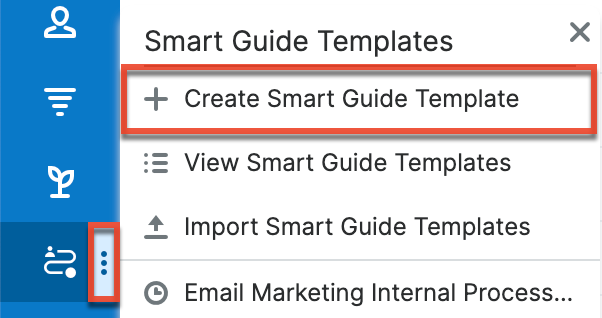
- Navigate to Admin > Templates in the Sugar Automate Settings section of the Admin page:
- Click the Create button on the upper right of the Smart Guide Templates list view. Alternatively, click the three-dots menu in the Smart Guide Templates module tab to open the Actions menu and select "Create Smart Guide Template".
- From list view:
- From the module tab:
- From list view:
- Refer to the Smart Guide Template Fields section of this page to complete the fields in the record view layout. All required fields are marked as such and must be completed prior to saving.
- After completing the Smart Guide template fields, click "Save" and then move on to the Adding Stages to Smart Guide Templates section to add stages to the Smart Guide.
Smart Guide Template Fields
The Smart Guide Templates module contains the following fields:
| Field | Description |
| Active |
This checkbox controls whether the Smart Guide is visible to users on Sugar records. When checked, the Smart Guide is available for users to enable on records. It is a good idea to uncheck this box until you have completely configured the Smart Guide and its related records. Note: Sugar Automate includes several templates that are enabled by default. If you do not want users to have the option to select them, simply uncheck the Active box for those records. |
| Active Smart Guide(s) Limit | The maximum number (integer) of Smart Guides from this template that may run simultaneously for a given parent record. When the limit is reached, users will be prohibited from launching a duplicate Smart Guide on a record until one of the running Smart Guides for this template has been completed for the parent record. |
| Assignee Rule | Choose how users should be assigned to activities within the Smart Guide. The Assignee Rule is directly related to the Target Assignee, explained later in this table.
Note: By default, users will not get notified when task activities are assigned to them by virtue of the assignee rule in a Smart Guide. |
| Auto Reassign Open Activities |
Select this option if you would like any open (Not Started or In Progress) activities to get reassigned when the assigned user changes on the parent module record. The Target Assignee field must be set to "Parent Assignee" at the Smart Guide Template level for this option to work. Note: This setting may be overridden at the activity level. For more information, see the Assignee Rule and Target Assignee field descriptions in the Smart Guide Activity Template Fields section. |
| Target Assignee | Choose the user(s) who will be automatically assigned to the activities in the Smart Guide according to the Assignee Rule.
Note: This setting may be overridden at the activity level. For more information, see the Assignee Rule and Target Assignee field descriptions in the Smart Guide Activity Template Fields section. |
| Available Modules | Select the Sugar modules that will be followed along the Smart Guide. A Smart Guide may include any combination of default modules and the modules configured in Smart Guide > Configure Modules. Note: If you select Leads, Contacts, and Opportunities for the Smart Guide's "Available Modules", a user will be able to start the Smart Guide on a lead record and continue to manage the same Smart Guide after they convert the lead into a contact and, optionally, an opportunity. Please note that the related contact and opportunity records must be created on the Lead Conversion screen in order for the Smart Guide to continue with those records. |
| Stage Numbering | This toggle allows you to hide or show the numbering of the Smart Guide stages. |
| Cancel Action |
Decide what should happen to incomplete or not-started Smart Guide activities if a user cancels a running Smart Guide by clicking "Cancel" in the Smart Guide Actions menu:
Please note that "Cancel" will stop the current Smart Guide without deleting the Smart Guide record even if "Remove Open Activities" is set. Completed activities will not be affected by either of the Cancel Action options. |
| Date Completed | The date and time that the Smart Guide was completed. |
| Date Started | The date and time that the Smart Guide was initiated. |
| Description | Enter a description for or other information about the Smart Guide's intended use. |
| Disabled Activity Actions | Optionally, select any activity actions that you want to restrict for this Smart Guide. For more information, refer to the Disabling Stage and Activity Actions section. |
| Disabled Stage Actions | Optionally, select any stage actions that you want to restrict for this Smart Guide. For more information, refer to the Disabling Stage and Activity Actions section. |
| Name | Enter the user-facing name of the Smart Guide. This will be the menu option that appears in the Smart Guide selector under Sugar records. |
| Not Applicable Action | Decide how to allocate points for activities marked "Not Applicable" in this Smart Guide. The "Default" setting will close the activities with 10/10 points; "Custom" will close the activity with 0/0 points for the Smart Guide. |
| Points | The Points field calculates and displays the sum total of points related to activities in the Smart Guide. This field cannot be edited and will default to blank until you have added activities with point values to the Smart Guide. For more information on activity points, please refer to the Points description in the Smart Guide Activity Template Fields section. |
| Related Activities | The Related Activities field calculates and displays the sum total of activities in the Smart Guide. This field cannot be edited and will default to zero until you have added activities to the Smart Guide. |
Smart Guide Templates Module Tab
The Smart Guide Templates module tab is located on the navigation bar at the top of the Sugar screen after the administrator clicks on "Templates" on the Admin panel. Click the three-dos menu in the Smart Guide Templates tab to display the Actions, Recently Viewed, and Favorites menus. The Actions menu allows you to perform important actions within the module. The Recently Viewed menu displays the list of Smart Guide templates you last viewed in the module. The Favorites menu displays the list of Smart Guide templates you most recently marked as favorites in the module.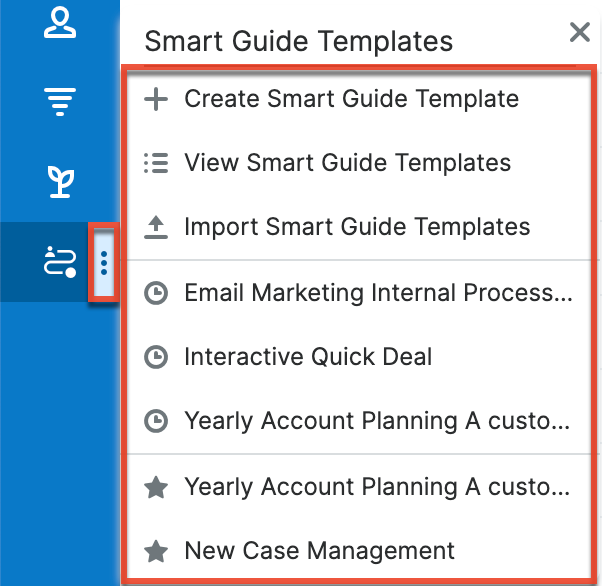
The Actions menu allows you to perform the following operations:
| Menu Item | Description |
| Create Smart Guide Template | Opens the record view layout to create a new Smart Guide template |
| List Smart Guide Templates | Opens the list view layout to search and display Smart Guide templates |
| Import Smart Guide Templates | Opens the import wizard to create or update Smart Guide templates using external data |
Adding Stages to Smart Guide Templates
After creating the Smart Guide template record, you must create stages for the Smart Guide. Stages are the groups of activities in the customer's decision-making process and are defined in the Smart Guide Stage Templates module.
After saving the Smart Guide template, follow these steps to add a stage to the Smart Guide:
- Click on the Add Stage button in the panel below the Smart Guide template's fields:

- Refer to the Smart Guide Stage Template Fields section of this page to complete the fields in the record view layout. All required fields are marked as such and must be completed prior to saving.
- After completing the stage template's fields, click "Save." At this point in the design process, you may only need to populate the stage's name (e.g. "Awareness") before saving.
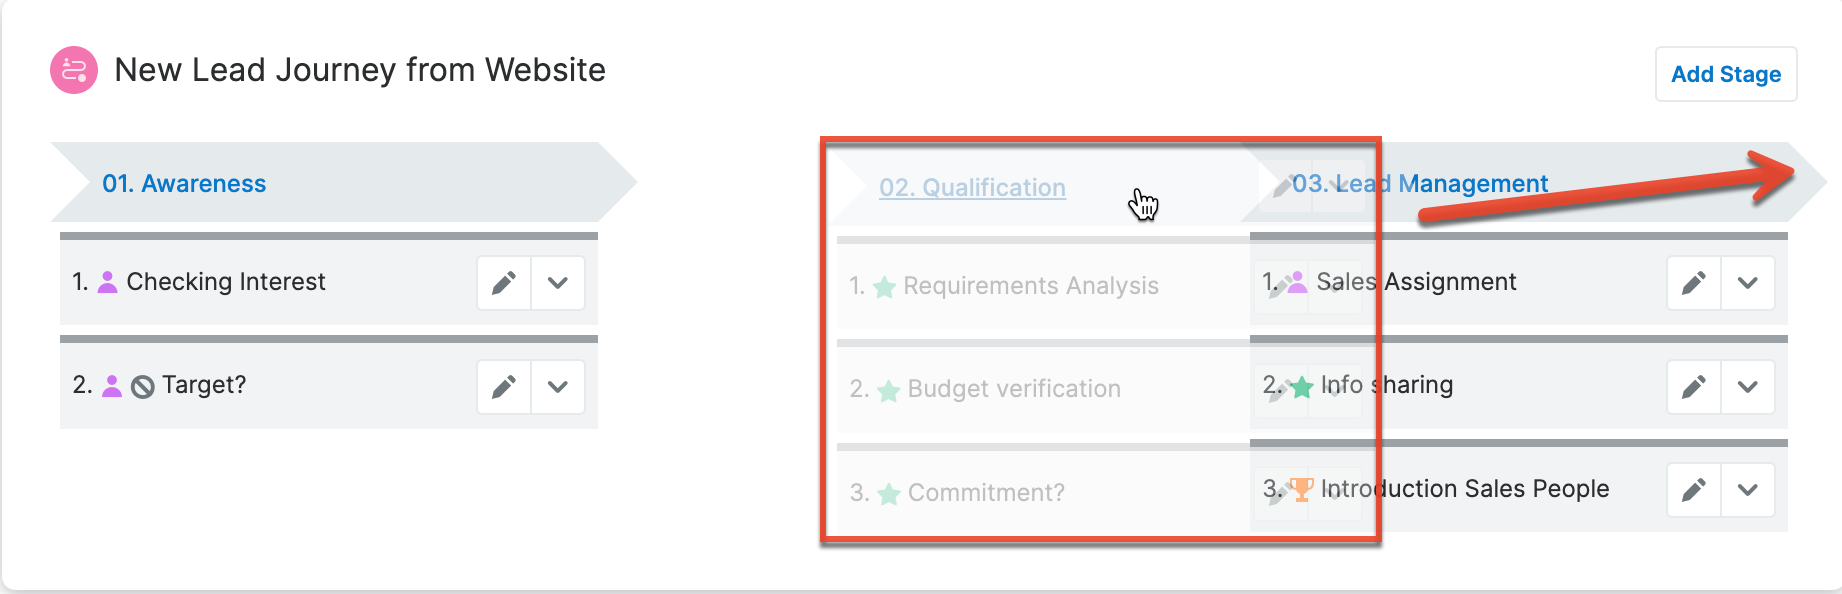
- Continue creating stage templates via the Add Stage button until you have made one for every stage of the Smart Guide. For example, if the current Smart Guide will move through Awareness > Consideration > Purchase > Loyalty, you must create four separate stage templates.
- New stages will be added to the end of the Smart Guide cycle. At any time from the Smart Guide template's design panel, you can re-order the stages by simply dragging them into the order you prefer. The stage's order numbers will adjust appropriately.
- After creating a stage template for each stage of the Smart Guide and ordering the stages as desired, move on to the Adding Activities to Smart Guide Templates section to add activities to the stages.
Smart Guide Stage Template Fields
The Smart Guide Stage Templates module contains the following fields:
| Field | Description |
| Smart Guide Template | Select the Smart Guide template that contains this stage. This field should be automatically populated. |
| Date Completed | The date and time that the last activity in the stage was completed, turning the stage's header arrow green. |
| Date Started | The date and time that the first activity in the stage was initiated by its assigned user. |
| Description | Enter a description for or other information about the stage's intended goal. |
| Name | Enter the name of the stage within the Smart Guide. The name will be displayed in the arrow-shaped column header for this stage. |
| Order | "Order" is the step number that corresponds to the stage in the overall Smart Guide. By default, the number will reflect the order in which the stages are created, but it can be edited as needed. The order number is also displayed in the arrow-shaped column header for this stage. |
| Points | The Points field calculates and displays the sum total of points for all activities in the stage. This field cannot be edited and will default to blank until you have added activities with point values to the stage. For more information on activity points, please refer to the Points description in the Smart Guide Activity Template Fields section. |
| Related Activities | This field counts and displays the number of activities related to the stage via the Smart Guide Activity Templates module. This field cannot be edited and will default to blank until you have added activities to the stage. |
| Start Next Smart Guide | This field allows the admin to optionally select a Smart Guide that will begin when this stage is completed. The new Smart Guide will be created and related to the same parent record as the current Smart Guide's parent. |
Adding Activities to Smart Guide Templates
Activities are the concrete actions that must be completed to move from one stage to the next. Under each stage, you can add activities in the form of tasks, calls, meetings, and milestones via the Smart Guide Activity Templates module. For calls and meetings, the connector will automatically add the activity's assigned user and the person associated with the Smart Guide's parent Sugar record (e.g. the lead or contact) as guests for the activity. This ensures that the activity appears on the assigned user's calendar and that the call or meeting shows up in the lead or contact's subpanel. Users can add or remove guests via the call or meeting's record view.
After saving a Smart Guide's stage template, follow these steps to add an activity to the stage:
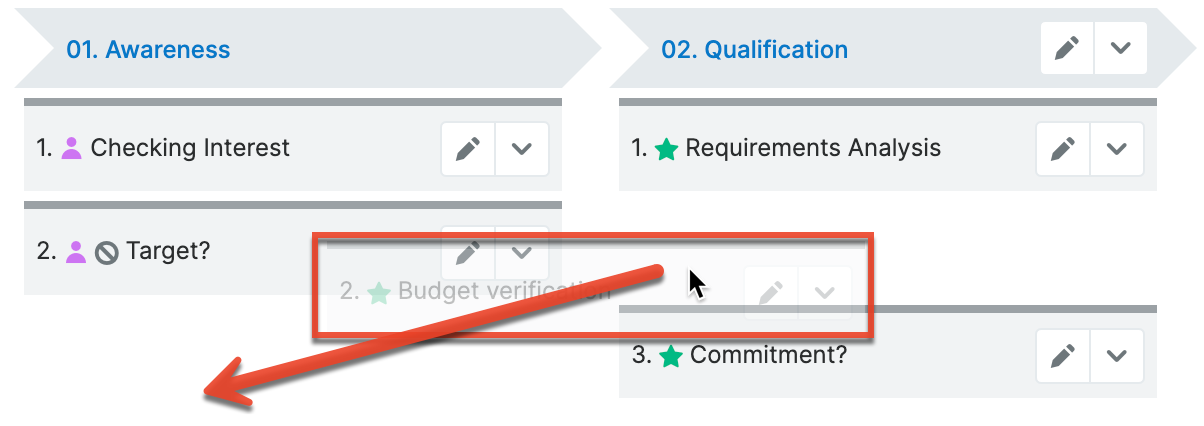
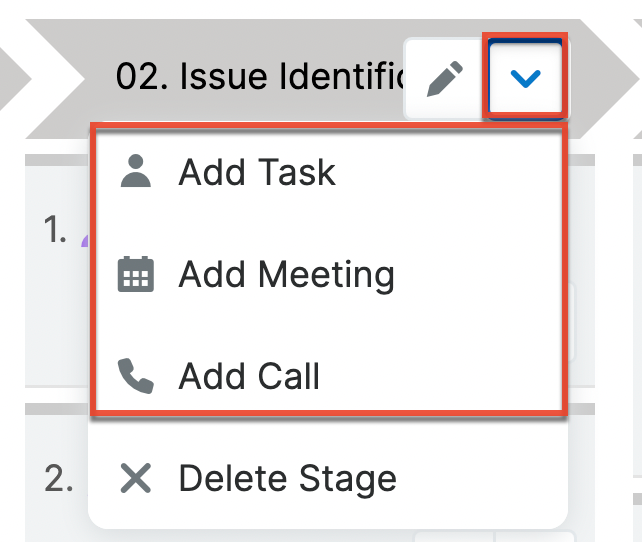
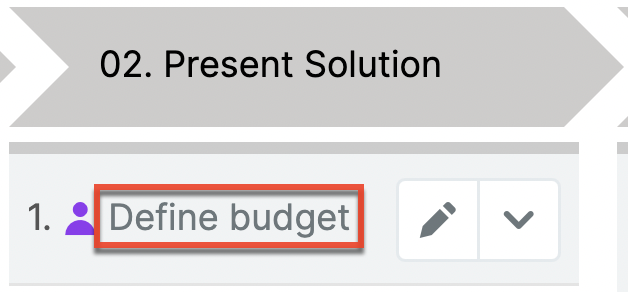
- Hover over the stage where you want to add an activity. When the stage's Actions menu appears, click the down arrow to reveal the options to add an activity:
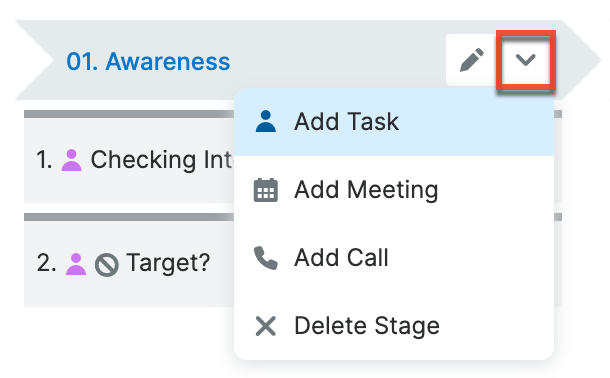
Alternatively, click "Copy" from a similar activity's Actions menu to duplicate, edit, and save a new activity in the Smart Guide. - Click on "Add Task," "Add Call," or "Add Meeting" to create an activity record for the stage.
- Refer to the Smart Guide Activity Template Fields section of this page to complete the fields in the record view layout. If creating a task, select the relevant task Type. All required fields for the new activity are marked as such and must be completed prior to saving.
- After completing the activity template's fields, click "Save."
- Continue adding activities to this stage and all of the other stages in the Smart Guide as required by your business process. New activities will be added to the end of the Smart Guide stage. At any time, from the Smart Guide Template designer, you can re-order the activities by simply dragging them into the order you prefer. You may also drag and drop activities around from one stage to another. The activity order numbers will automatically adjust for the stage.
Once you have defined all activities for each stage of the Smart Guide, you may choose to add sub-activities to the activities created in this section. If so, please refer to the Adding Sub-Activities section. If sub-activities are not required by your business process, then the Smart Guide template is complete and is ready to share with users. For more information on using the templates you have created for Sugar Automate, please refer to the Sugar Automate User Guide.
Adding Sub-Activities
The activities on a Smart Guide Template may optionally contain one or more sub-activities. Simply expand the parent activity's Actions menu and select the appropriate activity type that you would like to nest underneath it. For example, an activity task called "Get Approval" could contain two sub-activity tasks for "Manager Approval" and "QA Signoff", which may be assigned to different users.
After saving a stage's activity template, follow these steps to add sub-activities under the activity:
- On the parent activity (e.g. "Get Approval"), click the down arrow to reveal the Actions menu:

- Click on "Add Task," "Add Call," or "Add Meeting" to create an activity record under the current activity. Alternatively, click "Copy" from a similar sub-activity's Actions menu to duplicate, edit, and save a new sub-activity in the Smart Guide.
- Refer to the Smart Guide Activity Template Fields section of this page to complete the fields in the record view layout. If creating a task, select the relevant task Type. All required fields for the new activity are marked as such and must be completed prior to saving.
- After completing the activity template's fields, click "Save." The sub-activity will be slightly indented and display the default order number x.1, where x is the order number of the parent activity.
- To add another sub-activity to the same parent, return to the parent activity's Actions menu and select the appropriate activity type to create. Complete the activity's details and save. The second sub-activity will display the default order number x.2 when shown in the Smart Guide panel.
- Continue adding sub-activities as required by your business process. New sub-activities will be added to the end of the parent activity. At any time, from the Smart Guide Template designer, you can re-order the sub-activities by simply dragging them into the order you prefer. You may not individually drag sub-activities to a new parent activity, but you can drag and drop the parent activities including all their sub-activities around from one stage to another. The activity order numbers will automatically adjust for the stage.
Once you have defined all activities and optional sub-activities for each stage of the Smart Guide, the template is complete and ready to share with users. For more information on using the templates you have created for Sugar Automate, please refer to the Sugar Automate User Guide.
Smart Guide Activity Template Fields
The Smart Guide Activity Templates module contains the following fields:
| Field | Description |
| Activity Type | Define the activity as a task, call, or meeting. Please note that tasks may be action items or milestone activities, depending on the selected Task Type. |
| Allow Activity By | Optionally, restrict the ability to complete this activity to one or more users, teams, or roles. |
| Assignee Rule |
Optionally, choose how users should be assigned to this activity if you want the Assignee Rule to be different than the one you set at the Smart Guide Template level. The activity's Assignee Rule will always take precedence over the Smart Guide Template's Assignee Rule. The Assignee Rule is directly related to the Target Assignee, explained later in this table.
Note: By default, users will not get notified when task activities are assigned to them by virtue of the assignee rule in a Smart Guide. |
| Assignee Rule Activity | Shown only when the Assignee Rule is set to "Specific Activity Completed", the Assignee Rule Activity field displays all other activities that are related to the current Smart Guide. Select the activity that will determine the current activity's assignee. |
| Target Assignee | If you have set an activity-level Assignee Rule, choose the user(s) who should be automatically assigned to this activity.
|
| Blocked By |
For the Blocked By field, select one or more optional activities that users must complete before they can start the current activity. For more information, refer to the Blocking Activities section. |
| Blocked By Stages |
For the Blocked By Stages field, select one or more optional stages that users must complete before they can start the current activity. For more information, refer to the Blocking Activities section. |
| Smart Guide Stage Template | This field should be automatically populated with the stage that owns this activity. |
| Description | Enter a description for or other information about the activity's intended goal. |
| Direction | Only visible for call activities, the Direction field indicates whether the call will be inbound or outbound. |
| Duration (hours/minutes) | Only visible for call and meeting activities, the Duration field is optional and represents the length of time that the activity will last. |
| Guests |
Only visible for call and meeting activities, the Guests section allows you to choose a combination of contacts and users to automatically add as guests to the call or meeting record.
|
| Momentum Start Trigger |
Decide when this activity's momentum tracker should begin relative to the Smart Guide or stage you are in. By default, this field is not set and the additional momentum fields will not appear until you have selected an option for the Start Trigger. If the Momentum Start Trigger is not set for a parent, then the sub-activities will not affect the parent's momentum regardless of momentum applied for sub-activities.
|
| Momentum Points | The Momentum Points field controls the display of the Momentum Bar as well as the Gauge Chart for every running Smart Guide in Sugar. A higher momentum point value for one activity over another would indicate the relative importance of that activity over the other. For more information, please refer to the Smart Guide Momentum and Calculating Momentum sections of this page. |
| Momentum Due Days | The number of days expected to complete the Activity. If the activity should be completed in less than a full day, enter 0 for this field and use the Momentum Due Hours field instead. |
| Momentum Due Hours | The number of hours in addition to the Momentum Due Days expected to complete the Activity. If the activity should be completed in whole days, enter 0 for this field and use the Momentum Due Days field instead. |
| Momentum Start Module Momentum Start Field |
Visible only after setting the Momentum Start Trigger to "On Parent Date Field", use these two fields to specify the module and field that contains the date relative to which the activity's momentum timer will begin. You must select the module first to populate the available date fields for that module. |
| Name | Enter the name of the action item or milestone that this activity represents. The name will be displayed on the activity card under the stage's column header. |
| Order | This is the step number that corresponds with where the activity chronologically appears under the stage header. By default, the number will reflect the order in which the activities are created, but it can be edited as needed. The order number is also displayed to the left of the activity's name. |
| Points | The Points field controls the growth of the Progress bar that is displayed for every running Smart Guide in Sugar. You can assign 1 to 10 points to an activity using the dropdown, which defaults to 10. Each time you assign points to an activity, the parent stage's total point value increases and so does the overall Smart Guide's point value. Later, when a user engages with a Smart Guide, the Progress Bar will grow commensurate to each completed activity's point value relative to the Smart Guide's total point value. For more information on progress points, please refer to the Smart Guide Progress section of this page. |
| Populate Fields | This field is only visible on the activity template when the activity's target Call, Meeting, or Task module contains one or more custom fields that were created in Studio. The admin can specify a custom value for any custom field. Simply select the field that you would like to update (e.g. "Call Purpose") from the dropdown list and then type the value (e.g. "Call to schedule demo") in the adjacent field. You can populate the values of multiple fields for the activity record by using the Add and Remove icons at the end of the row. |
| Priority | Only visible for task activities, this will help you prioritize the tasks in a Smart Guide |
| Send Invites |
For calls and meetings, choose whether Sugar should send email invitations to the guests.
|
| Due Date Type |
Decide when this activity's progress timer should recognize that this task is due relative to the Smart Guide or stage you are in. After selecting an option, you will be prompted to enter the number of days until the activity is due in the Due Days field.
|
| Due Days |
Visible only after selecting the Due Date Type, enter the number of days it should take to complete this activity in order to calculate the activity's Due Date field. Note: If the Due Date Type is "Days From Parent Date Field" and the Due Date Criteria is set to "Percentage", then this field will be read as a percentage number (e.g., "50" = 50%) instead of a number of days. |
| Due Date Activity | Visible only after setting the Start/Due Date Type to "Days From Specific Activity Completed", use this field to select the activity that, when closed, will set the current activity's due date based on the value set in Start/Due Days. |
| Due Date Module | Visible only after setting the Due Date Type field to "Days from Parent Date Field", select the module that contains the field that contains the date relative to which the activity will be due. You must select the module before you can select the Due Date Field. |
| Due Date Field | Visible only after setting the Due Date Type field to "Days from Parent Date Field", select the field that contains the date relative to which the activity will be due. You must select the module first to populate the available date fields for that module. |
| Due Date Criteria |
Visible only after setting the Due Date Type to "Days From Parent Date Field", choose how to calculate the Due Date relative to the Due Date Field:
|
| Start Date Type |
Decide when this activity's progress timer should begin relative to the Smart Guide or stage you are in. After selecting an option, you will be prompted to enter the number of days until the activity is due in the Start Days field.
|
| Start Days | Visible only after selecting the Start Date Type, enter the number of days it should take to start this activity relative to the trigger event. |
| Start Date Field; Start Date Module |
Visible only after setting the Start Date Type to "Days From Parent Date Field", use these two fields to specify the module and field that contains the date relative to which the activity will begin. You must select the module first to populate the available date fields for that module. |
| Time of Day | Only visible for call and meeting activities, the Time of Day field is an optional start time for the activity. Please note that the start date will be determined by the Start/Due Date Type and Start/Due Days fields. |
| Start Next Smart Guide | This field allows the admin to optionally select a Smart Guide that will begin when this activity is completed. The new Smart Guide will be created and related to the same parent record as the current Smart Guide's parent. |
| Task Type | The Task Type field is shown when "Task" is selected for the Activity Type. Each task type is represented by a different icon in the Smart Guide. The types of tasks are:
|
| URL |
Optionally, insert an internal (from your Sugar instance) or external (from the web or your intranet) URL that will help the user complete the current activity. The value of the URL field will be shown as a link shortcut on the activity in the Smart Guide view. For more information, refer to the Sugar Automate page in the Application Guide. Note: Custom URLs can be crafted using the same variables that are leveraged in Web Hooks for Smart Guides. |
 Milestone: This task often requires no action. It represents a significant decision or moment in the customer's Smart Guide. Some examples include reaching a targeted revenue amount or a certain number of email clicks or opens.
Adding Sugar Actions
Sugar Actions allow you to trigger automated or manual actions based on changes to the Smart Guide or the related parent record of the Smart Guide. Sugar Actions are created from the Sugar Actions subpanel within a guide, stage, or activity Smart Guide template. Some fields will be prefilled based on where you create the Sugar Action.

Once you have created a Sugar Action, you will select the trigger type that will define the source of the Sugar Action's trigger and the direction of the action once the trigger conditions are met.
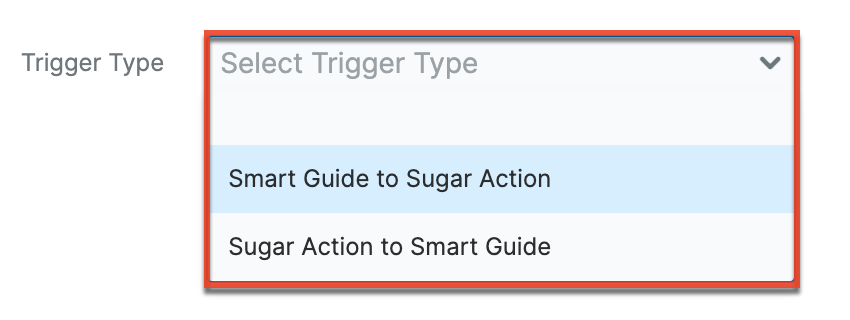
There are two different trigger types:
Smart Guide to Sugar Action
The Smart Guide to Sugar Actions trigger type can be added to any stage or activity of a Smart Guide and can either prompt a user to manually create, view, or edit a related Sugar record or trigger an automatic action to a related Sugar record based on changes to the Smart Guide.
When this trigger type is created for an activity template, the Sugar Action will appear on the activity in the Smart Guide as the icon unless you set the Display Icon field to "No" or set the Action Trigger Type field to be automatic (e.g., "Automatically Create Record"). When the user hovers over a Sugar Action icon on an activity, they will see the descriptive text used as the Sugar Action record's name. 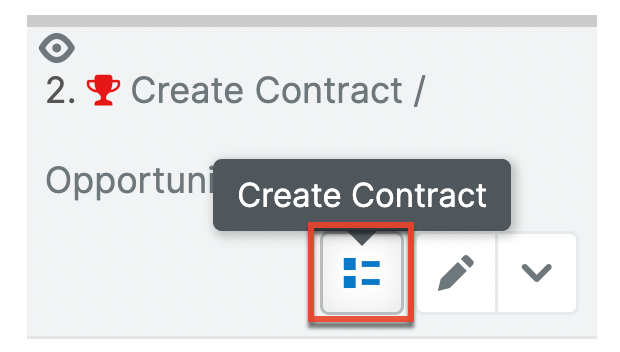
Click on the icon at any time during the Smart Guide to perform the activity's related action. The admin also has the option to launch the action automatically when its parent activity begins or ends using the Trigger Event setting on the activity's Sugar Action record. For more information on the options available, refer to the Sugar Guide to Action Fields section. For more information on completing Sugar Actions, refer to the Sugar Automate page in the Application Guide.
When used on a stage or Smart Guide instead of at the activity level, a Sugar Action will not show as an icon; instead, it will automatically initiate when the stage or Smart Guide is set to "In Progress" or "Completed", as set in the Trigger Event field. For more information on the options available, refer to the Sugar Guide to Action Fields section. For more information on completing Sugar Actions, refer to the Sugar Automate page in the Application Guide.
To add a "Smart Guide to Sugar Action" Sugar Action to a Smart Guide stage or activity, follow these steps:
- Navigate to the Smart Guide template record and find or create the stage or activity that should contain a Sugar Action.
- Click on the name of the stage or activity in the template.
- From the stage or activity's record view, scroll down to the Sugar Actions subpanel and click on the Create (+) button.
Note: There is a limit of one active Sugar Action per Trigger Event type for each stage or activity in a Smart Guide. Attempting to add a second Sugar Action for the same Trigger Event type will result in an error on save unless one of the records has an "Active" value of "false". - Set the Trigger Type field to "Smart Guide to Sugar Action".
- Complete the other Sugar Action fields according to the Sugar Guide to Action Fields and Pre-Populating Fields via Sugar Actions sections, and then click "Save".
- When setting the Relationship field, the first selector will always display the parent record's module name (i.e., Calls, Meetings, or Tasks) and refer to itself using the "self" identifier. If you would like to choose a record in a one-away module from the stage or activity (e.g., the opportunity related to the activity), then change the first selector to that module's name. A second Relationship selector dropdown will then appear containing the related module's name and it will now contain the "self" identifier to indicate that it is the chosen record. If you would like to choose a record in a two-away module from the stage or activity (e.g., create a contact related to the opportunity that is related to the activity), then change the second selector field to the two-away module. For this example, the two-level relationship will require three dropdown fields configured like this:
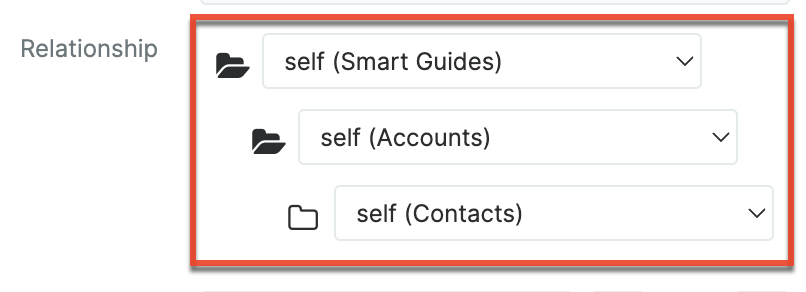
- When setting the Relationship field, the first selector will always display the parent record's module name (i.e., Calls, Meetings, or Tasks) and refer to itself using the "self" identifier. If you would like to choose a record in a one-away module from the stage or activity (e.g., the opportunity related to the activity), then change the first selector to that module's name. A second Relationship selector dropdown will then appear containing the related module's name and it will now contain the "self" identifier to indicate that it is the chosen record. If you would like to choose a record in a two-away module from the stage or activity (e.g., create a contact related to the opportunity that is related to the activity), then change the second selector field to the two-away module. For this example, the two-level relationship will require three dropdown fields configured like this:
- After saving the Sugar Action, you will return to the stage or activity record view. You can now add another Sugar Action for a different Trigger Event on the stage or activity or click on the Smart Guide Template name to return to configuring the overall Smart Guide.
Pre-Populating Fields via Sugar Actions
When creating a "Sugar Guide to Sugar Action" trigger type from the Sugar Actions module, values can also be set to pre-populate in fields on the related record. When the Sugar Action is triggered and the Action Trigger Type field is set to "Manual", a new drawer will open and the values will be prefilled in the drawer which you selected in the Sugar Action record's Populate Fields section. If the Action Trigger Type field is set to "Automatic", the records will be created or updated in the background with the predefined field values.
Simply select the field that you would like to update (e.g. "Name") from the dropdown list and then type the value (e.g. "Call to schedule demo") in the adjacent field. You can populate the values of multiple fields for the related record by using the Add and Remove icons at the end of the row. If you choose to populate a date or datetime-type field, then you can either set a fixed date (or date and time) or one that occurs in the future relative to the day the action is triggered. For relate fields, simply choose the field name and then select the record to relate.
When the Sugar Action's "Action Type" is set to "Create Record" and the relationship type is a call, meeting, or task, the newly created activity will be related to the Smart Guide and show up in the Smart Guide panel. To place the new activity in a specific position in the Smart Guide, use the Populate Fields functionality to set the "Smart Guide Order" field to the numeric place that the activity should occupy in the Smart Guide.
Sugar Action to Smart Guide
The "Sugar Action to Smart Guide" trigger type can trigger a change to a Smart Guide based on changes to the related parent record fields.
To add a "Sugar Action to Smart Guide" Sugar Action to a Smart Guide, follow these steps:
- Navigate to the Smart Guide template record.
- Scroll down to the Sugar Actions subpanel and click on the Create (+) button.
- Set the Trigger Type field to "Smart Action to Smart Guide".
- Complete the other Sugar Action fields according to the Sugar Action to Smart Guide Fields section, and then click "Save".
Sugar Action Fields
The Sugar Actions module contains the following fields. The fields displayed are dependent on the Trigger Type selected.
Sugar Guide to Sugar Action Fields
| Field | Description |
| Name | The name of the Sugar Action record; this will be displayed as a description when the user hovers over an activity's Sugar Action icon in the Smart Guide. |
| Trigger Type | The Sugar Action trigger type that will define the source of the Sugar Action's trigger and where the action will take place once the trigger conditions are met. |
| Active | When "Active" is set to true, the Sugar Action will occur once the trigger conditions are met. |
| Smart Guide/Stage/Activity Template | The parent Smart Guide, stage, or activity template that contains the Sugar Action. It will be pre-populated with the name of the template you started from. |
| Action Type | Select whether you want the action to edit, view, or create a related Sugar record. Note: When using the "Edit" and "View" action types, it is best practice to select a related module that has a "one" relationship with the current record because the application can only let you edit or view one related record during the action. If more than one relationship exists (a "many" relationship), the edit or view action will occur for only one of the related records. This may confuse the user into thinking that only one related record exists even when that is not true. |
| Trigger Event |
Select when the user should be prompted to complete this action. Please note that each Trigger Event can only have one active Sugar Action per stage or activity.
Note: Regardless of the selected Trigger Event, the user may choose to click the Sugar Action icon on an activity at any time during the Smart Guide to perform the action without being prompted. Proactively performing an action without a prompt will not prevent the prompt from occurring at the designated Trigger Event time, but the user may click "Cancel" to reject the prompt. |
| Action Trigger Type |
This field is visible when the Action Type field is set to "Create Record":
|
| Relationship | Use the Relationship selector to choose the type of record that you want the user to view, create, or edit. For more information on using the selector, refer to the steps listed within the Sugar Guide to Sugar Actions section. |
| Display Icon | Set to "Yes" by default and available only for Sugar Actions on activities with a trigger type of "Manually Create/Update Record", set this field to "No" to hide the clickable icon that allows users to manually initiate the Sugar Action. |
| Populate Fields | This field is only visible on the Sugar Action when the Action Type field is set to "Create Record". The admin can specify a custom value for fields on the related Sugar record. For more information, refer to the Pre-Populating Fields via Sugar Actions section. |
| Email Fields |
When the Action Type is set to "Create Record" and the Relationship field is set to "Email", the following two fields are exposed to configure the email message:
|
Sugar Action to Sugar Guide Fields
| Field | Description |
| Name | The name of the Sugar Action record; will be displayed as a description when the user hovers over an activity's Sugar Action icon in the Smart Guide. |
| Trigger Type | Select the Sugar Action trigger type that will define the source of the Sugar Action's trigger and where the action will take place once the trigger conditions are met. |
| Active | When "Active" is set to true, the Sugar Action will occur once the trigger conditions are met. |
| Sugar Guide Template Trigger | This is the Smart Guide that will be triggered by changes to its related parent record fields. It will be pre-populated with the name of the Smart Guide you started from. |
| Module Trigger | Select the related parent record module type for the Sugar Action trigger conditions. |
| Field Trigger | Select the related parent record module fields for the Sugar Action trigger conditions. Once a field is selected you can select the operator and field value for the trigger. |
| Smart Guide Target | Select the Smart Guide target that will be affected once the trigger conditions are met. If you select a stage or activity as the target, you can then select a specific stage or activity. Click the (+) button to add multiple targets. Note: If the Smart Guide Target is "Smart Guide", no other targets can be added since the Smart Guide will either be completed or canceled once the trigger conditions are met. |
| Smart Guide Action | Select the action that will be triggered on the selected Smart Guide target once the trigger conditions are met. The actions available will depend on the target selected. |
Blocking Activities
Using the Blocked By field, the admin has the option to make an activity's start dependent on the completion of one or more earlier activities. For example, you can block users from starting "Meeting 2" until "Meeting 1" has been completed.
Similarly, the admin can choose to block activities until a specified stage has been completed using the Blocked By Stages field. For example, you can block users from starting the "Value Proposition Meeting" activity until the "Prospecting and Introduction" stage has been completed.
Blocked activities display the Blocked icon (a circle with a slash) and do not have options to start or complete the activity from the Smart Guide panel. Users will also receive an error if they attempt to close the activity from its Sugar record view. Once the required activities have been completed, then the blocked activity will become unblocked.
Removing Stages and Activities from Smart Guide Templates
If you would like to remove a stage or activity from a Smart Guide template, simply expand the stage or activity's Actions menu and click on "Delete Stage" or "Delete Activity." This will apply to all Smart Guides that are started after the change has been made. Any running or completed Smart Guides will not be affected by the deletion.
Disabling Stage and Activity Actions
If you would like to remove an option from the Stage Actions Menu or the Activity Actions Menu in a Smart Guide, select the options using the "Disabled Stage Actions" and "Disabled Activity Actions" fields on the Smart Guide template record. These fields are both multiselect and are empty by default.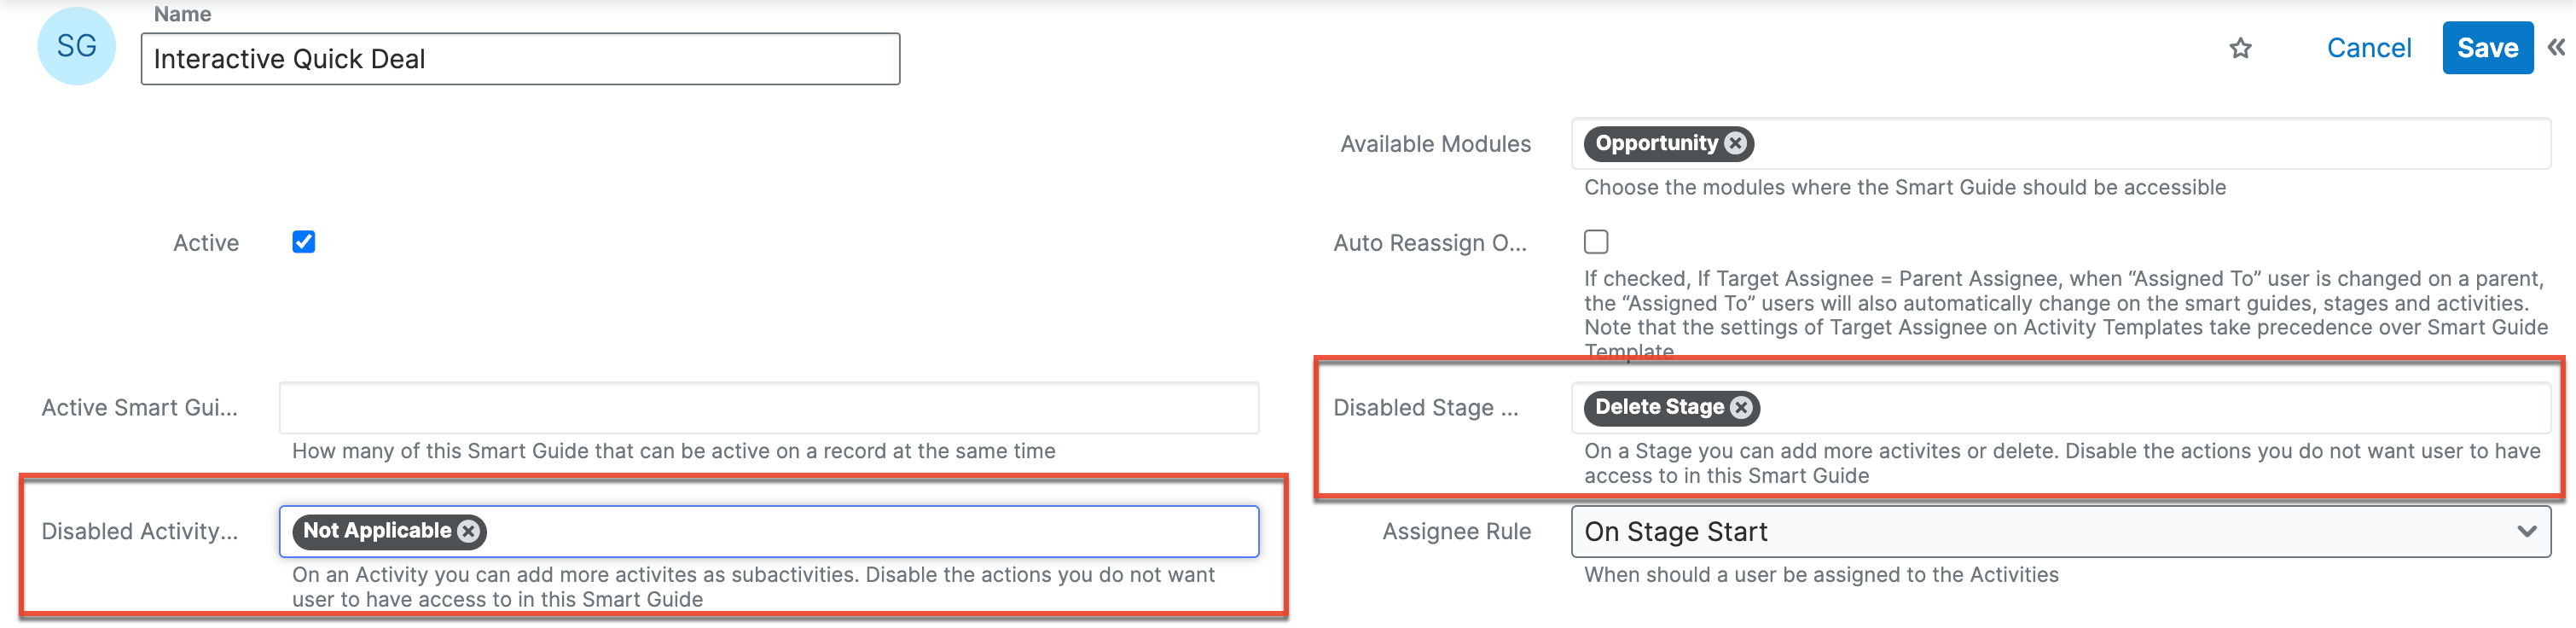
- Disabling a stage action will remove it from the Actions menu for all users on all of the stages in the Smart Guide.
- Disabling an activity action will remove it from the Actions menu on all of the Smart Guide's activities for all users.
Changes made to the Disabled Actions fields on existing Smart Guide templates will be applied instantly on save and apply to all new and existing Smart Guides related to the template.
Copying Smart Guide Templates
You can also create a new Smart Guide template by duplicating an existing Smart Guide's template. The Copy option is useful if the Smart Guide you want to create has similar stages and activities to an existing Smart Guide. Unlike other records in Sugar, all of the related stages and activities will also copy over to the new Smart Guide template, which you can edit, rearrange, delete, or add to later.
The following steps cover creating a new Smart Guide template by duplicating an existing Smart Guide template:
- Navigate to Admin > Templates in the Smart Guide section of the Admin panel.
- Click on the name of the Smart Guide that you want to copy.
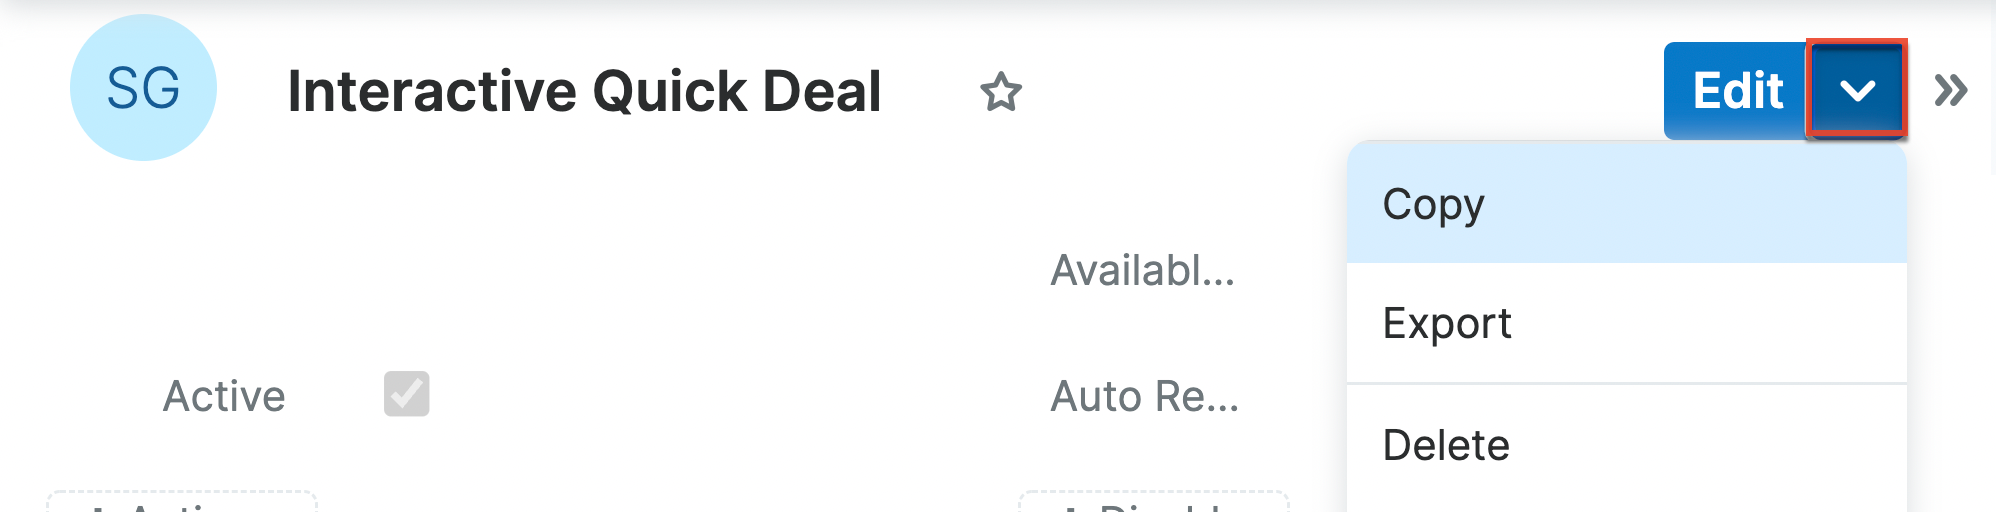
- Click the record's Actions menu and select "Copy".
- The displayed record view is pre-populated with the original Smart Guide's values. Update the necessary fields and then click "Save."
Importing Smart Guide Templates
Smart Guide templates can be exported from one Sugar instance and then imported into another Sugar instance where both have Sugar Automate (e.g. from your test or development instance to your live production instance). Only files that have been exported from a Sugar instance can be imported into a Sugar instance. Exported Smart Guides will download as the appropriate .json file type for upload to the Smart Guide Templates module.
Follow these steps to export a Smart Guide template from a test instance and then import it to a production instance as an example:
Note: Both instances must have Sugar Automate.
- In your test instance, create and configure a Smart Guide template with the desired stages and activities according to the sections covered earlier on this page.
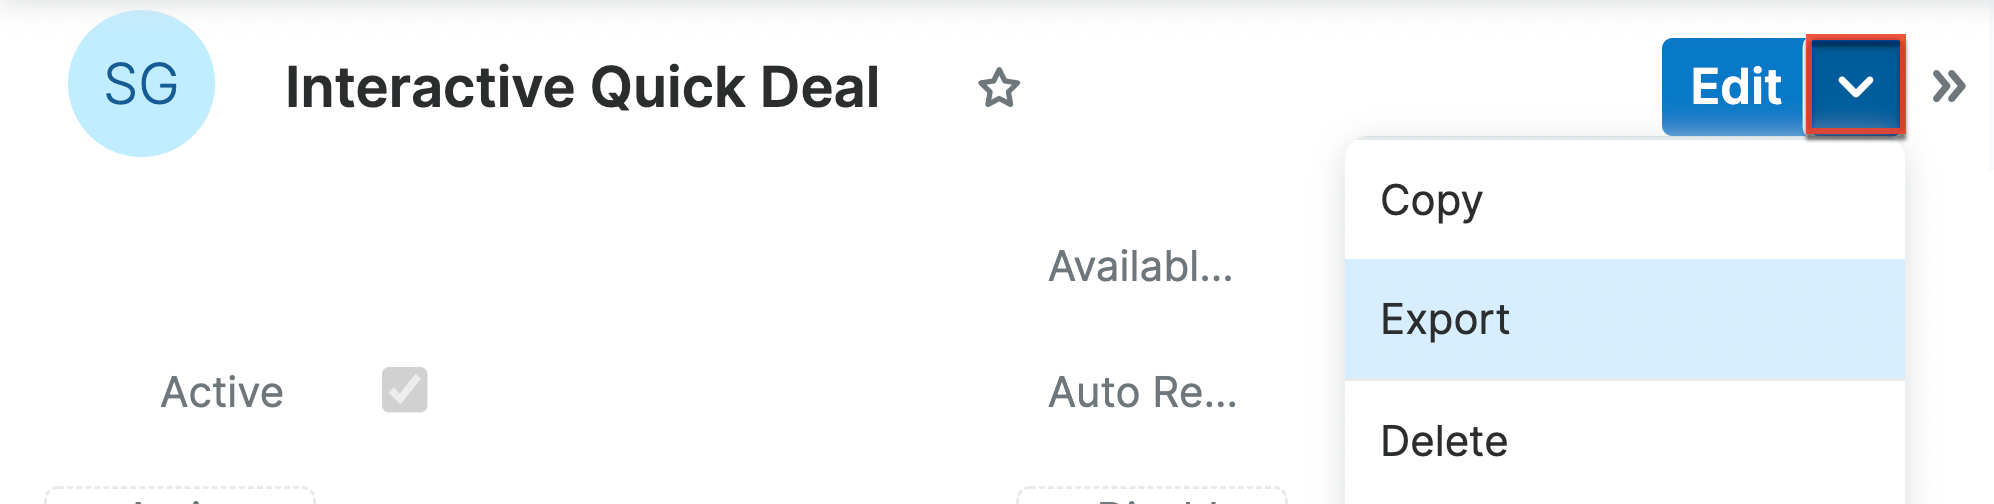
- When you are satisfied with the template, expand the template's record-view Actions menu and click on "Export." Save the exported .json file to your computer.
- Navigate to your production instance. In the Admin panel, click on "Templates" in the Smart Guide section.
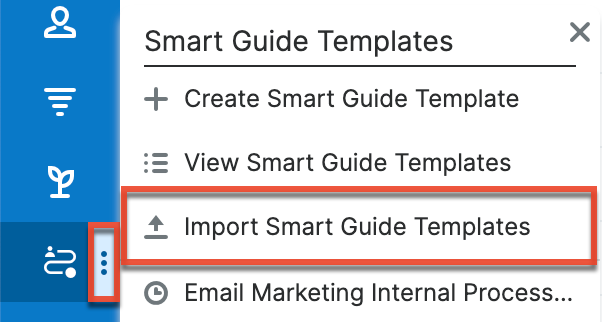
- Click the three-dots menu in the Smart Guide Templates module tab and select "Import Smart Guide Template".
- Click on "Choose File" to search for and select the .json file you saved in step 2 and then click "Import."
- Review the template's design and settings to be sure everything imported as expected.
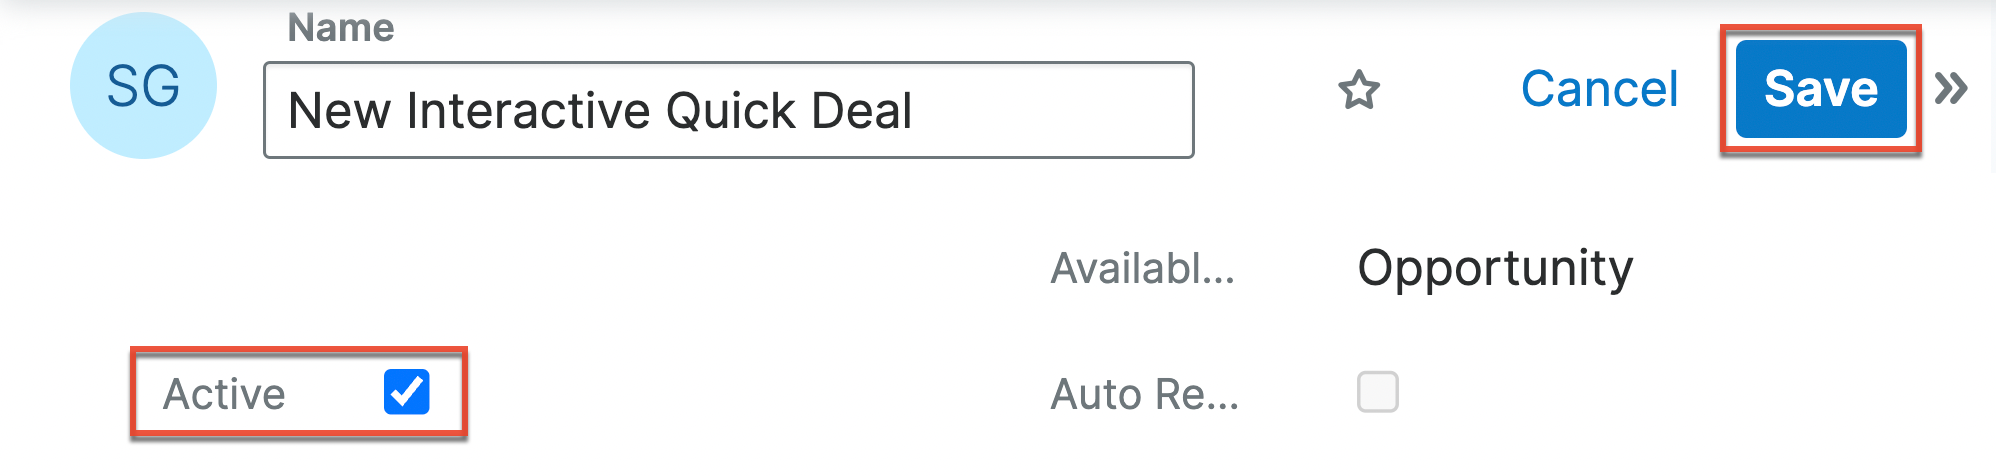
- Finally, activate the Smart Guide template in your production instance by placing a checkmark in the template record's Active field and immediately test its behavior.
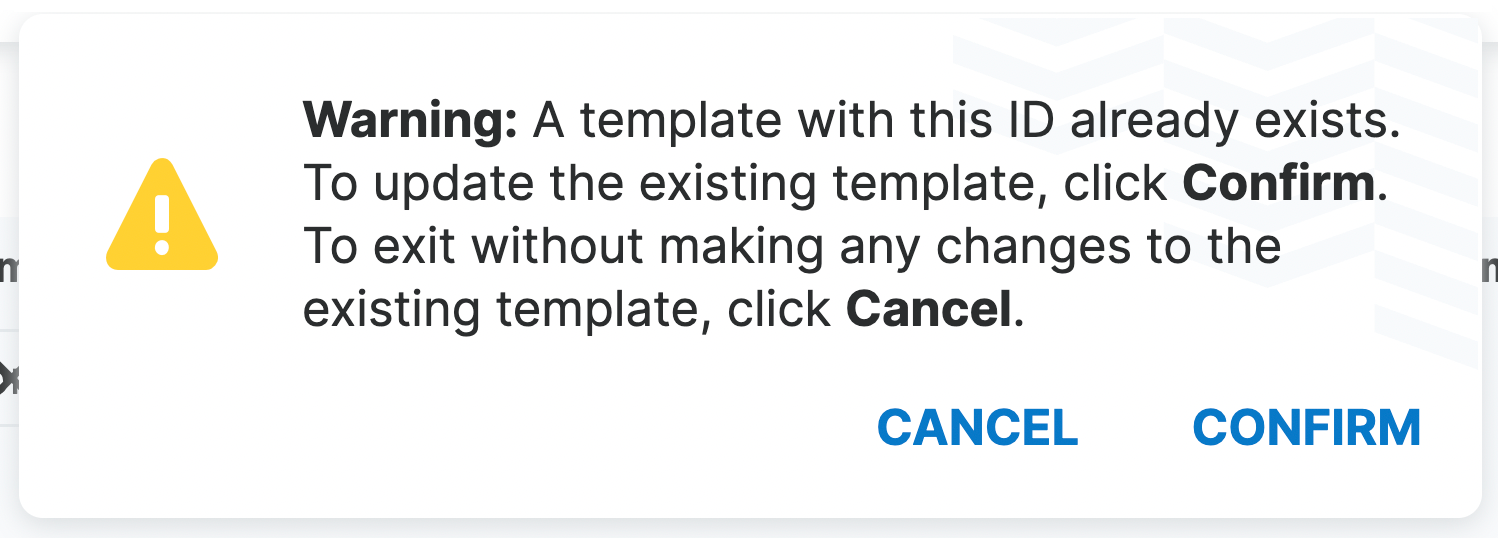
Note: You cannot import a new Smart Guide template with the same name but different ID as an existing Smart Guide template. You must change the name of the new record or use "Copy" to create a duplicate Smart Guide template.
Updating Smart Guide Templates via Import
If you have access to a test instance with Sugar Automate, you can update existing Smart Guide templates via the import tool. The existing Smart Guide template and the updated Smart Guide template must have the same record IDs. This allows you to export a Smart Guide template for maintenance without interrupting your production instance.
Follow these steps to update an existing Smart Guide template via the import tool:
Note: You must already have Sugar Automate on both your test and production instances.
- In your production instance, navigate to the record view for the Smart Guide template that you would like to update.
- Expand the template's record-view Actions menu and click on "Export." Save the exported .json file to your computer.
- Navigate to your test instance's Admin panel and click on "Templates" in the Smart Guide section.
- Click the three-dots menu in the Smart Guide Templates module tab and select "Import Smart Guide Template."
- Click on "Choose File" to search for and select the .json file you saved in step 2 and then click "Import."
- Navigate to the imported Smart Guide and make any changes according to the sections covered earlier on this page.
- When you have finished testing and making changes, expand the template's record-view Actions menu and click on "Export." Save the exported .json file to your computer, replacing the previous template file if prompted.
- Return to your production instance. Navigate to the Admin panel and click on "Templates" in the Smart Guide section.
- Expand the Smart Guide Templates module tab and select "Import Smart Guide Template."
- Click on "Choose File" to search for and select the .json file you saved in step 7 and then click "Import."
- An alert will prompt you to confirm that you would like to replace the existing template. Click "Confirm" to commit the update or click cancel to without making any changes.
The changes you made in your test instance should now be reflected in the original Smart Guide template in your production instance. The changes will apply to all Smart Guides that are started after the import. Any running or completed Smart Guides will not be affected.
Using Smart Guides With SugarBPM
Customers using SugarBPM for workflow automation can configure their process definitions to start, cancel, or delete a Smart Guide when specified conditions are met. It is also possible to create criteria for evaluation based on sub-activity records that are part of a Smart Guide.
Starting Smart Guides via SugarBPM
Administrators can configure process definitions to start a certain Smart Guide when conditions are met for a record. For example, some opportunities may not need to engage in the exhaustive sales process, like when an existing customer requests a quote. For this scenario, the "Opportunity Quick Deal" Smart Guide could be set to automatically begin when a new opportunity is created for existing business.
To set a condition for Smart Guides to start via SugarBPM, simply build a Change Fields action into a process definition for the affected module. For the "quick deal" example mentioned above, the affected module is Opportunities. In its simplest form, the basic process definition structure would be as follows:
- Target module: Opportunities
- Start event: New records only; Type = Existing Business
- Change Fields action: Smart Guide Template = "Opportunity Quick Deal"
- End event: Terminate
For more information on creating process definitions, please refer to the SugarBPM documentation.
Canceling and Deleting Smart Guides via Sugar BPM
Two checkbox fields exist on the Smart Guide record that, when set to "true" (checked), will either cancel or delete a Smart Guide: "Is Canceled" and "Is Deleted". An administrator can configure a SugarBPM process definition's Change Fields action to set one of these fields to "true" and thereby cancel or delete the running Smart Guide when a condition is met. For example, If an opportunity closes before a related sales Smart Guide has completed, then the Smart Guide could be set to automatically cancel.
To set a condition for deleting or canceling Smart Guides via SugarBPM, simply build a Change Fields action into a process definition for the affected module. For the example mentioned above, the affected module is Opportunities. In its simplest form, the basic process definition structure would be as follows:
- Target module: Smart Guides
- Start event: New records and all updates; Smart Guide Template = "Opportunity Quick Deal"
- Receive Message event: Opportunities "Status" changes to "Closed Won" OR Opportunities "Status" changes to "Closed Lost"
- Change Fields action: "Is Cancelled" = true
- End event: Terminate
For more information on creating process definitions, please refer to the SugarBPM documentation.
Adding SugarBPM Event Criteria Based on Smart Guides
When designing events that evaluate a set of criteria (e.g., Start event, gateways), you can add criteria that evaluate meetings, calls, or tasks that are sub-activities of a Smart Guide activity. For example, you might design a Start event that triggers a process when all of the sub-tasks under the target meeting in a Smart Guide are complete, which then notifies the creator of the meeting via email. In its simplest form, the basic process definition for this example would be as follows:
- Target module: Meetings
- Start event: Updated records only (all updates); Tasks (Child Tasks: parent_meeting_of_task_rel) when All Related Records have Status = "Completed"
- Send Message event: Send to user who created the meeting
- End event: Terminate
The module relationships that represent these sub-activities in Smart Guides can be difficult to differentiate from other relationships to the same modules but they follow a certain naming convention. If you are viewing a process definition that targets the Meetings module, the three sub-activity relationships are named as described in the following table:
| Module Relationship in a Process Definition Targeting the Meetings Module | Value in the Module Dropdown Field |
| Call sub-activities of a meeting | Calls [*:M] (Child Calls: parent_meeting_of_call_rel) |
| Meeting sub-activities of a meeting | Meetings [*:M] (Child Meetings: parent_meeting_of_meeting_rel) |
| Task sub-activities of a meeting | Tasks [*:M] (Child Tasks: parent_meeting_of_task_rel) |
The naming convention is the same when targeting the Calls or Tasks modules and the names of the relationships in the above table can be extrapolated to these target modules.
For more information on creating process definitions, please refer to the SugarBPM documentation.
Understanding Progress and Momentum
Sugar Automate measures the performance of each Smart Guide in Sugar via Smart Guide progress and Smart Guide momentum. Smart Guide progress lets you know how close to completion the Smart Guide is, while momentum measures how efficiently the Smart Guide has advanced with respect to the time-based performance standards set by the administrator. 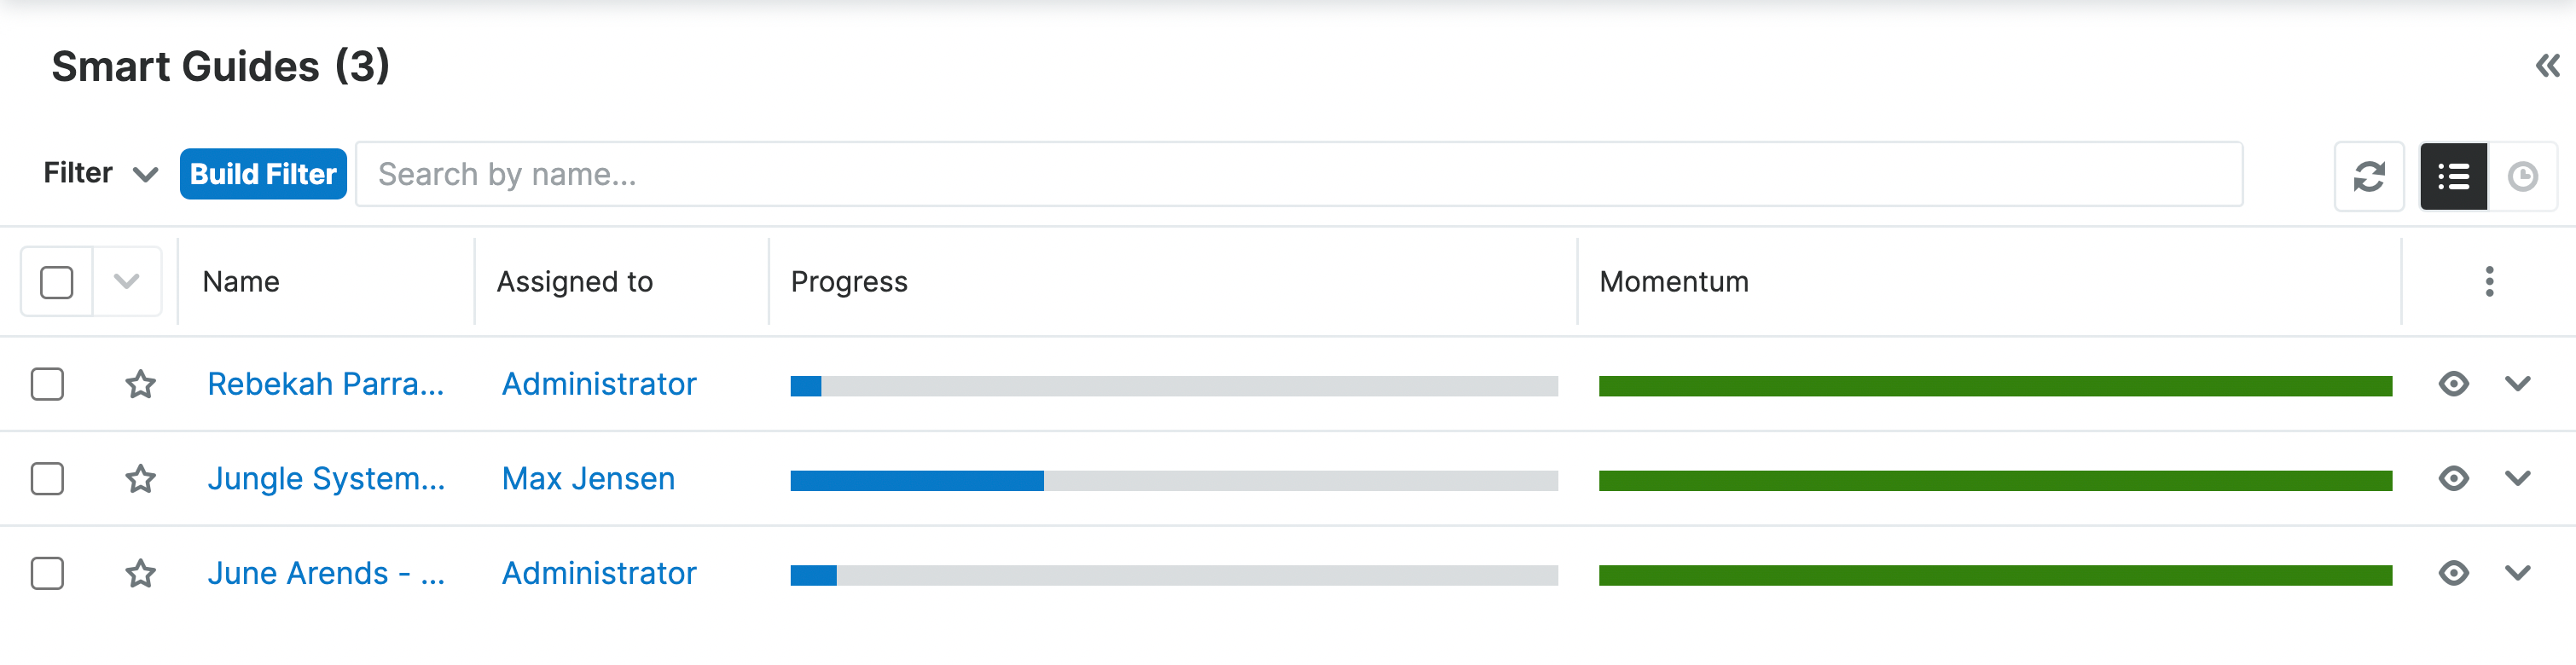
The following sections explain progress and momentum in detail.
Smart Guide Progress
Smart Guide progress is visually represented as a Progress Bar. The blue portion of the bar represents the percentage of points that have been completed relative to the Smart Guide's total point value.
Points contribute to the growth of the Progress Bar for running Smart Guides in Sugar. When creating activities for your Smart Guide templates, you can assign 1 to 10 points to each activity in the Smart Guide. Each time you assign points to an activity, the parent stage's total point value increases and so does the overall Smart Guide's point value. Later, when a user engages with a Smart Guide, the progress bar will grow commensurate to each completed activity's point value relative to the Smart Guide's total point value.
While an activity can have a maximum of 10 points, there is no limit to the number of points that may be attributed to a stage or Smart Guide. For more information on Smart Guide progress, please refer to the Calculating Progress section of this page.
All fields associated with Smart Guide progress are located on the activity's task, meeting, or call record. For more information on assigning progress points, please refer to the Smart Guide Activity Template Fields section.
Calculating Progress
The Smart Guide panel contains a progress bar that represents how far along a customer is in the Smart Guide based on the point values and statuses of the Smart Guide's activities. The administrator assigns the point values from 1 point up to 10 points for each activity in a Smart Guide. When an activity is In Progress, 30% of its point value is credited to the progress bar. Activities set to Held, Completed, Not Held, or Not Applicable credit 100% of their point values to the progress bar. The Smart Guide calculates its overall progress as a percentage rounded up to the next whole number: {points completed}/{total Smart Guide points}.
For example, in the Smart Guide below, the administrator has created a Smart Guide with a total of 240 points, and the activities associated with 80 of those points have been completed. Therefore, the progress bar shows that the Smart Guide is 33% complete (80/240=0.333, rounded down). 
Smart Guide Momentum
For most processes, there is an optimal amount of time that should elapse between stages and activities. This is known as process momentum. Depending on the type of Smart Guide, this is sometimes called velocity, efficiency, or forward motion. Momentum functionality in the Sugar Automate allows admins to define the optimal time-to-complete between activities and stages. The performance standards can then be calculated against actual time-to-complete and used by individuals and their managers to assess process efficiency.
Momentum Points contribute to the Momentum Score for running Smart Guides in Sugar. A higher momentum point value for one activity over another would indicate the relative importance of that activity over the other. All fields associated with momentum are located on the activity's task, meeting, or call record. For more information on assigning momentum points, please refer to the Smart Guide Activity Template Fields section.
Smart Guide momentum is visually represented in Sugar as a Gauge Chart dashlet but can also be displayed as a Momentum Bar on the list view dashlet. Both visualizations show how well the Smart Guide is keeping up with expected time standards as a percentage of momentum points completed.
For more information on the momentum functionality, please refer to the Calculating Momentum section of this page.
Calculating Momentum
Smart Guide momentum reflects how well a Smart Guide is keeping up with expected time standards as a percentage of momentum points completed. When momentum is defined for one or more activities, it becomes a part of a summed score for the Smart Guide Stage as well as to the Smart Guide object itself.
The momentum of an activity contains its total Momentum Points when not yet started. The tracking of the actual momentum days or hours only begins when an activity has been started.
Below is an example of how Momentum Points and Momentum Scores are calculated for the Gauge Chart and the Momentum Bar. As an example, imagine a Smart Guide template that has been set up with two stages that have two tasks each. Each task has the following Momentum Points and Momentum Due Days set:
| Task | Momentum Points |
Momentum Due Days |
Momentum Due Hours |
Stage Totals | Smart Guide Total |
| Task A | 100 | 5 | 0 | 200 potential momentum points |
320 potential momentum points |
| Task B | 100 | 5 | 0 | ||
| Task C | 80 | 5 | 0 | 120 potential momentum points |
|
| Task D | 40 | 5 | 0 |
In the example above, Task A is given a Momentum Point value of 100. if Task A is completed within its expected 5 days (i.e., less than 120 hours), then the Momentum Score for that task will remain 100. However, if Task A is completed after the expected 5 days, for example, it takes 6 days (i.e., 144 hours), then the score for that task will be less than 100 because there is a penalty for each hour over the projected hours that a task is not completed.
The following calculation is used to calculate the Momentum Score for an activity:
- Activity Momentum = (expected time / actual time) x potential activity points
The formula applied to Task A, which was completed in 144 hours opposed to the projected 120 hours, gives us a Momentum Score of 83 from the activity's 100 potential momentum points:
- (120/144) x 100 = 83
Assuming no other activities in our example have kicked off, Tasks B, C, and D still have perfect 100% scores and the overall Smart Guide Momentum after Task A is completed is a total 303 (83+100+80+40) out of a potential 320, or 95% (rounded up) of the Smart Guide's potential momentum points, as represented by the Smart Guide's gauge chart:
Momentum Scores are also visualized in the Smart Guide list view dashlet as a color-coded bar that follows the same color convention as the gauge chart and with a bar-length that represents the momentum score's percentage of the Smart Guide's potential momentum: 
Reporting on Momentum
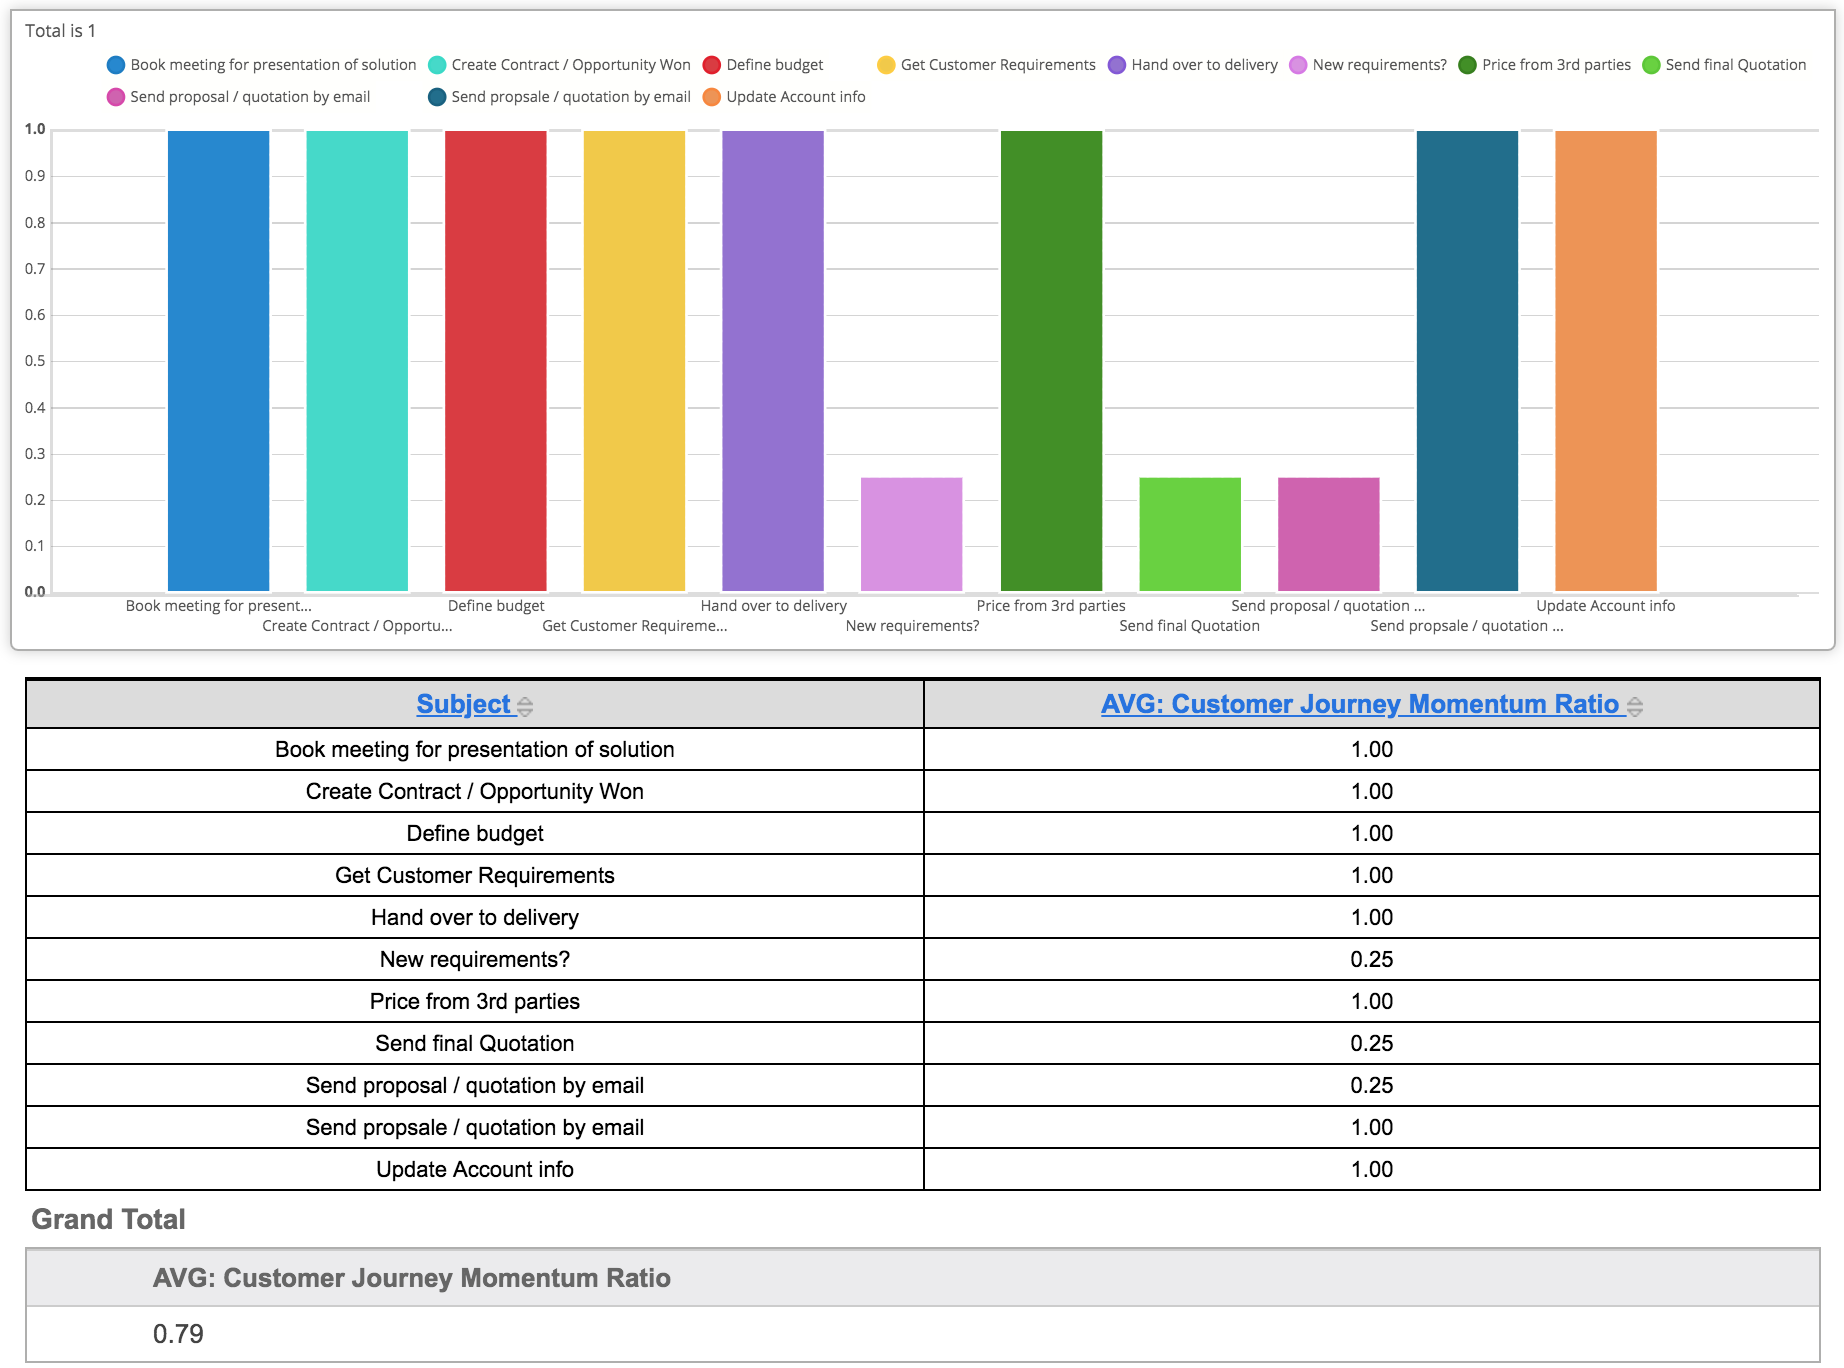
Smart Guide progress points, momentum points, and momentum scores are also reportable fields in the Reports module. For more information on building reports in Sugar, please refer to the Reports documentation. As an example, the following report evaluates the average rate of momentum for the activities in a given Smart Guide for all users. It helps to identify common points of delay in the Smart Guide that may need the attention of management.
Note: Before using this report, be sure that you have assigned momentum points for the activities in the Smart Guides that you want to track and that enough time has passed for momentum values to have been calculated. For more information on assigning momentum points, please refer to the Smart Guide Activity Template Fields section.
Use the following steps to create a report that evaluates the average momentum for each task in a Smart Guide:
- Navigate to the Reports module and create a Summation Report for the Smart Guides module.
- Define the first filter:
- In the Related Modules panel, under the Smart Guides folder, find the "Smart Guide Stages" folder and click on the + icon to expand it.
- Under the Smart Guide Stages folder, find the "Tasks" folder and click on the word "Tasks".
- In the Available Fields panel, click on the Status field to add the filter to the main panel.
- Set the filter's operator and value to "is Completed".

- Define the second filter:
- In the same Available Fields panel, click on the Smart Guide Momentum Points field to add a new filter to the main panel.
- Set the filter's operator and value to "Greater than 0".

- Define the third filter:
- In the Related Modules panel, under the topmost Smart Guides folder, click on the words "Smart Guide Template" next to the Smart Guide Template folder.
- In the Available Fields panel, click on the Name field to add the filter to the main panel.
- Select your favorite Smart Guide template for the filter and enable the Run Time Filter option.

- Click "Next" and then set one Group-By field:
- In the Related Modules panel, under the Smart Guides folder, find the "Smart Guide Stages" folder and click on the + icon to expand it.
- Under the Smart Guide Stages folder, find the "Tasks" folder and click on the word "Tasks".
- In the Available Fields panel, click on the Subject field to add it to the main panel.
- Click "Next" to proceed to the Display Summary step where one Display Summary line should already be set.
- Set the following additional Display Summary:
- Smart Guides > Smart Guide Stages > Tasks > AVG: Smart Guide Momentum Ratio
- Click "Next" to proceed to the Chart Options step and choose "Vertical Bar (Grouped)".
- Click "Next" to proceed to the final step, name the report "Average Momentum Ratio by Smart Guide Task", and click "Save & Run".
The resulting report will display a separate bar for each task in the selected Smart Guide. The bar represents what fraction of 1 (i.e., 100%) each task has achieved in momentum. Those with a value of less than 1 have lower rates of momentum based on the average of their actual vs expected completion times. In the table below the chart, you can also view the total average momentum for the entire Smart Guide.
Advanced Configurations
The following advanced options may be configured by administrators who want to enable additional modules to be used with Smart Guide templates, to define custom "closed" statuses for records used in Smart Guides, and to create Web Hooks for communicating with external systems.
Configuring Modules for Smart Guides
The Smart Guide panel will be included on records for modules that are enabled for Smart Guides via Configure Modules. By default, the Accounts, Contacts, Leads, Opportunities, and Cases modules are enabled. When you create new Smart Guide templates, the templates may include any combination of the enabled modules.
If your business converts lead records into contacts and opportunities, then you may want to design a Smart Guide template that follows the lead as it is converted in the system. For example, if you design a Smart Guide template and select Leads, Contacts, and Opportunities for the Smart Guide's Available Modules, a user will then be able to start the Smart Guide on a lead record and continue to manage the same Smart Guide after they convert the lead into a contact and, optionally, an opportunity. Please note that the contact and opportunity records must be created on the Lead Conversion screen in order for the Smart Guide to continue with those records.
To enable additional modules to be used with Smart Guide templates, you can configure Sugar Automate's available modules via Admin > Sugar Automate Settings > Configure Modules. Conversely, you can disable modules so that they cannot be used in Smart Guides.
The following steps walk through how to make modules available for Sugar Automate for your instance.
- Navigate to Admin > Sugar Automate Settings > Configure Modules.
- In the top section, select or remove modules until the multi-select field displays the modules that you may want to use in a Smart Guide template and click "Save". When you start creating individual Smart Guide templates, you can select as many or as few of the enabled modules as you like for each template.
Note: If you see a "No Access" label on this step, please clear your browser cache and reload the page.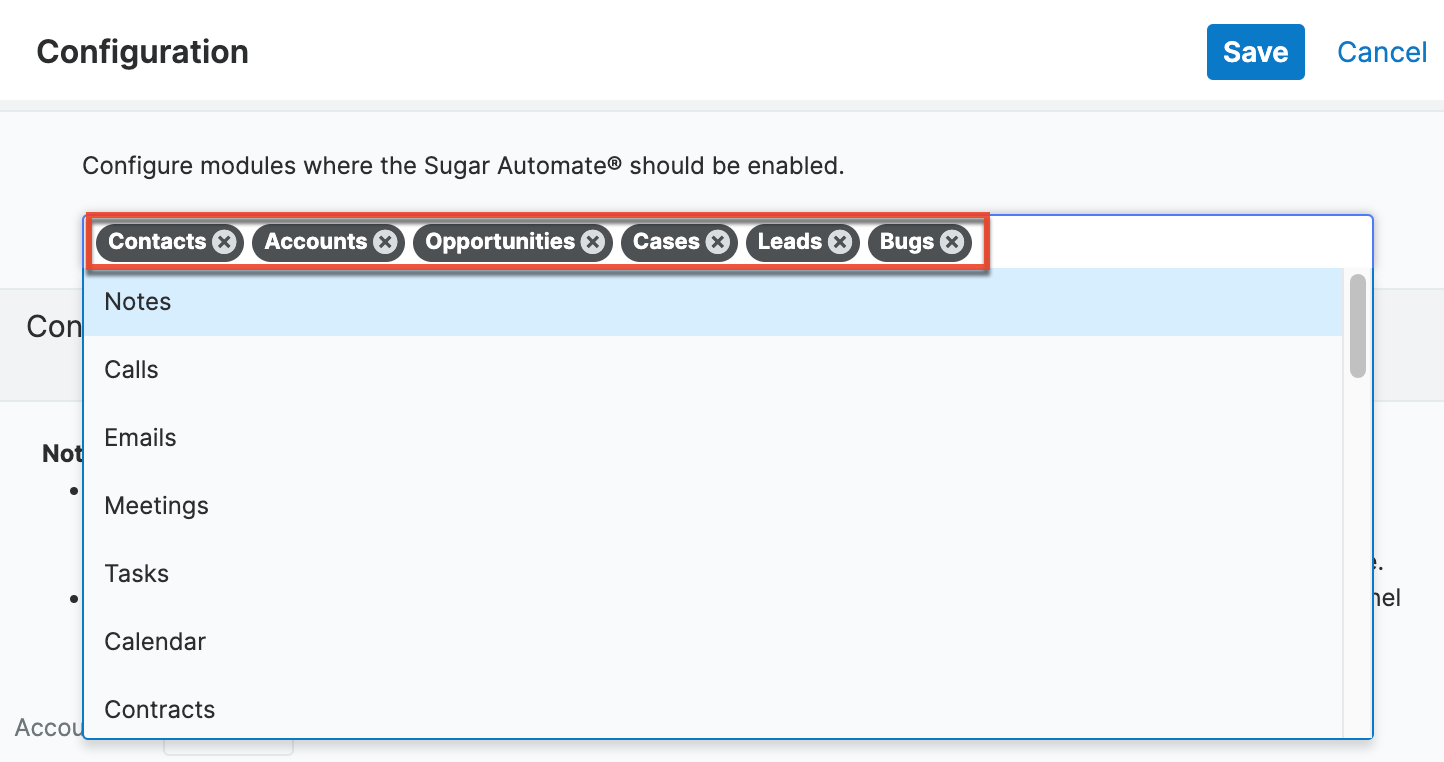
Configuring Custom "Closed" Statuses
Many instances have been configured to use different statuses (e.g. Closed, In Progress, Invalid) for records than the statuses used in a stock Sugar instance. You may define which statuses Sugar Automate considers "closed" for your instance via the Sugar dropdown editor.
By default, Sugar Automate considers tasks as closed when they have a status of "Completed" or "Not Applicable". Calls and meetings are closed when they have a status of "Held" or "Not Held". To add or remove statuses that are considered closed in your instance, navigate to Admin > Dropdown Editor and modify the statuses for the respective dropdown list shown below:
cj_calls_completed_status_listcj_meetings_completed_status_listcj_tasks_completed_status_list
For more information on working with dropdown lists, refer to the Developer Tools documentation in the Sugar Administration Guide.
Assignment Notifications
When a user starts a new Smarx and one or more of the activities in that Smart Guide are assigned to another user(s), the other users will receive a single, compiled "digest" style email that lists all of the activities that are assigned to them and of record type "task". No notifications will be sent to the logged-in user starting the Smart Guide for tasks that are assigned to them. For any call or meeting activities in the Smart Guide, email invitations will be sent according to the default behavior of the Sugar version you are using.
Please note that notification emails will only be sent if "Send Assignment Notification" is enabled in both the admin System Email Settings and in the user's profile.
Web Hooks
The Smart Guide Web Hooks allow you to send data to an external URL so that additional processing can be completed outside the Sugar application. This can allow you to send the data to other applications within your organization (e.g. send a Slack message) or to validate that the Smart Guide can progress on to the next stage.
Smart Guide Web Hooks are available for use with records in all of the template modules (Smart Guide Templates, Stage Templates, and Activity Templates) via the Web Hooks subpanel under each template's record view.
The following fields are available when creating a Smart Guide Web Hook:
| Field | Description |
| Active | Whether the Web Hooks should trigger |
| Custom Post Body | Visible only when the Request Body field is set to "Send Custom Post Body". Enter the data that you want to send to the endpoint with your request. |
| Error Message Path | The path of the message to display when an error occurs |
| Headers | Optionally, send additional headers with your Web Hook request. Each new line will be treated as a new header. For example: Content-Type: application/json X-Api-Key: xxxxxxxxx |
| Ignore Errors | Whether non-2xx HTTP Status Codes should throw errors |
| Name | The name of the Web Hook |
| Request Body |
Decide if you want to send the Smart Guide's data or custom post body with your request.
|
| Request Format | Select a format for sending the request out |
| Request Method | The HTTP request method that the web logic will utilize to call out to the specified URL |
| Response Format | Select a format for receiving a response |
| Sort Order | The order to process the Web Hook relative to the order numbers of any other Web Hooks for this template |
| Trigger Event | The event that must occur in order for the web logic hook to process (required field) |
| URL | The URL that will receive the data transmitted by the web logic hook Note: This URL should be a URL outside of your Sugar instance. If you have an instance on Sugar's cloud service, it is your responsibility to host the URL that will process the web logic hook. |
Web Hook Example
This example will cover how to send a Slack message using the Web Hooks for Sugar Automate.
Prerequisite: To successfully set up this integration, you must be the admin for your Slack workspace or have permission explicitly granted by the Slack admin to add webhooks to your workspace via the Slack API.
Steps to complete:
- Navigate to https://api.slack.com/apps and create a new app for your workspace.
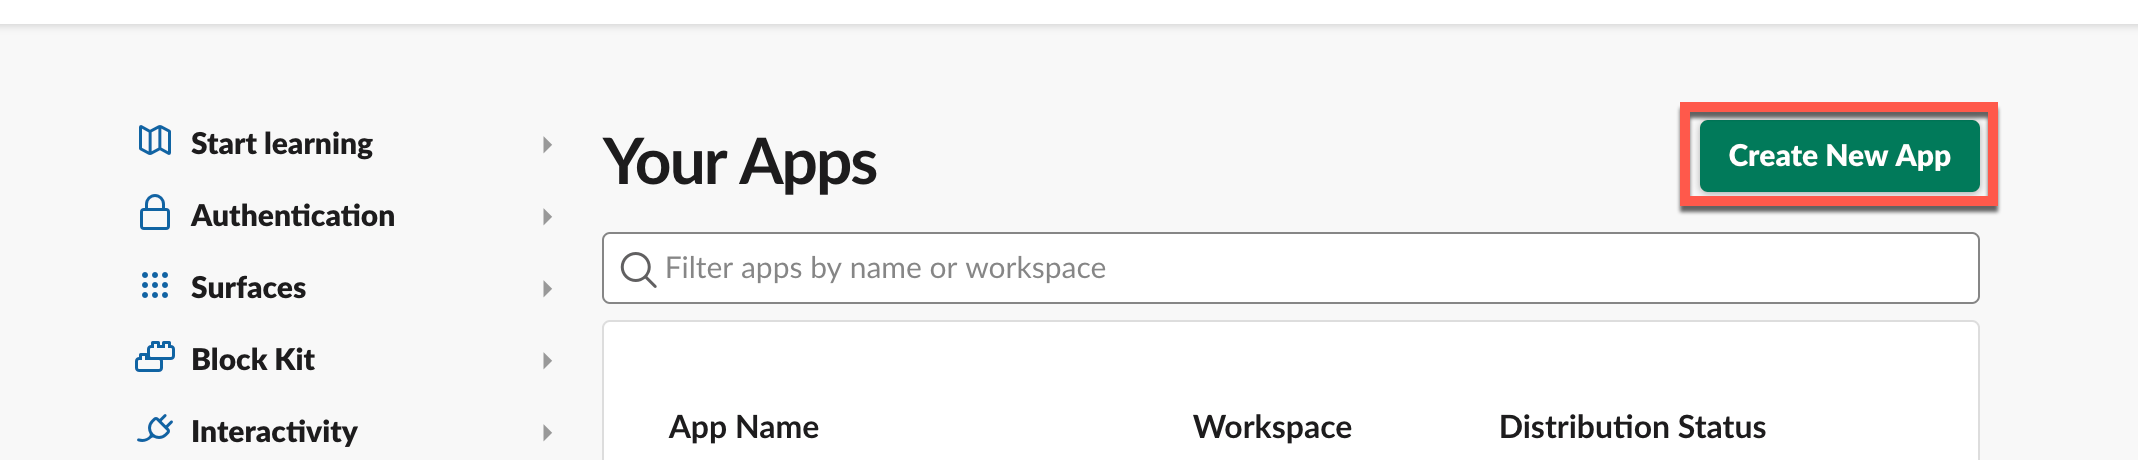
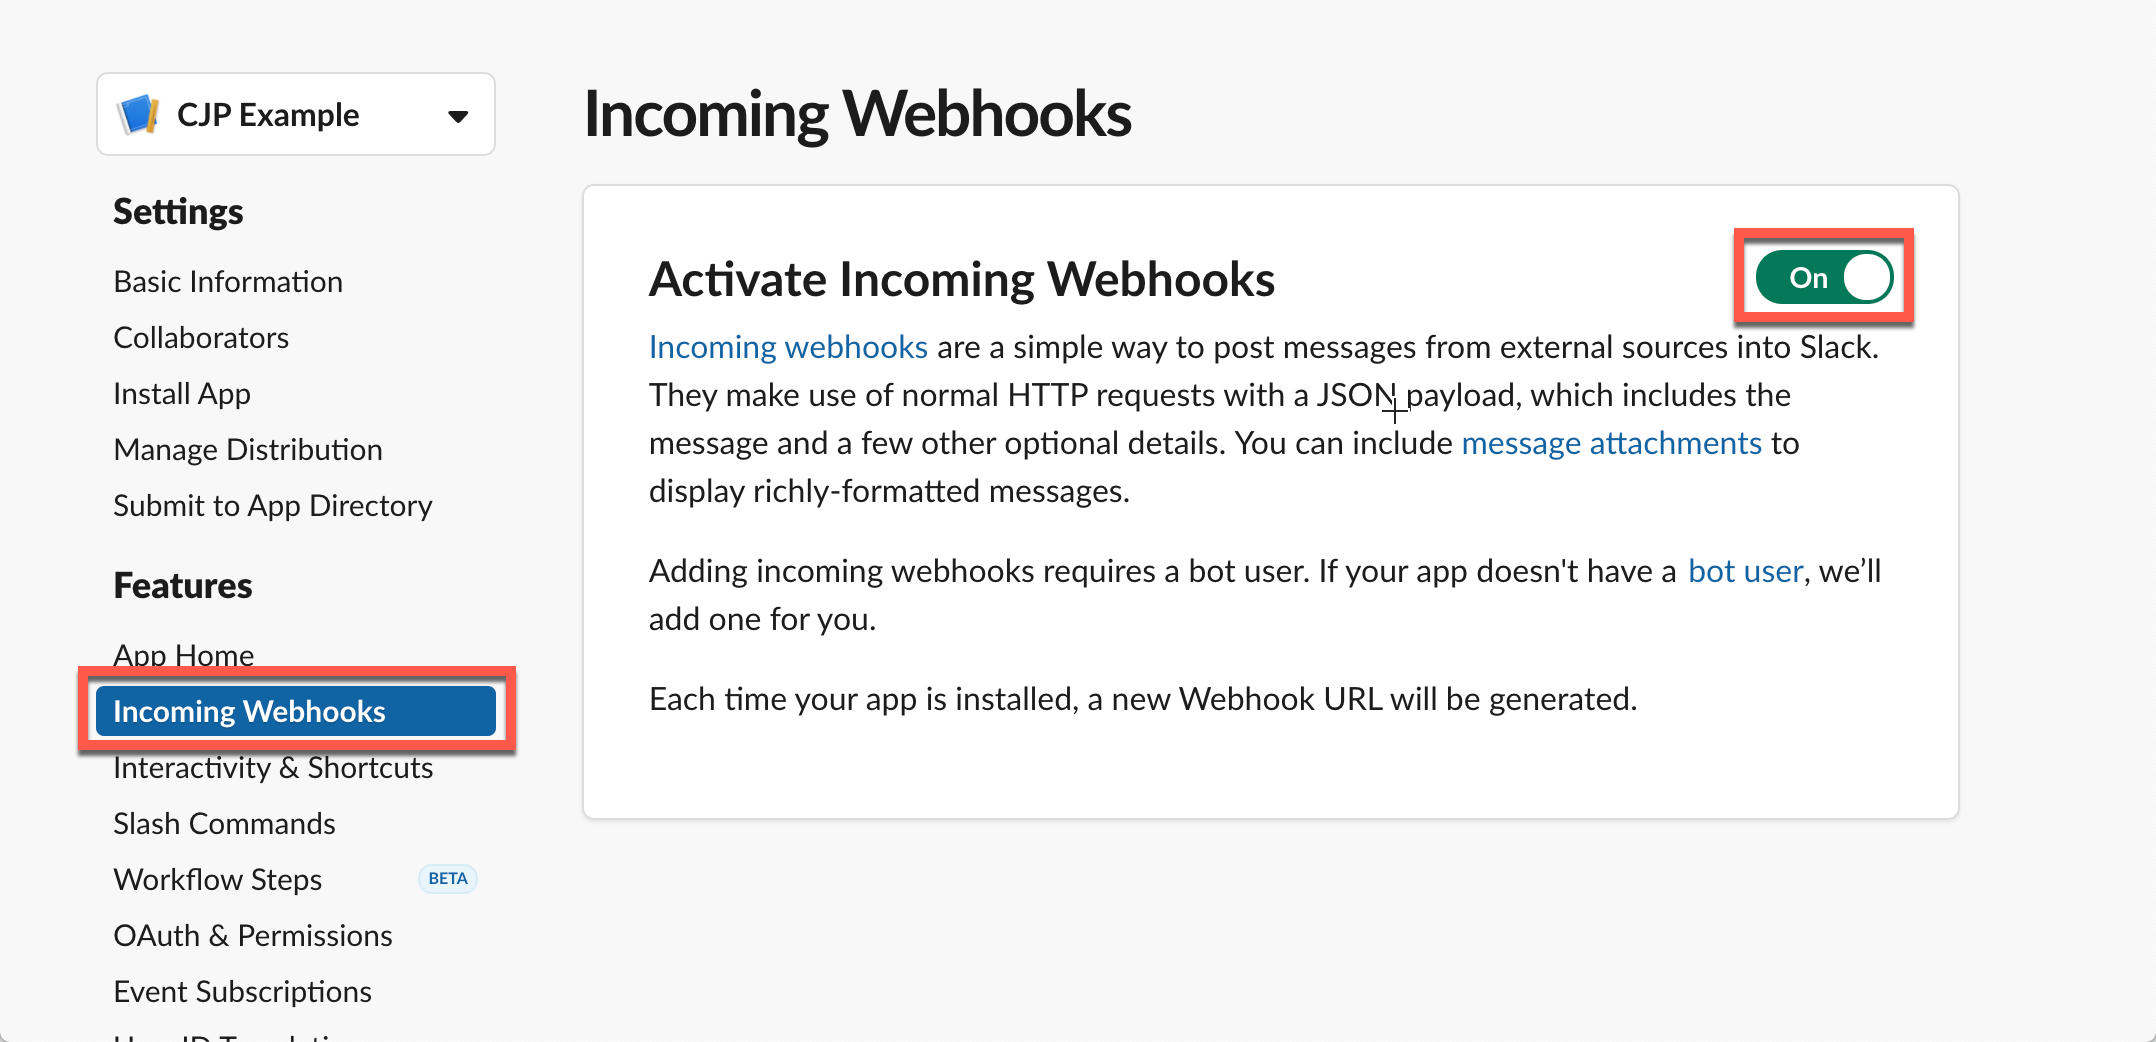
- Activate incoming webhooks for your app:
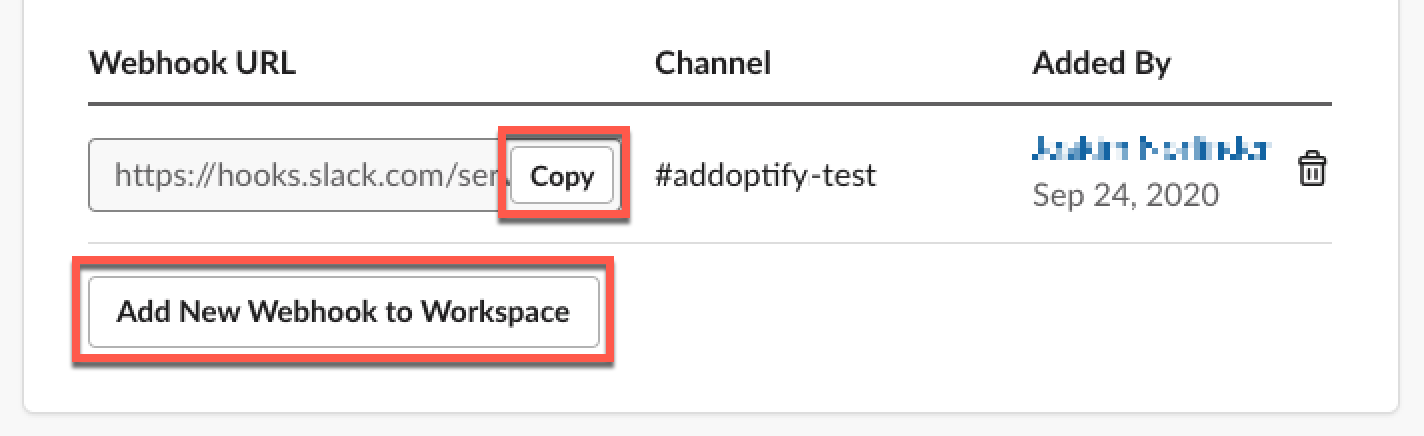
- After activating webhooks, click "Add New Webhook to Workspace" at the bottom of the screen, and in the pop-up, select the Slack channel where you want your message to appear. Copy the resulting URL to your clipboard.
- In your Sugar instance, navigate to the Web Hooks subpanel under the template record (Smart Guide Template, Stage Template, or Activity Template) where you want the web hook to trigger from. Click "Create" (+) in the subpanel.
- Configure the web hook record's fields as follows:
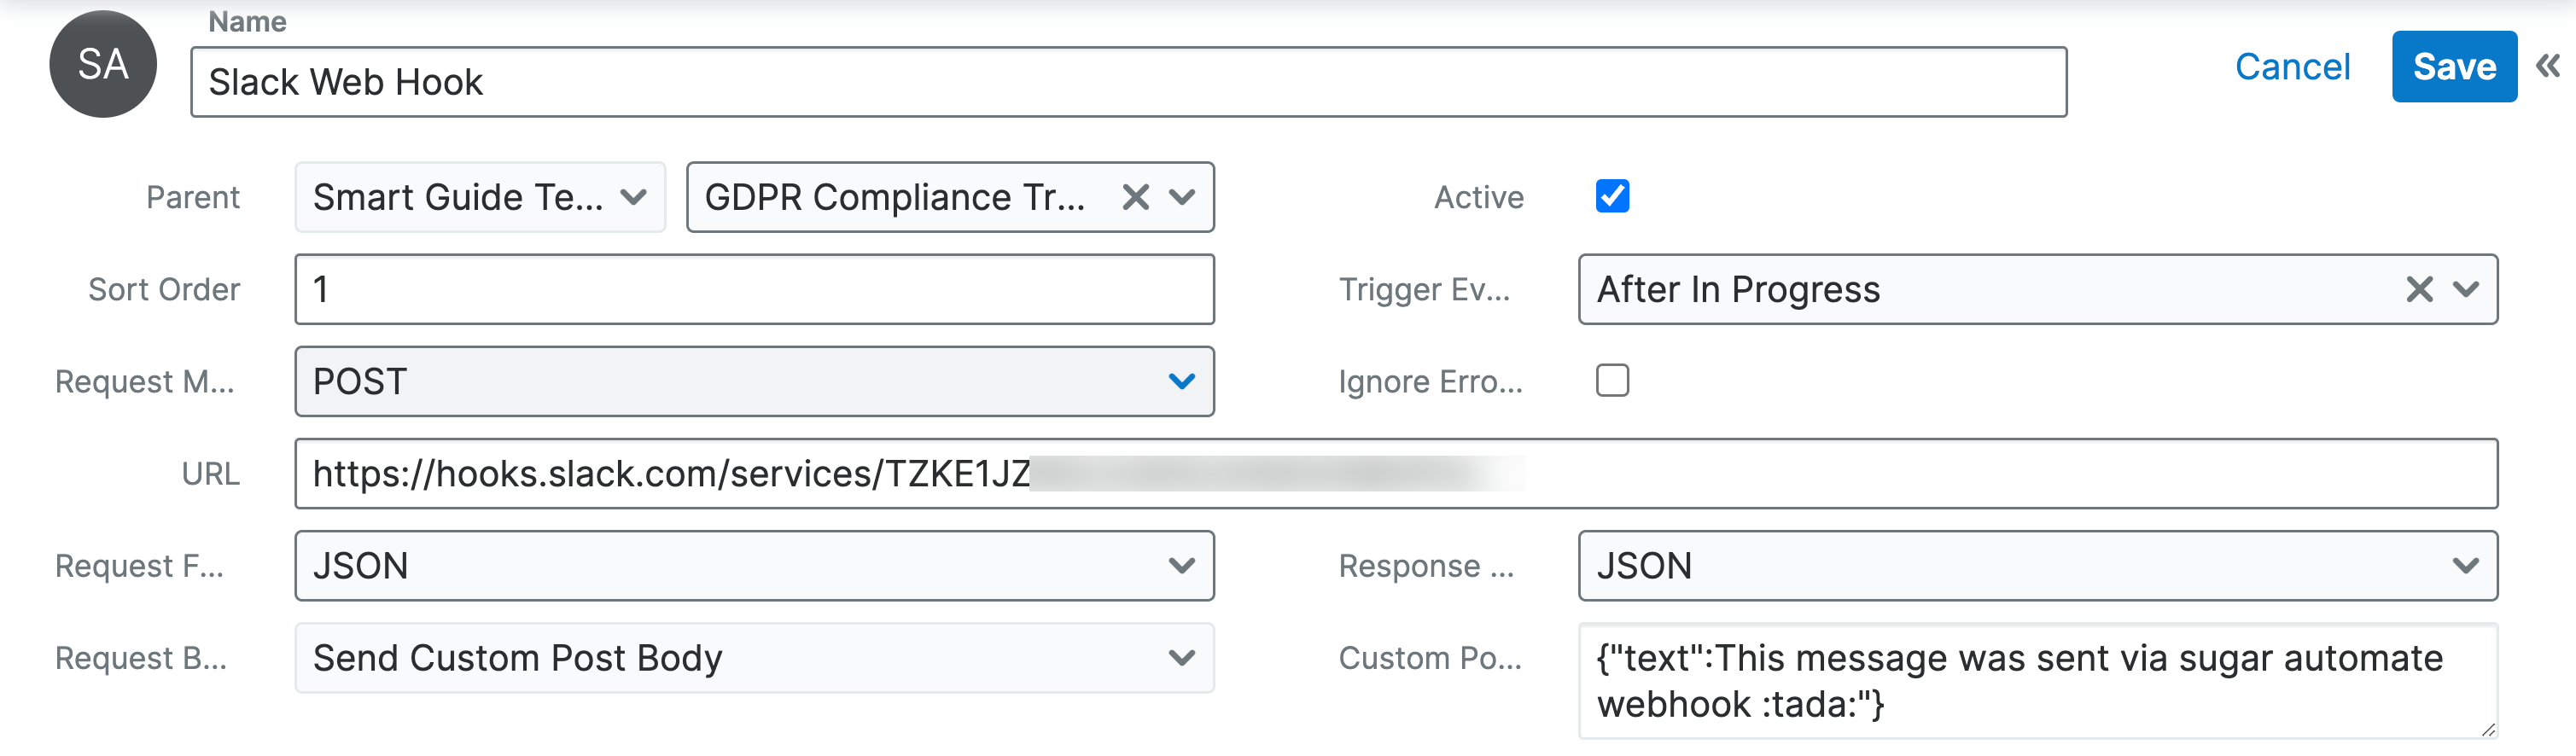
- Request Method: POST
- Trigger Event: For this example, we have selected "After In Progress", meaning that our hook will get triggered after the parent activity's status has been set to "In Progress".
- URL: Enter the Webhook URL that you generated and copied from Slack's API in the earlier step.
- Request Format: Set the format in which the "Post Body" will be sent. It can be a JSON string or a query string. For the Slack example, we will be sending a JSON String.
- Custom Post Body: Enter the post body to send with your request as instructed in the Slack API documentation. For testing, we have entered:
{"text": "This message was sent via Smart Guide webhook:tada:"}
Note: To include variable data from the Smart Guide or its related parent record (e.g., the Smart Guide's name or fields from the account record in an account Smart Guide), refer to the Custom Post Body Variables section of this page.
- Save the web hook record in Sugar with an "Active" status enabled.
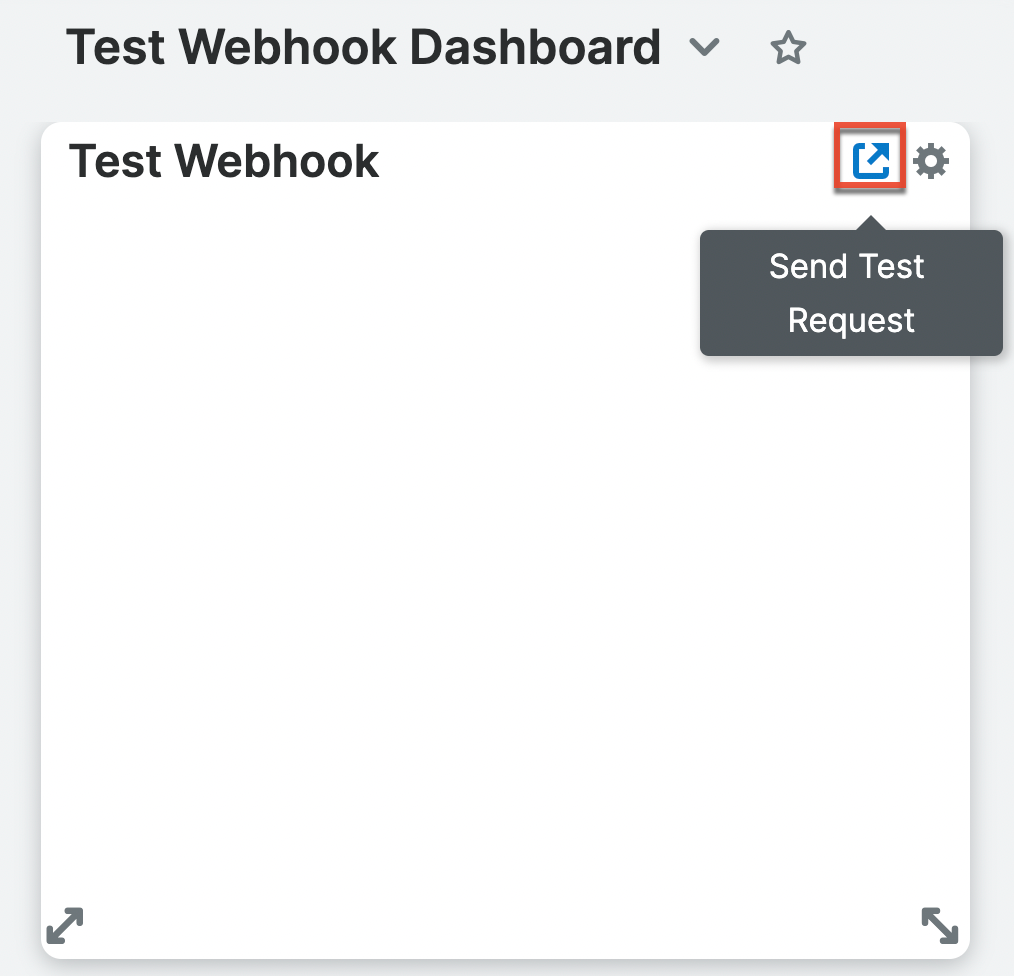
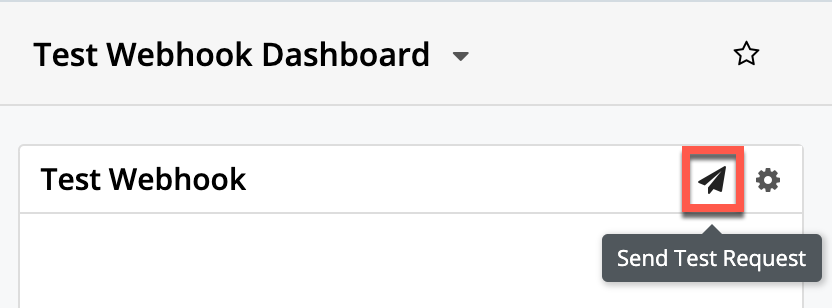
- Test your web hook by clicking on "Send Test Request" in the Test Webhook dashlet in the intelligence pane of the web hook's record view.
To test your web hook in production, start the related Smart Guide in your Sugar instance and set the relevant Smart Guide, stage, or activity to "In Progress". When this web hook triggers, you will see a message in your Slack app.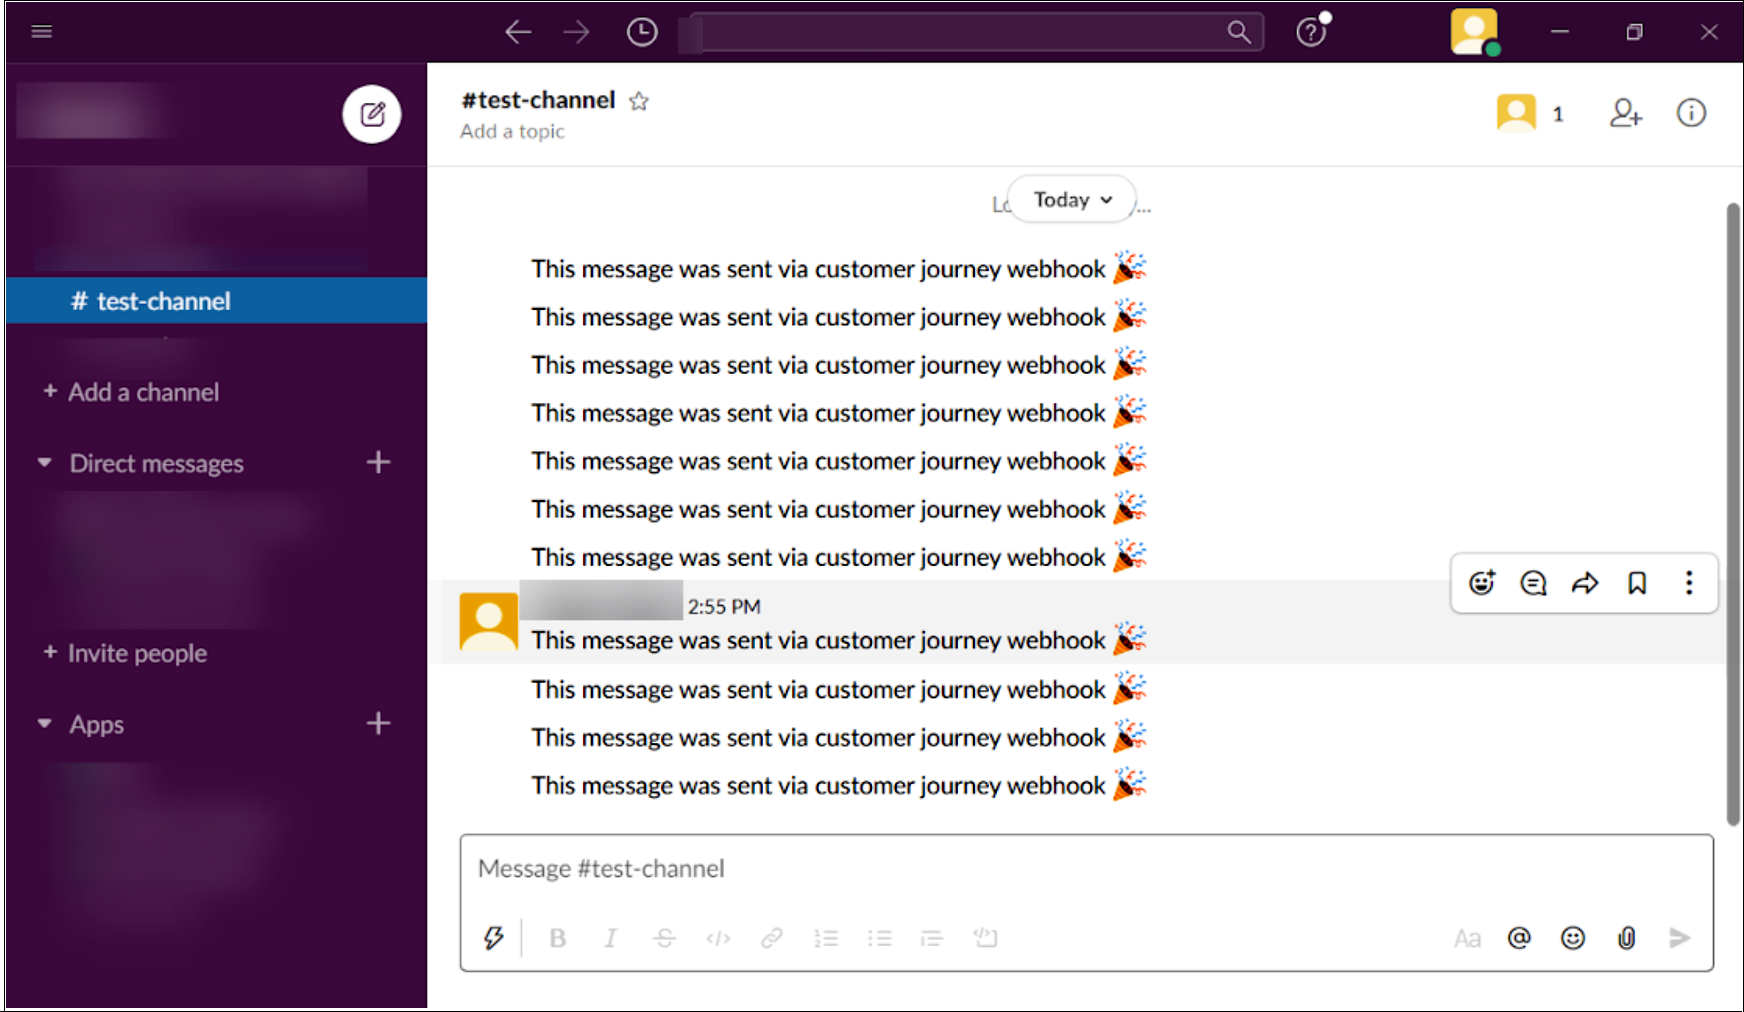
Custom Post Body and URL Variables
When sending a web hook request via POST with a custom post body, you can include field variables from the Smart Guide's parent record (the parent account or contact, for example) and from the Smart Guide, stage, and activities to which the web hook is associated. Additionally, the Current User, Assigned User, and site URL variables can be sent to the external endpoint.
The variables used for web hooks can also be used in the URL field on Smart Guide Activity records to create custom dynamic URLs that reflect data from the parent record. For example, entering the value http://www.google.com/search?q={$parent.name} will take the user who clicks the link from a running Smart Guide to a google search for the name of the parent record.
The following variables are only a few examples but serve to illustrate the format that is used. Please note that relate-type fields cannot be used as variables.
{$site_url}{$current_user.full_name}{$assigned_user.full_name}{$parent.name}{$activity.name}{$stage.name}{$Smart Guide.name}
Test Webhook Dashlet
From the Web Hooks record view, you will see a special Test Webhook Dashboard which contains the Test Webhook dashlet. The Test Webhook dashlet lets you send a test request to validate your work. Simply save the web hook record and then click on "Send Test Request".