Web-To-Lead Forms
Overview
Sugar provides a simple way to allow visitors to your website or other online locations to become leads in your Sugar instance. You can generate a web-to-lead form in Sugar and place the form on an external website. When a visitor to your site completes and submits the form, their information is entered into Sugar as a new lead record. You can use this lead information to generate more opportunities for your organization.
Note: Web-to-Lead forms are not available for Sugar Serve users. For more information on license types and the functionality available for each type, refer to the License Types Matrix documentation.
Creating Web-To-Lead Forms
The Sugar Campaigns module contains a lead form wizard to assist in generating a custom web-to-lead form. Use the following steps to create a web-to-lead form via the Campaigns module:
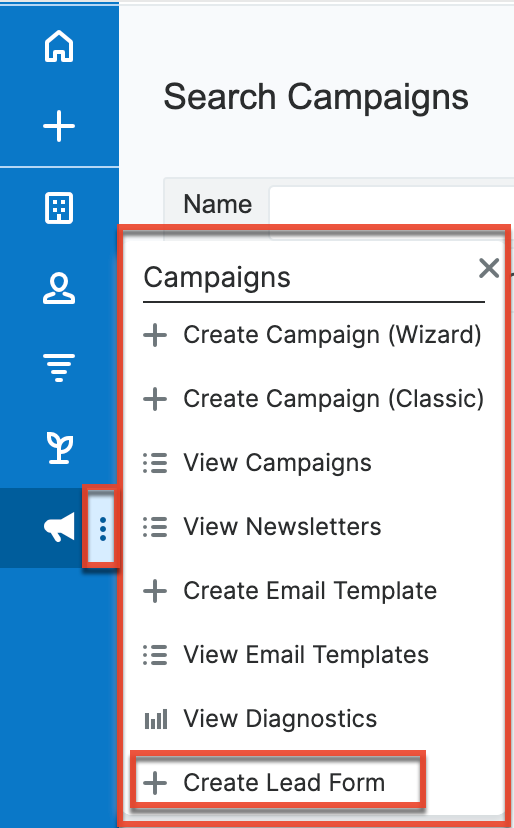
- Click the Campaigns module tab in the navigation bar, then click the three-dots menu and select "Create Lead Form".
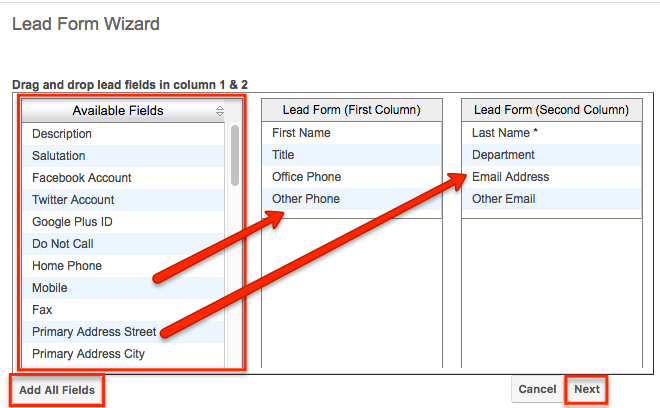
- Click and drag the desired fields from the Available Fields list to the Lead Form (First Column) or Lead Form (Second Column) lists.
Note: You can also choose to add all fields to either column by clicking the Add All Fields button. - All required fields marked with an asterisk must be added to a column on the lead form prior to continuing.
- Once the desired fields have been moved to the appropriate columns, click the Next button to continue.
- Enter appropriate values for the fields on the next page of the wizard:
- Form Header: This will be the title at the top of your form. A generic title has been populated; modify or remove this to suit your needs.
- Form Description: This will be a brief description of the form and will show below the form header, but before the form begins. A generic description has been populated; modify or remove this to suit your needs.
- Submit Button Label: Enter in the label for the button that will be used to complete the form. "Submit" is the default label but you can change this label (e.g., "Sign Up", "Save", "Complete") to best suit your needs. When the visitor clicks this button, the lead's data is first sent to your Sugar instance, and then the visitor is redirected to a new page, which can be configured via the Redirect URL field.
- Post URL: This is the location the form will send the data entered and is defaulted to your instance of Sugar. Enable the "Edit Post URL?" checkbox to edit this field.
Note: If you change this location to be anything other than your Sugar instance then a lead will not be generated when the form is completed. - Redirect URL: This is the location your visitors will be directed to after completing the form. You may enter the location of your corporate website, a custom "Thanks for signing up" page, or any URL to suit your needs.
Note: Leaving this field empty will display a message that says: "Thank You For Your Submission". - Redirect Request Type: Choose how the redirect will be performed. This field is editable only if "Redirect URL" is populated.
- "GET" will send the data that the visitor entered into the form fields as URL parameters. This means that the values can be read by programming done on your website, which may be helpful if you want to create a custom "Thank you" page that displays the answers that the visitor submitted. However, the answers would also be visible to anyone who can see the web history for the person who completes the form. In other words, if your Redirect URL is set to
www.mycompany.biz/thankyou, then the browser will append the form values entered to the URL for each visitor like so:www.mycompany.biz/thankyou?name=Joe%20Smith&phone=412-555-1234&message=Please%20call%20me%20backThis method is not recommended for forms that collect sensitive or personally identifiable information. In addition, the number of characters that can be sent via GET is limited to the length that the URL can handle, so it is not recommended for long forms or those with many text-area fields, which may contain a lot of content. Please research the risks associated with each request method before deciding which is best for your use case. - "POST" will send the form's data through the request body, which is hidden from the casual web viewer. This is generally considered the more secure method when compared with GET.
- "GET" will send the data that the visitor entered into the form fields as URL parameters. This means that the values can be read by programming done on your website, which may be helpful if you want to create a custom "Thank you" page that displays the answers that the visitor submitted. However, the answers would also be visible to anyone who can see the web history for the person who completes the form. In other words, if your Redirect URL is set to
- Include Form Results in Redirect: Choose whether the resulting form values are sent as parameters along with the request to the Redirect URL. If this box is unchecked, you will not receive the form data with the redirect request. This field is editable only if "Redirect URL" is populated.
- Related Campaign: Use the Select button to choose an existing campaign that is related to this lead form. Leads generated from this form will automatically be associated to this campaign.
- Assigned to: Use the Select button to choose the Sugar user that should be assigned to the new lead record when the form is submitted. By default, this field is populated with the current user who is generating the form.
- Team: Enter the name of the team that is allowed access to the leads generated from this form. To change the primary team, either enter the team name here or select the team. By default the primary team selected will be Global. More than one team can be assigned simultaneously. For more information on teams, please refer to the Team Management documentation.
- Form Footer: The form footer displays the text entered here below the form inputs, but before the submit button.
- All required fields are marked with a red asterisk and must be completed prior to continuing.
- Once the necessary information is entered, click "Generate Form".
- Sugar will generate the HTML needed for your form and show you a preview in a TinyMCE editor. If you desire, you can add additional text and images as well as change the layout of the form per your preference. You can click the HTML button to make advanced customizations and edit the generated HTML code.
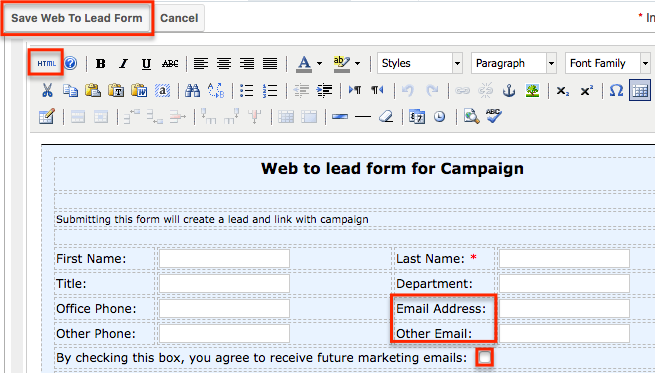
- Once any additional changes have been completed, click "Save Web To Lead Form".
Including Email Addresses on Forms
If the lead form contains any email address fields, an opt-in checkbox field (i.e., By checking this box, you agree to receive future marketing emails) will appear on the form which allows visitors to explicitly indicate that they wish to receive marketing emails. Please keep in mind that when the opt-in checkbox is enabled, this setting will apply to all email addresses entered on the form. In addition, if the global opt-out setting has been enabled via Admin > System Email Settings and the visitor enables the opt-in checkbox on the lead form, the opt-in setting will take precedence over the global opt-out setting when the lead record is created in Sugar. For more information about email address opt-outs, refer to the Emails documentation.
Saving Web-To-Lead Forms
Since your web-to-lead form will be hosted outside of Sugar, you will need to save the generated HTML to a different hosting location. Your generated form will not be saved or accessible through Sugar after leaving this screen. If you need to add or remove fields to your form after generation, you will have to go through the steps to generate a new form.
Use the following steps to save your generated web-to-lead form:
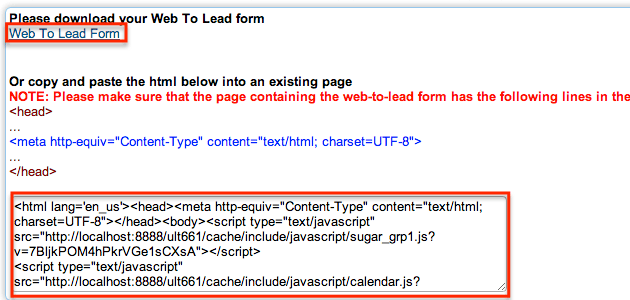
- You may download the generated HTML file by clicking on the Web to Lead Form link.
- This will download the HTML file to your local computer. Simply transfer this file to the final hosting destination.
- Alternatively, you may copy the HTML directly out of the text box on this screen and add it to a preexisting HTML file of your choosing.
- Once the web-to-lead form is accessible to your potential customers, include a link to the form on your corporate website, social media websites, or add as a tracker URL in a campaign. For more information regarding adding tracker URLs to a campaign, please refer to the Campaigns documentation.
Lead Generation
Once a web-to-lead form is submitted, the data entered on the form becomes a lead record in your Sugar instance. Leads can be converted to contacts, accounts, and opportunities. For more information on the Leads module, please refer to the Leads documentation.
The campaign selected during form generation is linked to the created lead via the Campaign field under the More Information panel as well as the Campaigns subpanel.
More Information panel: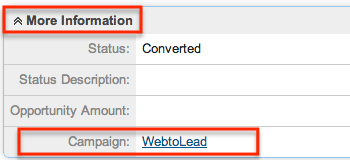
Campaigns subpanel: 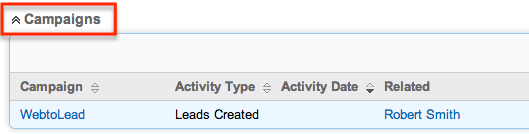
Leads created from the web-to-lead form can also be tracked on the Campaigns status page via the status chart and the Leads Created subpanel.
Status chart:
Leads Created subpanel: 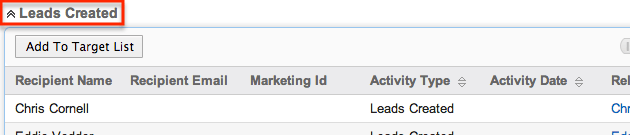
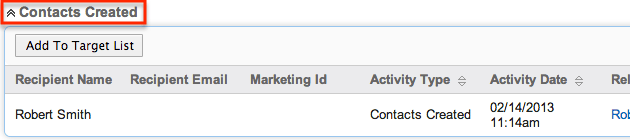
If a lead that was generated from a web-to-lead form is converted to a contact, this will be shown in the Campaigns status page as well: 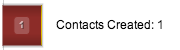
For more information regarding the Campaigns status page, please refer to the Viewing Campaign Status section in the Campaigns documentation.