Processes
Overview
Sugar's Processes module is the user-facing portal to SugarBPM™, Sugar's business process management tool that allows administrators to streamline everyday business processes by managing approvals, sales processes, call triaging, and more. A business process is a set of logically related tasks that are performed in order to achieve an organizational goal. It presents all of the tasks that must be completed in a simplified and streamlined format.
SugarBPM empowers Sugar administrators to automate vital business processes for their organization. Some examples of business processes that can be automated using SugarBPM include invoice approvals, lead routing, customer service case routing, and automated reminders and escalations. This documentation will cover how to use the Processes module, as well as the various actions and options available from within the module. For more information on how administrators can create and configure processes, please refer to the SugarBPM documentation in the Administration Guide.
For instructions concerning views and actions which are common across most Sugar modules, such as creating, editing, and deleting quote records, please refer to the Working With Sugar Modules section of this page.
Process Fields
The Processes module contains the following fields. Please note that administrators and users with developer-level role access cannot alter, add, or remove fields via Studio as they typically can with other Sugar modules.
| Field | Description |
| Assigned To | The user assigned to the record that requires approval or routing. |
| Date Modified | The date and time that the process definition's Activity element was initiated. |
| Date Created | The date and time that the process definition's Activity element was initiated. |
| Integration Sync ID | The sync key field used by external integrations to identify Sugar records in the external application. See the Integrate REST API endpoints in the Developer Guide for more details on how to use this field. Note: This field is not visible in the user interface. |
| Process Number | A unique, auto-increment number that is used to identify this process. Note: Process numbers are generated in sequential order as new processes are triggered. |
| Process Definition Name | The name of the process definition record that generated this process; For more information about Process Definitions, please refer to the Process Definitions documentation in the Administration Guide. |
| Process Name | The name given to the process definition's Activity element by the process owner. |
| Process User | The user responsible for executing this process' Activity element. |
| Process Owner | The user assigned to the process definition record that generated this process. |
| Record Name | The name or title of the record that requires approval or routing. |
Viewing Processes
The Processes module is the only SugarBPM module that is visible to regular users. From the Processes module list view, you can view running processes if there is anything for you to approve or review. You can view those same processes via the Processes dashlet in addition to any self-service processes waiting to be claimed in the Self Service Processes tab.
Viewing Via Dashlet
All users who may be engaged in a process should place the Processes dashlet on their home screens. Process users will not receive an email notification when an activity is ready for them (unless the administrator has explicitly configured this within the process definition). The dashlet makes it easy for users to know when it is their turn to participate in a process and to take the appropriate action.
Note: Users (including administrators) will see only the processes that immediately require their attention in the Processes dashlet.
To add the Processes dashlet, please refer to the Adding Dashlets section of the Dashboards and Dashlets documentation, choosing "Processes" from the Add a Dashlet page.
After saving the dashlet and its containing dashboard, the dashlet will offer several Processes-specific filtering tools: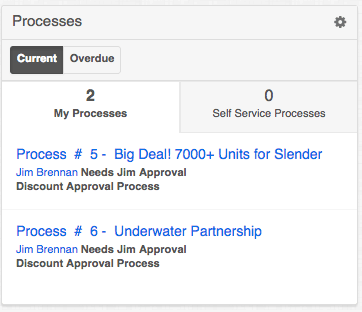
- Current: Click on this button to view processes that are running within the expected timeframe.
- Overdue: Click on this button to view processes that have a due date in the past. The label "Overdue" and the due date will be displayed adjacent to the Process description.
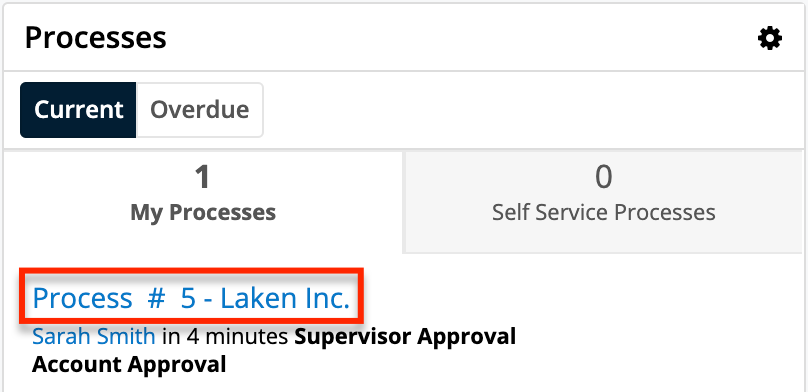
- My Processes: Enable this tab to view only the running processes upon which the logged-in user must act. To execute the Process, click on the name of the process. Please note that admin users can not see processes running for other users via the dashlet. To access the system's exhaustive list of running and completed processes, please refer to the Process Management section of the Administration Guide.
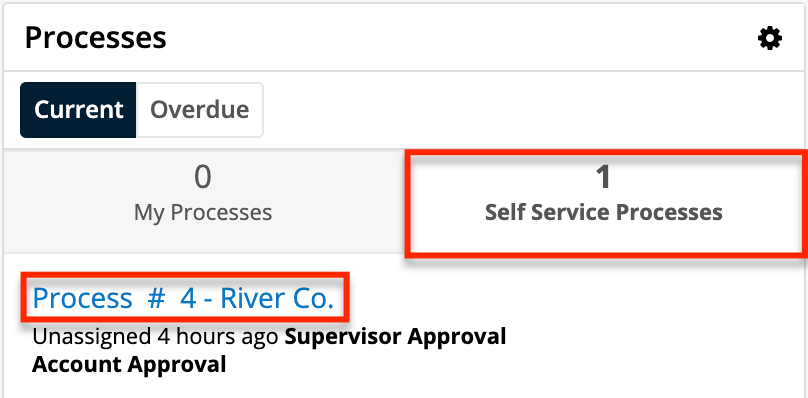
- Self Service Processes: Enable this tab to view only the running processes in the queue to be claimed by a user. Self-Service processes are configured inside the User Activity element settings of the related process definition.
- Process Description: Running processes are displayed in list view format with descriptive fields including the unique process number, the name of the affected Sugar record, the process title, the responsible user's name, and the label of the relevant process step.
- Due Date: When a due date exists it will appear adjacent to the process description.
To execute a process from the Processes dashlet, please refer to the Executing Processes section of this page.
Viewing Via List View
The Processes list view displays all running processes that require the logged-in user to take action (e.g., approve, reject, etc.) and that meet the current search criteria. Users will not see processes for any other user – even if the other user is a direct report or a member of the same team. To access the list view, simply click the Processes module tab. To view or execute one of the process activities from the list view, select "Show Process" from the record's list view Actions menu.
Executing Processes
When a running process requires action from a user, that user will see the process in their Processes dashlet and Processes module list view. At these moments within a flow, a user needs to decide if a circumstance is approved or rejected or review and/or edit a Sugar record. This decision is formally indicated by executing the process. The following sections explain how to execute the different process activities in Sugar.
Approval Processes
An approval process is a moment within a flow where a user must decide if a circumstance is approved or rejected. When an approval process requires action from a user, that user will see the process in their Processes dashlet and Processes module list view. The user will formally indicate their approval by executing the process.
As an example, an organization may require a different manager's approval depending on the discount total. The following image portrays how a Sugar process could automate this approval:
All of the steps in the above process are automated except for two approval steps: "Needs Jim Approval" and "Needs Chris Approval". When the automated process reaches either of these steps, Jim or Chris will see a line item in his Processes dashlet and list view. The following two sections explain what a running approval process looks like and how to execute the approval.
Approval Process Actions Menu
When a process requires an approve or reject response, the process' record view will display the record that is pending approval.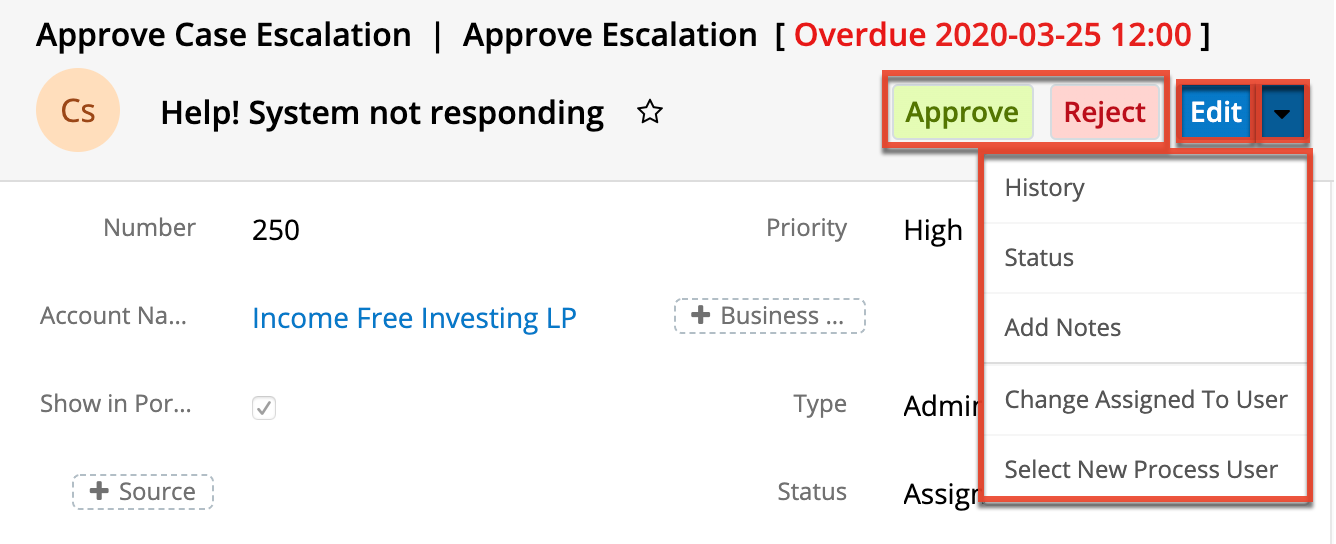
Below the process details are the process' approval buttons and process Actions menu, which allow you to perform the following operations:
| Menu Item | Description |
| Approve | Allow the process to continue to the next step along the approval path. |
| Reject | Allow the process to continue to the next step along the rejection path. |
| Edit | Edit the fields on the record to be approved. |
| History | Display the entire time-stamped history of all transitions, user engagements, and automated occurrences for this process. |
| Status | Display an image of this process' overall flow including the approval and rejection paths for this approval step. |
| Add Notes | Add notes for people who will engage with the process later and/or read notes left by other users before you. |
| Change Assigned To User | Choose a new Assigned To user for the Sugar record. Note: This option must be enabled by the administrator. |
| Select New Process User | Choose a new user to execute this process. Note: This option must be enabled by the administrator. |
Executing an Approval Process
Follow the steps below to execute an approval process:
- Click on the hyperlinked process name in your Processes dashlet. Please note that the dashlet will not differentiate between Approval processes and Routed processes. The process type will become apparent on the next screen.
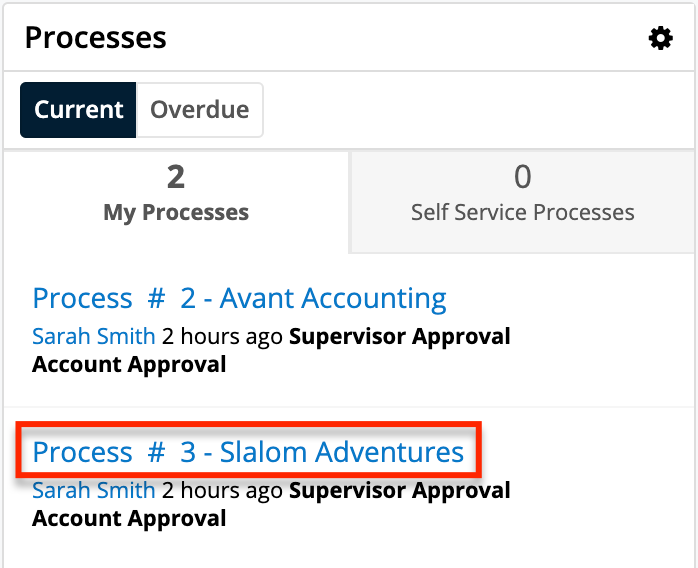
Alternatively, navigate to Processes list view and choose "Show Process" from the Actions menu of the record: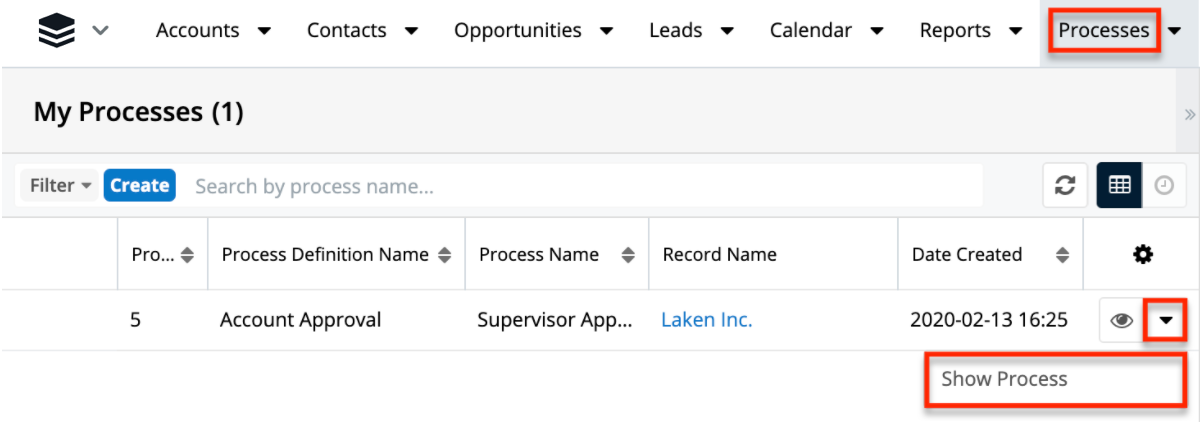
- The process landing page is the record view of the affected Sugar record. Expand the record's Actions menu to browse the available process options. For an overview of Processes-specific features and options that are available here, please refer to the Approval Process Actions Menu section of this page. You can review the user notes and history or, if enabled, choose to delegate this process step to another user.
- If desired or required by the process, edit any fields on the Sugar record by clicking the Edit button.
- Finally, click on either "Approve" or "Reject" to execute the process and return to your dashboard, where the executed process will no longer appear in the Processes dashlet.
Routed Processes
The other user activity that a process may require is to simply review and/or edit a Sugar record. For example, a high-value quote record may not require approval, but the executive team should be able to review the quote for capacity-planning purposes. In this situation, the process definition can be configured to route the process flow through the members of the executive team without requiring a conditional response. The following image portrays how a Sugar process will automate this procedure: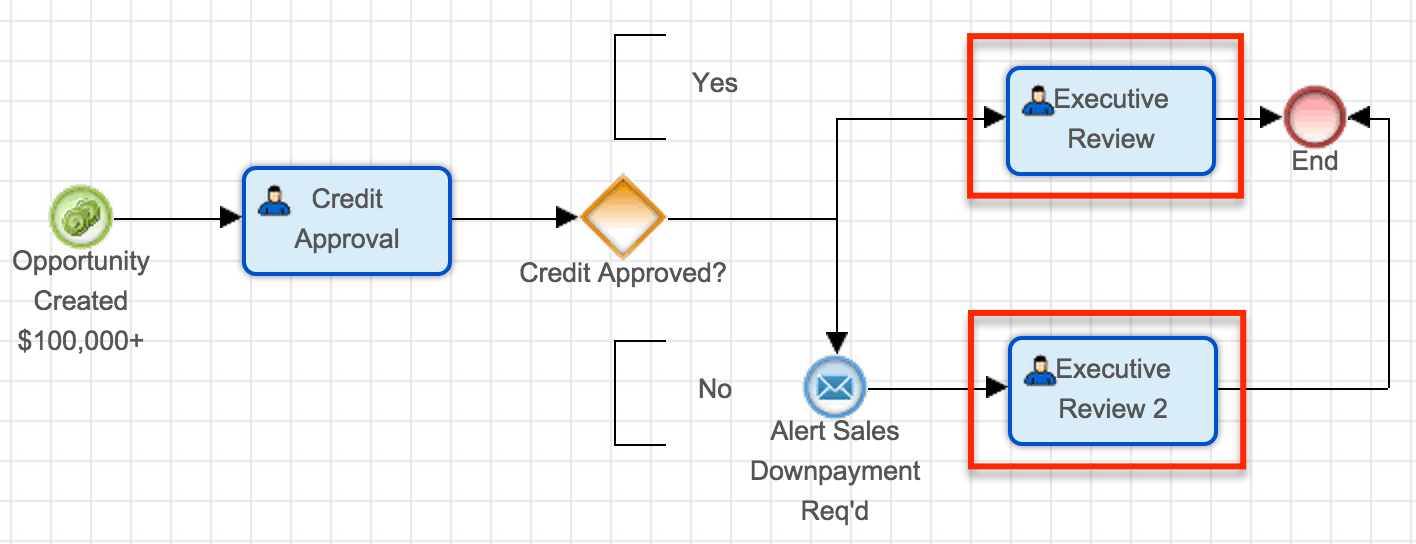
Routed Process Actions Menu
When a process routes a record to a user to review and/or edit, the process' record view will display the record that is pending review.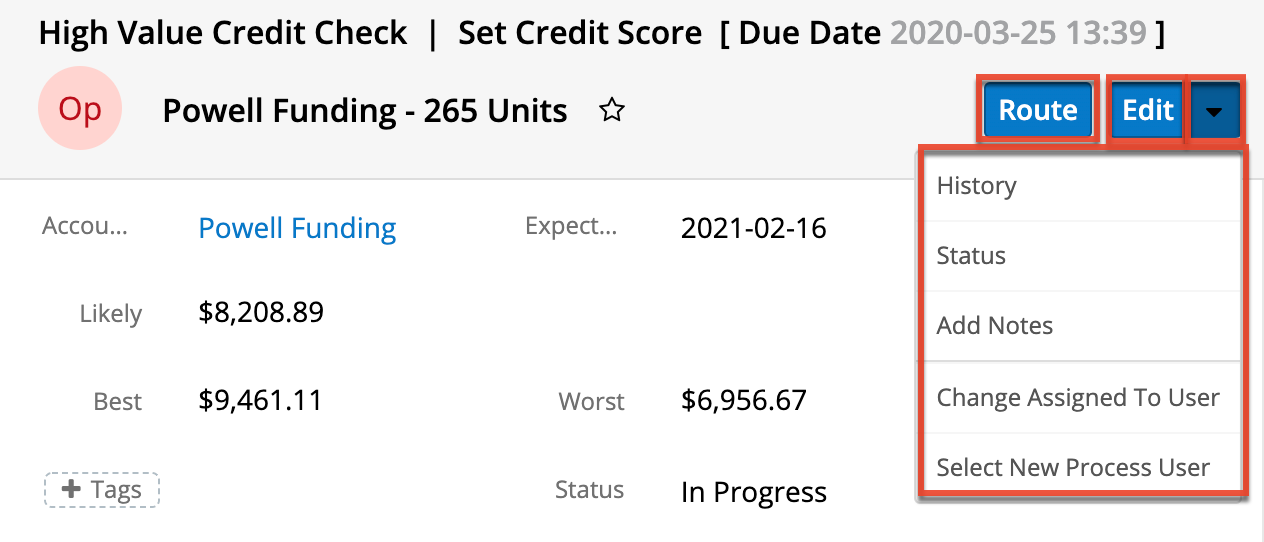
Below the process details are the process' Route button and Actions menu, which allow you to perform the following operations:
| Menu Item | Description |
| Route | Allow the process to continue to the next step. |
| Edit | Edit the fields on the record to be approved. |
| History | Opens a popup window that displays the entire time-stamped history of all transitions, user engagements, and automated occurrences for this process. |
| Status | Opens a popup window that displays an image of this process' overall flow including the approval and rejection paths for this approval step. |
| Add Notes | Opens a popup window where you can add notes for people who will engage with the process later or read notes left by other users before you. |
| Change Assigned To User | Choose a new Assigned To user for the Sugar record. Note: This option must be enabled by the administrator. |
| Select New Process User | Choose a new user to execute this process. Note: This option must be enabled by the administrator. |
Executing a Routed Process
Follow these steps to execute a process that has been routed to you:
- Click on the hyperlinked process name in your Processes dashlet. Please note that the dashlet will not differentiate between Approval processes and Routed processes. The process type will become apparent on the next screen.
Alternatively, navigate to Processes list view and choose "Show Process" from the Actions menu of the record: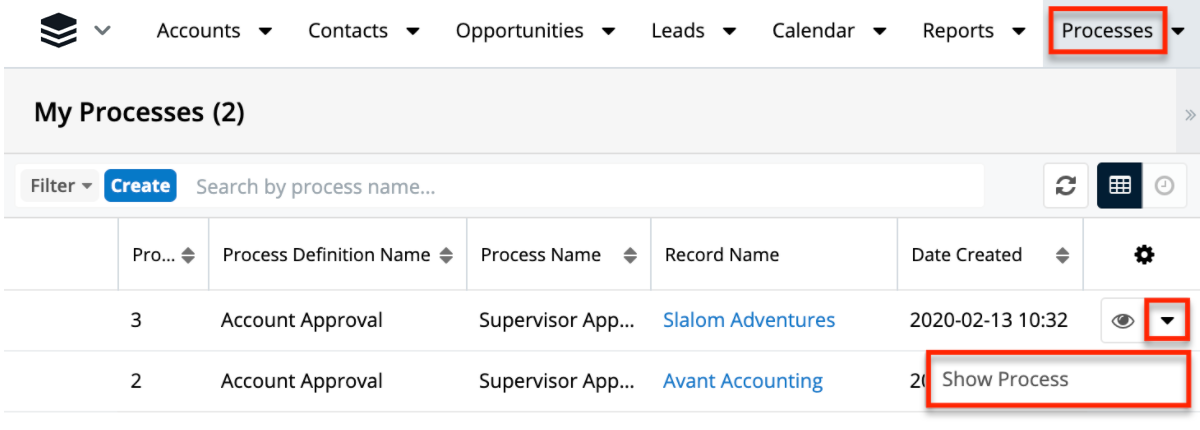
- The process landing page is the record view of the routed Sugar record. Expand the record's Actions menu to browse the available process options. For an overview of process-specific features and options that are available here, please refer to the Approval Process Actions Menu section of this page.
- When a flow has been routed to you for review, the only required action is to acknowledge receipt. However, you may first choose to edit the affected record. Review the details of the Sugar record and inspect the process notes for any critical information that your colleagues may have shared. For information about viewing process Notes, please refer to the Viewing Process Notes section of this page.
- When you have completed making edits and reviewing the record, click "Route" to complete the process. This will redirect you to your dashboard, where the executed process will no longer be visible in your Processes dashlet.
Self-Service Processes
Some user-facing processes will not have a designated process owner. Instead, users will be empowered to claim responsibility for them. These processes will appear in the Self Service Processes tab of the Processes dashlet. Self-service processes may require either an approval/rejection response or review of a routed action.
Self-Service Process Actions Menu
Self-service processes may require either an approval/rejection response or review of a routed record, but first, a user must claim the process. When a user claims a self-service process, the process' record view will display the record that is waiting to be claimed.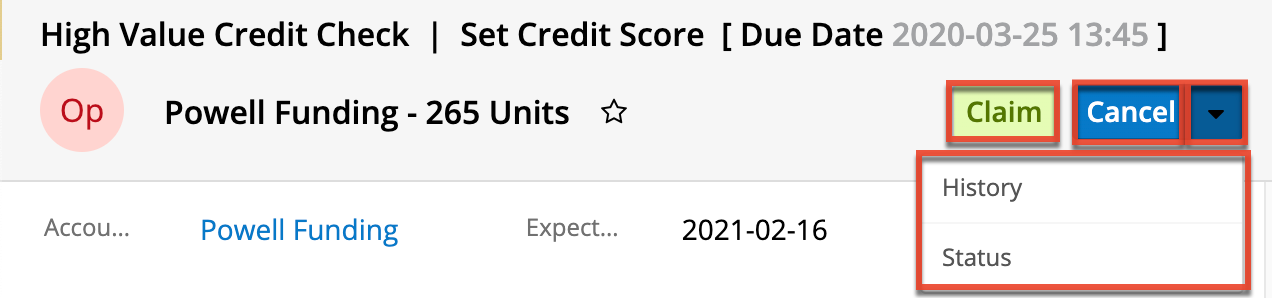
Below the process details are the process' Claim button and Actions menu, which allow you to perform the following operations:
| Menu Item | Description |
| Claim | Volunteer to execute this process and remove it from view of other team members. The process can be immediately executed after claiming it, or you can navigate away and find the process later in the My Processes tab of your Processes dashlet. |
| Cancel | Navigate back to the home page without claiming this process. |
| History | Opens a popup window that displays the entire time-stamped history of all transitions, user engagements, and automated occurrences for this process. |
| Status | Opens a popup window that displays an image of this process' overall flow including the approval and rejection paths for this approval step. |
Claiming a Self-Service Process
Follow these steps to claim and then execute a self-service process:
- Click on the hyperlinked process name in the Self Service Processes tab of your Processes dashlet.
- The process landing page is the record view of the affected Sugar record. Expand the record's Actions menu to browse the available process options. For an overview of process-specific features and options that are available here, please refer to the Self-Service Process Actions Menu section of this page.
- Click on "Claim" to indicate your intention to execute this process and remove it from the view of other team members. After clicking the Claim button, the page will reload and expose the Approve/Reject or Route buttons, depending on what type of process activity has been configured. The process can be immediately executed after claiming it, or you can navigate away and find the process later in the My Processes tab of your Processes dashlet.
- Execute the process as explained in either the Executing Approval Processes or Executing Routed Processes sections of this page.
Choosing a New Process User
When a process is routed to you for review or approval, it may be possible to designate a new user to execute the process. The administrator can enable or disable this option on each process definition, so it may be possible to do this for one process but not another. If the option is enabled, "Select New Process User" will be available in the Actions menu on the process record view: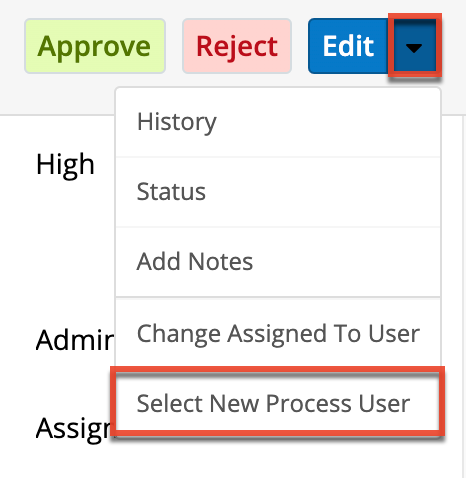
Follow these steps to reassign a process:
- Click on the hyperlinked process name in your Processes dashlet. Please note that the dashlet will not differentiate between Approval processes and Routed processes. The process type will become apparent on the next screen.
Alternatively, navigate to Processes list view and choose "Show Process" from the Actions menu of the record: - The process landing page is the record view of the affected Sugar record.
Note: Legacy user-interface modules will display the record's edit view. - Click on the triangle next to the Edit button to reveal the Actions menu. Click on "Select New Process User".
Note: If "Select New Process User" is not displayed, then the administrator has not enabled reassignments for this type of process. Please contact the administrator and ask them to reassign the process for you. - The "Select New Process User" window will appear.
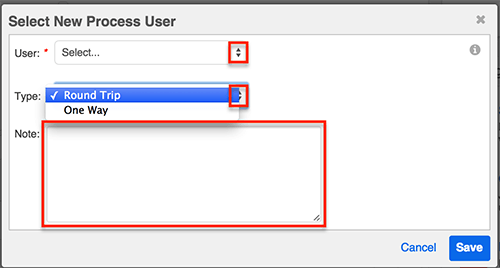
There are three options:- User: Choose a user to complete this step of the process. The administrator will have specified one Sugar team from which you may choose any member.
- Type: Choose a reassignment method:
- Round Trip: Choose "Round Trip" to make the process route back to you when the new user has completed this step.
- One Way: Choose "One-Way" to direct the process to a new user, and then have it continue to its next step without routing back to you.
- Note: As a best practice, add a note explaining why you are choosing a new user to execute this process. The new user will see your note when she clicks on "View Notes".
- Click on "Save" to be redirected to your dashboard where the reassigned process will no longer be visible on your Processes dashlet.
Choosing a New Assigned To User
When a process is routed to you for review or approval, it may be possible to choose a new assigned user for the affected Sugar record without affecting the flow of the process. The administrator can enable or disable this option for each process definition, so it may be possible to reassign the Sugar record for one process but not another. If the option is enabled, "Change Assigned To User" will be available in the Actions menu on the process record view: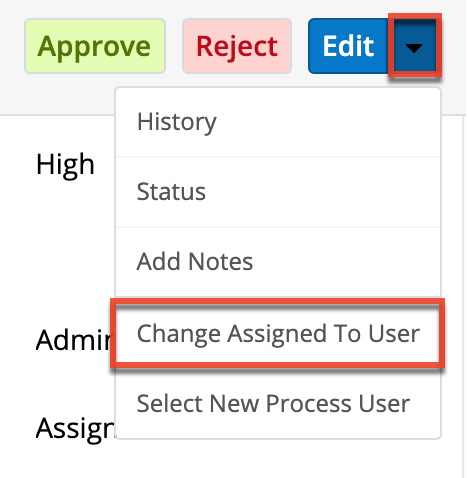
Follow these steps to designate a new assigned user:
- Click on the hyperlinked process name in your Processes dashlet. Please note that the dashlet will not differentiate between Approval processes and Routed processes. The process type will become apparent on the next screen.
Alternatively, navigate to Processes list view and choose "Show Process" from the Actions menu of the record: - The process landing page is the record view of the affected Sugar record.
Note: Legacy user-interface modules will display the record's edit view. - Click on the triangle next to the Edit button to reveal the Actions menu. Click on "Change Assigned To User".
Note: If "Change Assigned To User" is not displayed, then the administrator has not enabled reassignments for this type of process. Please contact the administrator and ask them to reassign it for you. - The "Change Assigned To User" window will appear:
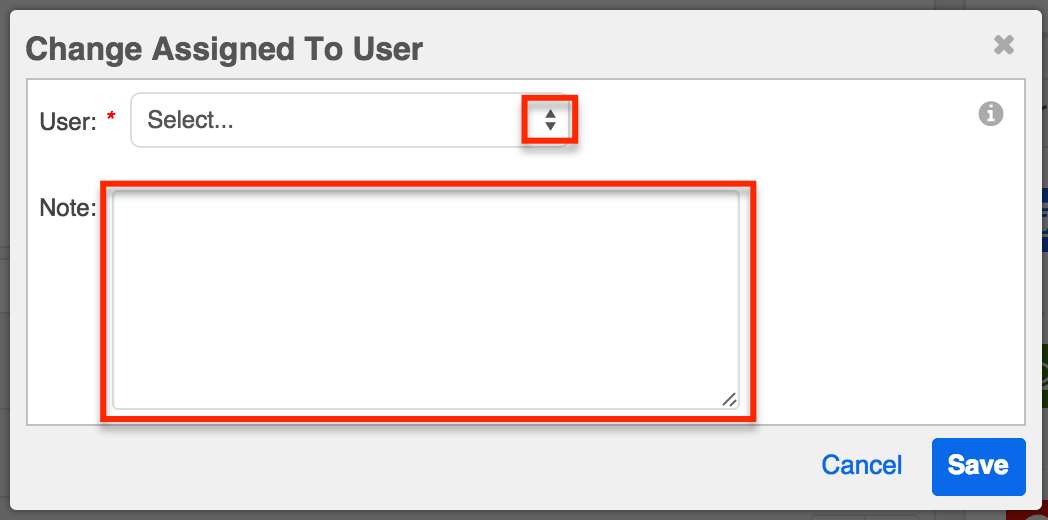
There are two options:- User: The user chosen here will become the "Assigned To" user of the related Sugar record. The administrator will have specified a Sugar team from which you may choose any member. No other users will be displayed in the User dropdown.
- Note: As a best practice, insert an explanation of why you are choosing a new assigned user. The next process user will see your note when he or she clicks on "View Notes".
- Click on "Save" to update the Sugar record. The page will reload to reflect the change. You can now execute the process as explained in either the Executing Approval Processes or Executing Routed Processes sections of this page.
Viewing Details About a Running Process
When executing a running process, there are three options available that will help you gain valuable insight into the past, present, and future state of the process: History, Show Notes, Show Status. These options are accessible via the Actions menu on the process record view. Click on the triangle to the right of the edit button to expand the Actions menu: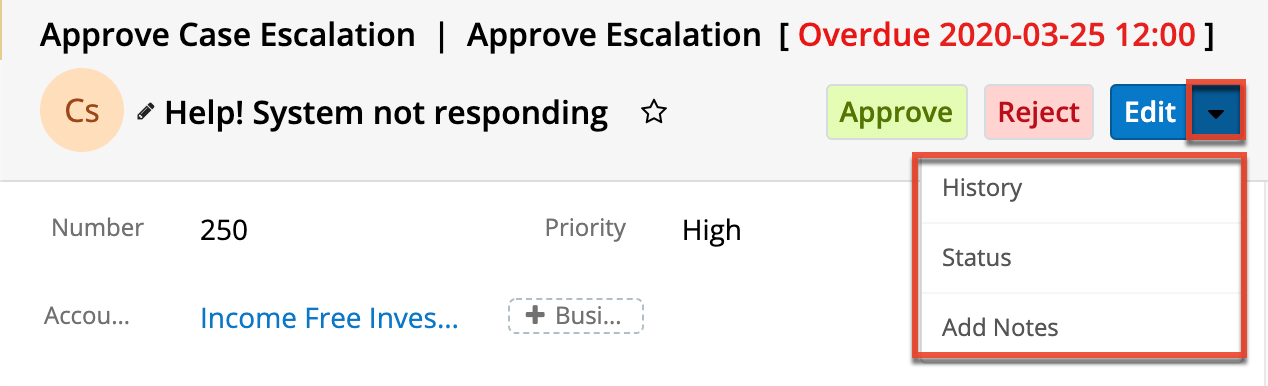
In processes targeting legacy user-interface modules, these options are represented by icons in the upper right area of the process record view: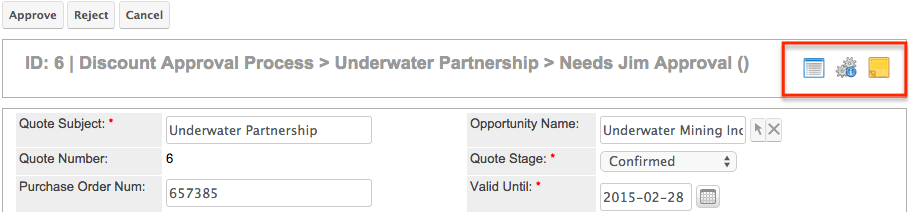
The three icons on a legacy record view represent the following actions:
| Action | Icon | Description |
| Show History | View the entire time-stamped history of all process transitions, user engagements, and automated occurrences that were executed by the SugarBPM engine. | |
| Show Notes | Read messages from users who have already engaged in the process and send messages to users who will engage in the process later. | |
| Show Status | Reveal an image of the process' visual design layout in a pop-up window. The image will reveal key information regarding the stages that have already been completed, the current stage of the process, and the stages that have yet to execute. |
Viewing Process History
All process records retain a timeline of events that have occurred throughout the process. This timeline can be displayed in a popup window by the process user or by a SugarBPM administrator.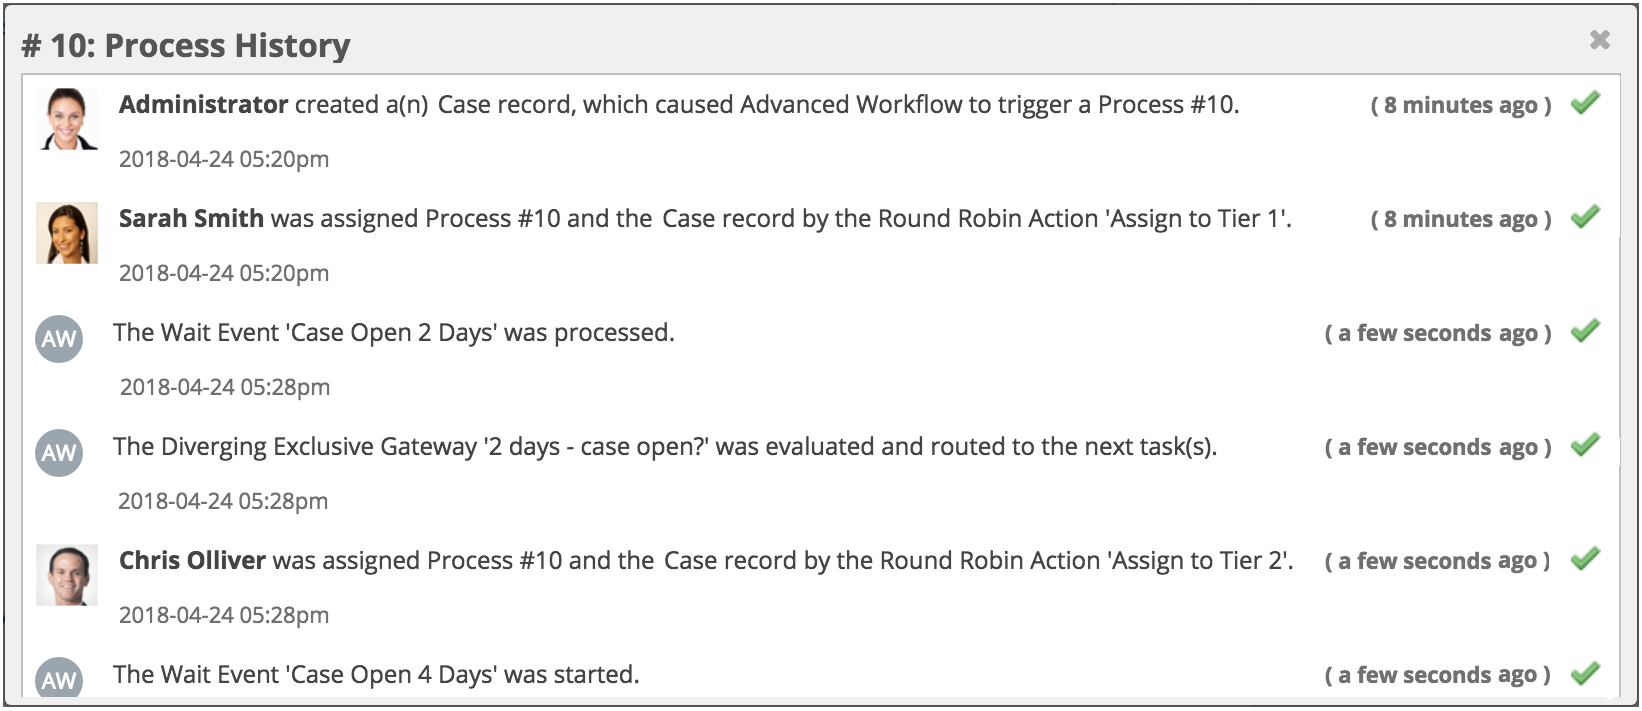
To review the entire time-stamped history of all transitions, user engagements, and automated occurrences for a particular process, follow these steps:
- From the Processes dashlet, click on the hyperlinked process name to view the process record view.
- Click on the triangle next to the Edit button to reveal the Actions menu, and then click "History". In legacy user-interface modules, click on the History icon in the corner of the screen. A popup window will appear over the current page outlining the transition history of the current process. Each process History entry will include the following components:
- The profile image and name of the process user who executed the transition
Note: Automated events will be executed by the SugarBPM (AW) engine.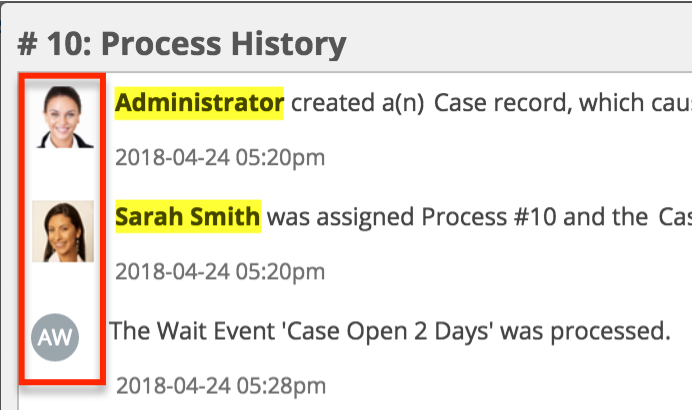
- Explanation of the transition that occurred:

- Transition status indicator (checkmark):
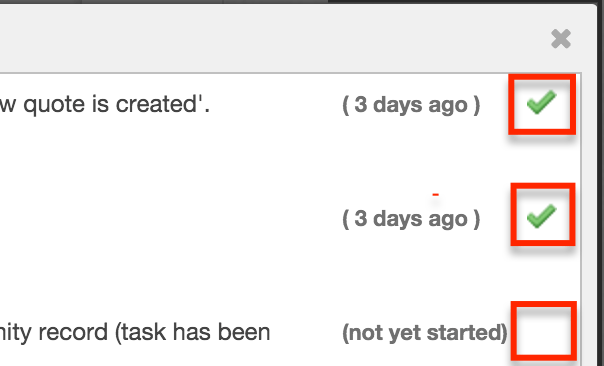
- Checkmark ✔: The action has been executed.
- No Checkmark: The action has not yet been executed.
- The profile image and name of the process user who executed the transition
- Click on the X in the corner of the window to return to the process record view.
Viewing Process Notes
A process user who is engaged in a process activity can add notes for people who will engage with the process later in its flow. When a different user engages in that same process later, he can see the earlier user notes and choose to add his own. Users who executed process activities at the beginning will not see the notes added by subsequent process users unless the process is routed back to them for review or approval later.
Note: Admin users can see all notes and add notes to any running process at any time from the Process Management page.
To create a note and view process notes from other users, follow these steps:
- From the Processes dashlet, click on the hyperlinked process name to view the process record view.
- Click on the triangle next to the Edit button to reveal the Actions menu, and then click "Show Notes".
Note: In legacy user-interface modules, click on the Notes icon in the corner of the screen.
 - A popup window will appear over the current page that displays time-stamped notes from earlier users of the current process.
- At the top of the window, there is also a composition area where you can add more notes. Simply type a message in the empty field and then click on "Add Note" to add it to the Notes window.
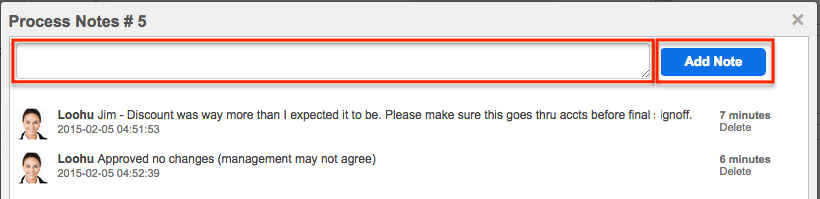
- Click on the X in the corner of the window to return to the process' record view.
Every person that may be involved in a process will not see the process throughout its entire flow. Regular users can only see the process in list view when they have a record to approve, reject, or review. Therefore, only one regular user (non-admin) can see the notes at any given time. In other words, the notes will only be seen by users who approve/reject/review the process after the note is added.
Previewing the Process Design
Users can view the progression of a process within the overall flow directly from the process' record view. Click on the triangle next to the Edit button to reveal the Actions menu, and then click "Show Process".
Note: In legacy user-interface modules, click the Status ![]() icon in the upper right corner.
icon in the upper right corner.
The process' visual design layout will open in a pop-up window, providing key information regarding the stages that have already been completed, the current stage of the process, and the stages that have yet to execute. The executed and in-progress stages of the process will be displayed in color, while bypassed or not-yet-executed stages will be presented in a grayed-out style.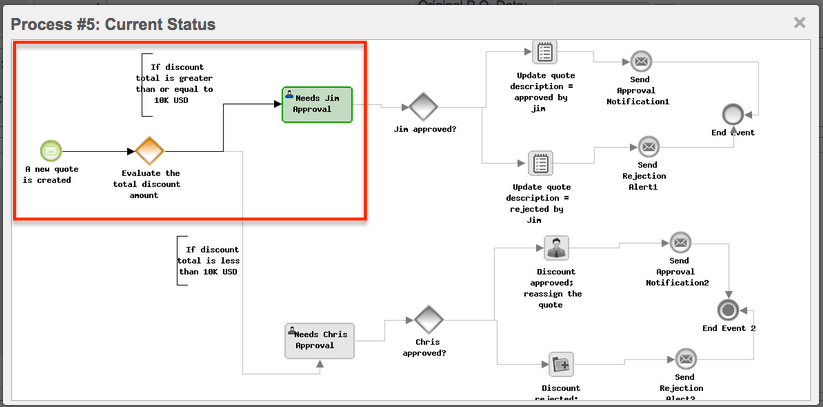
| Visual Element | Example | Description |
| Colorized shapes | This element has been executed or is in progress. | |
| Gray shapes | This element has been bypassed or occurs in the future. | |
| Green-outlined activity | 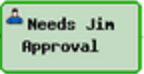 |
The activity is waiting for you (the viewing user) to respond. |
| Red-outlined activity |  |
The activity is waiting for a user to respond, but not the viewing user. |
| Red glowing shape | This element is in progress. | |
| Shape containing a small crossed-out circle | 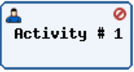 |
The process was terminated or canceled on this element. |
| Numeric value in parentheses | 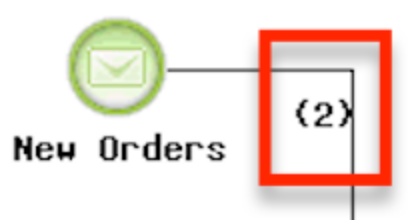 |
This element was triggered by multiple events concurrently. Note: This parenthetical notice may indicate that there is a flaw in the design of the process definition. Please review the conditions on the triggering event to eliminate the possibility of overlapping triggers. |
Terminated vs. Cancelled Processes
The SugarBPM automatically terminates a process when the record related to the process' Start event is deleted. The associated process will be removed from the Processes dashlet and the process record will display "Terminated" in the Status column of the administrator's Process Management list view.
Cancelled processes, on the other hand, have been intentionally stopped by the administrator. The associated process will be removed from the Processes dashlet and the process record will display "Canceled" in the Status column of the administrator's Process Management list view.
Working With Sugar Modules
The following sections detail menus, views, and actions common to Sidecar modules and contain links to additional information within the page or links to the User Interface documentation.
Process Menus
The Processes module contains various options and functionality which are available via menus in the module tab, list view, and record view. The following sections present each menu and its options with links to more information about each option in the User Interface documentation or, for Process-specific functionality, within this page.
Module Tab Menu
Click the Processes module tab in the navigation bar to access the Processes list view. From the Processes list view, click the three-dots menu in the Processes tab to display the Actions menu. The module tab's Actions menu has one option visible to all users, View Processes, which is another way to navigate to the Processes list view.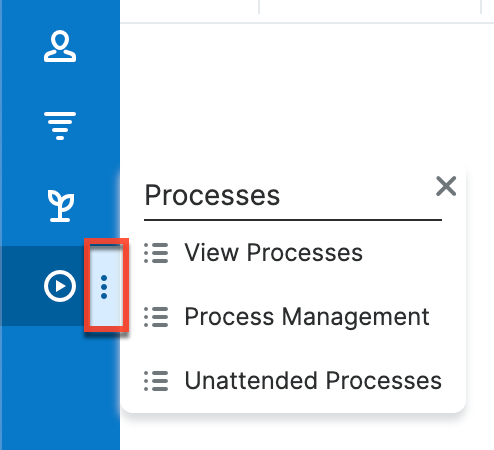
Administrators and users with developer-level role access may see additional options such as a link to the Process Management or Unattended Processes options. For more information about options available to administrators and developers, please refer to the SugarBPM documentation in the Administration Guide.
For more information on module tab menus including reasons a module may not be included in the menu, see the User Interface documentation.
List View Record Actions Menu
The Record Actions menu to the right of each record's Preview button allows users to execute a running process directly from the list view by clicking "Show Process". This will direct the user to a landing page where they will be instructed to approve, reject, or resume (route) the current process. For more information about executing processes, please see the Executing Processes section of this page.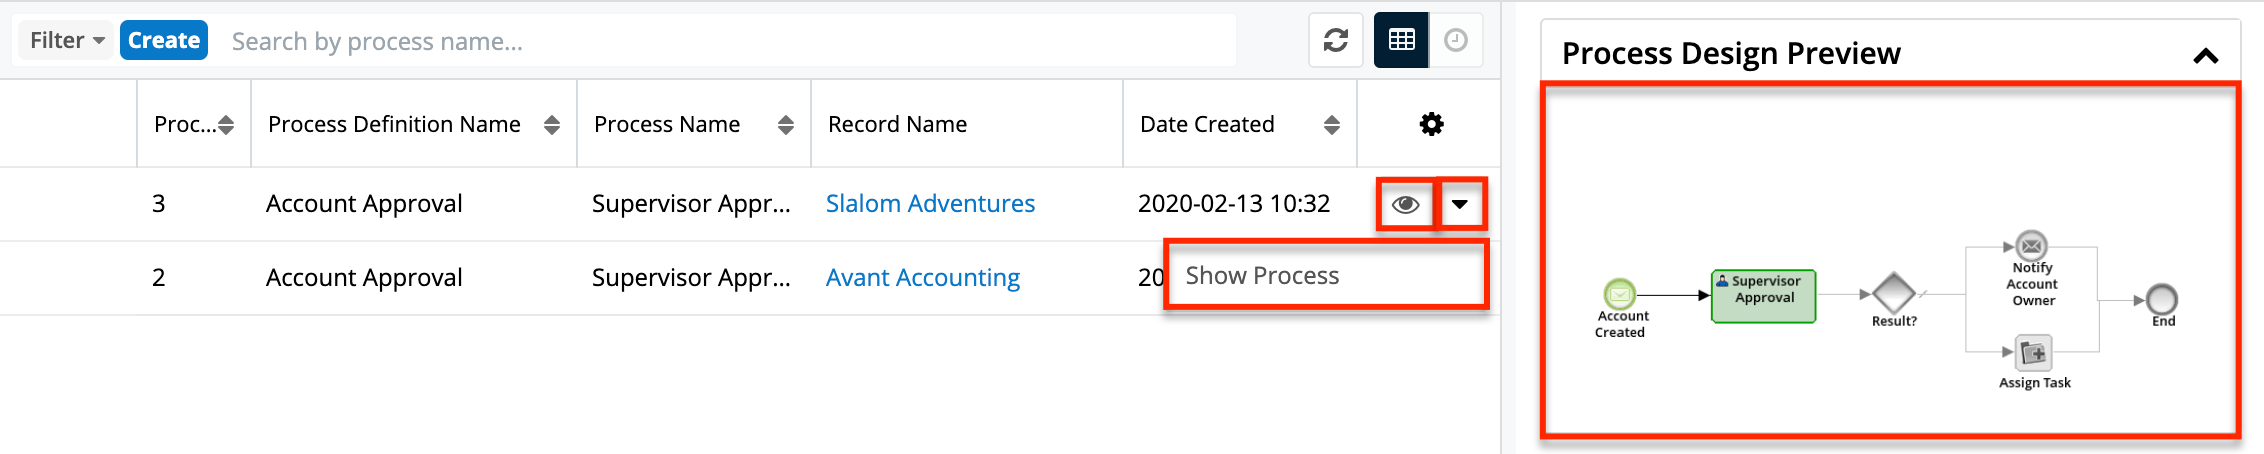
The list view's Record Actions menu allows you to perform the following operations:
| Menu Item | Description |
| Preview (Eye icon) | Preview the progression of this process in the intelligence pane. |
| Show Process | Navigate to the process' landing page to approve, reject, or resume (route) this process. |
Record View Actions Menu
The Process record view displays the Sugar record that is awaiting action in full detail including its module name, fields, process buttons, and subpanels of related records. To access a process' record view, click on the process name in the Processes dashlet or select "Show Process" from the process record's list view Actions menu.
The process' Actions menu appears on the top right of the page and allows you to perform operations on the current record specific to its process type. To learn more about the three available Actions menus (approval, routed, and self-service), please refer to the corresponding Actions menu section under the Executing Processes section below.
In addition to a Processes-specific Actions menu, there are several process-specific elements added to the record view above the record's name and module icon.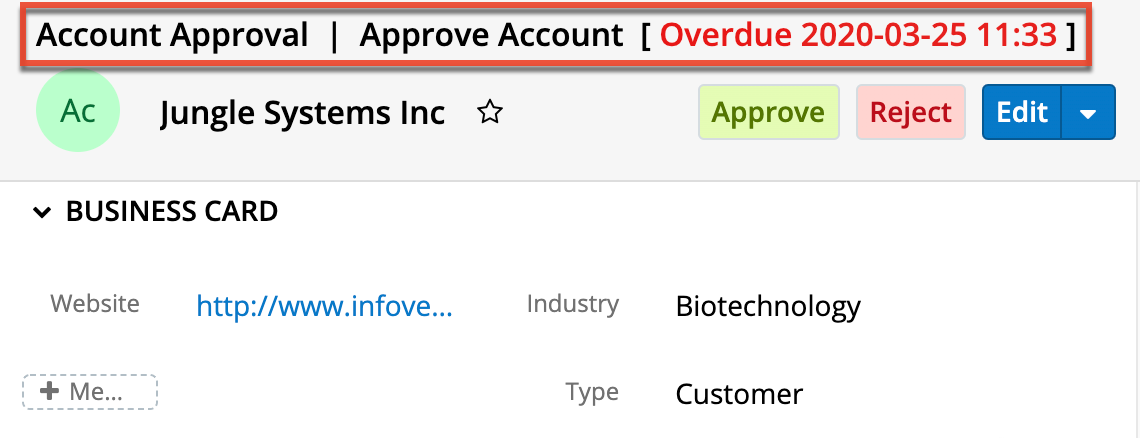
From left to right across the top of the record view, the process record view displays the following information:
| Menu Item | Description |
| Process Definition Name | The name of the process definition record that generated this process; For more information about Process Definitions, please refer to the Process Definitions documentation in the Administration Guide. |
| Process Name | The name that was given to the process definition's Activity element by the process owner. |
| Process Due Date | The date and time by which you should execute this process step. Note: If the administrator has not specified a due date, then no date will appear. If the due date occurs in the past, then the date will be preceded by the word "Overdue" in red text. |
Common Views and Actions
The following links will open specific sections of the User Interface documentation where you can read about views and actions that are common across most Sidecar modules.
| Content Link | Description |
| Searching for Processes List View Search Creating a Filter |
The Searching for Records section provides an introduction to list view search, which searches and filters within the Processes module. |
| Processes List View Total Record Count List View Search Column Reordering Column Resizing Column Sorting Column Selection Pagination Dashboards |
The List View section walks through the many elements of the Processes List View layout, which contains a list of all running processes that require action (e.g., approve, reject, etc.) from the logged-in user. Unlike other Sidecar modules, you will only see processes in the list view if there is anything requiring your approval or review. While the generic menu options are described in the User Interface sections linked to the left, the options specifically available in the Processes list view are described in the List View Record Actions Menu section of this page. |
| Processes Record View Favorite Designation Following Designation Next or Previous Record Actions Menu Show More Subpanels Related Record Subpanels Filtering Subpanels Reordering Subpanels Activity Stream Dashboards |
The Process record view displays the Sugar record that is awaiting action in full detail including its module name, fields, activity stream, and subpanels of related records. For information about navigating these elements of a record, please refer to the User Interface links on the left or the relevant module page in the Application Guide. To access the Process record view, click on a process name on the Processes dashlet or select "Show Process" from the process record's list view Actions menu. There are several process-specific elements added to the standard record view, which are explained in the Approval Process Actions Menu, Routed Process Actions Menu, and Self-Service Actions Menu sections of this page. Note: Processes may affect Sidecar module records as well as legacy user-interface modules. For information on navigating the legacy user interface, please refer to the User Interface (Legacy) documentation. |