Process Definitions
Overview
The Process Definitions module is one of four modules that make up SugarBPM™, Sugar's business process management tool that enables administrators to streamline common business processes by managing approvals, sales processes, call triaging, and more. Process definitions are central to the SugarBPM suite. They define the steps in automated business processes and control the flow of work that is allocated during running processes in Sugar. Process definitions are created by a Sugar administrator and consist of a network of activities and their relationships, criteria to indicate the start and end of the process, and information about the individual activities (e.g., participants) contained within the business process.
Before continuing, please read the SugarBPM overview page, which defines critical vocabulary and other elements that may be referenced on this page.
This documentation contains the following pages:
- SugarBPM
- Process Definitions (current page)
- Process Business Rules
- Process Email Templates
- Stock SugarBPM Templates
Additionally, the Processes page of the Application Guide contains documentation for the user-facing elements of SugarBPM.
The following image illustrates the relationship between all of the SugarBPM modules: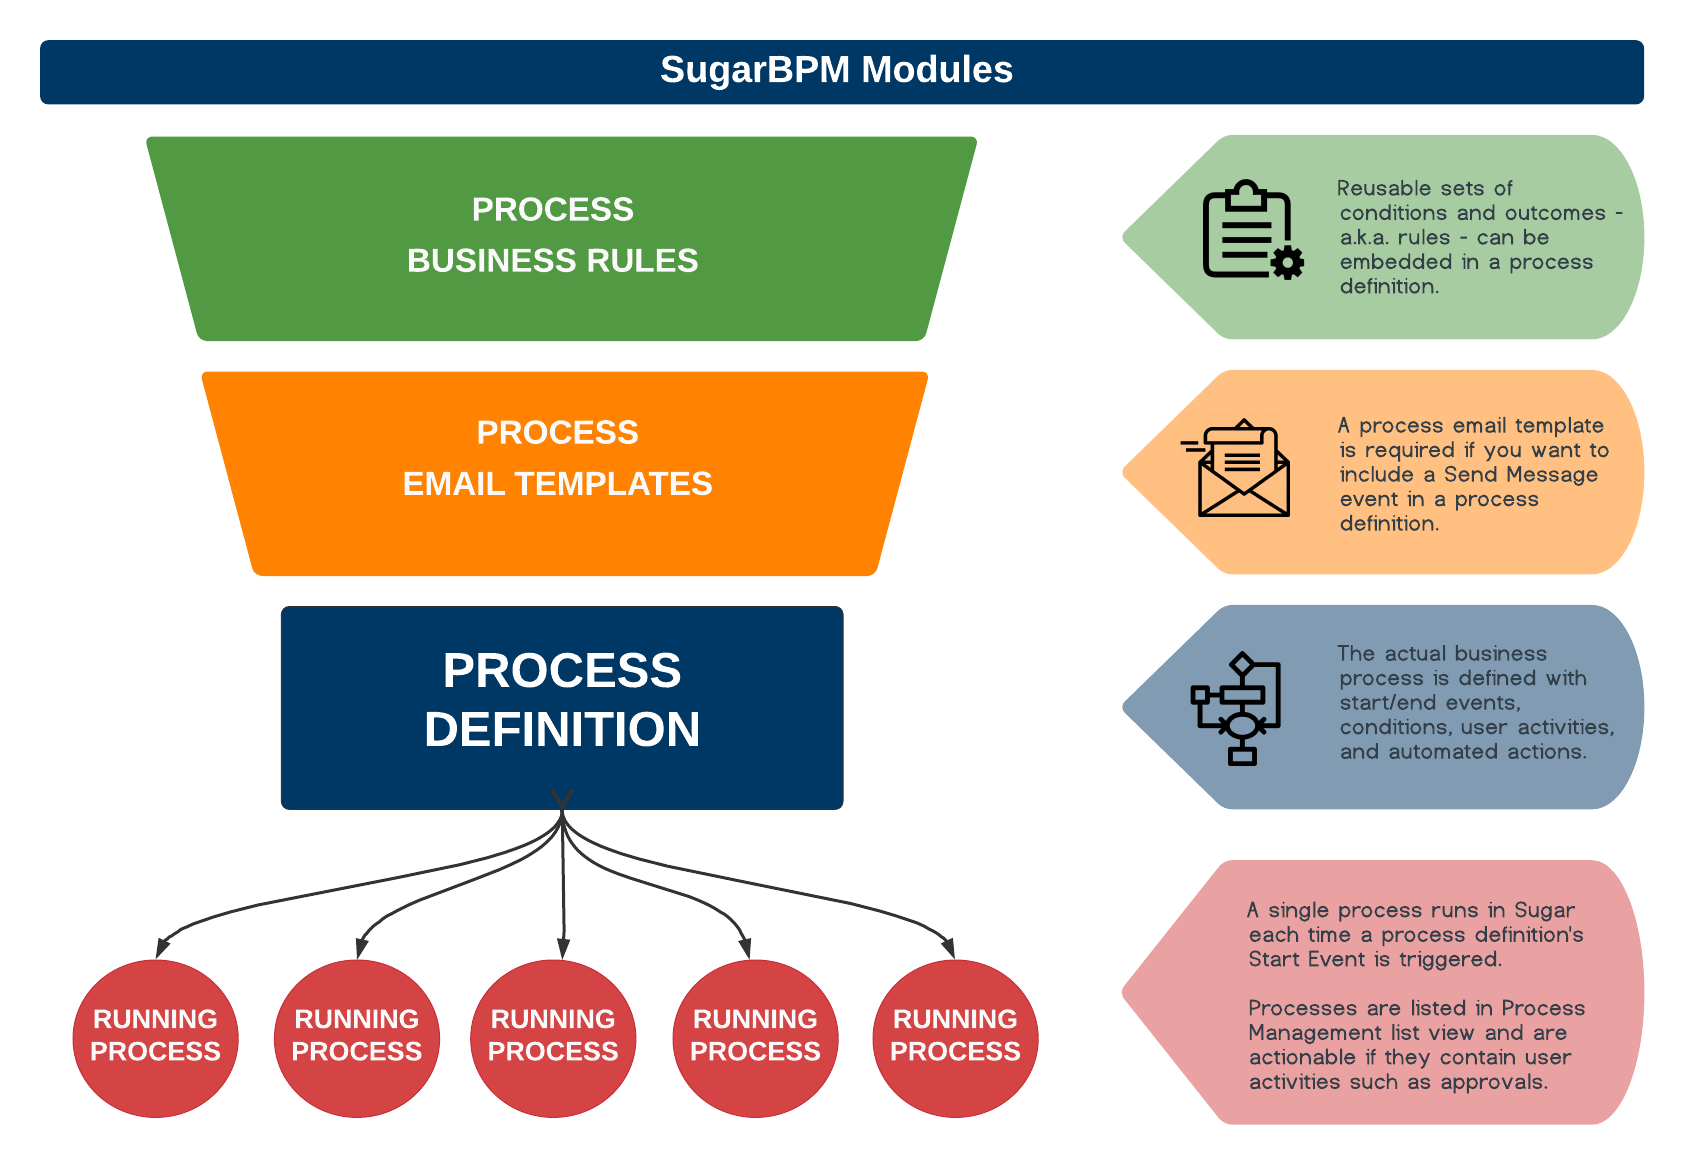
The process definition will be the parent record for countless running processes in Sugar. Every time a process definition's Start event is triggered, a single process will begin to run in Sugar. When a running process requires action from a user, that user will see the process in their Processes dashlet and Processes module list view. Users will never see the parent process definition that controls the process, nor will they see any processes for which they are not required to act.
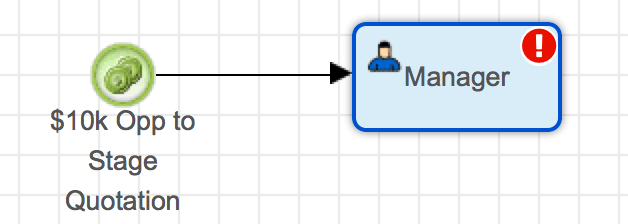
This is an example of a complete process definition created in the Visual Designer: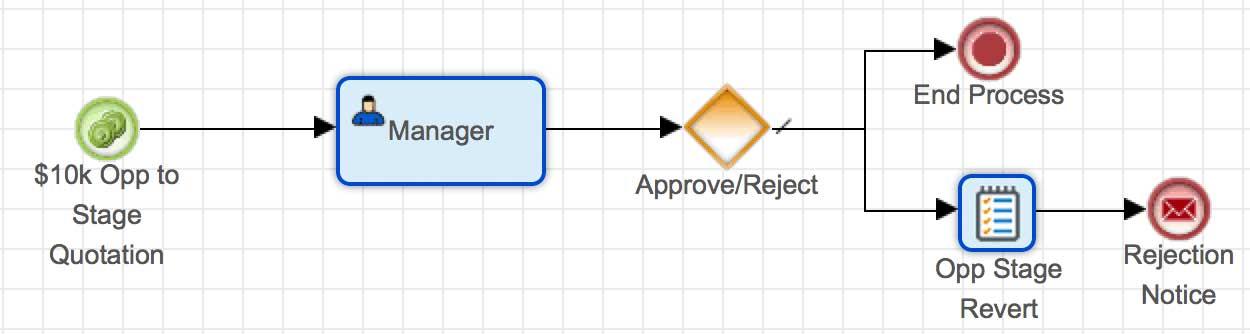
In the example above, the Start event is triggered when a $10,000+ opportunity moves to stage "Quotation" from any other stage. Every time this condition is met, the process definition will generate a new process instance.
Note: If a process definition will utilize process business rules or process email templates, those records must be created before designing the process definition. For more information about creating records in these supporting SugarBPM modules, please refer to the corresponding section of the SugarBPM documentation.
This documentation will cover information and actions specific to the Process Defintions module. For instructions concerning views and actions which are common across most Sugar modules, such as creating, editing, and deleting records, please refer to the Working With Sugar Modules section of this page.
Process Definition Fields
The Process Definitions module contains the following fields. For information on using and editing various field types, refer to the User Interface documentation.
| Field | Description |
| Assigned To | The Sugar user assigned to the process definition. |
| Date Created | The date the process definition record was created. |
| Date Modified | The date the process definition record or its design was last modified. |
| Description | A description or other information about the process definition. |
| Integration Sync ID | The sync key field used by external integrations to identify Sugar records in the external application. See the Integrate REST API endpoints in the Developer Guide for more details on how to use this field. Note: This field is not visible in the user interface. |
| Name | A unique and descriptive name. |
| Run Order | The order in which running processes targeting the same module are executed. The field is optional, and processes with a blank run order are run last. In the case of a tie, processes are run oldest to newest by their process definition's Date Created field. |
| Status | The enabled or disabled state of the process definition. |
| Tags | User-created keywords that can be used to identify records in filters, dashlets, and reports. Note: For more information on creating and using tags, please refer to the Tags documentation. |
| Target Module | The module that will be used for the Start event in the process definition design. |
Fields Exclusive to Process Definition Design
The following fields are available when designing process definitions targeting the given modules, but are not available in typical module views (e.g., record view) or in Studio. They can be leveraged in your process definitions, but it is important to note that some should only be read and not updated, while others can be updated under certain circumstances. See the sections below for more details.
| Field | Module(s) | Description |
| Contact Source | Contacts | A system-level dropdown field that represents the origin of newly created contacts. Its possible values are "Internal" and "External". |
| Is Attachment | Notes | A system-level checkbox field that Sugar sets to "true" on notes that represent a file attachment to another record (i.e., an email, knowledge base article, or another note). |
| Note Source | Notes | A system-level dropdown field that represents the origin of newly created notes. Its possible values are "Internal" and "External". |
| Pending Processing | Bugs, Cases, and custom issue-type modules | A system-level checkbox field. Sugar automatically sets the field to "true" on cases when creating a case via inbound email or relating a case to an inbound email. Sugar does not update it on bugs or other issue-type modules. |
Contact Source
The Contact Source field is available on the Contacts module. It is a system-level dropdown field that represents the origin of newly created contacts. It is set to External on contacts created via Portal and set to Internal on contacts created in Sugar. This field is not available in Studio or the user interface and is only available in SugarBPM. Note that it is intended to be read but not written to in order to preserve the accurate meaning of its value. Therefore, its value can be read in process definitions to determine the source of a contact, but should not be changed.
Is Attachment
The Is Attachment field is available on the Notes module and is a system-level checkbox field that indicates if the note represents a file attachment to another record. Files attached to records are stored in Sugar as notes and when designing process definitions, you may need to know if a particular note is an attachment to another record or not. This field differentiates between an individual note and an attachment note because it is only set to "true" on notes that are attachments to emails, knowledge base articles, or other notes.
Specifically, this field can be used to prevent inadvertent processes targeting the Notes module from being triggered for attachment notes. For example, if you create a process definition that is triggered when a new note is created, you may want to add a Start event criteria for "Is Attachment" is equal to "false". This way, processes are only started for notes that were created by a user or another workflow and not when a file is attached to a record. This can be particularly important for notes that are created with many attachment files, because in Sugar, the new note is created, as well as an additional note for every attachment file on the original note. If you do not want to trigger a process for each of these, the Is Attachment field can be used to filter out note records that do not meet the criteria.
Note Source
The Note Source field is available on the Notes module. It is a system-level dropdown field that represents the origin of newly created notes. It is set to External on notes created via Portal and set to Internal on notes created in Sugar. This field is not available in Studio or the user interface and is only available in SugarBPM. Note that it is intended to be read but not written to in order to preserve the accurate meaning of its value. Therefore, its value can be read in process definitions to determine the source of a note, but should not be changed.
Pending Processing
The Pending Processing field is available on the Bugs and Cases modules and also on all issue-type modules created in Module Builder. It is a system-level checkbox field. Sugar automatically sets the field to "true" on cases when creating a case via inbound email or relating a case to an inbound email. Refer to the Cases documentation for more details on how emails and cases can work together.
In addition to Sugar setting the value of the Pending Processing field on cases, Sugar Serve and Enterprise include several stock process definitions that both read and write to the field on cases. If your instance uses these SugarBPM templates to automate customer service processes, do not update the Pending Processing field on cases. Doing so may cause the processes to behave unexpectedly. However, you may still read its value in process definitions without updating the field.
Sugar and the stock SugarBPM templates only use the Pending Processing field on the Cases module and not the Bugs module or other issue-type modules. Therefore, it is safe to leverage the field and make changes to it on bugs and other issue-type modules in SugarBPM (e.g., via process business rules or Change Field events in process definitions).
Note: The Cases and Bugs modules are not available for Sugar Sell users. For more information on license types and the functionality available for each type, refer to the License Types Matrix documentation.
Process Definitions List View Dashlets
There are two specialized dashlets available exclusively on the intelligence pane for the Process Definitions module's list view. The following sections describe these dashlets, which offer insight into running processes in your instance.
Note: For more information on creating dashboards and adding dashlets to the intelligence pane, please refer to the Dashboards and Dashlets documentation.
Pending Activities by Process
The Pending Activities by Process dashlet displays a summary of the total number of activities that are awaiting a response from a process user. All open process activities are reflected in the dashlet as a whole number and are also grouped by user in the circular graph.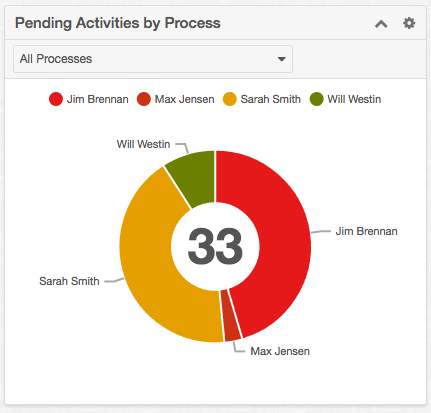
You can refine the dashlet's view by selecting a process definition from the dashlet's filter. This will restrict results to only the processes related to that process definition.
Process Summary Dashlet
The Process Summary dashlet can also be added to the Process Definition's list view intelligence pane. It displays an overview of all processes that have triggered in your instance. 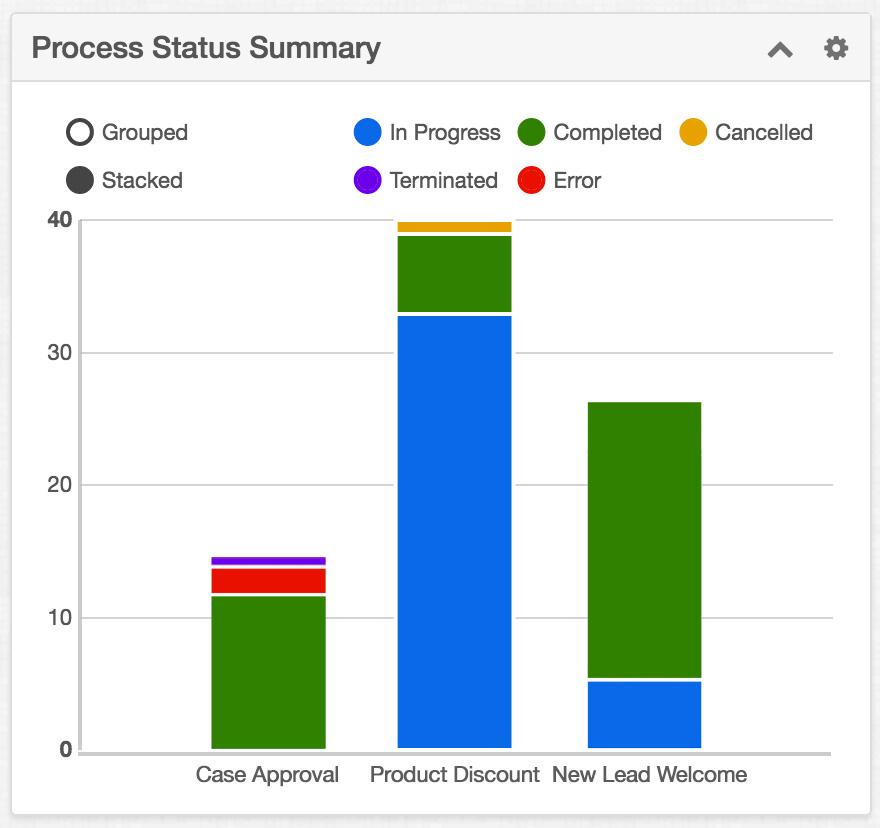
You can customize the dashlet view using the options above the chart. Toggle the display between "Stacked" and "Grouped" to view the results in different formats. To exclude a status from the display, click on the solid circle next to that status's name in the key above the chart.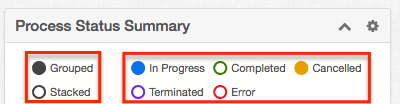
Creating Process Definitions
Note: All process definitions are disabled by default so that they will not trigger during the design phase. Please refer to the Enabling Process Definitions section of this page for steps to enable a completed process definition.
Process Definitions can be created from any of the following places in Sugar:
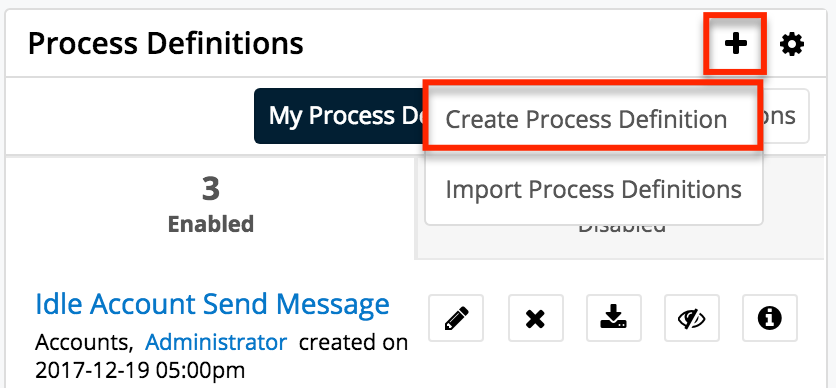
- Process Definitions dashlet:
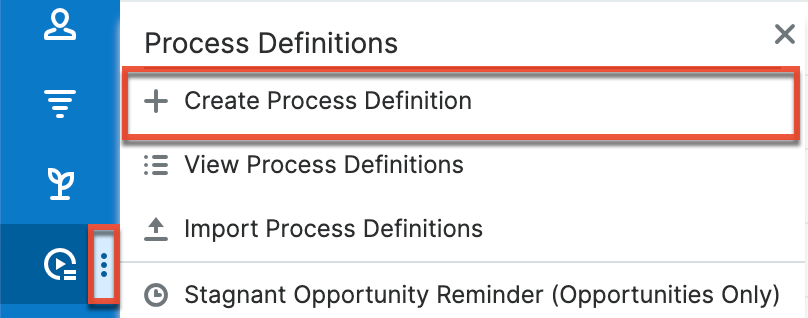
- Process Definitions module tab menu:
- Process Definitions list view:
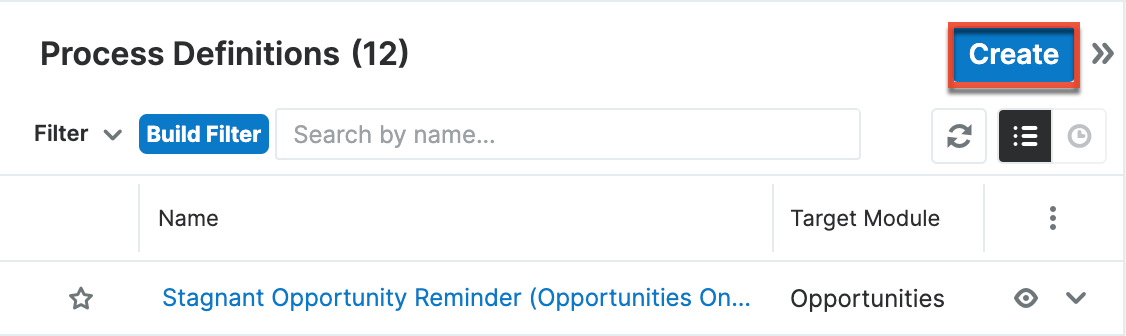
Upon clicking "Create Process Definition" (or the Create button from list view), you will be directed to the process definition's record view. The record view is where you store information that will make it easy to find and understand the process definition in the future. For more information about the available fields in the Process Definitions module, please refer to the Process Definitions Fields section of this documentation.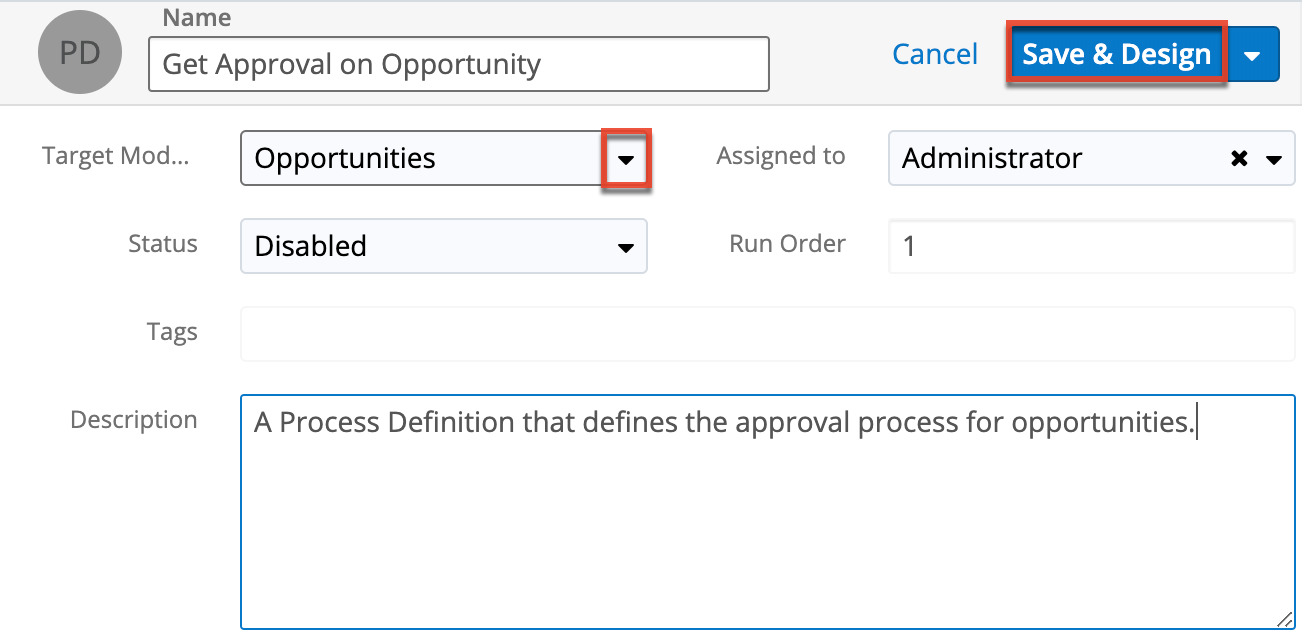
After completing this form, you will be directed to the Visual Designer canvas where the process definition's elements can be composed.
Designing Process Definitions
Creating a process definition for your business process is easy using SugarBPM's visual designer, where you can graphically assemble a series of flow elements using an intuitive drag-and-drop interface. All process definitions are set to "Disabled" by default in order to prevent triggering of processes before the design is complete. This means that you must change the status to "Enabled" before it will work. Please see Enabling Process Definitions for more information.
Using the Visual Designer
Before designing a process definition, take a moment to understand how to interact with process definition elements on the design canvas. In the visual designer, process definitions are auto-saved every 30 seconds by default, and the Undo button can revert changes as far as 25 levels back per session. You can disable or adjust the auto-save increment via Admin > System Settings.
Note: The visual designer interface may not be compatible with some touchscreen mobile devices. Please build process definitions from a desktop or laptop computer to prevent any potential complications.
Editing Tools
If you edit the design of an enabled process definition, any running process will immediately adapt to the new flow pattern. Therefore, it is best practice to disable a process definition before making changes to its design. Disabling the process definition will prevent running processes from adapting to the new flow prematurely. Changing the process definition's status to "Disabled" will not cause any interruptions to already running processes. Upon re-enabling the process definition, any processes still running will adapt to the new flow.
Three icons on the right side of the design toolbar represent editing tools for your process definition design.
- Undo: Click the Undo button to revert the last change made in the Process Definition (up to 25 changes). When an undo action restores a design element on the page, it should also restore the element's configuration, but you should always confirm the configuration via the element's settings.
- Redo: Click the Redo button to reverse an undo action. When a redo action restores a design element on the page, it should also restore the element's configuration, but you should always confirm the configuration via the element's settings.
- Save: This control allows you to save changes made to the Process Definition design. The Save button is enabled only when there are unsaved changes. Keep in mind that the Visual Designer auto-saves your work every 30 seconds by default and the auto-save increment can be configured or disabled via Admin > System Settings.
Always review the settings for any canvas element re-instated by the Undo or Redo buttons to confirm they are configured as expected.
Process Validation
When using the SugarBPM visual designer for creating process definitions, a validation job periodically runs to inspect the layout and configuration of the process definition's elements. The validation job may run automatically at regular intervals configured in Admin > System Settings, and the administrator may also manually trigger the validate action at any time from the designer toolbar.
Three icons on the right side of the design toolbar represent the validation tools for your process definition design.
- Validate: The Validate button triggers an action that inspects each element in the design and verifies that evaluations and settings are valid. Any errors or warnings are displayed as badges on the affected elements and in the Error Console in the lower part of the screen.
- Save and Validate: Click the Save and Validate button to save your work and simultaneously validate the process design.
- Show/Hide Errors: Click this button to view or minimize the Error Console. The console displays warnings and errors that were found in the last validation action and may not reflect changes you have made since the last validation ran. For the most accurate information, click on Validate or Save and Validate immediately after repairing any errors.
Any configuration or sequence flow errors will be displayed in the Process Validation pane at the bottom of the design canvas. Expanding the validation pane will not force a new validation, but clicking "Validate" or "Save and Validate" will automatically expand the validation pane if it has been minimized or not yet opened.
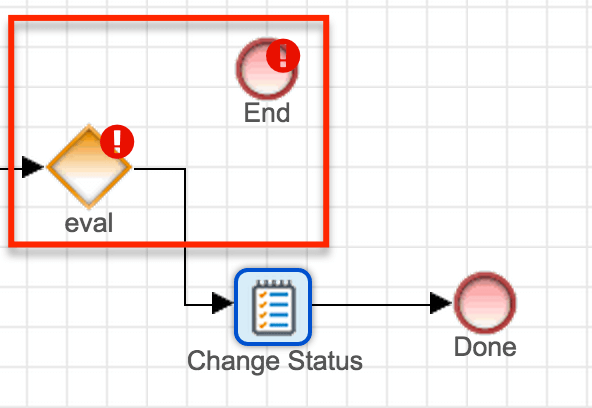
Some errors will occur and then resolve themselves naturally as the Process Definition is pieced together. For example, all elements will be considered in an error state until the appropriate connectors have been inserted in between elements. For more information on the errors and warnings returned by the process validator, refer to the article Troubleshooting Validation Errors and Warnings for Process Definitions.
Comments
The Comment element allows admins to mark up the designer canvas with helpful annotations connected to Action and Activity elements. While all elements can be descriptively labeled, further explanation may be needed to explain more complex Process Definitions. 
To insert a comment onto the Designer Canvas, simply drag and drop the comment icon onto the canvas and then double-click on the text "Text Annotation" to type a comment. Hit Enter to preserve the comment.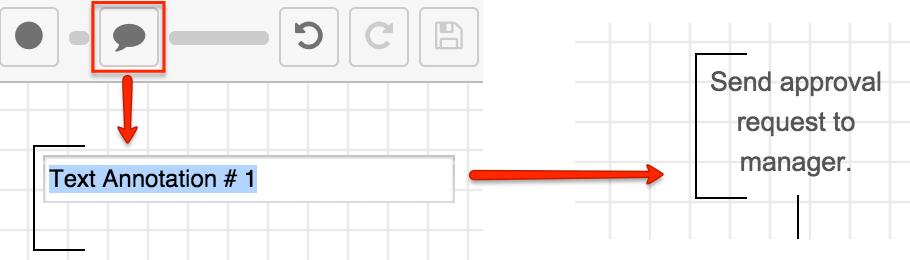
Sequence Flow
When you assemble a process definition, you are defining the overall sequence flow. The flow dictates the processing order of the events, actions, and activities in a process and is visually represented by lines called sequence connectors. Each sequence connector originates from a single source element (e.g., action, event, etc.) to a single target element.
Adding Sequence Connectors
All elements of a process flow must be connected by at least one directional line. Failure to connect flow elements correctly will result in an error in the Process Validation panel.
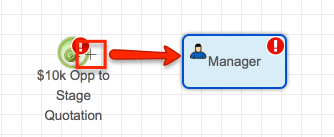
- To connect two elements on the Designer canvas, hover over the outer edge of the Start event icon until the mouse tip changes into a crosshair:
- Click the mouse button and drag the black square at the end of the connector onto the subsequent design element:
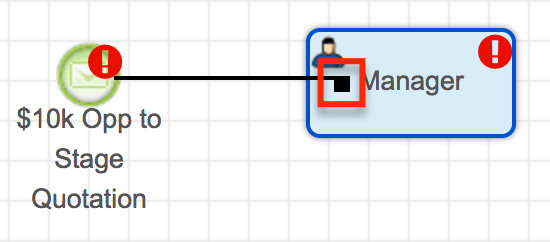
- Release the mouse button and the square at the end of the connector line will transition into an arrow pointing toward the subsequent element and indicating the direction of flow from one element to another.
- Optionally, adjust the position of the process elements as described in the Moving and Deleting Design Elements section to achieve an organized appearance.
Note: When dragging a connector to a subsequent element, you may choose to release the mouse button at the top, bottom, left, or right edge of the element in order to aesthetically organize the process and avoid running into other connector lines, which may possibly affect the flow of the process. For more information on interacting with objects on the canvas, please refer to the Moving and Deleting Design Elements section of this documentation.
Removing Sequence Connectors
To remove unwanted or misplaced sequence connectors from the design canvas, simply click on the line and press Delete on your keyboard as explained here:
- Click on the segment of the line that you wish to remove. The connector will transition to a selected state, and the beginning and end points of the connector line will be represented by red dots. Please confirm that the line connecting these red dots is the line that you intend to delete.
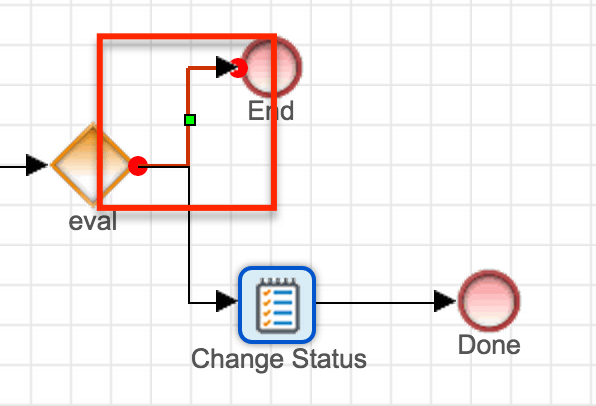
- Press the Delete key on your keyboard. The selected line will disappear.
If you accidentally delete a sequence connector, simply press the Undo button on the toolbar. Always review the settings for any canvas element reinstated by the Undo or Redo buttons to confirm they are configured as expected. For more information on interacting with objects on the canvas, please refer to the Moving and Deleting Design Elements section of this documentation.
Moving and Deleting Design Elements
To reposition or remove an entire branch or group of elements from a process definition design, you can easily mass select them on the canvas. The following table summarizes the mass actions available via the design canvas.
| Task | Procedure |
| Select a single element | Point to the element on the design canvas until the mouse tip becomes a four-headed arrow then click the shape. |
| Select multiple elements within an area | Click on the design canvas above and to the left of the elements that you want to select and then drag to create a selection box around the shapes. Any elements partially within the selection area will be included as part of the selection. |
| Move an element or group of elements using your mouse |
|
| Nudge an element or group of elements using the arrow keys |
|
| Delete an element or group of elements within an area |
|
| Delete a sequence connector | Please refer to Removing Sequence Connectors for more information on how to remove unwanted or misplaced sequence connectors from the design canvas. |
| Deselect all elements | Click a blank area on the design canvas. |
Evaluation Criteria Box
Certain elements in the process definition design can be configured in a criteria box. For these evaluations, you can interact with the operators and variables that comprise the criteria in the following ways:
Criteria pills are movable via drag and drop:

Criteria can be inserted by placing a cursor at the point of insertion and then clicking on the operator or variable to insert:
Note: Never use single quotes ( ' ' ) or double quotes (" ") inside the criteria builder; the SugarBPM engine automatically recognizes input types when processing the condition.
For more information on defining criteria, please refer to the Setting Conditions section of this page.
Process Definition Settings
Every process definition has a well-concealed option to configure important overall settings. To access this option, simply right-click on any empty space on the process definition's design canvas and select the "Process Definition" menu item: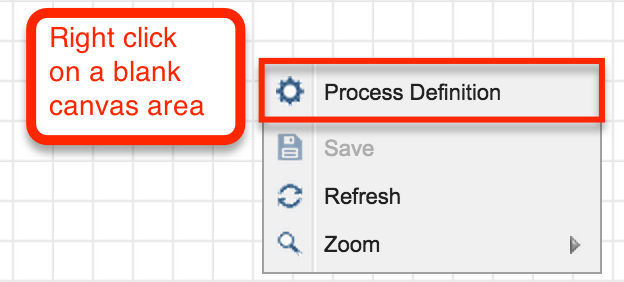
The Process Definition settings window will open where you can edit the name and description without exiting the designer. In addition, the settings window contains two tools for enhanced security over records that engage in processes triggered by the current process definition. The following sections describe how to configure Terminate Process conditions and how to prevent users from making changes to records during the process duration via Locked Fields.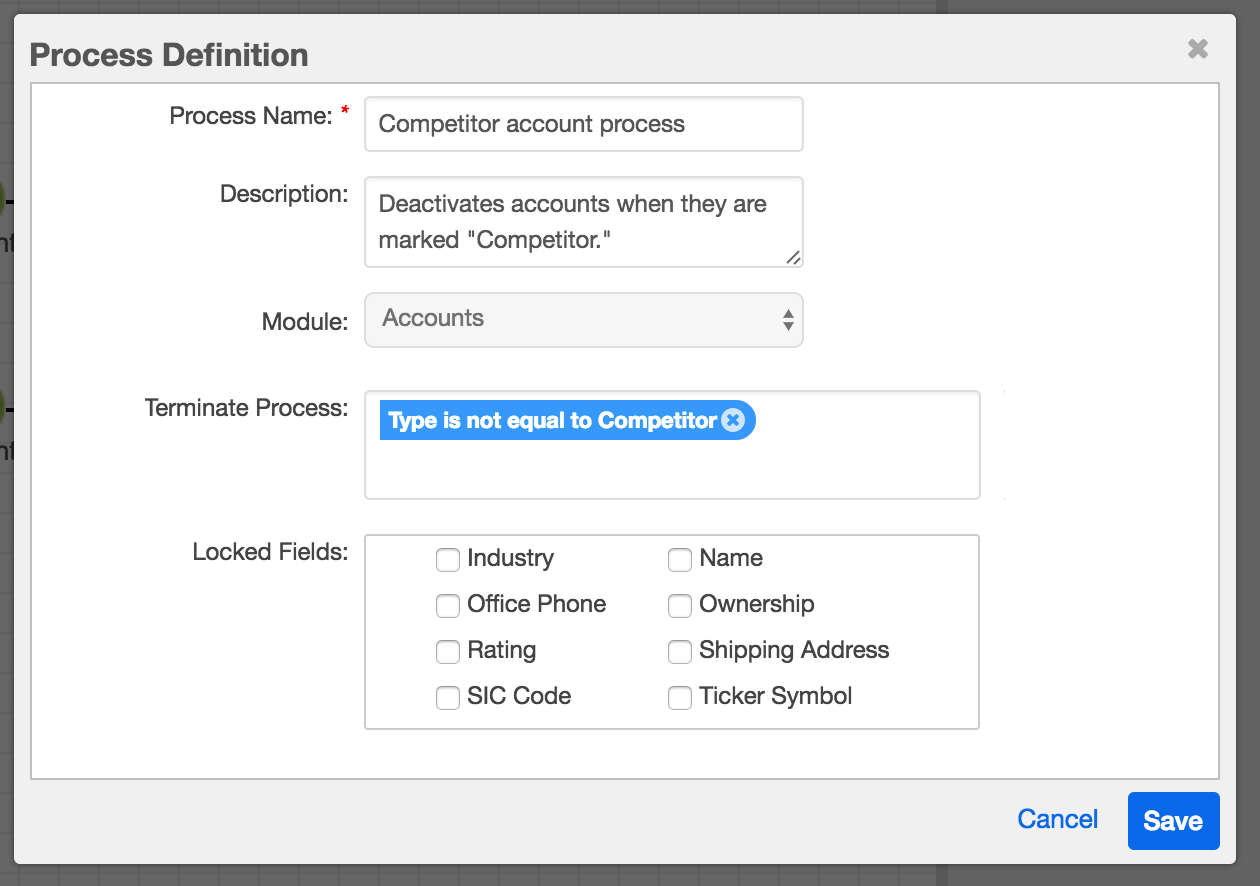
Terminate Process
All process definitions should include a condition for termination. Informally known as the process definition's "emergency brake," the Terminate Process settings can tell Sugar when NOT to start a process or under what conditions a process should abruptly end. If a process's target record meets the Terminate Process conditions, the process instance will instantly force stop and display a status of "Terminated" in the Process Management list. This setting is important to prevent conflicts between multiple running processes or conflicts between SugarBPM and other automated parts of your Sugar instance (e.g., Workflows, Sugar Logic, or third-party customizations).
Follow these steps to define Terminate Process conditions for a process definition:
- Navigate to the Visual Designer canvas for the relevant process definition.
- Find a blank spot on the design canvas and right-click to access the Process Definition's general settings.
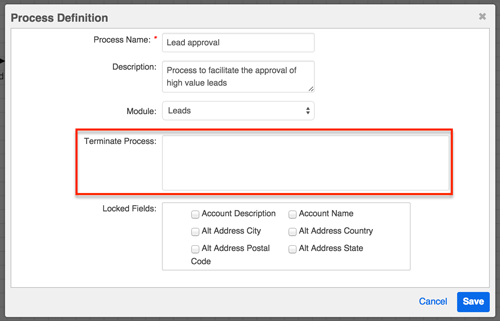
- Click on "Process Definition". The Process Definition settings will appear. Here you can edit the record-level settings and set Terminate Process criteria for this process definition.
- Click inside the Terminate Process field to reveal the criteria builder.
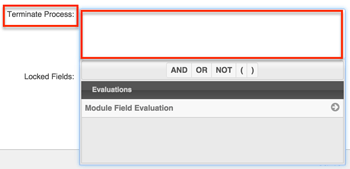
- Refer to the Module Field Evaluation section of this page to build a conditional statement that, when met, will force-stop a running process that was triggered by this process definition.

- Click "Save" to preserve this setting and return to the design canvas. Be sure to save the overall process definition before navigating away from the canvas.
Locked Fields
The Locked Fields feature of SugarBPM lets administrators, developers, and process administrators prevent users from changing select field data on records that are involved in active processes. Any number of fields (from none to all) can be locked on the record. When a record becomes involved in a process that has locked fields, that record will respect those field locks until the record is no longer participating in the process.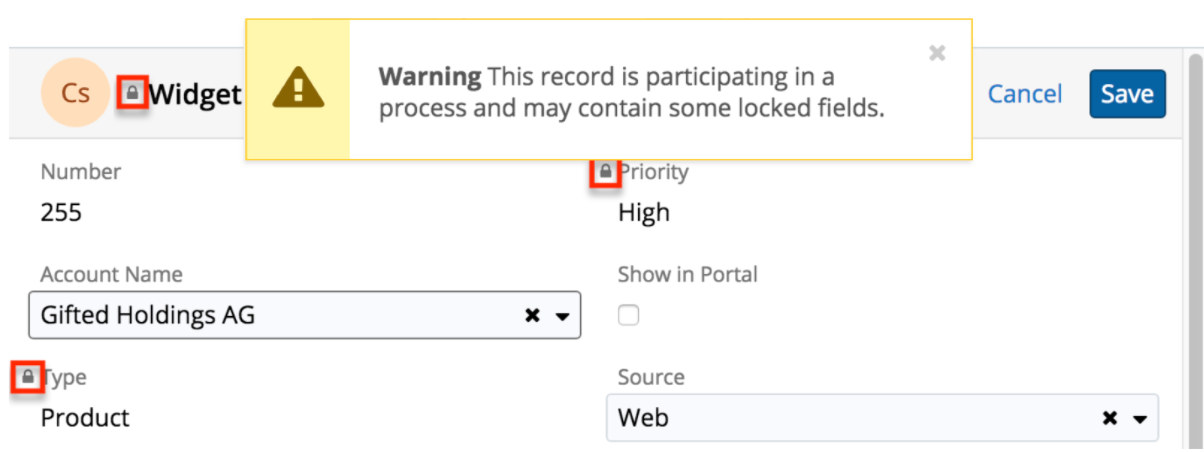
Note: Locked Fields configured in the Process Definition settings do not apply to the process user when he or she is executing the process. To prevent the process user from editing fields during the approve/reject or route stage, you must configure the fields as read-only on the Activity's Read-Only Fields tab.
Follow these steps to set Locked Fields for records participating in the current process definition:
- Navigate to the Visual Designer canvas for the relevant process definition.
- Find a blank spot on the design canvas and right-click to access the Process Definition's general settings.
- Click on "Process Definition".
- The Process Definition settings will appear. Here you can edit the record-level settings and set Locked Fields for this process definition. In the Locked Fields section, place a checkmark next to the field or fields for which you would like to prohibit editing:
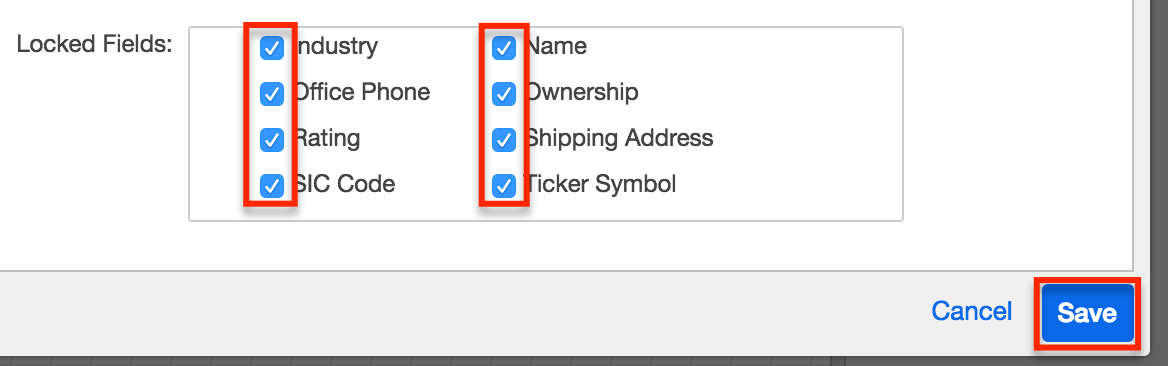
- Click "Save" to preserve this setting and return to the design canvas. Be sure to save the overall process definition before navigating away from the canvas.
Note: Records that are processed through the job queue, imported, mass updated, or merged will undergo locked-field validation.
Adding a Start Event
A Start event indicates where a process will begin. It defines the action that will trigger a new process to run. The target module chosen in the process definition's record view is the module that is used for the Start event in the process definition design. When a record in the target module meets the criteria set in the Start event, then a new process will commence based on this process definition. In other words, the Start event will receive a message from the target module that it is time to begin a new process.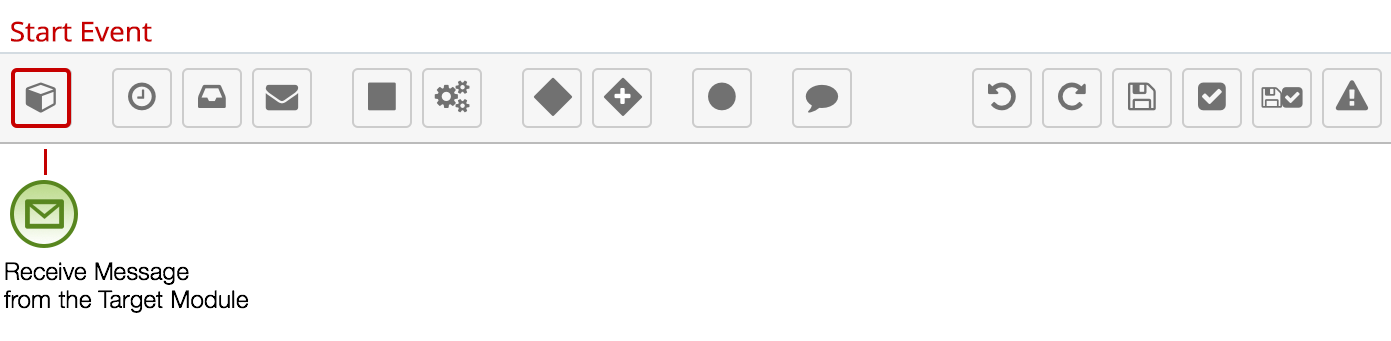
Follow these steps to add a Start event to the process definition:
- Drag the Start event icon onto the Designer canvas.
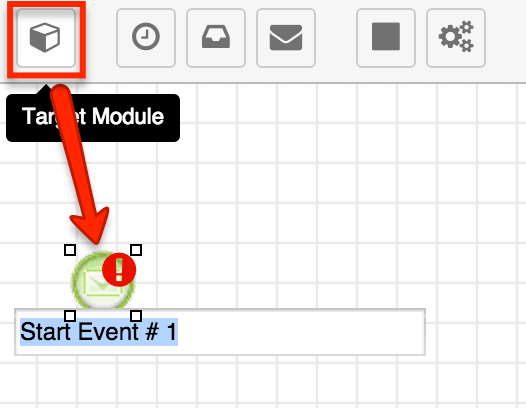
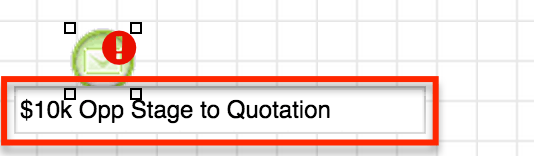
- Double-click the Start event icon's label to rename it.
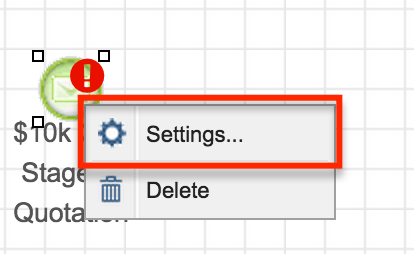
Note: The Start event will have an error icon and a warning icon if the process validator runs before the Start event has been configured and connected to the next element. This is normal. For more information about resolving validation errors, refer to the Process Validation section of this page. - To configure the Start event, right-click on the Start event icon and choose "Settings".
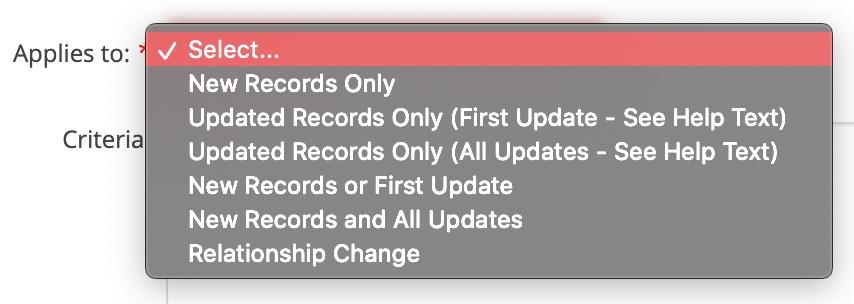
- Select an "Applies to" preference to choose how the process definition will be triggered to start. See the Start Event Types section below to understand each option.
- Click inside the Criteria field to expose the criteria builder and set the conditions for the Start event. Please refer to the Creating Conditions for Events and Actions section of this page to configure the conditions for the Start event.
Note: Comparison operators in Start event evaluations may not always work as expected for existing records that were last edited before the process definition was enabled. To ensure that existing records are evaluated properly for comparators such as "field changes from/to", perform an arbitrary mass update on the target module's records immediately after enabling the process definition so that Sugar can capture the "from" field values.
Start Event Types
There are several options when choosing how a process definition will be triggered to start. You can trigger processes based on several different conditions in a single Start event.
- New Records Only: A new process will begin if a record is created and the specified conditions are met on the first save.
- Updated Records Only (First Update): A new process will begin the first time the specified conditions are met on an existing record, even if the record has been updated several times before it qualifies. Once a record meets the conditions to trigger a First Update process, it cannot trigger that process definition again.
- Updated Records Only (All Updates): A new process will begin every time an existing record is saved and the specified conditions are met, as long as a process is not already running against the record. A given process definition can only run one process instance against a particular record at a time. However, it is important to note that two or more different process definitions may simultaneously run against the same record.
- New Records or First Update: A new process will begin when a new record is created or the first time it is updated if the specified conditions are met. Once a record meets the conditions to trigger a New Records or First Update process, whether it was triggered by a new record or a first update, it cannot trigger that process definition again.
- New Records and All Updates: A new process will begin every time a new record is created or an existing record is saved and the specified criteria are met, as long as a process is not already running against the record. A given process definition can only run one process instance against a particular record at a time. However, it is important to note that two or more different process definitions may simultaneously run against the same record.
- Relationship Change: A new process will begin every time a related record is added or removed from the target record and the specified conditions are met. This option can be configured to trigger on any module relationship change or only a change from a specified module.
Adding Multiple Start Events
Most use cases can be represented in a single Start event using one of the Start event types. It is best practice to use only one Start event when possible to prevent creating an invalid process definition with multiple Start events that can meet their conditions simultaneously. However, certain very specific use cases cannot be achieved using the available "Applies To" options. In these cases, it is acceptable to use multiple Start events, as long as they contain mutually exclusive criteria. In other words, only one Start event can evaluate to "true" for any given record. If it is possible for two or more Start events to evaluate as "true" against one Sugar record, the criteria for these Start events will be met simultaneously. SugarBPM does not support this type of configuration.
The following table demonstrates the proper and improper use of Start events that apply to multiple scenarios:
| Applies to | Criteria | Explanation | ||
| Start Event #1 |
Accounts; |
Type {is} Customer | Using a single Start event prevents any possibility of an invalid process definition that can meet two sets of criteria simultaneously. | |
| Start Event #1 | Accounts; New Records Only |
Type {is} Prospect | This combination of conditions cannot be represented in a single Start event, so in this case, it is necessary to use two. A Sugar record cannot be simultaneously "new" and "updated" (i.e., existing). It is therefore impossible for these two Start events to evaluate as "true" at the same time, making them mutually exclusive. | |
| Start Event #2 | Accounts; Updated Records Only (First Update) |
Type {is} Customer | ||
| Start Event #1 | Accounts; New Records Only |
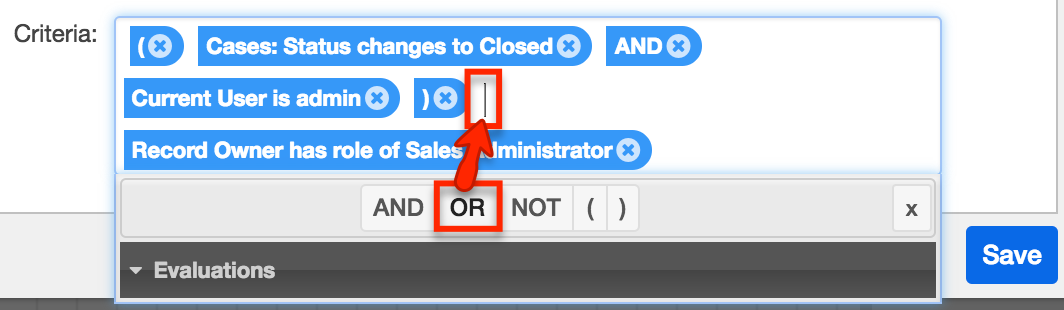
Type {is} Customer | This combination of Start event criteria is not mutually exclusive. A new account in Sugar may be classified as both "Manufacturing" and "Customer", which would make both events evaluate as "true". Instead, use one Start event with an OR operator between the two sets of criteria. | |
| Start Event #2 | Accounts; New records Only |
Industry {contains} Manufacturing |
The "Good design" example above applies a process definition to both new and updated records by using a single Start event triggered by "New Records or First Update".
The "Acceptable design" example above applies a process definition to both new and updated records by using one Start event triggered by "New Records Only" and a second Start event triggered by "Updated Records Only". For this use case, each Start event type has different criteria, which is why two events are needed. When using multiple Start events, join each of them to the next element in the process definition with separate connectors. Multiple Start events in a process definition should always merge into a single path.
Scenarios That Require Multiple Start Events
Most criteria can be represented in a single Start event, but there are a few types of scenarios where this is not possible:
- Processes that start with a split flow that eventually converges cannot be represented in a single Start event. If each subsection involves different elements before converging, multiple Start events are necessary to initiate each flow. An example of this is the stock Case Follow-Up Date Management process definition that comes out-of-the-box with Sugar Serve and Enterprise.
- Processes with Start event criteria that differ depending on if the process is triggered by a new record or an updated record cannot be represented in a single Start event. In other words, the following set of criteria can only be represented in two Start events: (new record AND Status = A) OR (updated record AND Status = B).
Adding Intermediate Events
As the name suggests, intermediate events occur after a process starts but before the process is complete. Intermediate events that are placed within the overall process flow represent things that happen during the normal operation of the process such as sending messages, receiving messages, or mandatory waiting periods.
Note: Intermediate events require the SugarBPM Scheduled Job scheduler to execute. If schedulers are not running, the flow of the process will be interrupted. For more information, please refer to the SugarBPM documentation.
Intermediate events are represented by the second group of icons on the design toolbar. There are three icons that each enable a configurable event.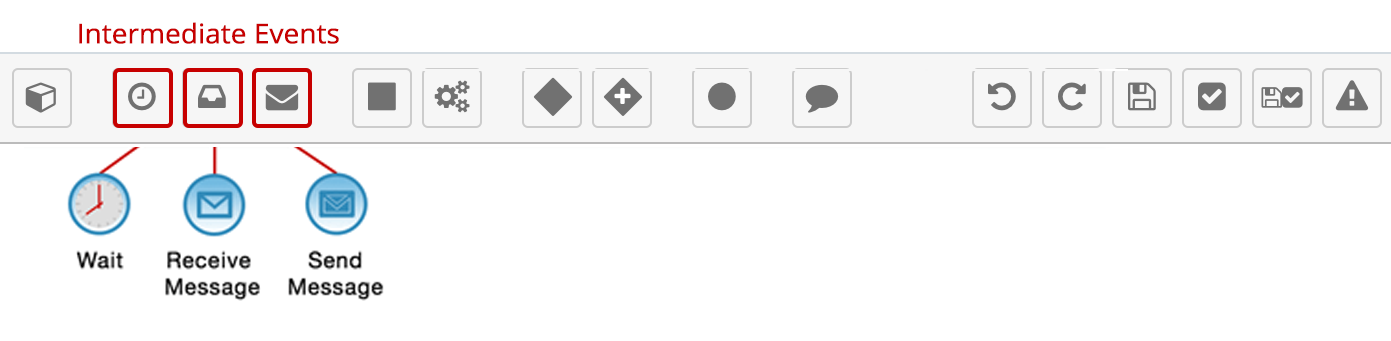
The types of intermediate events are:
Wait Events
This element will stop the execution of a process by the time interval set in the configuration. Wait events support specified times as well as a calculated delta between two times or events.
Note: Schedulers, specifically the SugarBPM Scheduled Job, must be running to execute Wait events. If schedulers are not running or if the event is not properly configured, the flow will be halted indefinitely, thereby stopping the flow of the process. For more information, please refer to the SugarBPM documentation.
A Wait event's clock begins when the Wait event is triggered. For example, consider a process definition that contains three five-minute Wait events. Each one will pause and evaluate a running process at 5-minute intervals for an aggregate 15 minutes of wait time from the beginning until the end of the process definition. While the Wait events enforce an evaluation at 5, 10, and 15 minutes into the process, the settings for each element need only account for the 5-minute span between timed events, and not its relative distance from the start of the process. Therefore, the Duration setting for each Wait event in the example should be set to 5 minutes.
To add a Wait event to the flow, drag and drop the clock icon onto the canvas: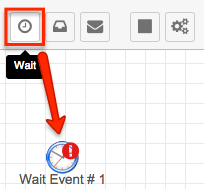
To configure this event, right-click on the icon and choose "Settings". A new window will display: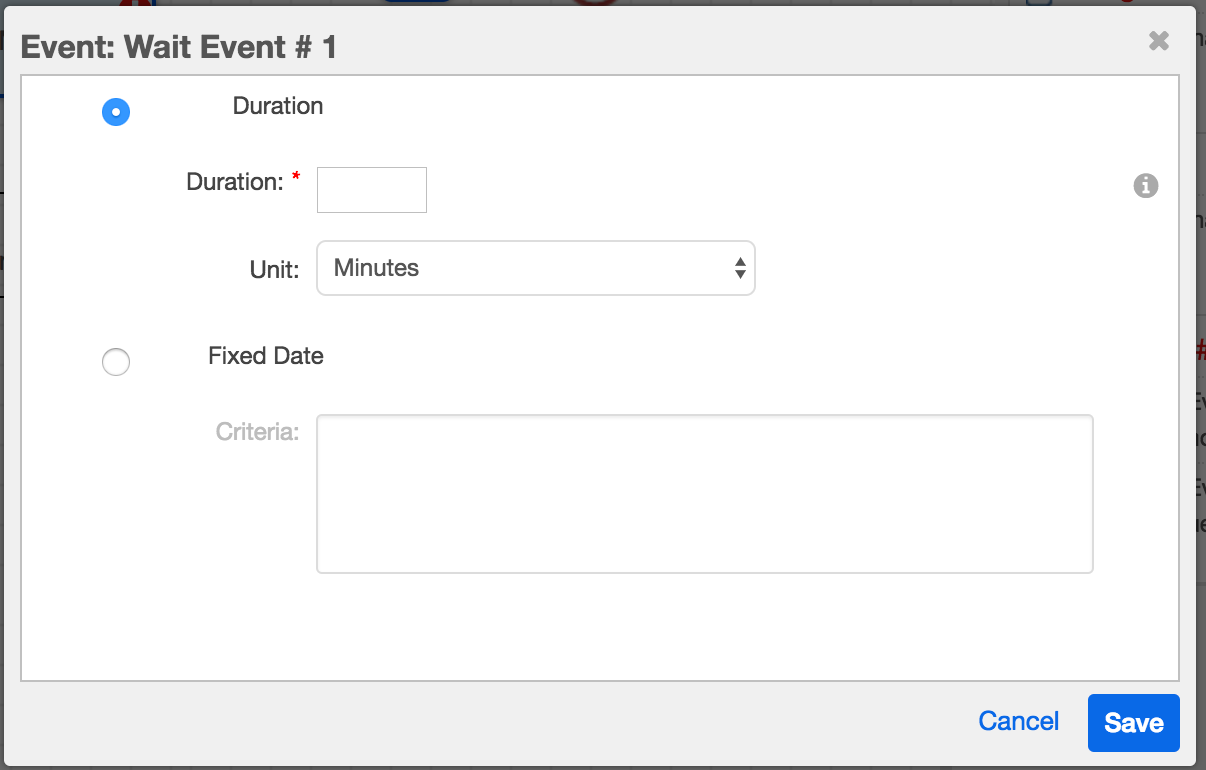
The configuration window has two main options: Duration and Fixed Date. Choose one of these options to enable its configuration fields.
- Duration (radio button): Choose this option to define the duration of the Wait event in minutes, days, or hours.
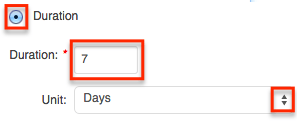
- Duration (text field): Required field when "Duration" is selected above. Enter an integer to use in conjunction with the Unit field.
- Unit (dropdown): The duration defined in days, hours or minutes.
- Fixed Date (radio button): Choose this option if the Wait event will be based on one or more of the record's datetime fields, a specific date, or a calculated formula. Formulas may be constructed using a combination of operators, Sugar variables, and constants.
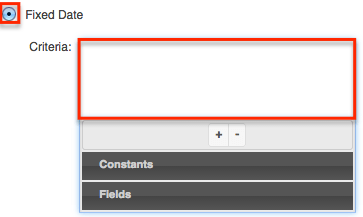
- Criteria: Click inside this field to reveal the criteria builder. Please refer to the Creating Conditions for Events and Actions section of this page for instructions on using the criteria builder.
Receive Message Events
This event will stop the flow of a process definition until the established criteria in the configuration are accomplished. In essence, it is a Wait event that pauses until a condition is met instead of for a specified duration. Most notably, Receive Message events can detect when a field's value changes or when a related record is added or removed.
Note: Schedulers, specifically the SugarBPM Scheduled Job, must be running to execute Receive Message events. If schedulers are not running or if the event is not properly configured, then the event will stop the flow of the process. For more information, please refer to the SugarBPM documentation.
To add a Receive Message event to the flow, drag and drop the Receive Message icon onto the canvas: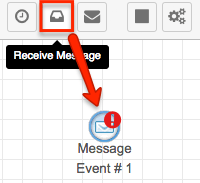
To configure this event, right-click on the icon and choose "Settings". A criteria builder window will display: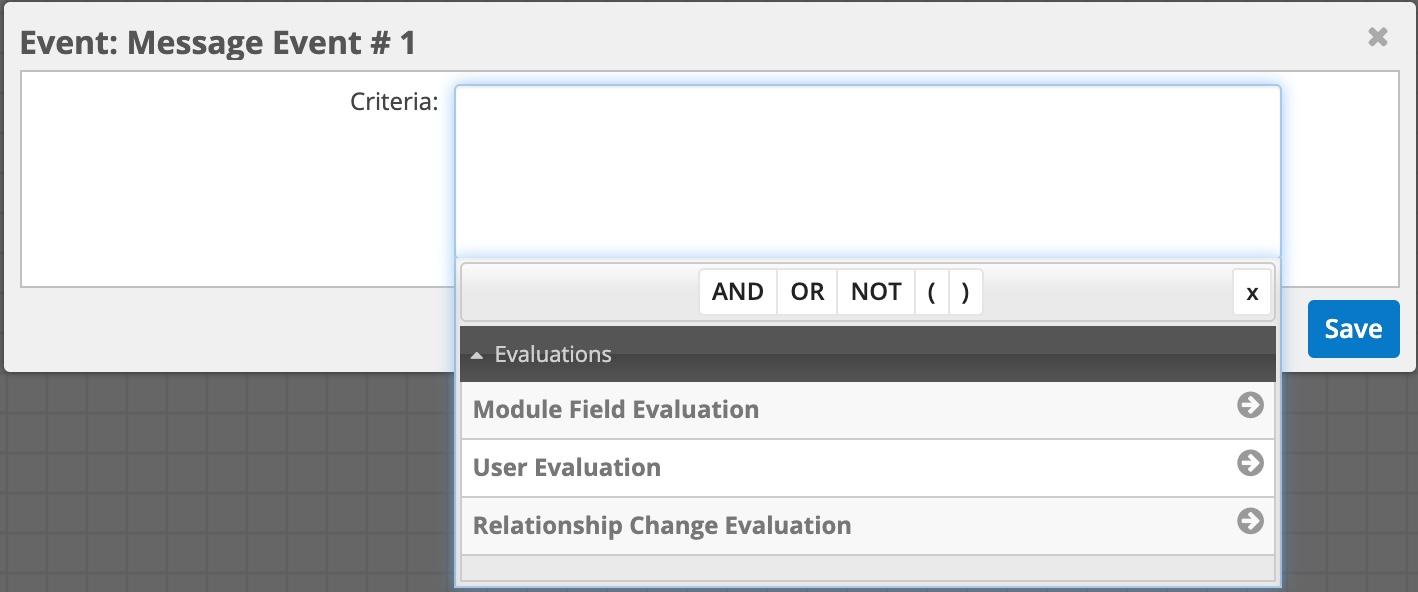
Click inside the Criteria field to reveal the criteria builder. Please refer to the Creating Conditions for Events and Actions section of this page for further instructions.
Send Message Events
This event is the only one that can send email messages. These messages must be created in the Process Email Templates module. Your email template can contain field variables to reference actual data from your target record or its related records.
Note: Schedulers, specifically the SugarBPM Scheduled Job, must be running to execute Send Message events. If schedulers are not running or if the event is not properly configured, the flow will ignore the event and continue running without sending any mail. For more information, please refer to the SugarBPM documentation.
Note: If your email template has been configured with a variable to show the old value of a changed field, it is important to strategically position the Send Message event within your process definition's design. For more information, refer to the Process Email Templates documentation.
To add a Send Message event to the flow, drag and drop the envelope icon onto the canvas: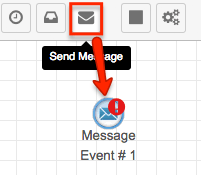
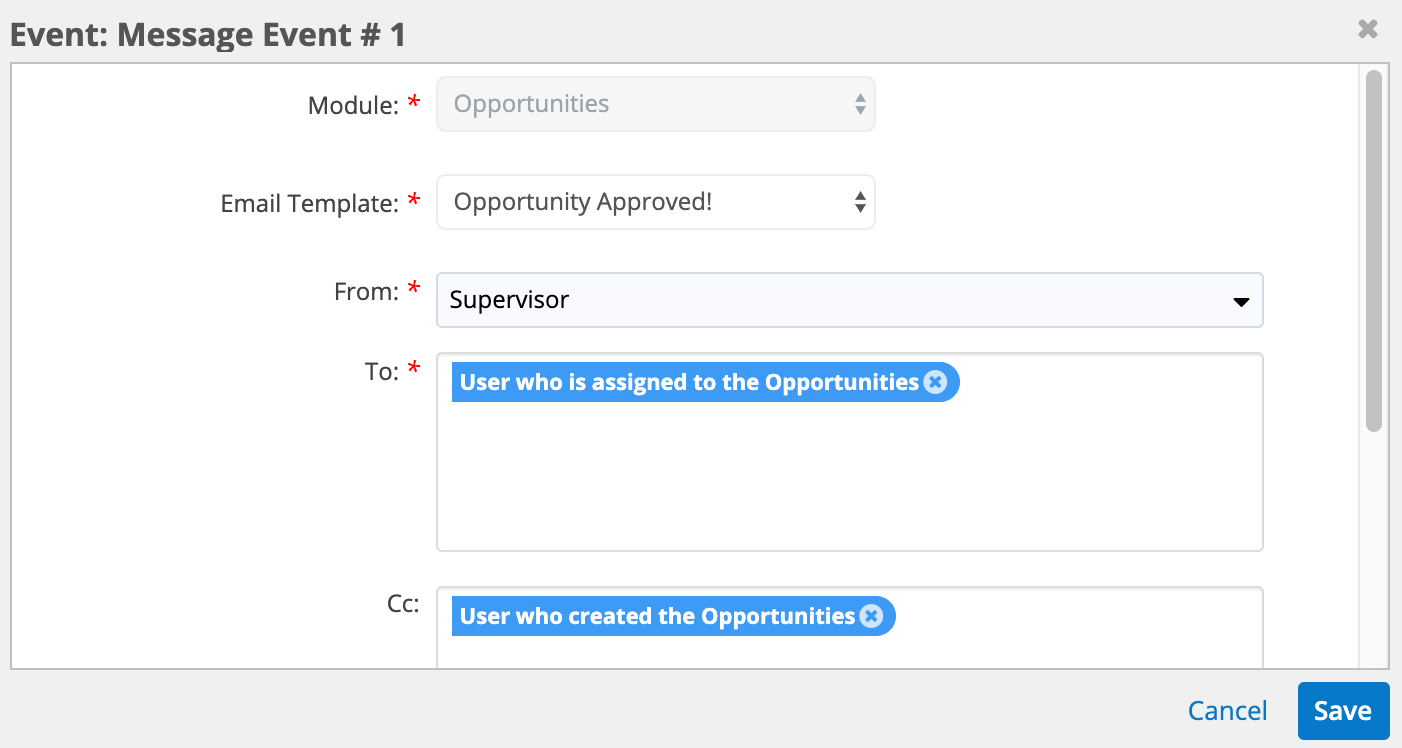
Right-click on the canvas icon and select "Settings" to open its configuration window, which contains the following options:
- Module: (read-only) This is the module that was set as the target module for the process definition and which also must be the target module for the email template.
- Email Template: (required) Choose an email template from the dropdown list. This list will only display templates that use the target module shown in the previous field.
- From: (required) Choose who should be shown as the sender of this email. Options include users associated with the target record (e.g., Record Owner), System Email, any Sugar user, and any outgoing email account configured in Sugar. If you select a user, the name of the sender will be the user's first and last name, and the email address of the sender and reply-to email address will be their primary email address. For details on how these fields are set for outgoing email accounts, see the Emails documentation.
- To (required), Cc, Bcc: Specify the message's recipients. For more information, refer to the Working With Recipient Fields section.
Note: Marketing and campaign emails should never be sent using SugarBPM. This is because SugarBPM does not respect the subject's request to opt out, which raises a liability concern.
Working With Recipient Fields
Recipient fields for Send Message events have options that are unique when compared with the recipient fields in Sugar's Emails module. Send Message events can be configured to send messages to individual recipients or users, members of user teams or roles, their user relationships such as a supervisor, users who created, modified, or are assigned to records, and other recipients from the process's target record or records related to the target record.
Email addresses can be added to the recipient fields via a combination of free entry in the recipient box and using the User, Recipient, Teams, and Role menus. These methods are described in the following sections.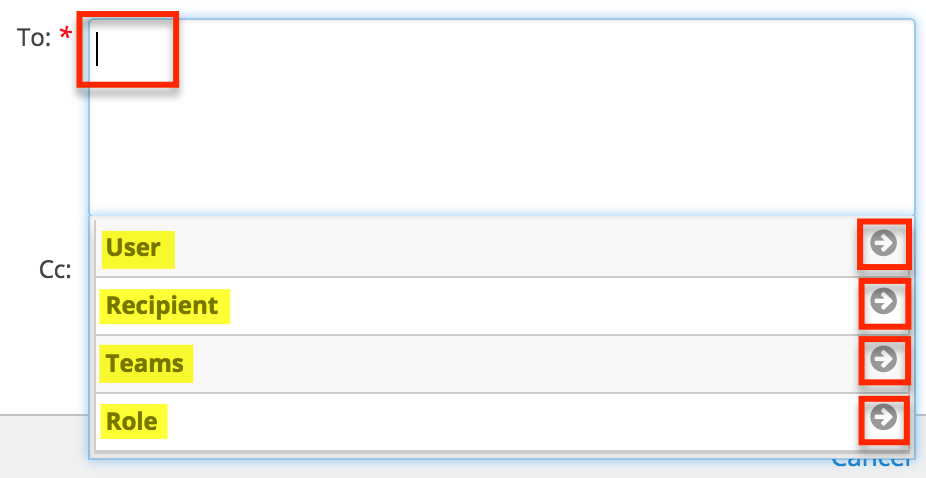
Adding Recipients via Free Entry
When you click inside the text area and start typing, Sugar will display a list of suggestions that auto-updates as you type. If the text you enter is found in an email address or name field for a record that has an email address in Sugar, then the corresponding record will be suggested as a potential match. You may click on a matching recipient to add their email address to the distribution list or continue typing a complete email address (e.g., mail@example.com) directly into the To, CC, or BCC field. When entering email addresses directly, press the Enter key after each address.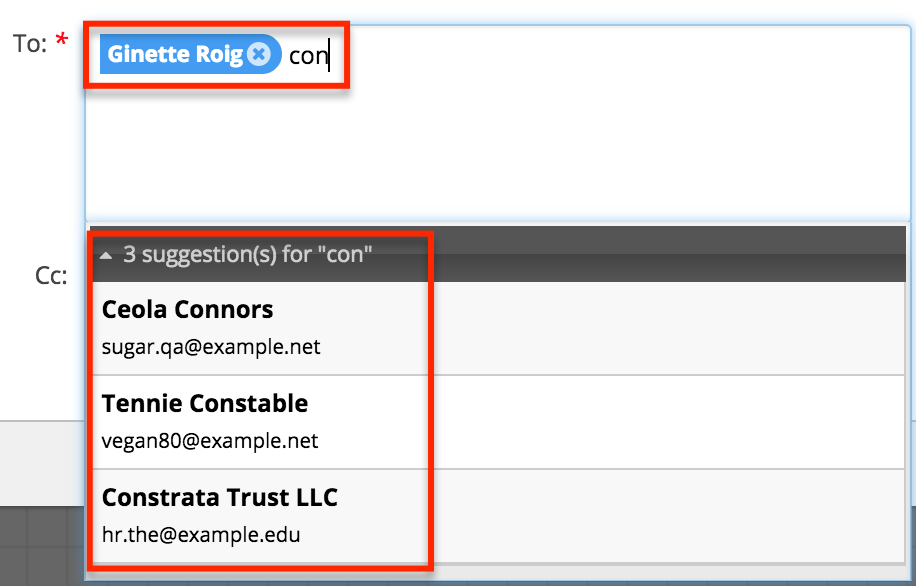
Adding Recipients via User Menu
To send a message to a user or the manager of a user associated with the target record, expand the User recipient panel. 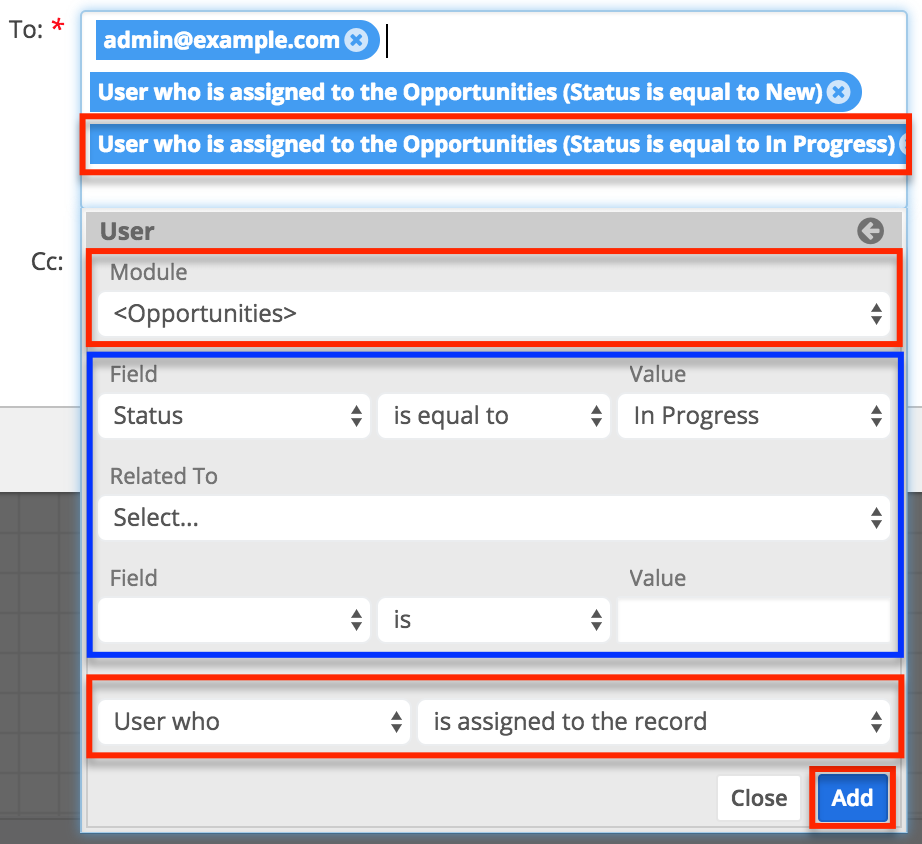
The User panel contains five rows but only the topmost Module field and bottom-most User row (highlighted in red above) are required. The available options are:
- Module (required): Select the first-level module relationship to the user recipient.
- If the user (or user's manager) is related to the target record, then select the target module. For example, the user who created or is assigned to the target record.
- If the user is related to a one-away record (e.g., a user who is related to a record that is related to the target record), then select the module that contains the user field.
- If the user is related to a two-away record (e.g., a user who is related to a record that is related to a record that is related to the target record), then select the intermediate module here, not the target module nor the module that contains the user field.
- Field/Value: Optionally, apply a filter to the first-level module. For example, if the first-level module is Opportunities, you can restrict the criteria to apply to only in-progress opportunities by setting "Status > is equal to > In Progress".
- Related To: Optionally, select a second-level module relationship. For example, set the second-level module to Contacts if you want to send an email to the users related to contacts that are related to the records in the first-level module.
- Field/Value: Optionally, apply a filter to the second-level module.
- User (required; not labeled): In the final row, select whether to send the message to a user or to the user's manager, and what their relationship to the bottom-most selected module is.
Note: Another way to add users as recipients is to message all users on a Sugar team. Refer to the Teams recipient option for more information.
Adding Recipients via Recipient Menu
To send a message to an email address stored in the Sugar database within the target module or a related module's email address field, expand the Recipient panel. 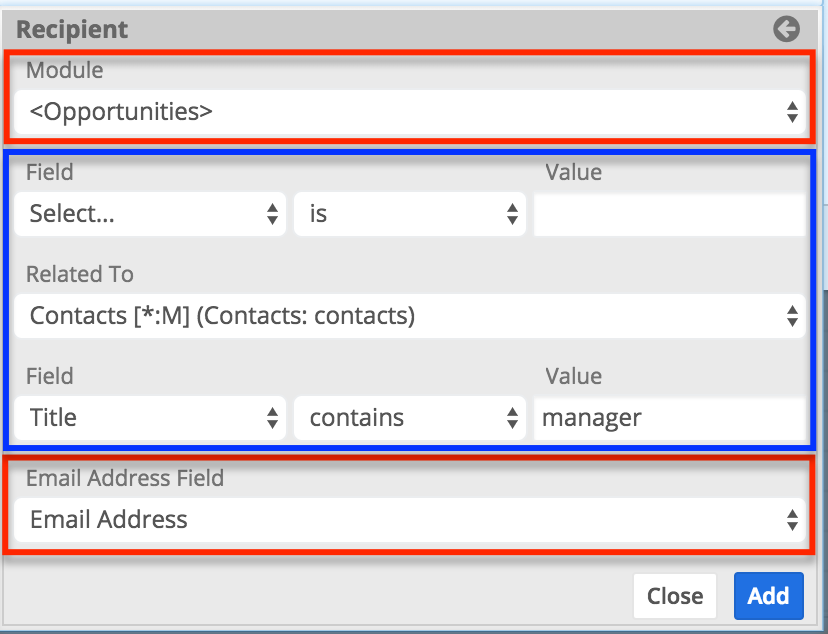
The Recipient panel contains five rows but only the topmost Module field and bottom-most Email Address Field rows (highlighted in red above) are required. The available options are:
- Module (required): Select the first-level module relationship to the recipient.
- If the recipient's email address is on the target record, then select the target module.
- If the recipient's email address is on a one-away record (e.g., in a field on a record that is related to the target record), then select the module that contains the email address field.
- If the recipient's email address is on a two-away record (e.g., in a field on a record that is related to a record that is related to the target record), then select the intermediate module here; not the target module nor the module that contains the user field.
- Field/Value: Optionally, apply a filter to the first-level module. For example, if the first-level module is Opportunities, you can restrict the criteria to apply to only open and won opportunities by setting "Status > is not equal to > Closed Lost".
- Related To: Optionally, select a second-level module relationship. For example, set the second-level module to Contacts if you want to send an email to a recipient related to contacts that are related to the records in the first-level module field.
- Field/Value: Optionally, apply a filter to the second-level module.
- Email Address Field (required): Finally, select the field that contains the recipient's email address.
Adding Recipients via Teams Menu
To send a message to the explicit members of a Sugar team or to all teams assigned to the target record, expand the Teams panel. The Team dropdown menu shows all active teams in Sugar but does not list any private or inactive teams. It also includes an "All teams assigned to the record" option to dynamically choose all teams in the Teams field on the target record at the time the process runs. To add all of the users on a team as recipients, select the team and then click "Add" to move the team's name to the distribution list. To add users from more than one team, simply select the next team and click "Add" again.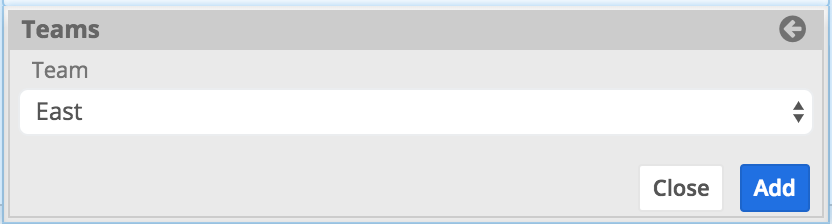
Adding Recipients via Role Menu
Click on the Role menu item to send a message to all of the users assigned to a specified Sugar role. To add users from more than one role, select the role, click "Add" and then select the next role and click "Add" again.
Adding Form Activities
The only unit of work that requires user interaction (as opposed to automation) is an Activity. It is a moment within a flow where a user must decide if a circumstance is approved or rejected, review a record that has been routed to them, or send a record to DocuSign. Activities are represented by the solid square icon on the design toolbar: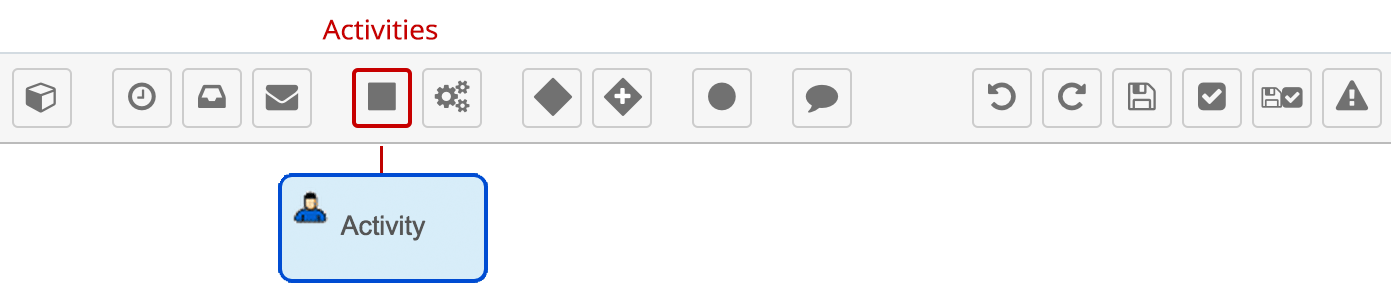
Activities pause a process until a user makes a decision to either approve or reject the record or indicates that they have reviewed a record that has been routed to them. When a process reaches this point in the flow, the appropriate user will see a line item in their Processes dashlet or Processes module list view. An Activity form element is configured in two steps. First, configure the Forms setting and then configure the Users setting.
To add a Form activity to the process definition's flow, drag and drop the Activity icon onto the canvas: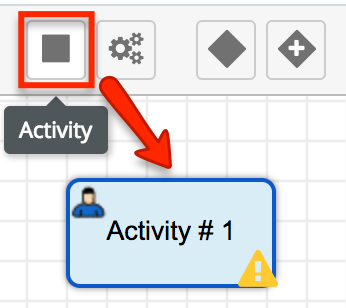
Forms Setting
The "Forms..." setting controls what type of form the process user will see when they are asked to execute this activity. The process user must be separately configured in the "Users..." setting. There are three types of Activity forms:
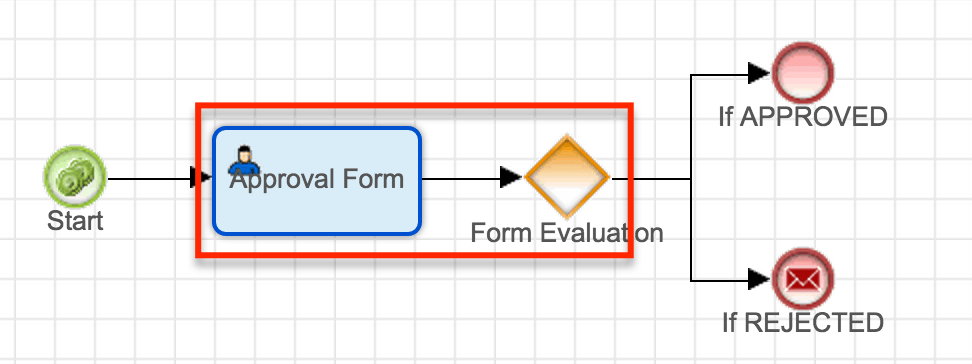
- Approve/Reject: This type of form will present itself as an Approve button and a Reject button on the record view of the record that triggered the process. A Gateway element must be placed after the Approve/Reject activity in order to specify a flow for approval as well as a flow for rejection.
- Route: This type of form should be used to ensure that a record within a process has been viewed or edited by the user configured in the Activity's "Users..." setting. The form will present itself as a Route button on the record view of the record that triggered the process. The process user has the option to edit the record before clicking the Route button. The administrator may choose to ensure only relevant fields are edited by leveraging the Read Only Fields and Required Fields options for this activity.
- Send to DocuSign: This type of form will present itself as a Send to DocuSign button on the record view of the record that triggered the process.
Note: If an activity is not properly configured, it will default to an Approve/Reject form.
To configure the Forms setting for an activity, right-click on the icon and select "Forms...".
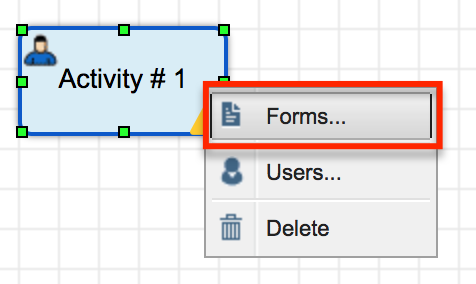
A configuration window will open. The configuration window has four tabbed sections.
These are explained in detail in the following sections.
General Tab
View the General tab (displayed by default) to choose a form type for the activity. 
- Form Buttons: Select the type of form to display.
- Route: The user will be prompted to acknowledge that they have reviewed and optionally edited/commented on the record.
- Approve/Reject (default): The user will be prompted to approve or reject a circumstance. Approve/Reject Form activities should always be followed by a Gateway element with Form Response Evaluation criteria to define the next step of the process in the case of approval or rejection.
- Send to DocuSign: The user will be prompted to view the record. Then, they can press the Send to DocuSign button in the Processes dashlet to open DocuSign's website, where they can manage documents, recipients, and the signing workflow.
- Other Routing Options: During a Form activity's execution, the process user may be given the option to reassign the record associated with the process. It may be appropriate to create specialized teams for users who will be engaged in particular parts of a process. For more information about managing teams and users, see the Team Management and User Management sections of the Administration Guide.
- Change Assigned To User: Enabling this option will add the "Change Assigned To User" option to the actions menu of the process execution screen, as seen here:
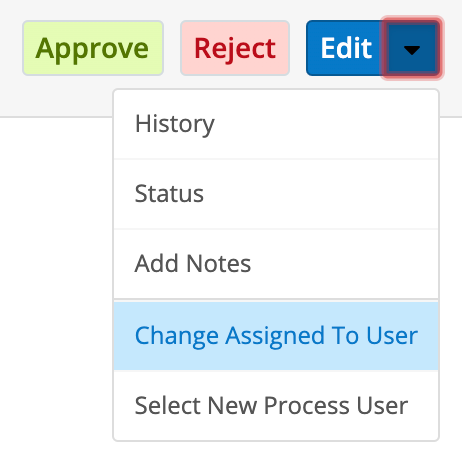
When the process activity is executed, the process user must select this option if they want to change the Sugar record's Assigned To user. The process user can only assign a user from the team configured by admin in the team field under "Other Routing Options".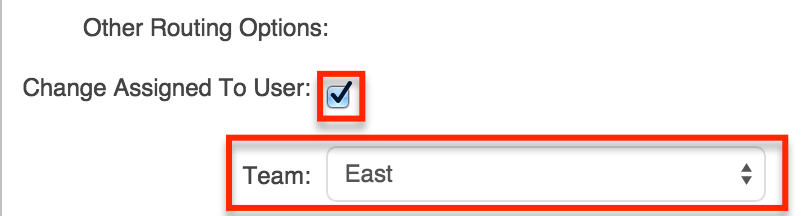
- Select New Process User: Enabling this option will add the "Select New Process User" option to the actions menu of the process execution screen, allowing the designated process user to delegate the Form activity to someone else. The process user can only select a new user from the team configured by admin in the Team field under "Other Routing Options".
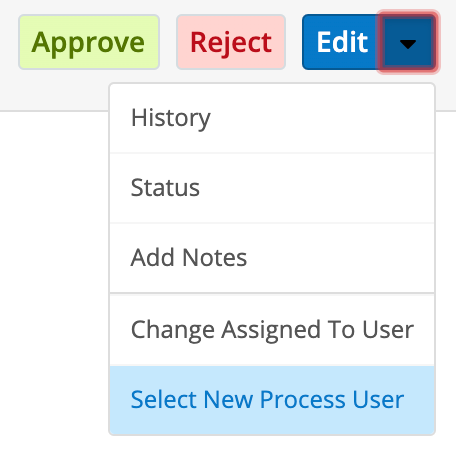
The current process user may select a new process user from the team configured by admin in the "Other Routing Options" Team field.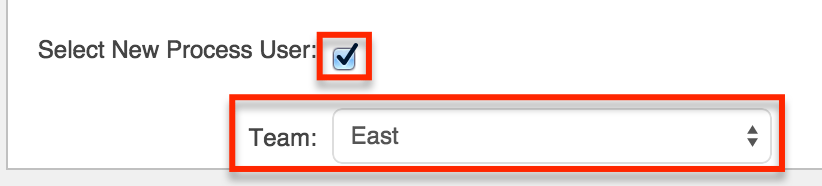
Read-Only Fields Tab
Here, the administrator can restrict the process user from editing some or all fields on the Sugar record for which the process applies. Place a checkmark next to the fields that should not be edited during the form processing step. 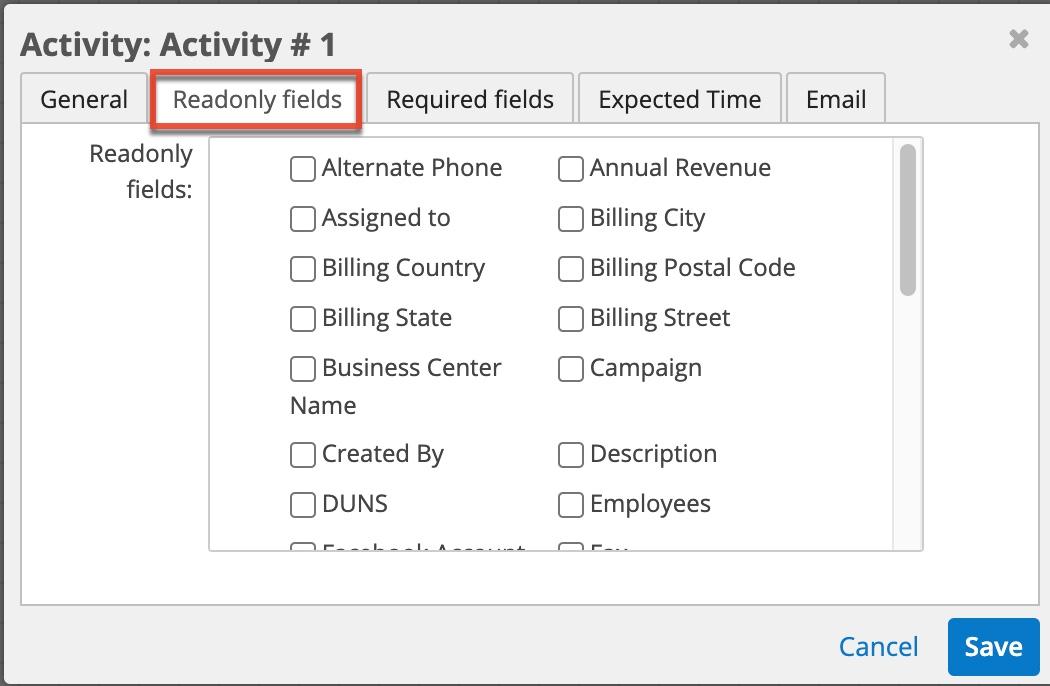
Note: Fields configured as Locked Fields in the Process Definition settings do not apply to the process user when he or she is executing the process. To prevent the process user from editing a field during the approve/reject or route stage, you must configure the fields as read-only in the activity's Read-Only Fields tab.
Required Fields Tab
In this tab, the administrator can require the process user to complete some or all fields on the Sugar record for which the process applies. Place a checkmark next to the fields that must be populated during the form processing step. 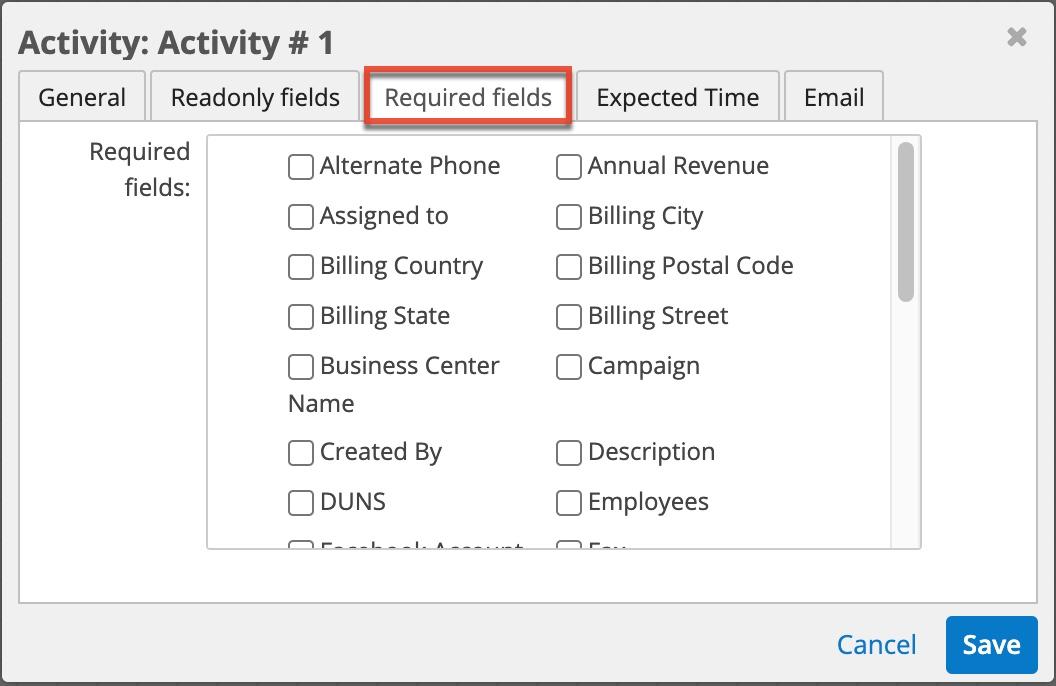
Expected Time Tab
Complete the fields in the Expected Time tab to set a timeout interval for the process user to execute this activity. When the time specified in the Duration field has expired, the activity will be considered overdue. If an Activity is overdue, the Due Date property will be shown in red on the process execution screen and the process will appear in the "Overdue" tab of the My Processes dashlet. 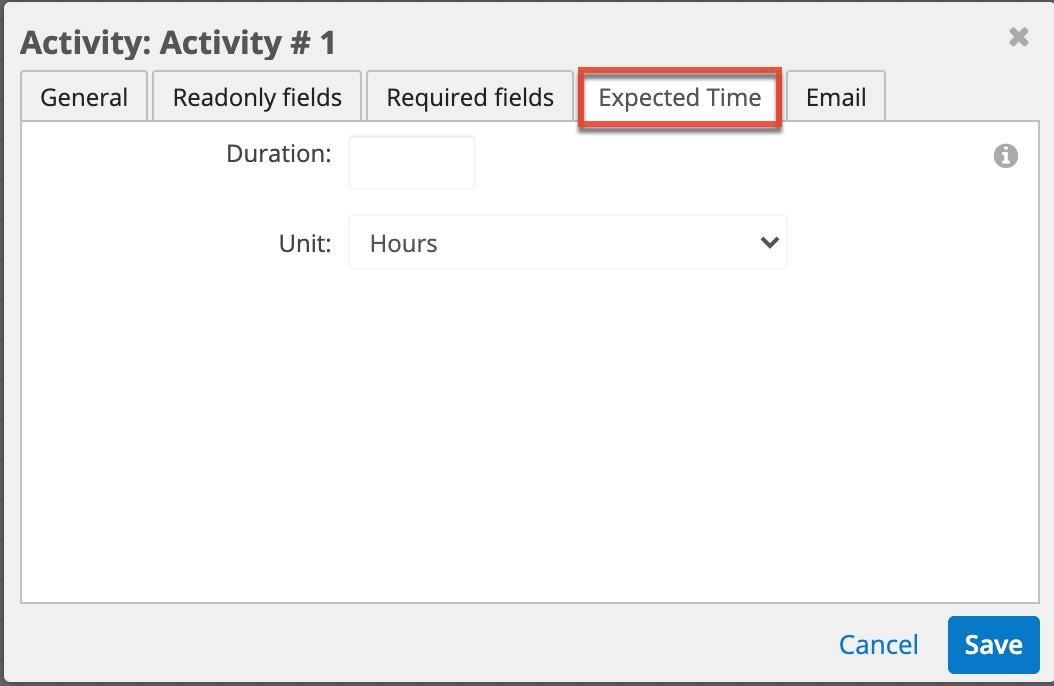
Email Tab
If you wish to send an email notification to the process user to inform them that a new process has been assigned to them, enable the checkbox in this tab. Then, select a process email template to use for the email. In this scenario, it is most useful to use an email template that contains a link to the process so the recipient can click the link to open the specific process requiring action in Sugar. See the Process Email Templates page for details on inserting this link. 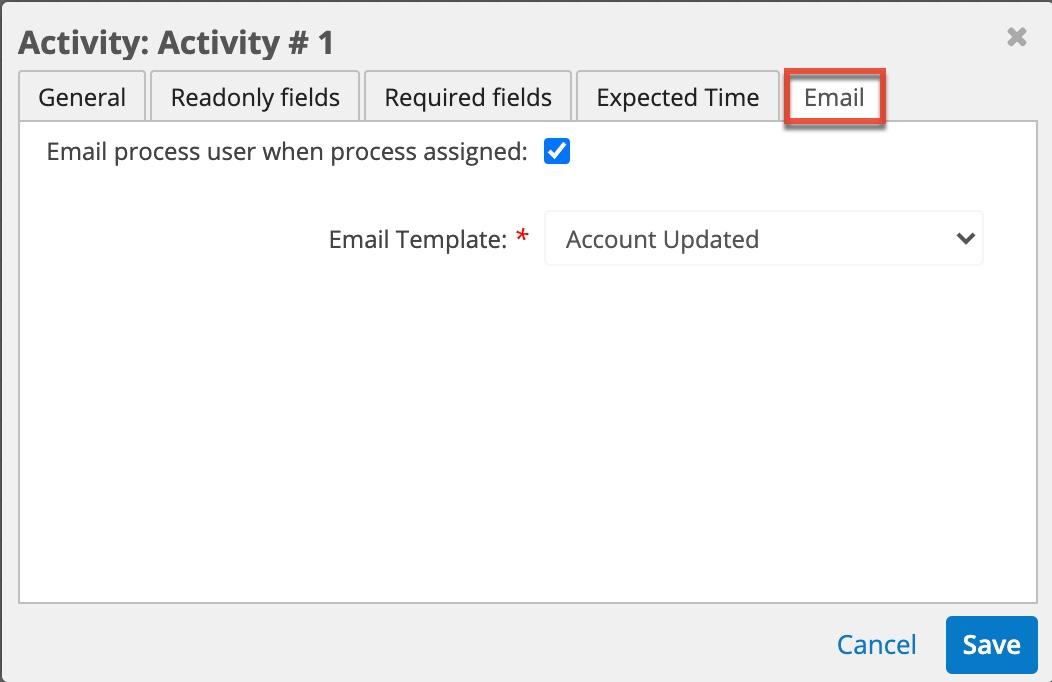
Users Setting
The "Users..." setting controls which user will be responsible for executing the process activity form. When a process reaches the activity in a flow, the process user will see a line item in their Processes dashlet or Processes module list view. The form type and other options must be separately configured in the "Forms..." setting.
Note: The Assignment Method chosen here refers only to the user that will execute the process, or "Process User". References to the Sugar record's assigned user are labeled "Assigned To User".
To configure the Users setting for an activity, right-click on the icon and select "Users...".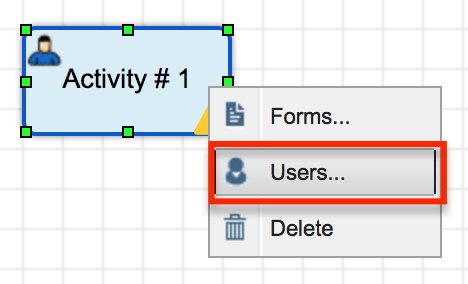
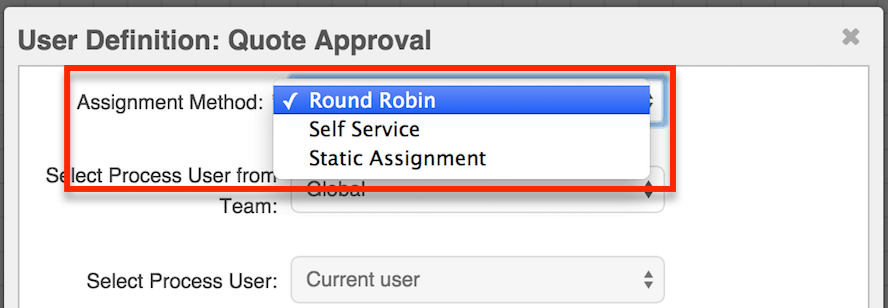
A configuration window will open. Choose one of the following process user assignment methods from the dropdown list:
- Static Assignment
- Round Robin (default)
- Self Service
These three options are explained in detail in the following sections.
Note: If this activity type is not properly configured, it will default to the Round Robin process-assignment method for the Global team.
Static Assignment
Choose "Static Assignment" to assign process Activities to a specific process user. You can also select one of the following variable user types:
- Current User: The Current User refers to the last process user who has been defined in the process definition. If no process user has been previously defined, the Current User will be the user who is in the Assigned To field of the targeted Sugar record.
- Record Owner: The Record Owner is the user who is in the Assigned To field of the targeted Sugar record.
- Supervisor: When selected, the supervisor of the user who is in the Assigned To field of the targeted Sugar record will be prompted to execute this process activity. This relationship must be configured in the "Reports to" field of the Users module. For more information about editing User fields, please refer to the User Management page of the Administration Guide.
Static Assignment will disable the Team configuration option in this window and require only the Select Process User field to complete the configuration.
Round-Robin
Choose the Round Robin assignment method to equally distribute process activities to the explicit members of a team in a take-your-turn fashion. For example, if Jim and Sally belong to team "East," a Round Robin distribution for team East will assign the activity to Jim the first time it runs, to Sally the second time it runs, and then to Jim again on the third execution (and so on). Round Robin actions process users in ascending order based on the ID of the user record in the Users module.
Round Robin will disable the Select Process User option in this window and require only the "Select Process User From Team" field to complete the configuration.

Self Service
Choose the Self Service assignment method to allow any user of a specified team to claim the activity in a process. By enabling users to claim process activities as they have time for them, Self Service assignment reduces congestion in the workflow. Self Service activities that are ready to be claimed will appear in the Self Service Processes tab of the Processes dashlet.
Self Service will disable the Select Process User option in this window and require only the "Select Process User From Team" field to complete the configuration.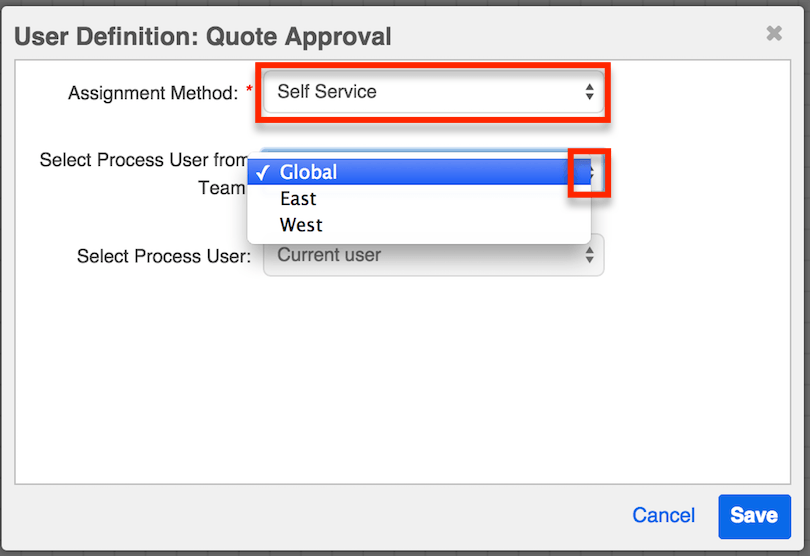
Adding Actions
Actions are automated elements used to execute a business rule, create or update a Sugar record, or designate a process user. Actions are completed by the SugarBPM engine and do not require any human interaction to execute. There are five types of actions available in the Visual Designer and they are all represented by a single icon on the design toolbar: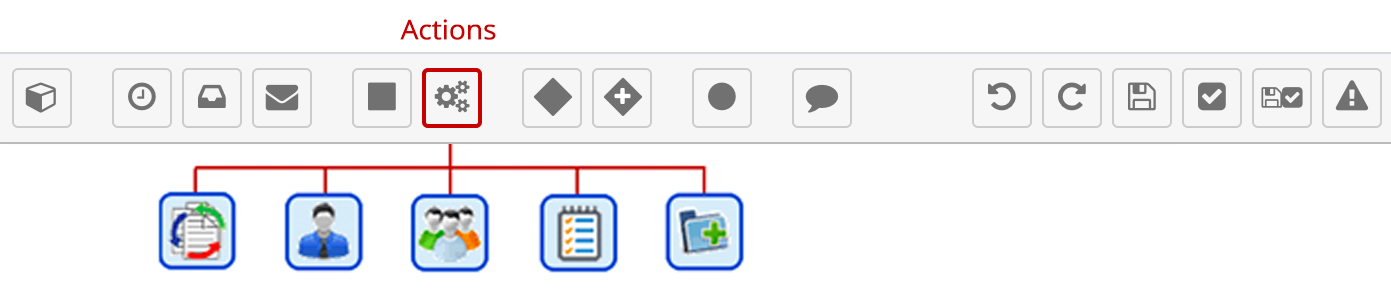
The action must be configured after adding it to the designer canvas. The available action types are:
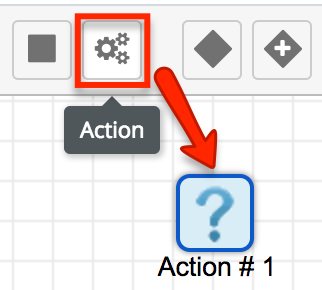
Note: The Action will have an error alert (!) icon warning you to add an outgoing sequence connector. This is normal and will disappear after you create the next element and connect it to the action. For more information about element errors, refer to the Process Validation section of this page.
The Action will display a question mark image until it has been configured. Right-click on the Action icon to configure the action type. By default, an Action element is configured as type "Unassigned". This is simply to prevent a non-configured Action from affecting the Process flow. You must choose one of the Action Types and then configure the appropriate settings.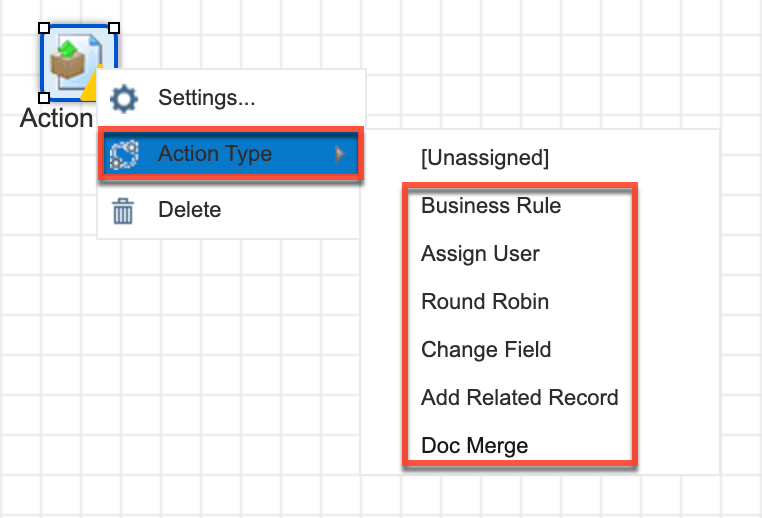
- Settings: This option will be grayed out until an action type is selected.
- Action Type: Choose the type of action this element will execute. These options are explained in detail in the remaining Adding Actions sections of this page.
- Delete: Remove the element from the canvas.
Business Rule
This Action type allows the administrator to select a process business rule in order to return a corresponding value. Business Rule actions must be followed by a Gateway element to analyze the rule's return value. Follow these steps to add a process business rule to the process definition:
Note: The process business rule must already be configured and saved in the Process Business Rules module in order for it to be available in the Action's settings and must utilize the same target module as the process definition.
- Right-click on the Action icon and then select Action Type > "Business Rule":
- The Action's icon will change to:

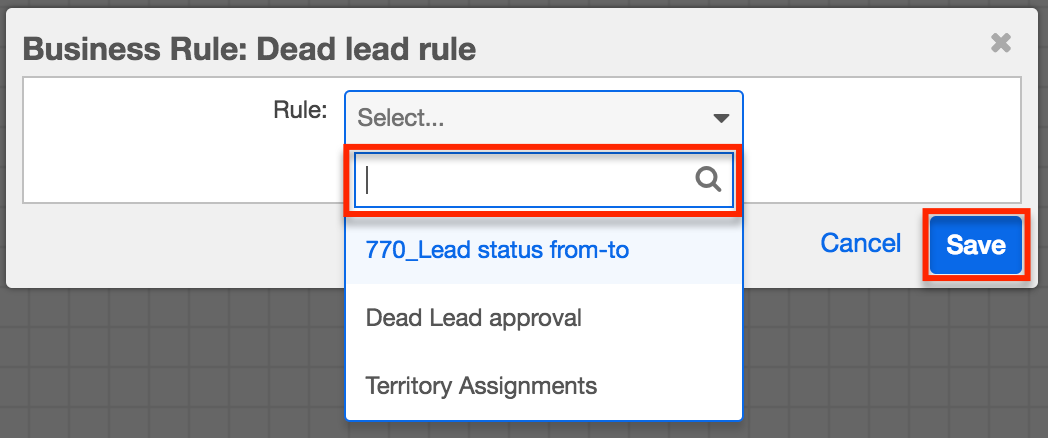
- Right-click on the icon again and choose "Settings":
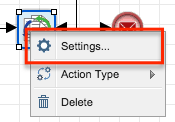
- Select the appropriate process business rule and then click the Save button. Please note that the Rule dropdown list will only display rules that were configured for the same target module as the process definition's target module.
- Now place a gateway element to the right of the business rule icon. Connect the business rule action to the gateway using a sequence connector.
Note: The gateway element is required in conjunction with a business rule action. - Determine the number of possible outcomes for the business rule. Drag the corresponding elements for each icon (any combination of events, actions, or activities) to the design canvas, just to the right of the gateway.
- Connect the gateway to these elements using sequence connectors.
- Finally, configure the gateway criteria before moving on. The gateway will evaluate all possible outcomes of the business rule and direct the flow of the process to the next element as appropriate. Please refer to the Adding Gateway Elements section of this page for more information.
Assign User
This Action type allows the administrator to specify a new process user or the user who will be responsible for the remaining part of the process. Assign User actions should be followed by an Activity for the process user to complete. When a process reaches this point in a flow, the process user will see a line item in their Processes dashlet or Processes module list view.
Follow these steps to add an Assign User action to the process definition:
Note: If an Assign User action is not properly configured, it will stop the flow of the process.
- Right-click on the Action icon and then select Action Type > "Assign User":
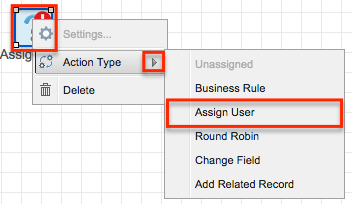
- The Action's icon will change to:

- Right-click on the icon and choose "Settings":

- The Settings dialog window has two options:
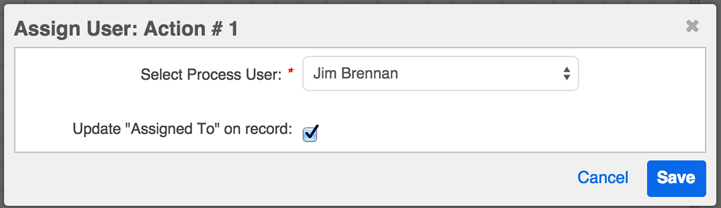
- Select Process User: Select the name of the user that will be responsible for the remaining process steps, until the process ends or a new process user is designated. The Dropdown list will only display users that have an Active status in the Users module.
- Update "Assigned To" on record: Enable this option to automatically change the Sugar record's "Assigned To" field to the process user chosen in the previous field. If the new user is not already a member of any of the teams on the record, the SugarBPM engine will append the user's private team to the record for visibility purposes.
Click "Save" to preserve these settings and return to the visual designer canvas.
Round Robin
This Action type assigns the process and, optionally, the target record, to the members of a team in a take-your-turn fashion. For example, if Jim and Sally belong to team "East", a Round Robin distribution for team East will assign the record to Jim the first time it runs, to Sally the second time it runs, and then to Jim again on the third execution (and so on). Round Robin actions select users for record assignment in ascending order based on the ID of the user record in the Users module.
Follow these steps to add a Round Robin action to the process definition:
- Right-click on the Action icon and then select Action Type > "Round Robin":
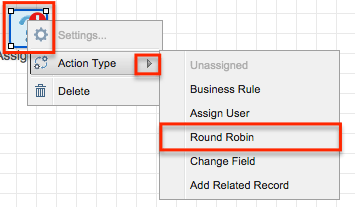
The Action's icon will change to:
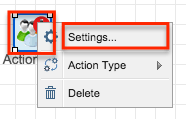
- Right-click on the icon and choose "Settings":
- The Settings dialog window has two options initially but more become available as fields are enabled:
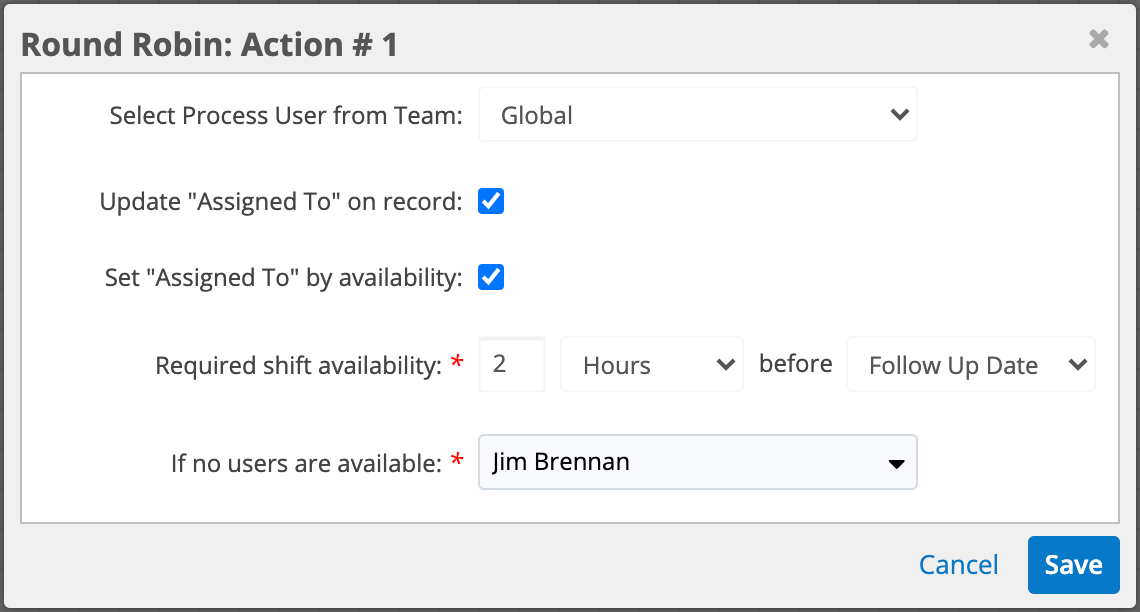
- Select Process User from Team: Select the name of the team from which a member will be chosen for assignment. If the Round Robin team is not already related to the record engaged in the process, it will be appended to the record's team set. Note that users with a "Members Reports-to" membership in a team are not included in the round-robin selection. See the Team Management documentation for more details on this type of membership.
- Update "Assigned To" on record: Enable this option if the Sugar record's Assigned To field should also be updated to the team member selected by the Round Robin action. Enabling this field causes the next checkbox to be displayed.
- Set "Assigned To" by availability: Enabling the previous checkbox causes this field to be displayed. Enable this option if you want SugarBPM to assign records based on users' availability for work.
- Required shift availability: Set these fields according to how much time employees need to have available to be assigned the record. See the Round Robin Availability section below for details on setting this field.
- If no users are available: Select the user that will be assigned records if no users in the Round Robin team are available.
- Click "Save" to preserve these settings and return to the visual designer canvas.
Round Robin Availability
If you configure a Round Robin action to assign records by availability, the process calculates the next user in the round-robin sequence that is available based on their shifts, shift exceptions, and holidays. Users who are currently on shift are considered available unless they have an enabled shift exception or holiday at that moment. Shift exceptions that are not enabled are not included. Refer to the Shifts documentation for details on setting up shifts and shift exceptions, and refer to the Getting Started documentation for details on creating user holidays.
If you also specify the minimum required shift availability, the calculations will consider only the users that have enough shift time before the specified deadline to complete the necessary work. For example, if your employees need two hours to perform the work required before the deadline (e.g., to meet the Service Level Agreement for a customer), set the Required shift availability field as follows: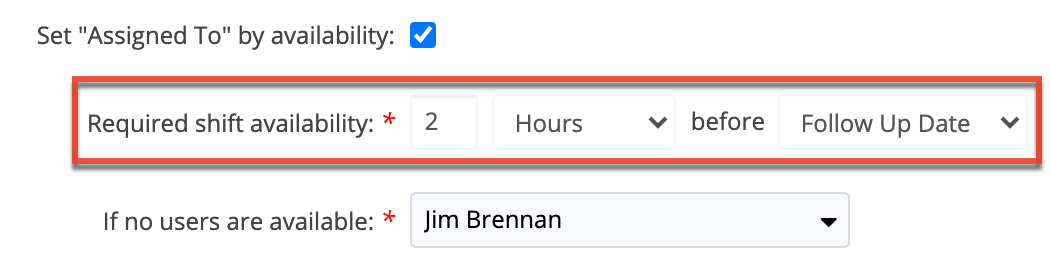
- Number field: Enter the number portion of the minimum required availability duration.
- Time dropdown field: Select the time unit (e.g., hours or minutes) for the duration.
- Datetime dropdown field: Select the deadline before which users must have the required amount of availability. This dropdown menu lists all fields of type Datetime on the target record. Note that it may not make sense to use datetime fields that are always in the past (e.g., Date Created).
Use the "If no users are available" field to select a default user to assign records to if none of the members of the team are available. Note that if the deadline is in the past at the time of record assignment, it is not possible for any user to have enough availability to be selected. As a result, the default user will be selected.
Change Field
This Action type will let you change the value of one or more fields on the target record, on records related to the target record, or on records related to that related record. Please note that calculated fields, including the Forecast field in the Revenue Line Items module (or in the Opportunities module if Revenue Line Items are disabled), cannot be modified by a Change Field action.
Note: If a Change Field action is not properly configured, the flow will ignore the action and continue running without changing any fields.
Follow these steps to add a Change Field action to the process definition:
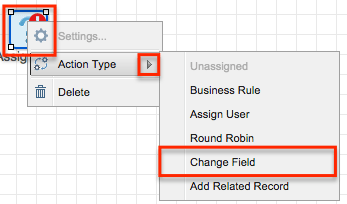
- Right-click on the Action icon and then select Action Type > "Change Field":
- The Action's icon will change to:

- Right-click on the icon again and choose "Settings":
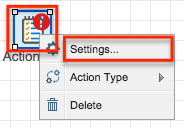
- The Change Fields window will appear. The Module field will be pre-populated according to the target module specified in the process definition's record view, and that module's available fields will be listed in the Fields section below.
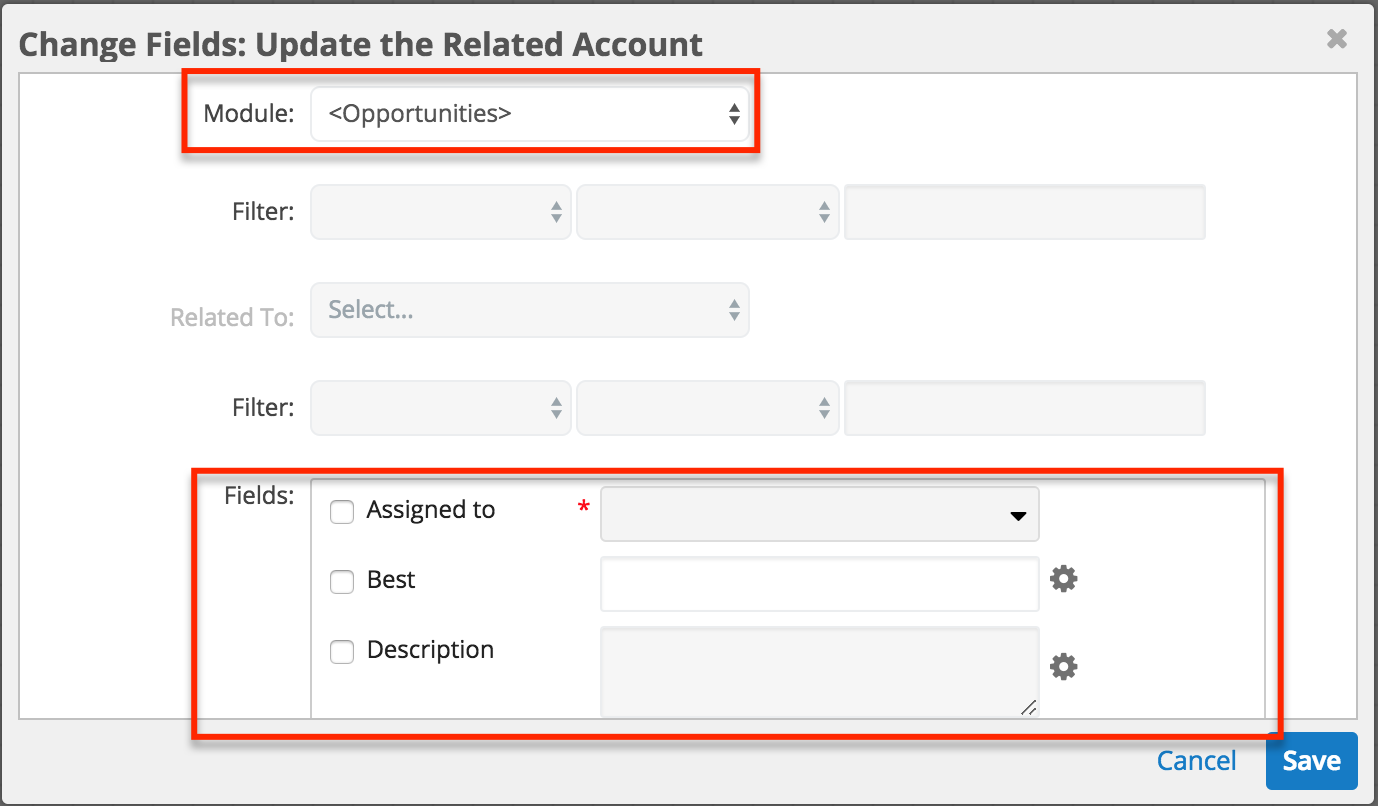
There are also several options that will allow you to change one or more fields on a one-away or two-away record related to the target module. The options are as follows:- Module (required): Select the first-level module relationship to the record you want to modify.
- If the record you want to modify is the target record, then simply leave the target module selected (default).
- If the record you want to modify is a one-away record (e.g., a record that is directly related to the target record), then select the module with the record that you want to modify.
- If the record you want to modify is a two-away record (e.g., a record that is related to a record that is directly related to the target record), then select the intermediate module here; not the target module nor the module that contains the record you want to modify.
- Filter: Optionally, apply a filter to the first-level module. For example, if the first-level module is Cases, you can restrict the criteria to apply to only open cases by setting "Status > is not equal to > Closed". Please note that, if the first-level module is on the one side of a one-to-one or many-to-one relationship, then the filter option will be grayed out, as the filter can be defined in the criteria of the event that precedes the action.
- Related To: Optionally, select a second-level module relationship. For example, set the second-level module to Accounts if you want to modify the accounts that are related to the records in the first-level module field.
- Filter: Optionally, apply a filter to the second-level module records. Please note that, if the first-level module is on the one side of a one-to-one or many-to-one relationship, then the filter option will be grayed out.
- Fields (required): Finally, select the fields you want to modify on the record, as explained in the next step.
- Module (required): Select the first-level module relationship to the record you want to modify.
- To have the process definition update a field, you must first enable that field for editing by clicking inside the field's adjacent checkbox. Each field will be locked from editing until its corresponding checkbox is selected.
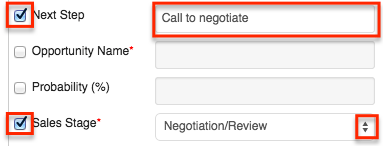
- Enter or select the desired field value. Fields that display a Settings
 icon support advanced configurations.
 - Click "Save" to preserve these settings and return to the Visual Designer canvas.
Note: Conditionally required fields are not available for use in this action type. Please remove the "Required If" text in Studio to use those fields in this process definition action. Review the Studio documentation for more information.
Advanced Configuration Options for Change Field Actions
The following field types support advanced configuration options for Change Field actions, as indicated by the Settings ![]() icon.
icon.
Text Fields
To specify the value of a text field, use any combination of Sugar field variables and text strings. For example, to append the Opportunity's Likely Amount to an existing Opportunity name, follow these steps. In this example, a $100 opportunity named "5 Widgets" will be updated to "5 Widgets - $100".
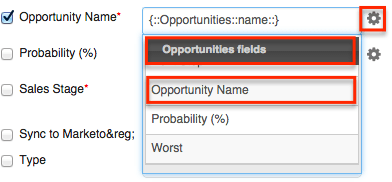
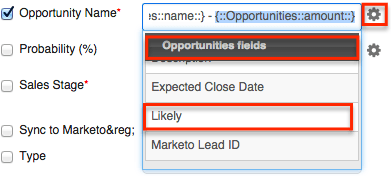
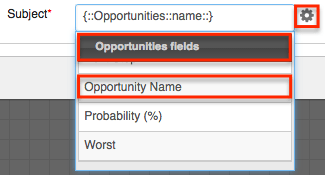
- Enable the checkmark next to the field name that you want to edit, and then click on the Settings icon next to the empty field:

- Click on Opportunities Fields > Opportunity Name. This will insert a variable into the Opportunity Name field that references the current value of the field when the corresponding process reaches this point in the flow.
- Place the cursor inside the field immediately after the variable and type a space or hyphen character for formatting.
- Click on the Settings icon again.
- Click on Opportunities Fields > Likely to insert a second field variable.
- When the formula is complete, the field value container will look similar to this:

Note: If a Change Field action references a field variable that is also changed by the action, the variable will reflect the value of the field before the change field action executes. For example, if the action changes the Probability field to {probability + 1}, and the same action also inserts the Probability field variable into the Description field, after saving, the description will display {probability} and the Probability field will equal {probability + 1}.
Number Fields
To create a calculated value for number fields, use some combination of operators, Sugar variables, and constants. For example, to calculate the Worst Amount field to contain 50% of the value of the Likely Amount field, follow these steps:
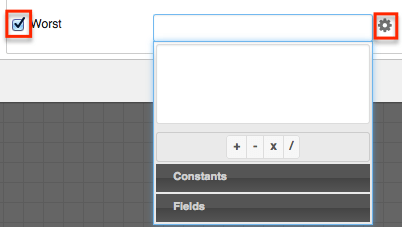
- Enable the checkmark next to the field name that you want to edit, and then click on the Settings icon next to the empty field:
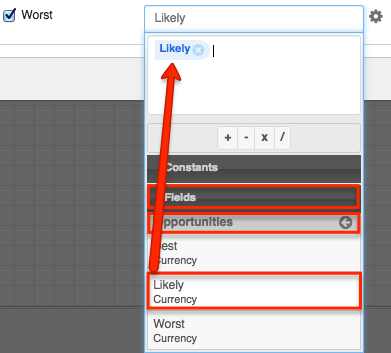
- In the criteria builder, place the variable for "Likely Currency" onto the criteria window by clicking on Fields > Opportunities > Likely Currency. This will automatically add the variable to the window:
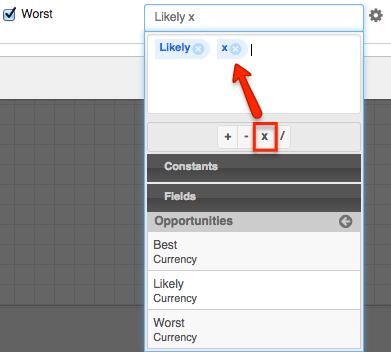
- Click on the multiply (x) operator from the Operators list to add it to the formula window:
- Now tell the criteria builder to multiply the Likely amount by half, or 0.5. Click on Constants > String, Number and Boolean > type "0.5" in the Value field (with no quotes) and then click "Add Number" to move the value to the criteria builder canvas.
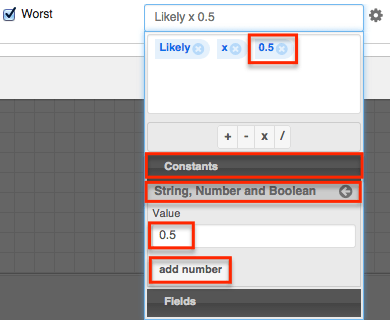
- When the formula is complete, click away from the criteria builder window to see the formula in the field value container:

Date Fields
Date and datetime fields will reveal a criteria builder where the admin can calculate a particular value. Please see the Fixed Dates section of the Creating Conditions for Events and Actions documentation on this page to learn how to configure date fields.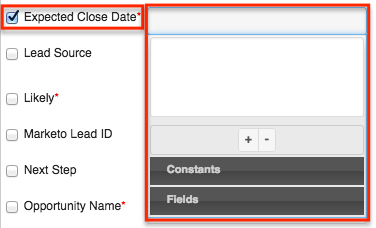
User Fields
For Change Field actions, user fields support the following variable user types relative to the record that triggered the running process:
- Created by User: The user who created the trigger record
- Current User: The user who is defined as the process user within the process definition
- Last Modified by User: The user who last modified the trigger record
- Record Owner: The user assigned to the trigger record
- Supervisor: The supervisor of the user assigned to the trigger record
Add Related Record
This Action type will create a new Sugar record and relate it to the target Sugar record or to a record related to the target record. Please note that the values of calculated fields, including the Forecast field in the Revenue Line Items module (or in the Opportunities module if Revenue Line Items are disabled), cannot be directly defined by an Add Related Record action.
When the SugarBPM engine creates a new record, the record's assigned user will receive an assignment notification email if notifications are enabled in Sugar's system settings and the user has enabled notifications in their user profile. For more information on assignment notifications, please refer to the Getting Started documentation in the Application Guide and the Email documentation in the Administration Guide.
Note: If an Add Related Record action is not properly configured, the flow will ignore the action and continue running without creating a new record.
Follow these steps to add an Add Related Record action to the process definition:
- Right-click on the Action icon and then select Action Type > "Add Related Record":
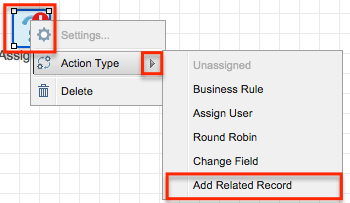
- The Action's icon will change to:

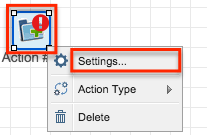
- Right-click on the icon and choose "Settings":
- The Add Related Record window will appear. The Module field will present the potential options in alphabetical order, with the topmost module's available fields listed in the Fields section below.
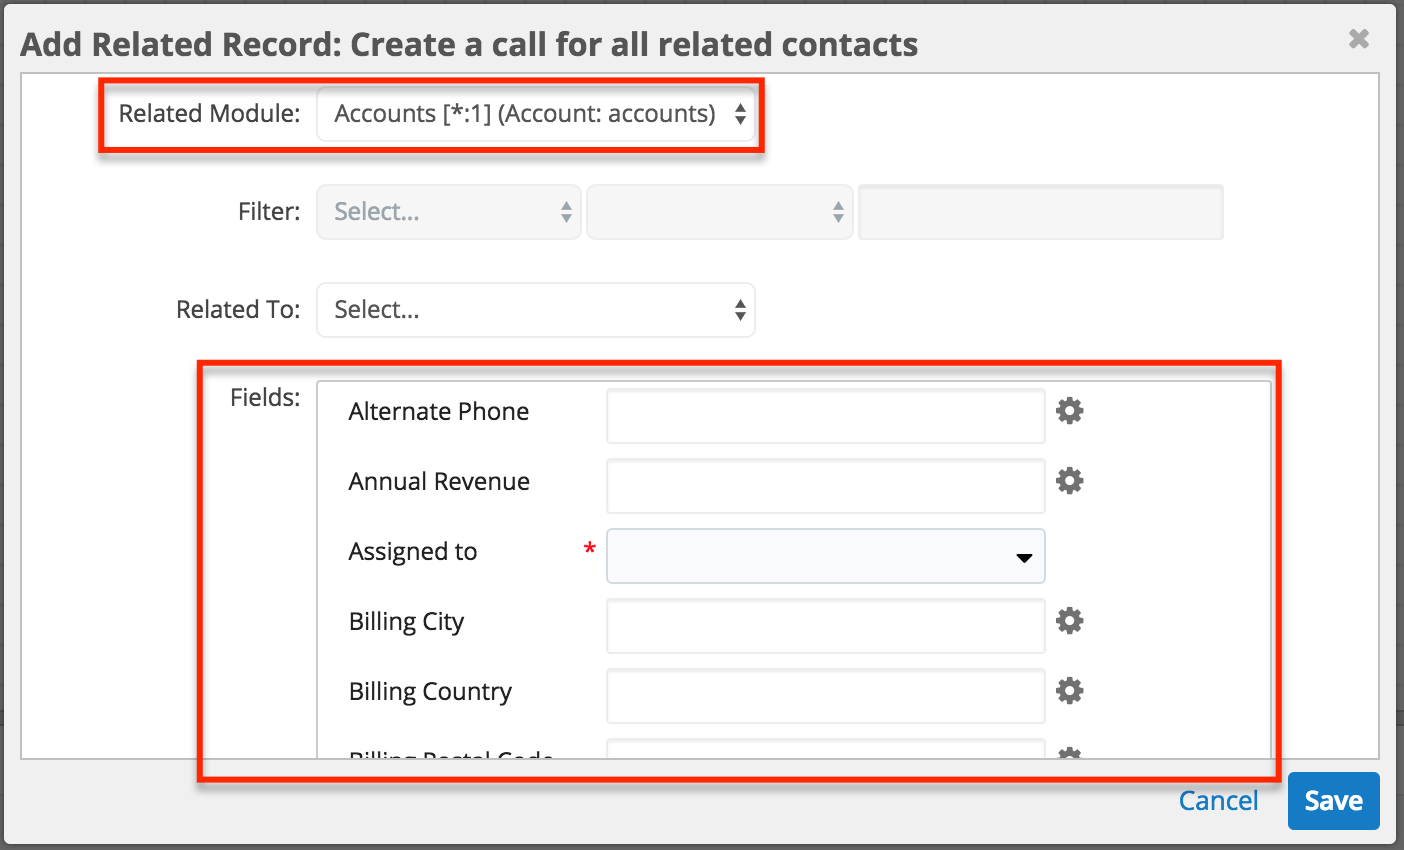
The following options will allow you to create a related record or a record in a two-away module related to the target module:- Related Module (required): Select the first-level module relationship to the record you want to create.
- If the record you want to create is directly related to the target record, then select that module here.
- If the record you want to create is a two-away record (e.g., a record that will be related to a record that is directly related to the target record), then select the intermediate module here; not the target module nor the module where you want to create a new record.
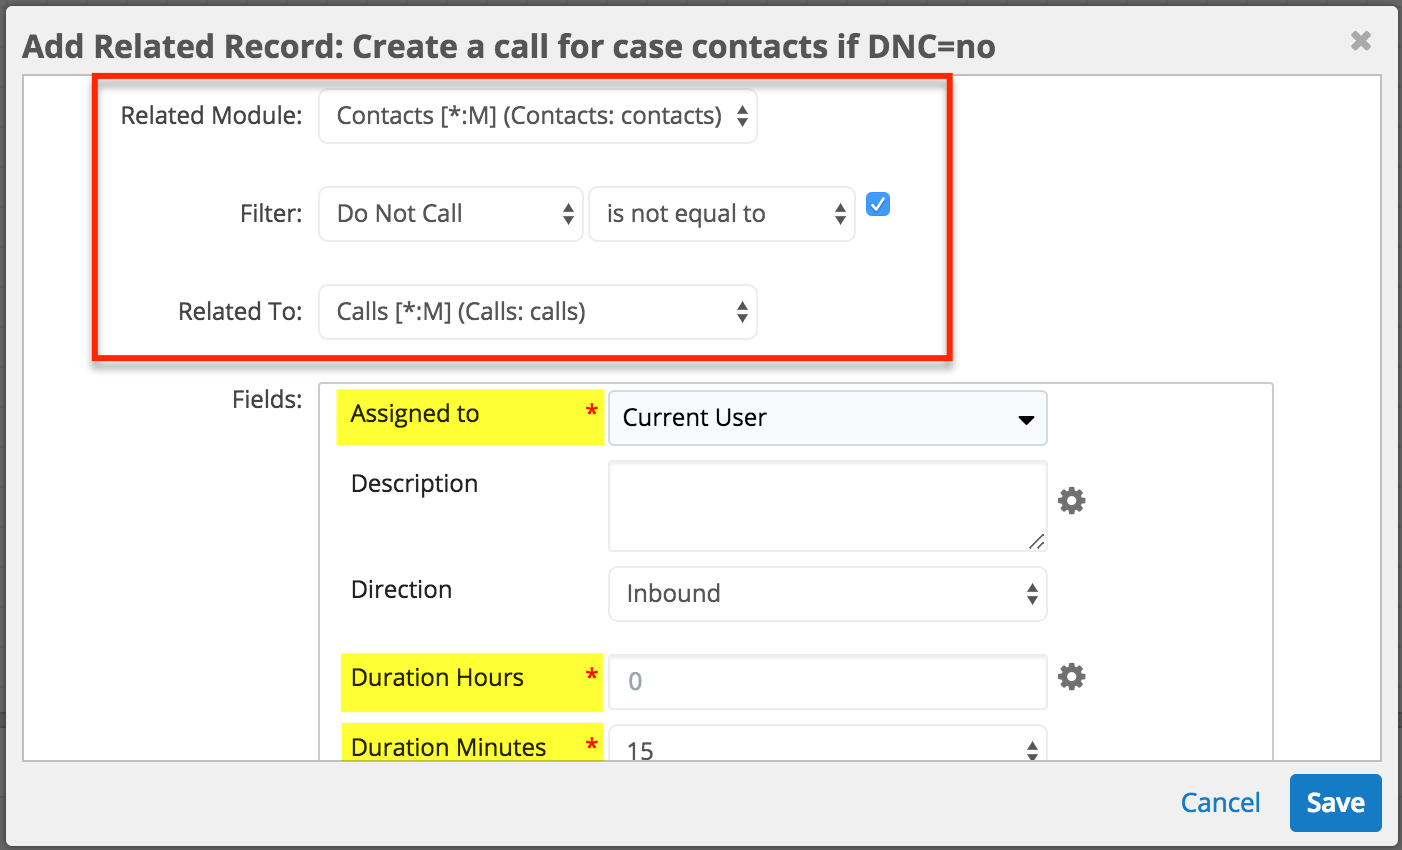
- Filter: If the record you want to create is a two-away record, optionally, apply a filter to the first-level module. For example, if the first-level (i.e., one-away) module is Contacts, you can create related call records for only the related contacts where "Do Not Call > is not equal to > Yes". Please note that, if the first-level module is on the one side of a one-to-one or many-to-one relationship, then the filter option will be grayed out.
- Related To: Optionally, select a second-level module relationship. For example, set the second-level module to Calls if you want to create calls related to the contact records in the first-level Related Module field.
- Related Module (required): Select the first-level module relationship to the record you want to create.
- Complete the fields that the SugarBPM engine will populate in the new record. Any fields that are required by the module (indicated by a red asterisk) must be configured in this step. The following screenshot shows an Add Related Record action configured for a Cases process to create call records related to any contacts that are related to the target case and do not have Do Not Call set.
Fields that display a Settings icon support advanced configurations. - Click "Save" to preserve these settings and return to the Visual Designer canvas.
Note: Conditionally required fields are not available for use in this action type. Please remove the "Required If" text in Studio to use those fields in this process definition action. Review the Studio documentation for more information.
Advanced Configuration Options for Add Related Record Actions
The following field types support advanced configuration options for Add Related Record actions, as indicated by the Settings ![]() icon.
icon.
Text Fields
To specify the value of a text field, use any combination of Sugar field variables and text strings. For example, when creating a follow-up task related to a target opportunity, follow these steps to use the opportunity's Name field in the subject of the task. In this example, a task related to an opportunity named "5 Widgets" will have the subject "Follow up - 5 Widgets".
- Click on the Settings icon next to the empty field, then choose Opportunities Fields > Opportunity Name. This will insert a variable into the Subject field that references the opportunity when the corresponding process reaches this point in the flow.
- Place the cursor inside the field immediately before the variable and type "Follow up: " Include a space or hyphen character for formatting. When the formula is complete, the field value container will look similar to this:

Number Fields
To create a calculated value for number fields, use some combination of operators, Sugar variables, and constants. For example, to calculate the Worst Amount field to contain 50% of the value of the Likely Amount field, follow these steps:
- Click on the settings icon next to the empty field:
- In the criteria builder, place the variable for "Likely Currency" onto the criteria window by clicking on Fields > Opportunities > Likely Currency. This will automatically add the variable to the window:
- Click on the multiply (x) operator from the Operators list to add it to the formula window:
- Now tell the criteria builder to multiply the Likely amount by half, or 0.5. Click on Constants > String, Number and Boolean > type "0.5" in the Value field (with no quotes) and then click "Add Number" to move the value to the criteria builder canvas.
- When the formula is complete, click away from the criteria builder window to see the formula in the field value container:
Date Fields: Date and datetime fields will reveal a criteria builder where the admin can calculate a particular value. Please see the Fixed Dates section of the Creating Conditions for Events and Actions documentation on this page to learn how to configure date fields.
User Fields: For Add Related Record actions, user fields support the following variable user types relative to the record that triggered the running process:
- Created by User: The user who created the trigger record
- Current User: The user who is defined as the process user within the process definition
- Last Modified by User: The user who last modified the trigger record
- Record Owner: The user assigned to the trigger record
- Supervisor: The supervisor of the user assigned to the trigger record
Doc Merge
This action type uses the Doc Merge feature to merge a document template with designated records. Merged documents are assigned to the user who initiates the process action.
Follow these steps to add a Doc Merge action to the process definition:
- Right-click on the Action icon and then select Action Type > "Doc Merge".
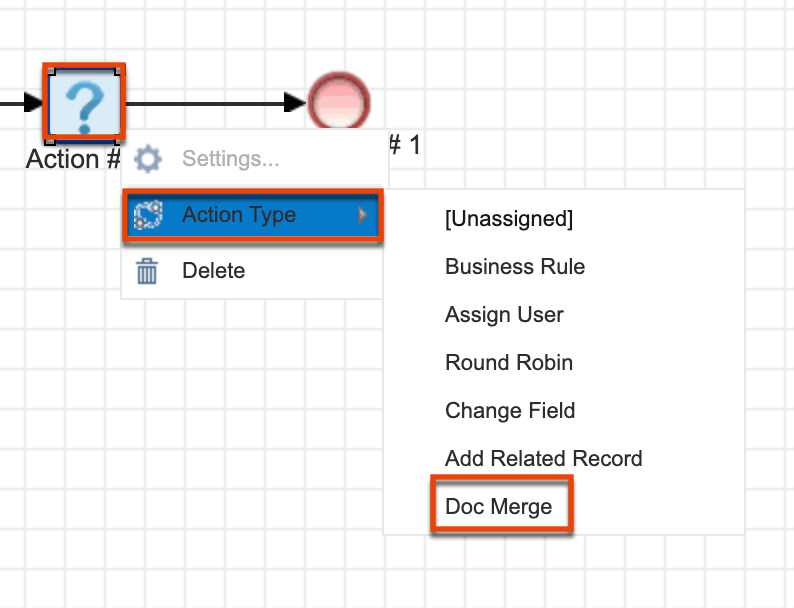
The icon changes to:
- Right-click on the icon, and then choose "Settings":
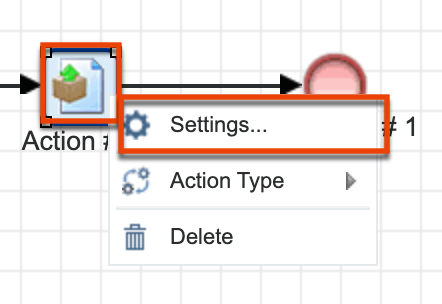
- Identify the following options in the Settings dialog window:
- Document Template: The name of the Document Template to be merged with records. You must begin typing in the Search field to initiate a search for Document Templates.
- Doc Merge to PDF: When this option is selected, the resulting merged document will be a PDF file type. Leave the checkbox de-selected to output the file as its native file type as stored in the Document Templates module (e.g., DOCX).
- Send merged document via email: If this option is selected, the resulting merged document will be sent via email using the selected email template, From, and To values.
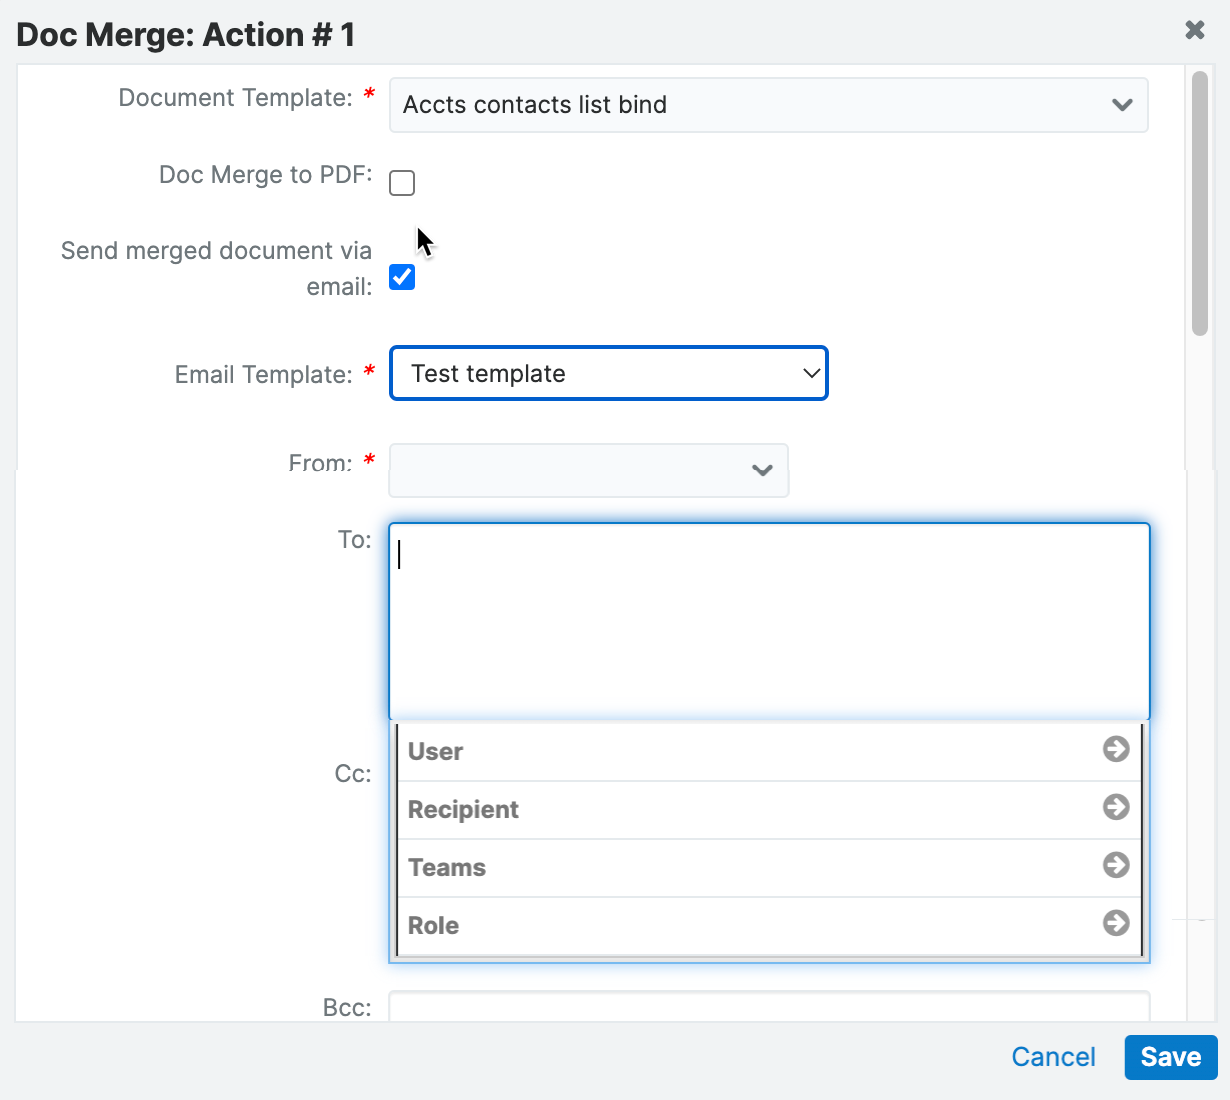
- Click the Save button to preserve these settings and return to the visual designer canvas.
Adding Gateway Elements
Gateways are connective elements used to control the flow of a process via merging and splitting. When a single activity may result in several different outcomes, a Gateway serves as a splitting mechanism (i.e., divergent element). When several activities may result in a common outcome, a Gateway serves as a merging mechanism (i.e., convergent element).
A Gateway is represented as a diamond in the Visual Designer and by the fourth group of icons on the design toolbar. There are two icons that each enable at least one type of configurable divergent or convergent moment.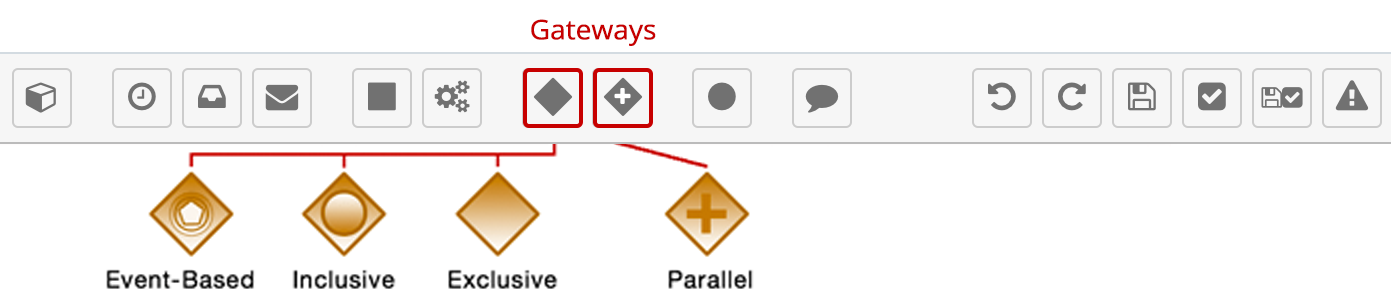
To add a Gateway element to a process definition, drag and drop one of the two Gateway icons onto the designer canvas. Right-click on the diamond-shaped icon that appears in order to define a Gateway type, direction, and configure its settings.
The four types of Gateways are explained in the following sections.
| Gateway Type | Divergent | Convergent | Use |
| Exclusive Gateway | ✅ | ✅ | When divergent, determines a single outgoing path based on data conditions; When convergent, accepts only the flow that reaches it first |
| Inclusive Gateway | ✅ | Evaluates all criteria to determine one or more outgoing paths | |
| Parallel Gateway | ✅ | ✅ | When divergent, begins the concurrent execution of all outgoing paths; When convergent, waits for completion of all concurrent paths |
| Event-Based Gateway | ✅ | Evaluates Wait events and Receive Message events, creating a "race" condition |
Note: A convergent gateway is usually required after a divergent gateway, but not always. Carefully consider the outcome for each path in all possible user scenarios and be sure to use the appropriate End event(s). When divergent paths do not converge, you will most likely need to use Terminate Process End events. For more information on End events, please refer to the Adding End Events section of this page.
Default Sequence Flows
Default sequence flows represent the path your process takes when none of the defined gateway conditions evaluate to true.
- There must be one default sequence flow defined per divergent gateway object.
- Define the default flow before configuring any other criteria for the outgoing flows. Because default flow elements require no conditions, the default flow element will not have a corresponding Criteria field in the Gateway's criteria builder pop-up.
- Failure to define a default sequence flow will result in an element error, as explained in the Process Validation section of this page.
To define a default sequence flow, first, connect the Gateway to all possible outcome elements. Next, right-click on the Gateway icon and hover over the Default Flow option. A menu will appear listing all of the potential flow routes from the Gateway. Select the element that should occur when no criteria are met by the others.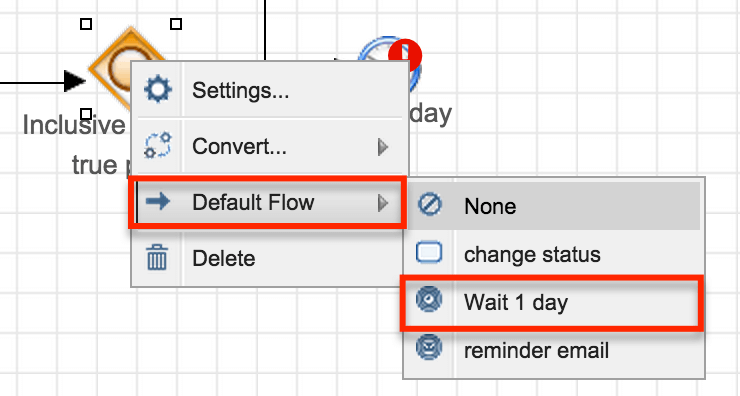
After defining the default flow, the sequence connector leading to the default flow element will be distinguished by a small hash mark through the connector line: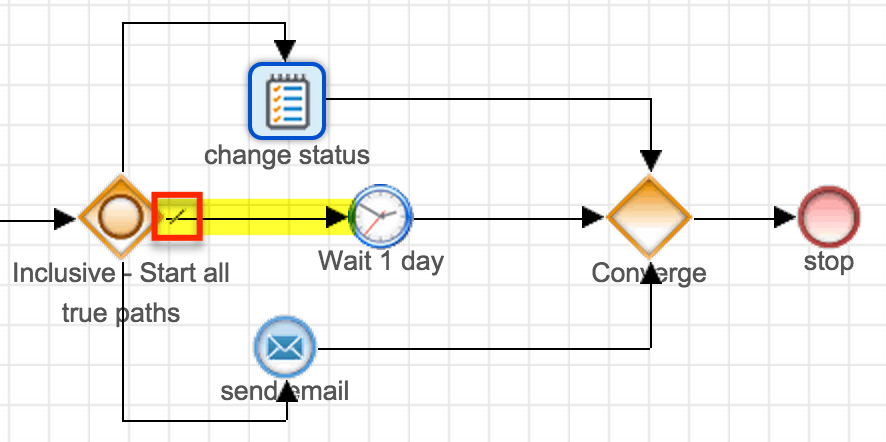
For more information on interacting with sequence connectors, please refer to the Sequence Flow section of this documentation.
Exclusive Gateways

Exclusive gateways can be used to diverge or converge flow elements in a process. Exclusive gateways will evaluate several conditions but only direct the flow to or from a single path in the flow.
Divergent Exclusive Gateway
Only one path will succeed from an Exclusive gateway, and it will be the one that first accomplishes its start criteria.
Note: You must define a default sequence flow for divergent Exclusive gateways to account for situations where all criteria are false.
- If several criteria are true, the flow will be routed through the first (topmost) flow that evaluates as true.
- If no criteria are true, the flow will be routed through the default flow. If you have not set a default flow, the process definition will be blocked by this element.
Follow these steps to configure a divergent Exclusive gateway:
- Drag the Exclusive gateway icon onto the designer canvas.
- A divergent Gateway requires two or more subsequent elements (any combination of intermediate events, end events, actions, and/or activities). These must be placed on the canvas and connectors must join the elements on the canvas before the Gateway can be configured.
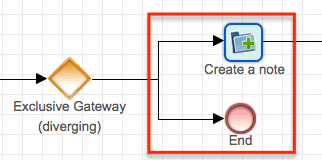
- Once the Gateway has been connected to the subsequent elements, right-click on the Gateway icon and select Direction > Diverging:
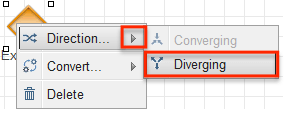
- Specify a default flow for the Gateway. If no criteria are fulfilled, the flow will be routed through the default one. From the visual designer canvas, right-click on the Gateway icon and hover over the Default Flow option. A menu will appear listing all of the potential flow routes from the Gateway. Select the element that should occur when no criteria are met by the others.
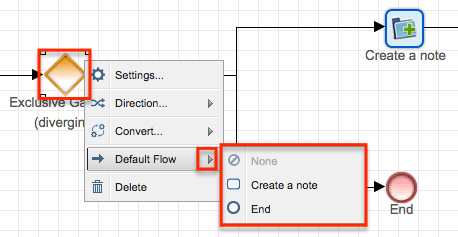
Note: The route set as default will not appear in the Criteria configuration window (step 6). - Right-click on the element again and select the option "Settings".
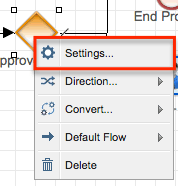
- A pop-up window will appear with a separate Criteria field for each potential outcome except the default one, which requires no criteria.
- Click inside each criteria field to display the criteria builder tool. Refer to the Creating Conditions for Events and Actions section of this page for criteria builder instructions.
- Drag and drop the Criteria fields in descending order of priority.
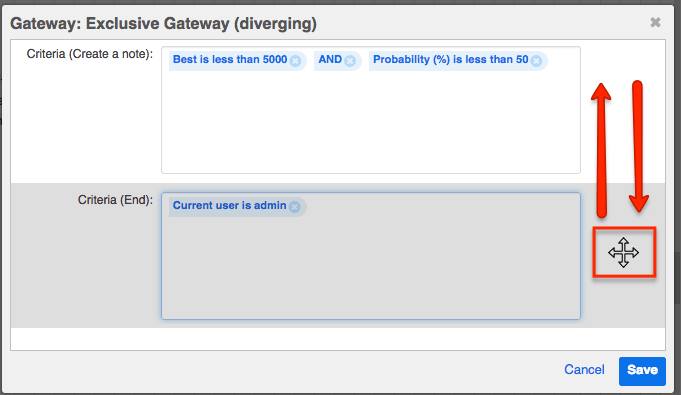
The criteria will be evaluated as they are presented in this window from top to bottom. Only one path will succeed from an Exclusive gateway, and it will be the one that first accomplishes its criteria. The remaining criteria will not be evaluated. If no criteria are fulfilled, the default flow will succeed (see step 4).
- Click "Save" to return to the design canvas and continue building the process definition.
Note: A convergent gateway is usually required after a divergent gateway, but not always. Carefully consider the outcome for each path in all possible user scenarios and be sure to use the appropriate End event(s). When divergent paths do not converge, you will most likely need to use Terminate Process End events. For more information on End events, please refer to the Adding End Events section of this page.
Convergent Exclusive Gateway
This Gateway joins multiple paths in a single thread, but only accepts the first flow that reaches the Gateway; the other flows will not be evaluated after that. There are no settings for this element. To configure this Gateway as a convergent element, right-click on the Gateway element and select Direction > Converging:
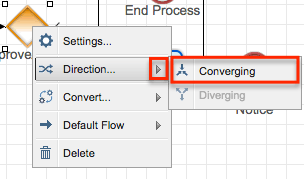
Inclusive Gateways

Inclusive gateways are divergent elements that direct a process's flow along all of the paths that accomplish their criteria. This may result in one flow or multiple flows.
Note: You must define a default sequence flow for Inclusive gateways to account for situations where all criteria are false.
- If only one set of criteria evaluates as true, the flow will follow that path as well as the default path.
- If several criteria are true, the flow will be routed along all paths that evaluate as true, which always includes the default path.
- If no criteria are true, the flow will only be routed through the default flow. If you have not set a default flow, the Process Definition will be blocked by this element.
Follow these steps to configure an Inclusive gateway:
- Drag the Exclusive gateway icon onto the designer canvas.
- Right-click on the Gateway icon and select Convert > Inclusive Gateway.
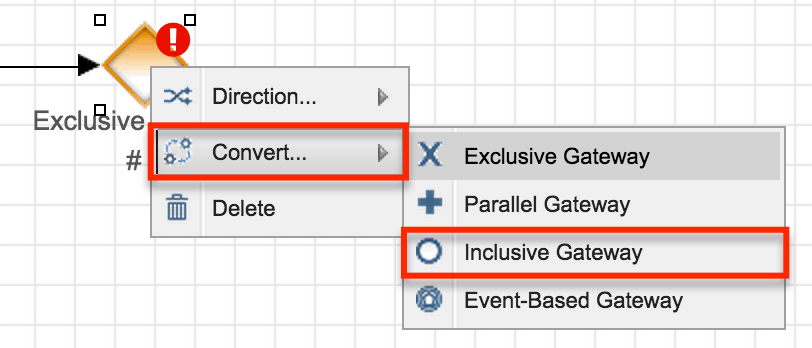
- The icon will transform from an empty diamond to a diamond containing a circle.
- Please note that the label will not automatically update and may still be labeled as "Exclusive". Edit this label as appropriate for your process.
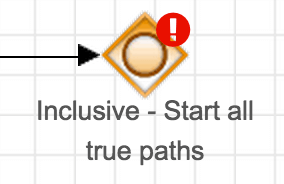
- A divergent Gateway requires two or more subsequent elements (any combination of intermediate events, end events, actions, and/or activities). These must be placed on the canvas and connectors must join the elements on the canvas before the Gateway can be configured.
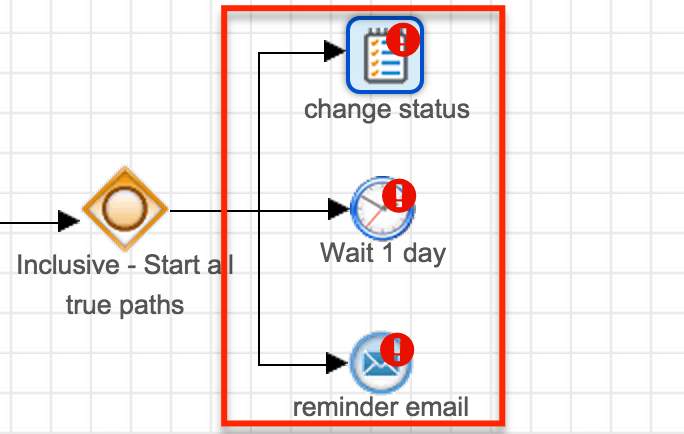
- Once the Gateway has been connected to the subsequent elements, specify a default sequence flow for the Gateway. The flow will always be routed through the default one at a minimum, as well as through any other paths that evaluate to true. From the visual designer canvas, right-click on the Gateway icon and hover over the Default Flow option. A menu will appear listing all of the potential flow paths from the Gateway. Select the element that should occur when no criteria are met by the others.
Note: The path set as default will not appear in the Criteria configuration window (step 6). - Right-click on the Gateway again and select "Settings".
- A pop-up window will appear with a separate Criteria field for each potential outcome except the default one, which requires no criteria. Click inside each criteria field to display the criteria builder tool. Refer to the Creating Conditions for Events and Actions section of this page for criteria builder instructions.
- Click "Save" to return to the design canvas and continue building the process definition.
Note: A convergent gateway is usually required after a divergent gateway, but not always. Carefully consider the outcome for each path in all possible user scenarios and be sure to use the appropriate End event(s). When divergent paths do not converge, you will most likely need to use Terminate Process End events. For more information on End events, please refer to the Adding End Events section of this page.
Parallel Gateways

Use a Parallel gateway in a complex process that has multiple things happening all at once (or "parallel" to each other). Unlike other gateways, there is no evaluation inside this gateway; it simply tells the process that two or more flows are about to happen at the same time.
Parallel gateways can be divergent or convergent. Divergent Parallel gateways will direct parallel flows, whereas convergent Parallel gateways will receive parallel flows. The same gateway is used for diverging and converging: 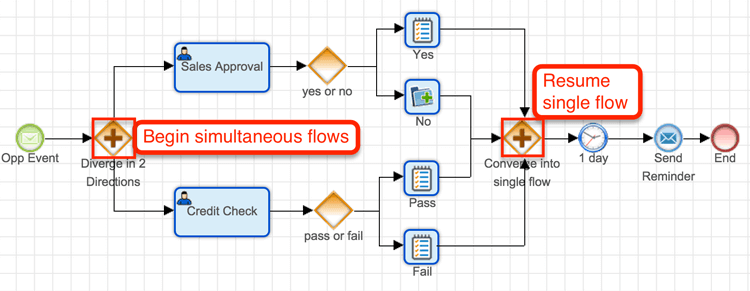
Divergent Parallel Gateway
The divergent Parallel gateway divides the flow into two or more elements in parallel until a subsequent (convergent) Parallel gateway or until the paths are legally terminated via End events. For example, in the screenshot above, the process requires approval from the sales manager and a credit check from the accounting department. If you tried to use an Exclusive gateway for this, it would enforce only one of these options (sales approval OR credit check). But using a Parallel gateway, the process can branch off in both directions at the same time and then converge later. When the parallel flows reconvene, use a convergent Parallel gateway to merge them.
Note: All divergent Parallel gateways must have a convergent Parallel gateway to close out the multiple paths; otherwise, the engine leaves them active.
The following example demonstrates a process where the Parallel gateway is leveraged to kick off two separate functions. The top flow starts the approval and specifies behavior for approve/reject response. The bottom flow starts a separate flow and eventually, a convergent parallel gateway is used to resume a singular flow for the process. 
Note: A convergent gateway is usually required after a divergent gateway, but not always. Carefully consider the outcome for each path in all possible user scenarios and be sure to use the appropriate End event(s). When divergent paths do not converge, you will most likely need to use Terminate Process End events. For more information on End events, please refer to the Adding End Events section of this page.
Convergent Parallel Gateway
A convergent Parallel gateway joins multiple paths into a single thread. The process flow will re-commence only when all of the flows that converge into this gateway have arrived. There are no configuration settings for this gateway.
Event-Based Gateways

Event-based gateways are used to create a "race" condition between Activities, Wait events, and Receive Message events that occur immediately after the gateway. Event-based gateways stop the process flow until one of the activities or events have completed per the following guidelines:
- Receive Message events are complete when their condition is met.
- Wait events are complete when they have satisfied the entirety of their set duration.
- Activity elements are complete when the activity's form has been approved, rejected, or routed, or if the activity gets reassigned to another user via "Select New Process User".
As soon as the first element completes, the flow direction then continues along the path that completed first and the incomplete paths are dropped. There are no configuration settings for an event-based gateway, but the following supporting elements are required:
- A combination of two or more form Activities, Wait events, or Receive Message events to evaluate immediately after the gateway.
- A convergent exclusive gateway must close out the multiple paths; otherwise, the engine leaves them active.
To add an Event-based gateway to your process design, drag and drop the gateway element onto the canvas. By default, it will be set as Exclusive; to convert it into event-based, right-click on the icon and select Convert > Event-Based Gateway.
Adding End Events
End events are represented by the fifth icon grouping on the design toolbar. There is one icon that can be configured three different ways after placing it on the Designer Canvas.
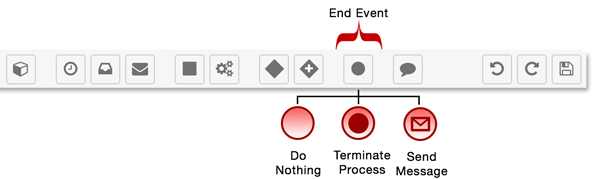
To define an End event type, drag the End event icon onto the Designer Canvas and then right-click on the red circle. Choose "Result" from the menu, and then find the appropriate End event type. Note that the active End event type will be grayed out because it is already selected, and the default type is "Do Nothing".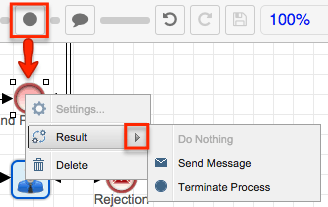
The three types of End event are:
Do Nothing
![]()
Most often used for sequential processes, this event ends a thread of the Process Definition without doing anything. It will not affect parallel threads that may be running simultaneously in the process. Those threads will continue to run uninterrupted by the Do Nothing End event. This event does not need any configuration; it is set by default when you drag and drop an End event onto the canvas.
To create a Do Nothing End event, drag and drop the End event icon into the canvas. Right-click on the element icon and confirm that "Do Nothing" is grayed out by default in the Result menu, indicating that it is the active End event type. If it is not grayed out, click on "Do Nothing" to make it the active End event type.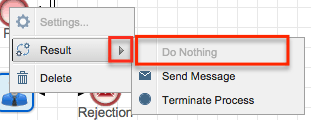
Terminate Process
![]()
Most often used for parallel processes, this event terminates the flow of the branch for which it is designed while simultaneously terminating the entire process, regardless of any parallel events in the process definition. The Terminate Process event does not need any configuration.
To create a Terminate Process End event, drag and drop the End event icon into the canvas. Right-click on the element icon then choose "Terminate Process" in the Result menu to make it the active End event type.
Send Message
![]()
The Send Message End event will signify the end of a process by emailing a message created in the Process Email Templates module to specified recipients. When a Send Message end event has multiple incoming paths, it will send an email message for each path coming into it. If you want the message to be sent only once, then you must use a converging gateway in front of the end event.
Please note that SugarBPM can only send email templates created in the Process Email Templates module and cannot send email messages created in any other part of the Sugar application. If no Process Email Template is specified in the event configuration, then the Process will terminate but no message will be sent. If your email template has been configured with a variable to show the old value of a changed field, it is important to strategically position the Send Message event within your process definition's design. For more information, refer to the Process Email Templates documentation.
Note: Send Message End events require the SugarBPM Scheduled Job scheduler to execute. If schedulers are not running, the message will not be sent. For more information, please refer to the SugarBPM documentation.
To create a Send Message End event, follow these steps:
- Drag and drop the End event icon into the canvas. Right-click on the element icon and then choose "Send Message" in the Result menu to make this the active End event type.
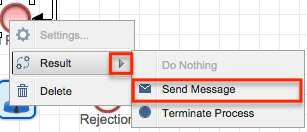
- Right-click on the canvas icon and select the option "Settings" to configure the event. A new window will appear:
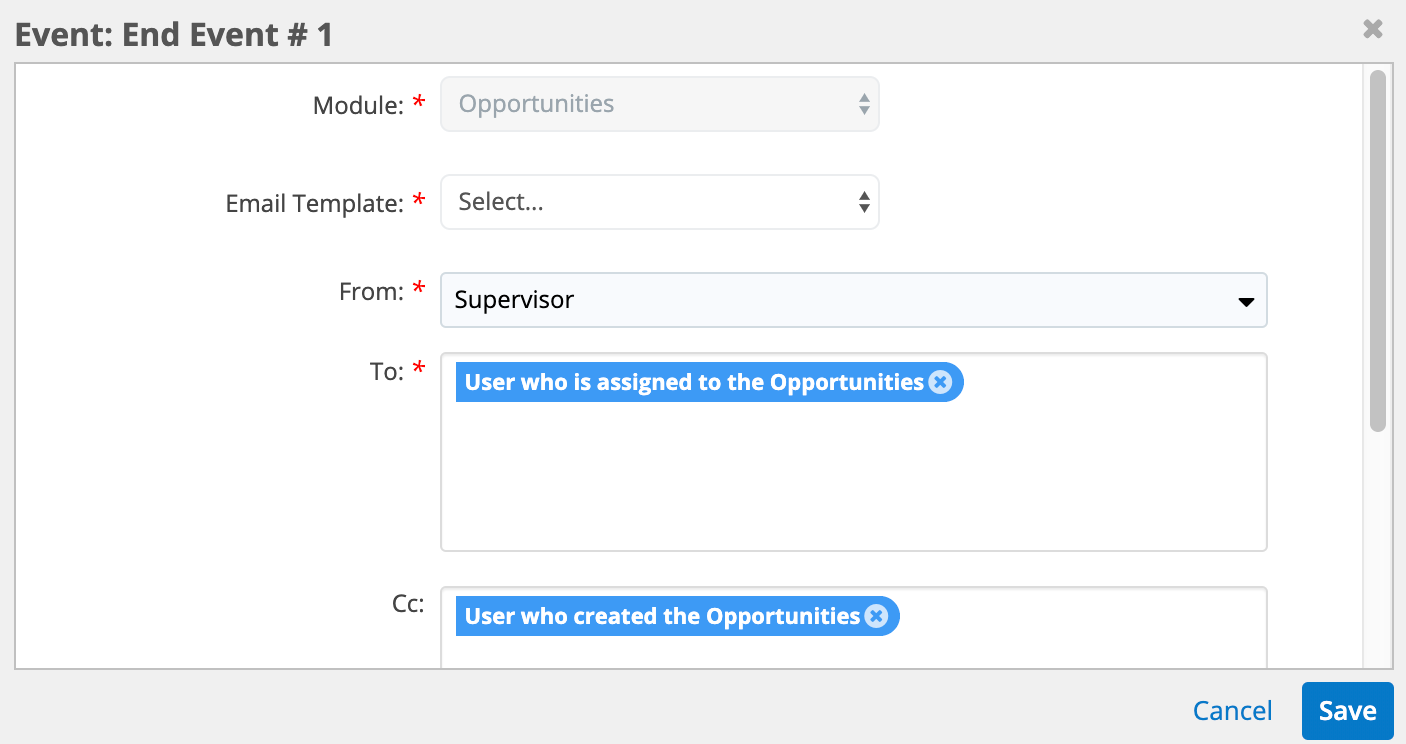
- Module: (read-only)This is the module that was set as the target module for the process definition and which also must be the target module for the email template.
- Email Template: (required) Choose an email template from the dropdown list. This list will only show templates that use the target module specified in the previous field.
- From: (required) Choose who should be shown as the sender of this email. Options include users associated with the target record (e.g., Record Owner), System Email, any Sugar user, and any outgoing email account configured in Sugar. If you select a user, the name of the sender will be the user's first and last name, and the email address of the sender and reply-to email address will be their primary email address. For details on how these fields are set for outgoing email accounts, see the Emails documentation.
- To, Cc, Bcc: (required) Specify the message's recipients. Click inside the text area to select variable users, the explicit members of a Sugar team, and/or type one or more email addresses. Please refer to the Working With Recipient Fields section of this page for more information about configuring the To, Cc, and Bcc fields.
Note: Marketing and campaign emails should never be sent using SugarBPM. This is because SugarBPM does not respect the subject's request to opt out, which raises a liability concern.
Setting Conditions
Conditional criteria may be defined for elements in a process definition based on process business rules, response forms, field values, related modules, specified users, and date intervals.
Creating Conditions for Events and Actions
Start event, End event, and all types of Action elements will display conditions as logical or mathematical operations, depending on the type of field that is under evaluation.
The available conditional components are:
- Logical Operations: Used in criteria builders for text and other non-numerical field types.
- Mathematical Operations: Used in criteria builders for date and numerical field types.
Logical Operations
Logical operations utilize the AND, OR, and NOT operators in conjunction with the Module Field Evaluation, User Evaluation, and Relationship Change Evaluation options to specify conditions for an event. For example, a Start event for opportunities may be limited to only opportunities containing a certain sales stage. Logical operations are defined inside a criteria builder in the process definition's design view.
The logical operations window will always contain a criteria field and logical operators:
- Criteria field: This is the field where the criteria will be constructed. Click inside the criteria field to reveal the logical operators and supported evaluation types.
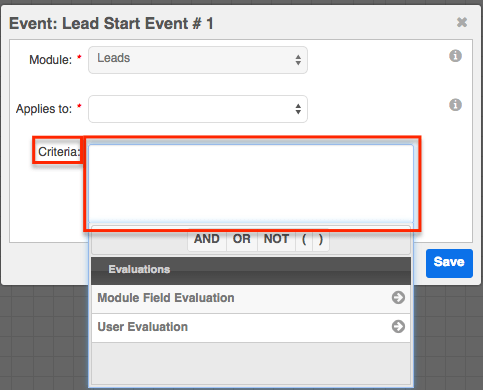
- Logical Operators: Click on the AND, OR, and NOT buttons to create logical statements. Use the parentheses to group operations.
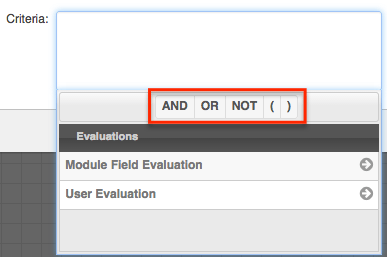
Module Field Evaluation
Note: Module Field Evaluations are logical operations that may be used in Start events and Receive Message events.
To reveal the Module Field Evaluation panel, click inside the criteria field and then click on "Evaluations" and select "Module Field Evaluation":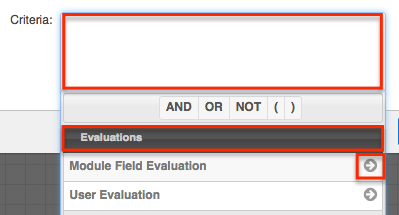
The Module Field Evaluation panel consists of the following options: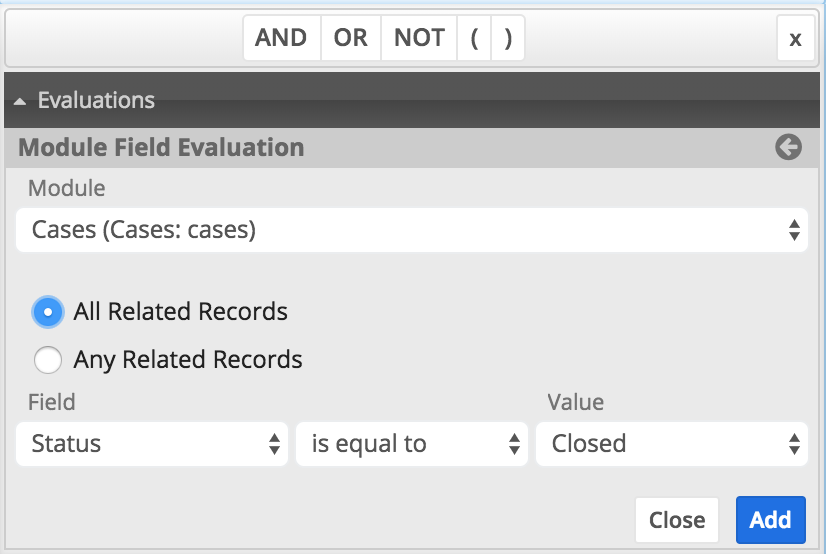
- Module: Click the down arrow to list and select the related module whose values will be evaluated.
- All/Any Related Records (for related records on the "many" side of a relationship): Decide how to evaluate related records when more than one related record may exist.
- Select "All Related Records" if the criteria must be true for all related records.
- Select "Any Related Records" if the criteria require only one or more of the related records to evaluate as true.
- Select "Any Related Records" if you want to use the "changes", "changes to", or "changes from" operator.
- Note: Process definitions created before Sugar 8.1 did not have the "any/all" option and will evaluate only the most recently modified related record. An administrator can update this setting on the Start event's criteria after upgrading to Sugar 8.1 or higher.
- Field: Click the down arrow to list and select the field variable of the chosen module.
- Comparison Operator (not labeled): Click the down arrow to list and select a comparative operator. Depending on the field type used in the evaluation, available options may include "is", "is not", "is equal to", "is not equal to", "contains", "does not contain", "includes any", "does not include any", "changes", "changes from", and "changes to".
- For global termination criteria, do not set target record "changes" as a process terminate criteria or it will cause the process to terminate right after starting.
- Note: Comparison operators may not always work as expected for records that were created or edited before the process definition was enabled. To ensure that existing records are evaluated properly for comparators such as "field changes from/to", perform an arbitrary mass update on the target module's records immediately after enabling the process definition so that Sugar can capture the "from" field values.
- Value: Enter a value to compare.
- Add: Move the evaluation to the criteria field.
Note: Checkbox fields are evaluated as "yes" or "no" (without quotes).
User Evaluation
Note: User Evaluations are logical operations that may be used in Start events, Send Message events, and Gateways.
To reveal the User Evaluation panel, click inside the criteria field and then click on "Evaluations" and select "User Evaluation":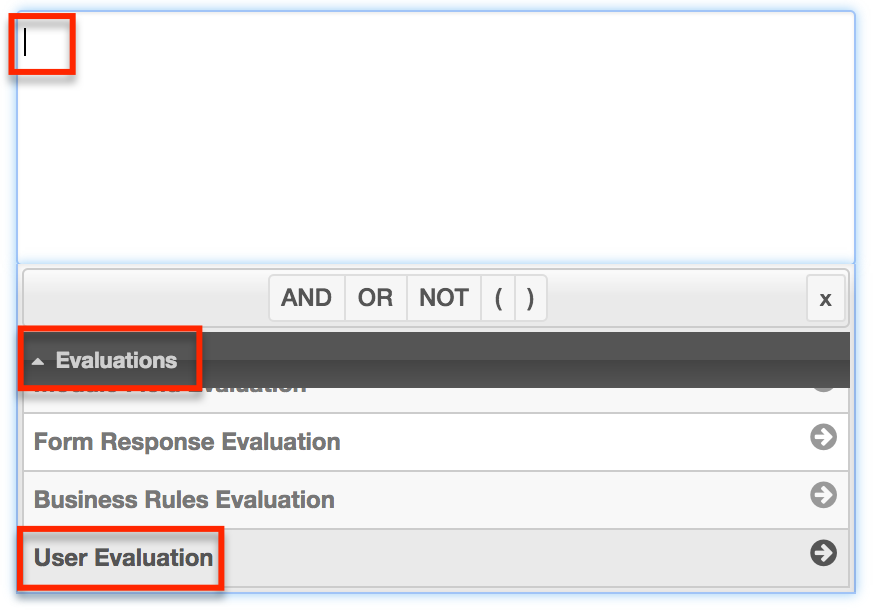
The User Evaluation panel consists of the following options: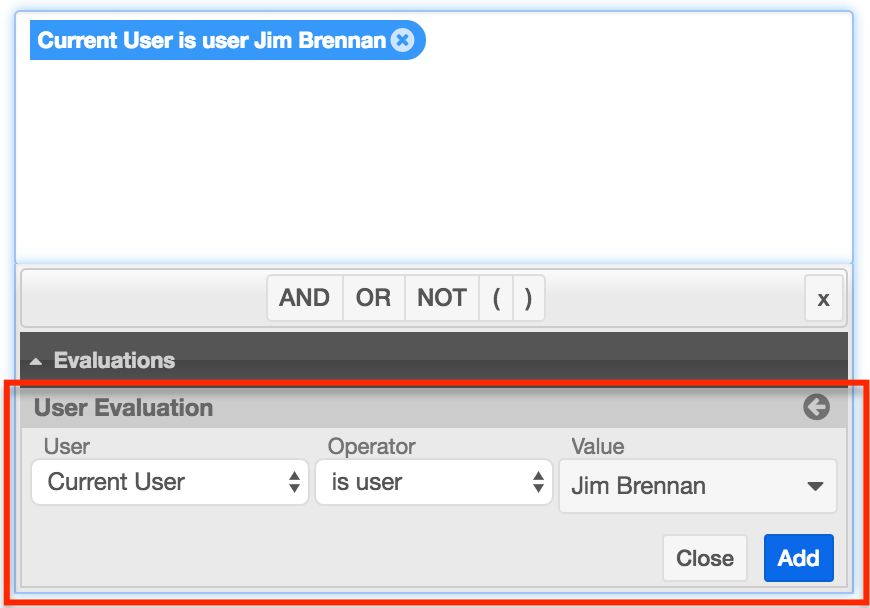
- User: Click the down arrow to list and select the type of user related to the current process:
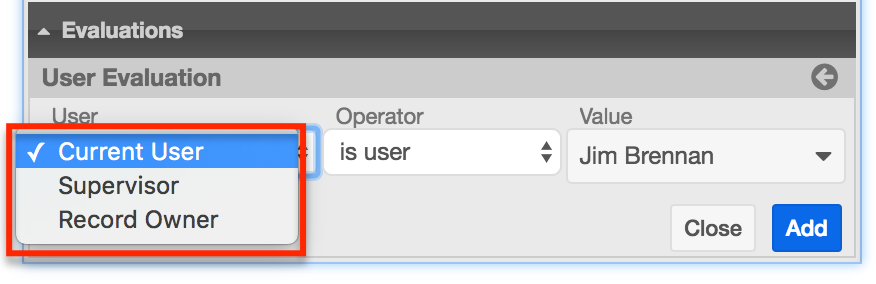
- Current User: For a Start event, the Current User refers to the user who is assigned to the target record. For any other element, the Current User refers to the last user who has been defined in the process definition.
- Supervisor: applies to the supervisor of the logged-in user who triggers the process
- Record Owner: applies to the user who is assigned to the record that triggers the process
- Operator: Click the down arrow to select the comparison operator:
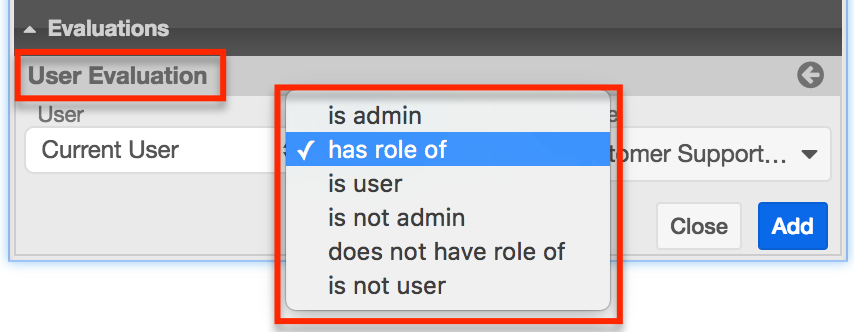
- is admin: The condition will only evaluate as true if the user specified in the User field is an admin user. This option will complete the evaluation definition and disable the Value field.
- has role of: The condition will only evaluate as true if the user specified in the User field is a member of a certain role. This option will populate the Value field with a list of available user roles.
- is user: The condition will only evaluate as true if the user specified in the User field is a specific user. This option will populate the Value field with a list of active users. To select multiple users, add this evaluation once for each user and connect the evaluations with OR operators. Surround all of the user evaluations with parentheses.
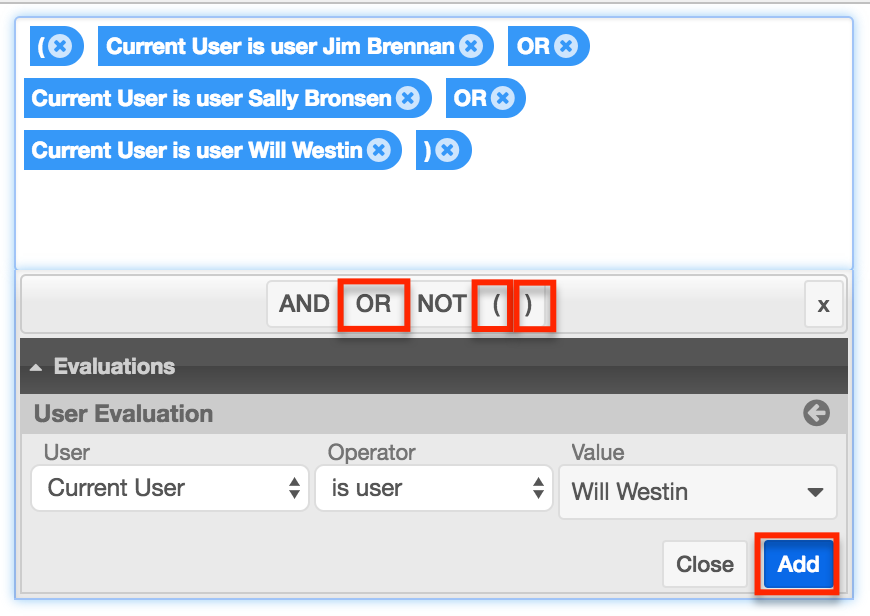
- is not admin: The condition will only evaluate as true if the user specified in the User field is not an admin user. This option will complete the evaluation item and disable the Value field.
- does not have role of: The condition will only evaluate as true if the user specified in the User field is not a member of a certain role. This option will populate the Value field with a list of available user roles.
- is not user: The condition will only evaluate as true if the user specified in the User field is not a specific user. This option will populate the Value field with a list of active users. To select multiple users, add this evaluation once for each user and connect the evaluations with AND operators. Surround all of the user evaluations with parentheses.
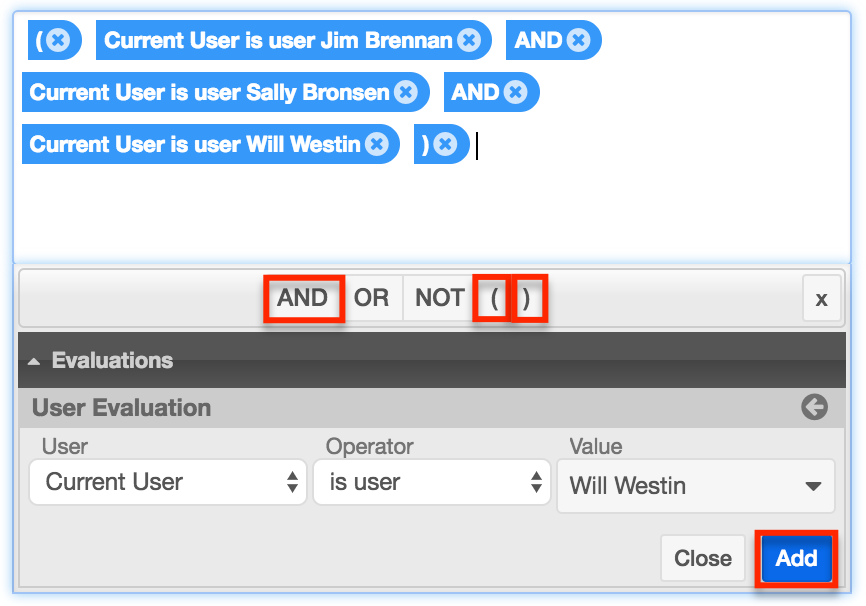
- Value: This field will be disabled if the Operator field is set to "is admin" or "is not admin". If the Operator is set to "is user" or "is not user", the Value field will load the user list as field options. If the Operator is set to "has role of" or "does not have role of", the Value field will load the roles list as field options.
- Add: Move the evaluation to the criteria field. By default, the evaluation will be placed at the end of the criteria statement but can be relocated within the statement by dragging it to the desired location.
Relationship Change Evaluation
Note: Relationship Change Evaluations are logical operations that may be used in Start events and Receive Message events.
To reveal the Relationship Change Evaluation panel, click inside the criteria field and then click on "Evaluations" and select "Relationship Change Evaluation":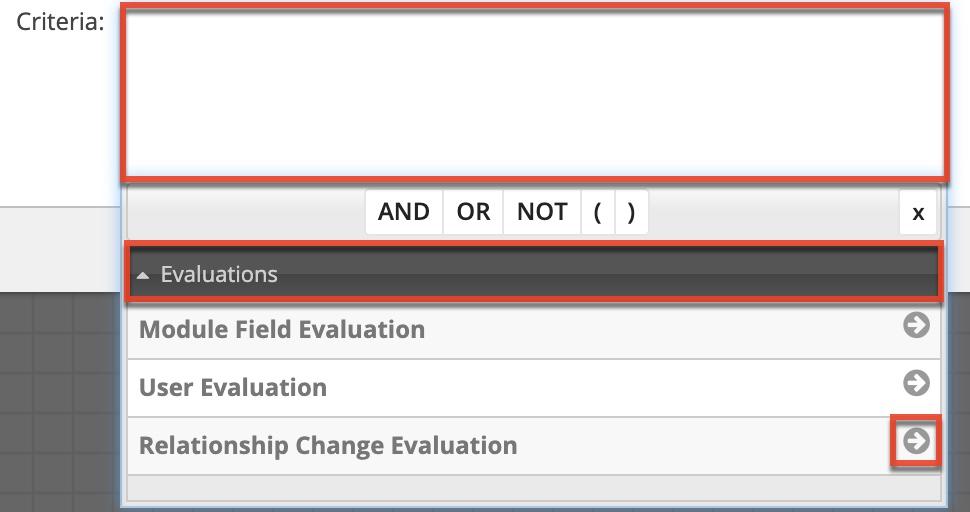
The Relationship Change Evaluation panel consists of the following options: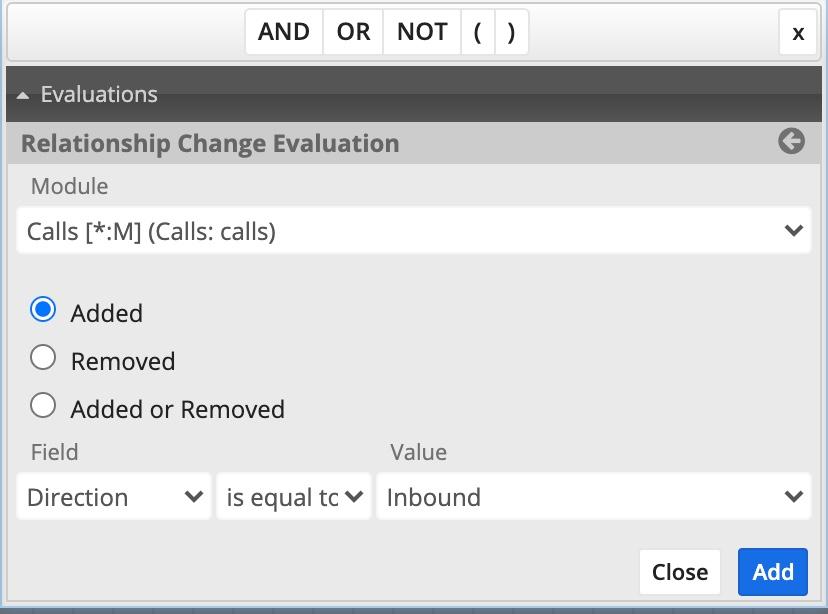
- Module: Click the down arrow to list and select the related module you want to monitor for relationship addition or removal. The default value is "Any Relationship", which is triggered when any related record is added or removed from the target module, regardless of the related module.
- Added/Removed/Added or Removed: Choose which type of relationship change(s) you wish to trigger on.
- Select "Added" to trigger when a related record is added to the target record.
- Select "Removed" to trigger when a related record is removed from the target record.
- Select "Added or Removed" to trigger when a related record is added or removed from the target record.
- Field: Click the down arrow to list and select the field variable of the chosen module. If "Any Relationship" is selected instead of a specific module, then this field, the comparison operator, and the value are disabled because it is not possible to add field criteria that apply to every module.
- Comparison Operator (not labeled): Click the down arrow to list and select a comparative operator. Depending on the field type used in the evaluation, available options may include "is", "is not", "is equal to", "is not equal to", "contains", "does not contain", "includes any", "does not include any", "changes", "changes from", and "changes to".
- For global termination criteria, do not set target record "changes" as a process terminate criteria or it will cause the process to terminate right after starting.
- Note: Comparison operators may not always work as expected for records that were created or edited before the process definition was enabled. To ensure that existing records are evaluated properly for comparators such as "field changes from/to", perform an arbitrary mass update on the target module's records immediately after enabling the process definition so that Sugar can capture the "from" field values.
- Value: Enter a value to compare.
- Add: Move the evaluation to the criteria field.
Note: Checkbox fields are evaluated as "yes" or "no" (without quotes).
It is important to note that relationship changes cannot occur at the same time as any other change, whether it is another relationship change, a field change, or a user change. Therefore, criteria that join a relationship change with another change evaluation using an AND operator will never evaluate to true because the relationship change happens independently of any other action. It is safe to join them with an OR operator, however, to trigger when either condition is true.
Using Evaluations
Follow these steps to add a condition to a Start event:
- Right-click on the opportunity Start event icon and choose "Settings".
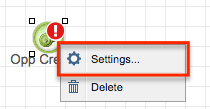
- Click inside the criteria field and then click on "Evaluations" and select "Module Field Evaluation" to restrict this Process Definition to only certain opportunities.
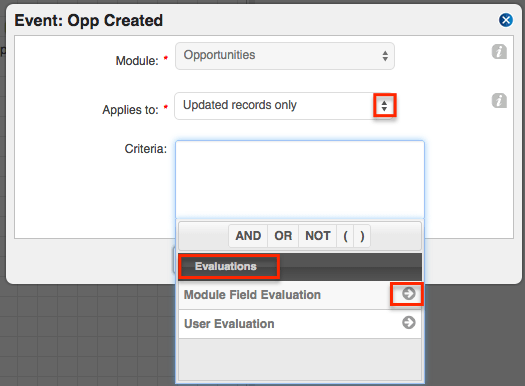
- Choose a field, operator, and field value for the first condition and then click "Submit" to add the condition to the Criteria window.
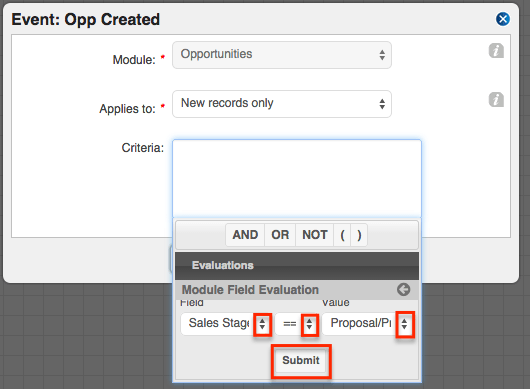
- Use the boolean logic elements AND, OR, and NOT in conjunction with parentheses for grouped criteria to build a compound filter.
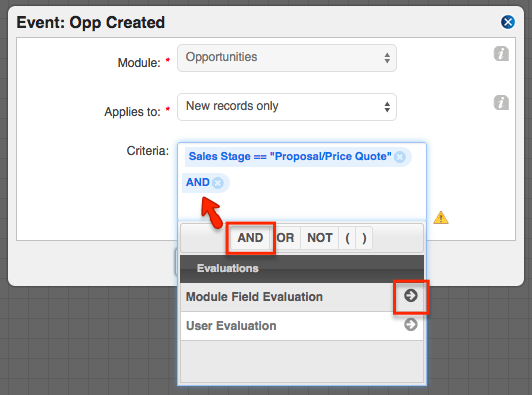
- Continue adding evaluation filters to the Criteria window.
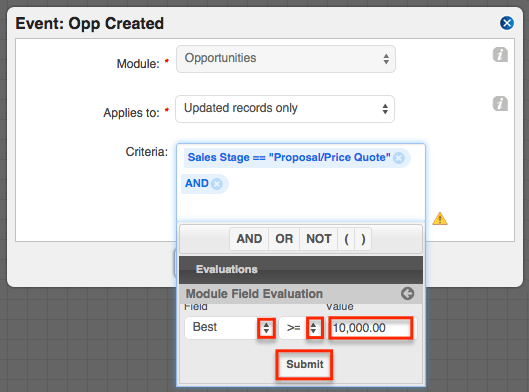
- When satisfied, click outside of the Criteria field to close the Evaluations window and then click "Save".
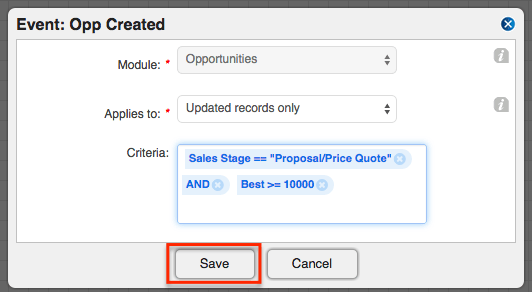
Mathematical Operations
Mathematical operations utilize mathematical operators in conjunction with the Fixed Date, Time Span, and Sugar Date variable options to specify conditions on an event. Mathematical operators can also be used to calculate a numerical value for a Sugar field using a combination of Sugar field variables and constant values. Mathematical operations are defined inside a criteria builder in the process definition's design view.
Note: Mathematical Operations may be used for Wait events, Change Field actions, and Add Related Record actions.
Mathematical operators primarily serve two purposes:
- Calculating Dates: Use addition (+) and subtraction (-) to create a date that is relative to another date. For example, set a quote as valid until two weeks after its close date:
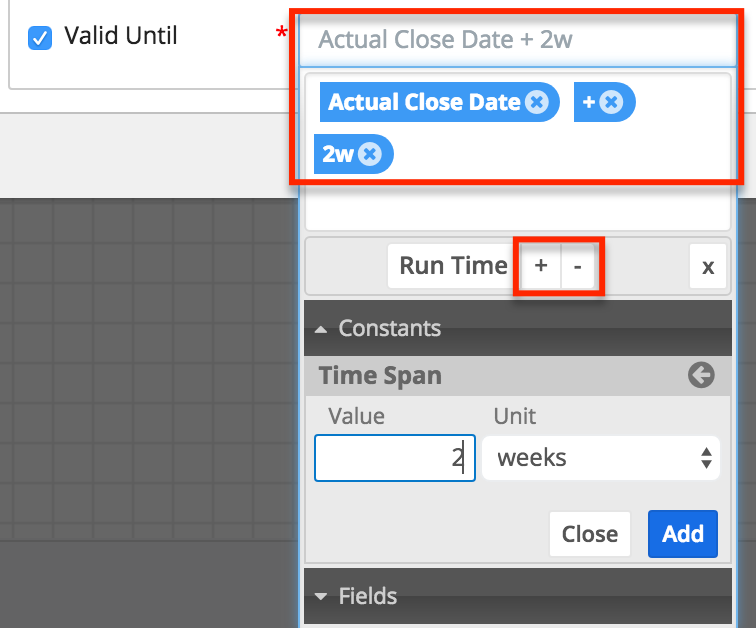
- Calculating Numeric Values: Use addition (+), subtraction (-), multiplication (x), and division (/) to create a calculated value relative to another Sugar field. Define a specific order of operations by leveraging parentheses in your formulas. For example, set a discount amount to 10% of the sum of a record's subtotal plus tax:
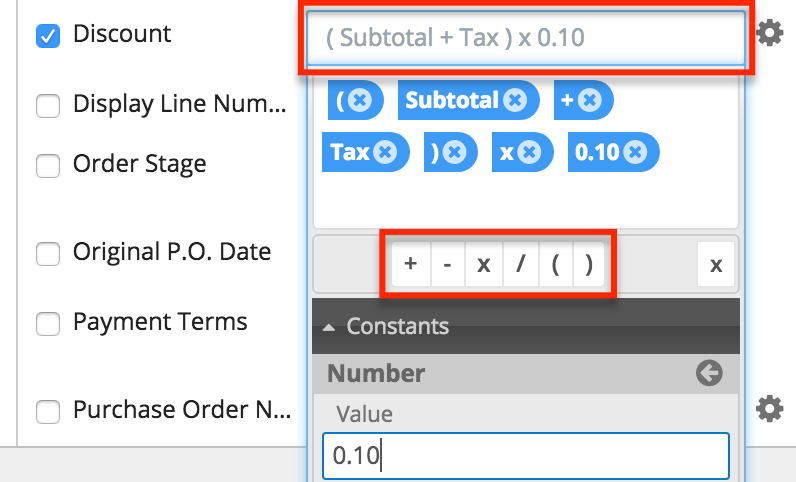
Calculating Dates
Dates are calculated in conditions using one or a combination of fixed date, time span, and Sugar date field variables. Anything other than the listed configurations or a legal chaining of the supported configurations will be marked as not valid and cannot be saved in a process definition.
The following table lists the supported configurations for date, datetime, and time span calculations in criteria:
| Configuration Type | Supported Expressions |
| Time Span |
|
| Date |
|
| Datetime |
|
Note: For more information on the Run Time option, which is shown near the plus and minus operators, please refer to the Sugar Date Variables section.
Fixed Date
The Fixed Date option enables the administrator to specify a formal, static date as a field value or as a variable in a formula that will calculate a field value. For example, if all opportunities in a process are expected to close at the end of the year, create a Change Field action that uses Fixed Date to change all opportunities' Expected Close Date fields to December 31, 2015.
Note: Fixed Dates may be used in mathematical operations for Wait events, Change Field actions, and Add Related Record actions.
To reference a Fixed Date, follow these steps:
- Click inside the date field and then click on "Constants" and select "Fixed Date":
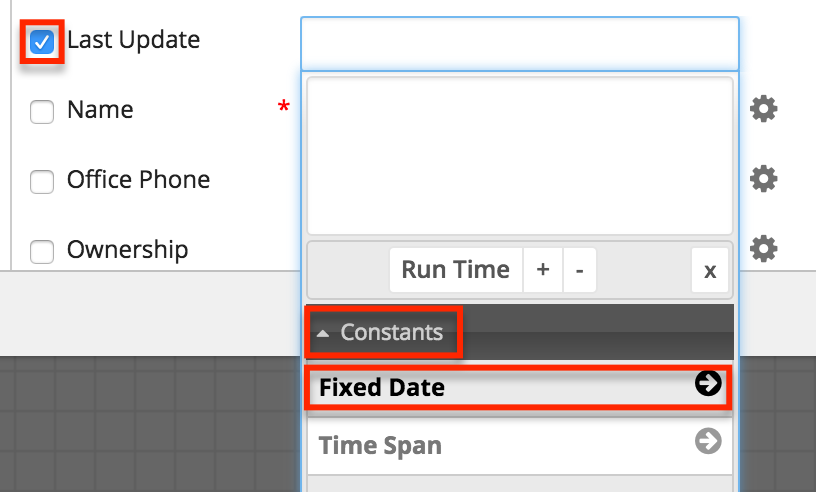
- The window will transition to a single Date field; click inside the Date field to reveal a calendar picker. Navigate from month to month using the back (<) and forward (>) symbols near the month label. Click on the date that will be used in the formula.
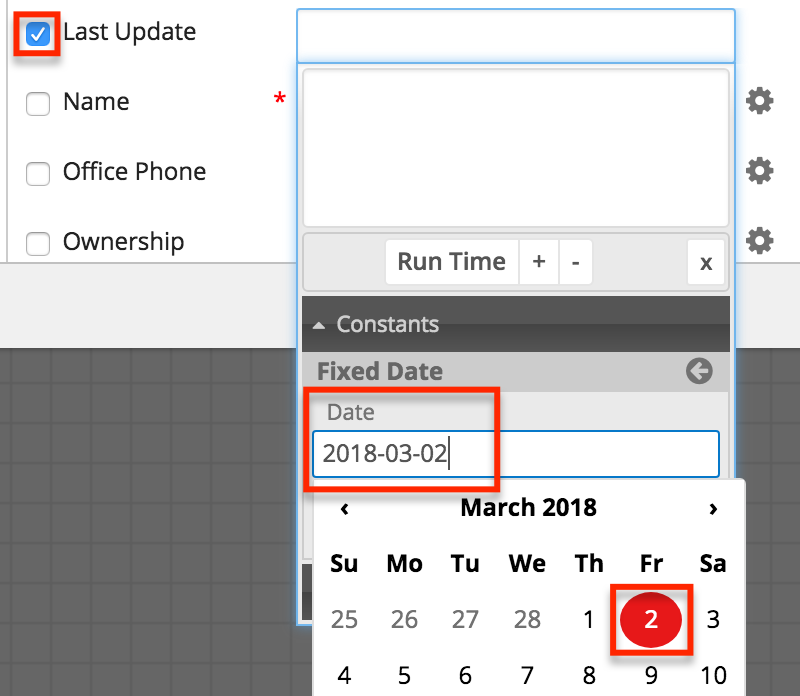
- Click the Add button to move the selected date onto the criteria builder canvas:
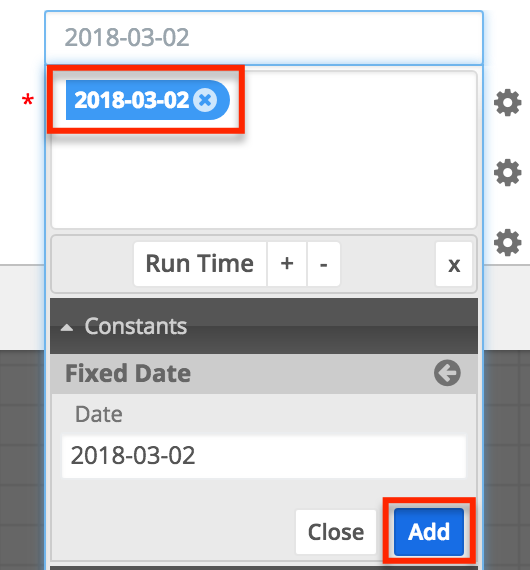
If the date added in this step is the static date for the field value, then the formula is complete. If the Fixed Date is only one component of a larger formula that will be used to determine a field value, then the Fixed Date should be entered in the order it is expected in the formula along with a logical combination of Time Span, Sugar Date variables, and mathematical operators.
Time Span
The Time Span option allows the passage of time within a date formula. For example, if a Due Date should be set for two weeks after a record's Start Date, build a formula that uses the Time Span "2 weeks" as a variable (e.g., 'Start Date + 2w'). To use a time span element relative to now (e.g., set a due date for 2 weeks from now), then use the Time Span element with a Run Time variable.
Note: Time Spans may be used in mathematical operations for Wait events, Change Field actions, and Add Related Record actions.
To reference a time span, follow these steps:
- Click inside the date field and then click on "Constants" and select "Time Span":
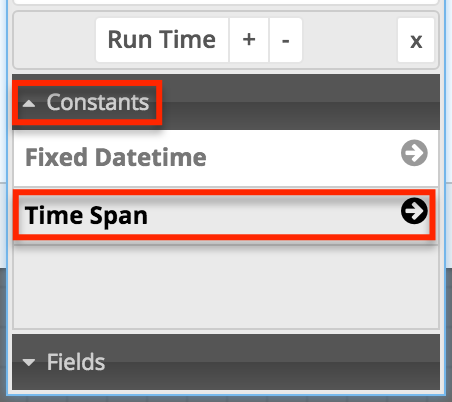
- The next window will display a Value field and a Units field. Use these two fields together to create a logical time span phrase (e.g., 2 weeks would be set as Value=2; Units=weeks). Time spans can be specified in years, months, weeks, and days for date fields and all of the previous increments plus hours and minutes for datetime fields.
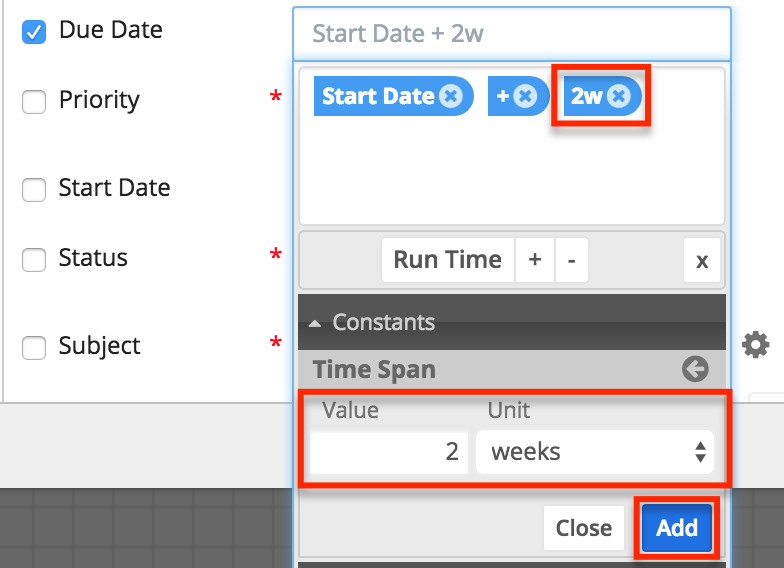
You also have access to the business hours unit for datetime fields on modules related to business centers. This allows you to perform calculations using the open hours of a business center. When you select "business hours", the Business Center dropdown menu appears where you can search for a specific business center or choose "From Target Module" to use the business center associated with the target module. For more information, refer to the Business Center Management documentation. - Click the Add button to move the selected time span onto the criteria builder canvas.
Note: The time span element is only one component of a larger formula. Enter it in the order it is expected along with a logical combination of Fixed Date, Sugar Date variables, and/or Mathematical Operators.
Sugar Date Variables
Sugar Date variables include the Run Time variable as well as the date fields from Sugar records. "Run Time" refers to the moment the process element runs. For example, an action that executes at 9:30AM on January 3 has a Run Time value of January 3 for date fields or 9:30AM January 3 for datetime fields. Date field variables can be used to add context to a date formula (e.g., Date Created + 1 month) or referenced independently (e.g., an action or event that triggers on Expected Close Date or three days after run time).
Note: Sugar Date variables may be used in mathematical operations for Wait events, Change Field actions, and Add Related Record actions.
To reference a Sugar date variable, follow these steps:
- Click inside the date field and the Run Time variable will appear as a button next to the plus and minus operators. To drill down to the date variables for each available module, click on "Fields" then click on the arrow adjacent to the desired module.
- After clicking on the module name, the window will reveal a list of all available date fields for that module. Click on any date field to move it to the criteria builder window:
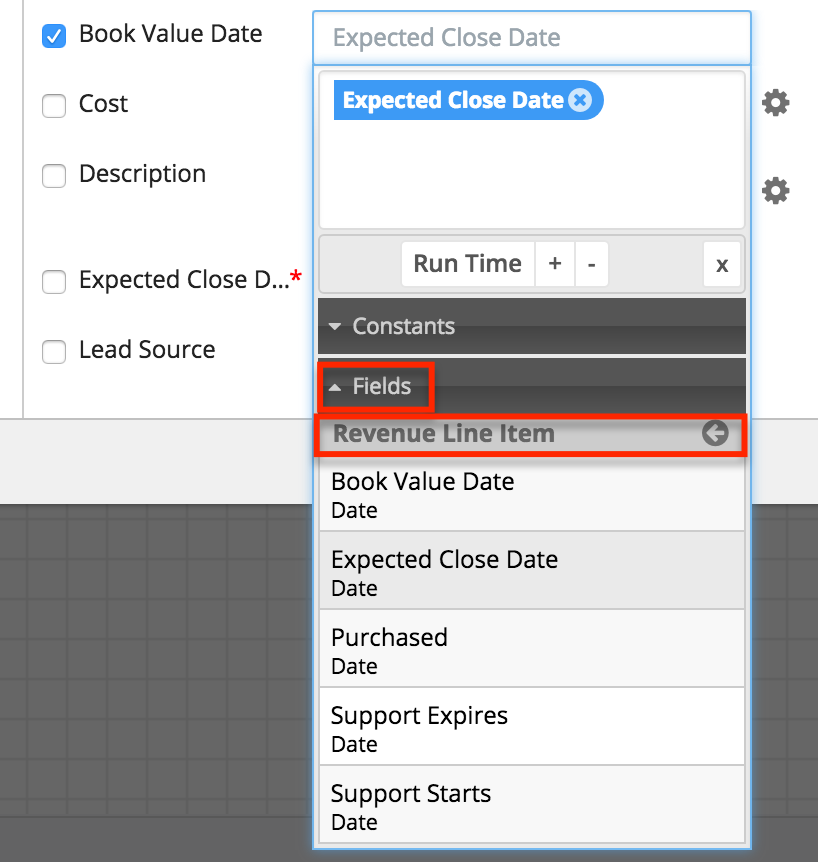
Note: If the date variable is the only component of the date formula, then the formula is complete. If the date variable is only one component of a larger formula that will be used to determine a field value, then the variable should be entered in the order it is expected in the formula along with a logical combination of Time Span, Fixed Dates, and/or Mathematical Operators.
Creating Conditions for Activities and Gateways
Form activities and gateway elements can evaluate user responses to forms or business rules that have been created by the administrator.
The available evaluations are:
- Form Response Evaluations: Configure this type of criteria for gateways that follow a Form activity.
- Business Rule Evaluations: Configure this type of criteria for gateways that follow a business rule action.
Form Response Evaluations
If a process contains an Approve/Reject activity, it must be followed by a gateway with a form response evaluation. To configure this evaluation, follow these steps:
Note: A divergent Gateway requires two or more subsequent elements (any combination of intermediate events, end events, actions, and/or activities). These must be placed on the canvas and connectors must join the elements on the canvas before the Gateway can be configured.
- Drag an Activity element onto the design canvas as explained in Adding Form Activities.
- Drag an Exclusive gateway element onto the design canvas to the right of the Activity.
- Drag two or more Actions or Events onto the canvas to the right of the Gateway.
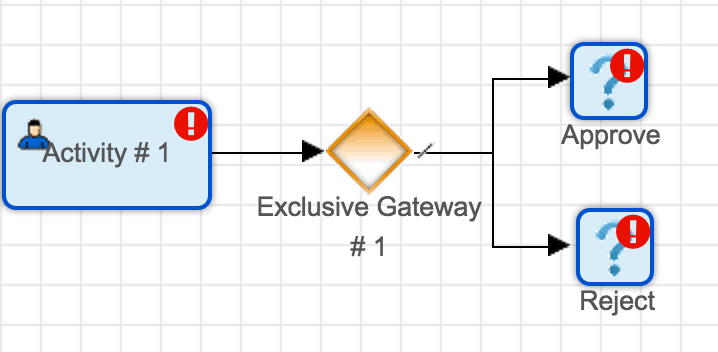
- Connect the activity to the gateway and the gateway to the subsequent elements using Sequence Connectors.
- Right-click on the gateway element and specify a default flow. This will be the direction that the flow takes if no criteria are accomplished within the gateway element. For this example, the default flow is set to the action labeled, "Approve". Please note that the default flow options will not be available until the corresponding elements have been placed on the canvas and connected to the gateway.
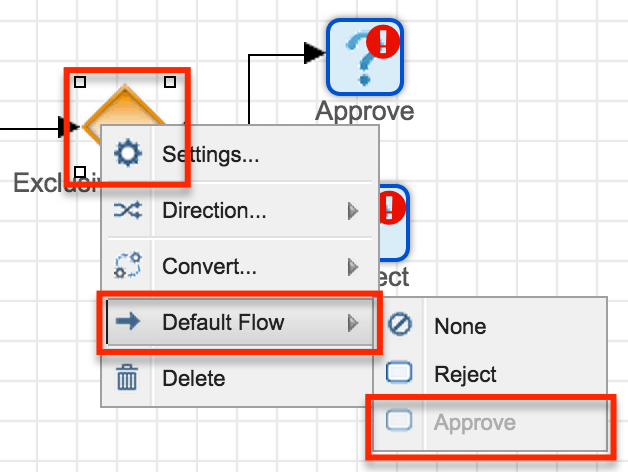
A hash mark will indicate that a default flow has been successfully configured: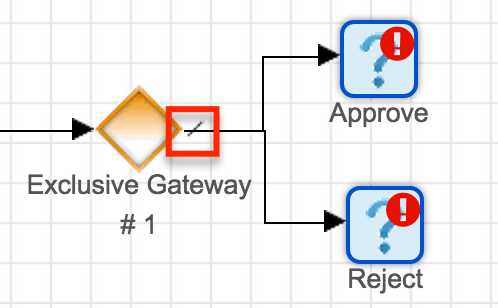
- Next, right-click on the gateway element again and select "Settings". Note that only the non-default outcome or outcomes will need to be configured. For the current example, we set the default flow to "Approve" so there is one criteria window, which represents the one non-default element in this example.
- Click inside the Criteria window to reveal evaluation options. The only required evaluation for a Form activity is the "Form Response Evaluation". Click on Evaluations > Form Response Evaluation and then select the form response that will result in the non-default flow. In this example, the form response must be "Rejected" or else the default flow will take over. Click "Submit" to move the condition to the Criteria window. If multiple criteria are required, click on the AND, OR, NOT, and parentheses operators as needed and insert additional conditional statements.
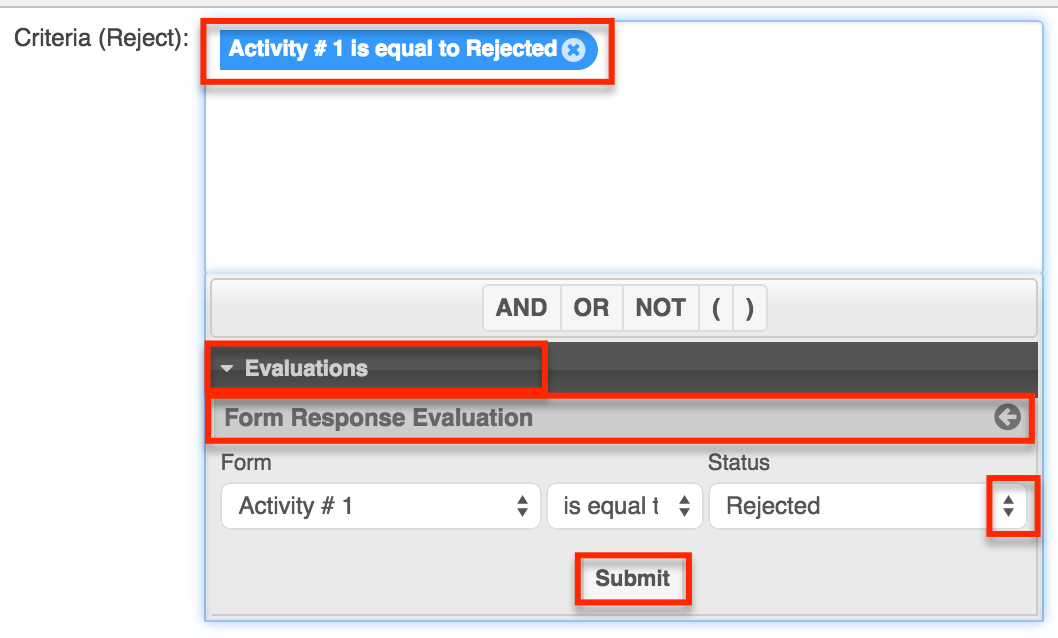
Note: Despite a Form activity having two outcomes (approval and rejection), it is possible to configure additional outcomes using a combination of criteria beyond the form response. For example, a separate outcome may be configured for:- Form Response = Rejected AND Status = New
- Form Response = Approved AND Status = New
- Form Response = Approved AND Status = Closed
- else Default Flow: In other words, if none of the above criteria are accomplished, continue with the default flow element. Please note that the default element does not need to be configured. It will always be the outcome when all other criteria evaluate to false.
- Only one outcome can occur from an Exclusive gateway, and it will be the one that accomplishes the condition. If several criteria are true, the priority will be higher on the one that lies further up the configuration. To change the priority order of a Gateway that is directed toward multiple elements:
- Right-click on the Gateway element and select the option "Settings".
- There will be a criteria builder window for each related element. Place the mouse pointer to the left or right side of the criteria fields and the pointer will change its appearance to a standard "move" cursor type.
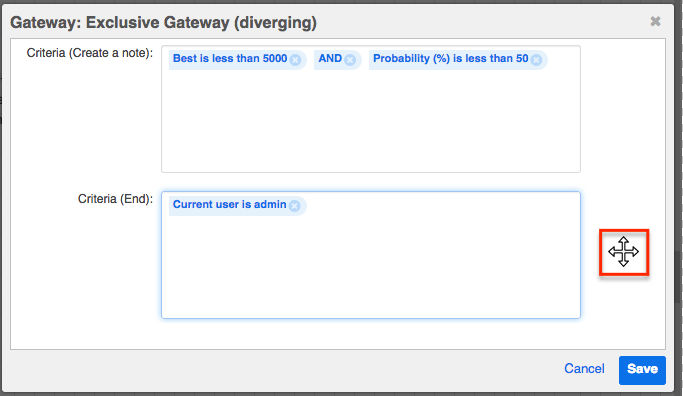
- Drag and drop the criteria fields into the desired sequence. This order will set the priority of the Gateway criteria.
- When you are satisfied with the conditions and their processing order, click "Save" to preserve the changes and return to the visual designer canvas.
- Right-click on the Gateway element and select the option "Settings".
Business Rule Evaluations
When referencing a process business rule within a process definition, the action must be followed by a gateway with a business rules evaluation.
Note: A divergent Gateway requires two or more subsequent elements (any combination of intermediate events, end events, actions, and activities). These must be placed on the canvas and connectors must join the elements on the canvas before the Gateway can be configured.
The following steps are an example of incorporating a business rule evaluation in a process definition:
- Drag an Action element onto the design canvas and configure it as explained in the Business Rule section of this page.
- Drag an Exclusive gateway element onto the design canvas to the right of the Action.
- Drag two or more action, intermediate, or end events onto the canvas to the right of the diverging gateway.
- Add a converging exclusive gateway to the right of everything and then connect the Business Rule action to the diverging gateway and connect the diverging gateway to all subsequent elements using Sequence Connectors. Notice that, in the example here, there are three potential outcomes for the gateway: "Assign to Jim", "Assign to Will", or proceed straight to the "Converge" point.
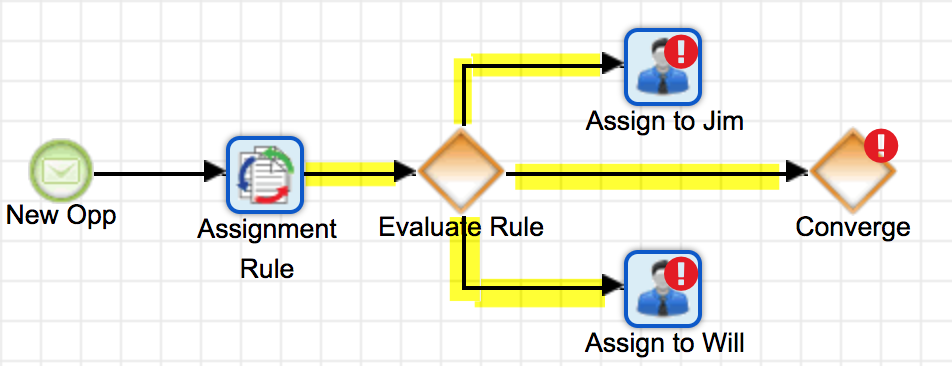
- Next, confirm that all of the diverging gateway's potential outcomes connect to the converge point using Sequence Connectors.
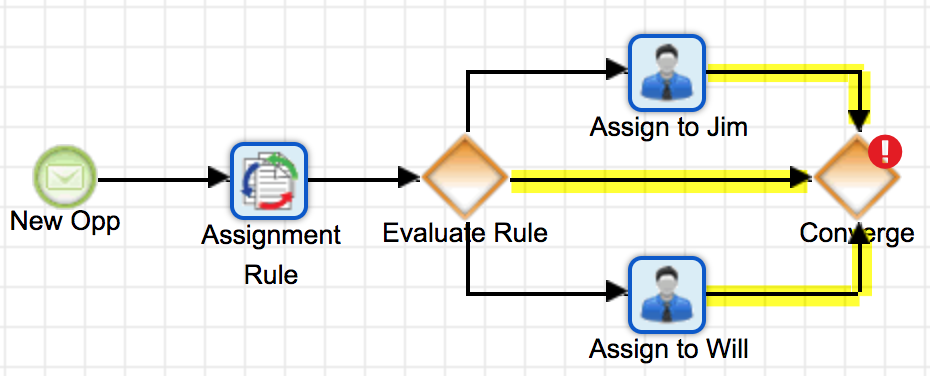
- Right-click on the gateway element and specify a default flow. This will be the direction that the flow takes if no criteria are accomplished within the gateway element. For this example, the default flow is set to the action labeled, "Assign to Jim". Please note that the default flow options will not be available until the corresponding elements have been placed on the canvas and connected to the gateway as explained in the previous steps.

A hash mark will indicate that you have successfully configured the default flow: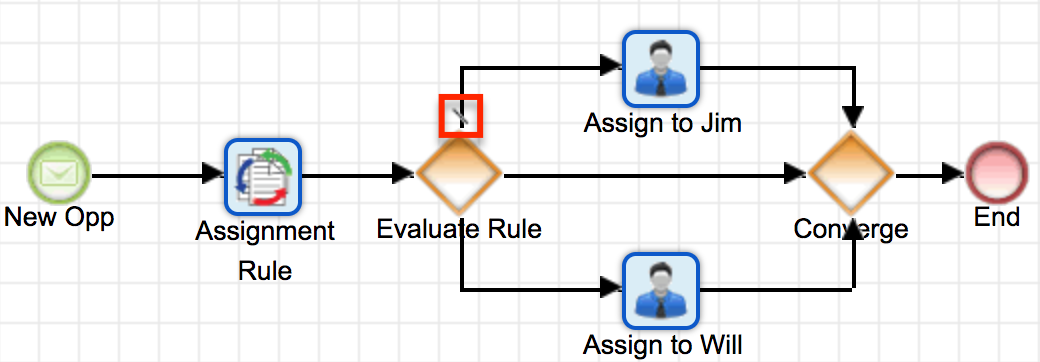
- Next, right-click on the gateway element again and select "Settings". Only the non-default outcome or outcomes will need to be configured. For the current example, we set the default flow to "Assign to Jim" so there are two criteria windows, which represent the two non-default elements in this example: "Assign to Will" and "Converge".
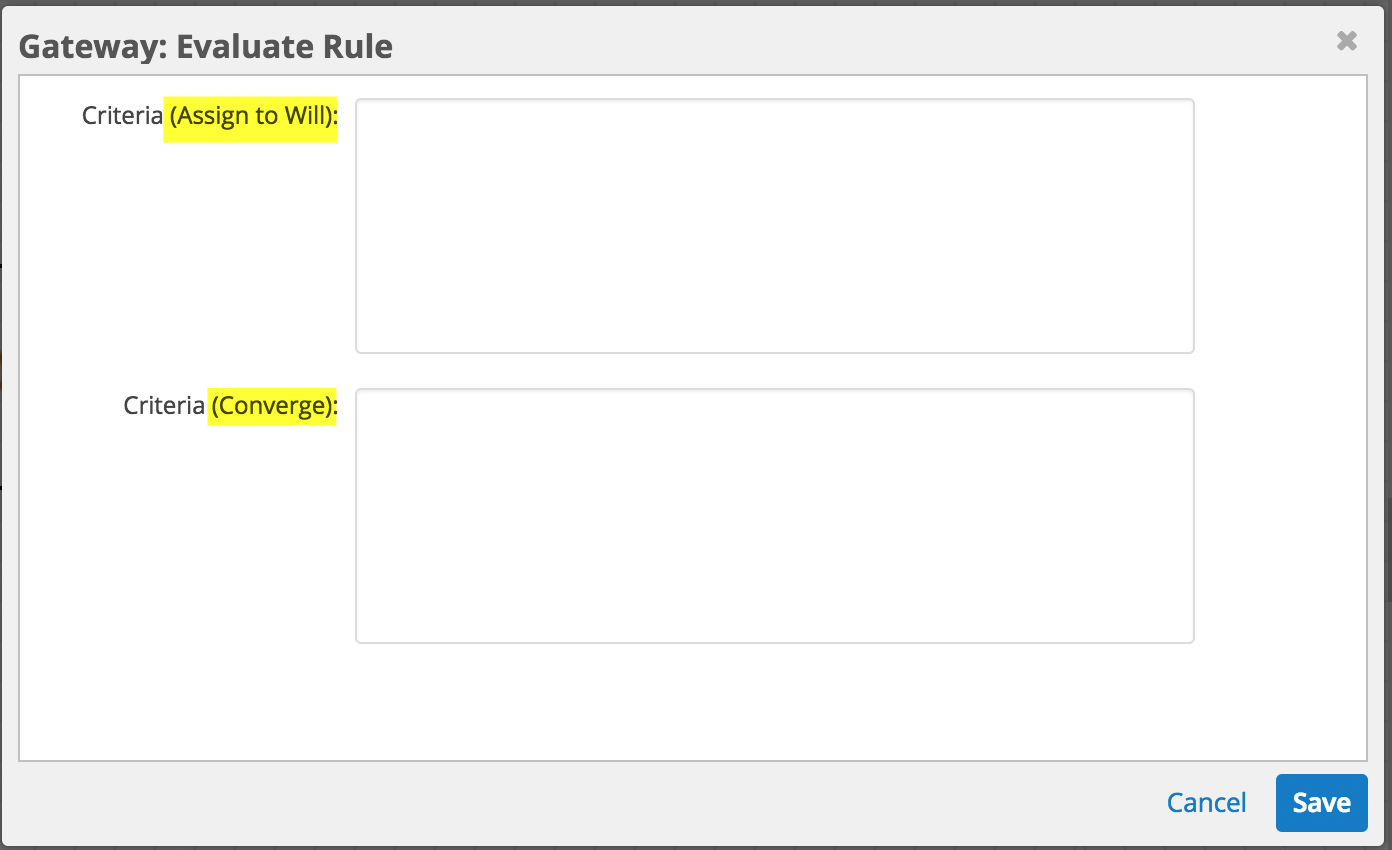
- Click inside the first Criteria window to reveal the evaluation options. The only required evaluation for a business rule is the "Business Rules Evaluation". Follow the remaining steps to configure the Business Rules Evaluation.
- Click on Evaluations > Business Rules Evaluation. The Business Rule field will appear and display all of the Business Rules that have been referenced by action elements in the current process definition.
- Select the name of the Business Rule action that this gateway is evaluating. In this example, we added an action named "Assignment Rule" in step 1, so we will select that value.
- The Response field will evaluate the Return Value designated in the process business rule. Type the Return Value that, when returned by the business rule, will result in the current process path. For example, if a Return Value of 1 causes the process to end, type "1" (no quotes) into the Response field for the Converge element's Criteria.
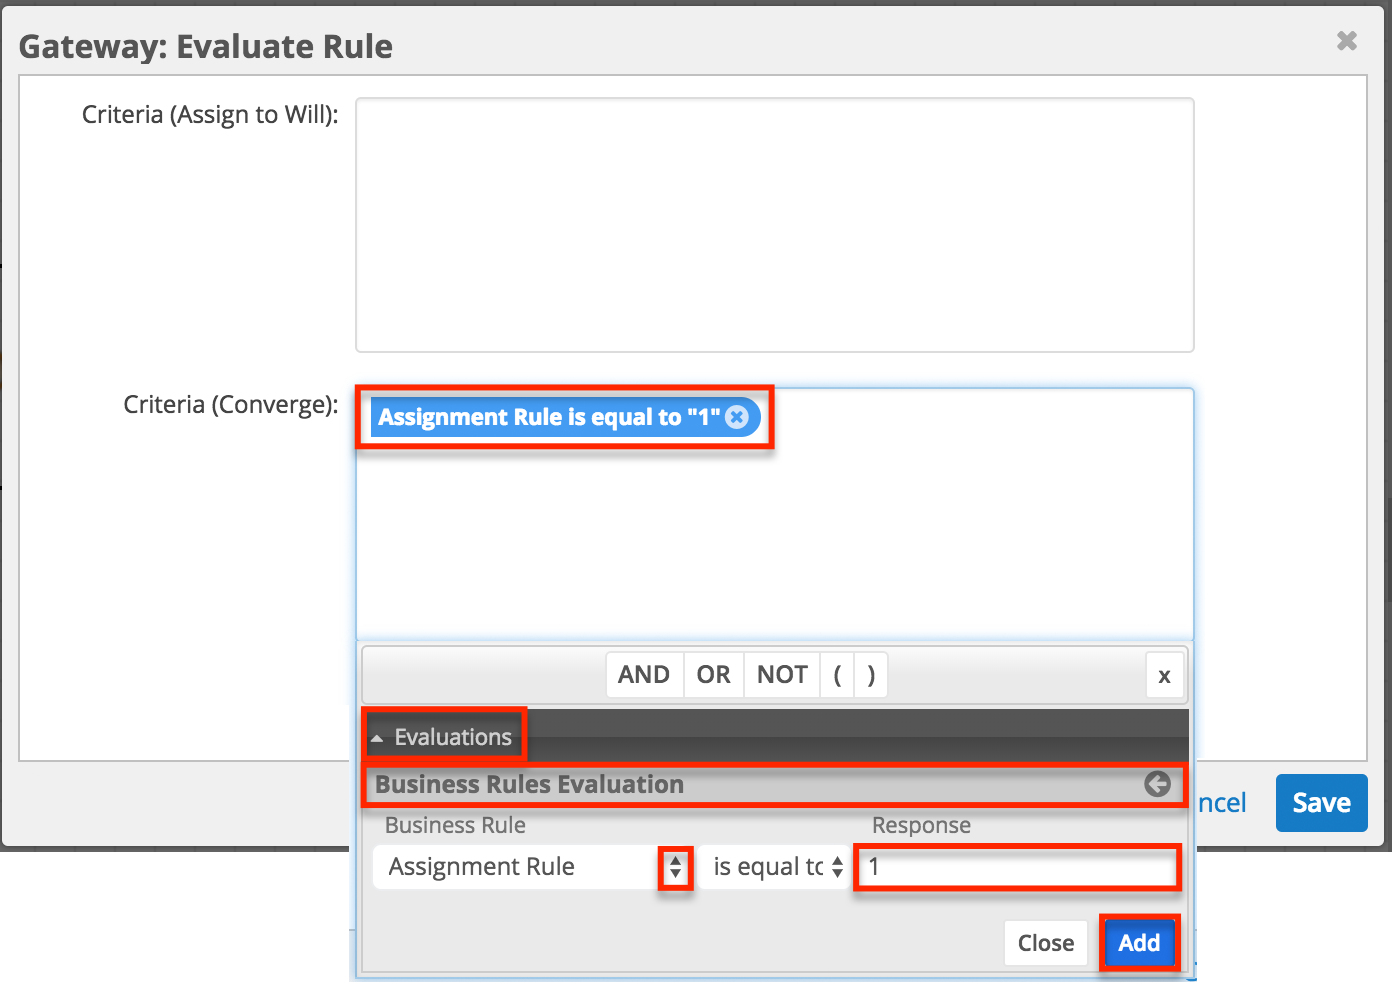
Note: Process business rule "Return Values" will always convert to text for evaluation in the Response field within a process definition. - Click "Add" to move the condition to the Criteria window.
- If multiple criteria are required for a single flow direction, click on the AND, OR, NOT, and parentheses operators as needed and insert additional conditional statements.
- Continue configuring Criteria for all possible flow outcomes.
- Only one outcome can occur from an Exclusive gateway, and it will be the one that accomplishes the condition. If several criteria are true, the priority will be higher on the one that lies further up the configuration. To change the priority order of a Gateway that is directed toward multiple elements:
- Right-click on the Gateway element and select the option "Settings".
- There will be a criteria builder window for each related element. Place the mouse pointer to the left or right side of the criteria fields and the pointer will change its appearance to a standard "move" cursor type.
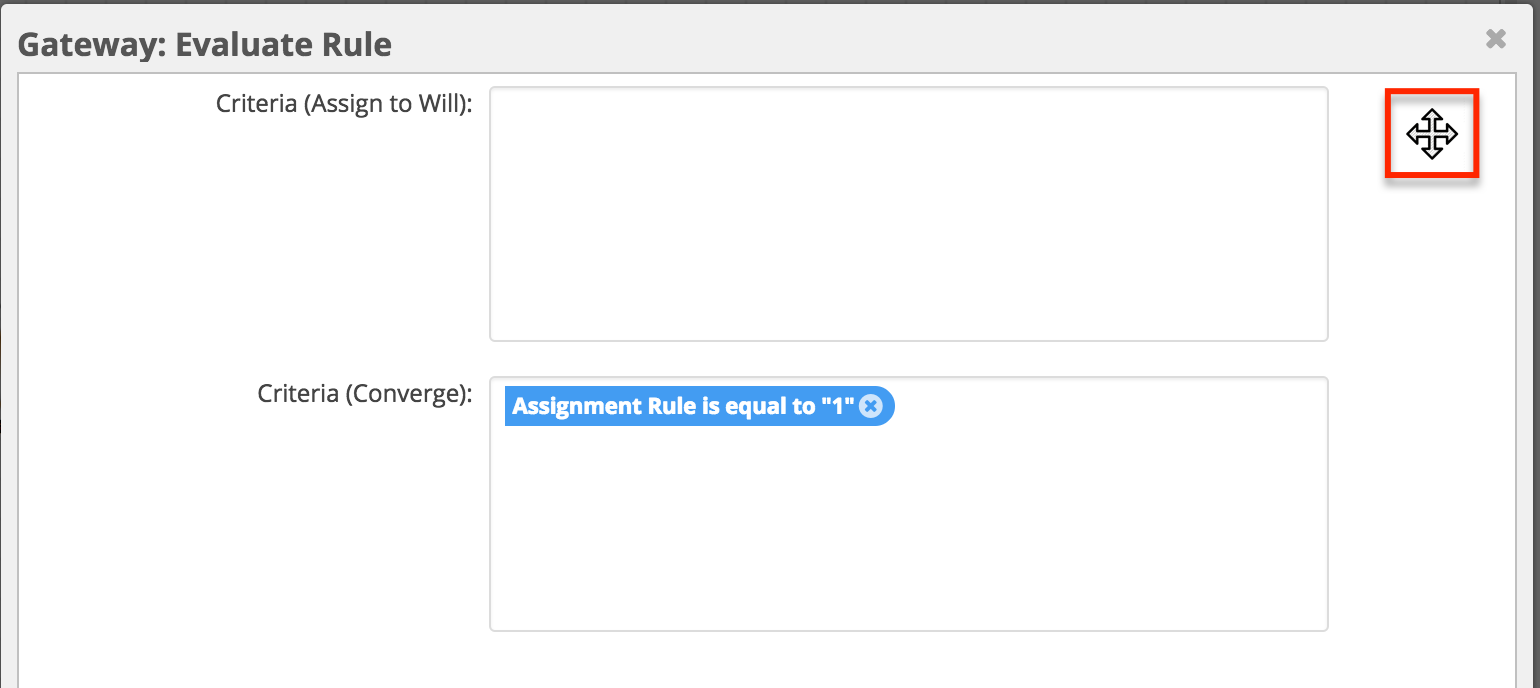
- Drag and drop the criteria fields into the desired sequence. This order will set the priority of the Gateway criteria.
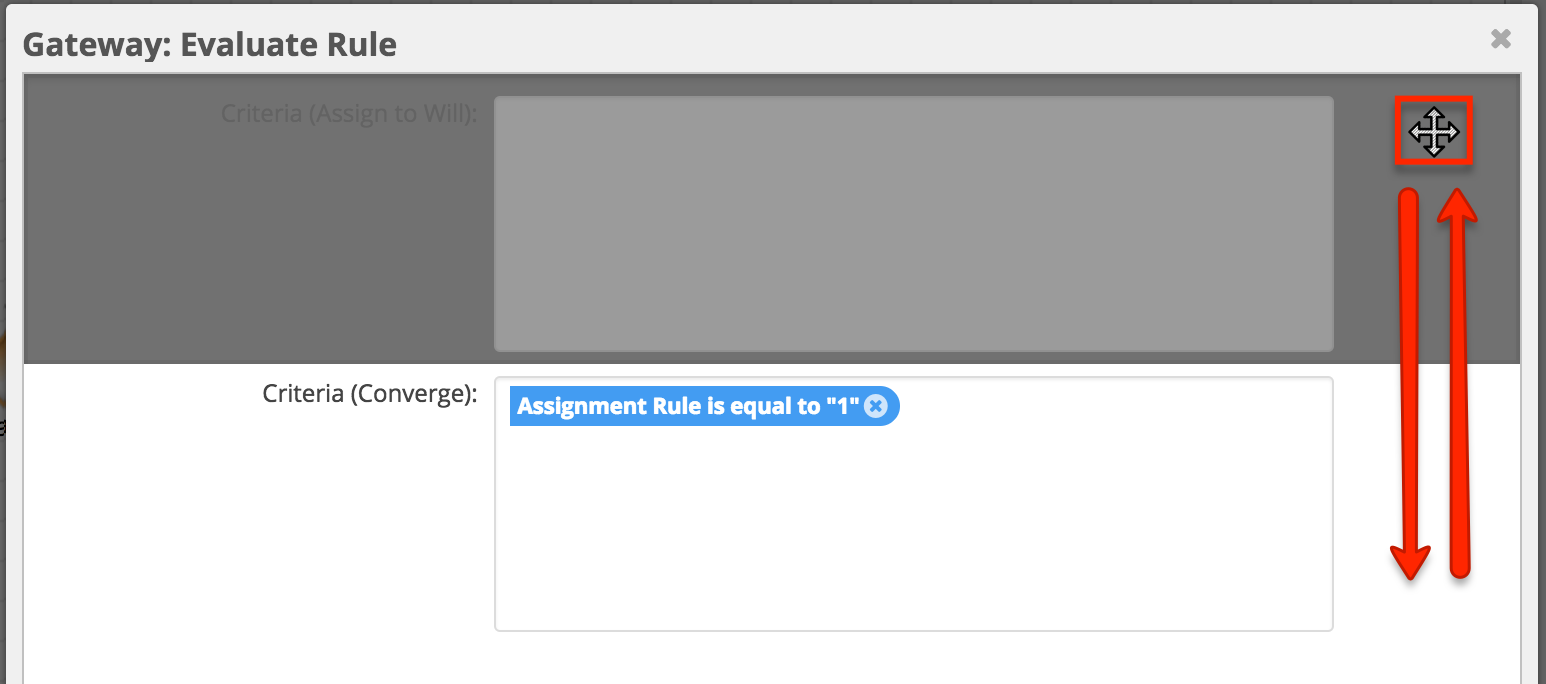
- When you are satisfied with the conditions and their processing order, click "Save" to preserve the changes and return to the visual designer canvas.
Exiting the Visual Designer
At any time during the design of the process definition, you can exit the visual designer by clicking the X at the top of the design canvas. While the visual designer automatically saves your progress by default, you should always press the Save button before exiting the designer in case the last save action occurred before your most recent change or the auto-save has been disabled in Admin > System Settings.
Returning to the Visual Designer
After exiting the Visual Designer, you can return to design view of a process definition from any of the following locations in Sugar:
- From the process definition's record view, select "Design" from the record's Actions menu:
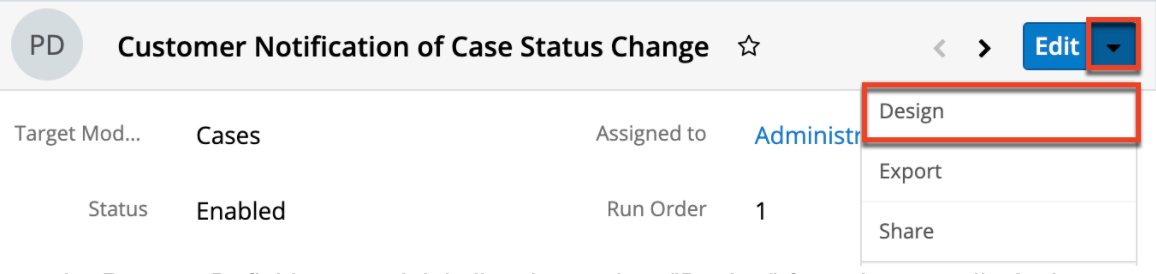
- From the Process Definitions module's list view, select "Design" from the record's Actions menu:
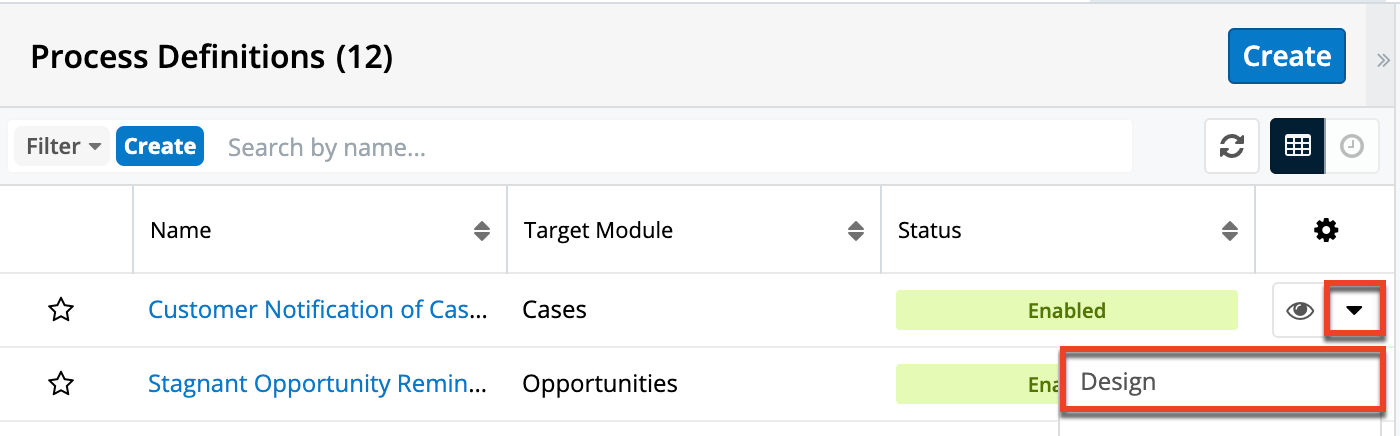
- From the Process Definitions dashlet, click on the Design icon adjacent to the relevant process definition:
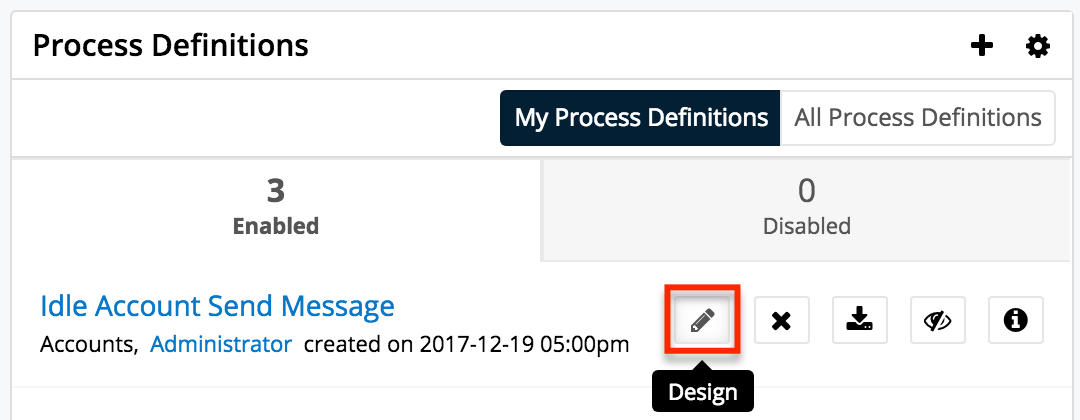
Please note that it may take several seconds for the design canvas to load.
Enabling and Disabling Process Definitions
It is necessary to enable process definitions when their design is complete. It is also possible to disable process definitions when needed. The following sections explain how to enable or disable a process definition.
Enabling Process Definitions
New process definitions are set to "Disabled" by default. This is a preventative feature that ensures a process instance is not triggered inadvertently during the design phase.
Note: Before enabling a process definition, please be sure that you have included a Terminate Process condition in your process design's settings.
After the design is fully configured, exit the Visual Designer and set the process definition to "Enabled". There are three ways to enable a process definition:
- Enabling via Dashlet: Visit your SugarBPM dashboard. Disabled process definitions will be listed in the "Disabled" tab of the Process Definitions dashlet. Find the Enable/Disable icon adjacent to the relevant process definition. Click on the icon and processes will immediately begin running when the process definition's conditions are met.
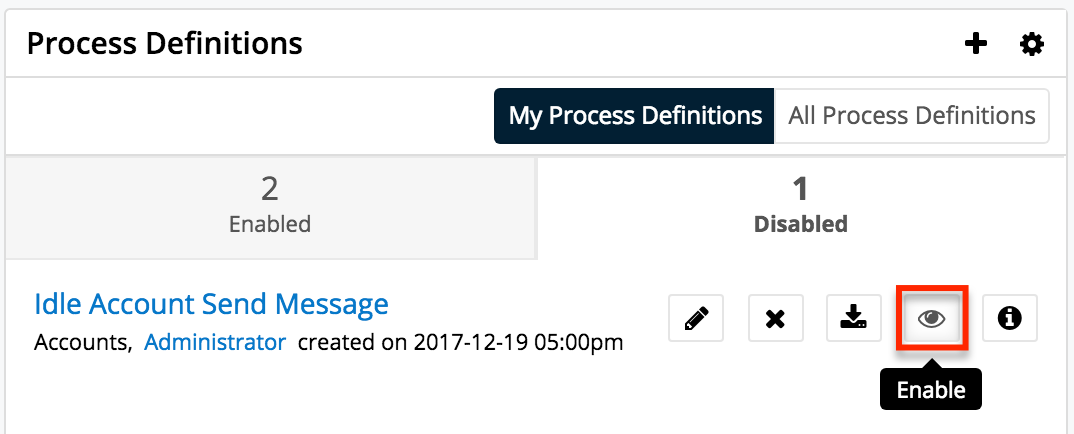
- Enabling via List View: Navigate to the Process Definitions list view by clicking on the Process Definitions module tab. From list view, identify the process definition that you want to enable. Click on that row's actions menu and select "Enable" from the dropdown options.
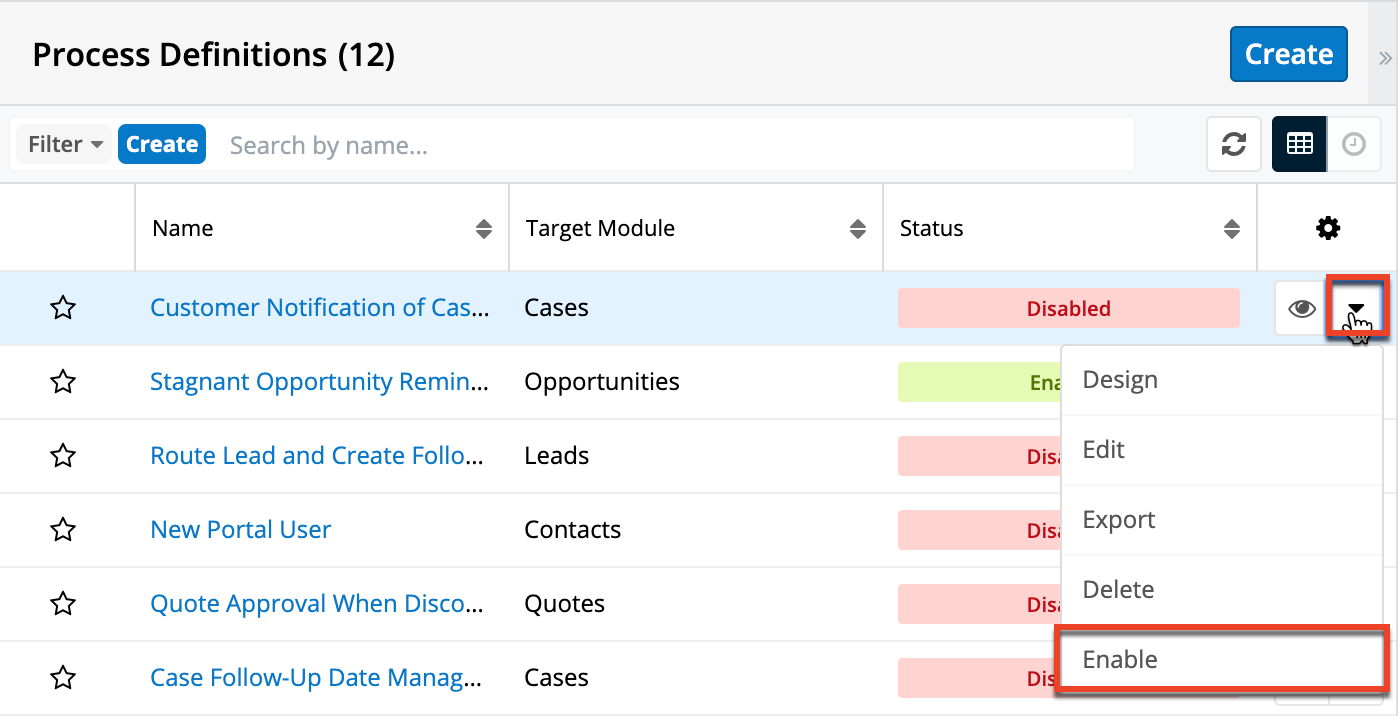
- Enabling via Record View: Click the process definition's name in the list view or from the Process Definitions dashlet to navigate to its record view. Edit the record's Status field to "Enabled" and then click the Save button.
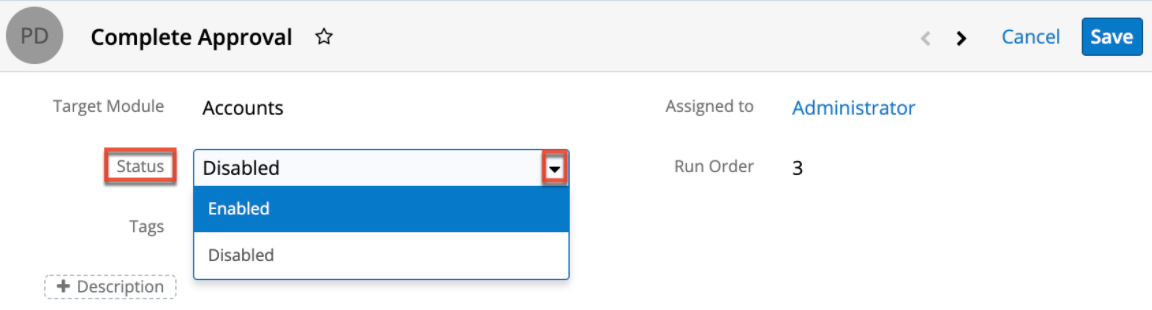
The process definition's Status will change from red to green "Enabled". Processes will immediately begin running when the process definition's conditions are met.
Disabling Process Definitions
Disabling a process definition will prevent it from triggering new processes. Any running processes related to the disabled process definition will pause in an In-Progress state until the process definition is re-enabled. To disable a process definition, use any of the techniques explained in the Enabling Process Definitions section, choosing "Disabled" instead of "Enabled".
Working With Sugar Modules
The Process Definitions module uses Sugar's Sidecar user interface. The following sections detail menus, views, and actions common to Sidecar modules and contain links to additional information within the page or links to the User Interface documentation.
Menus
The following sections describe the various menu options in the Process Definitions module with links to more information about each option in the User Interface documentation or, for process definition-specific functionality, within this page.
Module Tab Menus
Click the Process Definitions module tab in the navigation bar to access the Process Definitions list view. You may also click the three-dots menu in the Process Definitions tab to display the Actions, Recently Viewed, and Favorites menus. The Actions menu allows you to perform important actions within the module. The Recently Viewed menu displays the list of process definitions you last viewed in the module. The Favorites menu displays the list of process definitions you most recently marked as favorites in the module.
The Actions menu allows you to perform the following operations:
| Menu Item | Description |
| Create Process Definition | Opens the record view layout to create a new process definition. |
| View Process Definitions | Opens the list view layout to search and display process definitions. |
| Import Process Definitions | Opens the import wizard to enable import of .bpm files. |
To access the Process Definitions module or module tab, you must also be a System Administrator user or a regular user with a role that provides developer access to one or more modules. For more information on module tab menus including other reasons a module may not be included in the menu, see the User Interface documentation.
List View Record Actions Menu
The Record Actions menu to the far right of each record's row allows you to perform actions on the individual process definition record directly from the list view. 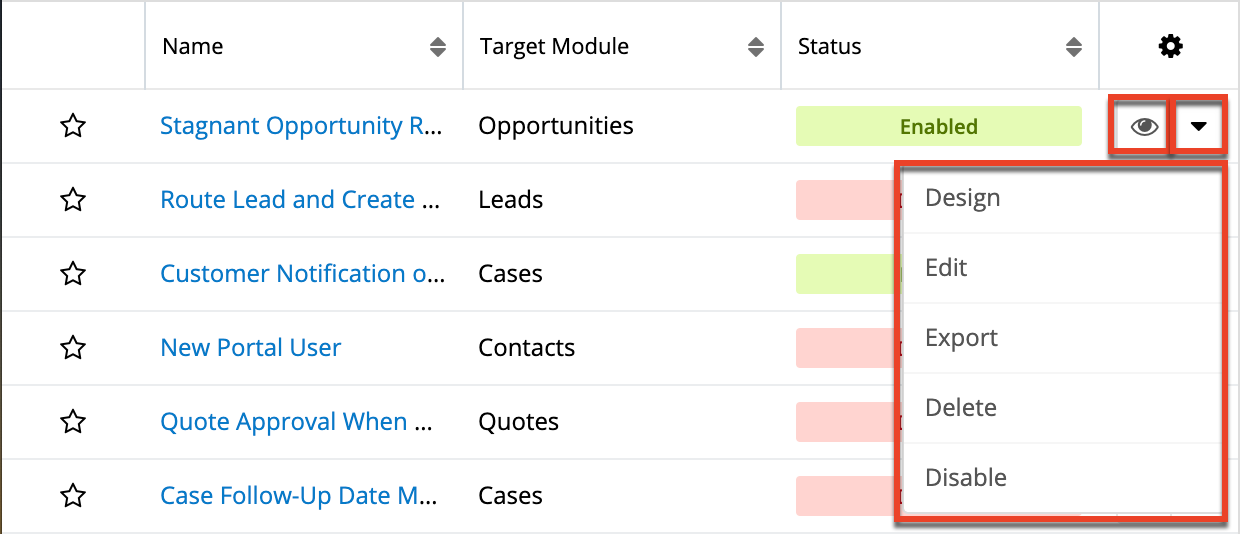
The list view's Record Actions menu allows you to perform the following operations:
| Menu Item | Description |
| Preview (Eye icon) | Preview the design of this process definition in the intelligence pane. |
| Design | Navigate directly to the process definition's Visual Designer, where you can create and edit the process flow. |
| Edit | Edit this process definition. |
| Export | Download a copy of this process definition to your computer as a .bpm file. |
| Delete | Delete this process definition. |
| Enable/Disable | Enable or disable this process definition. |
Record View Actions Menu
The process definition's record view displays the fields relevant to the Process Definitions module. To access a process definition's record view, simply click a hyperlinked process definition name from the Process Definitions list view. The record view's Actions menu appears on the top right of the page and allows you to perform various operations on the current record.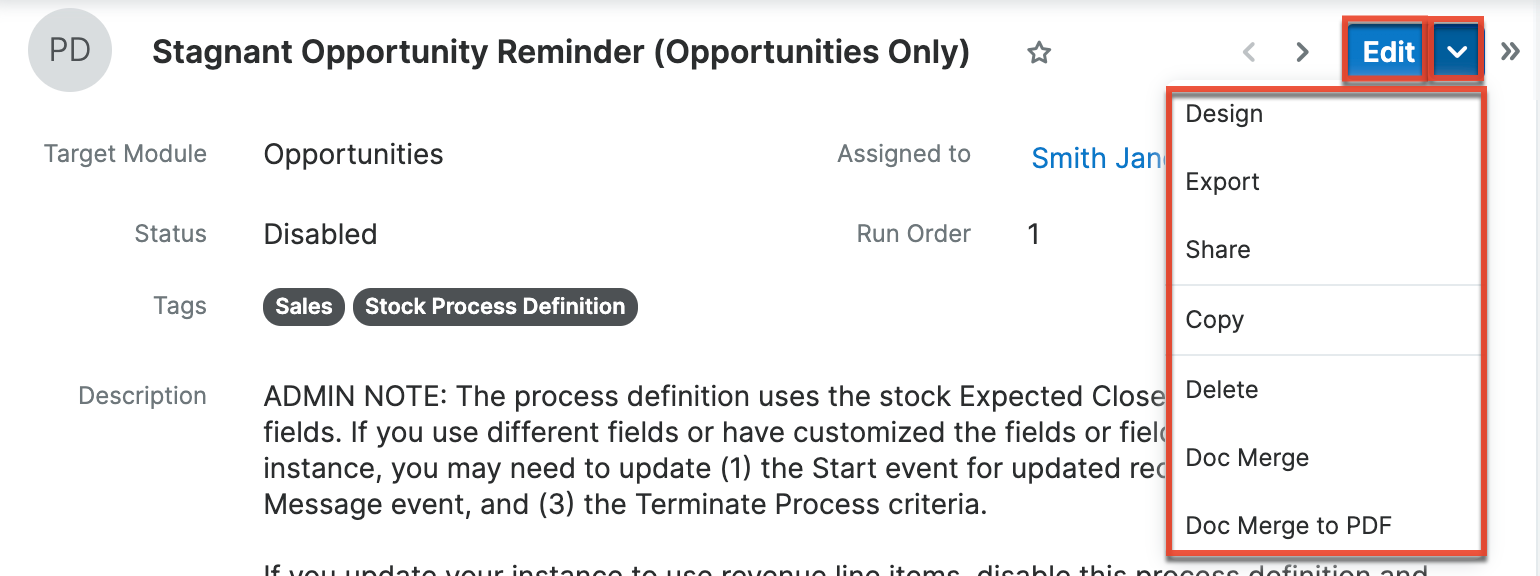
The Actions menu allows you to perform the following operations:
| Menu Item | Description |
| Edit | Edit this process definition. |
| Design | Navigate directly to the process definition's Visual Designer, where you can create and edit the process flow. |
| Export | Download a copy of this process definition to your computer as a .bpm file. |
| Share | Share a link to this process definition in Sugar via email. |
| Copy | Duplicate this record to make a new process definition. |
| Delete | Delete this process definition. |
| Doc Merge | Select or create a DOCX, XLSX, or PPTX template to merge record data into documents that will be accessible in the Doc Merge widget. |
| Doc Merge to PDF | Select or create a DOCX, XLSX, or PPTX template to merge record data into PDF documents that will be accessible in the Doc Merge widget. |
Common Views and Actions
The following links will open specific sections of the User Interface documentation where you can read about views and actions that are common across most Sidecar modules.
| Content Link | Description |
| Viewing Process Definitions Viewing via List View Viewing via Record View Viewing via Recently Viewed |
The Viewing Records section describes various methods of viewing process definition records, including via the Process Definitions list view and record view, the Recently Viewed menu in the Process Definitions module tab. For information on viewing a process definition's message content, please refer to the Designing Process Definitions section below. |
| Searching for Process Definitions List View Search Creating a Filter |
The Searching for Records section provides an introduction to list view search, which searches and filters within the Process Definitions module. |
| Process Definitions List View Total Record Count Create Button List View Search Favorite Designation Column Reordering Column Resizing Column Sorting Column Selection Preview Record Actions Menu Pagination Intelligence Pane |
The List View section walks through the many elements of the Process Definitions List View layout which contains a filterable list of all process definition records in Sugar. While the generic menu options are described in the User Interface sections linked to the left, the options specifically available in the Process Definitions list view are described in the List View Record Actions Menu section of this page. |
| Process Definitions Record View Favorite Designation Next or Previous Record Actions Menu Show More Intelligence Pane |
The Record View section walks through the many elements of the Process Definitions Record View layout which contains detailed information about a single process definition record. While the generic menu options are described in the User Interface sections linked to the left, the options specifically available in the Process Definitions record view are described in the Record View Actions Menu section of this page. |
|
Editing Process Definitions |
The Editing Records section describes the methods of editing existing process definition record fields: inline via the Process Definitions record view, in full edit mode on the record view, and inline via the Process Definitions list view. For information on editing a process definition record's content, please refer to the Designing Process Definitions section below. |
| Deleting Process Definitions Deleting via Record View Deleting via List View |
The Deleting Records section describes two ways to delete process definitions: via the Process Definitions record view and via an individual record's Actions menu on the list view. |
| Favoriting Process Definitions Favoriting via List View Favoriting via Record View |
The Favoriting Records section describes the various methods of marking process definitions as favorites, including via the Process Definitions list view and Process Definitions record view. Favoriting a process definition record allows you to easily access it from list views and the Process Definitions module tab. |
| Sharing Process Definitions | The Sharing Records section provides instructions for the Share record view option which composes an email with a link to the process definition record. If the recipient is logged into Sugar, clicking the link will bring them directly to the record view. |