Employee Records
Overview
Sugar's Employees module consists of individual people within your organization. The Employees module allows you to see a list of all employees, their contact information, and their employment status in one convenient location. Employee records are typically created when a user record is created, but users with administrative access can also add non-user employees. This means that, typically, all users will be listed as employees, but not all employees are necessarily Sugar users.
Note: For instances that use SugarIdentity, the administrator will need to access SugarIdentity to create and manage user records.
As the Employees module contains internal information about your company, not specifically Sugar, it is not subject to team and role restrictions.
Employee Fields
The Employees module contains a number of stock fields that come out of the box with Sugar. The below definitions are suggested meanings for the fields, but the fields can be leveraged differently to best meet your organization's needs. Fields can be altered, added, or removed via Admin > Studio. For more information on configuring fields, please refer to the Studio documentation in the Administration Guide.
For instances that use SugarIdentity, the administrator will need to access SugarIdentity to edit the following read-only fields for any employee records that are tied to a user record in SugarIdentity:
- First Name
- Last Name
- License Type
Note: For certain SugarIdentity-enabled instances, this field is only available to manage in SugarIdentity. - Title
- Department
- Office Phone
- Primary Address
- City
- State
- Postal Code
- Country
- Primary Email Address
| Field | Description |
| City | The city of the employee's address. |
| Country | The country of the employee's address. |
| Department | The department where this employee works. |
| Email Address | The employee's email address. |
| Employee Status | The employee's employment status in the organization, either: Active, Terminated, or Leave of Absence. |
| Fax | The employee's fax number. |
| First Name | The employee's first name. |
| Home Phone | The employee's home phone number. |
| IM Name | The employee's instant message screen name. |
| IM Type | The employee's instant message client type. |
| Last Name | The employee's last name. |
| Mobile | The employee's mobile phone number. |
| Notes | A description or other information about this employee. |
| Office Phone | The employee's office phone number and extension. |
| Other | An additional phone number for the employee. |
| Picture | A picture, headshot, or identifying image of the employee. |
| Primary Address | The number and street of the employee's address. |
| Postal Code | The postal code of the employee's address. |
| Reports to | This field list's the employee's manager, if the manager is a Sugar user. |
| State | The state of the employee's address. |
| Title | The employee's job title. |
Employees Module Tab
The Employees module tab can be accessed by clicking your profile icon and selecting "Employees" in the user menu. 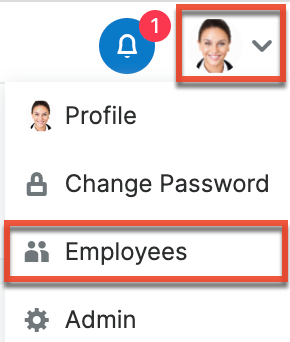
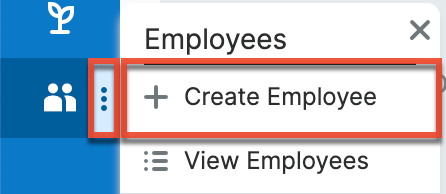
Once in the Employees list view, you can click the three-dots menu in the Employees module tab to display the Actions and Recently Viewed menus. The Actions menu allows you to perform important actions within the module. The Recently Viewed menu displays the list of employees you last viewed in the module. Please note that clicking the module tab allows you to access the Employees list view.
The Actions menu allows you to perform the following operations:
| Menu Item | Description |
| Create Employee | Opens the edit view layout to create a new employee. |
| View Employees | Opens the list view layout to search and display employees. |
Creating Employees
There are various methods for creating employees in Sugar including via the Employees module, the Users module, and duplication. The full edit view layout opens when creating the employee directly from the Employees menu and includes all of the relevant fields for your organization's employees. The edit view layout can be configured via Admin > Studio. For more information on configuring layouts, please refer to the Studio documentation. Please note that when a new user is created, an employee record is also created by default using the relevant information from the user record. For instances that use SugarIdentity, an administrator will need to access SugarIdentity to create new users.
Creating Via Employees Module
One of the most common methods of employee creation is via the Create Employee option in the Employees module tab. This opens up the edit view layout which allows you to enter in all the relevant information for the employee.
Use the following steps to create an employee via the Employees module:
- Click the three-dots menu in the Employees module tab and select "Create Employee".
- Enter appropriate values for the fields in the edit view layout. All required fields are marked with a red asterisk and must be completed prior to saving.
- Once the necessary information is entered, click "Save".
Creating Via Users Module
When a user is created, an employee record is also created by default using the relevant fields from the user record to be populated on the employee record. The field in the Users module that controls this is the "Display Employee Record" field. For more information on creating users, please review the Users documentation.
Note: For instances that use SugarIdentity, an administrator will need to access SugarIdentity to create new users. 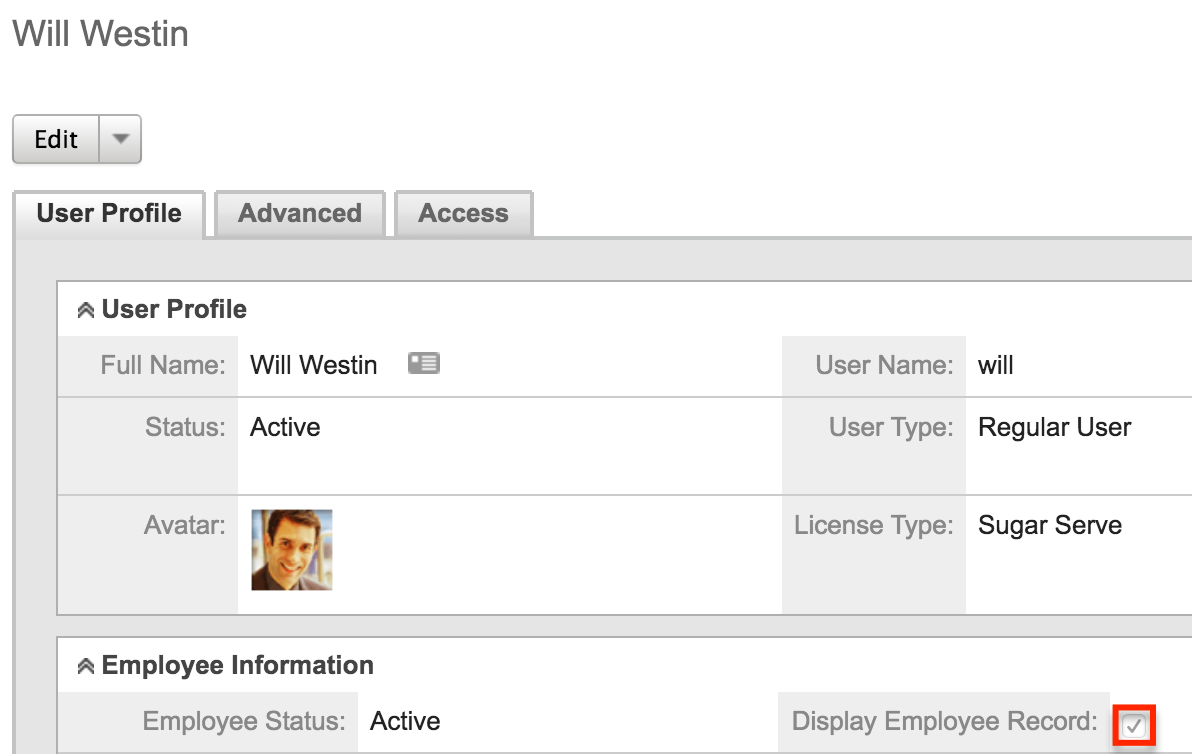
Creating Via Duplication
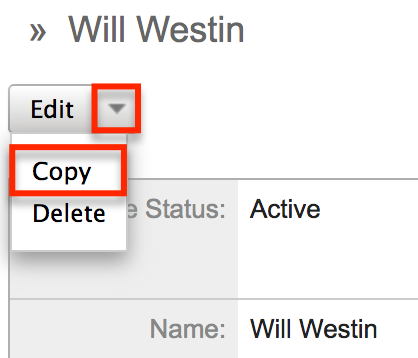
You can also create a new employee by duplicating an existing employee record. The Copy option is useful if the employee you are creating has similar information to an existing employee.
Use the following steps to create an employee by duplicating an existing record:
- Navigate to an employee record's detail view.
- Click the Actions menu and select "Copy".
- The displayed edit view is pre-populated with the original employee's values. Update the necessary fields, then click "Save".
Viewing Employees
There are various options available for viewing employee records in Sugar including via Employees list view, Employees detail view, and the Employees Recently Viewed menu. Please note that you will only be able to access these views by first clicking on the Employees button after clicking on your user name on the top right side of Sugar.
Viewing Via List View
The Employees list view displays all employee records meeting the current search criteria. To access the list view, simply click the Employees option under your user name on the module tab bar. While list view shows key employee fields, you can click the employee's name to open the record in detail view. For more information on viewing employees via list view, please refer to the Employees List View section of this documentation.
Viewing Via Detail View
The Employees detail view displays thorough employee information by showing all employee fields. The detail view can be reached by clicking an employee record's link from the Employees list view. For more information on viewing employees via detail view, please refer to the Employees Detail View section of this documentation.
Viewing Via Recently Viewed
As you work, Sugar will keep track of which employees you have recently viewed. Click the three-dots menu in the Employees module tab to see a list of the 3 records you most recently viewed in the module. Clicking the record's name (e.g., Will Westin) within the list will open it in detail view.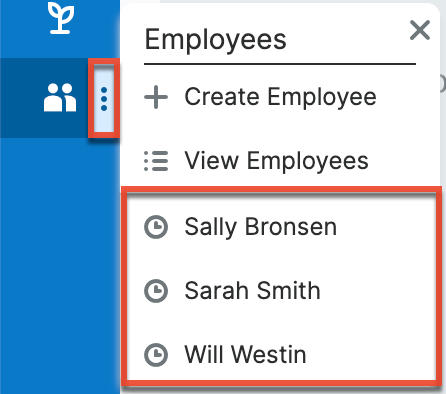
Searching Employees
The Employees list view includes a Basic and Advanced Search to help you locate records easily and effectively in a module-specific manner. Once the search is performed, the relevant results will be displayed in the Employees list view below. Please note that Sugar automatically appends the wildcard character (%) to the end of your search phrase. This allows the system to retrieve all records that start with the keyword entered in the search. To broaden the search, you can use the wildcard at the beginning of your text as well (e.g., %services). This will pull up any record that has the word "services" in the name, regardless of how it starts or ends.
For more information on using the various search methods as well as how wildcards are used in the different methods, please refer to the Search documentation.
Basic Search
Basic search offers a few, commonly used fields for a simplified search experience. From the Basic Search panel, click "Advanced Search" to access additional search functionality as needed.
The buttons and checkboxes available in Basic Search panel have the following functions:
- Search: Click the Search button or press your Return/Enter key to perform the search.
- Clear: Click the Clear button to clear all criteria from the searchable fields.
- Active Employees: Select this box to return only records where Employee Status is Active.

When you run a search, Sugar will return records matching all (as opposed to any) of the fields and checkboxes for which you have given a value. For example, if you select "Active Employees" and enter an employee's name, Sugar will only return employee records with a matching name that is active. Once the search is complete, the relevant results will populate in the list view below the search panel. To see all employee records, simply click "Clear" and then "Search" to perform a blank search with no filters.
Administrators can configure what fields appear on the Employees Basic Search via Admin > Studio. For more information on editing layouts, please refer to the Studio documentation in the Administration Guide.
Advanced Search
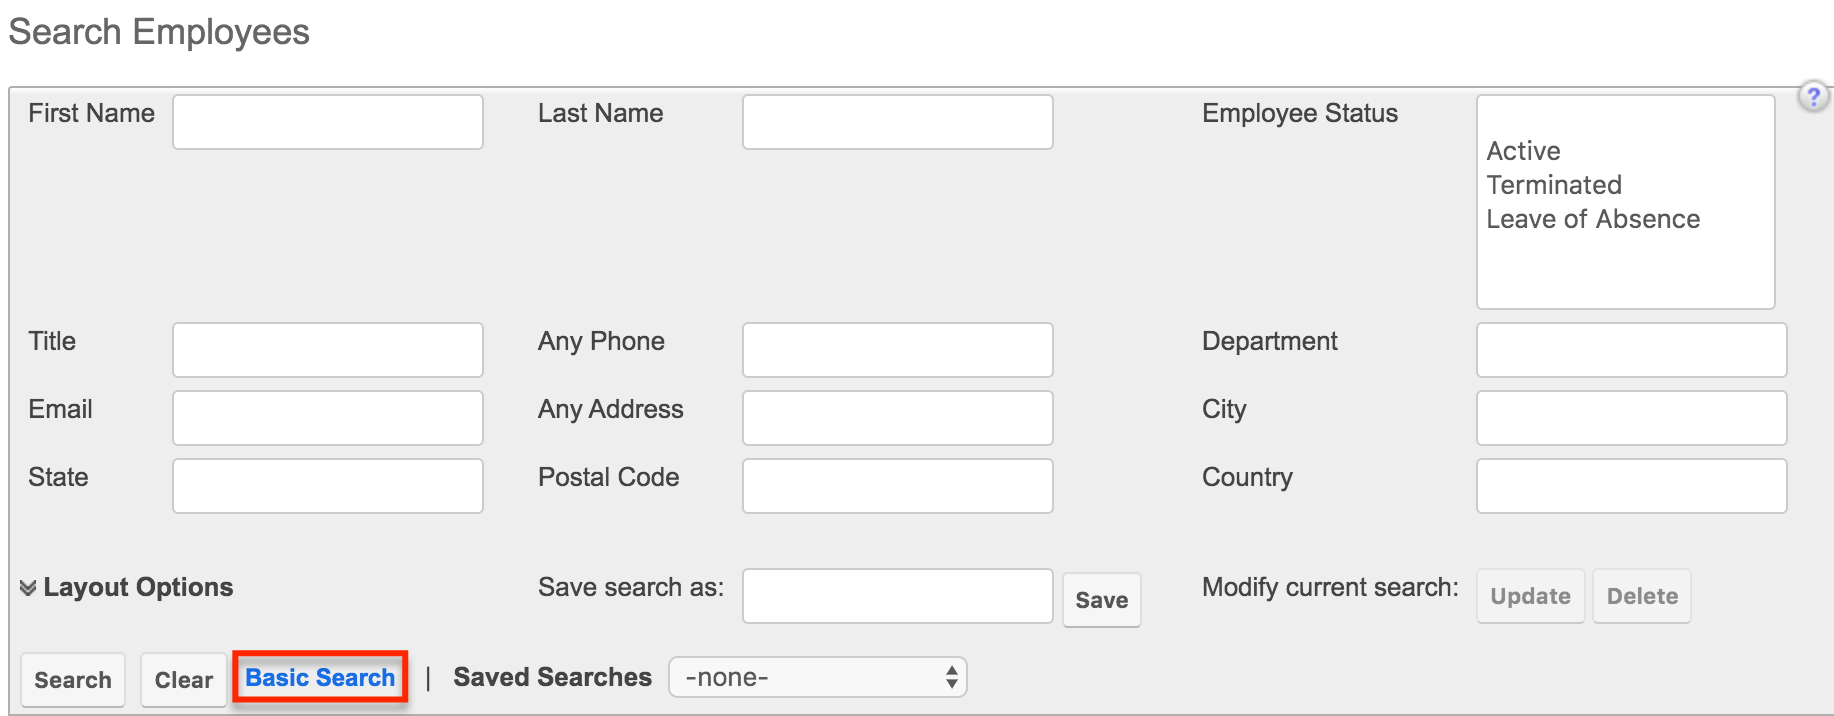
Advanced Search offers a more in-depth search experience than Basic Search including additional fields, layout options, and saved search capability. From the Advanced search panel, you can click "Basic Search" for simplified searching.
The buttons, checkboxes, and dropdowns available in Advanced Search have the following functions:
- Search: Click the Search button or press your Return/Enter key to perform the search.
- Clear: Click the Clear button to clear all criteria from the searchable fields.
- Active Employees: Select this box to return only records where Employee Status is Active.
- Layout Options: Use the expandable Layout Options section to configure your list view. For more information, please refer to the Layout Options section of the Search documentation.
- Saved Searches: Save, recall, update, and delete searches that you use often. For more information, please refer to the Saved Search section of the Search documentation.
When you run a search, Sugar will return records matching all (as opposed to any) of the fields and checkboxes for which you have given a value. For example, if you select "Active Employees" and enter an employee's name, Sugar will only return employee records with a matching name that is active. Once the search is complete, the relevant results will populate in the list view below the search panel. To see all employee records, simply click "Clear" and then "Search" to perform a blank search with no filters.
Administrators can configure what fields appear on the Employees Basic Search via Admin > Studio. For more information on editing layouts, please refer to the Studio documentation in the Administration Guide.
Employees List View
The Employees list view displays all employee records meeting the current search criteria. You can view the basic details of each employee within the field columns.
You have the option to change what fields are displayed in the list view by configuring your layout options in the Employees advanced search. For more information on configuring your list view, please refer to the Layout Options section of the Search documentation. Users with administrator or developer access also have the ability to change what fields are visible in the list view via Admin > Studio. For more information on editing layouts, please refer to the Studio documentation in the Administration Guide.
Pagination
List view displays the current search results broken into pages that you can scroll through rather than displaying potentially thousands of rows at once. To the right just below the search panel, you can see which records of the total results set are currently being displayed. The two single-arrow Next and Previous buttons can be used to scroll through the records page-by-page. The two double-arrow First Page and Last Page buttons allow you to skip to the beginning or the end of your current results.
By default, Sugar displays 20 records per list view page, but administrators can change the number of records displayed via Admin > System Settings. For more information on changing the number of displayed records, please refer to the System documentation in the Administration guide.
Checkbox Selection
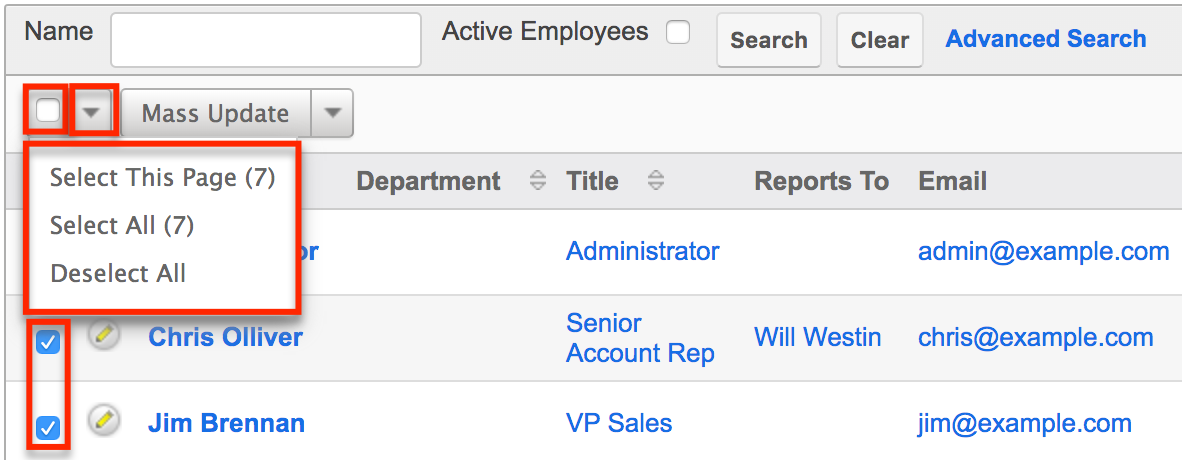
You can perform actions on employee records directly from the list view by first selecting the desired records. To select individual employee records on the Employees list view, mark the checkbox on the left of each row. To select or deselect multiple case records on the list view, use the options in the checkbox dropdown menu:
- Select This Page: Selects all records shown on the current page of case results.
- Select All: Selects all records in the current search results across all pages of case results.
- Deselect All: Deselects all records that are currently selected.
Actions Menu
The Actions menu to the right of the checkbox dropdown allows you to perform actions on the currently selected records.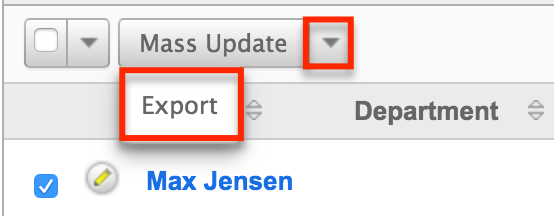
The options in the Actions menu allow you to perform the following operations:
| Menu Item | Description |
| Mass Update | Mass update one or more employees at a time. |
| Export | Export one or more employees to a CSV file. |
Column Sorting
List view provides the ability to sort all of the current search results by a field column in either ascending or descending order. To sort by a field or switch the sort direction, click the column header noting that the fields which allow sorting will have a pair of arrows. The list view may be sorted by only one column at a time. You can also set a default order-by column using the layout options in Advanced Search. For more information on setting a default column sort, please refer to the Layout Options section of the Search documentation.
Employees Detail View
The Employees detail view displays thorough employee information by way of all employee fields grouped into one page.
Users with administrator or developer access have the ability to change the detail view by configuring the layout via Admin > Studio. For more information on editing layouts, please refer to the Studio documentation in the Administration Guide.
Next or Previous Record
On the upper right of the Employees detail view, there are two buttons that allow you to page through each employee in the Employees list view's current search results. Clicking the Previous button displays the previous employee of the current search results while clicking the Next button displays the next employee of the current search results. The text in between shows which employee result you are currently viewing within the total number of current results.
Editing Employees
Administrators may edit employees at any time to update or add information to the record. You can make changes to existing employee records via the Employees edit view and quick create forms. Edit view is available within the Employees module and includes all of the Employees fields you should need. You can configure the Employees edit view via Admin > Studio. For more information on configuring layouts, please refer to the Studio documentation in the Administration Guide.
For instances that use SugarIdentity, the administrator can only edit employee records that are created directly in Sugar. For any employee records that are tied to a user record in SugarIdentity, there are certain fields (e.g., Office Phone, Title) in the employee's record that are read-only and can only be edited in SugarIdentity.
Editing Via Detail View
You can edit employees via the detail view by clicking the Edit button on the upper left of the page. Once the edit view layout is open, update the necessary fields, then click "Save" to preserve your changes. 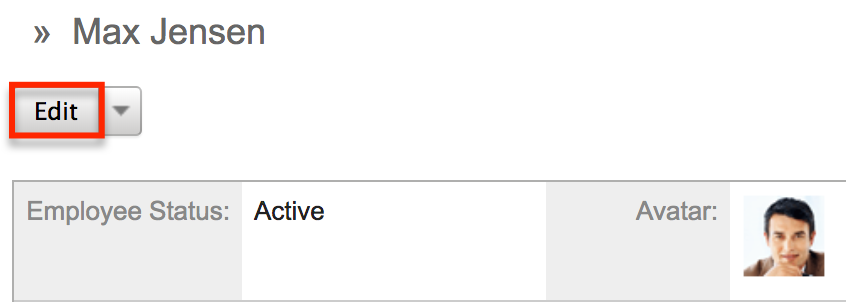
Editing Via List View
You can also edit employees by clicking the Pencil icon to the left of each employee's name in the list view. The edit view layout will open where you can update the necessary fields and click "Save" to preserve your changes.
Deleting Employees
If an employee record is invalid or should no longer appear in your organization's Sugar instance, it may be deleted from the Employee's detail view. Deleting employee records will also delete the user record that this employee was related to.
Note: For instances that use SugarIdentity, the administrator can only delete employee records that are created directly in Sugar. Any employee records that are tied to a user record in SugarIdentity cannot be deleted, and administrators will need to access SugarIdentity to delete the user record. Deleting the user record via SugarIdentity will delete the corresponding user and employee records from Sugar.
Use the following steps to delete an employee record via the detail view:
- Navigate to an employee record's detail view.
- Click the Actions menu and select "Delete".
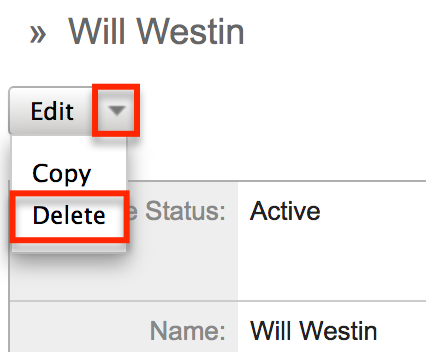
- A pop-up message will display asking for confirmation and alerting you that the User record will also be deleted. Click "Ok" to proceed.
Exporting Employees
Sugar's Export option allows administrators to download all fields for the selected employees to their computers as a CSV (comma-separated values) file. This may be useful when needing to use Employee data with other software such as Microsoft Excel. Due to PHP memory limitations on the server, there may be occasions when the application times out while exporting a large number of employee records. If you encounter an error when performing this action, we recommend selecting the records in smaller batches.
Employees may be exported from the Employees list view by selecting "Export" from the Actions menu. For more information on exporting records in Sugar, please refer to the Export documentation. 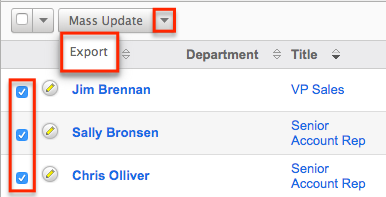
Mass Updating Employees
Mass Updating allows administrators to make the same change to multiple employee records at once from the Employees list view. Administrators can control which fields are available to change during mass update via Admin > Studio. Currently, only fields with the data type of date, datetime, dropdown, multiselect, and radio may be altered during a mass update. For more information on configuring mass update, please refer to the Studio documentation in the Administration Guide. Due to the PHP memory limitations on the server, there may be occasions when the application times out while mass updating a large number of employee records. If you encounter an error when performing this action, we recommend selecting the records in smaller batches.
Use the following steps to mass update employee records from the list view:
- Navigate to the Employees list view by clicking the Employees module tab.
- Use the list view's Basic or Advanced Search to find employees you wish to modify.
- Select the desired employees individually or using the checkbox dropdown's options.
- Choose "Mass Update" from the Actions menu.
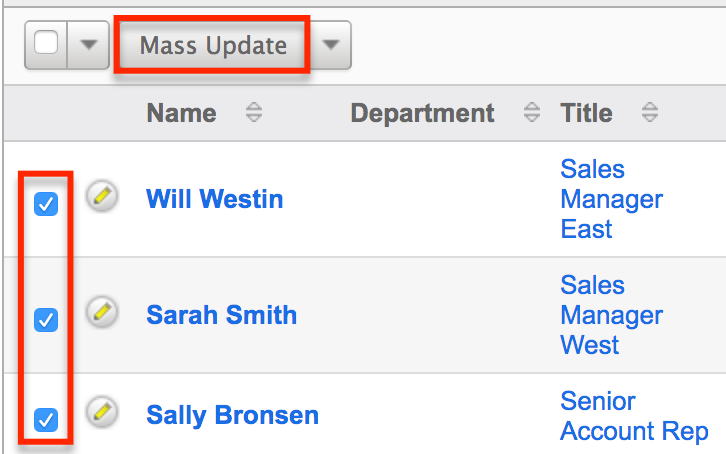
- Scroll to the Mass Update panel and set values for the fields you wish to alter.

- Click "Update" to save the changes to all of the currently selected employee records.