Import
Overview
For most modules, Sugar® allows users to transfer data from an external source (usually a comma-separated-values file) into the database via import. Sugar's import wizard is a quick and easy way to create or update many records at once. The import tool can be used to add a list of new customers or leads to the database, update existing data, migrate from a previous CRM system, or for any process that requires manipulating many records at once.
The modules available for import can vary per the Sugar administrator. If an administrator wishes to see a full list of importable modules, they may navigate to Admin > Import and see all available modules there. For more information, please review the System documentation.
When importing through any importable modules, Sugar presents users with a wizard to help guide users through the process of creating and updating records.
Import Guidelines
Importing is a very important process for both new Sugar users and those who have been using Sugar for years. Depending on your business needs, you may run imports anywhere from multiple times per week to only once or twice per year. Regardless of the import frequency, all users follow the same import guidelines:
- File Delimitation: Sugar accepts files that are delimited by a given separator, such as commas or tabs. The most common type of import will be using a CSV (Comma Separated Value) file, but Sugar will accept other file types as long as it recognizes the delimiter.
- Imposed Limitations: Sugar, by default, does not impose any type of import limitations. However, System Administrators can impose a limit on the number of rows or records that can be imported at one time. This limitation is found in Admin > System Settings > Advanced > Import - Maximum Number of Rows. Administrators can also limit what modules users are allowed to import into through the use of Roles.
- Scrub Data Before Import: It is strongly recommended that all data is reviewed and scrubbed before importing. It is much easier to see if you are importing good data or that you have removed all duplicates before importing than finding them after they are already in Sugar and are already in use by other users. In addition, you want to ensure standardized fields such as dates, phone numbers, etc. adhere to a common format so that the import will run as smoothly as possible.
- Parent Records First: When importing any records that use a relationship to another module, such as the Account - Contact relationship, it is best to try importing the parent, or higher level, records first. This is demonstrated with a one-to-many relationship between the two modules. In this case, it is best to import accounts first and then contacts, which rely on account records.
Importing New Records
The first type of import that will be covered is importing new records. Whether you are just starting a migration from another CRM to Sugar or if you are adding a new list of records that you have received, such as a new list of leads or accounts, this process will help to get the data into Sugar without having to manually enter each record. After preparing your import file, follow these steps to import the list into Sugar:
Note: For instances that use SugarIdentity, administrators need to access SugarIdentity to import a list of new users using a CSV file.
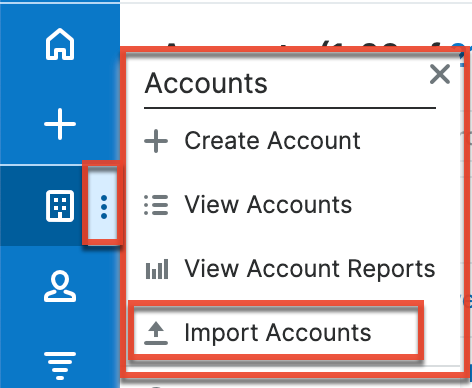
- Click the module tab in the navigation bar for the module (e.g., Accounts) that you wish to import into. Then click the three-dots menu in the module tab and select the import option. This will open the Import Wizard and bring you to the"Upload Import File" screen.
- If you would like to review the Import File Template, you can download it from this page. This will give you a template of the format Sugar is going to be using to import your data. For more information on the template, please review the Import File Template section of this documentation.
- Select the import file that you are going to use to import by clicking the Choose File button. When prompted, select the file from your computer and it will appear in this box.

- Ensure that "Create new records only" is selected.
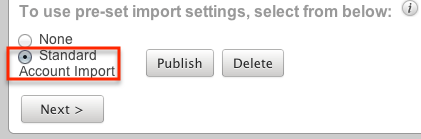
- If you have performed imports before and have previously saved your import settings, you can select your setting at the bottom of the page using the "To use pre-set import settings, select from below" option. If you do not have any saved import settings, this section will not appear. For more information on saving mapping, please review the Saving Field Mappings section of this documentation.
- Click "Next" to access the "Confirm Import File Properties" screen.
- This screen will show you the first two rows that Sugar is going to try to import as an example to let you know that your file was read properly by Sugar.
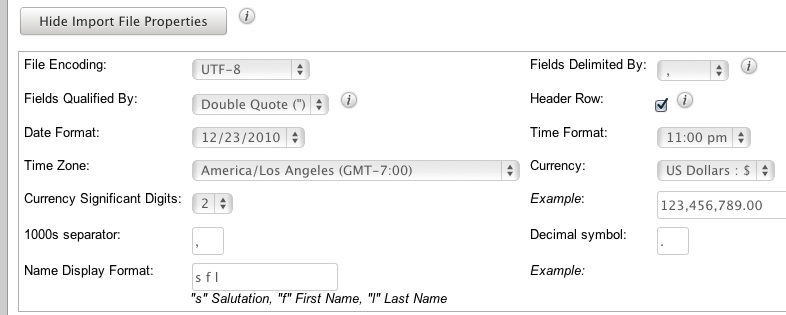
- The Import Wizard automatically detects the properties of the file that has been uploaded to ensure the best import possible. If you notice any mistakes or need to set up any advanced configuration, click "View Import File Properties". These changes are specific to the import and do not affect your standard user preferences.
- If the file was exported from either Salesforce.com or Microsoft Outlook, select the corresponding option under "If the import file data was exported from any of the following sources, select which one". If not, leave this as "None". This option will set up your mapping properly on the next screen.
- Click "Next" to access the Confirm Field Mappings screen.
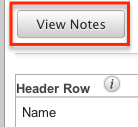
- Click the View Notes button for any relevant information, specific to this module, to the import that you are performing.
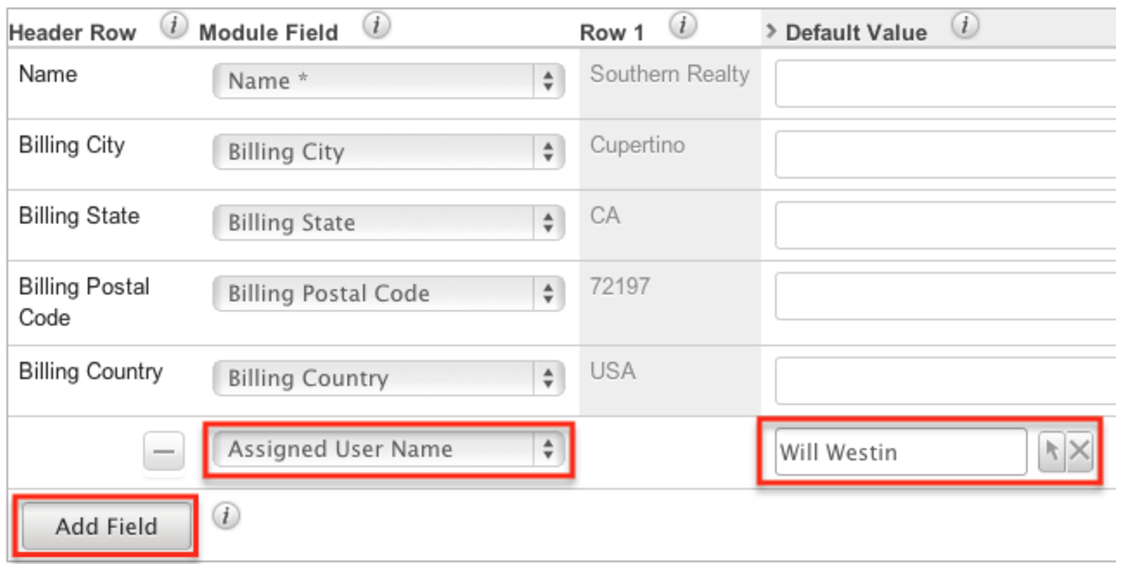
- This screen presents you with four columns:
- Header Row: This is the column header from your import file. This column will let you reference your file to make sure your column mapping is correct. If your import file does not have a header row, this column will not show.
- Module Field: This column contains a dropdown list of all importable fields for the module. The Import Wizard tries to match the Header Row with the corresponding Sugar field. If the suggested mapping is incorrect, use the dropdown list to change the mapping. Required fields are marked with an asterisk (*).
- Row 1: This column contains the values from the first row of data in your import file. This is another aid to help ensure you have your mapping correct, so that you can see the mapping using real data and not just the headers. If your import file does not have column headers, there will be an additional column for Row 2.
- Default Value: This column is hidden by default, but can be expanded if needed. When expanded, you have the option to fill in a value that will populate all records where a value for that field does not exist. For example, if you do not have anything populated in the Accounts Industry field, but you know this is a list of Technology companies, you can populate all blank values in the Industry field with the value of "Technology".

- Click "Add Field" if any data needs to be added to the import that is not on your import file. This can be used if you would like to assign a value to a record when the column is not on your import file. This is used in conjunction with the Default Value column. For example, if you are importing these accounts, but would like to assign them all to another user, John Smith, you would click the Add Field button, select the field from the Module Field column, and populate the desired value in the Default Value column. Now, all records will be assigned to John Smith upon import.
- Click "Next" to access the Check for Possible Duplicates screen.
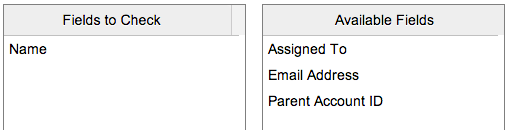
- This menu allows users to check if there are duplicated values on the import to records that already exist in Sugar. This menu will vary depending on what module you are importing into as the fields will be specific to this module. The fields available to the Import Wizard are determined based on the system-defined indexes. This is why you will not see all fields shown on this list, but only a subset of fields from the module. If you would like to cross reference existing Sugar records against what is being imported, simply drag and drop the field name from the right column, "Available Fields", to the left column, "Fields to Check". For more information on duplicate checking, please review the Detecting Duplicates section of this documentation.
- If the import configuration that you have set up is going to be used again in the future for additional imports, add a name at the button of the page so that it can be referenced later. For more information on saved field mappings, please review the Saving Field Mappings section of this documentation.
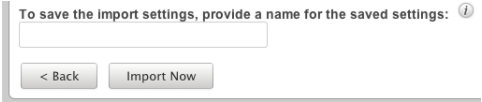
- When your duplicate checking settings are complete, click "Import Now" to begin the import.
- After the import completes, you are brought to the "View Import Results" page. Here, you are provided with a summary of the import.
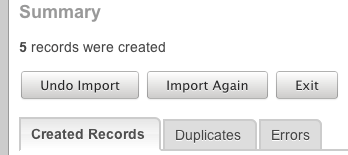
- The summary will tell you how many records were created, how many were not created due to an error, and how many were found as duplicates.
- There are three buttons below the Summary:
- Undo Import: If there was a mistake in the import that you realized after importing, you can check this button. All records that were created via the import will be deleted. This button cannot be re-accessed for this import. As soon as you navigate away from this page, the import is considered complete.
- Import Again: Click this button if you would like to go back to the first step of the Import Wizard and perform additional imports. Clicking this button will consider the import to be complete.
- Exit: This button will also consider the import to be complete, but will bring you back to the module's list view to be able to further review or search your records.
- There are also three tabs on the summary page under the buttons:
- Created Records: This tab will show you a list view of all of the records that were properly imported on this import.
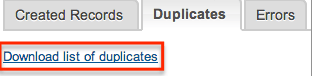
- Duplicates: This tab will present you with any records that were not imported due to the Import Wizard finding duplicates from Step 15. There is an option to download a list of the duplicates, which produces a new CSV file. You have the option to download this list, make any changes, and import again following this same process.
- Errors: This tab will show you any records that were not imported due to an error during the import process. This is usually seen when there is a problem with data that is on one of the records or rows in the CSV file. For instance, if you are missing a value for a required field, or a field is formatted incorrectly.

Note: Similar to the option to download duplicate records, you also have the option to download the list of errors using the two links provided:- The "Download list of errors" option will produce a new CSV file with columns showing (from left to right) the error, the field affected, the value, and the line in your original import file where the error occurred.

- The "Download list of rows that were not imported" option will download a new CSV file with the same format of your original one, containing only the rows that were not imported so that you can clean them up and then re-import.

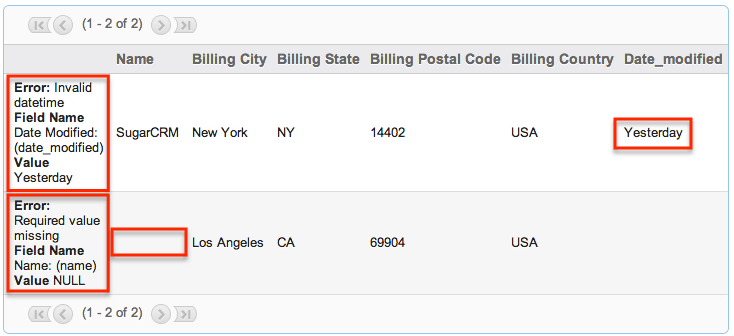
- The "Download list of errors" option will produce a new CSV file with columns showing (from left to right) the error, the field affected, the value, and the line in your original import file where the error occurred.
- Once you have downloaded the desired lists and reviewed the import, the buttons mentioned in Step 20 can be used to complete your import.
Importing Updates to Existing Records
In addition to importing new records, Sugar's Import Wizard also has the functionality to use an import file to update existing Sugar records. The process runs very similarly to the new record import process described above.
The most important aspect to importing updates to existing records is that Sugar will only update records where there is a matching ID in the import file. Every Sugar record, regardless of what module it is in, is defined with an alphanumeric ID field. This field is typically a 36-character alphanumeric value but may be less if imported from a previous CRM. This field is the only way that the Import Wizard will know which record to update.
Note: All other fields (name, email address, etc.) are not considered unique and can have duplicates, so only the ID field will work to differentiate records for an update from import.
The ID field is not usually shown in Sugar and must be found either by running a report or an export within the module.
During the import, if there are any other records without ID fields and they are in the import file, they will create new records, which will create duplicates in your database.
To import updates, follow the steps below.
- To prepare the import file, you must have the ID numbers for all of the records that you are going to be updating. The most common methods are either by exporting a list of records from the module list view or by running a report and exporting the results. For more information on exporting, please review the Export documentation.
- Export from List View: This option will include the record ID field, but it is recommended that you open the file in a spreadsheet editor (Microsoft Excel) and delete any columns that you are not updating. Be sure to leave the ID field and any required fields, such as Name, as the import will not complete without these.
- Export from Report: If you choose to run a report, be sure to include the ID field in your display columns so that the records can be matched up. You will also want to include any required fields, such as Name, as the import will not complete without these. Please note that only Rows and Columns reports can be used for exports.
After you have your file ready for import, you can proceed with working through the Import Wizard.
- Click the module tab in the navigation bar for the module (e.g., Accounts) that you wish to update via import. Then click the three-dots menu in the module tab and select the import option. This will open the Import Wizard and bring you to the"Upload Import File" screen.
- If you would like to review the Import File Template, you can download it from this page. This will give you a template of the format Sugar is going to be using to import your data. For more information on the template, please review the Import File Template section of this documentation.
- Select the import file that you are going to use to import by clicking the "Choose File" button. When prompted, select the file from your computer and it will appear in this box.
- Select the option "Create new records and update existing records".
- If you have performed imports before and have previously saved your import settings, you can select your setting at the bottom of the page using the "To use pre-set import settings, select from below" option. If you do not have any saved import settings, this section will not appear. If your CSV file was exported from Sugar, this is likely not a necessary step. For more information on saving mapping, please review the Saving Field Mappings section of this documentation.
- Click "Next" to access the "Confirm Import File Properties" screen. Before the "Confirm Import File Properties" screen opens, you will be prompted with an alert informing you that updates made to existing records cannot be undone. Read, and then click "OK" to proceed.
- This screen will show you the first two rows that Sugar is going to try to import as an example to let you know that your file was read properly by Sugar.
- The Import Wizard automatically detects the properties of the file that has been uploaded to ensure the best import possible. If you notice any mistakes or need to set up any advanced configuration, click "View Import File Properties". These changes are specific to the import and do not affect your standard user preferences.
- If the file was exported from either Salesforce.com or Microsoft Outlook, select the corresponding option under "If the import file data was exported from any of the following sources, select which one". If not, leave this as "None". This option will set up your mapping properly on the next screen. If this file was exported from Sugar, keep it set to "None".
- Click "Next" to access theConfirm Field Mappings screen.
- Click the View Notes button for any relevant information, specific to this module, to the import that you are performing.
- This screen presents you with four columns:
- Header Row: This is the column header from your import file. This column will let you reference your file to make sure your column mapping is correct. If your import file does not have a header row, this column will not show.
- Module Field: This column contains a dropdown list for each row that contains the name of a field in Sugar. The Import Wizard tries to match the Header Row with the corresponding Sugar field. If the suggested mapping is incorrect, use the dropdown list to change the mapping. Required fields are marked with an asterisk (*).
- Row 1: This column contains the values from the first row of data in your import file. This is another aid to help ensure you have your mapping correct, so that you can see the mapping using real data and not just the headers. If your import file does not have column headers, there will be an additional column for Row 2.
- Default Value: This column is hidden by default, but can be expanded if needed. When expanded, you have the option to fill in a value that will populate all records where a value for that field does not exist. For example, if you do not have anything populated in the Accounts Industry field, but you know this is a list of Technology companies, you can populate all blank values in the Industry field with the value of "Technology".
- Click "Add Field" if any data needs to be added to the import that is not on your import file. This can be used if you would like to assign a value to a record when the column is not on your import file. This is used in conjunction with the Default Value column. For example, if you are importing these accounts, but would like to assign them all to another user, John Smith, you would click Add Field button, select the field from the Module Field column, and populate the desired value in the Default Value column. Now, all records will be assigned to John Smith upon import.
- Click "Next" to access the Check for Possible Duplicates screen.
- This menu allows users to check if there are duplicated values on the import to records that already exist in Sugar. Duplicate checking will only apply to new records created by the import. For more information on detecting duplicates, please review the Detecting Duplicates section of this documentation.
- If the import configuration that you have set up is going to be used again in the future, add a name at the button of the page so that it can be referenced later. For more information on saving mapping, please review the Saving Field Mappings section of this documentation.

- Click "Import Now" to begin the import.
- After the import completes, you are brought to the "View Import Results" page. Here, you are provided with a summary of the import.
- The summary will tell you how many records were updated, how many were created, how many were not created due to an error, and how many were found as duplicates, as applicable.
- There are three buttons below the Summary:
- Undo Import: If there was a mistake in the import of any new records that you realized after importing, you can check this button. All new records that were created via the import will be deleted. After updating, no changes to updated records can be reverted. This button cannot be re-accessed for this import. As soon as you navigate away from this page, the import is considered complete. This button will not show if there were no new records created.
- Import Again: Click this button if you would like to go back to the first step of the Import Wizard and perform additional imports. Clicking this button will consider the import to be complete.
- Exit: This button will also consider the import to be complete, but will bring you back to the module's list view to be able to further review or search your records.
- There are also three tabs on the summary page under the buttons:
- Created Records: This tab will show you a list view of all of the records that were properly imported on this import. If this was only an update, there will not be any records showing on this tab as it does not show updated records.
- Duplicates: This tab will present you with any records that were not imported due to the Import Wizard finding duplicates from Step 16. There is an option to download a list of the duplicates, which produces a new CSV file. You have the option to download this list, make any changes, and import again following this same process. If you did not use any duplicate settings, this tab will be empty.
- Errors: This tab will show you any records that were not imported due to an error during the import process. This is usually seen when there is a problem with data that is on one of the records or rows in the import file. For instance, if you are missing a value for a required field, or a field is formatted incorrectly.
Note: Similar to the option to download duplicate records, you also have the option to download the list of errors using the two links provided:- The "Download list of errors" option will produce a new CSV file with columns showing (from left to right) the error, the field affected, the value, and the line in your original import file where the error occurred.
- The "Download list of rows that were not imported" option will download a new CSV file with the same format of your original one, containing only the rows that were not imported so that you can correct the errors and then re-import.
- The "Download list of errors" option will produce a new CSV file with columns showing (from left to right) the error, the field affected, the value, and the line in your original import file where the error occurred.
- Once you have downloaded the desired lists and reviewed the import, the buttons mentioned in Step 21 can be used to complete your import.
For more information on updating records in Sugar, please refer to the article Updating Records Via Import.
Updating the 'Date Modified' and 'Modified By ID' Fields
If the Date Modified and Modified By ID field values are blank in the import file or are set to "Do not map" during import, "Date Modified" will be set to the date and time that the record is imported and "Modified By ID" will be set to the ID of the user performing the import.
To make changes to records without affecting the Date Modified and Modified By ID fields, first export the data including the Date Modified and Modified by ID columns, and then import with the desired changes, including the original values in the Date Modified and Modified by ID columns. For example, if you want to mark half of your RLIs for purchase generation, but you do not want to affect the historical values of these fields, do an import to update the Purchase Generation field value to "Yes" and include the exported Date Modified and Modified By ID fields to preserve their values.
Updating the 'Date Created' and 'Created By ID' Fields
If the Date Created and Created By ID field values are blank in the import file or are set to "Do not map" during import, "Date Created" will be set to the date and time that the record is imported for new records. For existing records, the original time will be preserved. "Modified By ID" will be set to the ID of the user performing the import for new records. For existing records, the original user will be preserved.
Importing Fields With Multiple Values
Multiselect fields allow for the input of multiple values. When importing data to these fields, it is possible to import multiple field values using a comma delimiter within the field.
Importing Multiselect Fields to New Records
To import multiple values to a multiselect field on a new record, the import data file's mapped column should contain exact character matches to existing dropdown values separated by commas. For example, a multiselect field for Flavors contains the options Chocolate, Pistachio, Rocky Road, Spumoni, and Vanilla.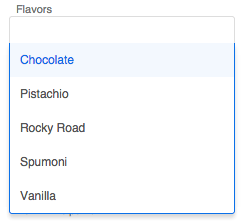
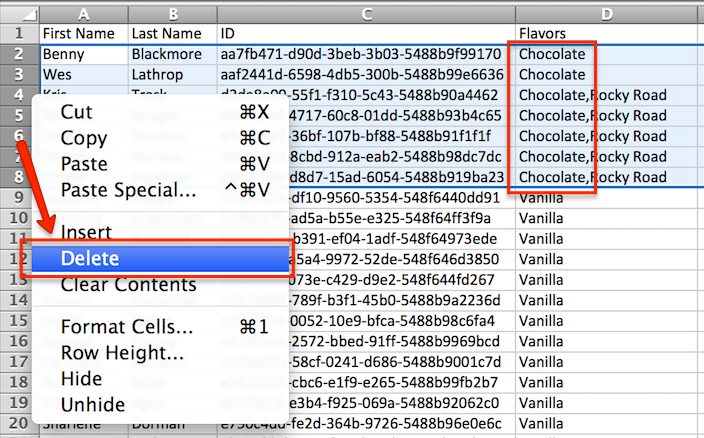
To import a new record that contains both "Vanilla" and "Chocolate" in the Flavors field, the import data file's Flavors column should contain Vanilla,Chocolate with a comma separating the values and no extra spaces. If one of the imported multiselect options is a phrase, such as "Rocky Road", then the imported data field should contain a space character only within that value: Vanilla,Chocolate,Rocky Road.
Note: The dropdown option display labels are not required to be unique, so best practice is to import the database values if they are known. For more information about how admin users can see database values and display labels for dropdown options, please refer to the Dropdown Editor documentation.
Importing Multiselect Fields to Existing Records
Importing updates to a multiselect field of a record already existing in Sugar will erase any previous values and replace them with the imported values. If you wish to append new values to the existing values via import, you must first export the contents of the field for each record you will be updating, add the desired values to the existing values in by modifying the exported CSV file, then import the modified export file to Sugar.
For example, imagine you would like to update 100 existing contact records. Each of the 100 contacts should have "Chocolate" added to the multiselect field "Flavors" without losing the data that is stored in the multiselect field already. The following steps explain how to append a multiselect field via import:
- Export the list of 100 contacts that need to be updated.
- Preserve (at least) the Last Name, ID, and Flavors fields in the export file. The other field columns may be deleted.
- Sort the spreadsheet data by the Flavors column.
- Remove any rows from the file that already contain "Chocolate" as a value in the Flavors column.
- If the Flavors column contains any empty cells, type the word
Chocolatein those cells. In the remaining cells of the Flavors column, add,Chocolate(with a leading comma but no extra spaces) to the end of the existing character string.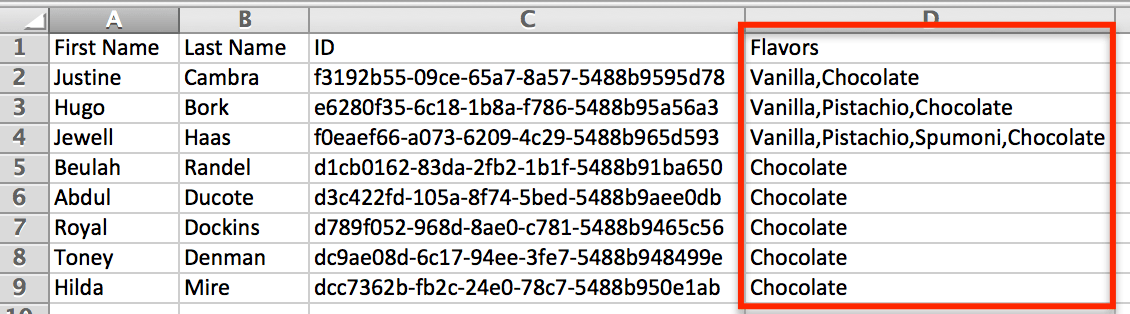
- Save this file for import.
- Follow the steps in the Importing Updates to Existing Records section of this documentation to complete the import and update process.
Importing Relationships
There are many situations where imports need to forge a relationship between two modules. A common example of this would be how importing contacts without an account name would leave the contacts orphaned and not linked to any parent account. To solve this problem, Sugar allows one-to-many and one-to-one relationships to be imported during the standard import process. The available fields will vary depending on the module being imported and will show on the Import Template.
Please note that when an opportunity is imported into Sugar, a revenue line item must also be imported and related to the opportunity in order to populate the amounts (e.g., best, likely, etc.) on the opportunity record. Be sure to include the opportunity ID and amounts on the revenue line item import file.
When importing a relationship, Sugar will need the related record's unique ID, or, in some cases, will accept the record's Name field. Examples of the fields that relate one module to another are explained below. For additional tips and steps to import related records, please refer to the Importing Related Records article.
|
Module |
Module Related To |
Field(s) Used For Relationship |
Instructions For Import |
| Accounts | Accounts | Member Of |
On the import file, add a column for "Member Of". You can use either the Sugar record ID or the exact name of the parent account. This will cause the imported record to be related to the parent account on the "Member Of" field. Using an account name that Sugar does not recognize will create an additional new account record. Note: If you are using the account name, it must be exactly as it shows in Sugar. For example, if your account in Sugar is "SugarCRM", but your import file contains "Sugar CRM" or "SugarCRN", the account will not relate properly. |
| Parent Account Id | On the import template, there is a column for "Parent Account". Use the existing Sugar record ID of the parent account. The dropdown option for this is Parent Account Id. This will cause the imported record to be related to the parent account on the "Member Of" field. | ||
| Campaigns | Campaign | Use the existing Sugar campaign name or campaign record ID to relate the account to the campaign record. Note: If you are using the campaign name, it must be exactly as it shows in Sugar. For example, if your campaign in Sugar is "End of Year Newsletter", but your import file contains "End of Year News" or "End of Year Promotion", the account will not relate properly. |
|
| Campaign ID | Use the existing Sugar campaign record ID number to connect the campaign name into the new account record. | ||
| Calls | Contacts | Contact ID | Use the existing Sugar contact record ID number to connect the contact name into the new call record. |
| Flex Relate |
Related To Module Related To ID |
On the import template, there are columns for both "Related To Module" and "Related To ID". Both need to be used to form the proper relationship. Related To Module: The Sugar module's plural name for the record that you are going to relate (Accounts, Contacts, etc.). Related To ID: The ID for the record you are relating. |
|
| Cases | Accounts | Account ID | Use the existing Sugar account record ID to relate the case to the account record. |
| Account Name | Use the existing Sugar account name or record ID to relate the contact to the account record. Note: If you are using the account name, it must be exactly as it shows in Sugar. For example, if your account in Sugar is "SugarCRM", but your import file contains "Sugar CRM" or "SugarCRN", the account will not relate properly. |
||
|
Contacts |
Accounts | Account ID | Use the existing Sugar account record ID to relate the contact to the account record. |
|
Account Name |
Use the existing Sugar account name or record ID to relate the contact to the account record. Using an account name that Sugar does not recognize will create a new account record with a relationship to the contact.Note: If you are using the account name, it must be exactly as it shows in Sugar. For example, if your account in Sugar is "SugarCRM", but your import file contains "Sugar CRM" or "SugarCRN", the account will not relate properly. |
||
| Campaigns |
Campaign |
Use the existing Sugar campaign name or campaign record ID to relate the contact to the campaign record. Note: If you are using the campaign name, it must be exactly as it shows in Sugar. For example, if your campaign in Sugar is "End of Year Newsletter", but your import file contains "End of Year News" or "End of Year Promotion", the contact will not relate properly. |
|
| Campaign ID | Use the existing Sugar campaign record ID number to connect the campaign name into the new contact record. | ||
| Contacts | Reports To | Use the existing Sugar contact record ID number to connect the new contact and the existing one. | |
| Emails |
Email Address Non-Primary Email Address |
Importing an existing email address into Sugar's Contacts module will cause all email messages related to that email address may match the contact's primary or non-primary email address and must be exact for the relationship to form properly. Note: Importing an update to a contact with an existing email address, the Opt-Out and Invalid checkboxes will not be disabled if they are checked on the existing email address. |
|
|
Leads |
Accounts |
Account ID |
Use the existing Sugar account record ID to relate the lead to an existing account record. This is not a relationship that can be forged from the Leads module in Sugar. This can be created from an Account record, though. This relationship is usually formed through the Lead Conversion process. |
|
Account Name |
In Leads, this is just a text field. This will not create any relationships. Upon conversion, an Account can be created. For more information on converting leads, please review the Lead Conversion documentation. | ||
| Campaigns |
Campaign |
Use the existing Sugar campaign name or campaign record ID to relate the lead to the campaign record. Note: If you are using the campaign name, it must be exactly as it shows in Sugar. For example, if your campaign in Sugar is "End of Year Newsletter", but your import file contains "End of Year News" or "End of Year Promotion", the lead will not relate properly. |
|
| Campaign ID | Use the existing Sugar campaign record ID number to connect the campaign name into the new lead record. | ||
| Contacts | Contact ID | Use the existing Sugar contact record ID to relate the lead to an existing contact record. This is not a relationship that can be forged from the Leads module in Sugar. This can be created from a contact record, though. This relationship is usually formed through the Lead Conversion process. For more information on converting leads, please review the Lead Conversion documentation. | |
| Opportunities | Opportunity ID | Use the existing Sugar opportunity record ID to relate the lead to an existing opportunity record. This is not a relationship that can be forged from the Leads module in Sugar. This can be created from an opportunity record, though. This relationship is usually formed through the Lead Conversion process. For more information on converting leads, please review the Lead Conversion documentation. | |
| Opportunity Name | In Leads, this is just a text field. This will not create any relationships. Upon conversion, an opportunity can be created. For more information on converting leads, please review the Lead Conversion documentation. | ||
| Emails |
Email Address Non-Primary Email Address |
Importing an existing email address into Sugar's Leads module will cause all email messages related to that email address may match the lead's primary or non-primary email address and must be exact for the relationship to form properly. Note: Importing an update to a contact with an existing email address, the Opt-Out and Invalid checkboxes will not be disabled if they are checked on the existing email address. |
|
|
Meetings |
Contacts |
Contact ID |
|
| Use the existing Sugar contact record ID number to connect the contact name into the new meeting record. | |||
| Flex Relate |
Related To Module Related To ID |
On the import template, there are columns for both "Related To Module" and "Related To ID". Both need to be used to form the proper relationship. Related To Module: The Sugar module's plural name for the record that you are going to relate (Accounts, Contacts, etc.). Related To ID: The ID for the record you are relating. |
|
|
Notes |
Contacts |
Contact ID |
Use the existing Sugar contact record ID number to connect the contact name into the new note record. |
|
Flex Relate
|
Related To Module Related To ID
|
On the import template, there are columns for both "Related To Module" and "Related To ID". Both need to be used to form the proper relationship. Related To: The Sugar module's plural name for the record that you are going to relate (Accounts, Contacts, etc.). Related To ID: The ID for the record you are relating. |
|
|
Opportunities |
Accounts |
Account ID |
Use the existing Sugar account record ID to relate the opportunity to the account record. |
| Account Name |
Use the existing Sugar account name or record ID to relate the opportunity to the account record. Using an account name that Sugar does not recognize will create a new account record with a relationship to the opportunity.Note: If you are using the account name, it must be exactly as it shows in Sugar. For example, if your account in Sugar is "SugarCRM", but your import file contains "Sugar CRM" or "SugarCRN", the account will not relate properly. |
||
| Campaigns | Campaign | Use the existing Sugar campaign name or campaign record ID to relate the opportunity to the campaign record. Note: If you are using the campaign name, it must be exactly as it shows in Sugar. For example, if your campaign in Sugar is "End of Year Newsletter", but your import file contains "End of Year News" or "End of Year Promotion", the opportunity will not relate properly. |
|
| Campaign ID | Use the existing Sugar campaign record ID number to connect the campaign name into the new opportunity record. | ||
| Revenue Line Items | Accounts | Account ID | Use the existing Sugar account record ID to which the revenue line item's opportunity belongs. Note: The Account Name field in revenue line items is normally populated based on the selected opportunity's related account and cannot be manually modified on the record view. If you import using the Opportunity ID and Opportunity Name, the related account name will automatically populate in the Account Name field. |
| Account Name | Use the existing account name related to the revenue line item's opportunity Note: The account name must be entered exactly as it appears in Sugar in order for the records to be related properly. |
||
| Campaigns | Campaign ID | Use the existing Sugar campaign record ID number from which the revenue line item's opportunity originated | |
| Campaign | Use the existing Sugar campaign name that is related to the revenue line item's opportunity. Note: The campaign name must be entered exactly as it shows in Sugar. For example, if your campaign in Sugar is "End of Year Newsletter", but your import file contains "End of Year News" or "End of Year Promotion", the revenue line item will not relate properly. |
||
| Opportunities | Opportunity ID | Use the existing Sugar opportunity record ID number to relate the revenue line item to the opportunity record. | |
| Opportunity Name | Use the existing opportunity name as it appears in Sugar to relate the revenue line item. | ||
| Products | Product Template ID | Use the existing Sugar product catalog record ID number to relate to the revenue line item. | |
| Product | Use the existing product catalog name as it appears in Sugar to relate to the revenue line item. | ||
|
Targets |
Accounts |
Account Name |
In Targets, this is just a text field. This will not create any relationships. |
| Campaigns |
Campaign ID |
Use the existing Sugar campaign record ID number to connect the campaign name into the new target record. | |
| Leads |
Lead ID |
Use the existing Sugar lead record ID to relate the target to an existing lead record. This is not a relationship that can be forged from either module in Sugar. This relationship is usually formed through the target conversion process. For more information on converting targets, please review the Lead Conversion documentation. | |
|
Tasks |
Contacts | Contact ID | |
| Use the existing Sugar contact record ID number to connect the contact name into the new Task record. | |||
| Flex Relate |
Related To ID Related To Module |
On the import template, there are columns for both "Related To ID" and "Related To Module". Both need to be used to form the proper relationship. Related To ID: The ID for the record you are relating. Related To Module: The Sugar module's plural name for the record that you are going to relate (Accounts, Contacts, etc.). |
Importing Team-Based Permissions
Modules with team-based permissions enabled support two additional columns for imports:
- Selected Teams: A comma-delimited list of the team names that are selected for extra access
- Selected Team Set ID: A unique identifier that references the group of teams contained in the Selected Teams field
When importing a list of new records or record updates, include one of these columns in the import file to set record-level access to the records. If known, the Selected Team Set ID field is the most efficient way to communicate the data to Sugar. In the more common scenario that the ID is unknown, simply insert the name of the selected team (or teams separated by commas) in the Selected Teams field.
Import File Template
The Import File Template is a very useful tool for building your import file from another source or from scratch. The template for any module can be found on the Upload Import File page, which is either the first or second page of the wizard, depending on the module.
The purpose of this file is to let you know what format Sugar is going to be looking for when you perform your import. The file contains all fields for a given module, regardless of if they show on any of your layouts. For instances that use SugarIdentity, there are a number of user fields that are read-only which can only be edited in SugarIdentity. So, including any read-only fields in the import file will not update the user records with the updated values. The file is also properly formatted and all settings are ready for the import. Upon opening the template, you will see a few example lines of either actual records from your instance, or, "demo data" if you have not yet performed an import. The template also contains instructions on how it is used.
It is best to use the format supplied in this template whenever possible to make your import process as seamless as possible.
Saving Field Mappings
When importing data, there can be times where you will be using the same import file format. If this file was not exported from Sugar, that likely means that you have to re-map most of the fields on the Confirm Field Mappings screen of the Import Wizard. To save time in the future, you can use the Import Wizard's pre-set import settings.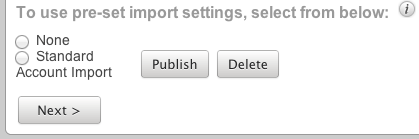
On the "Check for Possible Duplicates" page of the wizard, which is the last page before performing your import, there is a text box where you can name the import settings that you have used on this import.
Once you click "Import Now", this mapping will be saved and available for your use in future imports.
This mapping is now saved for your user and will appear on the Upload Import File page of the Import Wizard. This will include two buttons for "Publish" and "Delete". 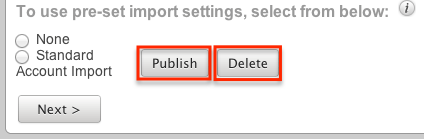
- Publish: Clicking this option will make your mapping available to all users. The Publish button will change to "Un-Publish" so that you can stop other users from using the template mapping. When it is published, it will appear as an option in the same section for other users when they perform an import.
- Delete: This button will remove the pre-set import mapping for all users. This action cannot be undone.
Detecting Duplicates
During an Import, Sugar's Import Wizard includes the functionality to check for duplicate records. When enabled, Sugar will check to see if a record already exists in Sugar with the given criteria. When checking for duplicates, Sugar will mark any record as a duplicate if it cross-references against any of the duplicate fields. For example, when importing Contacts, if you select Last Name and Email Address as your duplicate check fields, any record that has a matching last name or a matching email address to an existing contact in Sugar will be marked as a duplicate.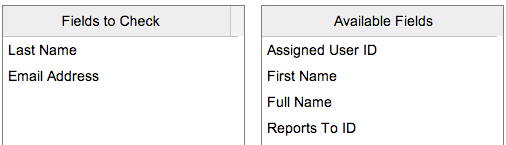
The duplicate check fields used in each module differ depending on what fields are available to the module. Not all fields are used or available in the duplicate check and are pre-determined based on system-defined indexes.
If your import file has any duplicate records based on the fields you elect to verify against, the first record will be imported, and then all subsequent records in the file matching the duplicate criteria will be flagged.
Any duplicates will show as such on the final page of the import. You will also have the option to download the duplicates so that they can be manually cross-referenced to verify if they are actually duplicates. If they are not, simply re-run the import process without selecting any fields on the "Check for Possible Duplicates" page.
Note: If you have both new and existing records on the same import file and would like to perform a duplicate check, please import them separately. It is not necessary to check for duplicates when updating existing records since you already know that the records exist in the system.
Adding Fields to Duplicate Check
There is a set of predefined fields that are used when checking for possible duplicates during an import. If you would like to perform the duplicate checks against other fields in the system, you can create a non-database index to have the specific field be checked. For more information on how to add additional fields, please refer to the article Creating Indexes for Import Duplicate Checking. If your instance is hosted on Sugar's cloud servers, you can apply the changes via module loadable package, as explained in the Creating an Installable Package That Copies Files article.
Admin Import Wizard
Administrators have special functionality available in Sugar that may not be available for all other users. One of these is access to the Admin Import Wizard. In the "Admin" menu, under the "System" panel, there is a link for "Import Wizard".
Clicking this option will bring you to the Import Wizard, similar to the one for specific modules. However, the first step here is for "Select Data Source", where you will need to select the module you wish to import data. The dropdown provided includes options for all importable modules in one convenient location. Once you select the module from the list, click "Next" and you will be directed to the standard import wizard where you can import new records or update existing ones. Please note that the import option can only be used to update existing user records for instances that use SugarIdentity. Administrators can access SugarIdentity to import a list of new users using a CSV file.