Metrics
Overview
The Metrics module stores all settings for all metric tabs, which are displayed in the Renewals and Service Consoles. Having multiple metric tabs allows users to quickly view different filtered and configured lists with one click. The metrics may have different filters, as well as different fields visible in the console list view. Regular users can view metrics in a read-only capacity, while administrators can also create and edit metrics. For more information on working on consoles, please see the Renewals Console and Service Console documentation. Additional information on admin configuration can be found in the Console Management page.
Metrics Fields
The Metrics module contains a number of stock fields that come out of the box with Sugar. For information on using and editing various field types, refer to the User Interface documentation.
Settings Tab Fields
| Field | Description |
| Context/Module | The location where the metric can be displayed (e.g., Service Console / Cases) |
| Teams | The Sugar team(s) assigned to the metric record |
| Status | The current status of the metric record. Inactive metrics are not displayed in the metric bar |
| Filter | The filter that is applied when viewing the returned results in the metric tab Note: For more details on building filters, please see the Search documentation. |
| Description | Explanation and details of the metric record |
| Tags | User-created keywords that can be used to identify records in filters, dashlets, and reports Note: For more information on creating and using tags, please refer to the Tags documentation. |
| Date Created | The date the metric record was created |
| Date Modified | The date the metric record was last modified |
| Assigned to | The Sugar user assigned to the metric record |
List Layout Tab Fields
| Field | Description |
| Primary Sort Order | The first field by which the list is sorted |
| Secondary Sort Order | The optional second field by which the list is sorted |
| Freeze First Column | A checkbox that automatically freezes the first column of the module tab list view so that it is remains visible when scrolling horizontally |
Creating and Editing Metric Tabs
The console's module tab contains a metric bar that contains multiple metric tabs. Metric tabs allow you to deploy predefined filters and views to your users for unified team views. Both the Service Console and the Renewals Console require a relationship hierarchy based on teams to determine which users the metric tabs are deployed to. To learn more, please see the Team Management page.
Each tab has its own settings, and the metric bar also has its own settings. An admin can configure the module tab lists and filters via a metric tab's three-dots menu. Additionally, an admin may use the three-dots menu on the metric bar itself to create and deploy a new metric tab. For more information on how admins can configure the console, please see the Console Management page.
To create a metric tab, choose the Create New option in the metrics bar's three-dots menu.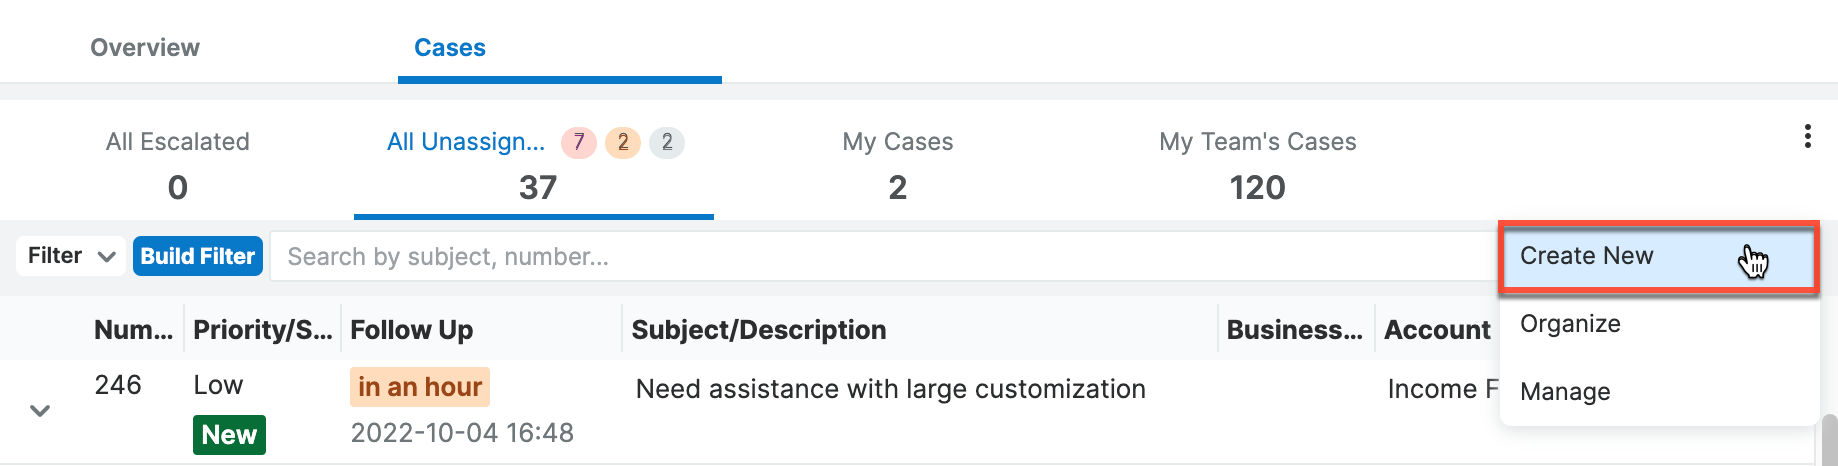
To edit a metric tab, click the Edit option in the specific metric tab's three-dots menu or access it directly in the Metrics module, which can be accessed via the Manage option under the metric bar's three-dots menu.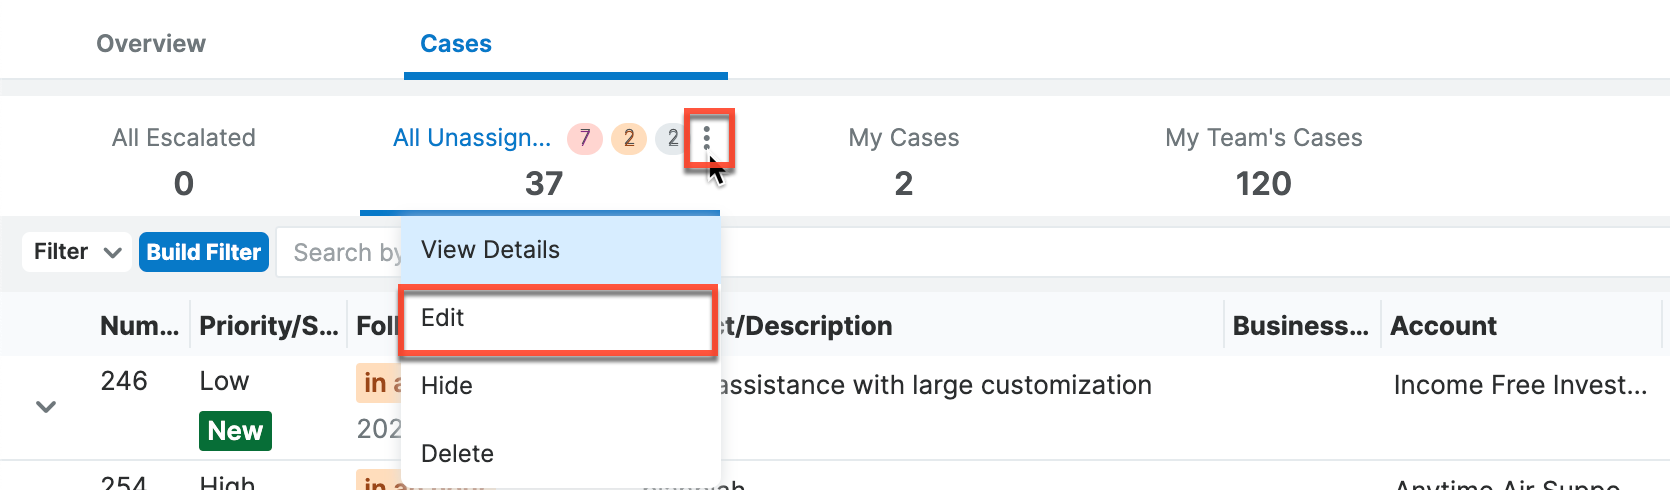
Settings Tab
When creating or editing a module tab, you will see two tabs, the first of which is the Settings tab. The Settings tab stores all the basic information about the metric tab, including the status and the team(s) it is deployed to. The first field, the Context/Module field is not editable, but instead, shows the console and module associated with the metric (e.g., Service Console / Cases). The Teams field is used to control the teams that will be able to access and use the metric tab in their console. For more information on teams, please read the Team Management page.
Once you have set the teams to which you wish to deploy the metric tab, a filter needs to be set. If no filter is set, the metric tab will show all records in the module. As only 100 records can be displayed on a metric tab at a time, it is best to make different views using filters to narrow down the results to a helpful and manageable subset. Create the filter in the same way you create list view filters. For more information on creating filters, please see the Search documentation.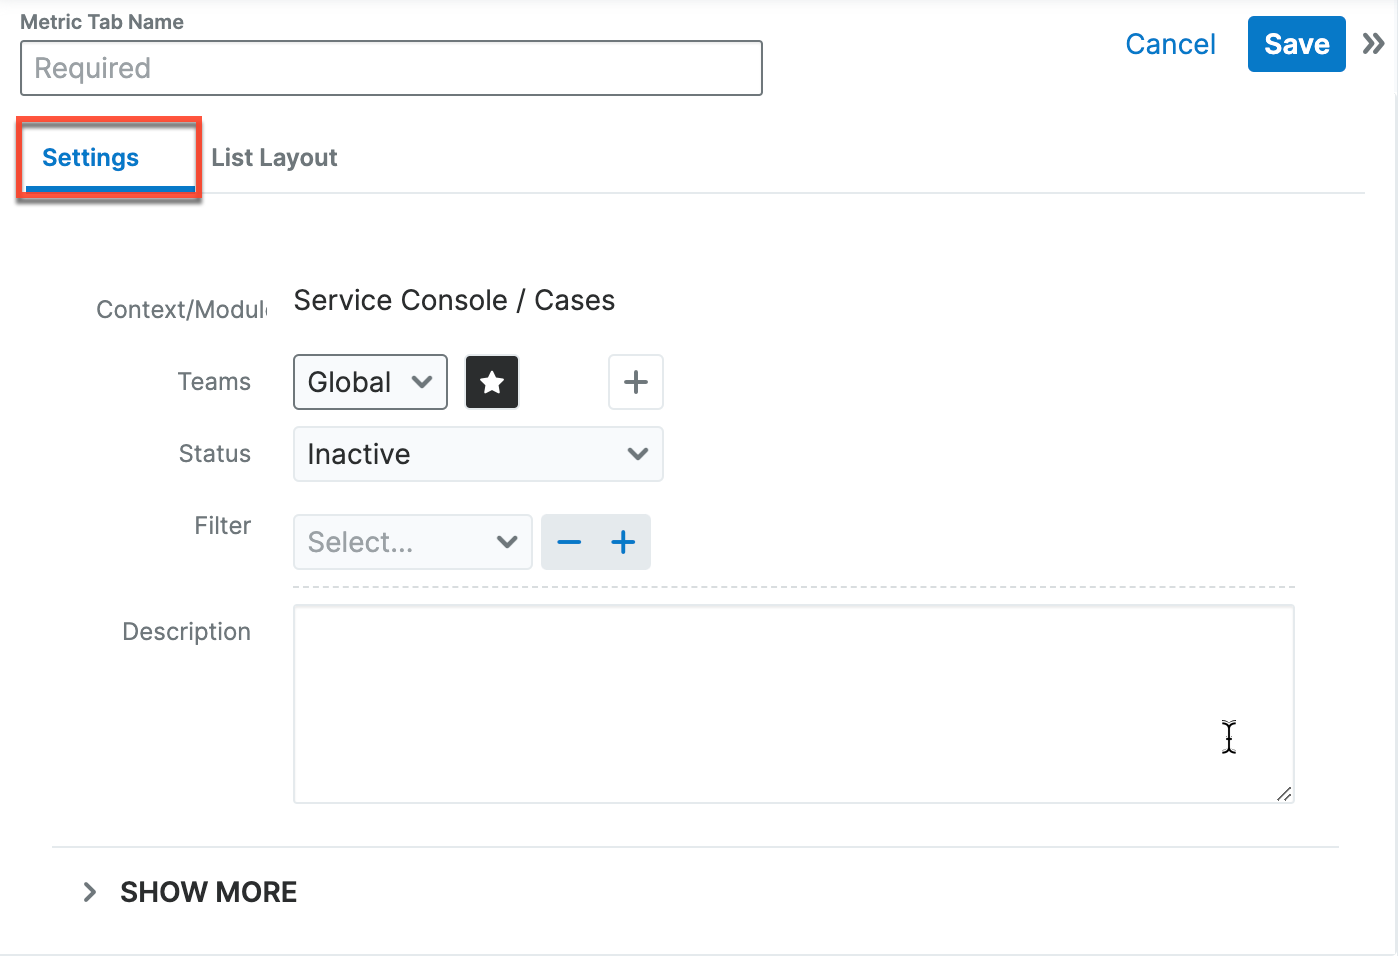
List Layout Tab
Each module will have its own metric bar so you may set metric tabs specific to that module. This allows you to set the default sort order, enable or disable column freezing, and define a filter for each module tab that is available on each metric bar within the console.
Sort Order
To set a default sort order for a field column in the list view, simply select a primary and optional secondary-level sort order for the list's display in the Default Sort Order section. You can also designate the specific field column to be sorted in descending or ascending order by toggling between the Sort Descending or Sort Ascending button to the right of the dropdown list.
Please note that the Sort Descending and Sort Ascending buttons will appear for the Secondary Sort Order once you select a field. The available fields to select in the Primary and Secondary Sort Order dropdown lists are determined by the Columns list on the right-hand side. As fields are added to or removed from the Columns list, the available fields in the sort order dropdown lists will update in real-time.
For example, if the selected field (e.g., Priority) in the Primary Sort Order field is removed from the Columns list, then that field will also be removed from both sort order dropdown lists, and the secondary sort order value (e.g., Follow Up Date), if selected, will automatically move up to the Primary Sort Order field. Please note that certain field types such as ID, relate (e.g., Assigned to), and widget-type fields (e.g., Status *, Follow Up Date *) will not appear as available options in the sort order dropdown lists as they are not sortable.
Column Freezing
The Freeze First Column setting, if enabled, automatically freezes the first column of the metric tab list view for users so that it is always visible even when scrolling horizontally. Note that an admin can disable this feature for the whole Sugar instance. See the User Interface page for details on column freezing and the System page for details on the system-wide admin setting.
Filters
The Filter section allows you to filter the list view based on pre-defined filters (e.g., My Items) as well as create custom filters. Simply use the plus and minus buttons to add or remove filter criteria like you would for a standard list view filter. Once you have made the necessary configurations, click "Save" to preserve the changes and update the module tab's view for all users who access the console. For more information on creating filters, refer to the Search documentation. Please note that administrators can configure the Search layout in Admin > Studio to control which fields are available as filters for the Cases tab list view. For more information on editing the Search layout, refer to the Studio documentation. 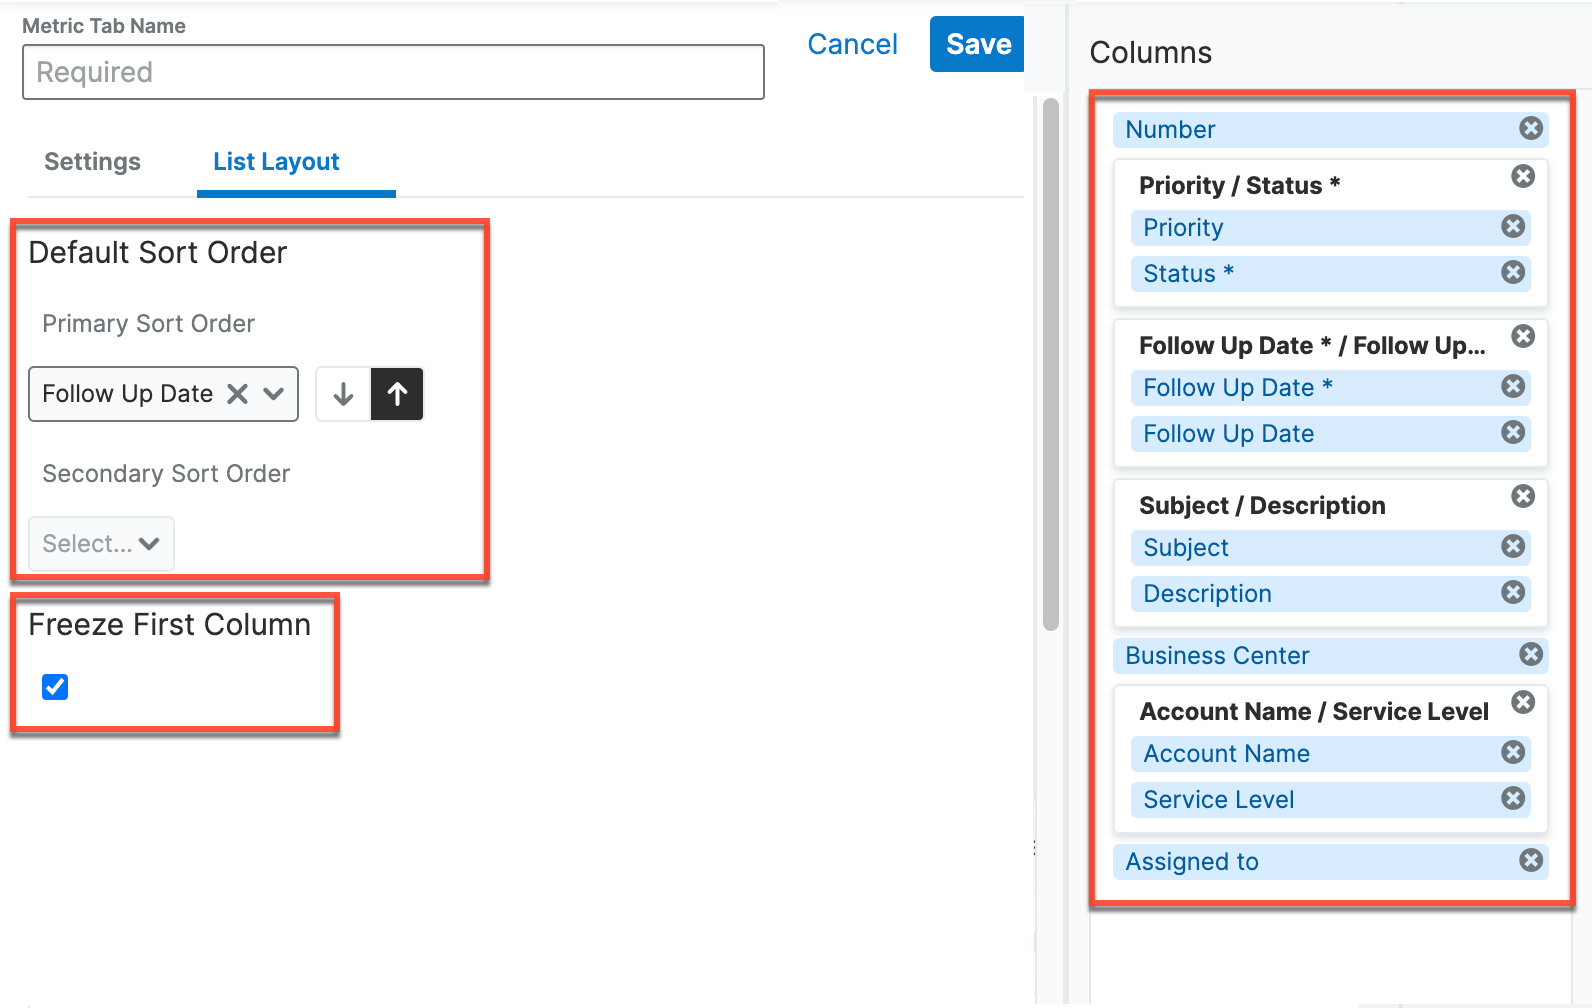
Configuring the Console's Tabbed List Views
In addition to setting a default sort order and defining a filter for the list view, you can also designate which fields to display as columns in the metric tab's list view as well as the left-to-right order of the field columns. Simply use the "Columns" and "Available Fields" lists on the right-hand side to configure the list view layout per your business needs. Fields with an asterisk (e.g., Expected Close Date *) are widget-type fields that provide data based on one or more fields in a special format. See the Widgets section for a list of widget-type fields available in the Renewals Console.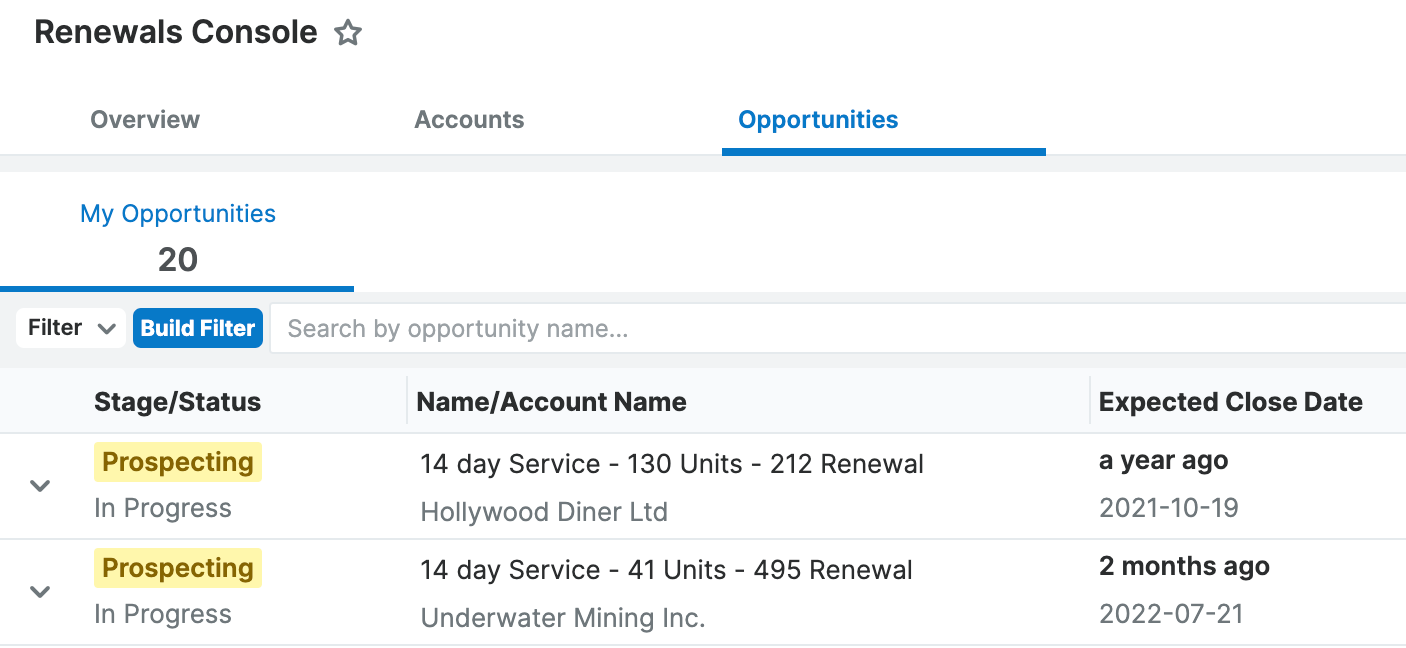
The following steps cover configuring the Accounts tab's list view for the Renewals Console as an example:
- To add a field to the list view layout, drag and drop the desired stock/custom fields (e.g., Business Center Name) for Accounts from the Available Fields list to the Columns list.
Note: The Preview table below the Filter field will automatically update in real-time to reflect your current field selections and the designated order of the field columns configured in the Columns list.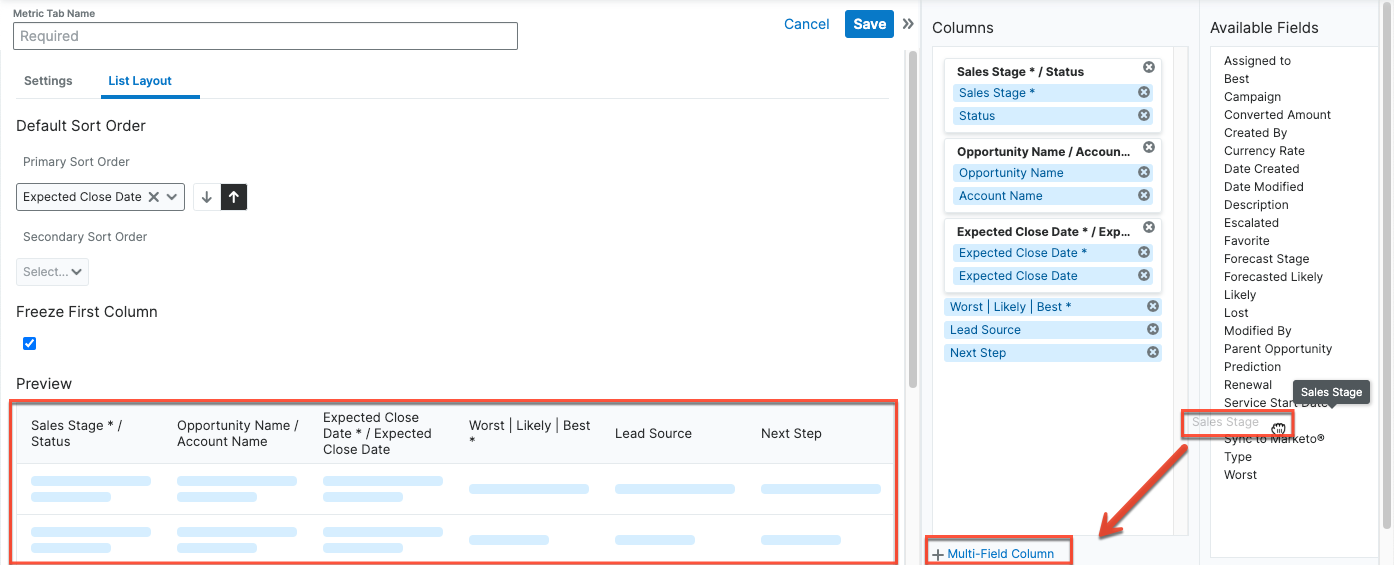
- To display multiple field values in a single column, click the "Multi-Field Column" option below the Columns list. A multi-row box will then appear in the Columns list where you can drag and drop two fields from either the "Available Fields" or "Columns" lists that you wish to display in the same column.
Note: The column will display the field values in two rows, and you can drag and drop the fields within the multi-field box to designate which field value will appear on top.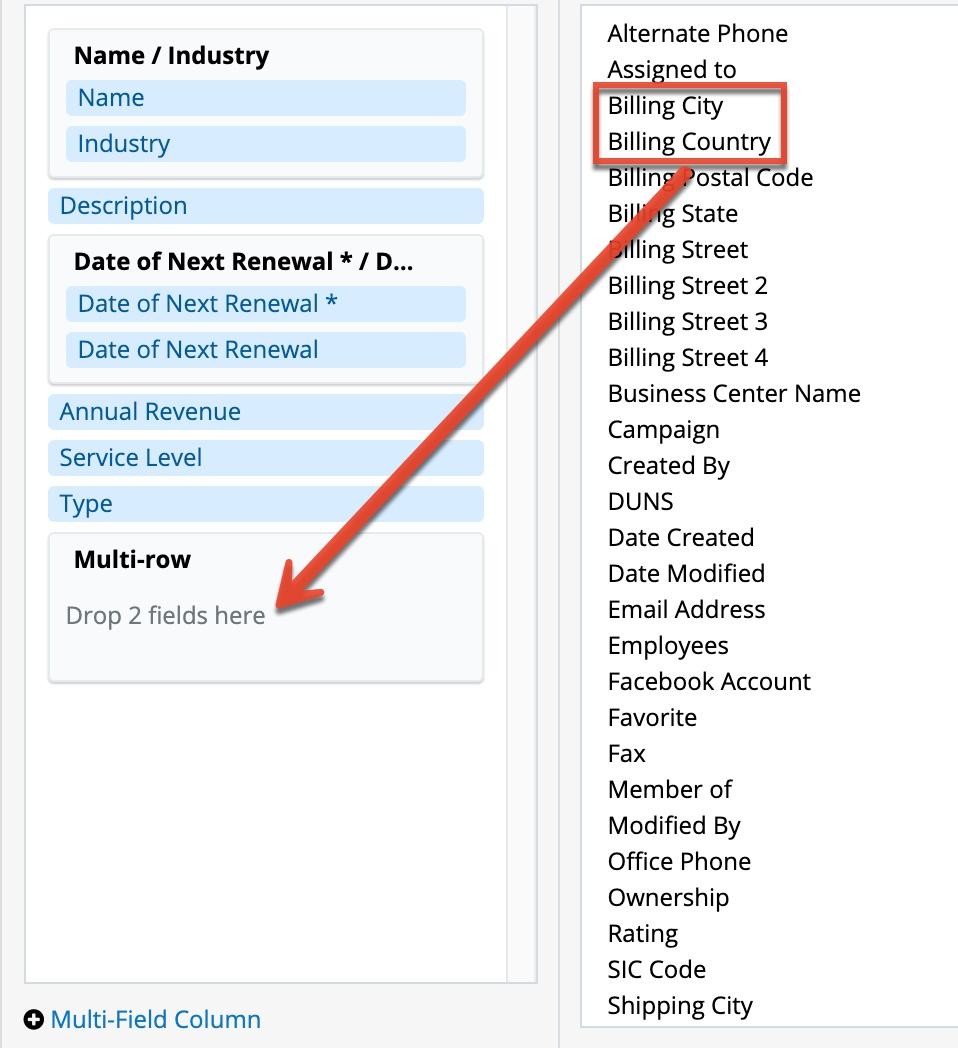
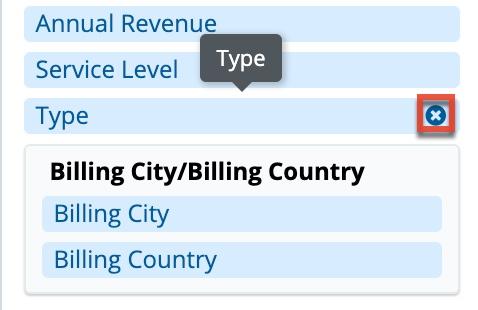
- To remove a field from the layout, simply hover your mouse over the particular field pill or multi-row box in the Columns list then click the "x" to the right of the name. The field(s) will then reappear in the Available Fields list.
- To change the left-to-right order of the fields displayed on the list view, drag and drop the fields up or down within the Columns list.
- Click "Save" to preserve and update the Accounts tab's list view for all users who access the console.
Widgets
Several widgets are available in the Consoles to display data from existing fields in a different format. These fields are marked with an asterisk (*) in the Columns and Available Fields lists.
The following widgets are available in the Cases tab of the Service Console:
- Follow Up Date *: Displays the value of the Follow Up Date field in terms of the amount of time until or since the follow-up date (e.g., in 3 days)
- Status *: Displays the value of the Status field in a color-coded badge
The following widget is available in the Accounts tab of the Renewals Console:
- Date of Next Renewal *: Displays the value of the Date of Next Renewal field in terms of the amount of time until or since the next renewal date (e.g., in 2 years)
The following widgets are available in the Opportunities tab of the Renewals Console:
- Expected Close Date *: Displays the value of the Expected Close Date field in terms of the amount of time until or since the expected close date (e.g., in 5 months)
- Sales Stage *: Displays the value of the Sales Stage field in a color-coded badge
- Worst | Likely | Best *: Displays the values of the Worst, Likely, and Best fields plotted on a graph
Restoring Default Settings
Below the preview table, you will see two options that allow you to easily access the Console Management documentation from the Console Settings window or restore the console back to the administrator-set default settings. If you wish to restore the default admin-set configuration, simply click the "Click here" link. After restoring the default settings, you will need to click "Save" in the Console Settings window to preserve the changes. 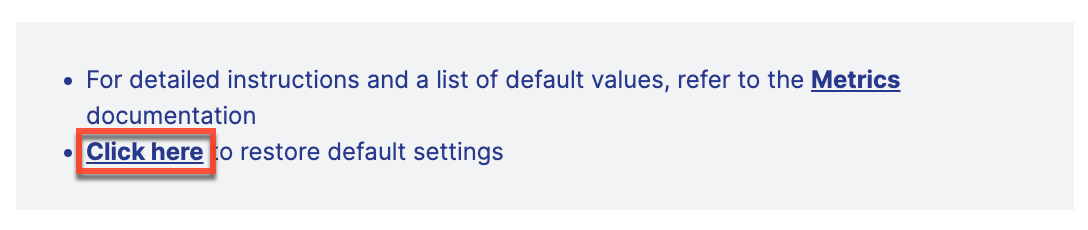
Configuring the Module Tab Drawers
The module tab drawers can be accessed by clicking on a module tab (e.g., Accounts) in the console (e.g., Renewals Console) then clicking the desired record's row in the list view. This opens a drawer within the console which aggregates key information about the record, its related records, past/upcoming interactions (e.g., emails, calls, meetings), etc. The drawer contains four dashlets that can be rearranged and configured by system admin users as well as the regular user assigned to the dashboard. To access and configure the dashlets in the module tab drawers (e.g., Account Detail drawer), you will need to have at least one record assigned to you.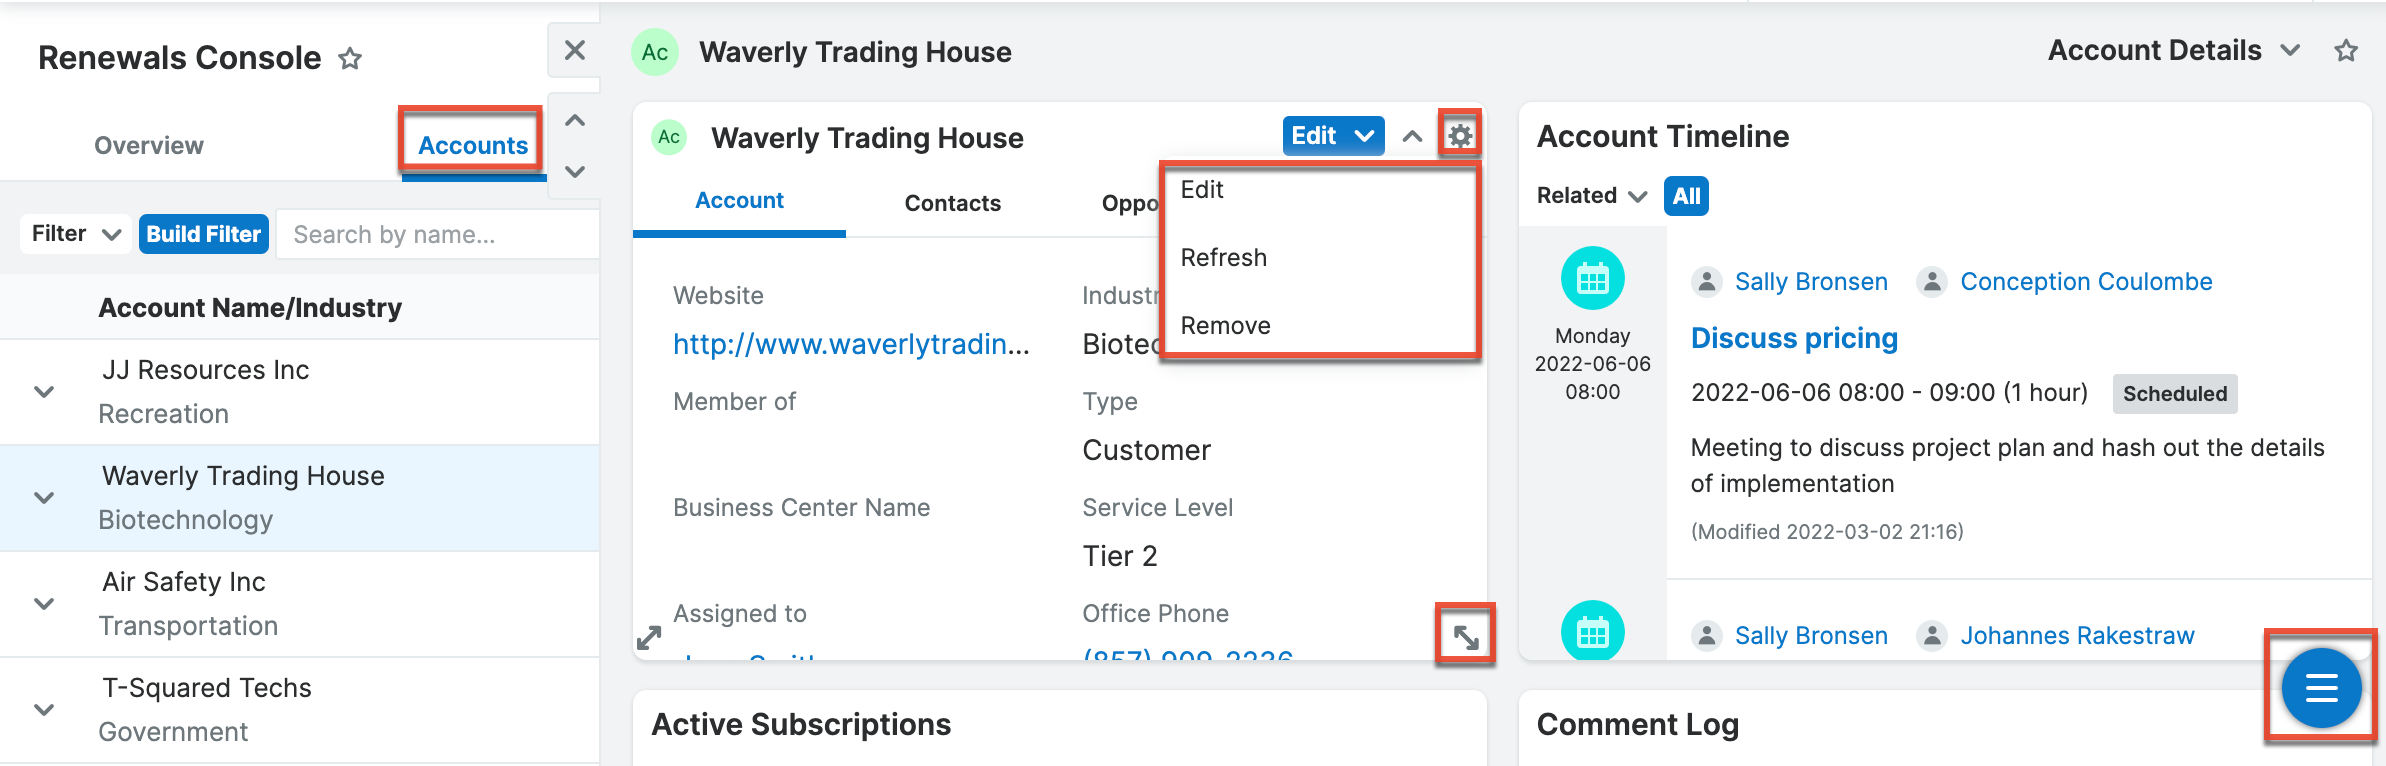
To change the position of dashlets in the module tab drawer, simply drag and drop the dashlet in the desired location on the layout to swap the position of two dashlets. To resize dashlets, drag the double-ended arrow at the bottom right corner. You can also configure the dashlets in the dashboard by clicking the Gear icon at the top right of the dashlet and selecting "Edit", which will display configuration options specific to the dashlet. To retrieve updated information in the dashlet, you can select the Refresh option in the dashlet gear menu, which will manually refresh the dashlet. Select "Remove" in the dashlet gear menu to delete the dashlet from the module tab drawer.
To add dashlets to the module tab drawer, click the floating actions button in the drawer then select "Add Dashlet". Click the title (e.g., List View) corresponding to the desired dashlet in the Add Dashlet page then configure the dashlet as desired. For more information on rearranging, editing, adding, and deleting dashlets, refer to the Dashboards and Dashlets documentation. Please note that any changes made to the layout and dashlet settings will be updated for all users who access the console.
Note: Record view dashlets such as the Account Record Dashlet, Case Record Dashlet, and Opportunity Record Dashlet can be edited via Studio > {Module Name} > Layouts > Record View Dashlet. For more information, refer to the Dashboards and Dashlets and Studio documentation.
Working With Sugar Modules
While the Metrics module has some features that only apply to metrics, it also uses the Sidecar user interface that most Sugar modules are based on. The following sections detail menus, views, and actions common to Sidecar modules and contain links to additional information within the page or links to the User Interface documentation.
List View Menus
The Metrics list view displays all metric records and allows for searching and filtering to locate specific metrics. You can view the basic details of each record within the field columns of the list view or click a business center's name to open the record view. To access a module's list view, simply click the module's tab in the navigation bar.
List View Mass Actions Menu
The Mass Actions menu to the right of the checkbox option in the list header allows you to perform mass actions on all currently selected records. You can use the checkbox on each record's row to select individual business center records or click the checkbox in the list header to select all records displayed on the current set of list view results.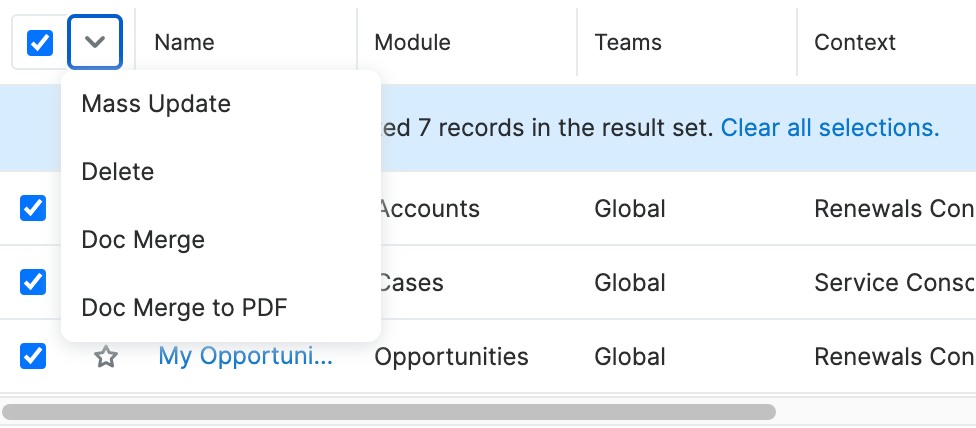
The Mass Actions menu allows you to perform the following operations:
| Menu Item | Description |
| Mass Update | Mass update one or more business center records at a time. |
| Delete | Delete one or more business center records at a time. |
| Doc Merge | Select or create a DOCX template to merge record data into documents that will be accessible in the Doc Merge widget. |
| Doc Merge to PDF | Select or create a DOCX, XLSX, or PPTX template to merge record data into PDF documents that will be accessible in the Doc Merge widget. |
List View Record Actions Menu
The Record Actions menu to the far right of each record's row allows you to perform actions on a business center record directly from the list view.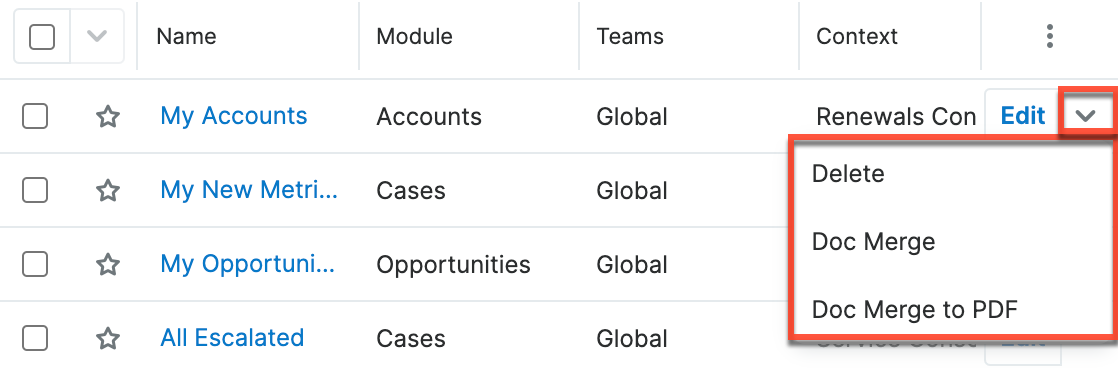
The options in the Record Actions menu allow you to perform the following operations:
| Menu Item | Description |
| Edit | Edit this record. |
| Delete | Delete this record. |
| Doc Merge | Select or create a DOCX, XLSX, or PPTX template to merge record data into documents that will be accessible in the Doc Merge widget. |
| Doc Merge to PDF | Select or create a DOCX, XLSX, or PPTX template to merge record data into PDF documents that will be accessible in the Doc Merge widget. |
Common Views and Actions
In the table below, the left column contains links to the User Interface page covering topics that are applicable to all Sidecar modules. The right column has links to sections of the current page that cover topics specific to metrics.
| General Instructions for Working With Sugar Modules | Metrics-Specific Instructions |
| Use the links below to navigate to the User Interface page which covers topics generic to many Sugar modules. | When Business-Centers-specific help exists for each topic, use the links below to navigate to sections of the current page. |
| Creating Records | |
| Viewing Records | |
| Searching for Records | |
| List View | List View Mass Actions Menu List View Record Actions Menu |
| Record View | |
| Intelligence Pane | |
| Editing Records | |
| Deleting Records | |
| Finding Duplicate Records | |
| Viewing Audit Logs | |
| Favoriting Records | |
| Sharing Records |