Module Loader
Overview
Module Loader is used to install a variety of custom file packages, including custom modules, into a Sugar instance. Using Module Loader, you can also manage and uninstall these packages, all done through Sugar's user interface. Packages are uploaded as a ZIP file from an administrator's local computer and then, when deployed, will force changes upon the instance's filesystem and database.
Custom module packages can be created and modified in Module Builder, and then, after deployment, they will show in Module Loader. They can also be exported from Module Builder in one instance, and then uploaded to another instance via Module Loader.
Module Loader Layout
Module Loader consists of three panels. The panels include all necessary information about the packages, and also include different buttons to perform actions, explained in Module Loader Fields. The panels are:
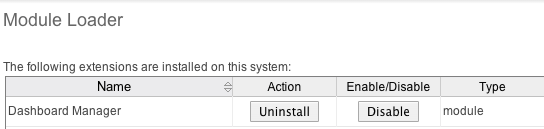
- Installed Packages: This panel shows all installed packages. On this panel, you have the option to uninstall or disable installed packages. After installation, the packages will move from the Uploaded Packages panel to this panel.
- Module Upload: This panel consists of an upload option where files can be uploaded to Sugar via a browser file selection window. Please review Uploading Modules for more information on using this panel.

- Uploaded Packages: This panel shows all packages that have been uploaded to Sugar, but have not yet been installed, or have been uninstalled. Packages can be installed or deleted from Sugar using this panel.

Module Loader Fields
Module Loader contains different fields on the Installed Packages and Uploaded Packages panels. Each set of fields show relevant and identifying information about the module package.
The Installed Packages panel consists of the following fields:
| Field | Description |
| Name | The name of the package, pulled from the manifest.php file of the package. |
| Action | Button allowing you to uninstall the package from your Sugar instance if the package is marked as uninstallable in the manifest.php file of the package. |
| Enable/Disable | Button allowing you to enable or disable the functionality of the package without uninstalling. Note: Always perform a Quick Repair and Rebuild after disabling and then re-enabling a package via Module Loader. |
| Type | Describes the type of package, pulled from the manifest.php file of the package. |
| Version | The version of the package pulled from manifest.php file of the package. |
| Date Installed | The date and time that the package was installed. |
| Description | The description of the package pulled from the manifest.php file of the package. |
The Uploaded Packages panel consists of the following fields:
| Field | Description |
| Name | The name of the package pulled from the manifest.php file of the package. |
| Install | Button allowing you to install the package to your Sugar instance. |
| Delete | Button allowing you to delete the package from your Sugar instance. |
| Type | Describes the type of package, pulled from the manifest.php file of the package. |
| Version | The version of the package, pulled from manifest.php file of the package. |
| Date Published | The date and time that the package was initially created from the publisher. |
| Uninstallable | Tells you if the package is uninstallable from the manifest.php file of the package. |
| Description | The description of the package pulled from the manifest.php file of the package. |
Uploading Packages
After receiving the file that you would like to install, you must first upload it to your Sugar instance. To upload a file, use the following steps:
- Navigate to Admin > Module Loader
- Click the "Choose File" button in the Module Upload panel to open a file selection window from your browser

- Select the file from your local computer
- After you select your file, click the "Upload" button to complete the process

- After it has been uploaded, the package will show in the Uploaded Packages panel

It is also possible to upload packages using a REST API endpoint. Refer to the Developer Guide for more information.
Installing Packages
After uploading a package to Module Loader, it must be installed for the package's contents to take effect on your instance. To install a package, follow the following steps:
- Follow the steps to upload your package to Module Loader.
- Click the "Install" button on the Uploaded Packages panel.

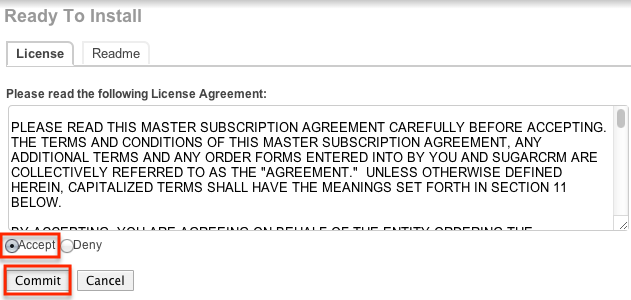
- You will be brought to the installation screen to confirm that the packages should be installed and to read and accept any license or readme documentation as needed. Click "Commit" when ready to run the installation.
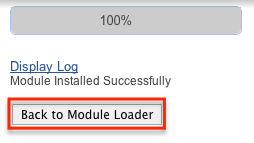
- The next page will show a progress bar and a completion notice. If there are any errors, they will be displayed with a verbose explanation of what went wrong. If not, click "Display Log" to show what happened during the installation process.
- Note: To sustain the stability, security, and integrity of Sugar's cloud service environment, all installed packages are scanned to check for code not conforming to environmental agreements. Any package that fails this scanner will not be installed and the installer will produce a reason for the failed installation. If this happens, please contact the developer of your package for more information.
- Click "Back to Module Loader" when complete to return to Module Loader. If you do not need to install any further packages, you can navigate to any other section of Sugar as need be.
If you install a package that causes an error or puts the Sugar instance into an unusable state within the first five minutes, the package installation is rolled back so that the Sugar instance can become usable again. Details of the errors can be found in the Package Install log file to help troubleshoot the cause.
It is also possible to install packages using a REST API endpoint. Refer to the Developer Guide for more information.
Uninstalling Packages
After a package has been installed in your Sugar instance, it can be removed if it is no longer needed. When uninstalled, the package will remove any available customizations to your instance from the filesystem and database. Any legacy workflows based on the module will also be deleted.
Note: Packages have to be defined as "Uninstallable" in the manifest.php file of the package to be able to be uninstalled.
To uninstall a package, perform the following steps:
- Navigate to Admin > Module Loader.
- Locate the package you would like to uninstall in the Installed Packages panel.
- Click the "Uninstall" button.

- Note: If you do not see an Uninstall button next to your package, it may be caused by one of the following circumstances:
- There may be a newer version of the package installed that has an Uninstall button and that package must be uninstalled first.
- The manifest.php file may not define the package as uninstallable.
- The package may be missing files that are critical to performing the uninstall.
- Note: If you do not see an Uninstall button next to your package, it may be caused by one of the following circumstances:
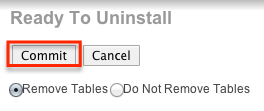
- If the package has added any database tables to your instance, you will see a selection of whether to remove or retain the database tables. If the database tables include any information you would like to keep, select the "Do Not Remove Tables" option. An example of this would be if you are uninstalling a custom module but will be reinstalling a new version of the same module. You would want to keep the data but remove any files associated with the old module that will be replaced with the new package.
- Click "Commit" when you are ready to uninstall the package.
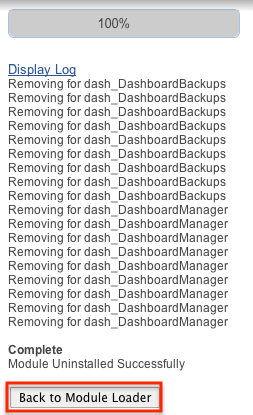
- The next page will show a progress bar and a completion notice. If there are any errors, they will be displayed with a verbose explanation of what went wrong. If not, click "Display Log" to show what happened during the uninstall process.
- Click "Back to Module Loader" when complete to return to Module Loader. If you do not need to uninstall any further packages, you can navigate to any other section of Sugar as need be.
- After the package has been uninstalled, it can be deleted from your instance via the Uploaded Packages panel.

It is also possible to uninstall packages using a REST API endpoint. Refer to the Developer Guide for more information.
Installing Role-Based Customizations
Administrators have the ability to create role-based custom dropdown lists and role-based custom record views via Studio and Dropdown Editor. These role-based customizations are included when exporting customizations via Studio. When the exported package is then installed on a destination instance, administrators will be given the opportunity to map the package's customized roles to the destination instance's roles. Sugar will attempt to select a matching role from amongst the destination instance's roles. The role mapping can be manually altered by selecting a different role from the dropdown menus. If you do not want to install a role's customizations, choose "Do not map this role" in the dropdown. Once the mappings are correctly set, click "Commit" to proceed with installing the package.
Importing Role-Based Custom Record Views
If the package contains role-based custom record views, the mapped roles in the destination instance will be updated to match the package's custom record views. Any prior customizations made record view for the destination instance's role will be overwritten. Regardless of any prior customizations made on the destination instance, all mapped roles will be updated to completely match the imported role-based record views. For more information about creating role-based custom record views, please refer to the Studio documentation.
Importing Role-Based Custom Dropdown Lists
When a package contains non-stock dropdown values for the default role, the destination instance's default role-list will be completely overwritten by the package.
If the package, the destination instance, or both include role-based custom dropdown lists, Sugar will take the destination instance's original customized role-lists into consideration when deciding on the resulting customized role-lists. The following table demonstrates how default custom dropdown lists and role-based custom dropdown lists will be affected:
- When a cell indicates "Undefined", it means that the role does not have a customized role-list, and it will inherit the custom default list.
- When a cell indicates "Any", it means that the role's role-list is customized, but any of the possible combinations of values will produce the same result.
- When a cell indicates "Empty", it means that the role's role-list is customized to have no enabled values.
- In every situation, the resulting default role-list will be overwritten to exactly match the package's default role-list.
| Situation and Outcome | Destination Default Role-List |
Destination Custom Role-List |
Package Default Role-List |
Package Custom Role-List |
Resulting Default Role-List |
Resulting Custom Role-List |
|
The destination and package match. The destination remains unchanged. |
A,B,C | B,C | A,B,C | B,C | A,B,C | B,C |
|
This role is not customized in the destination or package. This role will not be customized and will inherit the default role-list. |
A,B,C | Undefined | X,Y,Z | Undefined | X,Y,Z | Undefined |
|
This role is customized in both the destination and package. This role's custom role-list is updated to match the package's. |
A,B,C | Any | A,B,C | A,C | A,B,C | A,C |
|
This role is customized in both the destination and package. This role's custom role-list is updated to match the package's. |
A,B,C | Any | X,Y,Z | X,Y | X,Y,Z | X,Y |
|
This role's custom role-list has no enabled options in the package. This role's custom role-list will have no enabled values. |
A,B,C | Any, Empty, or Undefined | X,Y,Z | Empty | X,Y,Z | Empty |
|
This role is customized in the destination but not in the package. This role's custom role-list is reduced to the values present in both the destination's custom role-list and the package's default role-list. |
A,B,C | A,C | A,B,E | Undefined | A,B,E | A |
|
This role is customized in the destination but not in the package. This role's custom role-list will have no enabled values since there is no overlap between the destination's custom role-list and the package's default role-list. |
A,B,C | Any | X,Y,Z | Undefined | X,Y,Z | Empty |
|
This role is customized in the destination but not in the package. This role's custom role-list will have no enabled values since there is no overlap between the destination's custom role-list and the package's default role-list. |
A,B,C | C | A,B,E | Undefined | A,B,E | Empty |
For more information about creating role-based custom dropdown lists, please refer to the Dropdown Editor documentation.