Opportunities
Overview
This page is applicable to instances configured to use stand-alone opportunities. If your instance uses revenue line items, refer to the Opportunities with Revenue Line Items documentation. For more information about changing your opportunities model, please see the Opportunities Configuration documentation in the Administration Guide.
Sugar's Opportunities module allows you to track individual sales from start to finish. Each opportunity record relates to other important records such as quotes, contacts, etc. Each opportunity will typically progress through several sales stages until it is marked either "Closed Won" or "Closed Lost". Opportunities can be leveraged even further by using Sugar's Forecasts module to understand and predict sales trends as well as focus work to achieve sales quotas. For more information on the Forecasts module, please refer to the Forecasts documentation.
Please note that you will only be able to see opportunity records as allowed by your license type, team membership, assigned roles, and user access type. For more information, please refer to the referenced documentation in the Administration Guide.
This documentation will cover information and actions specific to the Opportunities module. For instructions concerning views and actions which are common across most Sugar modules, such as creating, editing, and deleting opportunities, please refer to the Opportunity Management documentation.
Scope
This documentation covers information and actions specific to the Opportunities module and contains the following three pages:
- Opportunity Management: This page contains information related to the opportunities module that is common whether your instance is configured to use stand-alone opportunities or opportunities with revenue line items.
- Opportunities (current page): This page contains specific information about how to use the stand-alone opportunities module.
- Opportunities with Revenue Line Items: This page contains specific information about how to use the opportunities module with revenue line items.
Opportunity Fields
The Opportunities module contains a number of stock fields that come out-of-the-box with Sugar. For information on using and editing various field types, refer to the User Interface documentation. The definitions below are suggested meanings for the fields, but the fields can be leveraged differently to best meet your organization's needs. Administrators or users with developer-level role access have the ability to alter, add, or remove fields via Admin > Studio. For more information on configuring fields, please refer to the Studio documentation in the Administration Guide.
| Field | Description |
| Account Name | The account to which the opportunity belongs. |
| Assigned to | The Sugar user assigned to the opportunity. |
| Best 1 | The opportunity's most optimistic total amount. |
| Campaign | The campaign, if any, from which the opportunity originated. Note: This is an optional field as not all opportunities will have a campaign. |
| Comment Log | A shared log of messages, comments, or other text, including the name of the user that added the log entry and the date and time it was added. It is possible to tag other users and link to other Sugar records in Comment Log entries by inserting a clickable pill; see the User Interface documentation for more details. |
| Date Created | The date the opportunity record was created. |
| Date Modified | The date the opportunity record was last modified. |
| Description | A description or other information about the opportunity. |
| Escalated | Displayed as a red badge with the text "Escalated" beside the record name in the header and at the top of the preview, this field indicates if the record has an open escalation related to it. If the record is not escalated, the badge is not visible. This field can also be added to other views. See the Escalations page for more details on escalating records. |
| Expected Close Date | The date the sale is likely to be completed. |
| Forecast Stage | The opportunity's commit range for forecasting (e.g., "Include", "Exclude", etc.), which indicates whether or not the opportunity should be included in the forecast. Note: The available values are determined by the Ranges configuration in Admin > Forecasts. For more information on configuring forecasting ranges, please refer to the Forecasts documentation in the Administration Guide. |
| Forecasted Likely | Equal to the Likely field if the opportunity has a forecast stage value within the included range or equal to zero if it does not. |
| Integration Sync ID | The sync key field used by external integrations to identify Sugar records in the external application. See the Integrate REST API endpoints in the Developer Guide for more details on how to use this field. |
| Lead Source | The source (e.g., Trade Show) from which the opportunity originated. |
| Likely 1 | The opportunity's most probable total amount. |
| Lost 1 | Representing revenue that has been lost. |
| Next Step | The succeeding stage of the opportunity's sales cycle. |
| Opportunity Name | The name of the opportunity. |
| Prediction | Displayed as a column in the Opportunities list view for Sugar Sell instances with AI Prediction enabled, this field shows the opportunity win likelihood scores for each record. |
| Probability (%) | The opportunity's current likelihood of being won. Note: This value is calculated based on the selected sales stage and cannot be edited. |
| Sales Stage | The opportunity's current sales stage (e.g., Prospecting, Qualification, etc.). |
| Teams | The Sugar team(s) assigned to the opportunity record. |
| Type | The type (e.g., new business, existing business) of opportunity. |
| Worst 1 | The opportunity's least optimistic total amount. |
1 The amount will display in the system default currency or, if your Show Preferred Currency option is enabled on your user profile, in your preferred currency. If the record's selected currency differs, you will also see a grey box with the value displayed using the record's selected currency. For more information on currencies and opportunities, please refer to the Opportunity Management documentation.
Sales Stages
A sales stage identifies the current stage (e.g., Prospecting, Qualification, etc.) that the opportunity is in during the sales cycle. When you select a sales stage in the opportunity record, the system automatically populates the corresponding probability value (e.g., 10, 20, etc.) in the Probability (%) field. These probability values are a useful tool to help calculate and predict your sales forecast for a specified time period. For more information on the Forecasts module, please refer to the Forecasts documentation. Administrators have the ability to configure the sales stage and probability values for each sales stage via Admin > Dropdown Editor. For more information, please refer to the Adding Custom Sales Stages and Probabilities to Opportunities article.
Please note that the below values are only guidelines for defining your sales stage and you can skip one or more stages based on your organization's needs.
| Sales Stage | Probability | Suggested Definition |
| Prospecting | 10 | This is the first stage in the sales process and indicates that the opportunity or revenue line item with this prospect is new and needs to be qualified by a sales representative. |
| Qualification | 20 | The sales representative is currently interacting with the prospect to determine if a sales opportunity exists. |
| Needs Analysis | 25 | After determining that the prospect has an interest in the products or services, the sales representative now uncovers the prospect's business challenges. |
| Value Proposition | 30 | After uncovering the prospect's business challenges, the sales representative now maps the company's products and/or services to the prospect's business challenges and describes the value of the solution. |
| Id. Decision Makers | 40 | After determining that there is a match between the prospect's business challenges and the company's products and/or services, the sales representative now identifies the decision makers necessary to close this opportunity or revenue line item. |
| Perception Analysis | 50 | The sales representative analyzes the prospect's perceived value of the company's solution at this stage in order to prepare the appropriate combination of products and services for the sales quote. |
| Proposal/Price Quote | 65 | The sales representative delivers the proposal, sometimes called the price quote, to the prospect. |
| Negotiation/Review | 80 | The sales representative reviews and negotiates the proposal with the prospect. |
| Closed Won | 100 | The sales representative has won this opportunity or revenue line item and the company can now bill the customer. |
| Closed Lost | 0 | The sales representative has lost this opportunity or revenue line item. |
Quotes and Opportunities
Quotes and opportunities both track sales throughout their lifecycle, but the two modules serve different purposes. Quotes allow you to communicate the details of a sale with customers while opportunities allow you to forecast potential sales and the possible ranges of their dollar amounts. To aid in using both modules, Sugar allows you to generate an opportunity from a quote.
Generating Opportunities From Quotes
To generate an opportunity from a quote, choose "Create Opportunity from Quote" from the quote record's Actions menu.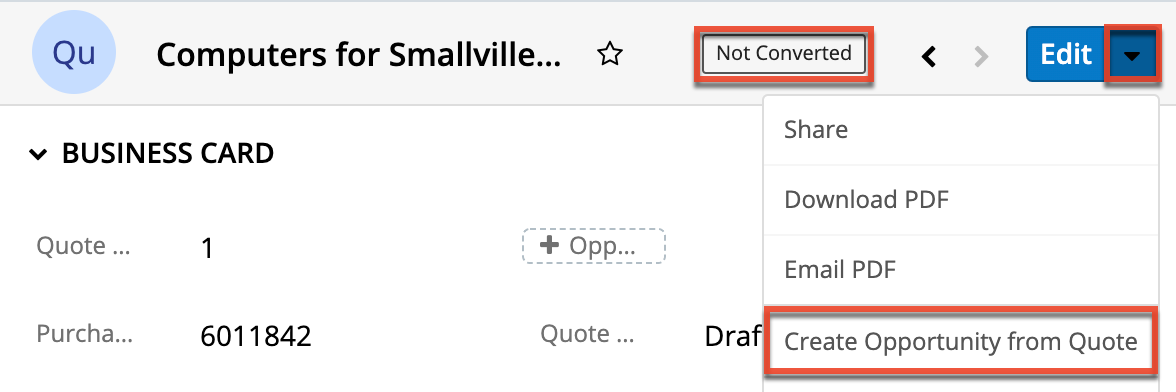
Note: Quotes that are already "Converted" (as indicated by the badge adjacent to the quote's name in the example pictured here) cannot be re-converted into an opportunity. The "Create Opportunity from Quote" menu option will be grayed out when the quote's badge is Converted.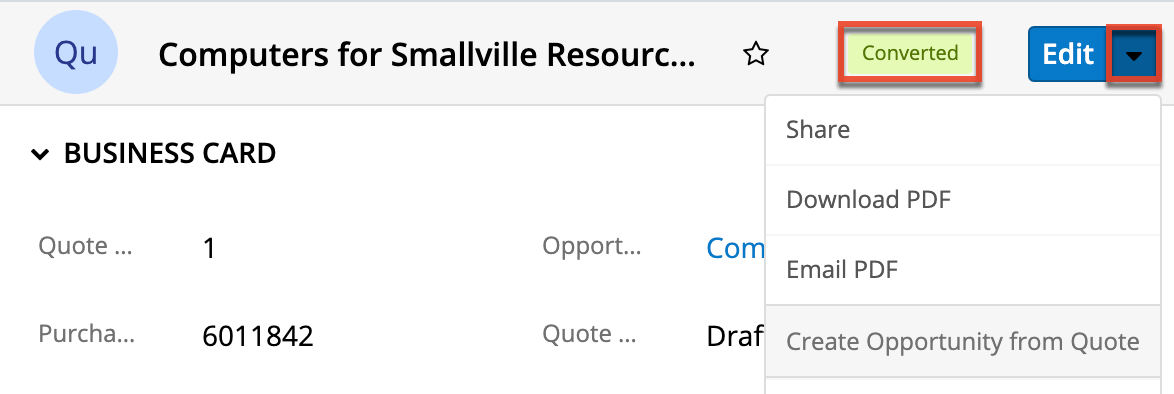
After selecting the Create Opportunity from Quote option, you will be navigated to the newly created and saved opportunity, which will be pre-populated with the original quote's values in the Name, Account Name, Expected Close Date, Best, Likely, and Worst fields. In addition, the opportunity's Type will default to "New Business" and the Status to "In Progress". You can edit the opportunity record to modify any of these values as needed. The originating quote will be related to the new opportunity and can be found in the Quotes subpanel on the opportunity's record view.
For more information on creating an opportunity from a quote, please refer to the Creating Opportunities from Quotes section of the Quotes documentation.