Contacts
Overview
Sugar's Contacts module consists of individual people with whom your organization has an established relationship. Sugar enables you to convert lead records to contact records according to your organization's qualification process. Contact records are typically related to an account record, and multiple contacts may be associated with a single account. Each contact record may then relate to other Sugar records such as meetings, cases, opportunities, and many others, making the contact record a hub for viewing and continuing your interaction with the individual. This documentation will cover information and actions specific to the Contacts module. For instructions concerning views and actions which are common across most Sugar modules, such as creating, editing, and deleting contacts, please refer to the Working With Sugar Modules section of this page.
Please note that you will only be able to see contact records as allowed by your team membership, user access type, and assigned roles. For more information on teams and roles, please refer to the Team Management and Role Management documentation in the Administration Guide.
Contact Fields
The Contacts module contains a number of stock fields that come out-of-the-box with Sugar. For information on using and editing various field types, refer to the User Interface documentation. The below definitions are suggested meanings for the fields, but the fields can be leveraged differently to best meet your organization's needs. Administrators or users with developer-level role access have the ability to alter, add, or remove fields via Admin > Studio. For more information on configuring fields, please refer to the Studio documentation in the Administration Guide.
| Field | Description |
| Account Name | The account to which the contact belongs. |
| Alternate Address | The contact's alternate address (e.g., billing or shipping). |
| Assigned To | The Sugar user assigned to the contact. |
| Assistant | The name of the contact's assistant within his or her company. |
| Assistant Phone 2 | The assistant's phone number. |
| Avatar | An image of the contact (e.g., business card or profile picture). Click on the circle to the left of the name to upload an image. Once an image is uploaded, you can remove the image by clicking on the image and then clicking the trash can icon in the lower right corner. |
| Birthdate | The contact's date of birth. |
| Business Center Name | The business center this contact belongs to. In Sugar Sell, contacts created during lead conversion inherit the lead's business center, which is then used for SugarBPM business hour calculations. |
| Campaign 1 | The campaign, if any, from which the contact originated. |
| Comment Log | A shared log of messages, comments, or other text, including the name of the user that added the log entry and the date and time it was added. It is possible to tag other users and link to other Sugar records in Comment Log entries by inserting a clickable pill; see the User Interface documentation for more details. |
| Confirm Portal Password | When editing, confirmation of the contact's password for accessing Sugar Portal. |
| Contact Source | A system-level dropdown field that represents the origin of newly created contacts. It is set to External on contacts created via Portal and set to Internal on contacts created in Sugar. This field is not available in Studio or the user interface and is only available in SugarBPM. |
| D&B Principal ID | Unique ID number associated with the contact in D&B. |
| Date Created | The date the contact record was created. |
| Date Modified | The date the contact record was last modified. |
| Department | The contact's department within his or her company. |
| Description | A description or other information about the contact. |
| Do Not Call | Indication that the contact should not be called. |
| Email Address | The contact's email address. |
| Facebook Account | The contact's Facebook account information. |
| Fax | The contact's fax number. |
| First Name | The contact's first name. |
| Google Plus ID | The contact's Google Plus ID. |
| Home 2 | The contact's residence number. |
| Integration Sync ID | The sync key field used by external integrations to identify Sugar records in the external application. See the Integrate REST API endpoints in the Developer Guide for more details on how to use this field. |
| Last Name | The contact's last name. |
| Lead Source | The source from which the contact originated. Note: The Lead Source field will be set to "Support Portal User Registration" for contacts created via portal registration. |
| Mobile 2 | The contact's mobile number. |
| Name | When viewing, the contact's full name. Click the circle to the left of the name to upload an image to use as an avatar. |
| Office Phone 2 | The contact's office number. |
| Other Phone 2 | The contact's alternate phone number. |
| Portal Active | Indication that the contact is enabled to access Sugar Portal. |
| Portal Application | The portal application name. Only used when integrating a custom portal solution with Sugar. |
| Portal Name | The contact's user name for accessing Sugar Portal. |
| Portal Password | The contact's password for accessing Sugar Portal. |
| Portal User Company Name | The name of the company to which the customer belongs to. Note: This field will display the company name the customer enters when signing up for the Sugar Portal. |
| Preferred Language | The contact's preferred language when accessing Sugar Portal. |
| Primary Address | The contact's primary address. |
| Reports To | The contact's manager in his or her company. |
| Salutation | Standard greeting for the contact (e.g., Mr., Ms., Mrs., etc.). |
| Sync to mail client | Indication that the contact should be synced to mail client when using the Sugar Plug-in for Outlook, for example. Note: This field must be set on a per-user basis. |
| Tags | User-created keywords that can be used to identify records in filters, dashlets, and reports. Note: For more information on creating and using tags, please refer to the Tags documentation. |
| Teams | The Sugar team(s) assigned to the contact record. |
| Title | The contact's title within his or her company. |
| Twitter Account | The contact's Twitter account information. |
1 This field's value is not visible to Sugar Serve users; when this field appears on layouts, users without a supported license type will see a placeholder containing the text "License Required" instead of the field's value. See the User Management page for more details on license types.
2 If an admin has turned on the Enable Click-to-Call setting in Admin > System Settings, phone number fields are displayed as links that can be opened to dial them using the default computer telephony integration software on the user's computer. For Sugar Serve or Sell users logged in to Amazon Connect, calls are dialed in SugarLive.
Contact Creation via Sugar Portal
The Sugar Portal allows your customers to file bugs, cases, and review knowledge base articles created in Sugar. Please note that customers have to be registered users of the portal in order to be able to access the portal. When a potential portal user visits the portal login page and completes the registration form, their information is entered into Sugar as a new contact record with the Lead Source field set to "Support Portal User Registration". Once the contact record is validated and approved for portal access, you can enable the Portal Active checkbox to activate their portal account. For more information on managing the Sugar portal, please refer to the Portal Deployment User Guide. 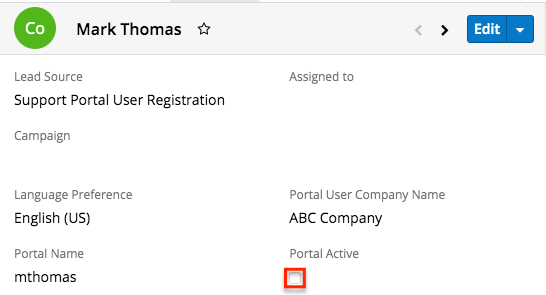
Emails and Contacts
Contacts include an email address that can be used to email the contact as a recipient. The methods for doing so are covered in the Emailing Records section of the User Interface documentation. Contacts may also be recipients of campaigns that allow you to send email messages to a large group of recipients as well as to track the results of that message. Please refer to the Campaigns and Contacts section of this page for more information. In addition to being a recipient or sender of an email, contacts may be related to emails by being selected in the email's Related To field. These relationships allow the contact to display all relevant email correspondence in the Emails subpanel and History dashlet on a contact's record view.
Emails Subpanel
The Emails subpanel in the Contacts module displays emails that are associated with the contact record in a variety of ways:
- Explicitly related to the contact: If the contact is selected in the email's Related To field, the email and contact are explicitly related, and the email will appear in the contact's Emails subpanel and History dashlet. Instructions for using this flex relate field are available in the Emails documentation.
- Implicitly related to the contact: If one of the contact's email addresses appears in the email's From, To, or Cc fields, the email and contact are implicitly related, and the email will appear in the contact's Emails subpanel and History dashlet. This implicit relationship is made for emails sent from Sugar as well as any email imported into Sugar via Inbound email contacts or email archiving.
The Emails subpanel allows the following functions to be performed:
- Email Details: To view the details of an email, click the subject to open it in detail view.
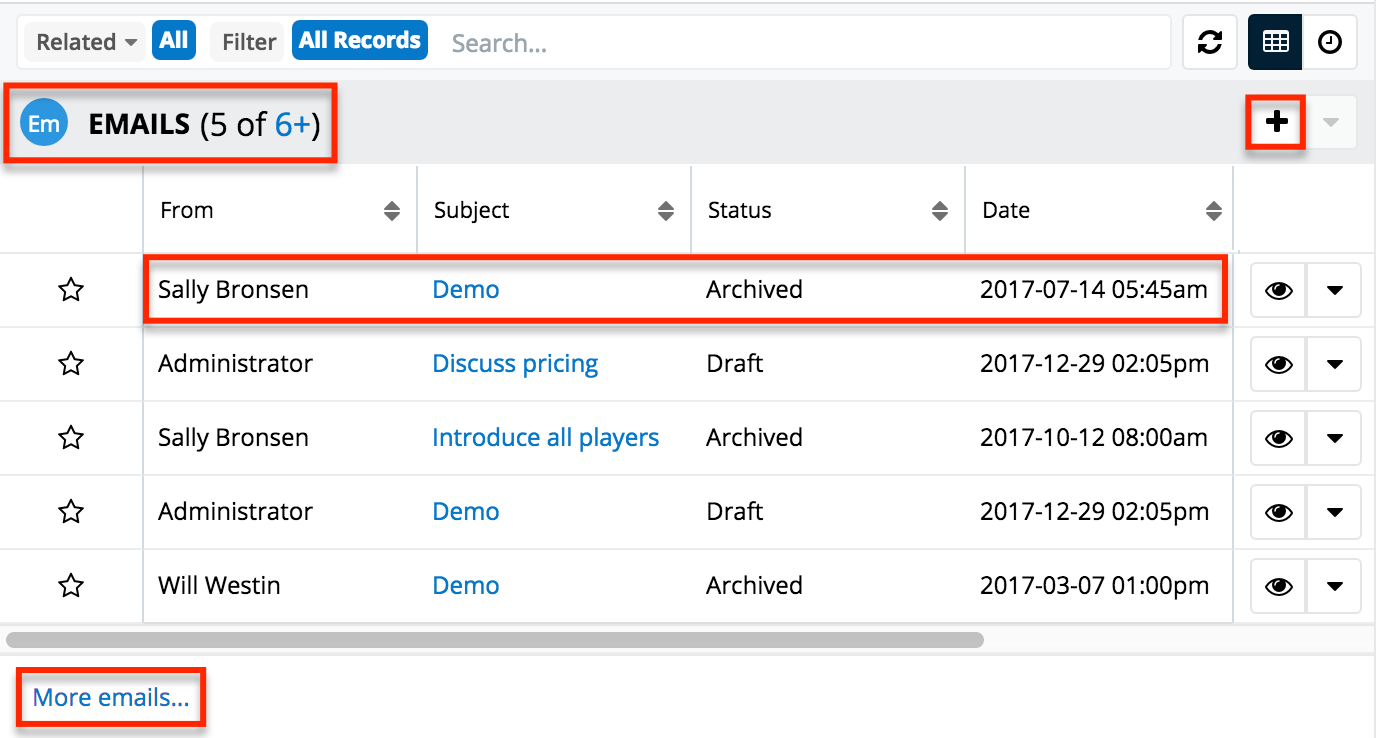
- Record Count: Subpanel headers display the total count of related records (e.g., "5 of 6+") next to the module name. The count captures the number of records currently displayed with an additional, hyperlinked number (e.g., "6+") where there are more records than currently displayed. Click the hyperlinked number to see the total count of related records.
- Collapse or Expand: Click anywhere in the subpanel's header to collapse or expand it. Subpanels will remain collapsed or expanded on future visits to the module.
- Note: Administrators can choose to disable collapse stickiness or to collapse all subpanels by default via Admin > System Settings. For more information, please refer to the System documentation in the Administration Guide.
- Column Widths: Place your cursor on the column divider. When the double arrow cursor appears, click and drag the column to the desired size. Please note that the column width will not be preserved when you navigate away from the page.
- Column Sort: Click a column header to sort the subpanel's items by that value. Clicking the same header again will reverse the sorting order (e.g., from ascending to descending).
- Compose a New Email: Click the Plus button on the upper right of a subpanel to create a new email with, by default, both an implicit and explicit relationship to the contact you are currently viewing. The email will automatically select the contact in the Related To field as well as add the contact's primary email address as a recipient in the To field.
- Note: To send email from Sugar, users must configure their outbound email server via Emails > Email Settings or, if using the system email account to send email, the system's outbound email server must be configured by an administrator in Admin > System Email Settings.
- Note: Because creating a new related record opens a drawer on top of the current record view, you should use the Cancel button to return to record view. Using the browser's back button will return you to the previous page.
- More Records: By default, Sugar displays up to five records in each subpanel, though administrators can alter the number via Admin > System Settings as described in the System documentation of the Administration Guide. If additional related records exist, click "More {Module Name}..." (e.g., "More Emails...") at the bottom of the subpanel to load the next set of records.
Calls, Meetings, and Contacts
Contacts can be related to calls and meetings in two ways. First, they can be selected in the event's Related To field, indicating that the contact was the topic of the call or meeting. Second, they can be included as invitees to the call or meeting.
Calls and Meetings Subpanels
Each contact's record view includes a Calls subpanel and a Meetings subpanel. These subpanels display all calls and meetings which include the contact as an attendee. If the contact is not an attendee but is selected in the call's or meeting's Related To field, the call or meeting will not appear in the subpanels.
When relating an existing call or meeting to a contact via the subpanels on a contact's record view, the contact will automatically be added as an invitee. When creating a call or meeting from the subpanels, the contact will automatically be added as an attendee and the contact's account will automatically be set in the event's Related To field.
Campaigns and Contacts
Sugar's Campaigns module can be used to send mass emails or a series of newsletter emails to Sugar accounts, contacts, leads, and targets. The results of each campaign are recorded to measure its impact. Contacts are not related directly to campaigns. Rather, each campaign is related to several target list records, and each target list is related to contacts and other recipients. To send a campaign email to a contact, the contact should belong to a default-type target list related to the campaign. To prevent a contact from receiving emails from a campaign, the contact should belong to the campaign's suppression list-type target list. Once a campaign is sent, the results specific to a particular contact will appear in the Campaign Log Subpanel on the contact's record view as described in the Campaign Log Subpanel section of this page.
Contacts can be added to target lists via the target list record itself, from the Contacts list view using the Add To Target List option, or from the Contacts record view using the Manage Subscriptions option. Instructions for using the Add To Target List and Manage Subscriptions options in the Contacts module are provided in the sections below. For instructions on other available methods of adding to target lists, please refer to the Target Lists documentation.
Adding to a Target List via Contacts List View
A target list consists of a group of individuals or organizations you wish to be included or excluded from a mass marketing campaign. These targets are typically identified based on a set of predetermined criteria such as being a prospect or existing customer, age group, industry, etc. There are various ways to add contacts to a target list in Sugar including using the Add To Target List option from the Contact list view's Mass Actions Menu. For more information on target lists and other methods of adding contacts, please refer to the Target Lists documentation.
You can use the Select All feature in the list view when adding to a target list, which will allow you to easily select the first 1000 records in the result set. If you wish to add more than 1000 records or add a specific group of records to the target list, please use the filter option in list view search to perform the additions in smaller batches.
Use the following steps to add accounts to a target list via the Contacts list view:
- Navigate to the Contacts list view by clicking the Contacts module tab.
- Use the List View Search to find the Contact records you wish to add to a target list.
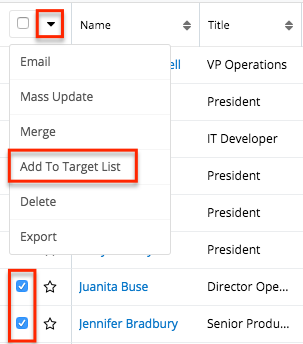
- Select the desired contact records then choose "Add to Target List" from the Mass Actions menu.
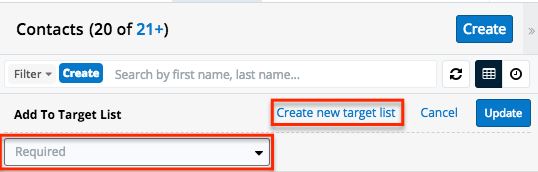
- Below the search bar, locate and select the desired target list in the dropdown list or click "Create new target list" to add the contacts to a new target list. Click "Update" to add the record(s) to the target list.
In order to view the contacts that have been added, you can navigate to the Target Lists module. Click the target list's name to open the record view, and you will see the contact records within the Contacts subpanel. 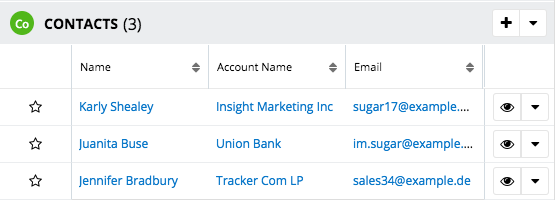
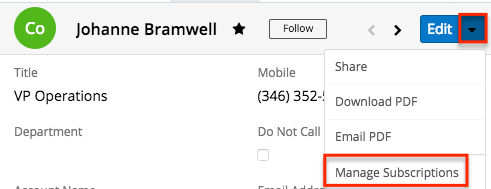
Managing Contact Subscriptions
Contacts who receive newsletter-type campaign emails from your Sugar instance are considered subscribers to that newsletter. Users can manage these newsletter subscriptions from the Contacts record view using the Manage Subscriptions option in the Actions menu. Please note that you can only manage subscriptions for newsletter-type campaigns. A newsletter campaign you have created will have one or more default-type target lists. Contacts are added to these target lists in order to receive your newsletter. The Manage Subscriptions option allows you to add a contact to the default-type or suppression-type target lists of your newsletter campaigns without leaving the Contacts module. For more information on newsletter subscriptions, please refer to the Campaigns documentation.
Use the following steps to manage contact subscriptions via a contact's record view:
- Navigate to a contact's record view.
- Select "Manage Subscriptions" from the Actions menu.
- To add the contact to a newsletter subscription mailing list, select the newsletter from the Available/Newsletters Unsubscribed To list and drag it to the Newsletters Subscribed To list. This will add the contact to the campaign's default target list.
- To remove the contact from the newsletter subscription mailing list, select the newsletter from the Newsletters Subscribed To list and drag it to the Available/Newsletters Unsubscribed To list. This will add them to the suppression-type unsubscription target list for the newsletter campaign which will prevent the contact from receiving the newsletter. Please note that the contact will not be removed from the campaign's default target list.
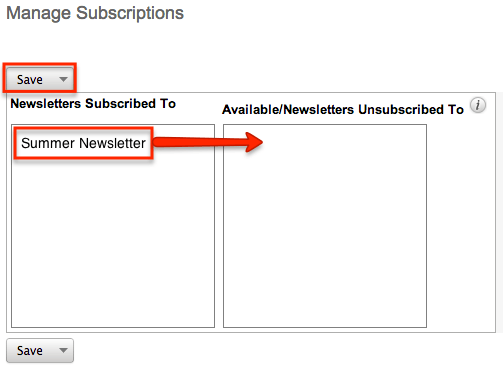
- Click "Save" to preserve your changes.
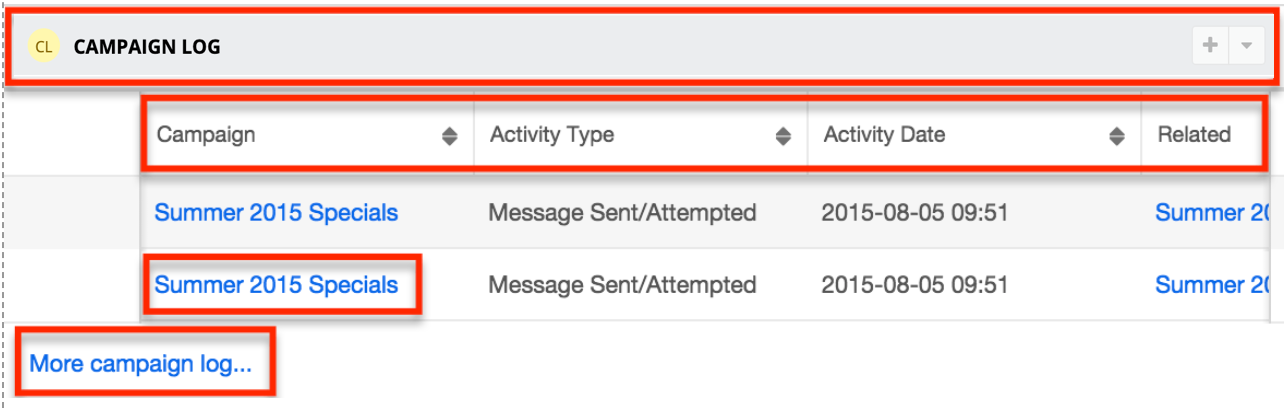
Campaign Log Subpanel
The Campaign Log subpanel contains historical information regarding a contact's interaction with all Sugar campaigns. When a mass marketing campaign is sent to a contact (or manually marked as sent in the case of non-email campaigns), the related campaign activity information will appear within the Campaign Log subpanel on the contact's record view. This information mirrors the "View Status" page available from within each individual campaign and shows activities such as when a campaign was sent, when the recipient viewed the campaign message, when the recipient clicked a tracked link within the campaign, etc. Since this subpanel contains historical campaign interactions for the contact, it cannot be used to associate a contact with a campaign or otherwise manage a campaign or target list. For more information on associating a contact with a campaign, please refer to the Adding to a Target List via Contacts List View section of this page. For more information on campaigns, please refer to the Campaigns documentation.
The Campaign Log subpanel allows the following functions to be performed:
- Campaign Details: To view the details of a campaign, click its name to open it in detail view.
- Record Count: Subpanel headers display the total count of related records (e.g., "5 of 6+") next to the module name. The count captures the number of records currently displayed with an additional, hyperlinked number (e.g., "6+") where there are more records than currently displayed. Click the hyperlinked number to see the total count of related records.
- Collapse or Expand: Click anywhere in the subpanel's header to collapse or expand it. Subpanels will remain collapsed or expanded on future visits to the module.
- Note: Administrators can choose to disable collapse stickiness or to collapse all subpanels by default via Admin > System Settings. For more information, please refer to the System documentation in the Administration Guide.
- Column Widths: Place your cursor on the column divider. When the double arrow cursor appears, click and drag the column to the desired size. Please note that the column width will not be preserved when you navigate away from the page.
- Column Sort: Click a column header to sort the subpanel's items by that value. Clicking the same header again will reverse the sorting order (e.g., from ascending to descending).
- More Records: By default, Sugar displays up to five records in each subpanel though administrators can alter the number via Admin > System Settings as described in the System documentation of the Administration Guide. If additional related records exist, click "More {Module Name}..." (e.g., "More campaign log...") at the bottom of the subpanel to load the next set of records.
Converting Leads to Contacts
Sugar enables you to convert lead records to contact records as you determine that they qualify for your organization's definition of a contact (e.g., after an evaluation/qualification process or upon entering into business with the individual). When the lead is converted, a new contact record is created with a relationship to the original lead record. For more information on converting leads, please refer to the Leads documentation.
Use the following steps to convert leads into contacts:
- Navigate to a lead's record view.
- Select "Convert" from the Actions menu or click the Unconverted button to initiate the lead conversion process.
Note: Sugar will automatically perform a duplicate check for the modules (e.g., Contacts) on the Convert Lead page.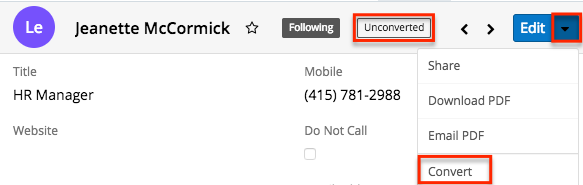
- If there are no duplicate records found for a module (e.g., Contacts), the new record will be automatically marked for creation on the Convert Lead page and associated to the lead. The panel will be collapsed as well, but you can click the header to open the panel and view the record's details.
- If there are duplicate records found for a module (e.g., Contacts), they will display in a list view within the panel. You can select an existing contact, or if none of the suggested duplicates are valid, simply click "Ignore and create new" to create a new contact record.
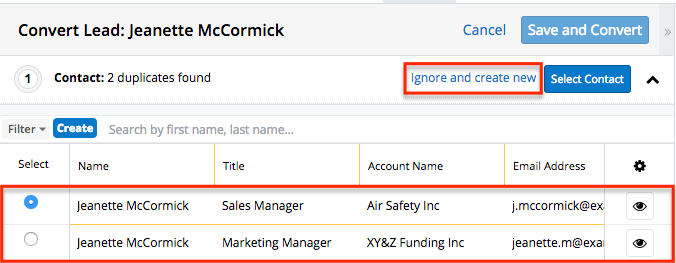
- Some of the fields (e.g., address, phone) on the displayed record view will be pre-populated with the lead's values. Simply update any necessary fields then click the Create Contact button.

- Complete the other module panels (Accounts, Opportunities) accordingly on the Convert Lead page.
- Once all of the necessary information is entered and the appropriate panels are completed, click "Save and Convert".
Once the lead has been converted successfully, the lead's record view will display the converted contact, account, and opportunity information below the record's detail. You can click the Preview icon to the far right of each record's row to view the details of the converted contact and other records.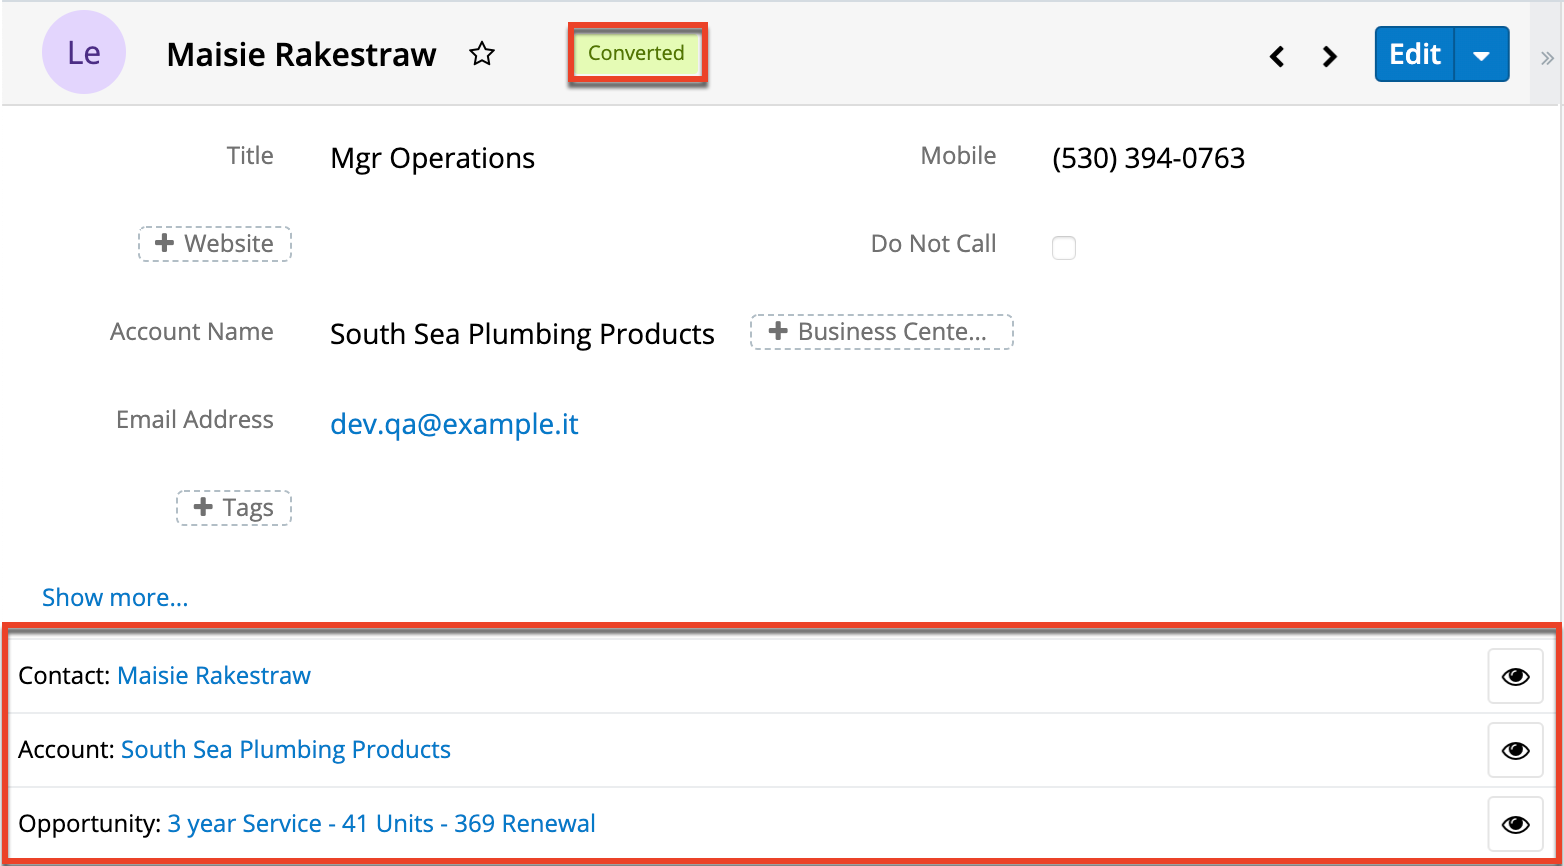
vCards and Contacts
vCards are electronic business cards that are exchanged between applications such as email and web browsers. Contacts may be created from vCards generated by another application or saved as vCards for use in other software.
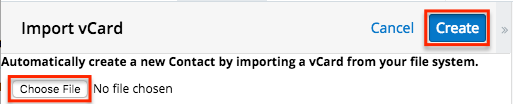
Creating Contacts via vCard
Use the following steps to create a contact in Sugar via vCard:
- Click the three-dots menu in the Contacts module tab and select "Create Contact From vCard".
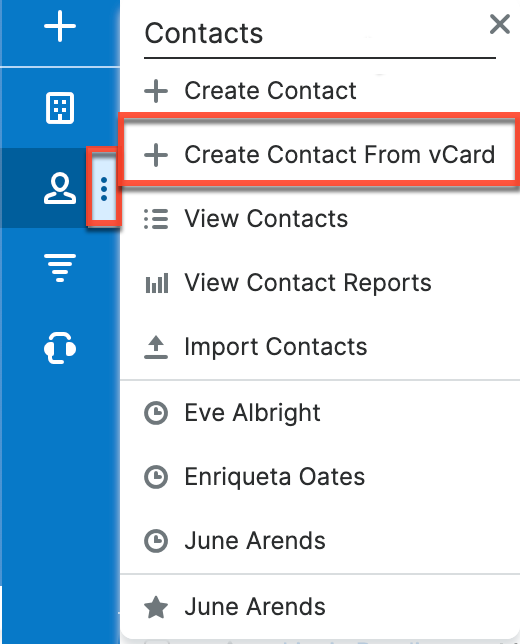
- Choose the vCard file from your computer and click "Create".
Downloading a Contact's vCard
The following steps cover downloading a vCard and saving it as a contact in Microsoft Outlook as an example:
- Navigate to a Contacts record view.
- Select "Download vCard" from the Actions menu to download the vCard file.
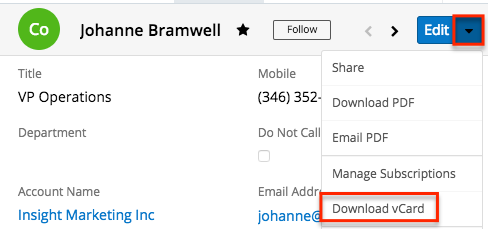
- Open the downloaded file in your mail or address book application. For this example, double clicking opens the vCard in Outlook.
- Make any necessary changes to the information, then click "Save & Close" to save this lead in Outlook.

Working With Sugar Modules
While the Contacts module has some features that only apply to contacts, it also uses the Sidecar user interface that most Sugar modules are based on. The following sections detail menus, views, and actions common to Sidecar modules and contain links to additional information within the page or links to the User Interface documentation.
Contact Menus
The Contacts module contains various options and functionality which are available via menus in the module tab, list view, and record view. The following sections present each menu and its options with links to more information about each option in the User Interface documentation or, for Contacts-specific functionality, within this page.
Module Tab Menus
Click the Contacts module tab in the navigation bar to access the Contacts list view. You may also click the three-dots menu in the Contacts module tab to display the Actions, Recently Viewed, and Favorites menus. The Actions menu allows you to perform important operations within the module. The Recently Viewed menu displays the list of contacts you most recently viewed. The Favorites menu displays the list of contacts you most recently marked as favorites.
| Menu Item | Description |
| Create Contact | Opens the record view layout to create a new contact. |
| Create Contact From vCard | Imports a vCard file from your computer to create a new contact. |
| View Contacts | Opens the list view layout to search and display contacts. |
| View Contact Reports | Displays existing reports based on the Contacts module. |
| Import Contacts | Opens the import wizard to create or update contacts using external data. |
For more information on module tab menus including reasons a module may not be included in the menu, see the User Interface documentation.
List View Menus
The Contacts list view displays all contact records and allows for searching and filtering to locate specific contacts. You can view the basic details of each record within the field columns of the list view or click a contact's name to open the record view. To access a module's list view, simply click the module's tab in the navigation bar.
List View Mass Actions Menu
The Mass Actions menu to the right of the checkbox option in the list header allows you to perform mass actions on all currently selected records. You can use the checkbox on each record's row to select individual contact records or click the checkbox in the list header to select all records displayed on the current set of list view results.
The Mass Actions menu allows you to perform the following operations:
| Menu Item | Description |
| Email one or more contacts at a time. | |
| Mass Update | Mass update one or more contacts at a time. |
| Merge | Merge two or more duplicate contacts. |
| Add to Target List | Add one or more contacts to a target list. |
| Delete | Delete one or more contacts at a time. |
| Export | Export one or more contacts to a CSV file. |
| Recalculate Values | Visible only if the module contains fields using Sugar Logic and only to System Administrators or users with Developer-level role access, this option will refresh the selected records' calculated values. |
| Doc Merge | Select or create a DOCX, XLSX, or PPTX template to merge record data into documents that will be accessible in the Doc Merge widget. |
| Doc Merge to PDF | Select or create a DOCX, XLSX, or PPTX template to merge record data into PDF documents that will be accessible in the Doc Merge widget. |
| Map | For instances with Sugar Maps enabled, display this record or the selected records on a map. |
| Directions starting from Current User | For instances with Sugar Maps enabled, plot driving directions on a map from your address to this record or all selected records. |
List View Record Actions Menu
The Record Actions menu to the far right of each record's row allows you to perform actions on the individual contact directly from the list view.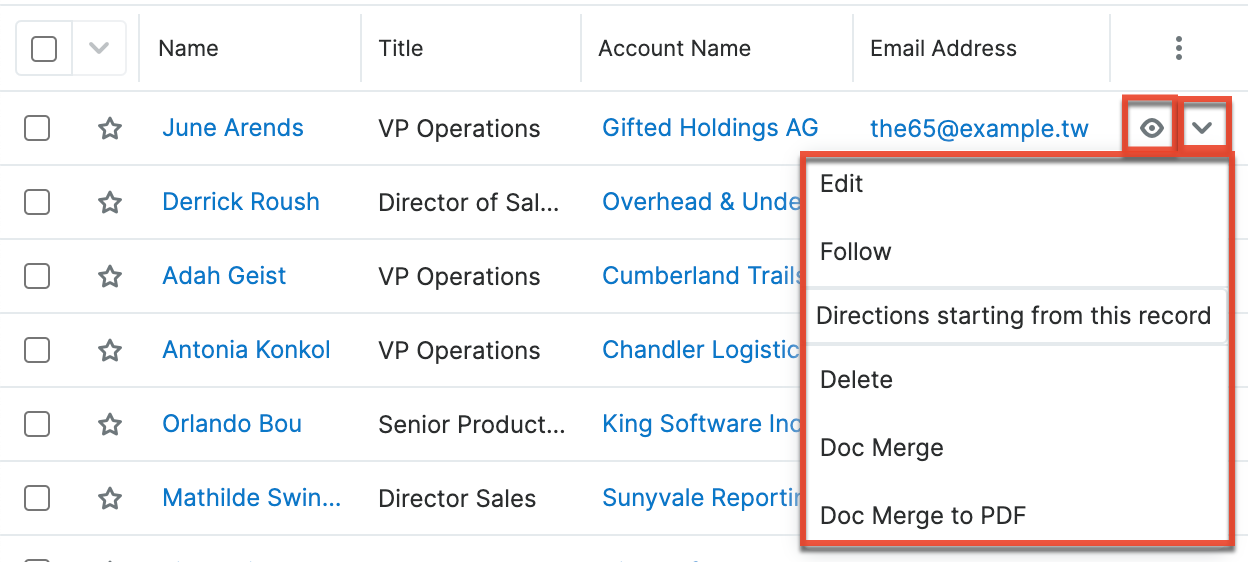
The list view's Record Actions menu allows you to perform the following operations:
| Menu Item | Description |
| Preview (Eye icon) | Preview this contact in the intelligence pane. |
| Edit | Edit this contact. |
| Follow | (Available if Activity Streams are enabled) Follow changes to this contact in your activity stream. |
| Directions starting from this record | For instances with Sugar Maps enabled, plot driving directions on a map from this record to another record or records. |
| Delete | Delete this contact. |
| Doc Merge | Select or create a DOCX, XLSX, or PPTX template to merge record data into documents that will be accessible in the Doc Merge widget. |
| Doc Merge to PDF | Select or create a DOCX, XLSX, or PPTX template to merge record data into PDF documents that will be accessible in the Doc Merge widget. |
Record View Actions Menu
The Contacts record view displays a single contact in full detail including its fields, subpanels of related records, and activity stream. To access a contact's record view, simply click a hyperlinked contact name from anywhere within Sugar. The record view's Actions menu appears on the top right of the page and allows you to perform various operations on the current record.
The Actions menu allows you to perform the following operations:
| Menu Item | Description |
| Edit | Edit this contact. |
| Share | Share a link to this contact via email. |
| Download PDF |
Download the record's information as a PDF file.
|
| Email PDF |
Email the record's information as a PDF attachment.
Note: To send emails through Sugar, users must first configure a default user email account via Emails > Email Settings. |
| Manage Subscriptions | Manage this contact's newsletter campaign subscriptions. |
| Download vCard | Download a vCard from Sugar and transfer this contact's information to another application (e.g., Outlook). |
| Find Duplicates | Locate potential duplicates of this contact. |
| Copy | Duplicate this contact to create a new contact. |
| Historical Summary | View a historical summary of activities (e.g., calls, meetings, etc.) related to this contact. |
| View Audit Log | View a record of changes to this contact. |
| View Personal Info | Display this record's fields which an admin has designated as personal information. |
| Delete | Delete this contact. |
| Doc Merge | Select or create a DOCX, XLSX, or PPTX template to merge record data into documents that will be accessible in the Doc Merge widget. |
| Doc Merge to PDF | Select or create a DOCX, XLSX, or PPTX template to merge record data into PDF documents that will be accessible in the Doc Merge widget. |
| Geocode | For instances with Sugar Maps enabled, manually set this record's location on a map. |
| Map | For instances with Sugar Maps enabled, display this record or the selected records on a map. |
| Directions starting from Current User | For instances with Sugar Maps enabled, plot driving directions on a map from your address to this record or all selected records. |
Common Views and Actions
In the table below, the left column contains links to the User Interface page covering topics that are applicable to all Sidecar modules. The right column has links to sections of the current page that cover topics specific to contacts.
| General Instructions for Working With Sugar Modules | Contacts-Specific Instructions |
| Use the links below to navigate to the User Interface page which covers topics generic to many Sugar modules. | When Contacts-specific help exists for each topic, use the links below to navigate to sections of the current page. |
| Creating Records | Contact Creation via Sugar Portal Converting Leads to Contacts Creating Contacts via vCard |
| Viewing Records | |
| Searching for Records | |
| List View | List View Mass Actions Menu List View Record Actions Menu |
| Record View | Record View Actions Menu |
| Intelligence Pane | |
| Editing Records | |
| Deleting Records | |
| Emailing Records | Emails and Contacts Campaigns and Contacts |
| Exporting Records | Downloading a Contact's vCard |
| Recalculating Calculated Values | |
| Finding Duplicate Records | |
| Merging Records | |
| Viewing Record Historical Summaries | |
| Viewing Record Audit Logs | |
| Record PDFs | |
| Favoriting Records | |
| Following Records | |
| Sharing Records |