Calendar
Overview
Sugar's Sidecar Calendar module allows users to easily schedule, view, and manage events like your calls, meetings, and other important Sugar occasions in one place. The calendar lets you show event milestones from Sugar that are not traditionally considered "activities", such as the expected close dates for your cases or opportunities. When creating a new calendar, you can decide what conditions must be met to have the event appear on your calendar. You can also view other users' and teams' scheduled events via the User and Team Calendars. This documentation will cover how to use the Calendar module as well as the various actions and options available from within the module. For information on using Sugar's legacy ("BWC") calendar, refer to the Help Article.
Suggested Settings
We recommend making the following admin configurations to your Sugar instance to optimize the user experience. Most customers will want users to be able to access each other's calendars (team permitting), but only edit or delete their own calendars.
Note: You must be a system administrator to complete the following configurations.
To create a role that restricts calendar users from editing or deleting other users' calendars, create a new role via Admin > Role Management with the following settings:
- Role Name: Calendar Users
- Module Permissions: For the Calendar module, set the following permissions so that users can see each other's calendars (team permitting) but only edit or delete their own:
- Access: Enabled
- Access Type: Normal
- Delete: Owner
- Edit: Owner
- List: All
- Record View: All
After saving the new role, scroll to the role's Users subpanel and add all users who will have access to the Calendar module. By default, all users will have access to Calendar unless they have been restricted by a role. For more information on configuring roles in Sugar, refer to the Role Management documentation in the Administration Guide.
Calendar Module Tab
Click the Calendar module tab in the navigation bar to access the calendar view. Unlike other modules where clicking the module tab displays the module's list view, clicking the Calendar module tab displays a calendar view. Clicking the three-dots menu within the module tab will display an Actions menu with several options: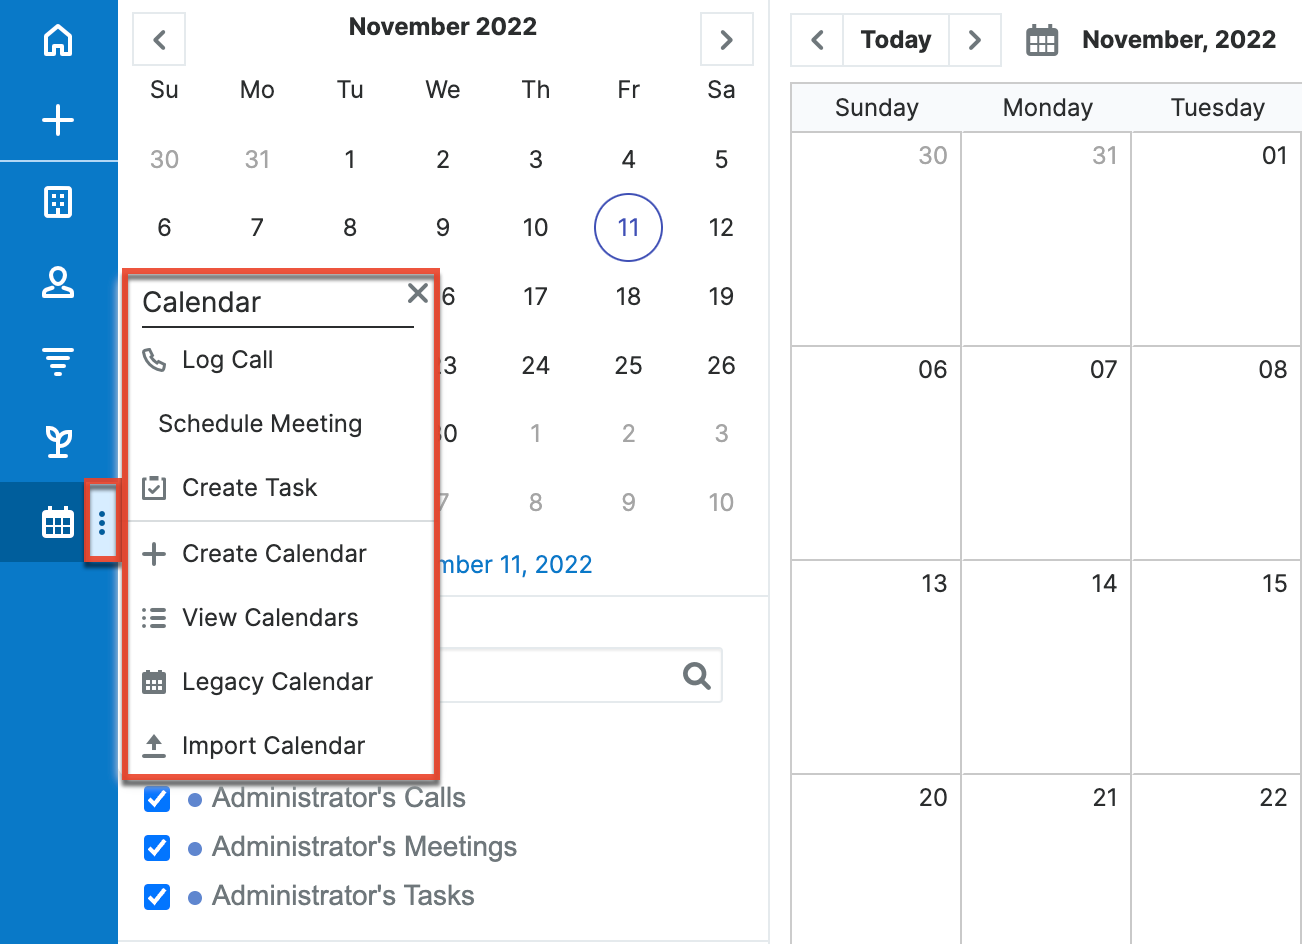
The Actions menu options will change depending on the calendars that you have created. You will see an option to create a new record in any module that you have established a calendar for. For example, if you have calendars for Meetings, Calls, and Tasks you will see the options to Schedule Meeting, Log Call, and Create Task. You will also see the following options by default:
| Menu Item | Description |
| Create Calendar | Create a new calendar. |
| View Calendars | View the Calendar list view. |
| Legacy Calendar | Open the legacy Calendar module. This option is temporarily available and will be disabled in the future. |
| Import Calendar | Import a CSV file with Calendar data. |
Calendar Actions
When viewing your calendar, there are several options across the top, side, and bottom of the calendar to help you navigate the calendar and increase the functionality available. These buttons are accessible from any calendar screen, with some notable exceptions. Most of the buttons are used to change the view of the calendar to show a specific time period or jump to a specific time period.
The options are defined as follows:
| Option | Description |
| Date jumper | The Date jumper is the small, embedded calendar on the left side of the screen. Jump to a different date and remain in your day, work week, week, agenda, timeline, or scheduler view by clicking on a date in the Date jumper. If you are in month view and click on a date in the Date jumper, you will be taken to the day view for that date. Click the left and right arrows to scroll through months; or click the date written out along the bottom of the month to be taken to today's day, work week, week, agenda, timeline, or scheduler view, depending on your current view. If you are in month view, clicking the date along the bottom of the month will take you to today's day view. For more information, refer to the Viewing the Calendar section of this page. |
| Today | The Today button is located toward the top of the screen and lets you jump to today on the calendar. Click the left and right arrow buttons on either side of "Today" to move the calendar view backward or forward in time relative to today. For more information, refer to the Viewing the Calendar section of this page. |
| Date or date range | The date or date range is located toward the top of the screen to the right of the Today button. Click the date or date range to open a date picker from which you can select a new date or timeframe. For more information, refer to the Viewing the Calendar section of this page. |
| View selector | At the upper right of the calendar view, choose whether to view the calendar by Day, Work Week, Week, Month, Agenda, Timeline, or Scheduler. For more information on the available views, refer to the Calendar Views section of this page. |
| Users dropdown | To the right of the View selector, the Users dropdown shows a key that matches users with the colored stripes on the left side of the visible calendar events. This dropdown menu is populated only if visible calendar events include at least one internal user as a guest or owner. |
| Share | To the right of the Users dropdown, you can share the calendar by exporting as a PDF or iCal or publishing the calendar in iCal format. For more information, refer to the Sharing Calendars section of this page. |
| Define Calendar Day (gear icon) | The button with a gear icon in the top right opens the Define Calendar Day dialog box. Set the "Start of Day" and "End of Day" to define the hours you want to show for your day, week, work week, and timeline view. |
| Show full day | The "Show full day" button is located below the calendar view on the left. This button is available only when the day, work week, week, or timeline view is showing your defined Calendar Day hours. Clicking "Show full day" will expand the viewable hours beyond the Calendar Day that you define. Hours outside the workday are shaded blue. |
| Show Calendar Day | The "Show Calendar Day" button is located below the calendar view on the left. This button is available only when the full day is visible in day, work week, week, and timeline view. Clicking "Show Calendar Day" will collapse the viewable hours to the Calendar Day that you defined by clicking the gear icon above the calendar. |
Calendar List View
List View Menus
The Calendar list view displays all calendars and allows for searching and filtering to locate specific calendars. You can see the basic details of each calendar within the field columns of the list view or click a calendar's name to open the record view to see the calendar configuration. To access the Calendar module's list view, click the three-dots menu within the Calendar module tab to display the Actions menu and then select "View Calendars".
List View Mass Actions Menu
The Mass Actions menu to the right of the checkbox option in the list header allows you to perform mass actions on all currently selected records. You can use the checkbox on each record's row to select individual calendar records or click the checkbox in the list header to select all records displayed on the current set of list view results.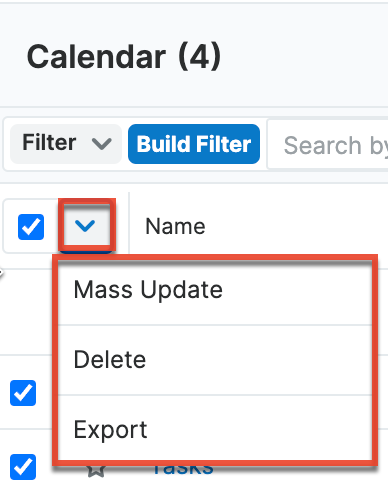
The Mass Actions menu allows you to perform the following operations:
| Menu Item | Description |
| Mass Update | Mass update one or more calendar records at a time. |
| Delete | Delete one or more calendars at a time. |
| Export | Export one or more calendar records' fields to a CSV file. |
List View Record Actions Menu
The Record Actions menu to the far right of each record's row allows you to perform actions on the individual meeting directly from the list view. 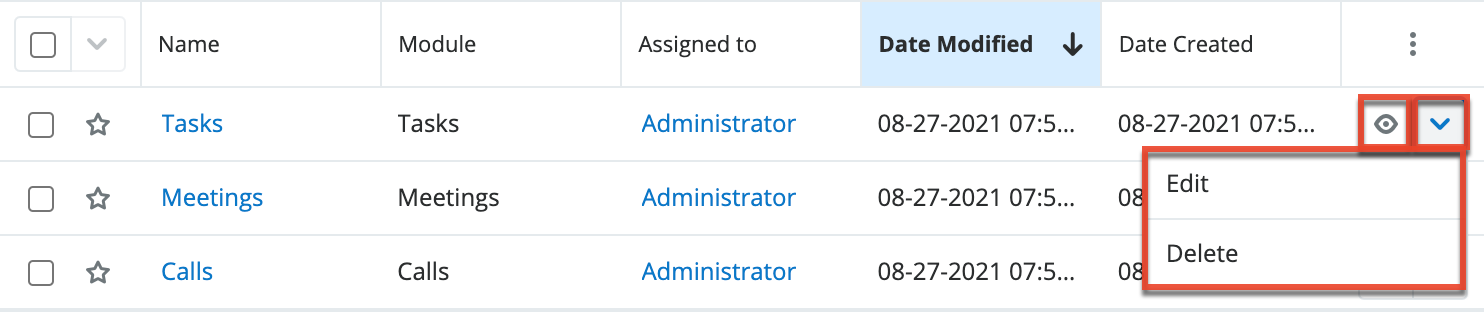
The list view's Record Actions menu allows you to perform the following operations:
| Menu Item | Description |
| Preview (Eye icon) | Preview this calendar in the intelligence pane. |
| Edit | Edit this calendar. |
| Delete | Delete this calendar. |
Calendar Record View
The calendar record view displays the calendar's configurations as described in the Configuring Calendars section below. To access a calendar's record view, simply click a hyperlinked calendar name from the Calendar list view. The record view's Actions menu appears on the top right of the page and allows you to perform various operations on the current calendar record. 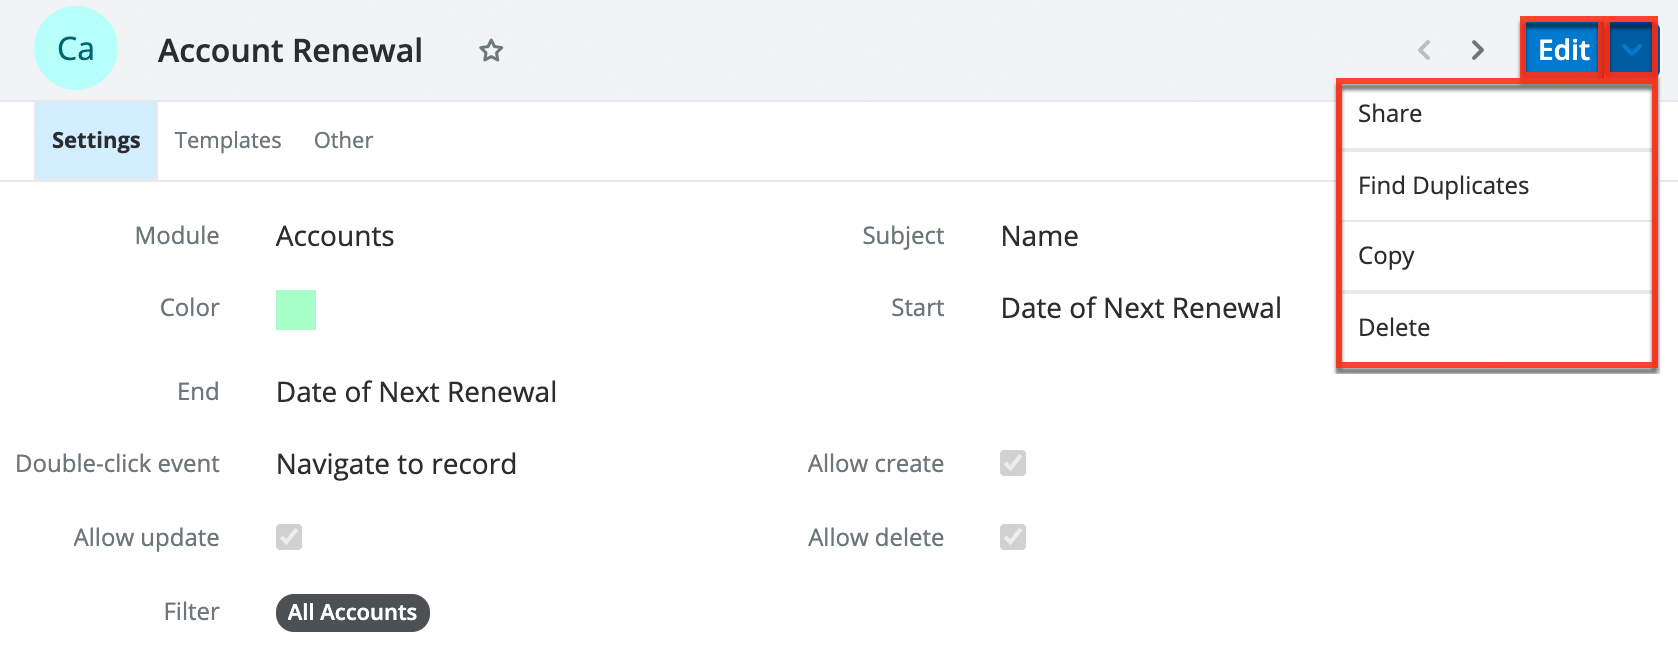
The Actions menu allows you to perform the following operations:
| Menu Item | Description |
| Edit | Edit this calendar. |
| Share | Share a link to this calendar via email. |
| Copy | Duplicate this calendar. |
| Delete | Delete this calendar. |
Configuring Calendars
You can use the Calendar module to set up calendars for many out-of-the-box or custom modules and configure the appearance of the calendar. You will only be able to see, create, and edit calendars as allowed by your team membership, user access type, and assigned roles. To view all calendars that you have access to, click the three-dots menu in the Calendar module tab to open the Actions menu, then select "View Calendars".
Creating or Editing a Calendar
To create a new calendar, click the Create button in the top right of the Calendar list view or click the Create Calendar option in the Calendar module tab's Actions menu. To edit a calendar, click on the calendar name in the Calendar list view and then click on the Edit button. You can copy an existing calendar by clicking on the calendar name in the Calendar list view and then selecting "Copy" from the record view Actions menu.
Calendar Settings
The following table describes the field options available in the Settings tab of the calendar record's edit view:
| Field | Description |
| Module | Choose the module that has the information to be shown on the calendar. |
| Subject | Select the field whose value will be used for the subject of the calendar event. The subject of the event is displayed as the first line in the calendar event's tooltip. |
| Color | Choose the color of the calendar events. |
| Start | Select the field whose value represents the start date for the event. |
| End | For all-day events, select the field that represents the end date for the event. Providing the Start and End date will make the event appear as an all-day event at the top of the calendar day. Note: If you provide the Duration minutes, Duration hours, and Duration days, you will not see the End field. |
| Duration minutes | For events that occur at a specific time (as opposed to all-day events), select the field to be used in the <Minutes> slot of the <Days>:<Hours>:<Minutes> duration. Providing a Start and duration will make the event appear during the appropriate hours on your calendar. 1 |
| Duration hours | For events that occur at a specific time (as opposed to all-day events), select the field to be used in the <Hours> slot of the <Days>:<Hours>:<Minutes> duration. Providing a Start and duration will make the event appear during the appropriate hours on your calendar. 1 |
| Duration days | For events that occur at a specific time (as opposed to all-day events), select the field to be used in the <Days> slot of the <Days>:<Hours>:<Minutes> duration, if any. Providing a Start and duration will make the event appear during the appropriate hours on your calendar. 1 |
| Double-click event | Configure the behavior that happens when you double-click an event in the calendar view. There are three types of options:
These options also exist for related modules. For all modules that are related one-to-one or one-to-many with the module chosen for the calendar, you will see additional options that include "(Related module name)" after the above three options. These options will direct you to the one record in the related module. For options that direct you to a related user profile (e.g., "Modified by"), the destination depends on your user type (i.e., administrators are directed to the Users module and regular users are directed to the Employees module). |
| Allow create | Choose whether to allow users to create an event/record for this module from the calendar view. Users will be allowed to create events/records as allowed by their team membership, user access type, and assigned roles. |
| Allow update | Choose whether to allow users to update an event/record for this module from the calendar view. Users will be allowed to create events/records as allowed by their team membership, user access type, and assigned roles. |
| Allow delete | Choose whether to allow users to delete an event/record for this module from the calendar view. Users will be allowed to delete events/records as allowed by their team membership, user access type, and assigned roles. |
| Filter | Filter which events appear on the calendar. See the User Interface documentation for more information. Some modules, like Calls and Meetings, contain filters that are unique for those modules. |
1 For more information, see the Understanding End and Duration Fields section below.
Understanding End and Duration Fields
There are two ways to define an event's timeframe in the Calendar module: provide a start date and an end date or provide a start date/time and a duration. The former method (start and end dates) will display all-day events in every view since only the dates are known without times of day. The latter method (start date/time and duration) will display events on the calendar at the appropriate time slots in day, week, work week, and timeline views since the actual timespan for the events are known.
Some out-of-the-box modules, like Tasks, can only be configured using the start and end dates and will therefore only be visible as all-day events. Other modules, like Calls, can be configured in either way. By default, however, they use the start date and the duration time. You can change how these types of modules appear on your calendar by setting Duration minutes, Duration hours, and Duration days to the blank option and then select an option for the End field. If you provide the Duration minutes, Duration hours, or Duration days, you will not see the End field.
Note that not every module that contains a datetime field can be configured to be displayed using a start date and duration time. Datetime fields in some modules are handled differently within Sugar and, while many allow for displaying events with the start date and duration time, this is not universal.
Calendar Templates
In the Templates tab of the calendar configuration window, you can establish what information you want to be shown in the tooltip, day view, week view, month view, agenda, timeline, scheduler, or iCal event. Click "Edit" in the top right corner to enable editing of all fields, or click the pencil icon next to a specific field to enable editing of that field. Use the Insert Field dropdown menu to choose placeholders that will be populated from information in your records.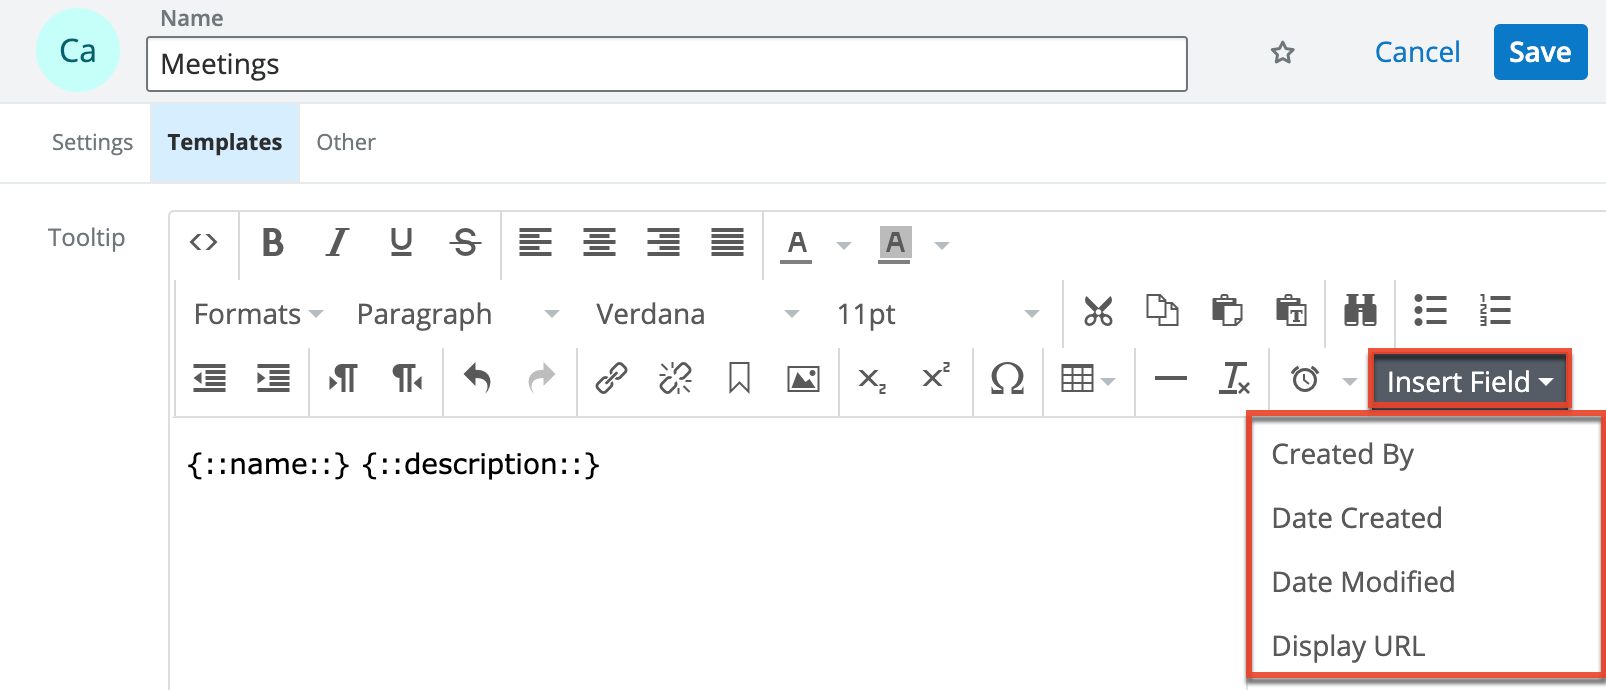
For example, if you want the tooltip for your meetings calendar to include the location of the meeting, you can use the following steps:
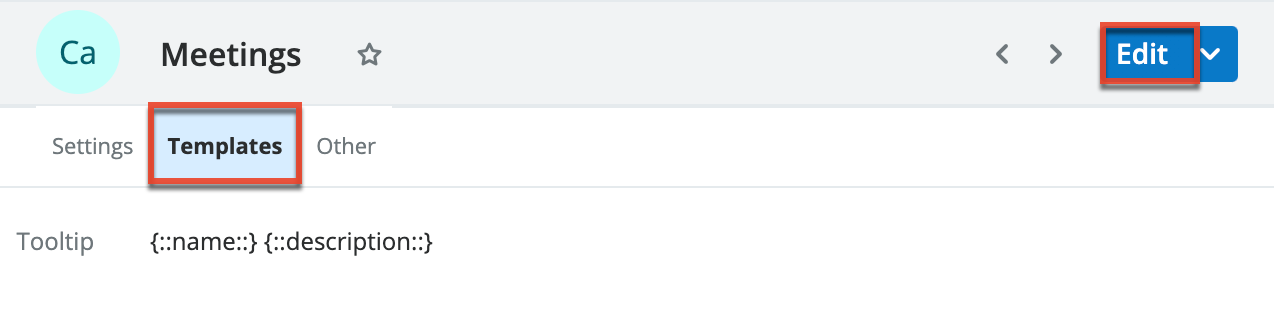
- Click the three-dots menu within the Calendar module tab to display the Actions menu and then select "View Calendars".
- Select the Meetings calendar.
- Go to the Templates tab and then click "Edit" in the top right corner.
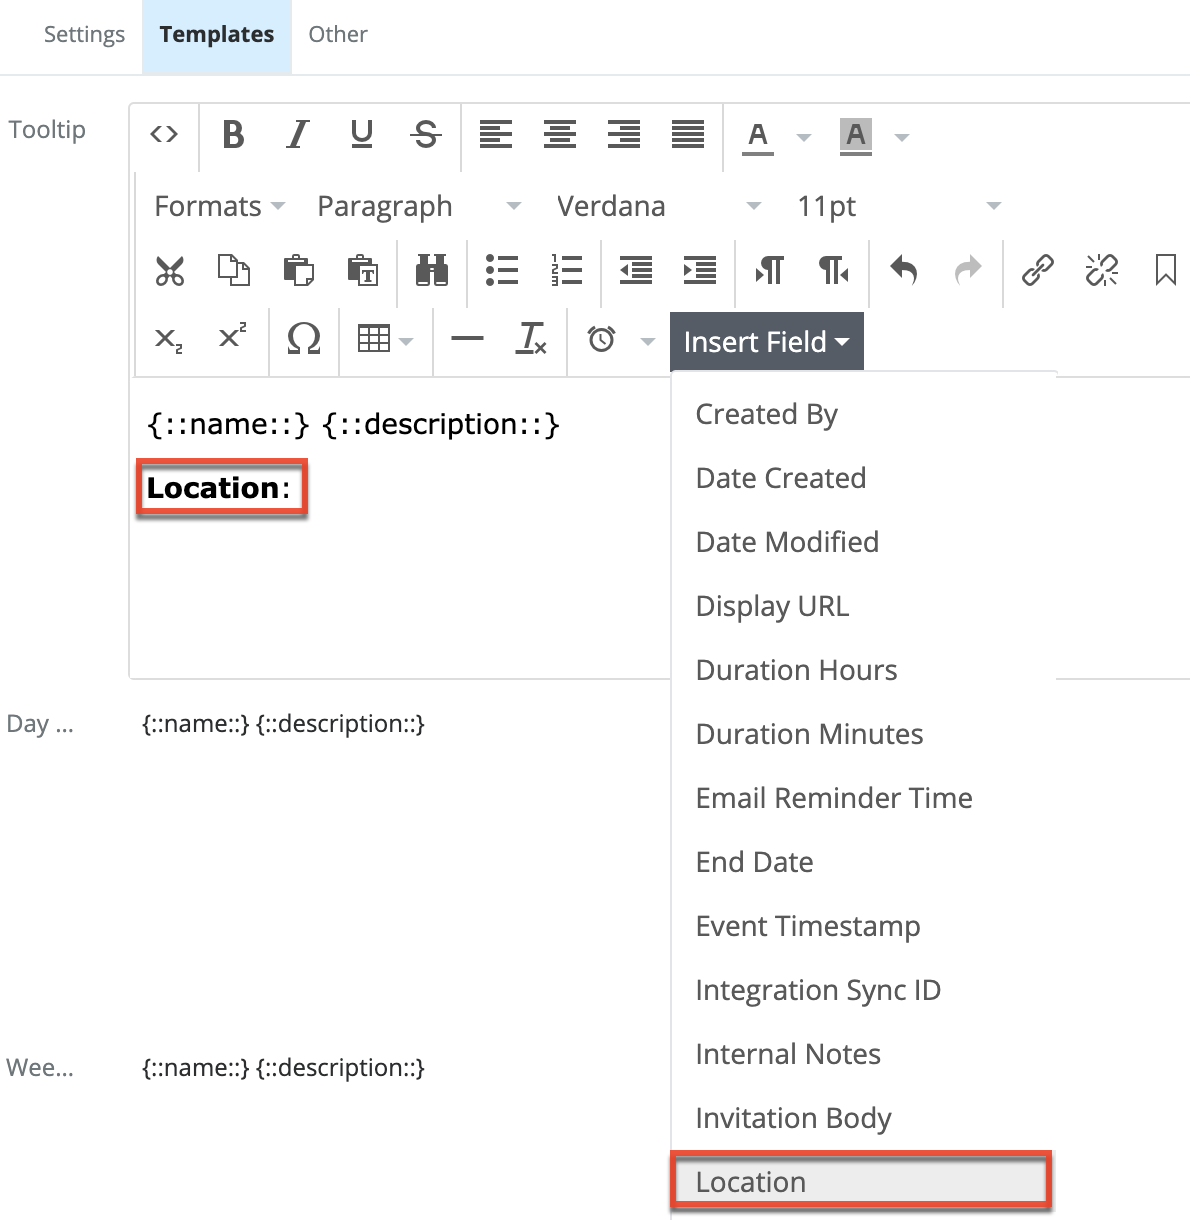
- Use the formatting toolbar to include any text that you want to be constant (e.g., Location:), then choose "Location" from the Insert Field dropdown menu.
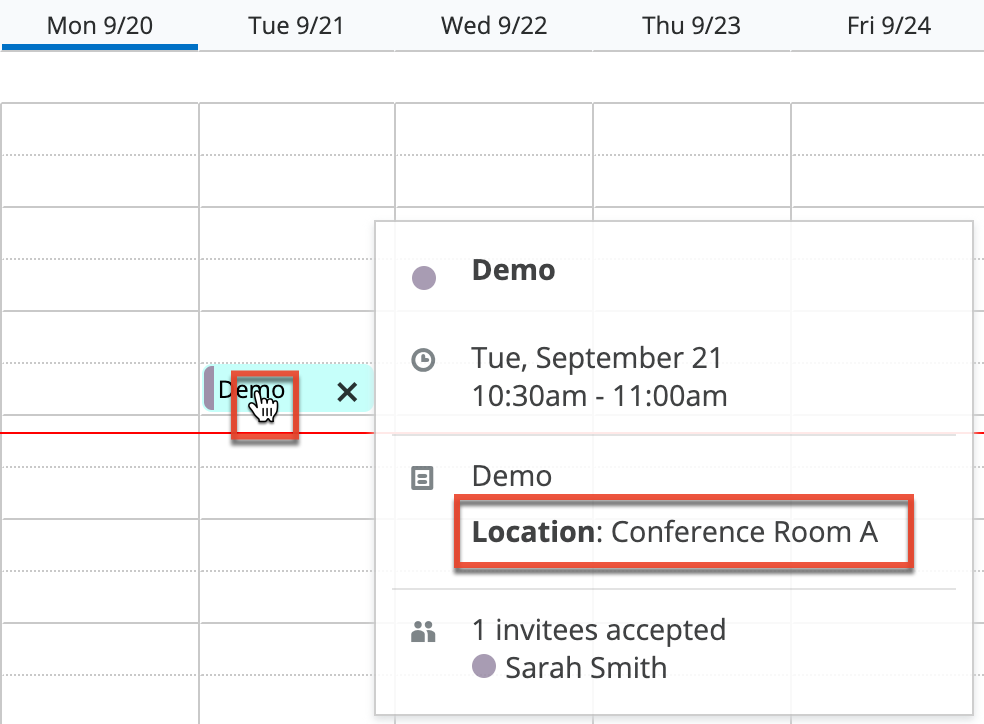
- Click "Save".
- Click the Calendar module tab to be taken to the calendar view. Hover over an event and see that the location is now visible in the tooltip.
Other Calendar Fields
The following table describes the field options in the Other tab of the calendar configuration window:
| Field | Description |
| Description | The description of the calendar. |
| Assigned to | The Sugar user that is assigned to the calendar. |
| Teams | The Sugar team(s) that is assigned to the calendar. |
| Date Modified | The date the calendar was last modified. |
| Date Created | The date the calendar was created. |
| Comment Log | A shared log of messages, comments, or other text, including the name of the user that added the log entry and the date and time it was added. It is possible to tag other users and link to other Sugar records in Comment Log entries by inserting a clickable pill; see the User Interface documentation for more details. |
Importing a Calendar
To import a calendar record, click the three-dots menu within the Calendar module tab and select "Import Calendar". In the first step of the import, you can download a template CSV file. The template file contains instructions for how to format your data to import it to the calendar.
Creating Calendar Events
You create calendar events by creating a record in the module that the calendar represents. For example, if you have a calendar that shows your scheduled calls, you create a new event on your calls calendar by creating a new call record. You can create these records as usual (i.e., via the individual modules or the Quick Create menu) or via the Calendar module, as described below. For more information on creating records via Quick Create or modules, refer to the User Interface documentation or the specific module's page, respectively.
Creating Events via Calendar
The calendar allows you to easily create records for the modules that have configured calendars by clicking on the cell corresponding to the specific date (and time) you wish to attribute to the record. This option is available only if you have selected "Allow create" when creating the calendar and if you are allowed by your team membership, user access type, and assigned roles. The record view will appear in edit mode and the field that is mapped to the start date and time will automatically be populated based on the date and time cell you selected in the calendar.
Use the following steps to create a calendar event (e.g., meeting) via the calendar view:
- Click the Calendar module tab. You can choose to view the calendar by Day, Work Week, Week, Month, Timeline, or Scheduler.
- On the calendar view, double-click the cell corresponding to the date (and time, if applicable) you wish to schedule the meeting and choose "Schedule Meeting".
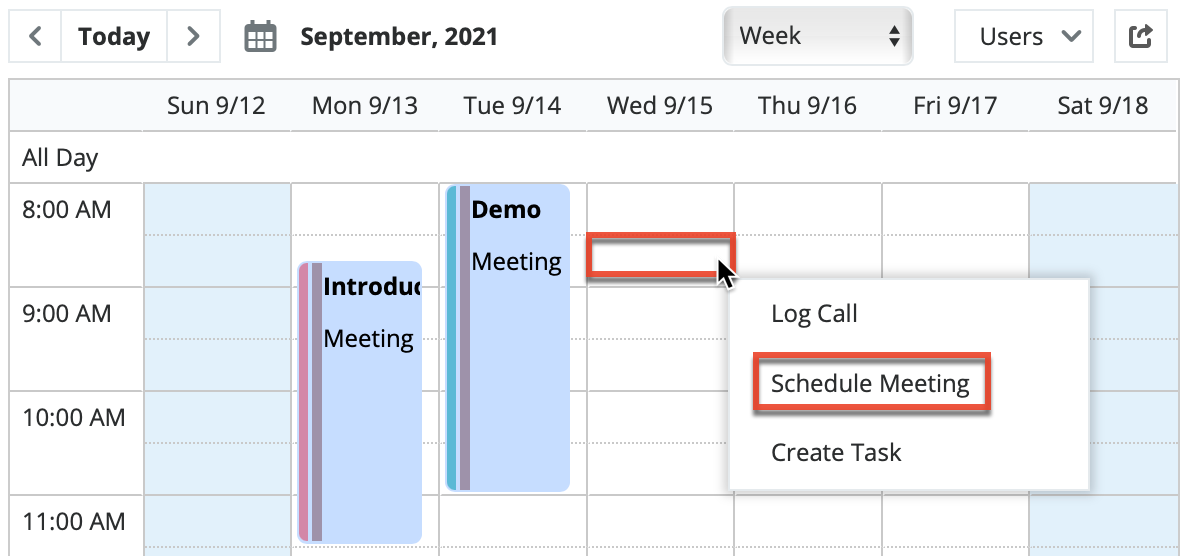
When "Schedule Meeting" is clicked, a Meeting record view will appear in edit mode. - Refer to the Meetings documentation for additional instructions about creating meeting records.
Creating Events via Calendar Actions Menu
When you add a calendar for a module, the module's create option is added to the Calendar module's Actions menu. For example, if you add a calendar that uses the Meetings module, the Calendar module tab contains the Schedule Meeting option. This opens up the record view in edit mode for the corresponding module (e.g., Meetings) which allows you to enter all the relevant information for the calendar event.
The following steps cover creating a new meeting via the Calendar module tab as an example:
- Click the three-dots menu in the Calendar module tab to open the Actions menu and select "Schedule Meeting".
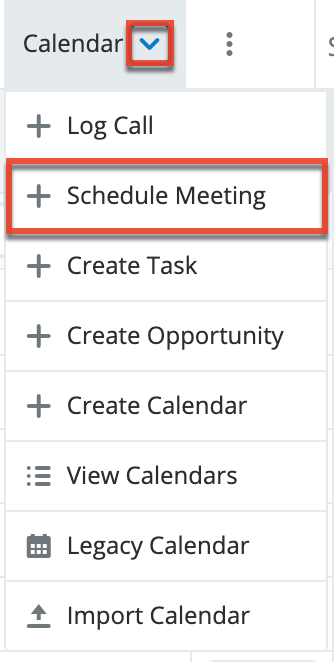
- Refer to the Meetings documentation for additional instructions about creating meeting records.
Viewing the Calendar
The Calendar module allows users to schedule, view, and manage various events (e.g., Calls, Meetings, Tasks) in Sugar. The Calendar module can be accessed by clicking the Calendar module tab. Calendar events are color-coded by default to match the color of the parent module icon.
Please note that you will only be able to see calendars and events on calendars as allowed by your team membership, user access type, and assigned roles. For more information on teams and roles, please refer to the Teams and Roles documentation in the Administration Guide.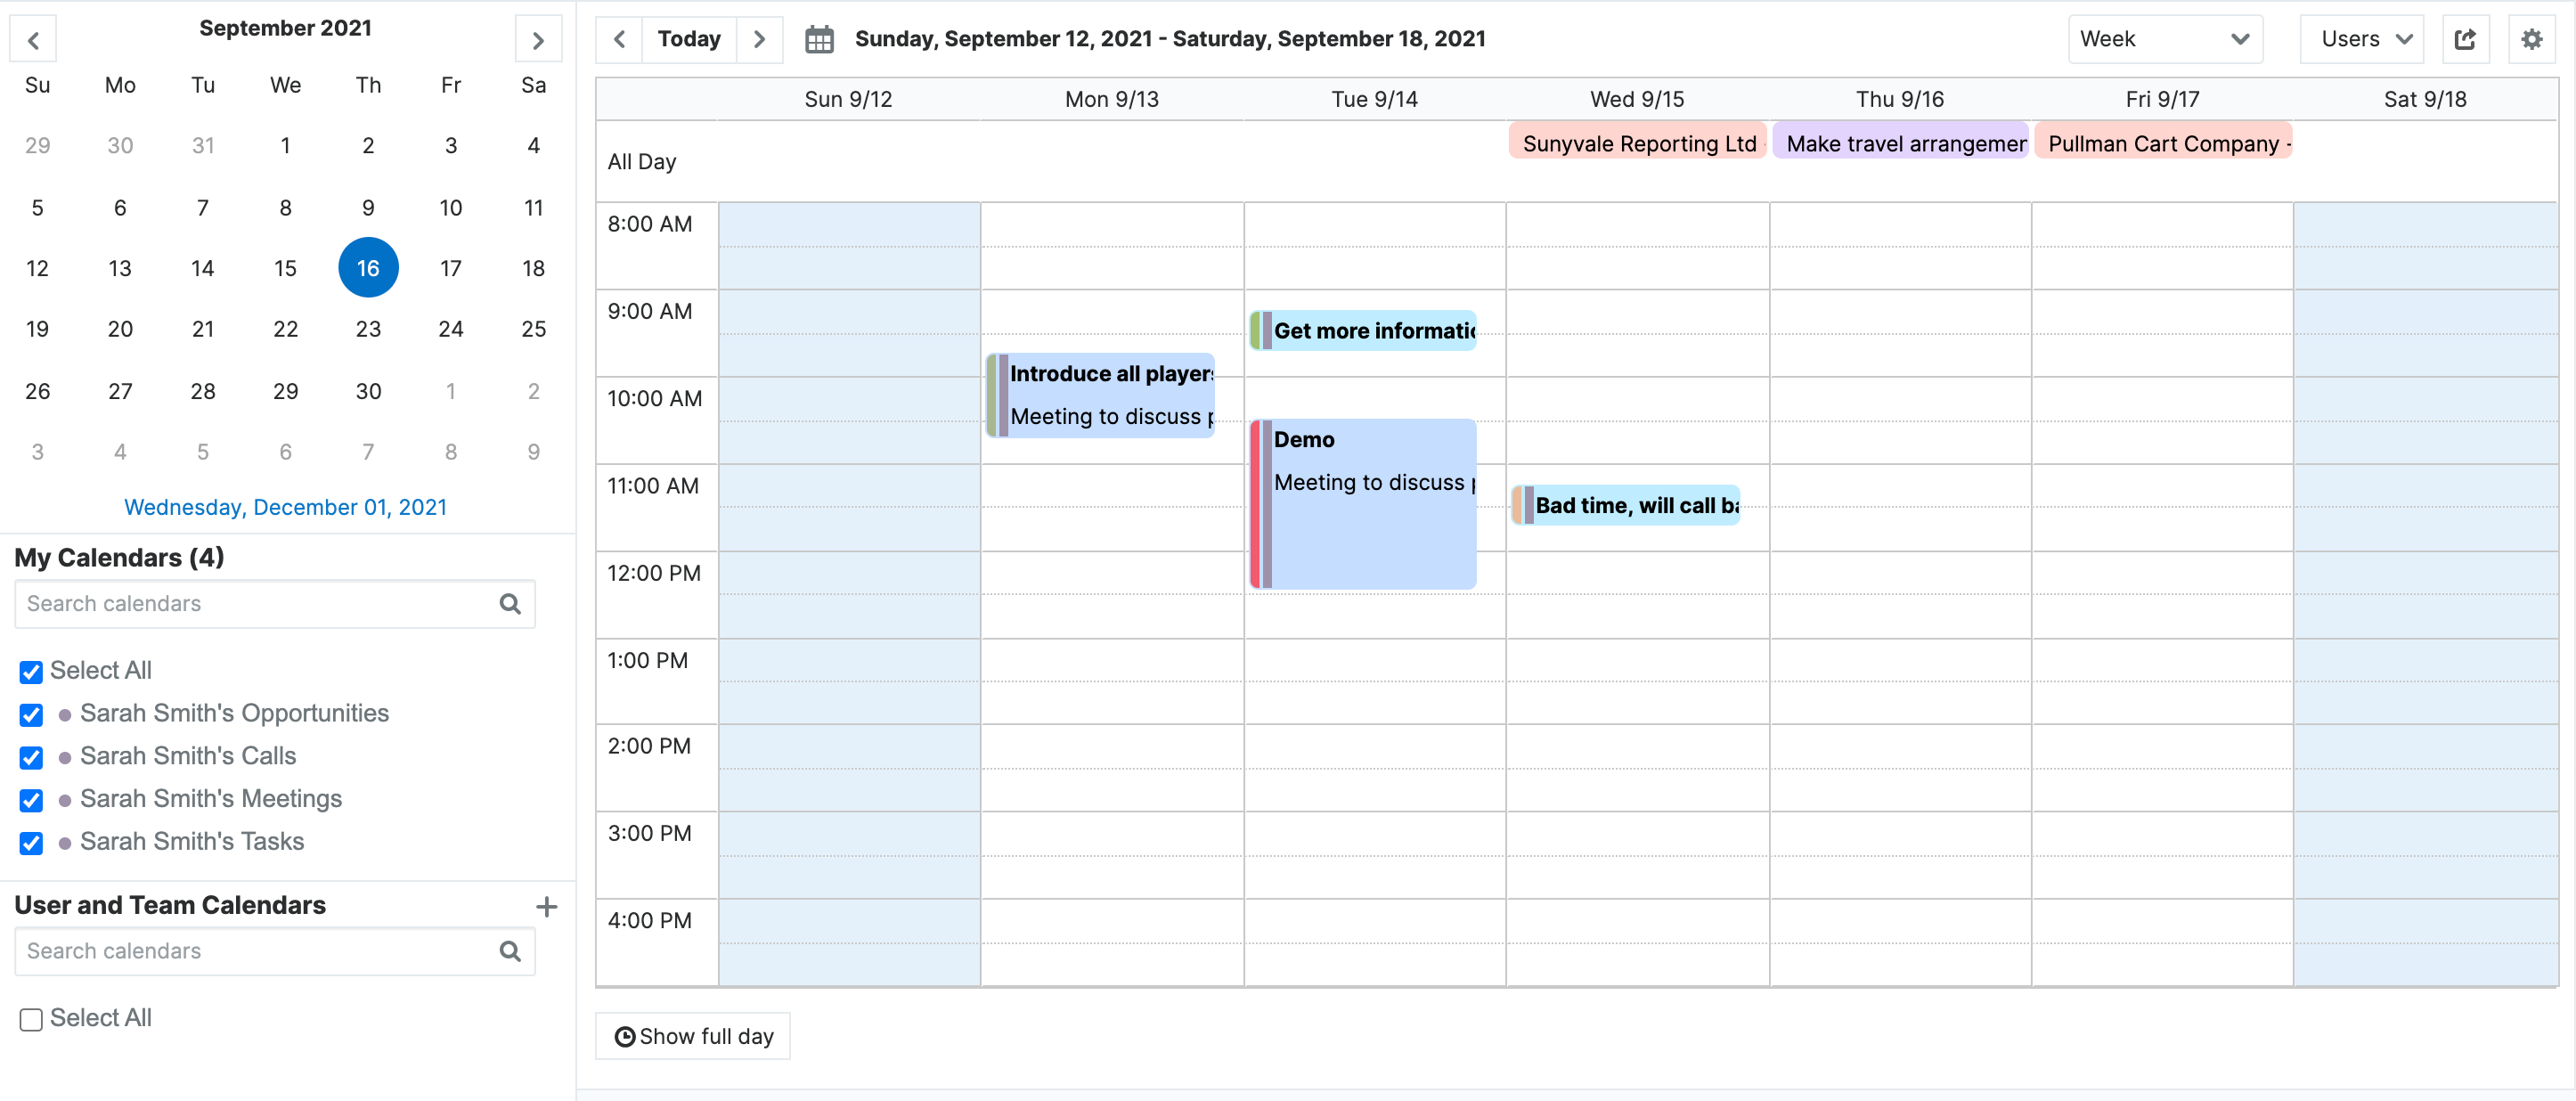
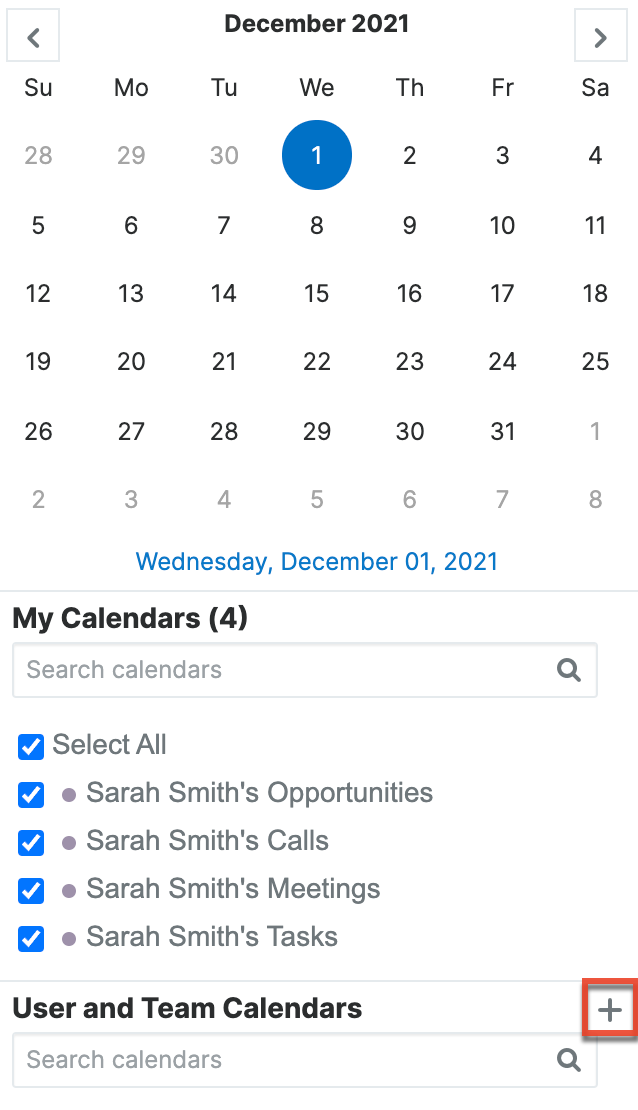
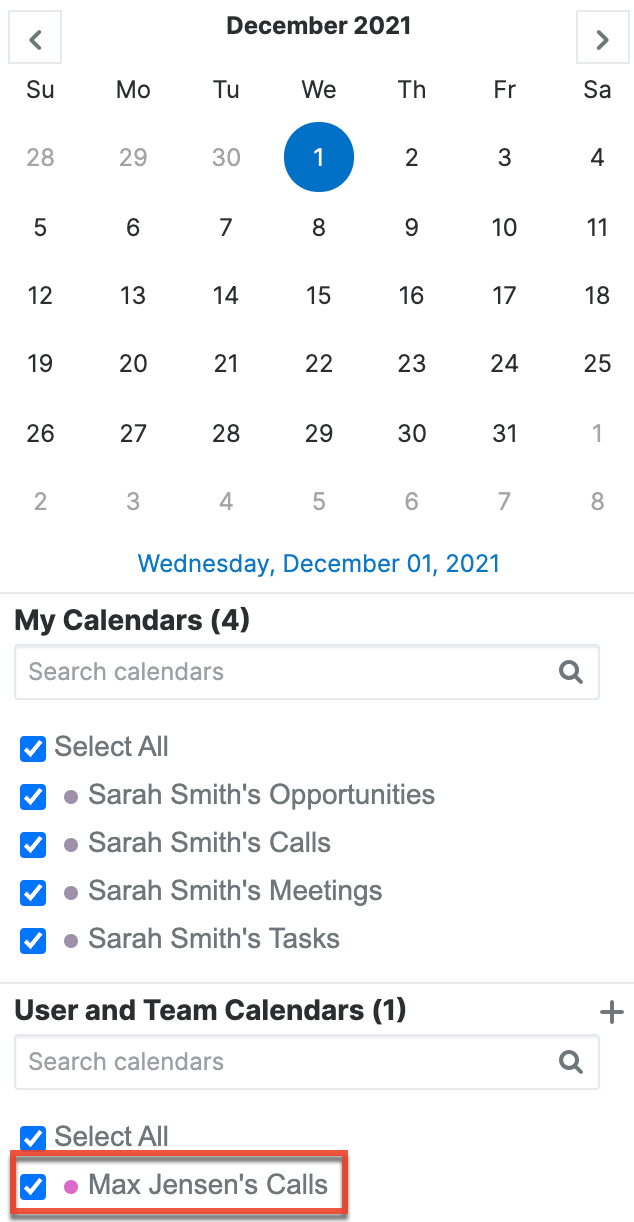
You can choose which calendars to show on the calendar view by checking the boxes next to the calendar names in the My Calendars and User and Team Calendars panels on the left side of the calendar. The My Calendars panel shows all calendars that are assigned to a team that you are a member of. Enabling more than one calendar will show each calendar's events overlaid on a single calendar view. Click "Select All" to select all calendars in the list.
Hover your mouse on the cell of an existing calendar event to view tooltip information that you specified in the calendar templates. You can also double-click the calendar event to enact your double-click event action that is configured for the calendar. Click on the colored strip on the left side of the calendar event to open the record preview on the right side of the calendar.
Jump to a different date by using the Date jumper on the top left side of the calendar. You will remain in your day, work week, week, agenda, timeline, or scheduler view by clicking on a date in the Date jumper. If you are in month view and click on a date in the Date jumper, you will be taken to the day view for that date. Select any date within the same month or use the left or right arrows to navigate to previous or upcoming months. You can click the date written as text (e.g., "September 2021") at the top of the Date jumper to zoom out to see all months in the year, then you can click the year text (e.g., "2021") to zoom out to see all years in the decade, etc., to more easily navigate through months and years. Click the date link written as text (e.g., "Wednesday, December 01, 2021") at the bottom of the Date jumper to go to today's day, work week, week, agenda, timeline, or scheduler view, depending on your current view.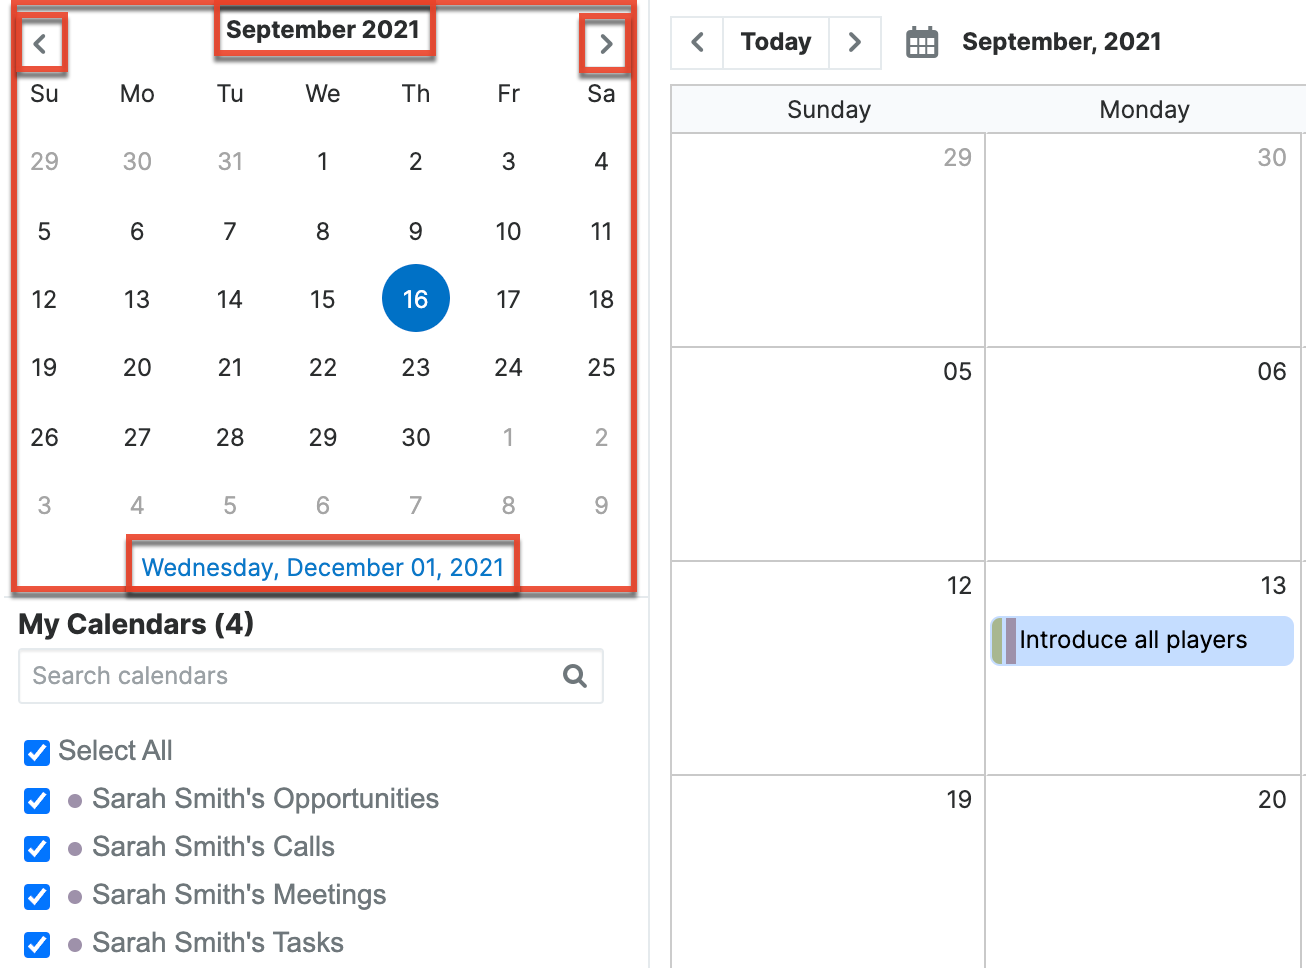
Jump to a different date and remain in your day, work week, week, month, agenda, timeline, or scheduler view by clicking the date text to the right of the Today button to open the date picker.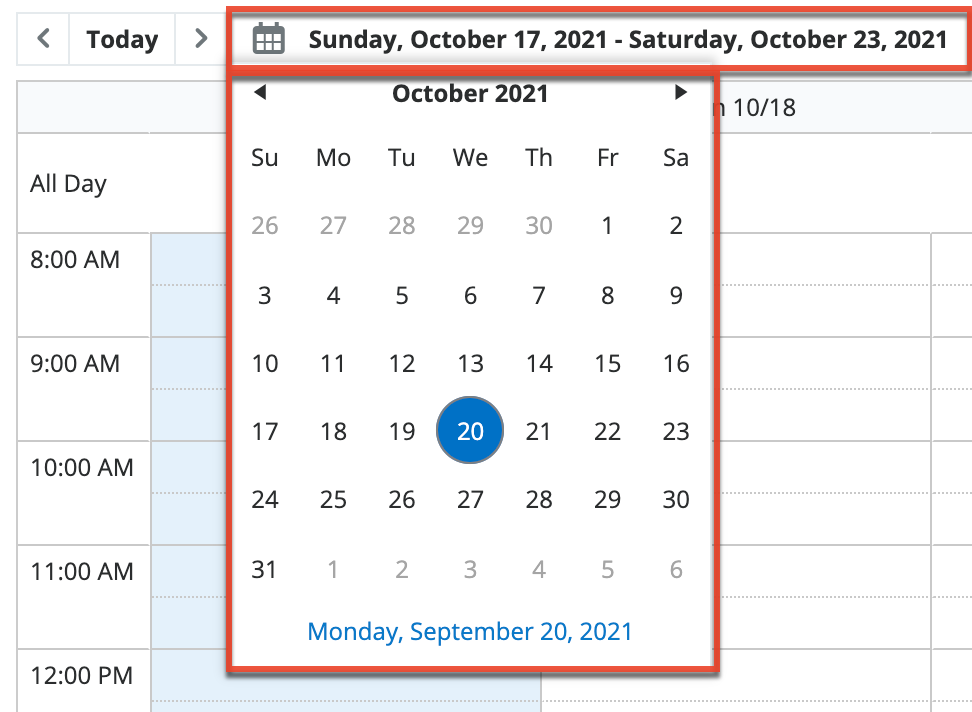
You can always jump to today's date by clicking Today on the top left of the calendar view. Alternatively, you can jump to the next day, work week, week, month, agenda, timeline, or scheduler, depending on your current view, using the left and right arrows on either side of the Today button at the top left of the calendar view. 
The calendar view can also be changed to have a different first day of the week using the Calendar Options in your user profile. Simply navigate to the Advanced tab of your user profile, then scroll to the Calendar Options panel and select the appropriate "First Day of Week" (e.g., Sunday, Monday). For more information on configuring the first day of the week, please refer to the Getting Started documentation.
Calendar Views
The Calendar module can be viewed as a Day, Week, Work Week, Month, Agenda, Timeline, or Scheduler view using the View selector dropdown menu near the top right of the calendar. The view options are:
| View Option | Description |
| Day | View the calendar one day at a time with 30-minute increments marked. Click the "Show full day" or "Show Calendar Day" button on the bottom left of the calendar to expand or collapse the visible hours, respectively. All-day events are shown at the top of the day. |
| Work Week | View a 5-day work-week with 30-minute increments marked. Workdays are defined as Monday through Friday. If "First Day of Week" in Profile > Advanced > Calendar Options is set to either Saturday or Sunday, the Work Week view displays Monday as the first day of the week. If "First Day of Week" is Tuesday, Wednesday, Thursday, or Friday, the Work Week view displays the remainder of the current week and then continues into the following week without showing weekend days. Click the "Show full day" or "Show Calendar Day" button on the bottom left of the calendar to expand or collapse the visible hours, respectively. All-day events are shown at the top of the day. |
| Week | View a 7-day week with 30-minute increments marked. Click the "Show full day" or "Show Calendar Day" button on the bottom left of the calendar to expand or collapse the visible hours, respectively. All-day events are shown at the top of the day. |
| Month | View a full month. |
| Agenda | View events in the upcoming week, including today. Three columns are shown: Date, Time, and Event. The Time column displays the start and end time of the event, if applicable. All-day events show "all day" in the Time column. |
| Timeline | View events for the current day in a horizontal hourly view that shows event duration (start and end times). Scroll left and right on the timeline to see more times. Click the "Show full day" or "Show Calendar Day" button on the bottom left of the calendar to expand or collapse the visible hours, respectively. All-day events are shown as spanning the full day. |
| Scheduler | View events for the current month in a horizontal day view. Scroll left and right on the scheduler to see more days. |
Viewing User and Team Calendars
The Calendar module allows you to view not just your own activities, but also the calendars of other Sugar users in the panel labeled "User and Team Calendars". These calendars will be added to the User and Team Calendars panel on the left side of the calendar and you can decide which calendars to overlay on your calendar view by checking the corresponding checkboxes. Click "Select All" to select all calendars in the User and Team Calendars panel.
Use the following steps to add a user or team calendar:
- Click the plus button to the right of the User and Team Calendars panel.
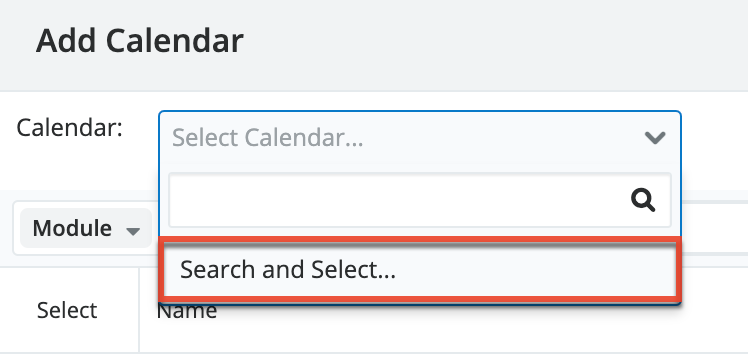
- In the Add Calendar drawer, choose the calendar you want to show by clicking "Select Calendar" and then searching for the calendar. You can also click "Search and Select..." from the Select Calendar dropdown menu to open a list of calendars that you have access to.
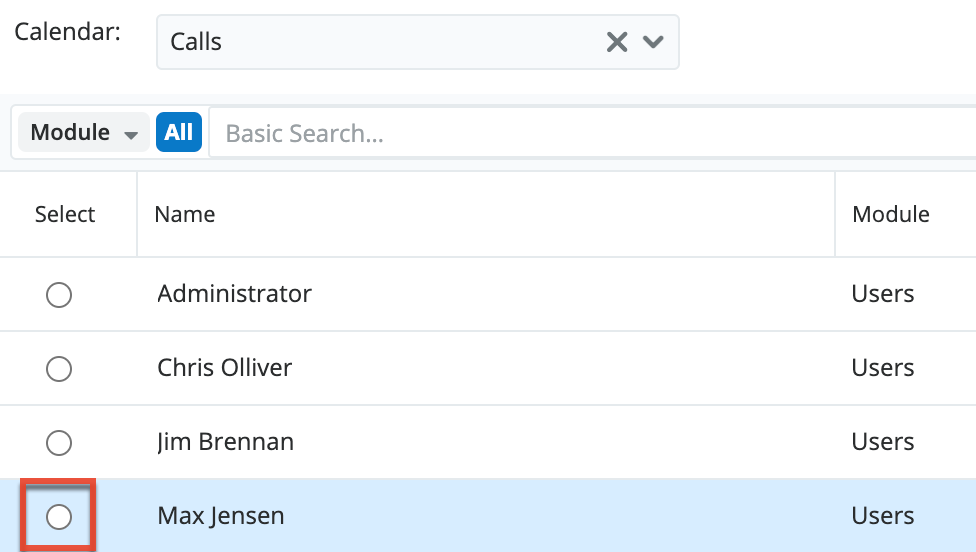
- In the Add Calendar drawer, choose the user you want to apply the calendar to.
- The user's calendar is added to the User and Team Calendars panel. Check or uncheck the checkbox to the left of the calendar to show or hide the calendar on your calendar view.
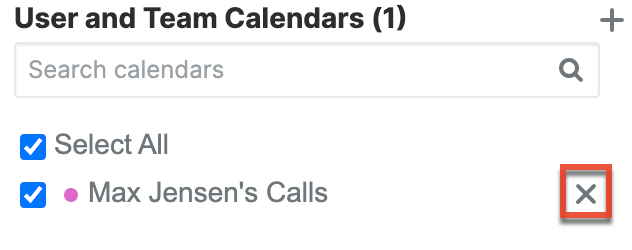
- To hide a user or team calendar that you no longer want to see in your User and Team Calendars list, click the x that appears to the right of the calendar name when you hover over the calendar in the panel.
Please note that you will only be able to see activity records as allowed by your team membership, user access type, and assigned roles. For more information on teams and roles, please refer to the Teams and Roles documentation in the Administration Guide.
Editing Calendar Events
Editing Events via Calendar
Sugar records displayed on the calendar can be edited directly from the calendar instead of having to access the record via the individual modules (e.g., Calls) depending on how you configured the calendar's double-click event setting. Dragging and dropping event cells within the calendar can make changes to the start and end dates. For more information on moving calendar events from within the calendar, please refer to the Moving Scheduled Events on the Calendar section of this documentation.
If you have the Double-Click Event field set to "Navigate to record", "Navigate to record in a new tab", or "Open drawer for edit" in the Settings tab of the calendar configuration window, you can use the following steps to edit a Sugar record via the calendar:
- Navigate to the calendar by clicking the Calendar module tab.
- Locate the calendar event (e.g., Meeting) you would like to edit and double-click on the event to open the associated record in the current tab, a separate tab, or a drawer, depending on your Double-click event setting.
- Make the necessary changes to the event.
- Click "Save" or, if you would like an invitation email to go out to the invitees where they can accept or decline the call or meeting, click "Save and Send Invites".
Please note that your ability to edit events in Sugar may be restricted by a role. For more information on roles, please refer to the Role Management documentation in the Administration Guide. Check with your system administrator if you do not see the Edit options.
Moving Scheduled Events on the Calendar
The Sugar calendar allows for the start time and duration of events to be edited from the calendar instead of having to directly edit the record via the module. This option is available only if you have selected "Allow update" when creating the calendar and if you are allowed by your team membership, user access type, and assigned roles. The records that appear on the calendar can also be dragged and dropped to new locations to change the start date and time. When changing the details with drag-and-drop, a pop-up message will ask you to confirm your changes. For drag-and-drop changes to call and meeting events, you can also select "Save and Send Invites" in the pop-up message to send a system-generated email update to the meeting or call invitees. Sugar users will see the meeting updated in their Planned Activities dashlet and their calendars.
Note: All occurrences of recurring meetings and calls will not be modified by dragging one record of the series. 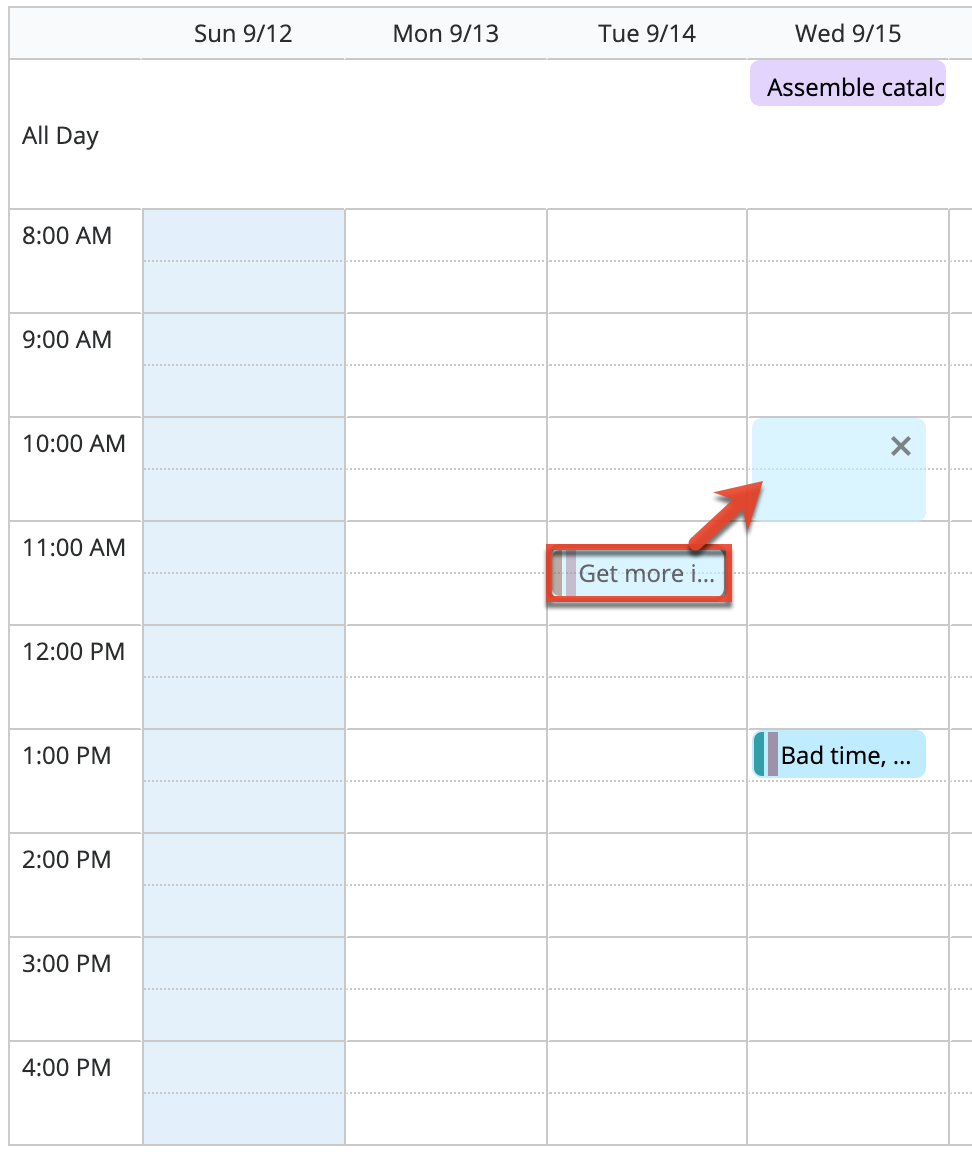
In addition, the events can be dragged from the bottom of the box to be able to change the duration of the event. To do this, simply hover over the event's box to make the down arrow appear at the bottom. Click when the arrow appears and drag to the new end time of the event. 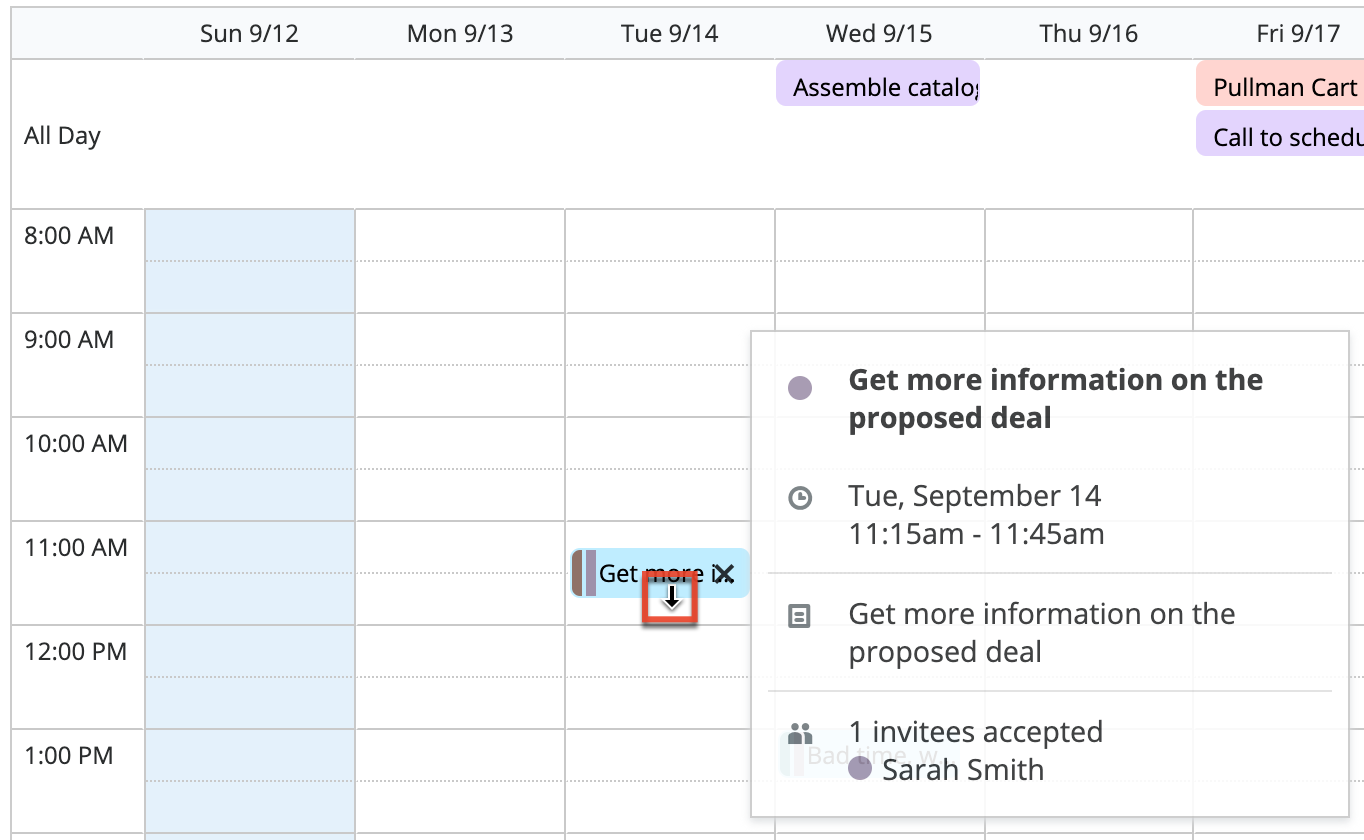
Calendar With Revenue Line Items
Instances that leverage the Revenue Line Items module will enjoy added benefits when using a calendar based on the Opportunities module. Instead of updating Service Start Date or Expected Close Date fields in each revenue line item in an opportunity one-by-one, users can update all of an opportunity's revenue line items at once by dragging and dropping an event.
There are two scenarios for the Opportunities module out-of-the-box:
- If the calendar has "Start" set to "Service Start Date", the calendar event is located on the service start date as an all-day event. Dragging and dropping the calendar event to another date on the calendar updates the Service Start Date field for all associated revenue line items in the opportunity.
- If the calendar has "Start" set to "Expected Close Date", the calendar event is located on the expected close date as an all-day event. Dragging and dropping the calendar event to another date on the calendar updates the Expected Close Date field for all associated revenue line items in the opportunity.
Editing Recurring Meetings and Calls
When a meeting or call is set to be recurring, additional copies or duplicates of the call or meeting record are created for the specific time and date of each recurrence. Therefore, editing one record's cell on the calendar will not affect the other occurrences of the same call or meeting and will only affect the one occurrence you are editing. Users must select "Edit All Recurrences" from the meeting record's Action Menu.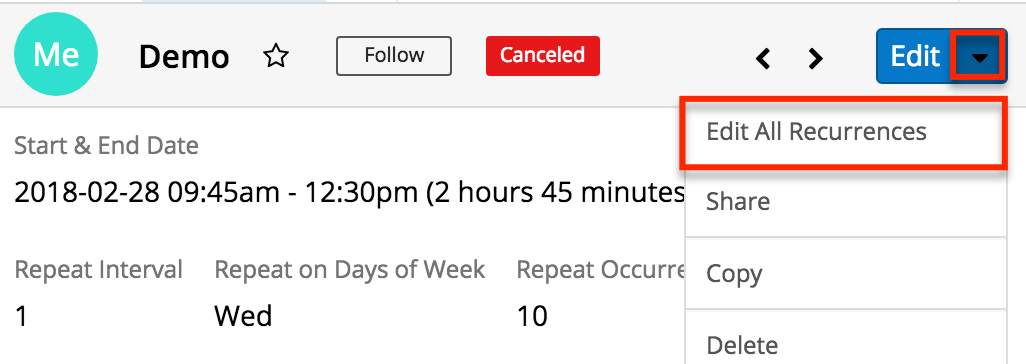
Please refer to the steps in the Editing All Recurrences via Record View section of the Meetings documentation for instructions on how to edit all recurrences.
Removing Events From Your Calendar
If an event appears on your calendar and you want to remove it from the view but do not want to delete the associated record, there are multiple ways to do so. You can adjust your filter settings for the calendar so that events of this type do not appear on your calendar or you can edit the event record so that the record is not captured by your current filter settings. For example, if you have a calendar that shows all of your meetings, your calendar will show all meetings that have a Status of Scheduled, Held, and Canceled. If you want to remove the canceled meetings from your calendar, you would need to modify the calendar's filter so that only meetings that have a Status of Scheduled or Held are displayed. This is an example of adjusting your filter settings for the calendar to remove events. As an example of editing the event records to remove the event from your calendar, if you had a calls calendar that showed all calls with a Status of "Scheduled", "In Progress", or "Held" and you see a call on your calendar that you know was canceled, change the call's Status to "Canceled" to remove this event from your calendar. Once the status has been updated, the calendar's filter will remove it from the view.
If you want to remove an event from your calendar and permanently delete its associated record (not common), use the following steps:
- Navigate to the calendar by clicking the Calendar module tab.
- Locate the event you would like to delete.
- Click the x that appears when you hover over the event.
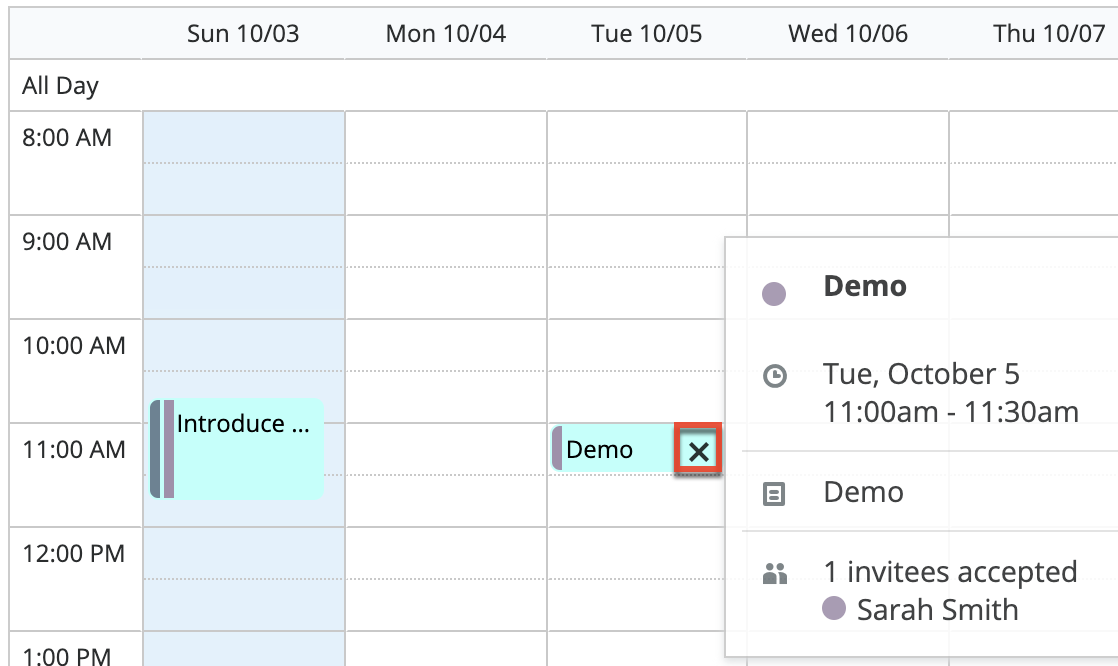
- You will be asked to confirm whether or not you want to delete this record. Click "Confirm" to delete the record, or "Cancel" to keep the record.
This option is available only if you have selected "Allow delete" when creating the calendar and if you are allowed by your team membership, user access type, and assigned roles.
Recurring calls and meetings can be deleted by this method if you would like to delete the individual call or meeting. Deleting one record through this process will not remove the entire series. Please refer to the steps in the Deleting All Recurrences via Record View section of the Meetings documentation for instructions on how to delete all recurrences.
Note: Your ability to delete calls and meetings in Sugar may be restricted by a role. For more information on roles, please refer to the Role Management documentation in the Administration Guide. Check with your system administrator if you do not see the Delete options.
Sharing Calendars
Sugar allows users to share calendars between applications to ensure that activities do not overlap between calendars. The Sugar calendar can be viewed in other applications such as the Outlook calendar to display the user's free/busy time from Sugar.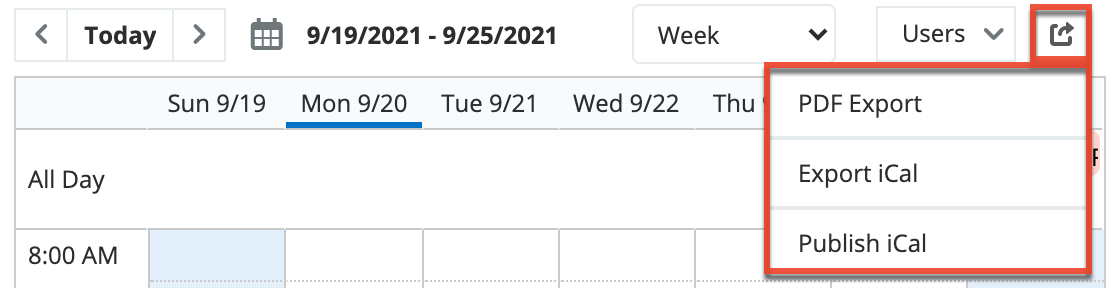
| Option | Description |
| PDF Export | Export a PDF of the current calendar view. Deselected calendars and events outside of the current calendar view will be omitted from the PDF calendar. Events that are changed after you export the iCal will not be visible on your exported iCal. |
| Export iCal | Export an iCal file that contains all scheduled events on the currently visible calendar(s). Events that occur on visible (i.e., checked in the My Calendars or User and Team Calendars pane) calendar(s) will be included in the file even if they occur outside of the current calendar view. You can edit what information is shared via iCal by adjusting the iCal event template in the calendar configuration. Events that are changed after you export the iCal will not be visible on your exported iCal. |
| Publish iCal | Generate a URL that can be used in another iCal-compatible application (e.g., Apple Calendar or Google Calendar). Events that are changed after you publish your iCal will be synced to the published calendar. Note: The sync is not instantaneous and may take several hours to complete. |
Publishing Your Sugar Calendar
Sugar calendars can be shared and viewed with various iCal-compatible calendar applications (e.g., Apple Calendar or Google Calendar). The calendars are viewable as read-only in the external calendar applications and any edits to existing activities can only be done in Sugar. For more information on sharing your calendar on another application, please review the Calendar Options section in the Getting Started documentation.
Publishing to Your Outlook Calendar
You can specify settings in another application, such as Outlook, to enable the ability to view a user's free/busy information from the Sugar calendar. Please note that the settings must be configured on each user's computer. Once configured, the invitee shows as busy for any time currently scheduled in Sugar if the user's email address in Sugar matches the invitee email address in Outlook.
Use the following steps to configure this functionality:
- In Sugar, navigate to your user preferences and select the Advanced tab.
- Copy the Search location URL located at the bottom in the Calendar Options panel.
- In Outlook, go to File > Options > Calendar > Free/Busy Options.
- In the Internet Free/Busy section, paste the Search location URL into the corresponding box.
Integrating With MS Outlook
Sugar allows you to sync meetings and calls in Sugar with your local installation of Microsoft Outlook using Sugar Connect. The plug-in also allows you to archive emails and sync contacts. All meetings and calls, including recurring ones, can be synced using Sugar Connect. When a meeting or call is synced from Outlook to Sugar, the meeting or call will appear on the Sugar calendar.
For more information on using Sugar Connect, please review the Sugar Connect User Guide.
Calendar Scheduler Dashlet
The Calendar Scheduler dashlet provides users with a way to show event calendars throughout Sugar. You can choose which calendars to show on each dashlet and which view to display (e.g., day or week view). For more information on using the Calendar Scheduler dashlet, refer to the Sugar Dashlets documentation.