Tile View Settings
Overview
Tile view allows users to visualize and engage with their Sugar records in an intuitive kanban interface, where records are represented by visual tiles organized into columns. Users can drag-and-drop tiles from one column to another to update a record (e.g., from one status to another). Administrators can configure tile view to fit their specific business needs by enabling and disabling modules, changing the visible columns, and selecting the fields displayed in each tile via Admin > Tile View Settings. This page describes how to configure tile view in Sugar. For information on using tile view in Sugar, refer to the User Interface documentation in the Application Guide.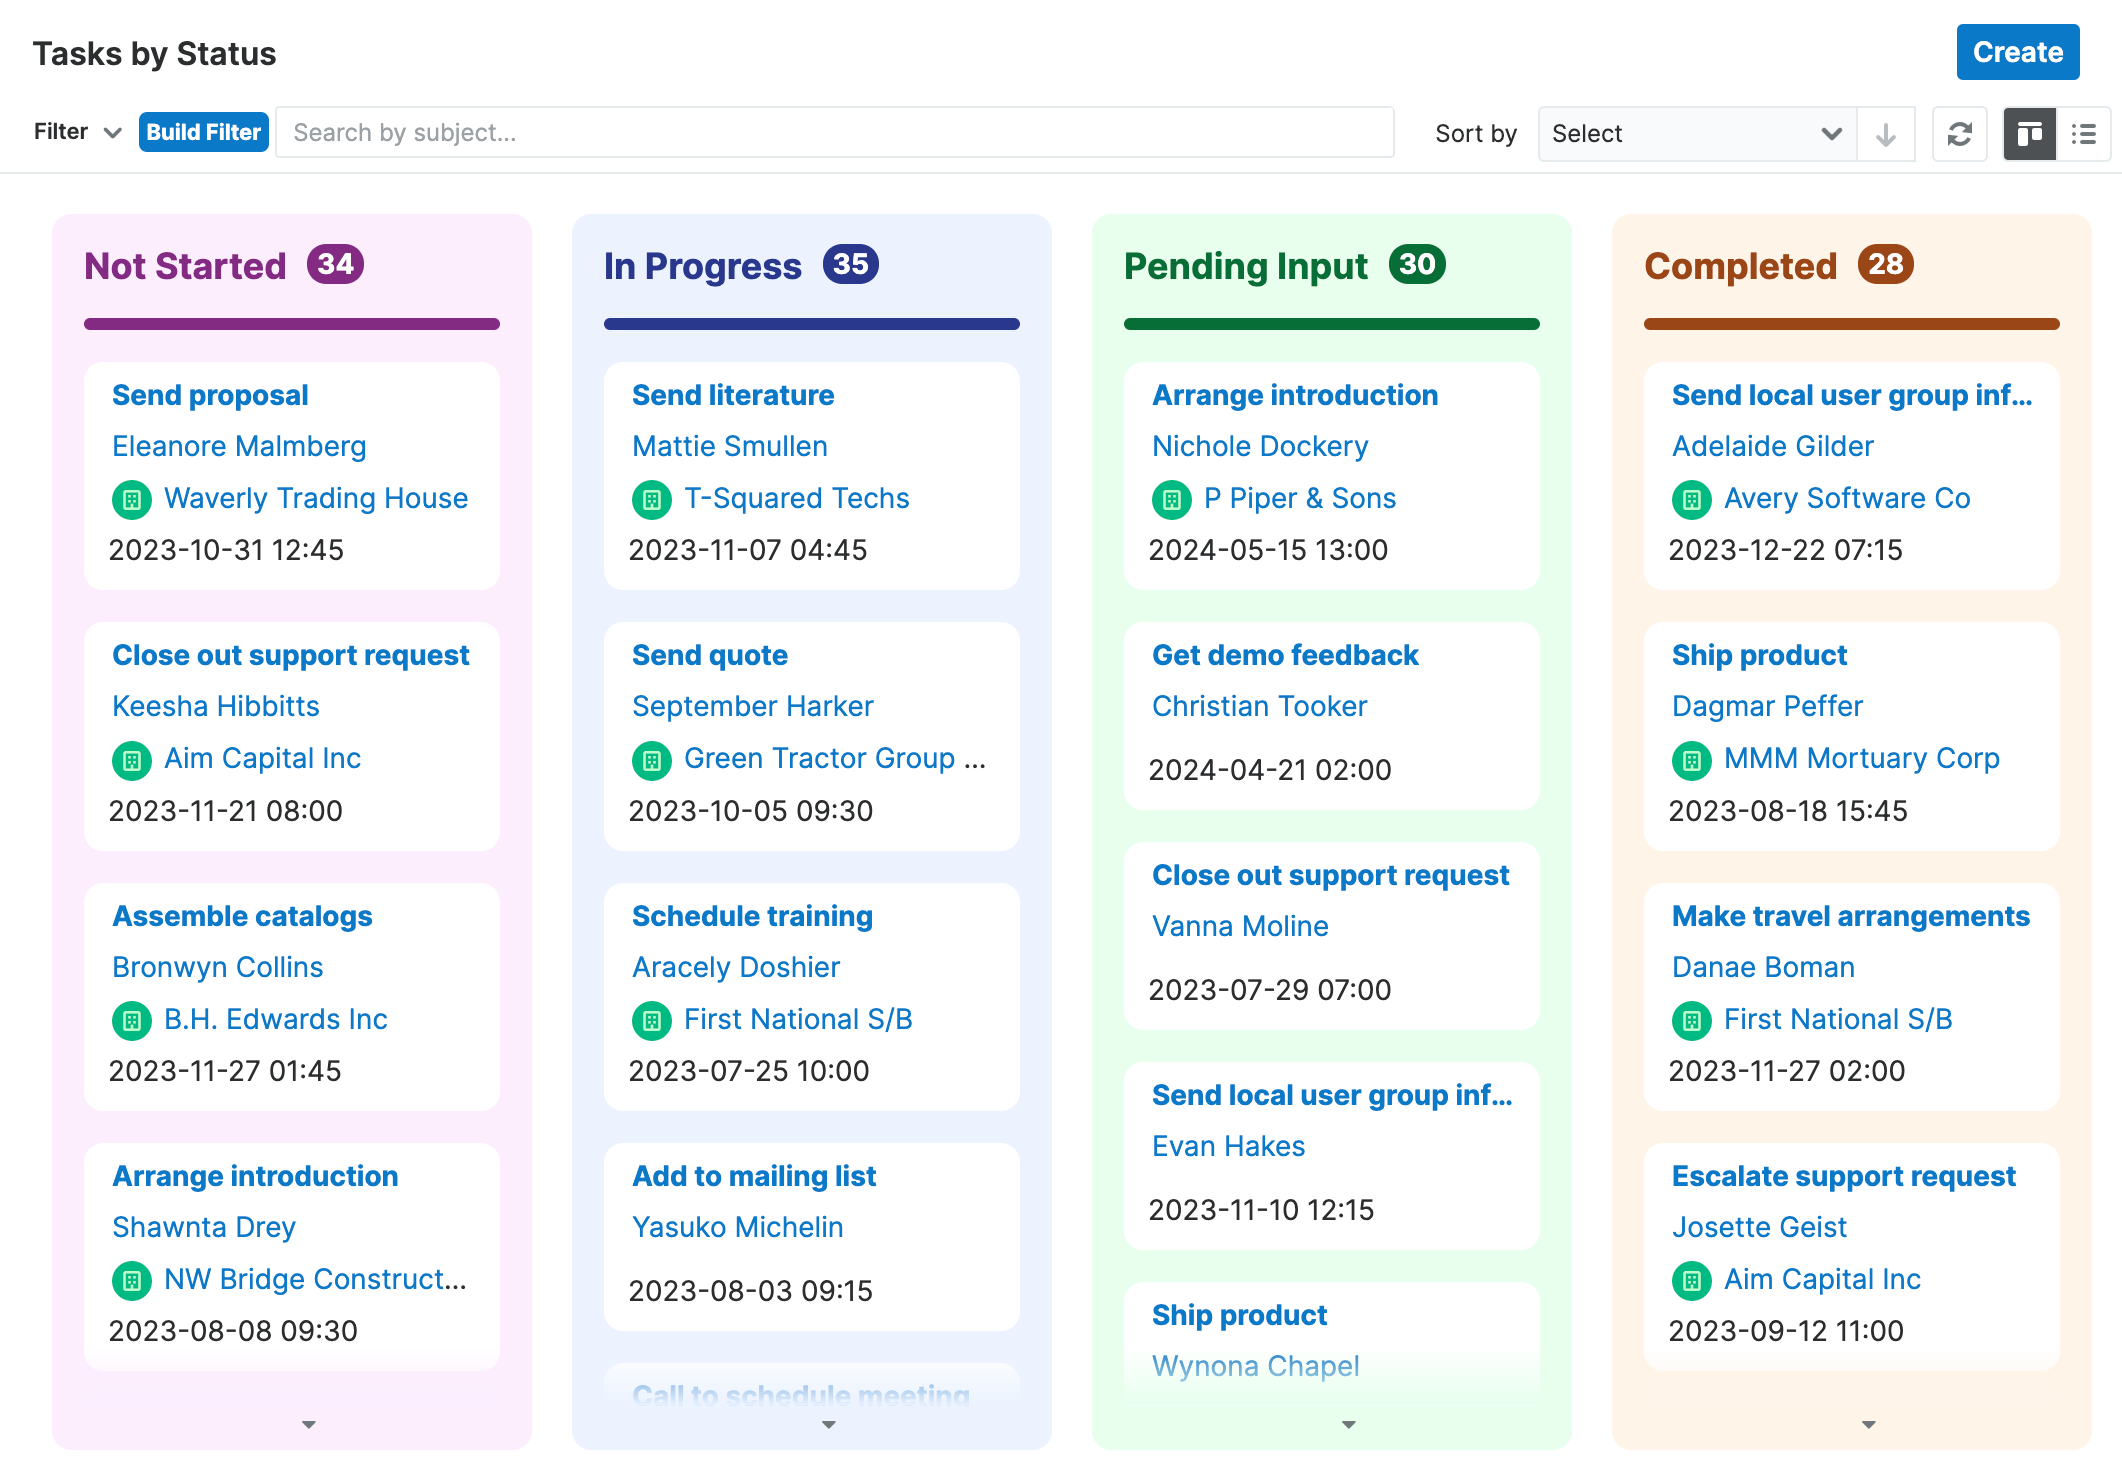
Note: Tile view functionality is supported for many Sidecar, including custom modules, but not all user license types can access all of these modules. For more information on license types and the module functionality available for each type, refer to the License Types Matrix documentation.
Tile View Settings
Upon navigating to Admin > Tile View Settings, the tile view administration page's first section is labeled "Tile View Modules", where you can enable and disable tile view access for the available modules. The second section is labeled "Module Settings", where you can configure the column headers, the fields that display on the tiles, and the number of tiles displayed per column for each module's tile view.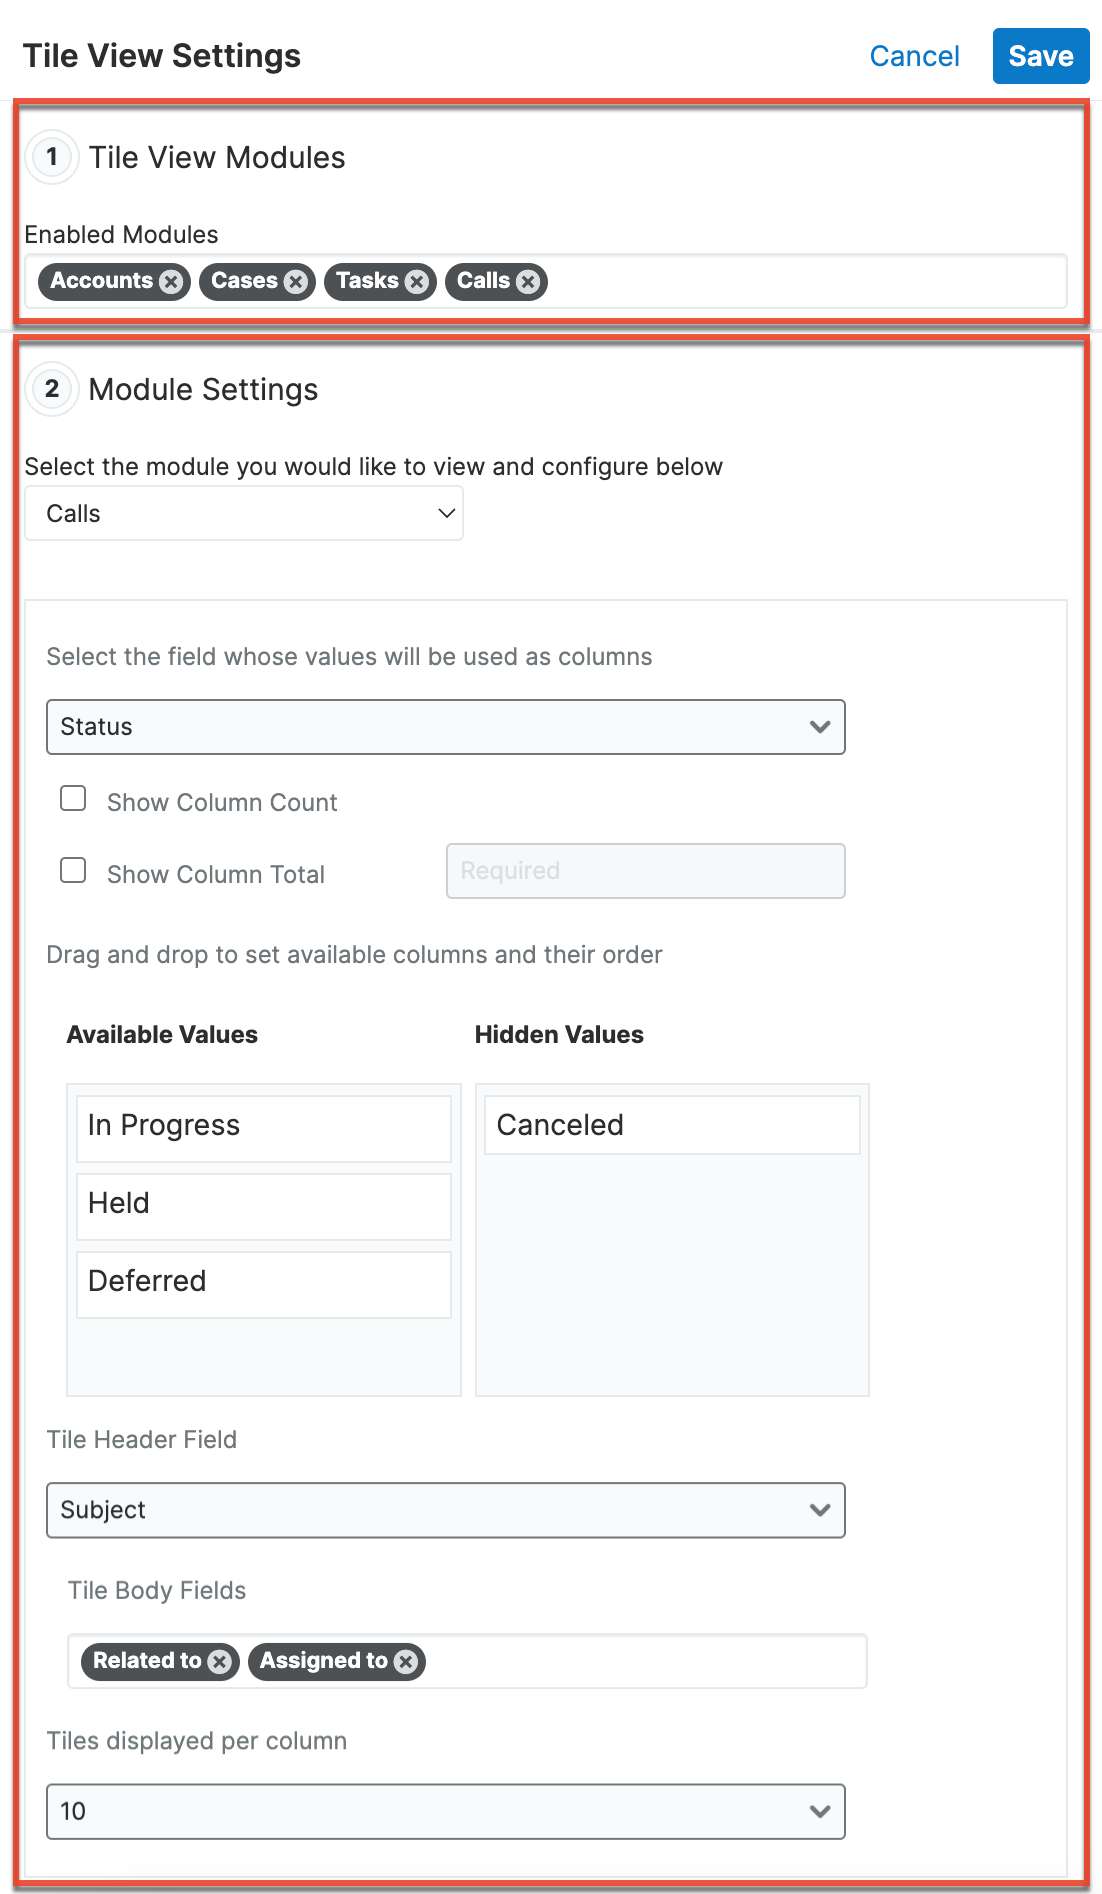
Tile View Settings Fields
The Tile View Settings page contains the following fields:
| Field | Description |
| Enabled Modules | Multiselect field used to enable and disable tile view access for supported modules. |
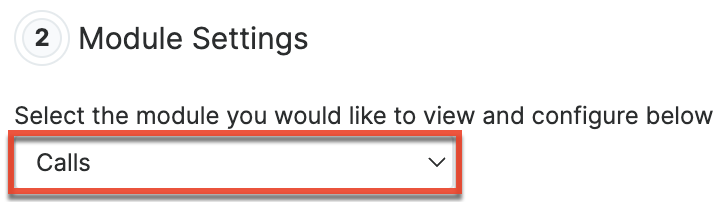
| Module | Use the module dropdown field to select which module's tile view settings you want to view and configure. Only the modules enabled in the Enabled Modules field will be shown. |
| Field | Use the field dropdown to select which field you want to group by in the module's tile view. The field's values will be used as columns across the top of the tile view. You may choose any dropdown field available for the selected module. |
| Show Column Count |
When enabled, tile view displays the number of records in each column. |
| Show Column Total |
When enabled, tile view displays the sum of an integer, float, or currency field for the records contained in each column. |
| Drag and drop to set available columns and their order |
The field values for the field (e.g., Status) selected in the first dropdown option will display in the Available Values column. Use drag and drop to move the field values between hidden and available to determine whether the value will be used as a column in tile view:
|
| Tile Header Field | Select the field (e.g., Subject) whose value will be shown as the tile's clickable header. |
| Tile Body Fields | Select the fields whose values will be shown in the tile's body beneath the tile header field (e.g., Subject). Drag and drop the fields into the order that you want them to be listed. |
| Tiles displayed per column | Select the number of tiles that each column in the tile view should load by default. Users will be able to manually scroll beyond this number of records to load additional tiles. |
Enabling and Disabling Tile View
Use the Enabled Modules field to enable and disable access to tile view for users. By default, tile view is enabled for Cases, Opportunities, Tasks, and Leads.
To disable tile view for a module, click the X next to its name (e.g., Tasks) to remove it from the Enabled Modules field and then click "Save". To enable a module, click inside the Enabled Modules field and select it from the alphabetized list of supported modules.
Please note that the order of the module names will also control the order that the modules appear in the module dropdown below. Simply drag and drop the modules into your preferred order and then click "Save". The next time you visit Tile View Settings, the modules listed in the module dropdown will appear in the order that the modules were saved.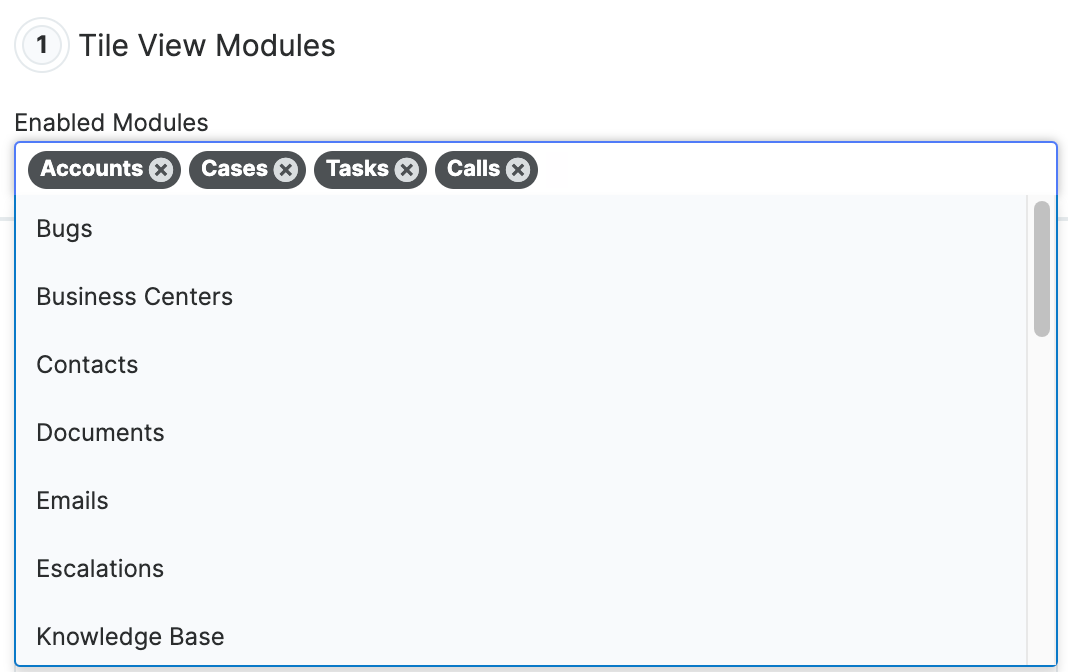
Note: Tile view functionality is supported for many Sidecar, including custom modules, but not all user license types can access all of these modules. For more information on license types and the module functionality available for each type, refer to the License Types Matrix documentation.
Configuring Tile View Column Headers
In the Module Settings panel, for each enabled module, you can select the field (e.g., Status) and values (e.g., In Progress) that will be used as columns, enable column count and column total, configure the fields displayed in the tiles, and set the default number of tiles displayed.
Note: Only dropdown fields are available to select for the tile view column headers.
Use the following steps to configure the tile view column headers:
- Navigate to Admin > Tile View Settings > Module Settings.
- Select the enabled module from the dropdown that you would like to configure.
- In the next dropdown field, select the field (e.g., Status) whose values will be used as columns in tile view.
- Optionally, enable "Show Column Count" if you would like the column headers to display the number of records.
- Optionally, enable "Show Column Total" if you would like the column headers to display a summation of an integer or currency value.
- When enabled, choose which integer, float, or currency field value to display as a sum in the column headers.
- The Available Values list displays the field values for the field you selected in Step 3. To hide a value from the tile view, simply drag and drop the value from the Available Values column to the Hidden Values column. Hidden values will not appear as columns in the tile view and any records that contain a hidden value will be omitted from the tile view. All values in the Available Values column will appear as column headers in the tile view.
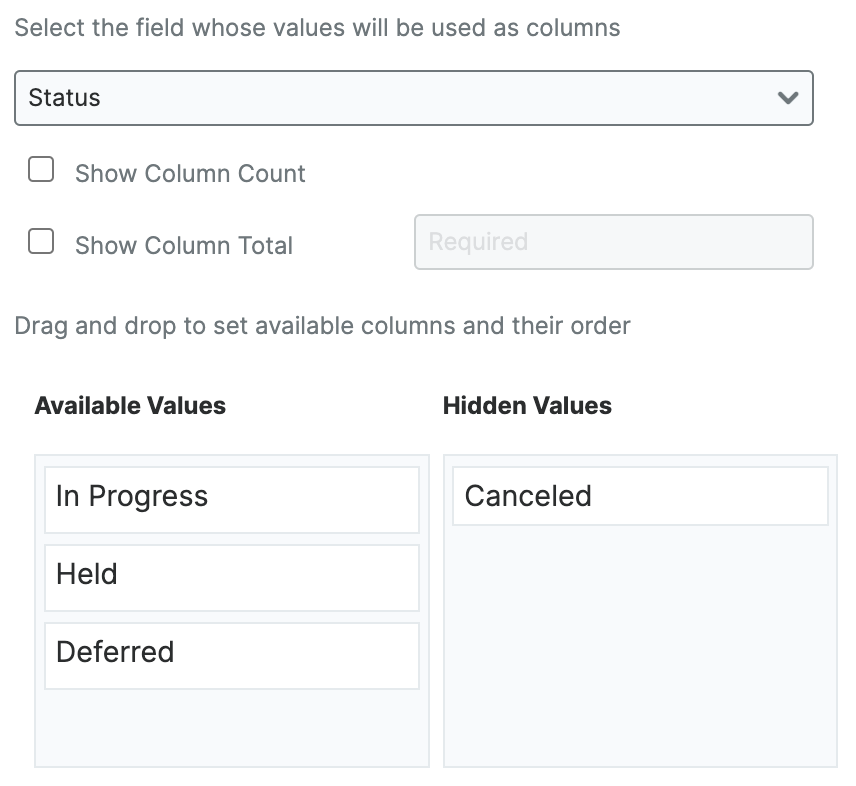
Note: If you add a new value to the selected dropdown field (e.g., Status) via Admin > Studio, the value will automatically appear in the Available Values column. You will need to click "Save" on the Tile View Settings page in order to have the new dropdown value appear as a column header in tile view. If you do not wish to add the new dropdown value as a column header, simply drag and drop the value to the Hidden Values column. - To change the left-to-right order of the tile view column headers, drag and drop the values (e.g., Not Started, In Progress) up or down within the Available Values list per your viewing preference.
- Click "Save" to preserve your changes or proceed to the next section for steps to configure the appearance of individual tiles.
After saving the changes, there will be one column header for each value in the Available Values list. If there are no records that contain one of the Available Values, then that value's column will contain no records in the tile view until a record has been saved with that value.
Configuring Tiles
The following steps explain how to configure the individual tiles to show your preferred fields. Both stock and custom fields in the module (e.g., Tasks) will be available to add to the Tile Header Field and Tile Body Fields to display in the tile view. As you change the tile-options fields, the Tile Preview in the Intelligence Pane will automatically update to reflect your current selections. Please note, in order to take advantage of the Focus Dashboards available in tile view, at least one field in the tile should be a record name field (e.g., account name, contact name).
Use the following steps to configure the individual tile header and body:
- Navigate to Admin > Tile View Settings > Module Settings.
- Select the enabled module from the dropdown that you would like to configure.
- Locate the Tile Header Field and select the field that you want to use as the topmost line of the tiles. This is typically the Subject or Name field but can be configured to use another field.
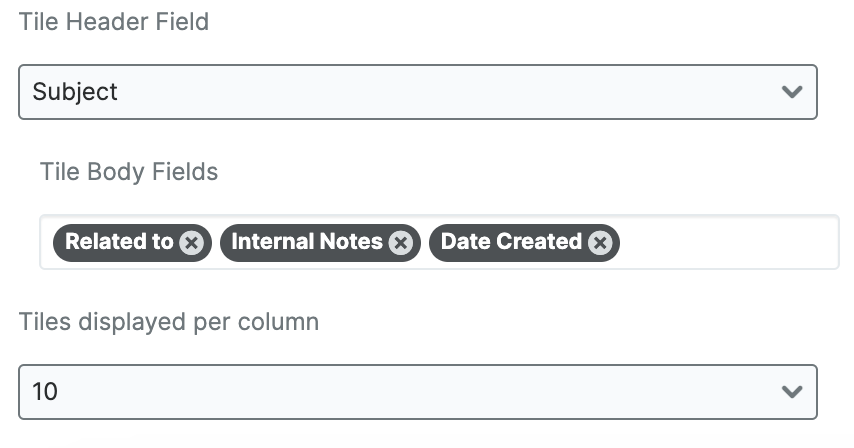
- Next, select the fields that you want to appear under the tile header field in the Tile Body Fields. You can drag and drop them into the order you want them to appear and see the Tile Preview update in real-time.
- Lastly, select the number of tiles to display in each column by default. If more tiles are available in the column, the users will be able to scroll to view more.
- Click "Save" to preserve your changes.